navigation DODGE JOURNEY 2020 Owners Manual
[x] Cancel search | Manufacturer: DODGE, Model Year: 2020, Model line: JOURNEY, Model: DODGE JOURNEY 2020Pages: 396, PDF Size: 25.53 MB
Page 2 of 396

WARNING: Operating, servicing and maintaining a passenger vehicle or off-highway \
motor vehicle can expose you to
chemicals including engine exhaust, carbon monoxide, phthalates, and lea\
d, which are known to the State of California to
cause cancer and birth defects or other reproductive harm. To minimize exposure, avoid breathing exhaust, do not idle the
engine except as necessary, service your vehicle in a well-ventilated area and wear gloves or wash\
your hands frequently
when servicing your vehicle. For more information go to www.P65Warnings.ca.gov/passenger-vehicle.
This Owner’s Manual illustrates and describes the operation of features and equipme\
nt that are either standard or optional on this vehicle. This manual may also include
a description of features and equipment that are no longer available or \
were not ordered on this vehicle. Please disregard any features and equipment described in this
manual that are not on this vehicle. FCA US LLC reserves the right to make changes in design and specificat\
ions, and/or make additions to or improvements to its
products without imposing any obligation upon itself to install them on \
products previously manufactured.
With respect to any vehicles sold in Canada, the name FCA US LLC shall b\
e deemed to be deleted and the name FCA Canada Inc. used in substitution therefore.
If you are the first registered retail owner of your vehicle, you may \
obtain a complimentary printed copy of the Warranty Booklet by calling 1-800-423-6343 (U.S.) or
1-800-387-1143 (Canada) or by contacting your dealer.
This Owner’s Manual is intended to familiarize you with the important features of y\
our vehicle. Your most up-to-date Owner’s Manual, Navigation/Uconnect manuals and
Warranty Booklet can be found by visiting the website on the back cover. U.S. residents can purchase replacement kits by visiting www.techauthority.com and Canadian
residents can purchase replacement kits by calling 1-800-387-1143.
The driver’s primary responsibility is the safe operation of the vehicle. Driving w\
hile distracted can result in loss of vehicle control, resulting in an accident and
personal injury. FCA US LLC strongly recommends that the driver use extreme caution whe\
n using any device or feature that may take their attention off the road.
Use of any electrical devices, such as cellular telephones, computers, p\
ortable radios, vehicle navigation or other devices, by the driver while the vehicle is moving
is dangerous and could lead to a serious accident. Texting while driving is also dangerous and should never be done while th\
e vehicle is moving. If you find yourself
unable to devote your full attention to vehicle operation, pull off the \
road to a safe location and stop your vehicle. Some states or provinces prohibit the use of
cellular telephones or texting while driving. It is always the driver’\
s responsibility to comply with all local laws.
This Owner’s Manual has been prepared to help you get acquainted with your new Dodg\
e brand vehicle and to provide a convenient reference source
for common questions.
Not all features shown in this manual may apply to your vehicle. For add\
itional information, visit www.mopar.com (U.S.), www.mopar.ca (Canada) or your local
Dodge brand dealer.
Drunk driving is one of the most frequent causes of accidents. Your driving ability can be seriously impaired with blood alcohol levels
far below the legal minimum. If you are drinking, don’t drive. Ride with a designated non-drinking driver, call a cab, a friend or use
public transportation.
DRIVING AND ALCOHOL
Driving after drinking can lead to an accident. Your perceptions are less sharp, your reflexes are slower and your judg\
ment is impaired
when you have been drinking. Never drink and then drive.
WARNING
Page 8 of 396
6
MULTIMEDIA
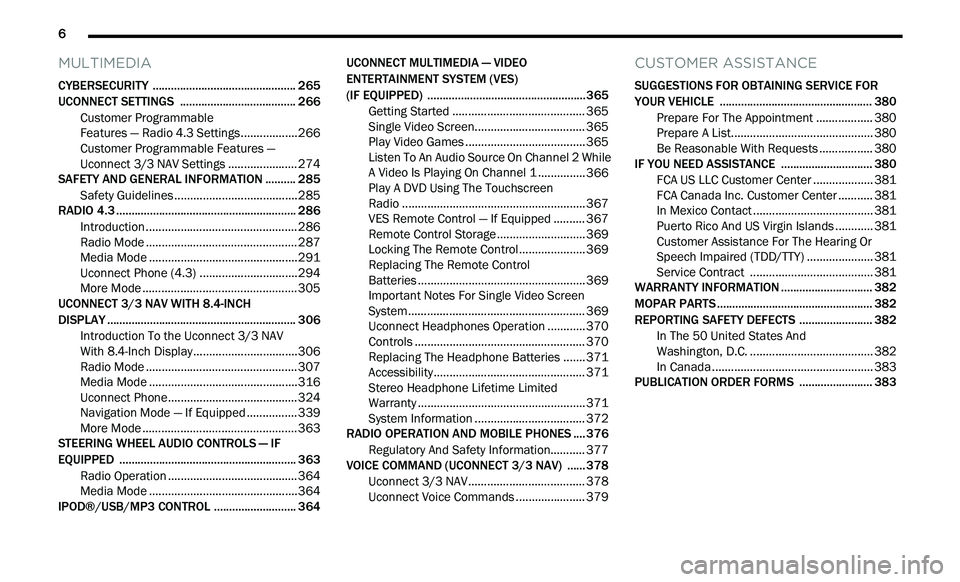
CYBERSECURITY ............................................... 265
UCONNECT SETTINGS .. .................................... 266
Customer Programmable
Features — Radio 4.3 Settings. .
................266
Customer Programmable Features —
Uconnect 3/3 NAV Settings .
.
....................274
SAFETY AND GENERAL INFORMATION . . ........ 285
Safety Guidelines .. .....................................285
RADIO 4.3 . .......................................................... 286
I ntroduction .. ..............................................286
Radio Mode . . ..............................................287
Media Mode . . .............................................291
Uconnect Phone (4.3) . . .............................294
More Mode . . ...............................................305
UCONNECT 3/3 NAV WITH 8.4-INCH
DISPLAY . ............................................................. 306
I
ntroduction To the Uconnect 3/3 NAV
With 8.4-Inch Display. .
...............................306
Radio Mode . . ..............................................307
Media Mode . . .............................................316
Uconnect Phone. . .......................................324
Navigation Mode — If Equipped . . ..............339
More Mode . . ...............................................363
STEERING WHEEL AUDIO CONTROLS — IF
EQUIPPED . .
........................................................ 363
Radio Operation .. .......................................364
Media Mode . . .............................................364
IPOD®/USB/MP3 CONTROL . . ......................... 364UCONNECT MULTIMEDIA — VIDEO
ENTERTAINMENT SYSTEM (VES)
(IF EQUIPPED) . .
..................................................365
Getting Started .. ........................................ 365
Single Video Screen. . ................................. 365
Play Video Games . . .................................... 365
Listen To An Audio Source On Channel 2 While
A Video Is Playing On Channel 1 . .
............. 366
Play A DVD Using The Touchscreen
Radio . ......................................................... 367
V
ES Remote Control — If Equipped . . ........ 367
Remote Control Storage . . .......................... 369
Locking The Remote Control. . ................... 369
Replacing The Remote Control
Batteries . .................................................... 369
I
mportant Notes For Single Video Screen
System . ....................................................... 369
U
connect Headphones Operation . . .......... 370
Controls . ..................................................... 370
R eplacing The Headphone Batteries . . ..... 371
Accessibility. . .............................................. 371
Stereo Headphone Lifetime Limited
Warranty . .................................................... 371
S
ystem Information . . ................................. 372
RADIO OPERATION AND MOBILE PHONES . . .. 376
Regulatory And Safety Information.. ......... 377
VOICE COMMAND (UCONNECT 3/3 NAV) .
..... 378
U
connect 3/3 NAV ..................................... 378
U
connect Voice Commands . . .................... 379
CUSTOMER ASSISTANCE
SUGGESTIONS FOR OBTAINING SERVICE FOR
YOUR VEHICLE .................................................. 380
Prepare For The Appointment .. ................ 380
Prepare A List. . ........................................... 380
Be Reasonable With Requests . . ............... 380
IF YOU NEED ASSISTANCE . . ............................ 380
FCA US LLC Customer Center ..
................. 381
FCA Canada Inc. Customer Center . . ......... 381
In Mexico Contact . . .................................... 381
Puerto Rico And US Virgin Islands . . .......... 381
Customer Assistance For The Hearing Or
Speech Impaired (TDD/TTY) . .
................... 381
Service Contract . . ..................................... 381
WARRANTY INFORMATION . . ............................ 382
MOPAR PARTS.. ................................................. 382
REPORTING SAFETY DEFECTS .. ...................... 382
In The 50 United States And
Washington, D.C. . .
..................................... 382
In Canada . .................................................. 383
P
UBLICATION ORDER FORMS . . ...................... 383
Page 274 of 396
272 MULTIMEDIA
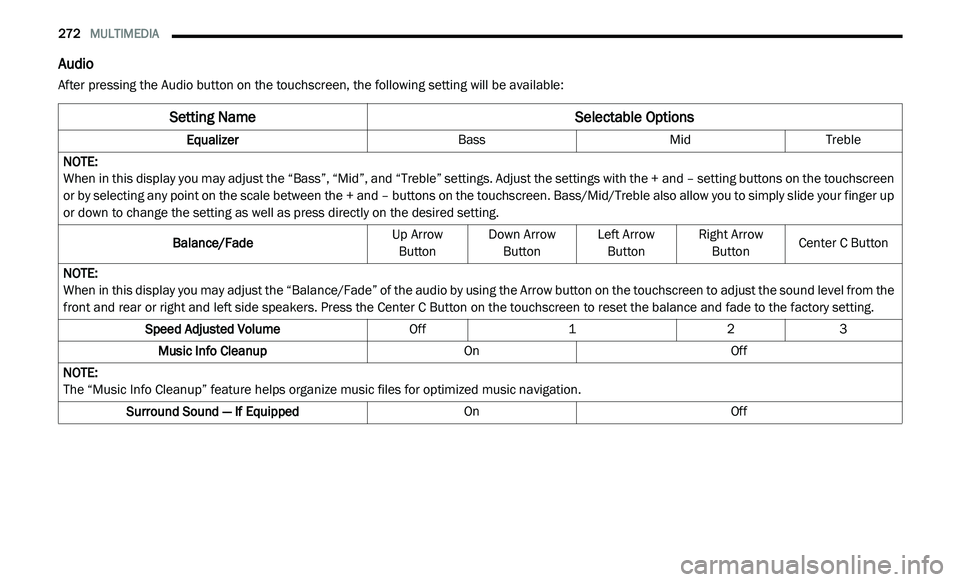
Audio
After pressing the Audio button on the touchscreen, the following setting will be available:
Setting Name Selectable Options
EqualizerBassMidTreble
NOTE:
When in this display you may adjust the “Bass”, “Mid”, and “Treble” settings. Adjust the settings with the + and – setting buttons on the touchscreen
o r
by selecting any point on the scale between the + and – buttons on the touchscreen. Bass/Mid/Treble also allow you to simply slide your finger up
or down to change the setting as well as press directly on the desired setting.
Balance/Fade Up Arrow
B u
tton Down Arrow
Bu tton Left Arrow
Bu tton Right Arrow
Bu tton Center C Button
NOTE:
When in this display you may adjust the “Balance/Fade” of the audio by using the Arrow button on the touchscreen to adjust the sound level from the
f r
ont and rear or right and left side speakers. Press the Center C Button on the touchscreen to reset the balance and fade to the factory setting.
Speed Adjusted Volume Off123
Music Info Cleanup OnOff
NOTE:
The “Music Info Cleanup” feature helps organize music files for optimized music navigation.
Surround Sound — If Equipped OnOff
Page 277 of 396
MULTIMEDIA 275
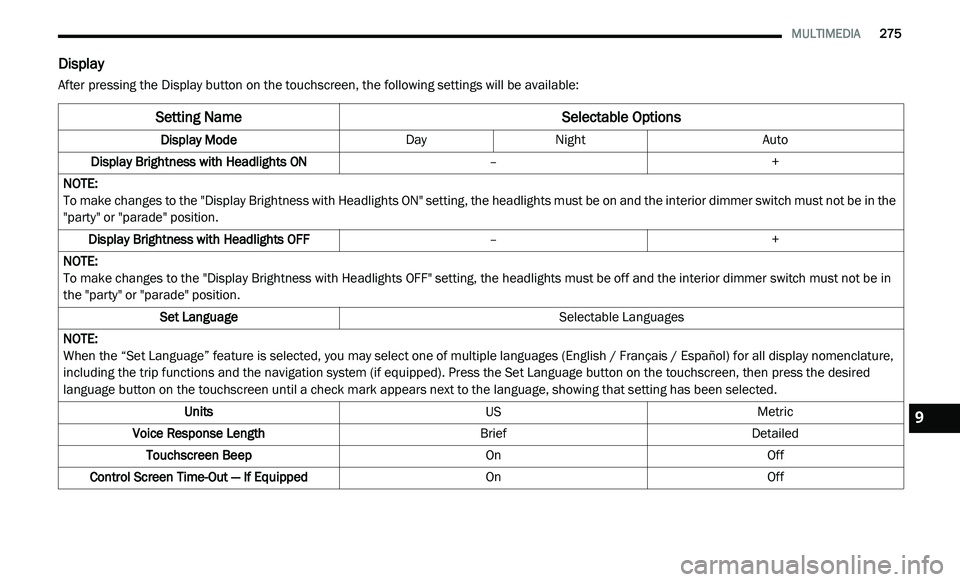
Display
After pressing the Display button on the touchscreen, the following settings will be available:
Setting Name Selectable Options
Display ModeDayNight Auto
Display Brightness with Headlights ON –+
NOTE:
To make changes to the "Display Brightness with Headlights ON" setting, the headlights must be on and the interior dimmer switch must not be in the
" p
arty" or "parade" position.
Display Brightness with Headlights OFF –+
NOTE:
To make changes to the "Display Brightness with Headlights OFF" setting, the headlights must be off and the interior dimmer switch must not be in
th
e "party" or "parade" position.
Set Language Selectable Languages
NOTE:
When the “Set Language” feature is selected, you may select one of multiple languages (English / Français / Español) for all display nomenclature,
in
cluding the trip functions and the navigation system (if equipped). Press the Set Language button on the touchscreen, then press the desired
language button on the touchscreen until a check mark appears next to the language, showing that setting has been selected.
Units USMetric
Voice Response Length BriefDetailed
Touchscreen Beep OnOff
Control Screen Time-Out — If Equipped OnOff
9
Page 278 of 396
276 MULTIMEDIA
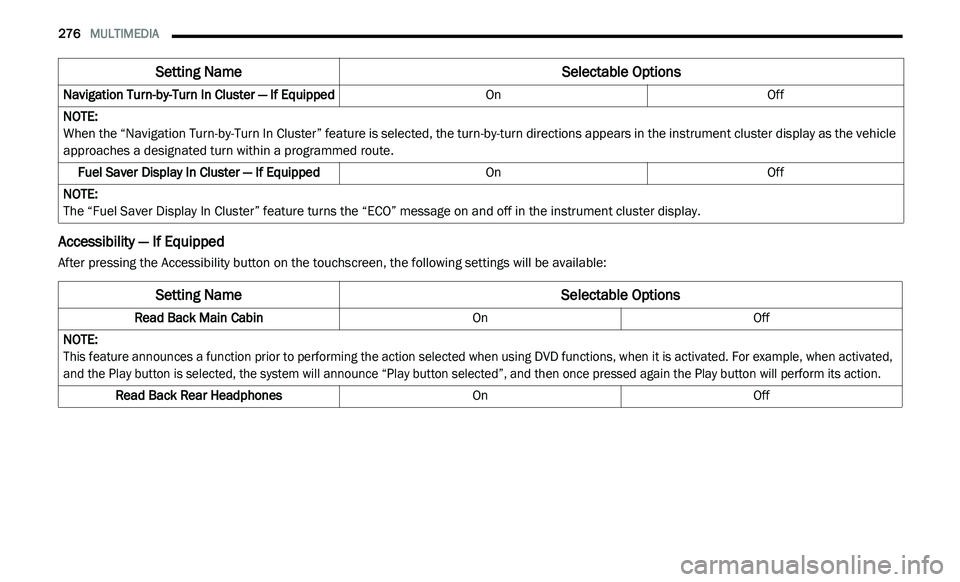
Accessibility — If Equipped
After pressing the Accessibility button on the touchscreen, the following settings will be available:Navigation Turn-by-Turn In Cluster — If Equipped
OnOff
NOTE:
When the “Navigation Turn-by-Turn In Cluster” feature is selected, the turn-by-turn directions appears in the instrument cluster display as the vehicle
a p
proaches a designated turn within a programmed route.
Fuel Saver Display In Cluster — If Equipped OnOff
NOTE:
The “Fuel Saver Display In Cluster” feature turns the “ECO” message on and off in the instrument cluster display.
Setting Name Selectable Options
Setting NameSelectable Options
Read Back Main CabinOnOff
NOTE:
This feature announces a function prior to performing the action selected when using DVD functions, when it is activated. For example, when activated,
a n
d the Play button is selected, the system will announce “Play button selected”, and then once pressed again the Play button will perform its action.
Read Back Rear Headphones OnOff
Page 284 of 396
282 MULTIMEDIA
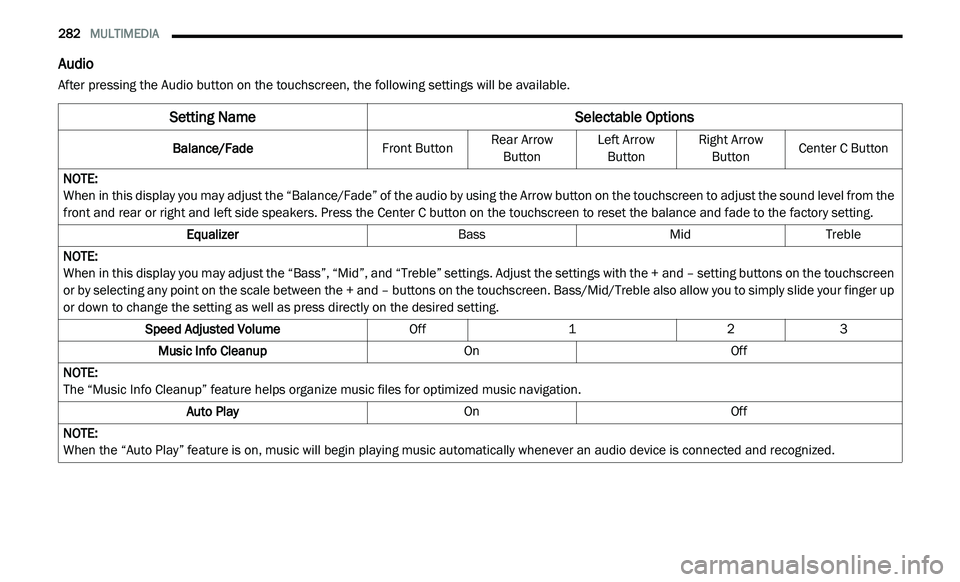
Audio
After pressing the Audio button on the touchscreen, the following settings will be available.
Setting Name Selectable Options
Balance/FadeFront ButtonRear Arrow
Bu
tton Left Arrow
Bu tton Right Arrow
Bu tton Center C Button
NOTE:
When in this display you may adjust the “Balance/Fade” of the audio by using the Arrow button on the touchscreen to adjust the sound level from the
f r
ont and rear or right and left side speakers. Press the Center C button on the touchscreen to reset the balance and fade to the factory setting.
Equalizer BassMidTreble
NOTE:
When in this display you may adjust the “Bass”, “Mid”, and “Treble” settings. Adjust the settings with the + and – setting buttons on the touchscreen
or
by selecting any point on the scale between the + and – buttons on the touchscreen. Bass/Mid/Treble also allow you to simply slide your finger up
or down to change the setting as well as press directly on the desired setting.
Speed Adjusted Volume Off123
Music Info Cleanup OnOff
NOTE:
The “Music Info Cleanup” feature helps organize music files for optimized music navigation.
Auto Play OnOff
NOTE:
When the “Auto Play” feature is on, music will begin playing music automatically whenever an audio device is connected and recognized.
Page 308 of 396
306 MULTIMEDIA
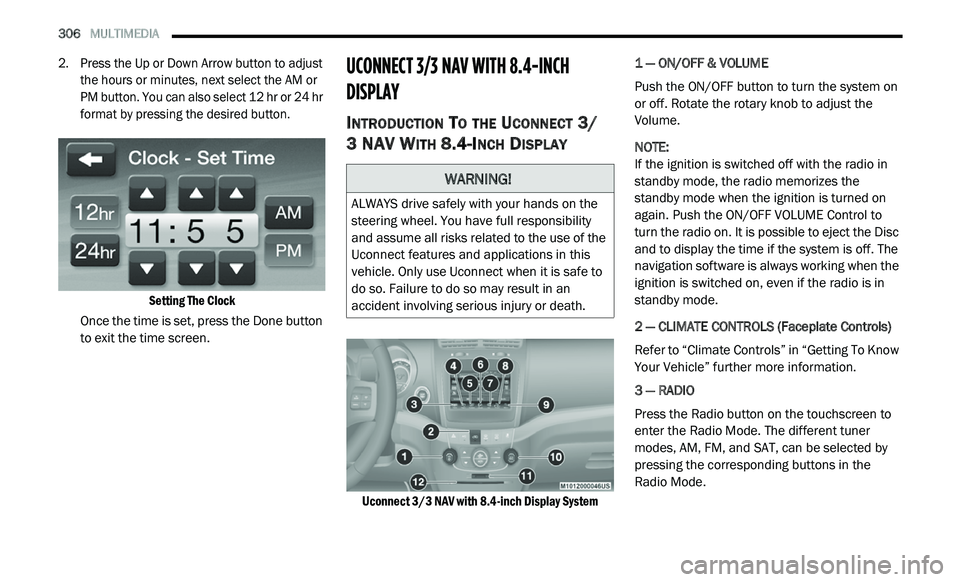
2. Press the Up or Down Arrow button to adjust
the hours or minutes, next select the AM or
PM button. You can also select 12 hr or 24 hr
format by pressing the desired button.
Setting The Clock
Once the time is set, press the Done button
t o
exit the time screen.
UCONNECT 3/3 NAV WITH 8.4-INCH
DI
SPLAY
INTRODUCTION TO THE UCONNECT 3/
3 NAV W
ITH 8.4-INCH DISPLAY
Uconnect 3/3 NAV with 8.4-inch Display System
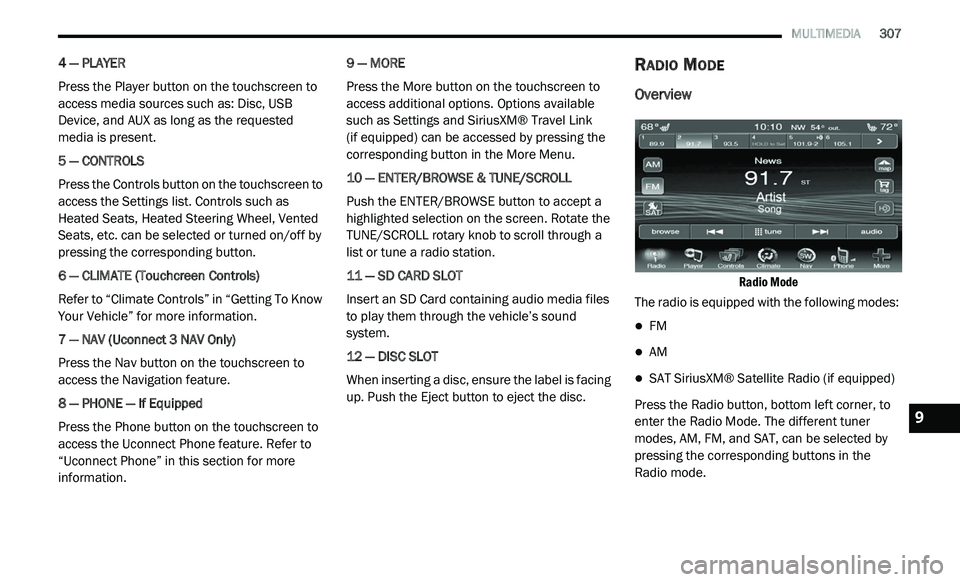
1 — ON/OFF & VOLUME
Push the ON/OFF button to turn the system on
o
r
off. Rotate the rotary knob to adjust the
Volume.
NOTE:
If the ignition is switched off with the radio in
st
andby mode, the radio memorizes the
standby mode when the ignition is turned on
again. Push the ON/OFF VOLUME Control to
turn the radio on. It is possible to eject the Disc
and to display the time if the system is off. The
navigation software is always working when the
ignition is switched on, even if the radio is in
standby mode.
2 — CLIMATE CONTROLS (Faceplate Controls)
Refer to “Climate Controls” in “Getting To Know
Y o
ur Vehicle” further more information.
3 — RADIO
Press the Radio button on the touchscreen to
en
ter the Radio Mode. The different tuner
modes, AM, FM, and SAT, can be selected by
pressing the corresponding buttons in the
Radio Mode.
WARNING!
ALWAYS drive safely with your hands on the
steering wheel. You have full responsibility
and assume all risks related to the use of the
Uconnect features and applications in this
vehicle. Only use Uconnect when it is safe to
do so. Failure to do so may result in an
accident involving serious injury or death.
Page 309 of 396
MULTIMEDIA 307
4 — PLAYER
Press the Player button on the touchscreen to
ac
cess media sources such as: Disc, USB
Device, and AUX as long as the requested
media is present.
5 — CONTROLS
Press the Controls button on the touchscreen to
a c
cess the Settings list. Controls such as
Heated Seats, Heated Steering Wheel, Vented
Seats, etc. can be selected or turned on/off by
pressing the corresponding button.
6 — CLIMATE (Touchcreen Controls)
Refer to “Climate Controls” in “Getting To Know
Y o
ur Vehicle” for more information.
7 — NAV (Uconnect 3 NAV Only)
Press the Nav button on the touchscreen to
ac
cess the Navigation feature.
8 — PHONE — If Equipped
Press the Phone button on the touchscreen to
ac
cess the Uconnect Phone feature. Refer to
“Uconnect Phone” in this section for more
information. 9 — MORE
Press the More button on the touchscreen to
a
c
cess additional options. Options available
such as Settings and SiriusXM® Travel Link
(if equipped) can be accessed by pressing the
c o
rresponding button in the More Menu.
10 — ENTER/BROWSE & TUNE/SCROLL
Push the ENTER/BROWSE button to accept a
hi
ghlighted selection on the screen. Rotate the
TUNE/SCROLL rotary knob to scroll through a
list or tune a radio station.
11 — SD CARD SLOT
Insert an SD Card containing audio media files
t o
play them through the vehicle’s sound
system.
12 — DISC SLOT
When inserting a disc, ensure the label is facing
u p
. Push the Eject button to eject the disc.
RADIO MODE
Overview
Radio Mode
The radio is equipped with the following modes:
FM
AM
SAT SiriusXM® Satellite Radio (if equipped)
Press the Radio button, bottom left corner, to
e n
ter the Radio Mode. The different tuner
modes, AM, FM, and SAT, can be selected by
pressing the corresponding buttons in the
Radio mode.9
Page 341 of 396
MULTIMEDIA 339
13. Start without me.
14. Where are you?
1
5. A re you there yet?
1
6. I need directions.
1
7. I 'm lost.
1
8. S ee you later.
B
luetooth® Communication Link
Mobile phones have been found to lose
c o
nnection to the Uconnect Phone. When this
happens, the connection can generally be
re-established by switching the mobile phone
OFF/ON. Your mobile phone is recommended to
remain in Bluetooth® On mode.
NAVIGATION MODE — IF EQUIPPED
Safety Precautions And Important
Information
Warning
Read this information carefully before starting
t o
operate the navigation system and follow the
instructions in this manual. Neither the FCA US
LLC nor Garmin® shall be liable for problems or
accidents resulting from failure to observe the
instructions in this manual. Failure to avoid the following potentially
h
a
zardous situations could result in an accident
or collision resulting in death or serious injury.
Always drive safely. Only use the navigation
features in this vehicle when it is safe to do
so. You accept full responsibility for the use
of the features in this vehicle.
When navigating, carefully compare informa -
tion displayed on the navigation system to all
a v
ailable navigation sources, including road
signs, road closures, road conditions, traffic
congestion, weather conditions, and other
factors that may affect safety while driving.
For safety, always resolve any discrepancies
before continuing navigation, and defer to
posted road signs and road conditions.
The navigation system is designed to provide
route suggestions. It is not a replacement for
driver attentiveness and good judgment.
Do not follow route suggestions if they suggest
a n
unsafe or illegal maneuver or would place the
vehicle in an unsafe situation.
WARNING!
ALWAYS drive safely with your hands on the
steering wheel. You have full responsibility
and assume all risks related to the use of the
Uconnect features and applications in this
vehicle. Only use Uconnect when it is safe to
do so. Failure to do so may result in an acci -
dent involving serious injury or death.
ALWAYS follow the law! Failure to follow
traffic laws may result in serious injury or
death.
9
Page 342 of 396
340 MULTIMEDIA
Be careful of the ambient temperature. Using
the navigation system at extreme tempera -
tures can lead to malfunction or damage.
A ls
o note that the unit can be damaged by
strong vibration, metal objects, or by water
getting inside the unit. Notice
This navigation system can be used when the
i
g
nition key is turned to ON/RUN or ACC.
To preserve the battery, however, it should
be used with the engine running whenever
p o
ssible. Using the navigation system for a long
time with the engine switched off can cause the
battery to run down.
Map Data Information
Garmin® uses a combination of governmental
a n
d private data sources. Virtually all data
sources contain some inaccurate or incomplete
data. In some countries, complete and accurate
map information is either not available or is
prohibitively expensive.
Getting Started
To access the Navigation system, press the Nav
button on bottom of the screen.
Setting Up Your System
When using your navigation system for the first
t i
me, complete the following tasks:
1. Ac quire satellites.
2
. U nderstand the main menu. A
cquiring Satellites
The bars indicate satellite strength.
Go to an open area, away from tall buildings and
t r
ees.
Acquiring satellite signals can take a few
m i
nutes.
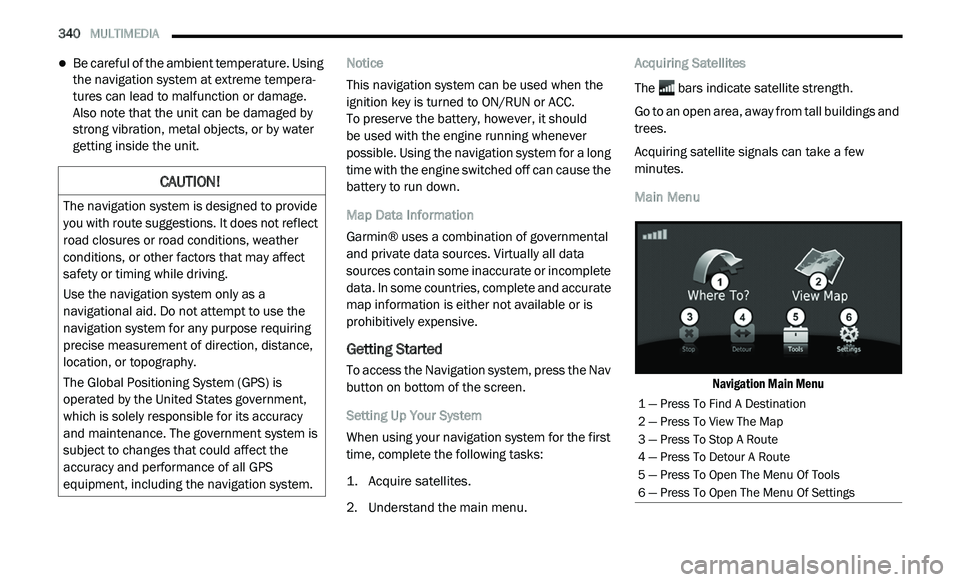
Main Menu
Navigation Main Menu
CAUTION!
The navigation system is designed to provide
you with route suggestions. It does not reflect
road closures or road conditions, weather
conditions, or other factors that may affect
safety or timing while driving.
Use the navigation system only as a
na
vigational aid. Do not attempt to use the
navigation system for any purpose requiring
precise measurement of direction, distance,
location, or topography.
The Global Positioning System (GPS) is
o p
erated by the United States government,
which is solely responsible for its accuracy
and maintenance. The government system is
subject to changes that could affect the
accuracy and performance of all GPS
equipment, including the navigation system.
1 — Press To Find A Destination
2 — Press To View The Map
3 — Press To Stop A Route
4 — Press To Detour A Route
5 — Press To Open The Menu Of Tools
6 — Press To Open The Menu Of Settings