navigation DODGE JOURNEY 2020 Owner's Manual
[x] Cancel search | Manufacturer: DODGE, Model Year: 2020, Model line: JOURNEY, Model: DODGE JOURNEY 2020Pages: 396, PDF Size: 25.53 MB
Page 354 of 396
352 MULTIMEDIA
Changing The Map Perspective
1. From the main menu press
S
ettings > Map
> Map View
.
2. S elect an option:
Press Track Up to display the map in two
dimensions (2-D), with your direction of
travel at the top.
Press North Up to display the map in 2-D
with North at the top.
Press 3D to display the map in three
dimensions.
Route Preferences
From the main menu, press Se
ttings >
Navigation > Route Preference .
The route calculation is based on road speeds
a n
d vehicle acceleration data for a given route.
Faster Time — Calculates routes that are
faster to drive but can be longer in distance.
Shorter Distance — Calculates routes that are
shorter in distance but can take more time to
drive.
Prompted — Select the faster time and
shorter distance for your route. Avoiding Road Features
1. Fr
om the main menu press
S
ettings >
Navigation > Avoidances
.
2. S elect the road features to avoid on your
r
outes.
3. P ress “Save.”
A
bout trafficTrends
When the trafficTrends feature is enabled,
your navigation system uses historic traffic
i n
formation to calculate more-efficient routes.
Different routes may be calculated based on
traffic trends for the day of the week or based
on the time of day.
Enabling trafficTrends
1. Fr om the main menu press
S
ettings >
Navigation > trafficTrends
.
2. S elect E
nabled.
Restoring The Original Navigation Settings
From the main menu press Se
ttings >
Navigation > > Restore. Language Settings
From the main menu press
S
e
ttings >
Language .
Voice Personality — sets the language for
voice prompts.
Keyboard — sets the language for your
keyboard.
Keyboard Layout — sets the keyboard layout.
Restoring The Original Language Settings
From the main menu press Settings >
Language > > Restore.
Restoring Original Traffic Settings
From the main menu, press Se
ttings > Traffic >
> Restore .
Restoring All Original Settings
From the main menu, press Se
ttings > >
Restore > Yes .
Page 355 of 396
MULTIMEDIA 353
Appendix
About GPS Satellite Signals
The navigation system must acquire satellite
si
gnals in order to navigate.
When the navigation system has acquired
s a
tellite signals, the signal strength bars on the
main menu are full . When it loses satellite
signals, the bars are clear .
For more information about GPS, go to
www.garmin.com/aboutGPS .
Updating The Software
To update the navigation system software, you
m u
st have a USB mass storage device and an
Internet connection.
1. G o to
a
uto-update.garmin.com
.
2. F ind your model and select S
oftware
Updates > Download . 3. R
ead and accept the terms of the Software
Li
cense Agreement.
4. F ollow the instructions on the Web site to
c
omplete the installation of the software
update.
Updating The Map Data
To update the navigation system map, you must
h a
ve a USB mass storage device and an
Internet connection, or visit your local dealer for
assistance. A map update can be purchased
once a year.
1. G o to
a
uto-update.garmin.com
.
2. S elect your vehicle from the drop-down lists.
3
. S elect O
rder Map Updates for your unit.
4. F ollow the Web site instructions to update
y
our map.
CAUTION!
Garmin® and FCA US LLC are not responsible
for the accuracy of, or the consequences of
using, a safety camera database.
Safety camera information is available in some
lo
cations. Go to
http://www.garmin.com
for
availability. For these locations, the navigation
s y
stem includes the locations of hundreds of
safety cameras. Your navigation system alerts you
when you are approaching a safety camera and
can warn you if you are driving too fast. The data
is updated at least weekly, so you always have
access to the most up-to-date information.
You can purchase a new region or extend an
e x
isting subscription at any time. Each region
that you purchase has an expiration date.
9
Page 356 of 396
354 MULTIMEDIA
Custom Points of Interest (POIs)
NOTE:
Custom POI files must be named “poi.gpi”. and
l o
cated on the USB storage device in a folder
named “POI” within a folder named “Garmin®”
(Garmin®/POI/).
You can manually load custom POI databases,
av
ailable from various companies on the
Internet. Some custom POI databases contain
alert information for points such as safety
cameras and school zones. The navigation
system can notify you when you approach one
of these points. You are responsible for
ensuring that your use of safety camera
information is lawful in your area. NOTE:
Each time you load custom POIs to the naviga -
tion system, any other custom POIs already
s a
ved in the system will be overwritten.
Finding Custom POIs
You can view a list of the custom POIs loaded in
y o
ur navigation system.
Press Where To? > Extras > Custom POIs .Deleting Custom POIs
1. P
ress
T
ools > My Data > Delete Custom
POI(s)
.
2. P ress Yes
to confirm.
NOTE:
All custom POIs will be deleted from your navi -
gation system.
Saving Trip Logs
Trip logs are recorded while you navigate a
r o
ute.
SiriusXM® Travel Link (US Market Only)
Now, in addition to delivering over 130 channels
of the best sports, entertainment, talk and
commercial-free music, SiriusXM® now offers
premium infotainment services that work in
conjunction with compatible navigation systems.
To access SiriusXM® Travel Link, press the
ME
NU button then press the Travel Link button.
CAUTION!
Garmin® and FCA US LLC are not responsible
for the consequences of using custom POI
databases, or for the accuracy of custom POI
databases.
After downloading your POI database, use the
Ga
rmin® POI Loader to install the POIs onto a
USB mass storage device. Use the USB mass
storage device to load the POIs. The POI
Loader is available at
garmin.com/products/
poiloader
. Refer to the POI Loader Help file for
more information; click H
e
lp to open the Help
file. The file name can only be POI.gpi. No other
file name or extension should be used.
Page 358 of 396
356 MULTIMEDIA
End-User License Agreement
Software License Agreement
BY USING THE NAVIGATION SYSTEM, YOU
AG
REE TO BE BOUND BY THE TERMS AND
CONDITIONS OF THE FOLLOWING SOFTWARE
LICENSE AGREEMENT. PLEASE READ THIS
AGREEMENT CAREFULLY.
Garmin® Ltd. and its subsidiaries (“Garmin®”)
gr
ant you a limited license to use the software
embedded in this device (the “Software”) in
binary executable form in the normal operation
of the product. Title, ownership rights, and
intellectual property rights in and to the
Software remain in Garmin® and/or its
third-party providers.
You acknowledge that the Software is the
p r
operty of Garmin® and/or its third-party
providers and is protected under the United
States of America copyright laws and
international copyright treaties. You further
acknowledge that the structure, organization,
and code of the Software, for which source code
is not provided, are valuable trade secrets of
Garmin® and/or its third-party providers and that
the Software in source code form remains a
valuable trade secret of Garmin® and/or its
third-party providers. You agree not to decompile, disassemble, modify, reverse assemble, reverse
engineer, or reduce to human readable form the
Software or any part thereof or create any
derivative works based on the Software. You
agree not to export or re-export the Software to
any country in violation of the export control laws
of the United States of America or the export
control laws of any other applicable country.
The Garmin® device you have purchased
(
“
Device”), or the download that you are making
(the “Download”), may contain an application,
content, or both. If a Device, the software
embedded in it (the “Software”), or if a Download,
the application, including its embedded software
(collectively, the “Application”) is owned by
Garmin® Ltd. or its subsidiaries (collectively,
“Garmin®”). The map data that may be
embedded in your Device, the Application or
downloaded separately (the “Map Data”) is either
owned by Garmin®, or by HERE North America
LLC and/or its affiliates (“HERE”) or another third
party and is licensed to Garmin®. Garmin® also
owns, or licenses from third party providers,
information, traffic data, text, images, graphics,
photographs, audio, video, images and other
applications and data that may be embedded
in the Device or Application, or downloaded
s e
parately (“Other Content”). The Map Data and Other Content are collectively the “Content”. The
Software, Application and Content (collectively,
the “Garmin® Products”) are protected under
copyright laws and international copyright
treaties. The Garmin® Products are licensed, not
sold. The structure, organization and code of the
Software and Application are valuable trade
secrets of Garmin® and/or its third-party
providers. The Garmin® Products are each
provided under this License Agreement and are
subject to the following terms and conditions
which are agreed to by End User (“you” or “your”),
on the one hand, and Garmin® and its licensors
and affiliated companies of Garmin® and its
licensor, on the other hand. Garmin’s® licensors,
including the licensors, service providers,
channel partners, suppliers and affiliated
companies of Garmin® and its licensors, are
each a direct and intended third party beneficiary
of this Agreement and may enforce their rights
directly against you in the event of your breach of
this Agreement.
IMPORTANT:
C
AREFULLY READ THIS ENTIRE
LICENSE AGREEMENT BEFORE PURCHASING
OR USING YOUR DEVICE OR DOWNLOADED
APPLICATION OR CONTENT. PURCHASING,
INSTALLING, COPYING, OR OTHERWISE USING
YOUR DEVICE OR DOWNLOADED APPLICATION
Page 365 of 396
MULTIMEDIA 363
Garmin® is a trademark of Garmin® Ltd. or its
subsidiaries, registered in the USA and other
countries. This trademark may not be used
without the express permission of Garmin®.
All other company names and trademarks
m e
ntioned or referenced in this documentation
are the properties of their respective owners. All
rights reserved.
MORE MODE
“More” Main Menu
The More Main Menu consists of the following
options:
Settings
SiriusXM® Travel Link (if equipped)
Refer to the “Navigation Mode” in this
s e
ction for more information.
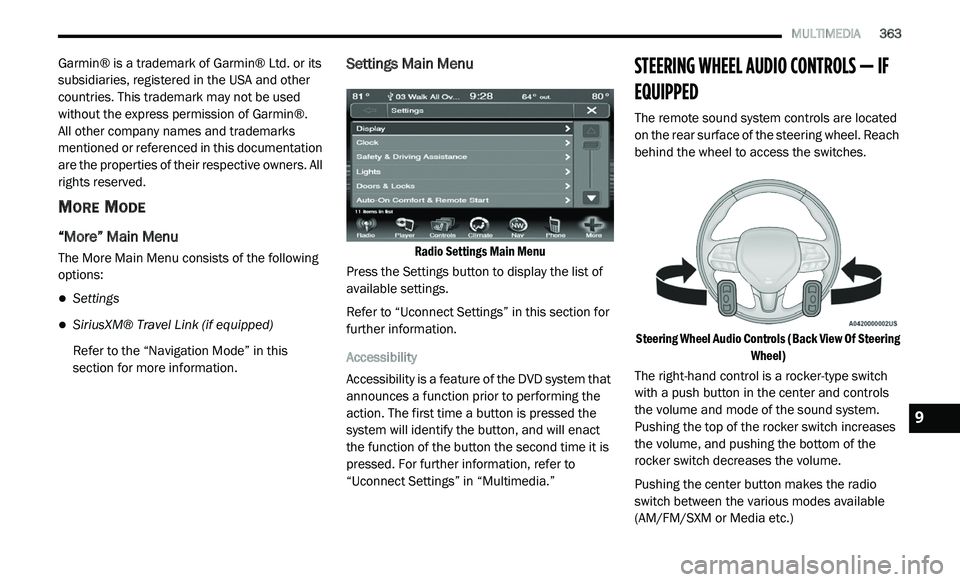
Settings Main Menu
Radio Settings Main Menu
Press the Settings button to display the list of
a v
ailable settings.
Refer to “Uconnect Settings” in this section for
f u
rther information.
Accessibility
Accessibility is a feature of the DVD system that
a n
nounces a function prior to performing the
action. The first time a button is pressed the
system will identify the button, and will enact
the function of the button the second time it is
pressed. For further information, refer to
“Uconnect Settings” in “Multimedia.”
STEERING WHEEL AUDIO CONTROLS — IF
EQUIPPED
The remote sound system controls are located
on the rear surface of the steering wheel. Reach
behind the wheel to access the switches.
Steering Wheel Audio Controls (Back View Of Steering Wh
eel)
The right-hand control is a rocker-type switch
w i
th a push button in the center and controls
the volume and mode of the sound system.
Pushing the top of the rocker switch increases
the volume, and pushing the bottom of the
rocker switch decreases the volume.
Pushing the center button makes the radio
s w
itch between the various modes available
(AM/FM/SXM or Media etc.)
9
Page 375 of 396
MULTIMEDIA 373
3. Channel 2 Audio Only/Mute — Audio: Only in
a single screen system: The Audio Only icon
is displayed on Channel 2 when Channel 1
is in a video mode. Mute: when the Mute
icon is displayed, the audio for Channel 2
has been muted using the remote control’s
MUTE button.
4. C hannel 2 Mode — Displays the current
s
ource for Channel 2.
5. R emote Locked Out — When the icon is
d
isplayed, the remote control functions are
disabled.
6. C lock — Displays the time.
7
. C hannel 1 Shared Status — When the icon is
d
isplayed, the audio for Channel 1 is also
shared with the radio and playing through
the cabin speakers.
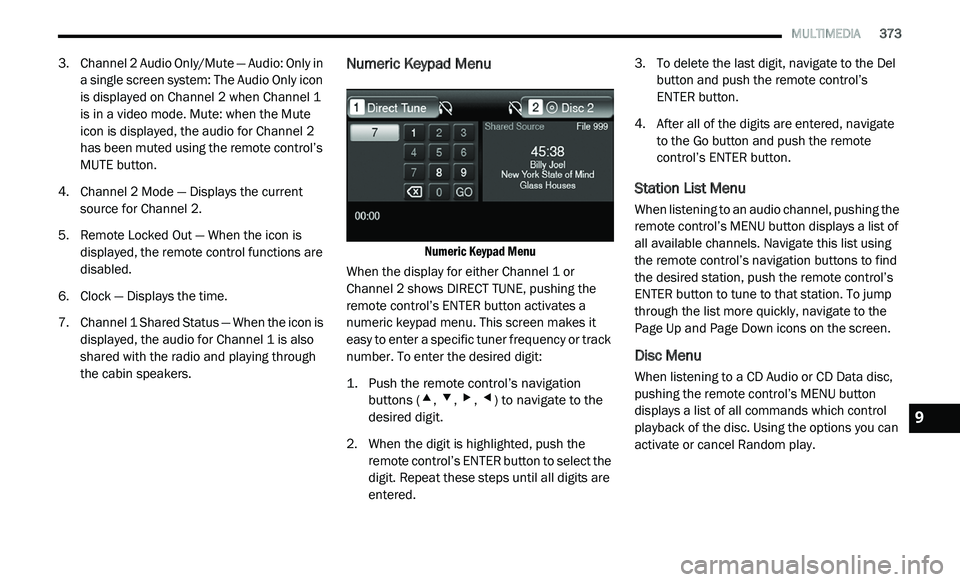
Numeric Keypad Menu
Numeric Keypad Menu
When the display for either Channel 1 or
C h
annel 2 shows DIRECT TUNE, pushing the
remote control’s ENTER button activates a
numeric keypad menu. This screen makes it
easy to enter a specific tuner frequency or track
number. To enter the desired digit:
1. P ush the remote control’s navigation
b
uttons (
▴, ▾, ▸, ◂) to navigate to the
desired digit.
2. W hen the digit is highlighted, push the
r
emote control’s ENTER button to select the
digit. Repeat these steps until all digits are
entered. 3. T
o delete the last digit, navigate to the Del
b
utton and push the remote control’s
ENTER button.
4. A fter all of the digits are entered, navigate
t
o the Go button and push the remote
control’s ENTER button.
Station List Menu
When listening to an audio channel, pushing the
remote control’s MENU button displays a list of
all available channels. Navigate this list using
the remote control’s navigation buttons to find
the desired station, push the remote control’s
ENTER button to tune to that station. To jump
through the list more quickly, navigate to the
Page Up and Page Down icons on the screen.
Disc Menu
When listening to a CD Audio or CD Data disc,
pushing the remote control’s MENU button
displays a list of all commands which control
playback of the disc. Using the options you can
activate or cancel Random play.
9
Page 376 of 396
374 MULTIMEDIA
Options Menu
When watching a video source (DVD Video with
the disc in Play mode, Aux Video, etc.), pressing
the Options button on the touchscreen activates
the Options Settings menu. From this menu you
can adjust Audio, Subtitles, Angle and Title.
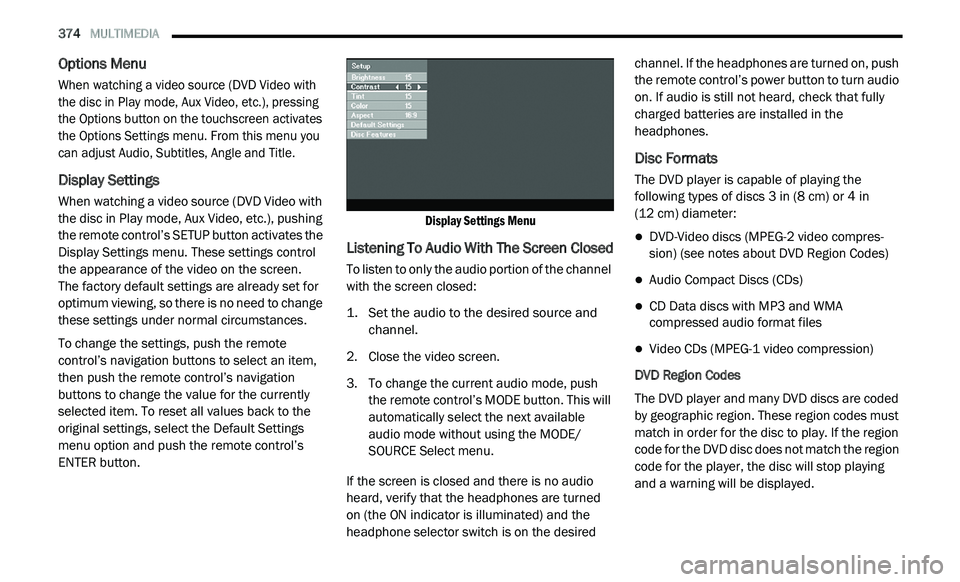
Display Settings
When watching a video source (DVD Video with
the disc in Play mode, Aux Video, etc.), pushing
the remote control’s SETUP button activates the
Display Settings menu. These settings control
the appearance of the video on the screen.
The factory default settings are already set for
o p
timum viewing, so there is no need to change
these settings under normal circumstances.
To change the settings, push the remote
c o
ntrol’s navigation buttons to select an item,
then push the remote control’s navigation
buttons to change the value for the currently
selected item. To reset all values back to the
original settings, select the Default Settings
menu option and push the remote control’s
ENTER button.
Display Settings Menu
Listening To Audio With The Screen Closed
To listen to only the audio portion of the channel
with the screen closed:
1. S
et the audio to the desired source and
c
hannel.
2. C lose the video screen.
3
. T o change the current audio mode, push
t
he remote control’s MODE button. This will
automatically select the next available
audio mode without using the MODE/
SOURCE Select menu.
If the screen is closed and there is no audio
h e
ard, verify that the headphones are turned
on (the ON indicator is illuminated) and the
h e
adphone selector switch is on the desired channel. If the headphones are turned on, push
the remote control’s power button to turn audio
on. If audio is still not heard, check that fully
charged batteries are installed in the
headphones.
Disc Formats
The DVD player is capable of playing the
following types of discs 3
in (8 cm) or 4 in
(12 cm) diameter:
DVD-Video discs (MPEG-2 video compres -
sion) (see notes about DVD Region Codes)
Audio Compact Discs (CDs)
CD Data discs with MP3 and WMA
compressed audio format files
Video CDs (MPEG-1 video compression)
DVD Region Codes
The DVD player and many DVD discs are coded
b y
geographic region. These region codes must
match in order for the disc to play. If the region
code for the DVD disc does not match the region
code for the player, the disc will stop playing
and a warning will be displayed.
Page 395 of 396

WARNING: Operating, servicing and maintaining a passenger vehicle or off-highway \
motor vehicle can expose you to
chemicals including engine exhaust, carbon monoxide, phthalates, and lea\
d, which are known to the State of California to
cause cancer and birth defects or other reproductive harm. To minimize exposure, avoid breathing exhaust, do not idle the
engine except as necessary, service your vehicle in a well-ventilated area and wear gloves or wash\
your hands frequently
when servicing your vehicle. For more information go to www.P65Warnings.ca.gov/passenger-vehicle.
This Owner’s Manual illustrates and describes the operation of features and equipme\
nt that are either standard or optional on this vehicle. This manual may also include
a description of features and equipment that are no longer available or \
were not ordered on this vehicle. Please disregard any features and equipment described in this
manual that are not on this vehicle. FCA US LLC reserves the right to make changes in design and specificat\
ions, and/or make additions to or improvements to its
products without imposing any obligation upon itself to install them on \
products previously manufactured.
With respect to any vehicles sold in Canada, the name FCA US LLC shall b\
e deemed to be deleted and the name FCA Canada Inc. used in substitution therefore.
If you are the first registered retail owner of your vehicle, you may \
obtain a complimentary printed copy of the Warranty Booklet by calling 1-800-423-6343 (U.S.) or
1-800-387-1143 (Canada) or by contacting your dealer.
This Owner’s Manual is intended to familiarize you with the important features of y\
our vehicle. Your most up-to-date Owner’s Manual, Navigation/Uconnect manuals and
Warranty Booklet can be found by visiting the website on the back cover. U.S. residents can purchase replacement kits by visiting www.techauthority.com and Canadian
residents can purchase replacement kits by calling 1-800-387-1143.
The driver’s primary responsibility is the safe operation of the vehicle. Driving w\
hile distracted can result in loss of vehicle control, resulting in an accident and
personal injury. FCA US LLC strongly recommends that the driver use extreme caution whe\
n using any device or feature that may take their attention off the road.
Use of any electrical devices, such as cellular telephones, computers, p\
ortable radios, vehicle navigation or other devices, by the driver while the vehicle is moving
is dangerous and could lead to a serious accident. Texting while driving is also dangerous and should never be done while th\
e vehicle is moving. If you find yourself
unable to devote your full attention to vehicle operation, pull off the \
road to a safe location and stop your vehicle. Some states or provinces prohibit the use of
cellular telephones or texting while driving. It is always the driver’\
s responsibility to comply with all local laws.
This Owner’s Manual has been prepared to help you get acquainted with your new Dodg\
e brand vehicle and to provide a convenient reference source
for common questions.
Not all features shown in this manual may apply to your vehicle. For add\
itional information, visit www.mopar.com (U.S.), www.mopar.ca (Canada) or your local
Dodge brand dealer.
Drunk driving is one of the most frequent causes of accidents. Your driving ability can be seriously impaired with blood alcohol levels
far below the legal minimum. If you are drinking, don’t drive. Ride with a designated non-drinking driver, call a cab, a friend or use
public transportation.
DRIVING AND ALCOHOL
Driving after drinking can lead to an accident. Your perceptions are less sharp, your reflexes are slower and your judg\
ment is impaired
when you have been drinking. Never drink and then drive.
WARNING