oil DODGE MAGNUM SRT 2007 1.G Owner's Manual
[x] Cancel search | Manufacturer: DODGE, Model Year: 2007, Model line: MAGNUM SRT, Model: DODGE MAGNUM SRT 2007 1.GPages: 380, PDF Size: 6.63 MB
Page 314 of 380
Insure nylon tubing in these areas has not melted or
collapsed.
Inspect all hose connections such as clamps and cou-
plings to make sure they are secure and no leaks are
present.
NOTE:
²
Often, fluid such as oil, power steering fluid, and
brake fluid are used during assembly plant operations
to facilitate the assembly of hoses to couplings. There-
fore, oil wetness at the hose-coupling area is not
necessarily an indication of leakage. Actual dripping
of hot fluid when systems are under pressure (during
vehicle operation), should be noted before a hose is
replaced based on leakage.
²Inspect the brake hoses whenever the brake system is
serviced and at every engine oil change. Inspect hy-
draulic brake hoses for surface cracking, scuffing, or
worn spots. If there is any evidence of cracking,
scuffing, or worn spots, the hose should be replaced
immediately! Eventual deterioration of the hose can
take place resulting in a possibility of a burst failure.
WARNING!
Worn brake hoses can burst and cause brake failure.
You could have an accident. If you see any signs of
cracking, scuffing, or worn spots, have the brake
hoses replaced immediately.
Master Cylinder - Brake Fluid Level Check
Check the fluid level in the master cylinder immediately
if the brake system warning light indicates system fail-
ure.
Check the fluid level in the master cylinder when per-
forming underhood services.
Clean the top of the master cylinder area before removing
the cap. Add fluid to bring the level up to the top of the
ªFULLº mark on the side of the master cylinder reservoir.
Overfilling of fluid is not recommended because it may
cause leaking in the system.
Add enough fluid to bring the level up to the require-
ments described on the brake fluid reservoir. With disc
MAINTAINING YOUR VEHICLE 313
7
Page 315 of 380
brakes, fluid level can be expected to fall as the brake
pads wear. However, low fluid level may be caused by a
leak and a checkup may be needed.
Use only manufacturer's recommended brake fluid. Re-
fer to ªFluids, Lubricants, and Genuine Partsº for the
correct fluid type.
WARNING!
²Overfilling the brake fluid reservoir can result in
spilling brake fluid on hot engine parts and the
brake fluid catching fire.
²Use of a brake fluid that has a lower initial boiling
point than the recommended MOPARtDOT 3
product or a brake fluid that is unidentified as to
FMVSS specification may result in sudden brake
failure during hard prolonged braking. You could
have an accident.
Use only brake fluid that has been in a tightly closed
container to avoid contamination from foreign matter or
moisture.
CAUTION!
Do not allow petroleum base fluid to contaminate
the brake fluid, all brake seal components could be
damaged causing partial or complete brake failure.
Automatic Transmission
Fluid Level Check
Regular automatic transmission fluid level checks are not
required. For this reason, the dipstick is omitted.
If you notice fluid loss or gear shift malfunction, have
your authorized dealer check the transmission fluid level.
314 MAINTAINING YOUR VEHICLE
Page 318 of 380
CAUTION!
Do not use abrasive or strong cleaning materials
such as steel wool or scouring powder, which will
scratch metal and painted surfaces.
Special Care
²
If you drive on salted or dusty roads or if you drive
near the ocean, hose off the undercarriage at least once
a month.
²It is important that the drain holes in the lower edges
of the doors, rocker panels, and rear cargo area be kept
clear and open.
²If you detect any stone chips or scratches in the paint,
touch them up immediately. The cost of such repairs is
considered the responsibility of the owner.
²If your vehicle is damaged due to an accident or
similar cause, which destroys the paint and protective
coating, have your vehicle repaired as soon as pos-
sible. The cost of such repairs is considered the respon-
sibility of the owner.
²If you carry special cargo such as chemicals, fertilizers,
de-icer salt, etc., be sure that such materials are well
packaged and sealed.
²If a lot of driving is done on gravel roads, consider
mud or stone shields behind each wheel.
²Use Moparttouch up paint or equivalent on scratches
as soon as possible. Your dealer has touch up paint to
match the color of your vehicle.
Wheel and Wheel Trim Care
All wheels and wheel trim, especially aluminum and
chrome plated wheels should be cleaned regularly with a
mild soap and water to prevent corrosion. To remove
heavy soil and/or excessive brake dust, use Mopart
Wheel Cleaner (05066247AB) or equivalent or select a
nonabrasive, non-acidic cleaner. Do not use scouring
pads, steel wool, a bristle brush, or metal polishes. Only
Mopartor equivalent is recommended. Do not use oven
cleaner. Avoid automatic car washes that use acidic
solutions or harsh brushes that may damage the wheels'
protective finish.
MAINTAINING YOUR VEHICLE 317
7
Page 319 of 380
Interior Care
Use MopartFabric Cleaner or equivalent to clean fabric
upholstery and MopartCarpet Cleaner for carpeting.
Interior Trim should be cleaned starting with a damp
cloth, or MopartSatin Select. Do not use harsh cleaners
or Armorall. Use MopartTotal Clean to clean vinyl
upholstery.
MopartTotal Clean is specifically recommended for
leather upholstery.
Your leather upholstery can be best preserved by regular
cleaning with a damp soft cloth. Small particles of dirt
can act as an abrasive and damage the leather upholstery
and should be removed promptly with a damp cloth.
Stubborn soils can be removed easily with a soft cloth
and MopartTotal Clean or equivalent. Care should be
taken to avoid soaking your leather upholstery with any
liquid. Please do not use polishes, oils, cleaning fluids,
solvents, detergents, or ammonia-based cleaners to clean
your leather upholstery. Application of a leather condi-
tioner is not required to maintain the original condition.WARNING!
Do not use volatile solvents for cleaning purposes.
Many are potentially flammable, and if used in
closed areas they may cause respiratory harm.
Cleaning Headlights
Your vehicle has plastic headlights that are lighter and
less susceptible to stone breakage than glass headlights.
Plastic is not as scratch resistant as glass and therefore
different lens cleaning procedures must be followed.
To minimize the possibility of scratching the lenses and
reducing light output, avoid wiping with a dry cloth. To
remove road dirt, wash with a mild soap solution fol-
lowed by rinsing.
Do not use abrasive cleaning components, solvents, steel
wool or other aggressive material to clean the lenses.
Glass Surfaces
All glass surfaces should be cleaned on a regular basis
with MopartGlass Cleaner or any commercial
household-type glass cleaner. Never use an abrasive type
318 MAINTAINING YOUR VEHICLE
Page 322 of 380
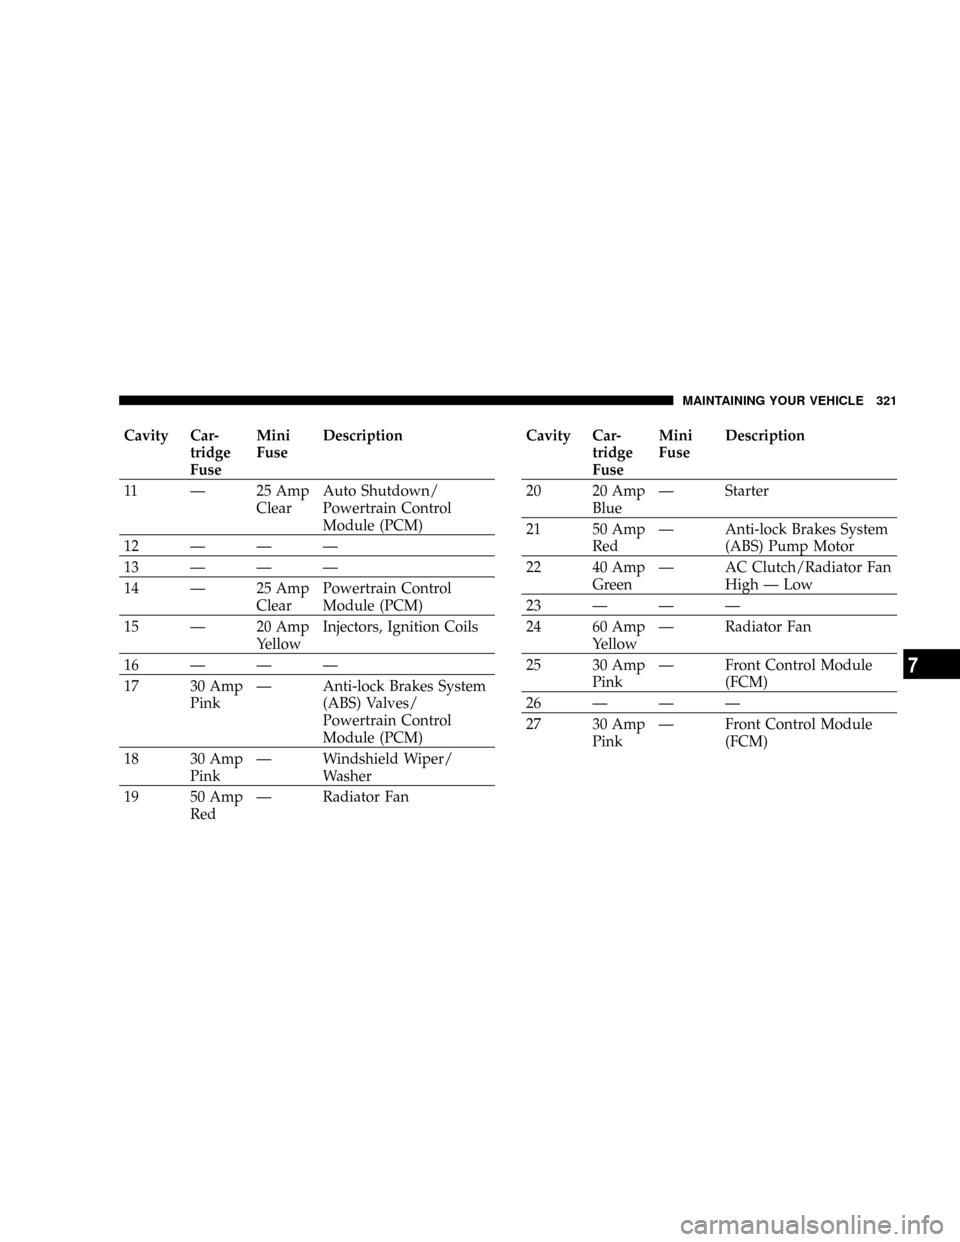
Cavity Car-
tridge
FuseMini
FuseDescription
11 Ð 25 Amp
ClearAuto Shutdown/
Powertrain Control
Module (PCM)
12ÐÐÐ
13ÐÐÐ
14 Ð 25 Amp
ClearPowertrain Control
Module (PCM)
15 Ð 20 Amp
YellowInjectors, Ignition Coils
16ÐÐÐ
17 30 Amp
PinkÐ Anti-lock Brakes System
(ABS) Valves/
Powertrain Control
Module (PCM)
18 30 Amp
PinkÐ Windshield Wiper/
Washer
19 50 Amp
RedÐ Radiator FanCavity Car-
tridge
FuseMini
FuseDescription
20 20 Amp
BlueÐ Starter
21 50 Amp
RedÐ Anti-lock Brakes System
(ABS) Pump Motor
22 40 Amp
GreenÐ AC Clutch/Radiator Fan
High Ð Low
23ÐÐÐ
24 60 Amp
YellowÐ Radiator Fan
25 30 Amp
PinkÐ Front Control Module
(FCM)
26ÐÐÐ
27 30 Amp
PinkÐ Front Control Module
(FCM)
MAINTAINING YOUR VEHICLE 321
7
Page 329 of 380
CAUTION!
Do not touch the new bulb with your fingers. Oil
contamination will severely shorten bulb life. If the
bulb comes in contact with an oily surface, clean the
bulb with rubbing alcohol.
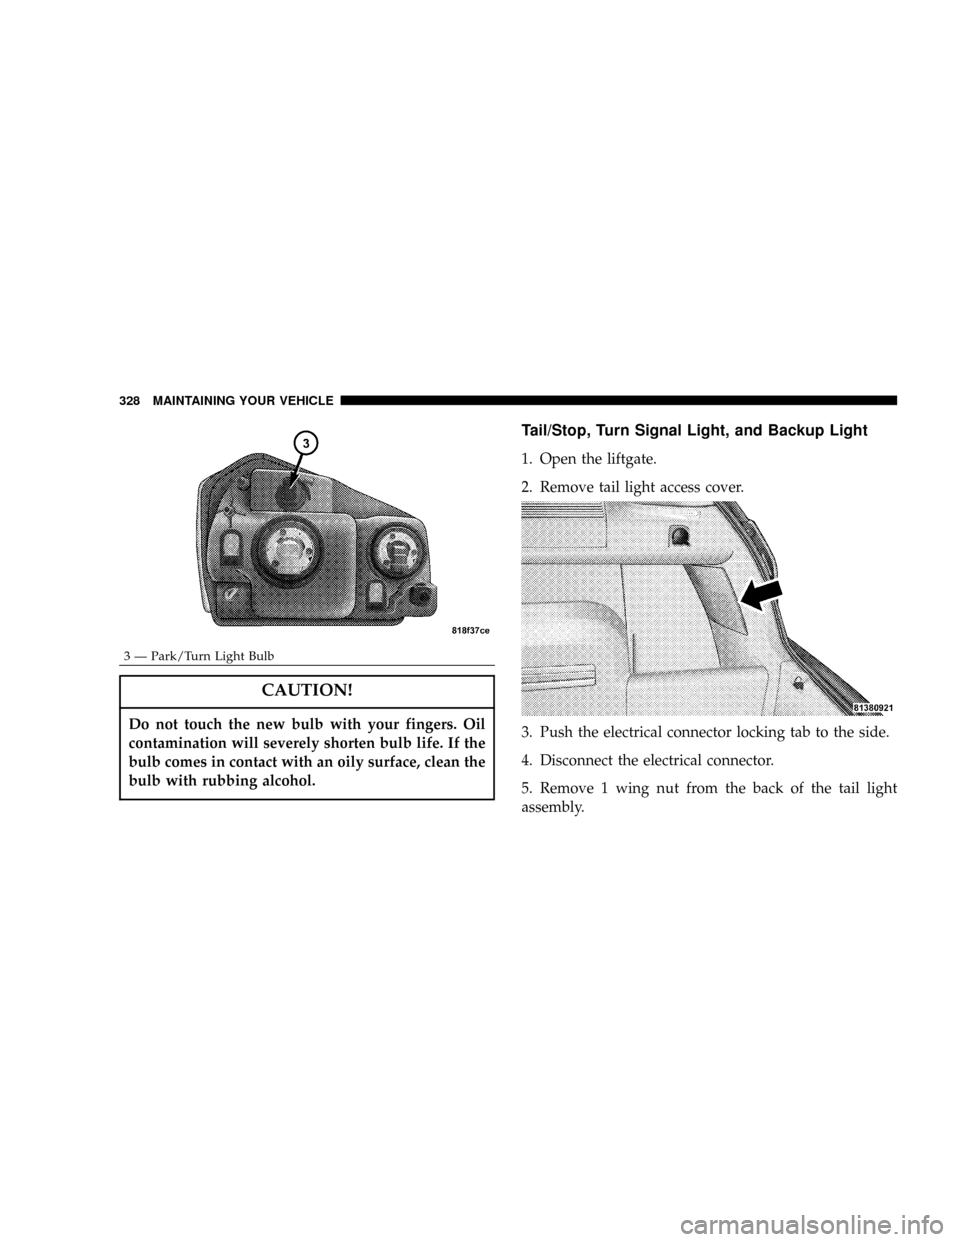
Tail/Stop, Turn Signal Light, and Backup Light
1. Open the liftgate.
2. Remove tail light access cover.
3. Push the electrical connector locking tab to the side.
4. Disconnect the electrical connector.
5. Remove 1 wing nut from the back of the tail light
assembly.
3 Ð Park/Turn Light Bulb
328 MAINTAINING YOUR VEHICLE
Page 332 of 380
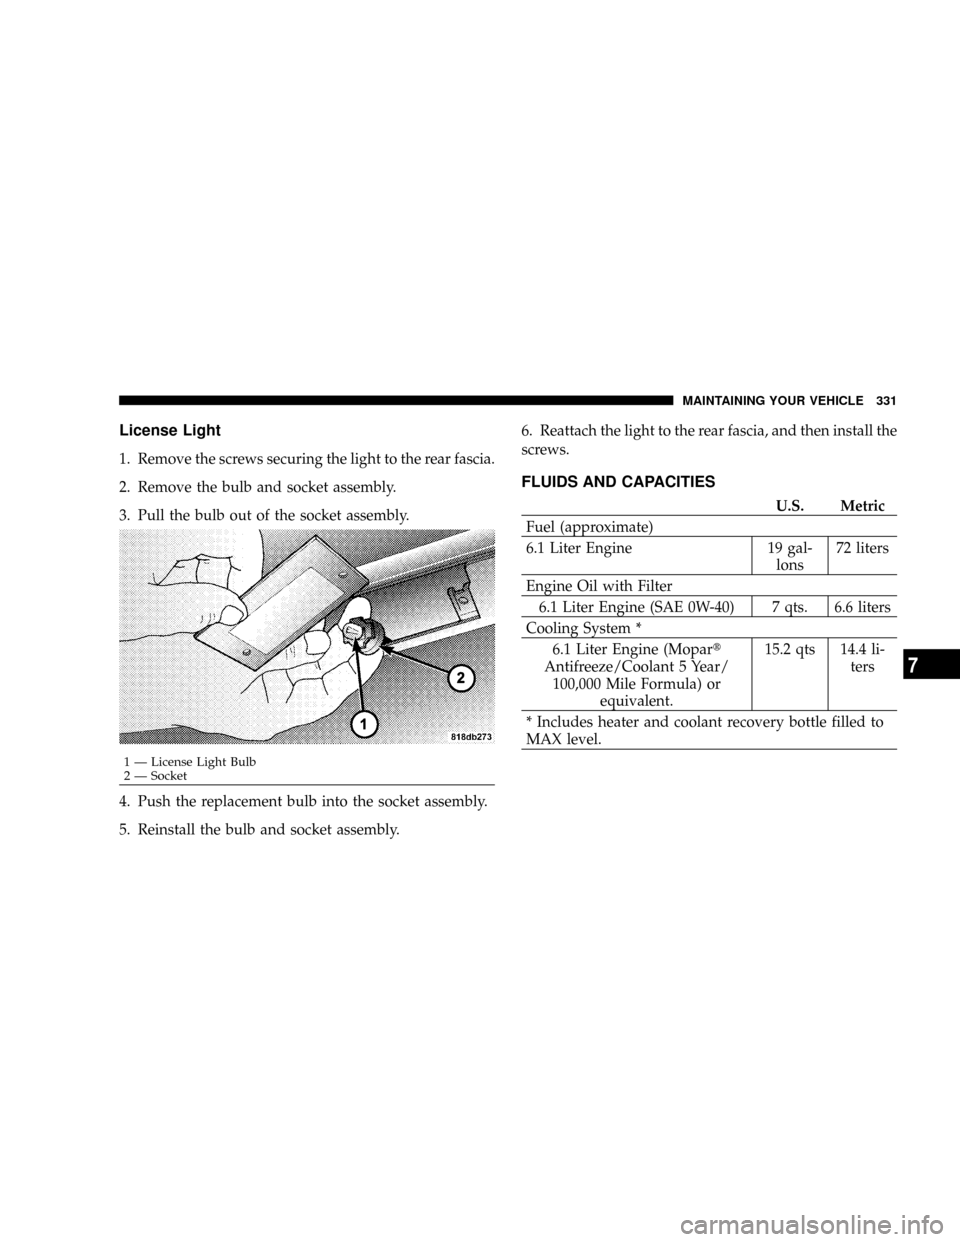
License Light
1. Remove the screws securing the light to the rear fascia.
2. Remove the bulb and socket assembly.
3. Pull the bulb out of the socket assembly.
4. Push the replacement bulb into the socket assembly.
5. Reinstall the bulb and socket assembly.6. Reattach the light to the rear fascia, and then install the
screws.
FLUIDS AND CAPACITIES
U.S. Metric
Fuel (approximate)
6.1 Liter Engine 19 gal-
lons72 liters
Engine Oil with Filter
6.1 Liter Engine (SAE 0W-40) 7 qts. 6.6 liters
Cooling System *
6.1 Liter Engine (Mopart
Antifreeze/Coolant 5 Year/
100,000 Mile Formula) or
equivalent.15.2 qts 14.4 li-
ters
* Includes heater and coolant recovery bottle filled to
MAX level.
1 Ð License Light Bulb
2 Ð SocketMAINTAINING YOUR VEHICLE 331
7
Page 333 of 380
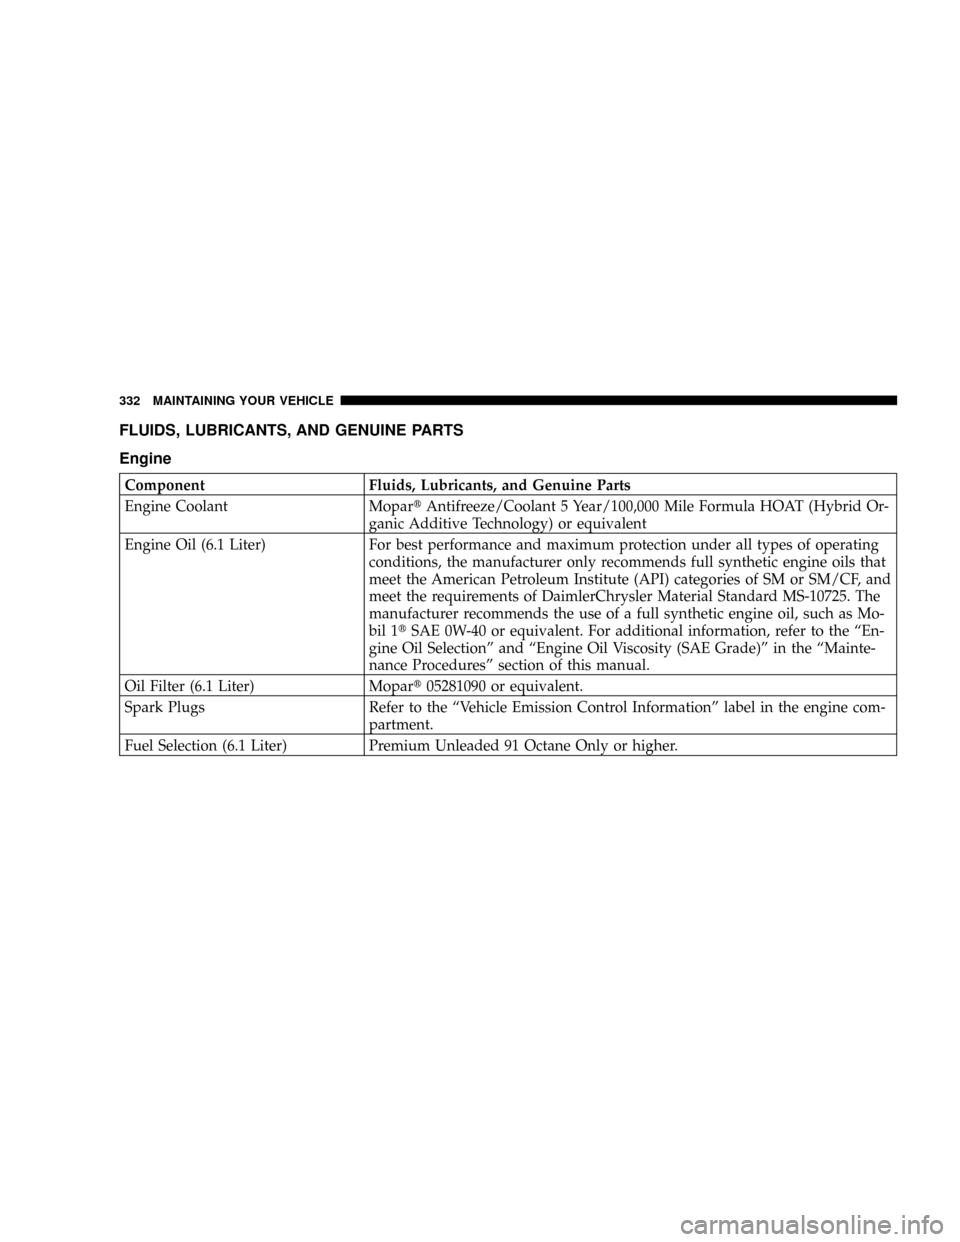
FLUIDS, LUBRICANTS, AND GENUINE PARTS
Engine
Component Fluids, Lubricants, and Genuine Parts
Engine Coolant MopartAntifreeze/Coolant 5 Year/100,000 Mile Formula HOAT (Hybrid Or-
ganic Additive Technology) or equivalent
Engine Oil (6.1 Liter) For best performance and maximum protection under all types of operating
conditions, the manufacturer only recommends full synthetic engine oils that
meet the American Petroleum Institute (API) categories of SM or SM/CF, and
meet the requirements of DaimlerChrysler Material Standard MS-10725. The
manufacturer recommends the use of a full synthetic engine oil, such as Mo-
bil 1tSAE 0W-40 or equivalent. For additional information, refer to the ªEn-
gine Oil Selectionº and ªEngine Oil Viscosity (SAE Grade)º in the ªMainte-
nance Proceduresº section of this manual.
Oil Filter (6.1 Liter) Mopart05281090 or equivalent.
Spark Plugs Refer to the ªVehicle Emission Control Informationº label in the engine com-
partment.
Fuel Selection (6.1 Liter) Premium Unleaded 91 Octane Only or higher.
332 MAINTAINING YOUR VEHICLE
Page 338 of 380
²Taxi, police, or delivery service (commercial ser-
vice).L
²Off-road or desert operation.
NOTE:IfANYof these apply to you, then change your
engine oil every 3,000 miles (5 000 km) or 3 months,
whichever comes first, and follow the maintenance rec-
ommendations in Schedule ªBº in this section.
NOTE:IfANYof these apply to you, then flush and
replace the engine coolant every 102,000 miles (170 000
km) or 60 months, whichever comes first, and follow the
maintenance recommendations in Schedule ªBº in this
section.
NOTE:Most vehicles are operated under the conditions
listed for Schedule9B.9
Second is ScheduleªA.ºIt is for vehicles that are not
operated under any of the conditions listed under Sched-
ule9B.9
Use the schedule that best describes your driving condi-
tions. Where time and mileage are listed, follow the
interval that occurs first.
NOTE:Under no circumstances should oil change
intervals exceed 6,000 miles (10 000 km) or 6 months
whichever comes first.
CAUTION!
Failure to perform the required maintenance items
may result in damage to the vehicle.
At Each Stop for Fuel
²
Check the engine oil level about 5 minutes after a fully
warmed engine is shut off. Checking the oil level while
the vehicle is on level ground will improve the accu-
racy of the oil level reading. Add oil only when the
level is at or below the ADD or MIN mark.
²Check the windshield washer solvent and add if
required.
MAINTENANCE SCHEDULES 337
8
M
A
I
N
T
E
N
A
N
C
E
S
C
H
E
D
U
L
E
S
Page 339 of 380
Once a Month
²
Check tire pressure and look for unusual wear or
damage.
²Inspect the battery, and clean, and tighten the termi-
nals as required.
²Check the fluid levels of coolant reservoir and brake
master cylinder, and add as needed.
²Check all lights and all other electrical items for correct
operation.
²Check rubber seals on each side of the radiator for
proper fit.
At Each Oil Change
²
Change the engine oil filter.
²Inspect the exhaust system.
²Inspect the brake hoses.
²Inspect the CV joints and front and rear suspension
components.
²Check the coolant level, hoses, and clamps.
338 MAINTENANCE SCHEDULES
8
M
A
I
N
T
E
N
A
N
C
E
S
C
H
E
D
U
L
E
S