four wheel drive DODGE NEON 1999 Service Repair Manual
[x] Cancel search | Manufacturer: DODGE, Model Year: 1999, Model line: NEON, Model: DODGE NEON 1999Pages: 1200, PDF Size: 35.29 MB
Page 102 of 1200
enough fluid has not passed through the system to
expel all the trapped air. Be sure to monitor the fluid
level in the pressure bleeder. It must stay at the
proper level so air will not be allowed to reenter the
brake system through the master cylinder reservoir.
BLEEDING WITHOUT A PRESSURE BLEEDER
NOTE: Correct bleeding of the brakes hydraulic
system without the use of pressure bleeding equip-
ment will require the aid of a helper.
The following wheel sequence for bleeding the
brake hydraulic system should be used to ensure
adequate removal of all trapped air from the hydrau-
lic system.
²Left rear wheel
²Right front wheel
²Right rear wheel
²Left front wheel
(1) Attach a clear plastic hose to the bleeder screw
starting at the right rear wheel and feed the hose
into a clear jar containing enough fresh brake fluid
to submerge the end of the hose (Fig. 36).
(2) Pump the brake pedal three or four times and
hold it down before the bleeder screw is opened.
(3) Open the bleeder screw at least 1 full turn.
When the bleeder screw opens the brake pedal will
drop.
(4) Close the bleeder screw. Release the brake
pedal onlyafterthe bleeder screw is closed.
(5) Repeat steps 1 through 3, four or five times at
each bleeder screw. Then check the pedal for travel.
If pedal travel is excessive or has not been improved,
enough fluid has not passed through the system to
expel all the trapped air. Be sure to monitor the fluid
level in the master cylinder reservoir. It must stay at
the proper level so air will not be allowed to re-enter
the brake system.(6) Test drive vehicle to be sure brakes are operat-
ing correctly and that pedal is solid.
MASTER CYLINDER BLEEDING
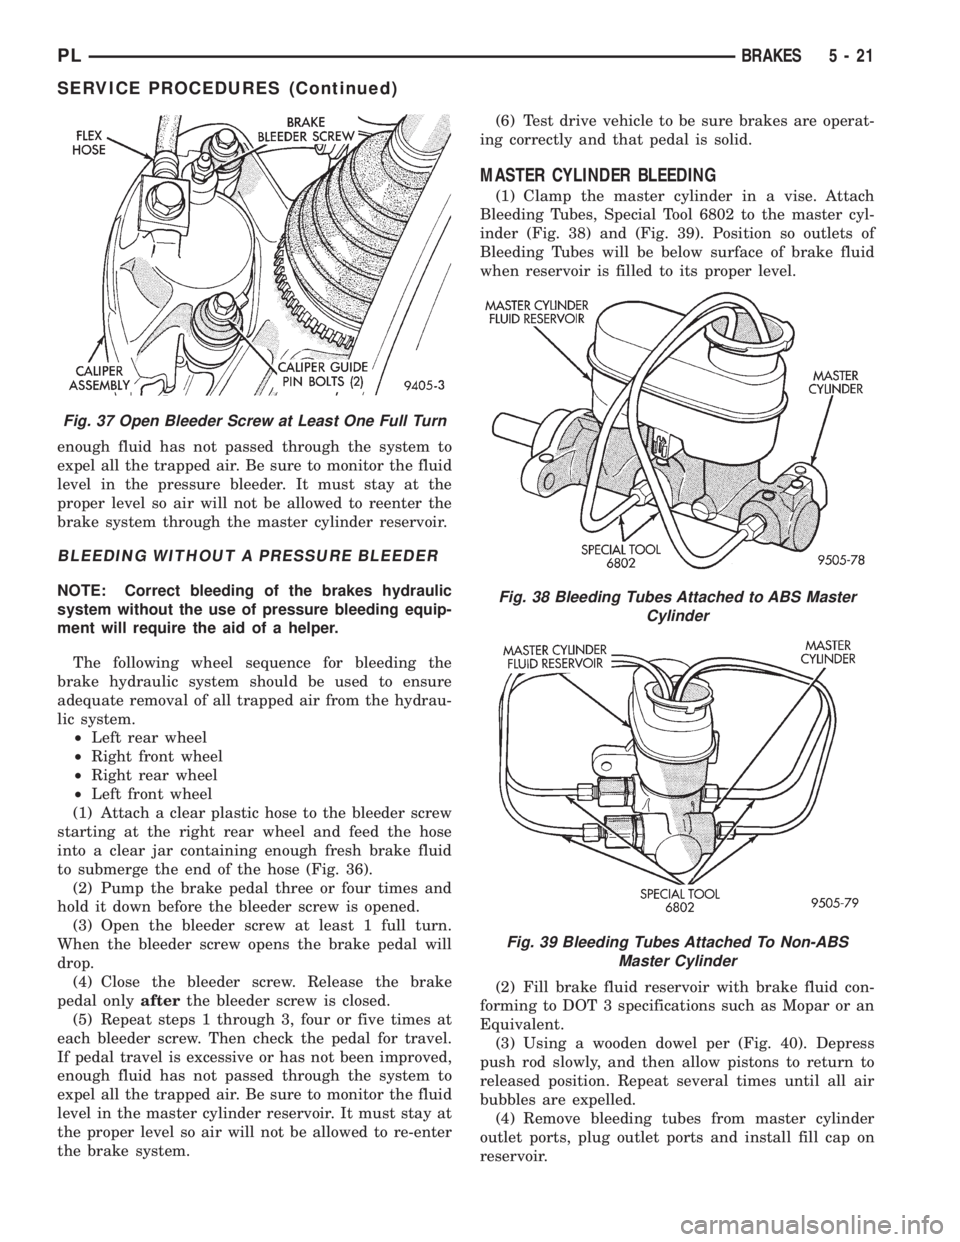
(1) Clamp the master cylinder in a vise. Attach
Bleeding Tubes, Special Tool 6802 to the master cyl-
inder (Fig. 38) and (Fig. 39). Position so outlets of
Bleeding Tubes will be below surface of brake fluid
when reservoir is filled to its proper level.
(2) Fill brake fluid reservoir with brake fluid con-
forming to DOT 3 specifications such as Mopar or an
Equivalent.
(3) Using a wooden dowel per (Fig. 40). Depress
push rod slowly, and then allow pistons to return to
released position. Repeat several times until all air
bubbles are expelled.
(4) Remove bleeding tubes from master cylinder
outlet ports, plug outlet ports and install fill cap on
reservoir.
Fig. 37 Open Bleeder Screw at Least One Full Turn
Fig. 38 Bleeding Tubes Attached to ABS Master
Cylinder
Fig. 39 Bleeding Tubes Attached To Non-ABS
Master Cylinder
PLBRAKES 5 - 21
SERVICE PROCEDURES (Continued)
Page 151 of 1200
This is accomplished by a sophisticated system of
electrical and hydraulic components. As a result,
there are a few performance characteristics that may
at first seem different but should be considered nor-
mal. These characteristics are discussed below.
NORMAL BRAKING SYSTEM FUNCTION
Under normal braking conditions, the ABS System
functions the same as a standard brake system with
a diagonally split master cylinder and conventional
vacuum assist.
ABS SYSTEM OPERATION
If a wheel locking tendency is detected during a
brake application, the brake system will enter the
ABS mode. During ABS braking, hydraulic pressure
in the four wheel circuits is modulated to prevent
any wheel from locking. Each wheel circuit is
designed with a set of electric solenoids to allow mod-
ulation, although for vehicle stability, both rear
wheel solenoids receive the same electrical signal.
During an ABS stop, the brakes hydraulic system
is still diagonally split. However, the brake system
pressure is further split into four control channels.
During antilock operation of the vehicle's brake sys-
tem the front wheels are controlled independently
and are on two separate control channels and the
rear wheels of the vehicle are controlled together.
The system can build and release pressure at each
wheel, depending on signals generated by the wheel
speed sensors (WSS) at each wheel and received at
the Controller Antilock Brake (CAB).
ABS operation is available at all vehicle speeds
above 3 to 5 mph. Wheel lockup may be perceived at
the very end of an ABS stop and is considered nor-
mal.
VEHICLE HANDLING PERFORMANCE DURING
ABS BRAKING
It is important to remember that an antilock brake
system does not shorten a vehicle's stopping distance
under all driving conditions, but does provide
improved control of the vehicle while stopping. Vehi-
cle stopping distance is still dependent on vehicle
speed, weight, tires, road surfaces and other factors.
Though ABS provides the driver with some steer-
ing control during hard braking, there are conditions
however, where the system does not provide any ben-
efit. In particular, hydroplaning is still possible when
the tires ride on a film of water. This results in the
vehicles tires leaving the road surface rendering the
vehicle virtually uncontrollable. In addition, extreme
steering maneuvers at high speed or high speed cor-
nering beyond the limits of tire adhesion to the road
surface may cause vehicle skidding, independent of
vehicle braking. For this reason, the ABS system is
termed Antilock instead of Anti-Skid.
NOISE AND BRAKE PEDAL FEEL
During ABS braking, some brake pedal movement
may be felt. In addition, ABS braking will create
ticking, popping and/or groaning noises heard by the
driver. This is normal due to pressurized fluid being
transferred between the master cylinder and the
brakes. If ABS operation occurs during hard braking,
some pulsation may be felt in the vehicle body due to
fore and aft movement of the suspension as brake
pressures are modulated.
At the end of an ABS stop, ABS will be turned off
when the vehicle is slowed to a speed of 3±4 mph.
There may be a slight brake pedal drop anytime that
the ABS is deactivated, such as at the end of the stop
when the vehicle speed is less then 3 mph or during
an ABS stop where ABS is no longer required. These
conditions will exist when a vehicle is being stopped
on a road surface with patches of ice, loose gravel or
sand on it. Also stopping a vehicle on a bumpy road
surface will activate ABS because of the wheel hop
caused by the bumps.
TIRE NOISE AND MARKS
Although the ABS system prevents complete wheel
lock-up, some wheel slip is desired in order to
achieve optimum braking performance. Wheel slip is
defined as follows, 0 percent slip means the wheel is
rolling freely and 100 percent slip means the wheel is
fully locked. During brake pressure modulation,
wheel slip is allowed to reach up to 25 to30%. This
means that the wheel rolling velocity is 25 to 30%
less than that of a free rolling wheel at a given vehi-
cle speed. This slip may result in some tire chirping,
depending on the road surface. This sound should not
be interpreted as total wheel lock-up.
Complete wheel lock up normally leaves black tire
marks on dry pavement. The ABS System will not
leave dark black tire marks since the wheel never
reaches a fully locked condition. Tire marks may
however be noticeable as light patched marks.
START UP CYCLE
When the ignition is turned on, a popping sound
and a slight brake pedal movement may be noticed.
Additionally, when the vehicle is first driven off a
humming may be heard and/or felt by the driver at
approximately 20 to 40 kph (12 to 25 mph). The ABS
warning lamp will also be on for up to 5 seconds
after the ignition is turned on. All of these conditions
are a normal function of ABS as the system is per-
forming a diagnosis check.
5 - 70 BRAKESPL
DESCRIPTION AND OPERATION (Continued)
Page 152 of 1200
PREMATURE ABS CYCLING
NOTE: When working on a vehicle which has a
complaint of premature ABS cycling it may be nec-
essary to use a DRB Scan Tool to detect and verify
the condition.
There is one complaint called Premature ABS
Cycling in which neither the Red Brake Warning
Lamp nor the Amber Antilock Lamp were illumi-
nated and no fault codes were stored in the CAB.
Symptoms of Premature ABS Cycling, include click-
ing sounds from the solenoids valves, pump motor
running and pulsations in the brake pedal. This con-
dition can occur at any braking rate of the vehicle
and on any type of road surface. This creates an
additional condition which needs to be correctly
assessed when diagnosing problems with the antilock
brake system.
The following conditions are common causes that
need to be checked when diagnosing a condition of
Premature ABS Cycling. Damaged tone wheels,
incorrect tone wheels, damage to a wheel speed sen-
sor mounting boss on a steering knuckle, a loose
wheel speed sensor mounting bolt, and excessive tone
wheel runout. Also, an excessively large tone wheel
to wheel speed sensor air gap can lead to the condi-
tion of Premature ABS Cycling. Special attention is
to be given to these components when diagnosing a
vehicle exhibiting the condition of Premature ABS
Cycling. After diagnosing the defective component,
repair or replace as required.
When the component repair or replacement is com-
pleted, test drive the vehicle to verify the condition of
Premature ABS Cycling has been corrected.
ABS BRAKE SYSTEM COMPONENTS
The following is a detailed description of the Teves
Mark 20 ABS brake system components. For infor-
mation on servicing the base brake system compo-
nents, see the base Brake System section of this
Service Manual.
ABS MASTER CYLINDER AND POWER BRAKE
BOOSTER
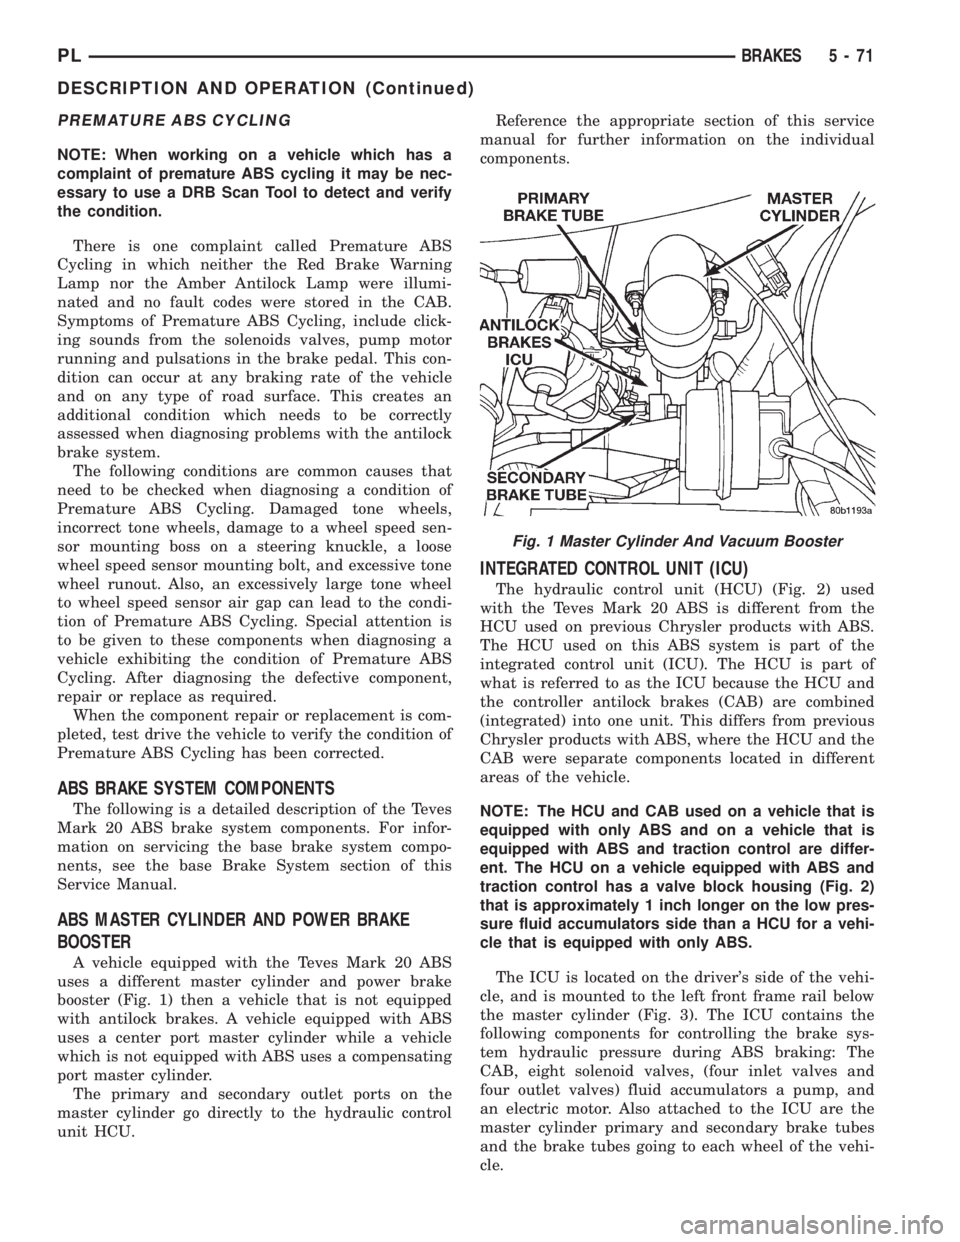
A vehicle equipped with the Teves Mark 20 ABS
uses a different master cylinder and power brake
booster (Fig. 1) then a vehicle that is not equipped
with antilock brakes. A vehicle equipped with ABS
uses a center port master cylinder while a vehicle
which is not equipped with ABS uses a compensating
port master cylinder.
The primary and secondary outlet ports on the
master cylinder go directly to the hydraulic control
unit HCU.Reference the appropriate section of this service
manual for further information on the individual
components.
INTEGRATED CONTROL UNIT (ICU)
The hydraulic control unit (HCU) (Fig. 2) used
with the Teves Mark 20 ABS is different from the
HCU used on previous Chrysler products with ABS.
The HCU used on this ABS system is part of the
integrated control unit (ICU). The HCU is part of
what is referred to as the ICU because the HCU and
the controller antilock brakes (CAB) are combined
(integrated) into one unit. This differs from previous
Chrysler products with ABS, where the HCU and the
CAB were separate components located in different
areas of the vehicle.
NOTE: The HCU and CAB used on a vehicle that is
equipped with only ABS and on a vehicle that is
equipped with ABS and traction control are differ-
ent. The HCU on a vehicle equipped with ABS and
traction control has a valve block housing (Fig. 2)
that is approximately 1 inch longer on the low pres-
sure fluid accumulators side than a HCU for a vehi-
cle that is equipped with only ABS.
The ICU is located on the driver's side of the vehi-
cle, and is mounted to the left front frame rail below
the master cylinder (Fig. 3). The ICU contains the
following components for controlling the brake sys-
tem hydraulic pressure during ABS braking: The
CAB, eight solenoid valves, (four inlet valves and
four outlet valves) fluid accumulators a pump, and
an electric motor. Also attached to the ICU are the
master cylinder primary and secondary brake tubes
and the brake tubes going to each wheel of the vehi-
cle.
Fig. 1 Master Cylinder And Vacuum Booster
PLBRAKES 5 - 71
DESCRIPTION AND OPERATION (Continued)
Page 153 of 1200
CAUTION: No components of the ICU are service-
able. If any component that makes up the ICU is
diagnosed as not functioning properly it MUST be
replaced. The replaceable components of the ICU,
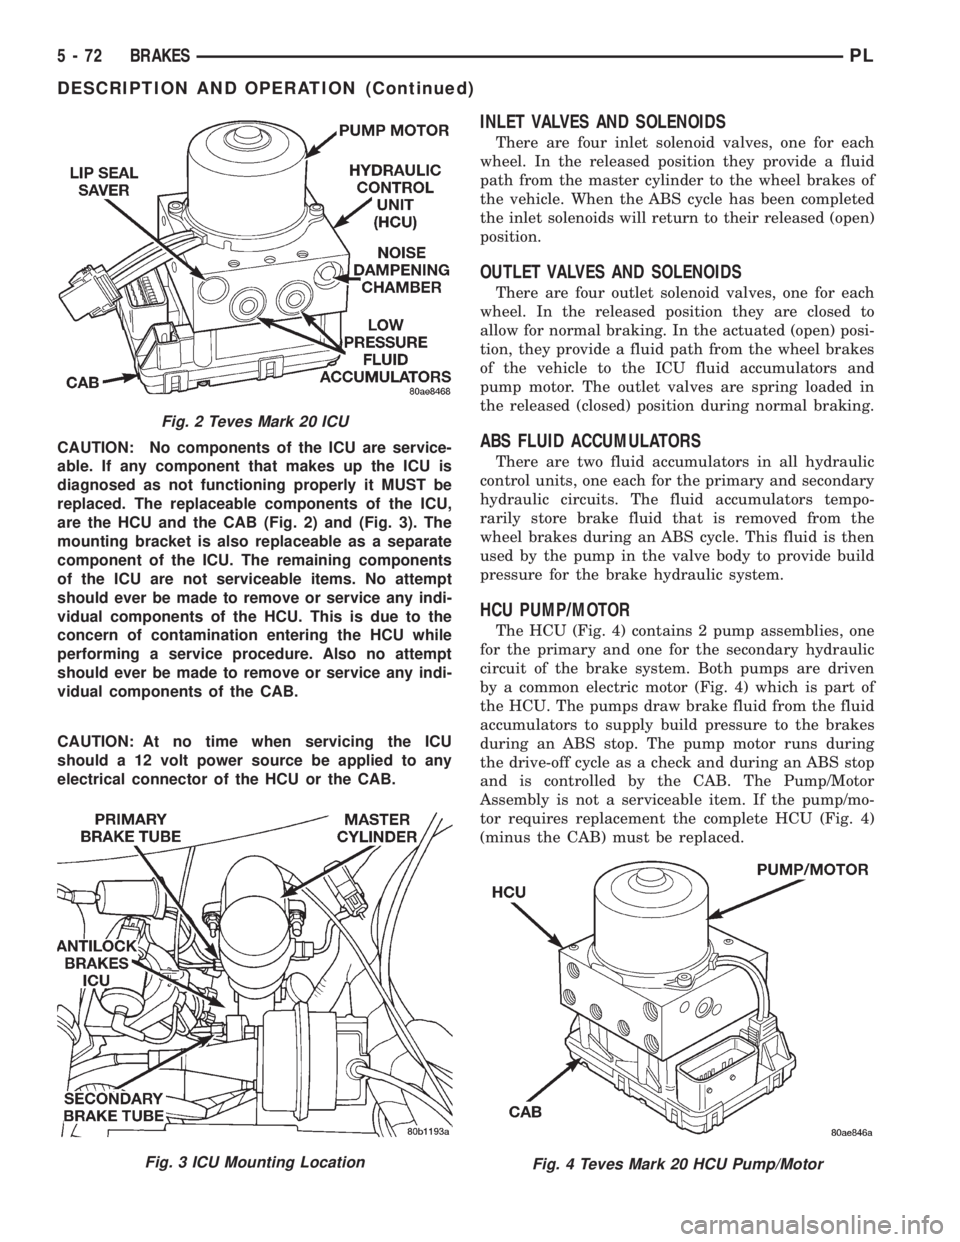
are the HCU and the CAB (Fig. 2) and (Fig. 3). The
mounting bracket is also replaceable as a separate
component of the ICU. The remaining components
of the ICU are not serviceable items. No attempt
should ever be made to remove or service any indi-
vidual components of the HCU. This is due to the
concern of contamination entering the HCU while
performing a service procedure. Also no attempt
should ever be made to remove or service any indi-
vidual components of the CAB.
CAUTION: At no time when servicing the ICU
should a 12 volt power source be applied to any
electrical connector of the HCU or the CAB.
INLET VALVES AND SOLENOIDS
There are four inlet solenoid valves, one for each
wheel. In the released position they provide a fluid
path from the master cylinder to the wheel brakes of
the vehicle. When the ABS cycle has been completed
the inlet solenoids will return to their released (open)
position.
OUTLET VALVES AND SOLENOIDS
There are four outlet solenoid valves, one for each
wheel. In the released position they are closed to
allow for normal braking. In the actuated (open) posi-
tion, they provide a fluid path from the wheel brakes
of the vehicle to the ICU fluid accumulators and
pump motor. The outlet valves are spring loaded in
the released (closed) position during normal braking.
ABS FLUID ACCUMULATORS
There are two fluid accumulators in all hydraulic
control units, one each for the primary and secondary
hydraulic circuits. The fluid accumulators tempo-
rarily store brake fluid that is removed from the
wheel brakes during an ABS cycle. This fluid is then
used by the pump in the valve body to provide build
pressure for the brake hydraulic system.
HCU PUMP/MOTOR
The HCU (Fig. 4) contains 2 pump assemblies, one
for the primary and one for the secondary hydraulic
circuit of the brake system. Both pumps are driven
by a common electric motor (Fig. 4) which is part of
the HCU. The pumps draw brake fluid from the fluid
accumulators to supply build pressure to the brakes
during an ABS stop. The pump motor runs during
the drive-off cycle as a check and during an ABS stop
and is controlled by the CAB. The Pump/Motor
Assembly is not a serviceable item. If the pump/mo-
tor requires replacement the complete HCU (Fig. 4)
(minus the CAB) must be replaced.
Fig. 2 Teves Mark 20 ICU
Fig. 3 ICU Mounting LocationFig. 4 Teves Mark 20 HCU Pump/Motor
5 - 72 BRAKESPL
DESCRIPTION AND OPERATION (Continued)
Page 156 of 1200
cally cleared from the CAB memory after the identi-
cal fault has not been seen during the next 255 key
cycles of vehicle operation.
CONTROLLER ANTILOCK BRAKE INPUTS
²Four wheel speed sensors.
²Stop lamp switch.
²Ignition switch.
²System relay voltage.
²Ground.
²Diagnostics Communications (CCD)
CONTROLLER ANTILOCK BRAKE OUTPUTS
²ABS warning lamp actuation.
²Diagnostic communication. (CCD)
ABS WARNING LAMP (YELLOW)
The ABS system uses a yellow colored ABS Warn-
ing Lamp. The ABS warning lamp is located on the
lower left side of the instrument pane. The purpose
of the warning lamp is discussed in detail below.
The ABS warning lamp will turn on when the CAB
detects a condition which results in a shutdown of
ABS function. When the ignition key is turned to the
on position, the ABS Warning Lamp is on until the
CAB completes its self tests and turns the lamp off
(approximately 4 seconds after the ignition switch is
turned on). Under most conditions, when the ABS
warning lamp is on, only the ABS function of the
brake system is affected. The standard brake system
and the ability to stop the car will not be affected
when only the ABS warning lamp is on.
The ABS warning lamp is controlled by the CAB.
The CAB turns on the yellow ABS warning lamp by
grounding the circuit.
HYDRAULIC CIRCUITS AND VALVE OPERATION
Through the following operation descriptions the
function of the various hydraulic control valves in the
ABS will be described. The fluid control valves men-
tioned below, control the flow of pressurized brake
fluid to the wheel brakes during the different modes
of ABS braking.
For explanation purposes, all wheel speed sensors
except the right front are sending the same wheel
speed information. The following diagrams show only
the right front wheel in a antilock braking condition.
NORMAL BRAKING HYDRAULIC CIRCUIT AND
SOLENOID VALVE FUNCTION
This condition is the normal operation of the vehi-
cles base brake hydraulic system. The hydraulic sys-
tem circuit diagram (Fig. 11) shows a situation where
no wheel spin or slip is occurring relative to the
speed of the vehicle. The driver is applying the brake
pedal to build pressure in the brake hydraulic system
to apply the brakes and stop the vehicle.
TEVES MARK 20 ABS CIRCUIT AND
SOLENOID VALVE FUNCTION
This hydraulic circuit diagram (Fig. 12) shows the
vehicle in the ABS braking mode. This hydraulic cir-
cuit (Fig. 12) shows a situation where one wheel is
slipping because the driver is attempting to stop the
vehicle at a faster rate than the surface the vehicle's
tires are on will allow. The normally open and nor-
mally closed valves modulate the brake hydraulic
pressure as required. The pump/motor is switched on
so that the brake fluid from the low pressure accu-
mulators is returned to the master cylinder circuits.
The brake fluid will then be routed to either the mas-
ter cylinder or the wheel brake depending on the
position of the normally open valve.
TEVES MARK 20 SECONDARY ABS CIRCUIT
AND SOLENOID VALVE FUNCTION
This hydraulic circuit diagram (Fig. 13) shows the
vehicle in the ABS braking mode. This hydraulic cir-
cuit (Fig. 13) shows a situation where one wheel is
slipping because the driver is attempting to stop the
vehicle at a faster rate than the surface the vehicle's
tires are on will allow. The normally open and nor-
mally closed valves modulate the brake hydraulic
pressure as required. The pump/motor is switched on
so that the brake fluid from the low pressure accu-
mulators is returned to the master cylinder circuits.
The brake fluid will then be routed to either the mas-
ter cylinder or the wheel brake depending on the
position of the normally open valve. A volume of 1.2
cc's of brake fluid is taken in by the lip seal saver
(Fig. 13) to protect the lip seals on the piston of the
master cylinder.
DIAGNOSIS AND TESTING
ABS GENERAL DIAGNOSTICS INFORMATION
This section contains the information necessary to
diagnose the ITT Teves Mark 20 ABS Brake System.
Specifically, this section should be used to help diag-
nose conditions which result in any of the following:
(1) ABS Warning Lamp turned on.
(2) Brakes Lock-up on hard application
Diagnosis of base brake conditions which are obvi-
ously mechanical in nature should be directed to
Group 5 Brakes in this service manual. This includes
brake noise, brake pulsation, lack of power assist,
parking brake, Red BRAKE Warning Lamp lighting,
or vehicle vibration during normal braking.
Many conditions that generate customer com-
plaints may be normal operating conditions, but are
judged to be a problem due to not being familiar with
the ABS system. These conditions can be recognized
without performing extensive diagnostic work, given
adequate understanding of the operating principles
PLBRAKES 5 - 75
DESCRIPTION AND OPERATION (Continued)
Page 172 of 1200
CLUTCH
CONTENTS
page page
GENERAL INFORMATION
CLUTCH COMPONENTS................... 1
CLUTCH DISC AND COVER APPLICATION.... 2
CLUTCH REPLACEMENT.................. 2
DESCRIPTION AND OPERATION
CLUTCH CABLE......................... 2
CLUTCH PEDAL POSITION SWITCH......... 2
DIAGNOSIS AND TESTING
CLASH±INTO±REVERSE COMPLAINTS....... 6
CLUTCH CHATTER COMPLAINTS........... 6
CLUTCH COVER AND DISC RUNOUT........ 6
CLUTCH DIAGNOSIS..................... 3
CLUTCH PEDAL POSITION SWITCH......... 2
DRIVE PLATE MISALIGNMENT............. 6
REMOVAL AND INSTALLATION
CLUTCH ASSEMBLY...................... 7CLUTCH CABLE......................... 6
CLUTCH PEDAL POSITION SWITCH......... 7
RELEASE BEARING AND FORK............. 9
CLEANING AND INSPECTION
CLEANING PRECAUTIONS................ 10
CLUTCH CONTAMINATION................ 10
ADJUSTMENTS
CLUTCH CABLE........................ 10
CLUTCH PEDAL POSITION SWITCH........ 11
SPECIFICATIONS
TORQUE.............................. 11
SPECIAL TOOLS
CLUTCH.............................. 11
GENERAL INFORMATION
CLUTCH COMPONENTS
NOTE: Neon vehicles produced at the Toluca
assembly plant, in Mexico, have conventional clutch
and flywheel assemblies. Vehicles produced at Bel-
videre assembly plant have modular clutch assem-
blies.
Before beginning clutch service, check the 11th
character of the V.I.N. to determine where it was
produced. The 11th character is ªDº for vehicles
produced at Belvidere, or ªTº for vehicles produced
at Toluca.
For a vehicle produced at Belvidere assembly,
refer to this manual for service information on the
modular clutch assembly. For a vehicle produced at
Toluca assembly, refer to the following information
to determine proper service procedures.
Service parts stock only a Conventional Clutch
Disc Assembly or a Modular Clutch Service Pack-
age to service Toluca built vehicles. The Modular
Clutch Service Package contains the following
parts:
²One modular clutch assembly
²One drive plate assembly
²One backing plate assembly
²Four drive plate to clutch bolts
²Eight drive plate to crankshaft boltsIf only the clutch disc requires replacement,
obtain the clutch disc. Replace the clutch disc
using the information in the Removal And Installa-
tion section of this manual.
If the clutch pressure plate or flywheel requires
replacement, obtain the Modular Clutch Service
Package. Refer to this manual for service informa-
tion on the modular clutch assembly.
The clutch assembly used in this vehicle consists of
a single, dry-type clutch disc and a diaphragm style
clutch cover.
The clutch disc has cushion springs riveted to the
disc hub assembly. The clutch disc facings are riveted
to the cushion springs. The facings are made from a
non-asbestos material.
The clutch cover pressure plate assembly is a dia-
phragm type unit with a one-piece diaphragm spring
with multiple release fingers. The pressure plate
release fingers are preset during manufacture and
are not adjustable.
A sleeve-type release bearing is used to engage and
disengage the clutch cover pressure plate. The bear-
ing is prelubed during manufacture and is a sealed
unit.
The release bearing is operated by a pivoting
release fork in the clutch housing. The fork pivots on
a ball stud within the housing. The release fork is
actuated by a self-adjusting clutch cable.
PLCLUTCH 6 - 1
Page 173 of 1200
The clutch cable has a unique self-adjuster mecha-
nism built into the cable which compensates for
clutch disc wear. The cable requires no maintenance
or lubrication. There are no serviceable components
on the cable assembly.
The clutch pedal is connected to the cable through
a plastic spacer. The upper end of the clutch pedal
pivots in the pedal bracket on two nylon bushings
and a shaft. These bushings are greased at assembly
and do not require periodic lubrication.
CLUTCH DISC AND COVER APPLICATION
The 2.0 single overhead cam engine uses a 216 mm
(8.5 in.) clutch disc. The manual transaxle is avail-
able only with the 2.0 liter engine.
CLUTCH REPLACEMENT
The transaxle must be removed to service the
clutch disc, pressure plate, flywheel/drive plate,
and/or clutch release bearing and lever.
DESCRIPTION AND OPERATION
CLUTCH CABLE
The manual transaxle clutch release system has a
unique self-adjusting mechanism to compensate for
clutch disc wear. This adjuster mechanism is located
within the clutch cable assembly. The preload spring
maintains tension on the cable. This tension keeps
the clutch release bearing continuously loaded
against the fingers of the clutch cover assembly.
CLUTCH PEDAL POSITION SWITCH
The clutch pedal position switch functions as a
safety interlock device. It prevents possible engine
cranking with the clutch engaged.
The clutch pedal position switch is wired in series
between the starter relay coil and the ignition
switch.
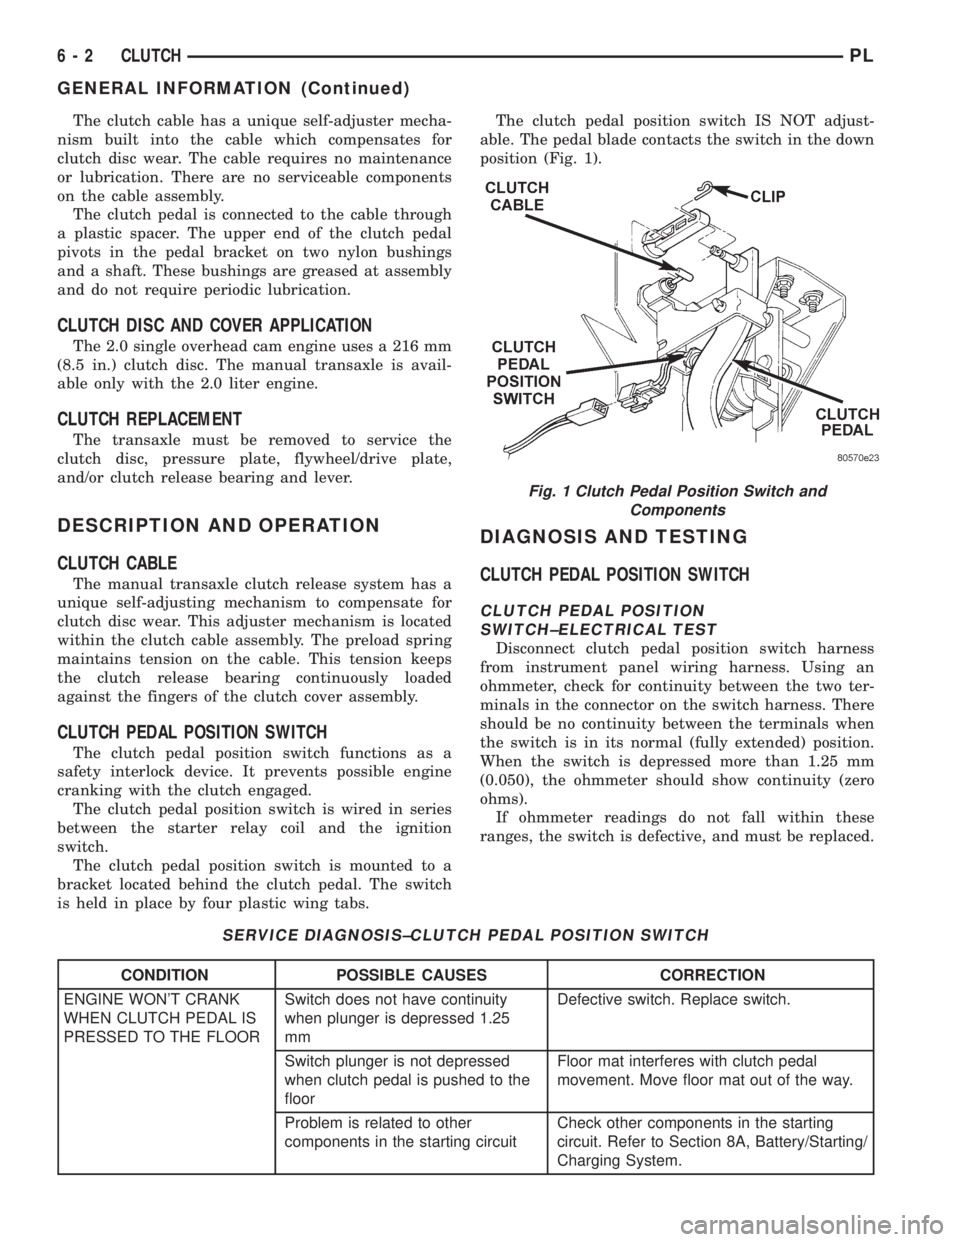
The clutch pedal position switch is mounted to a
bracket located behind the clutch pedal. The switch
is held in place by four plastic wing tabs.The clutch pedal position switch IS NOT adjust-
able. The pedal blade contacts the switch in the down
position (Fig. 1).
DIAGNOSIS AND TESTING
CLUTCH PEDAL POSITION SWITCH
CLUTCH PEDAL POSITION
SWITCH±ELECTRICAL TEST
Disconnect clutch pedal position switch harness
from instrument panel wiring harness. Using an
ohmmeter, check for continuity between the two ter-
minals in the connector on the switch harness. There
should be no continuity between the terminals when
the switch is in its normal (fully extended) position.
When the switch is depressed more than 1.25 mm
(0.050), the ohmmeter should show continuity (zero
ohms).
If ohmmeter readings do not fall within these
ranges, the switch is defective, and must be replaced.
SERVICE DIAGNOSIS±CLUTCH PEDAL POSITION SWITCH
CONDITION POSSIBLE CAUSES CORRECTION
ENGINE WON'T CRANK
WHEN CLUTCH PEDAL IS
PRESSED TO THE FLOORSwitch does not have continuity
when plunger is depressed 1.25
mmDefective switch. Replace switch.
Switch plunger is not depressed
when clutch pedal is pushed to the
floorFloor mat interferes with clutch pedal
movement. Move floor mat out of the way.
Problem is related to other
components in the starting circuitCheck other components in the starting
circuit. Refer to Section 8A, Battery/Starting/
Charging System.
Fig. 1 Clutch Pedal Position Switch and
Components
6 - 2 CLUTCHPL
GENERAL INFORMATION (Continued)
Page 182 of 1200
(4) Reinstall cable inspection cover and air cleaner
assembly. Check clutch pedal position switch opera-
tion.
CLUTCH PEDAL POSITION SWITCH
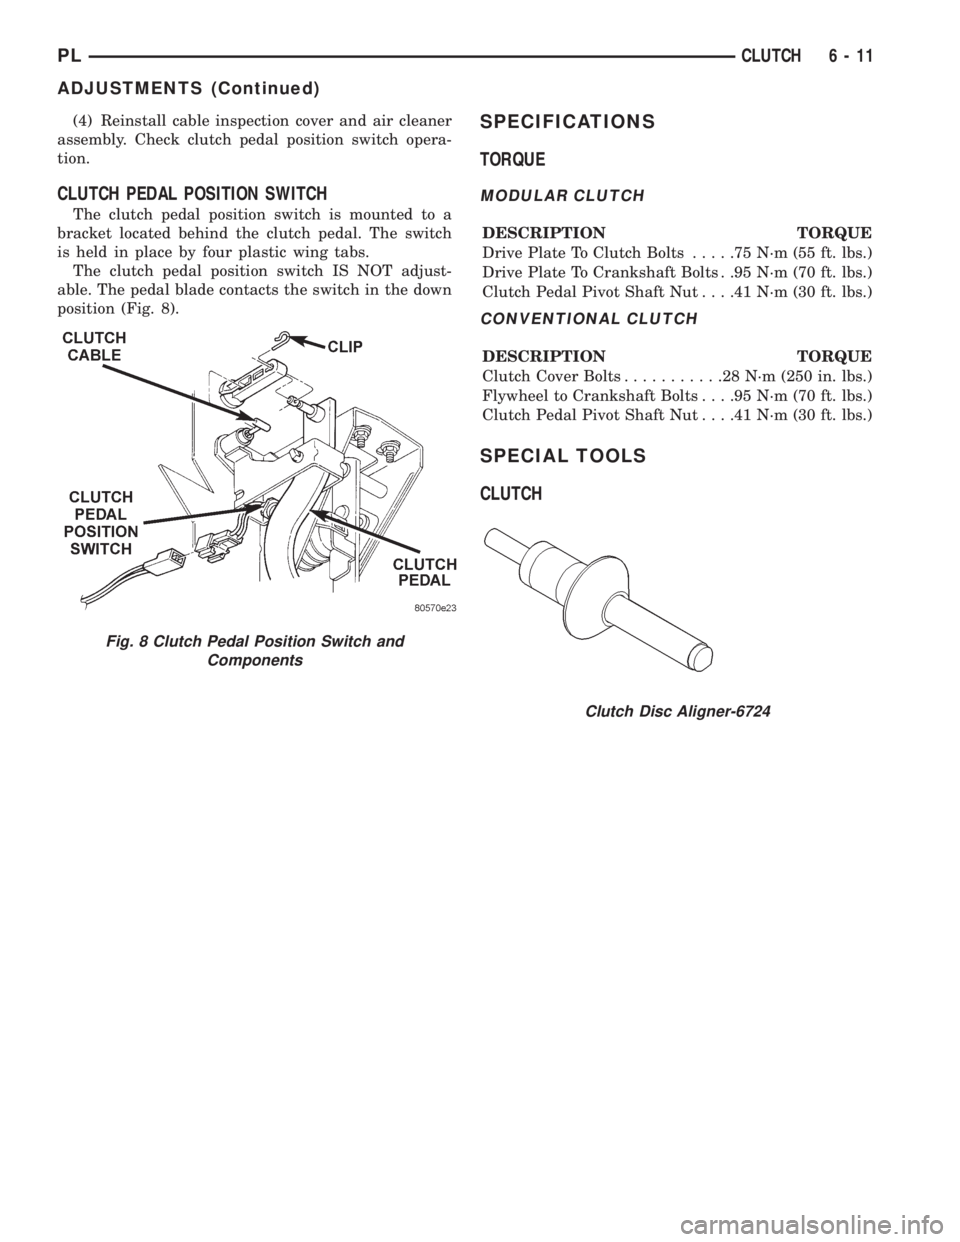
The clutch pedal position switch is mounted to a
bracket located behind the clutch pedal. The switch
is held in place by four plastic wing tabs.
The clutch pedal position switch IS NOT adjust-
able. The pedal blade contacts the switch in the down
position (Fig. 8).
SPECIFICATIONS
TORQUE
MODULAR CLUTCH
DESCRIPTION TORQUE
Drive Plate To Clutch Bolts.....75N´m(55ft.lbs.)
Drive Plate To Crankshaft Bolts . .95 N´m (70 ft. lbs.)
Clutch Pedal Pivot Shaft Nut. . . .41 N´m (30 ft. lbs.)
CONVENTIONAL CLUTCH
DESCRIPTION TORQUE
Clutch Cover Bolts...........28N´m(250 in. lbs.)
Flywheel to Crankshaft Bolts. . . .95 N´m (70 ft. lbs.)
Clutch Pedal Pivot Shaft Nut. . . .41 N´m (30 ft. lbs.)
SPECIAL TOOLS
CLUTCH
Clutch Disc Aligner-6724
Fig. 8 Clutch Pedal Position Switch and
Components
PLCLUTCH 6 - 11
ADJUSTMENTS (Continued)
Page 279 of 1200
HEATER A/C CONTROL BLOWER SWITCH
The switch is not serviced, replace heater A/C con-
trol. Refer to the Heater A/C Control Removal and
Installation.
HEATER A/C CONTROL LAMP
REMOVAL
(1) Remove the Heater A/C Control. Refer to the
Heater A/C Control Removal.
(2) Remove the two center knobs by pulling the
knob rearward.
(3) Replace the lamp.
INSTALLATION
For installation, reverse the above procedures.
HEATER CONTROL BLOWER SWITCH
The switch is not serviced, replace the heater con-
trol. Refer to the A/C Heater Control Removal and
Installation.
IGNITION KEY LAMP
REMOVAL
(1) Remove the steering column cover. Refer to
Steering Column Cover Removal.
(2) Disconnect the lamp hood from the base panel.
(3) Remove the lamp socket from hood and replace
the lamp.
INSTALLATION
For installation, reverse the above procedures.
INSTRUMENT PANEL
REMOVAL
CAUTION: Disconnect battery negative cable, in
engine compartment, before servicing instrument
panel.
(1) Disconnect and isolate the battery negative
cable.
(2) Remove the floor console. Refer to Floor Con-
sole Removal.
(3) Remove the right and left cowl side trim pan-
els (Fig. 19).
(4) Remove the steering column cover and liner.
(5) Remove the top cover and cluster bezel assem-
bly.
(6) Remove the right and left trim panel.
(7) Remove the defroster upper duct by lifting it
up.
(8) Remove the center outlet duct by pulling rear-
ward.(9) Disconnect the Heater A/C Control, by remov-
ing the control cables clips with a screwdriver and
remove the wire connector.
CAUTION: Lock the steering wheel in the straight
ahead position. This will prevent clockspring dam-
age when the steering wheel rotates freely.
(10) Disconnect the steering column at the bottom
slap together joint.
(11) Disconnect the ATX shifter interlock cable at
the shifter, if equipped.
(12) Disconnect the instrument panel wiring as
required.
(13) Remove the four attaching screws at the cen-
ter floor pan bracket (Fig. 20).
(14) Remove the four attaching screws at steering
column.
(15) Remove the four cowl top nuts.
(16) Remove the attaching screws from the left
and right lower cowl side bracket (Fig. 21).
(17) Remove the two attaching screws from the left
upper cowl side and one from the right upper cowl
side.
(18) Pull the instrument panel rearward away
from the dash/plenum.
(19) Remove the instrument panel from vehicle.
INSTALLATION
For installation, reverse the above procedures.
LEFT TRIM PANEL
REMOVAL
(1) Remove the top cover and cluster bezel (Fig.
19).
(2) Remove the steering column cover.
(3) Remove the two attaching screws along the
bottom and the one at the top of the trim panel and
pull rearward to remove.
INSTALLATION
For installation, reverse the above procedures.
ODOMETER
REMOVAL
(1) Remove the instrument panel top cover and
cluster bezel.
(2) Remove the four screws attaching cluster to
instrument panel (Fig. 22).
(3) Remove the cluster.
(4) Remove the screws attaching PC board cover to
cluster.
(5) Disconnect the odometer connector from the
printed circuit board.
8E - 10 INSTRUMENT PANEL AND SYSTEMSPL
REMOVAL AND INSTALLATION (Continued)
Page 360 of 1200
DRIVER AIRBAG MODULE
REMOVAL
WARNING: DISCONNECT AND ISOLATE THE BAT-
TERY NEGATIVE (GROUND) CABLE BEFORE
BEGINNING ANY AIRBAG SYSTEM COMPONENT
REMOVAL OR INSTALLATION PROCEDURE. THIS
WILL DISABLE THE AIRBAG SYSTEM. FAILURE TO
DISCONNECT BATTERY COULD RESULT IN ACCI-
DENTAL AIRBAG DEPLOYMENT AND POSSIBLE
PERSONAL INJURY. ALLOW SYSTEM CAPACITOR
TO DISCHARGE FOR 2 MINUTES BEFORE REMOV-
ING ANY AIRBAG COMPONENTS.
When removing a deployed module, rubber gloves,
eye protection and long sleeved shirt should be worn,
as there may be deposits on the surface which could
irritate the skin and eyes.
(1) Disconnect and isolate the battery negative
cable.
(2) Remove speed control switches or covers from
steering wheel armature and disconnect the wires.
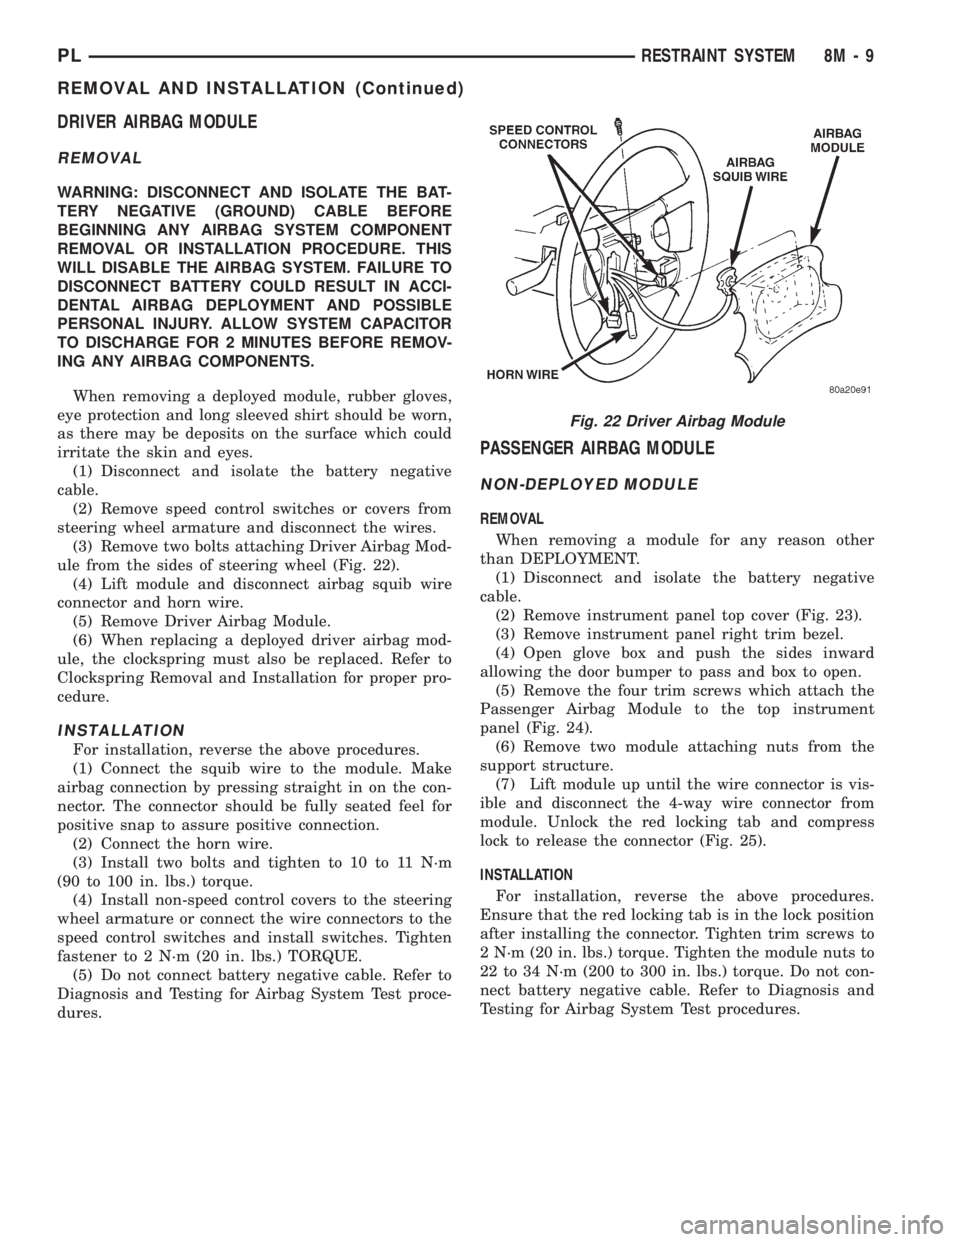
(3) Remove two bolts attaching Driver Airbag Mod-
ule from the sides of steering wheel (Fig. 22).
(4) Lift module and disconnect airbag squib wire
connector and horn wire.
(5) Remove Driver Airbag Module.
(6) When replacing a deployed driver airbag mod-
ule, the clockspring must also be replaced. Refer to
Clockspring Removal and Installation for proper pro-
cedure.
INSTALLATION
For installation, reverse the above procedures.
(1) Connect the squib wire to the module. Make
airbag connection by pressing straight in on the con-
nector. The connector should be fully seated feel for
positive snap to assure positive connection.
(2) Connect the horn wire.
(3) Install two bolts and tighten to 10 to 11 N´m
(90 to 100 in. lbs.) torque.
(4) Install non-speed control covers to the steering
wheel armature or connect the wire connectors to the
speed control switches and install switches. Tighten
fastener to 2 N´m (20 in. lbs.) TORQUE.
(5) Do not connect battery negative cable. Refer to
Diagnosis and Testing for Airbag System Test proce-
dures.
PASSENGER AIRBAG MODULE
NON-DEPLOYED MODULE
REMOVAL
When removing a module for any reason other
than DEPLOYMENT.
(1) Disconnect and isolate the battery negative
cable.
(2) Remove instrument panel top cover (Fig. 23).
(3) Remove instrument panel right trim bezel.
(4) Open glove box and push the sides inward
allowing the door bumper to pass and box to open.
(5) Remove the four trim screws which attach the
Passenger Airbag Module to the top instrument
panel (Fig. 24).
(6) Remove two module attaching nuts from the
support structure.
(7) Lift module up until the wire connector is vis-
ible and disconnect the 4-way wire connector from
module. Unlock the red locking tab and compress
lock to release the connector (Fig. 25).
INSTALLATION
For installation, reverse the above procedures.
Ensure that the red locking tab is in the lock position
after installing the connector. Tighten trim screws to
2 N´m (20 in. lbs.) torque. Tighten the module nuts to
22 to 34 N´m (200 to 300 in. lbs.) torque. Do not con-
nect battery negative cable. Refer to Diagnosis and
Testing for Airbag System Test procedures.
Fig. 22 Driver Airbag Module
PLRESTRAINT SYSTEM 8M - 9
REMOVAL AND INSTALLATION (Continued)