seat adjustment DODGE NEON 2000 Service User Guide
[x] Cancel search | Manufacturer: DODGE, Model Year: 2000, Model line: NEON, Model: DODGE NEON 2000Pages: 1285, PDF Size: 29.42 MB
Page 784 of 1285
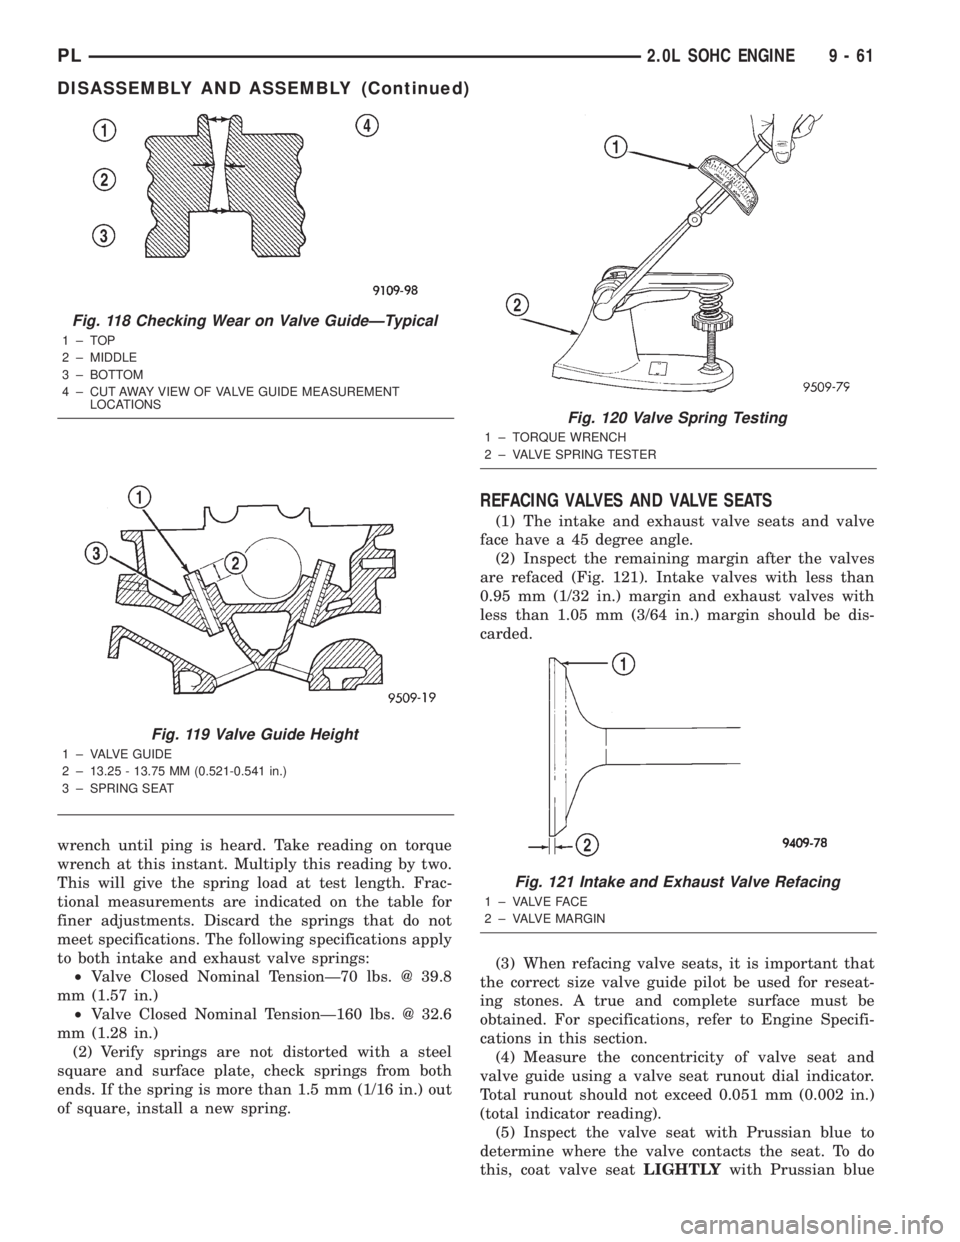
wrench until ping is heard. Take reading on torque
wrench at this instant. Multiply this reading by two.
This will give the spring load at test length. Frac-
tional measurements are indicated on the table for
finer adjustments. Discard the springs that do not
meet specifications. The following specifications apply
to both intake and exhaust valve springs:
²Valve Closed Nominal TensionÐ70 lbs. @ 39.8
mm (1.57 in.)
²Valve Closed Nominal TensionÐ160 lbs. @ 32.6
mm (1.28 in.)
(2) Verify springs are not distorted with a steel
square and surface plate, check springs from both
ends. If the spring is more than 1.5 mm (1/16 in.) out
of square, install a new spring.
REFACING VALVES AND VALVE SEATS
(1) The intake and exhaust valve seats and valve
face have a 45 degree angle.
(2) Inspect the remaining margin after the valves
are refaced (Fig. 121). Intake valves with less than
0.95 mm (1/32 in.) margin and exhaust valves with
less than 1.05 mm (3/64 in.) margin should be dis-
carded.
(3) When refacing valve seats, it is important that
the correct size valve guide pilot be used for reseat-
ing stones. A true and complete surface must be
obtained. For specifications, refer to Engine Specifi-
cations in this section.
(4) Measure the concentricity of valve seat and
valve guide using a valve seat runout dial indicator.
Total runout should not exceed 0.051 mm (0.002 in.)
(total indicator reading).
(5) Inspect the valve seat with Prussian blue to
determine where the valve contacts the seat. To do
this, coat valve seatLIGHTLYwith Prussian blue
Fig. 118 Checking Wear on Valve GuideÐTypical
1±TOP
2 ± MIDDLE
3 ± BOTTOM
4 ± CUT AWAY VIEW OF VALVE GUIDE MEASUREMENT
LOCATIONS
Fig. 119 Valve Guide Height
1 ± VALVE GUIDE
2 ± 13.25 - 13.75 MM (0.521-0.541 in.)
3 ± SPRING SEAT
Fig. 120 Valve Spring Testing
1 ± TORQUE WRENCH
2 ± VALVE SPRING TESTER
Fig. 121 Intake and Exhaust Valve Refacing
1 ± VALVE FACE
2 ± VALVE MARGIN
PL2.0L SOHC ENGINE 9 - 61
DISASSEMBLY AND ASSEMBLY (Continued)
Page 921 of 1285
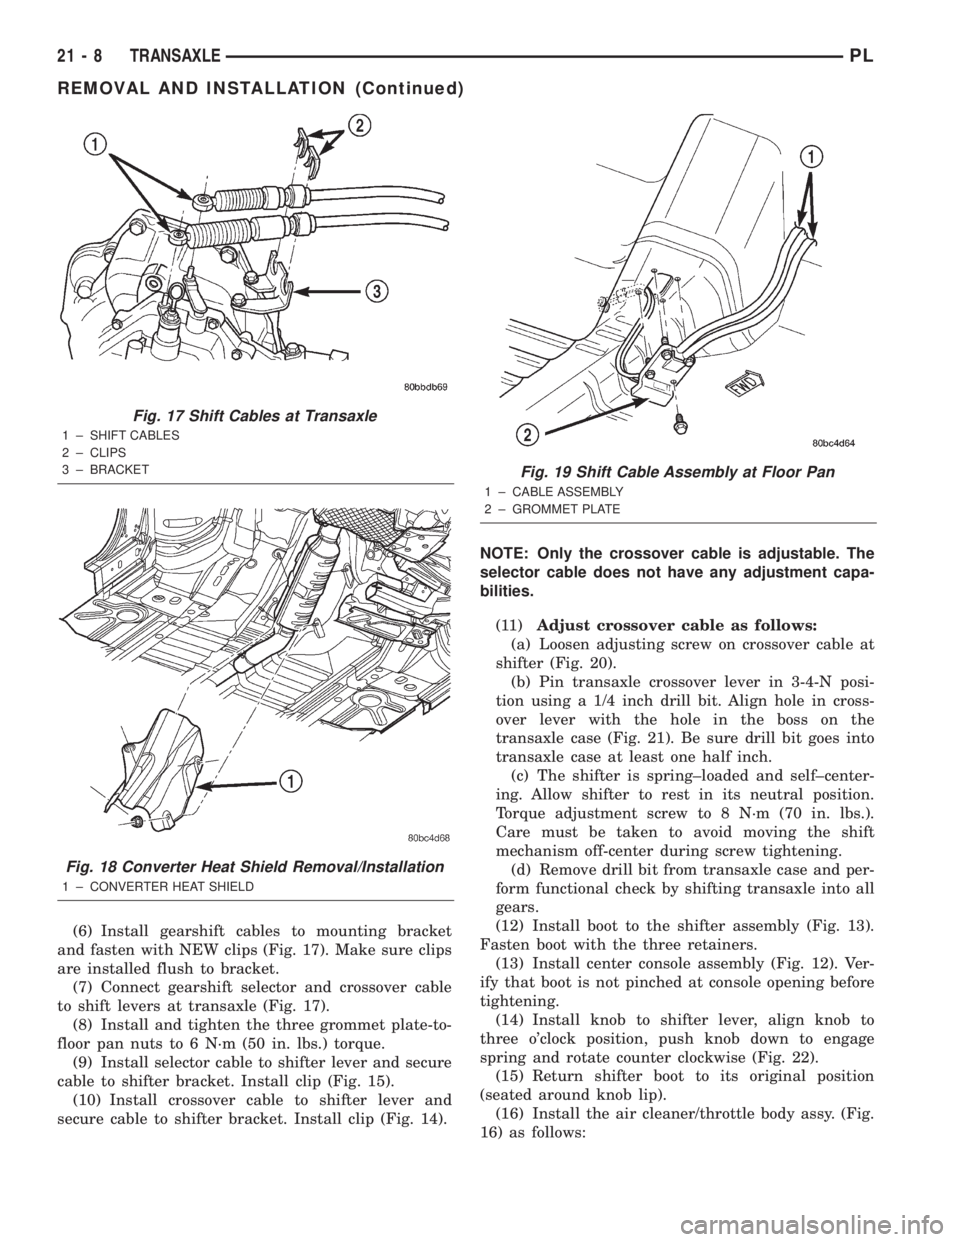
(6) Install gearshift cables to mounting bracket
and fasten with NEW clips (Fig. 17). Make sure clips
are installed flush to bracket.
(7) Connect gearshift selector and crossover cable
to shift levers at transaxle (Fig. 17).
(8) Install and tighten the three grommet plate-to-
floor pan nuts to 6 N´m (50 in. lbs.) torque.
(9) Install selector cable to shifter lever and secure
cable to shifter bracket. Install clip (Fig. 15).
(10) Install crossover cable to shifter lever and
secure cable to shifter bracket. Install clip (Fig. 14).NOTE: Only the crossover cable is adjustable. The
selector cable does not have any adjustment capa-
bilities.
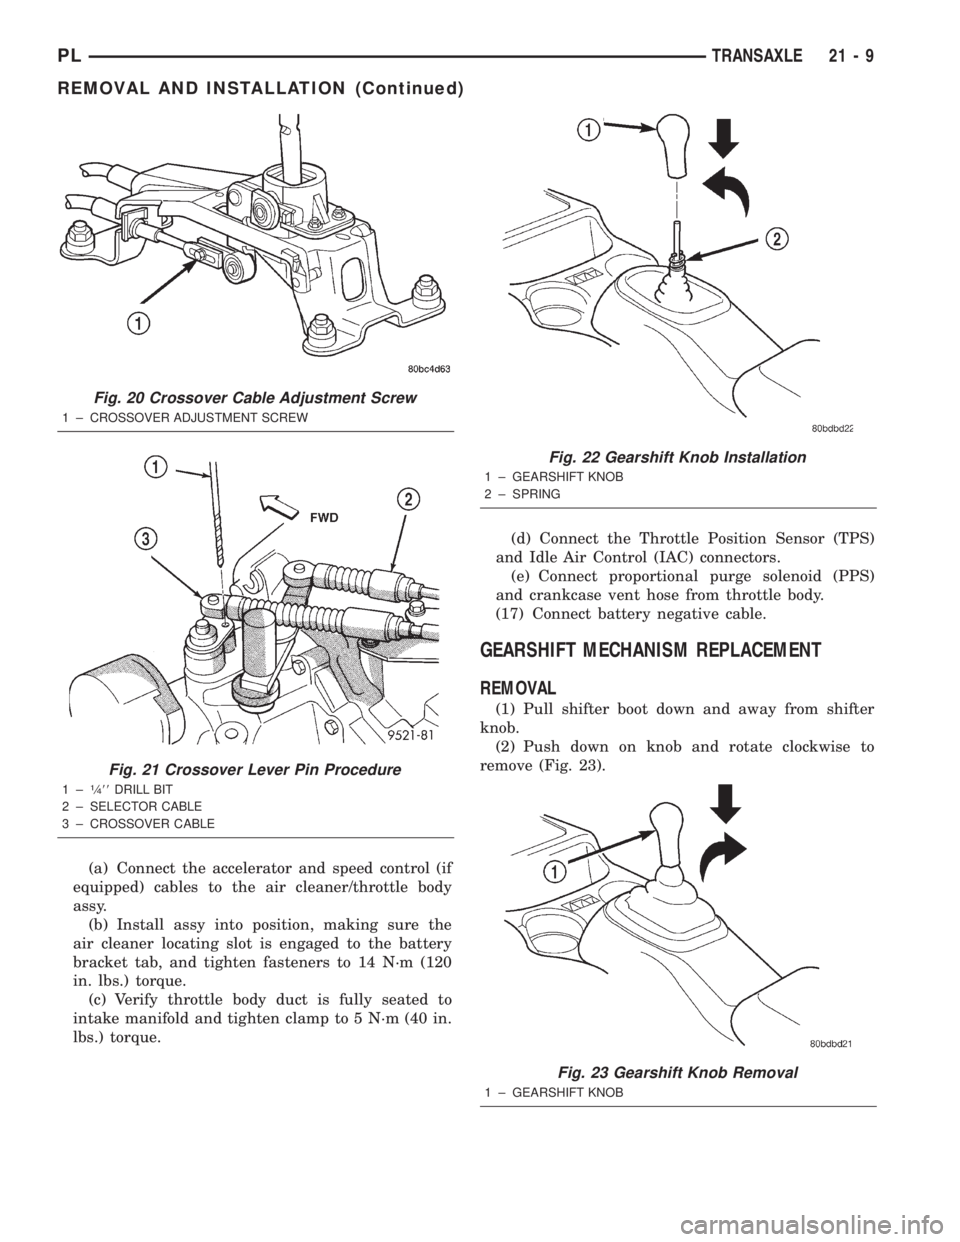
(11)Adjust crossover cable as follows:
(a) Loosen adjusting screw on crossover cable at
shifter (Fig. 20).
(b) Pin transaxle crossover lever in 3-4-N posi-
tion using a 1/4 inch drill bit. Align hole in cross-
over lever with the hole in the boss on the
transaxle case (Fig. 21). Be sure drill bit goes into
transaxle case at least one half inch.
(c) The shifter is spring±loaded and self±center-
ing. Allow shifter to rest in its neutral position.
Torque adjustment screw to 8 N´m (70 in. lbs.).
Care must be taken to avoid moving the shift
mechanism off-center during screw tightening.
(d) Remove drill bit from transaxle case and per-
form functional check by shifting transaxle into all
gears.
(12) Install boot to the shifter assembly (Fig. 13).
Fasten boot with the three retainers.
(13) Install center console assembly (Fig. 12). Ver-
ify that boot is not pinched at console opening before
tightening.
(14) Install knob to shifter lever, align knob to
three o'clock position, push knob down to engage
spring and rotate counter clockwise (Fig. 22).
(15) Return shifter boot to its original position
(seated around knob lip).
(16) Install the air cleaner/throttle body assy. (Fig.
16) as follows:
Fig. 17 Shift Cables at Transaxle
1 ± SHIFT CABLES
2 ± CLIPS
3 ± BRACKET
Fig. 18 Converter Heat Shield Removal/Installation
1 ± CONVERTER HEAT SHIELD
Fig. 19 Shift Cable Assembly at Floor Pan
1 ± CABLE ASSEMBLY
2 ± GROMMET PLATE
21 - 8 TRANSAXLEPL
REMOVAL AND INSTALLATION (Continued)
Page 922 of 1285
(a) Connect the accelerator and speed control (if
equipped) cables to the air cleaner/throttle body
assy.
(b) Install assy into position, making sure the
air cleaner locating slot is engaged to the battery
bracket tab, and tighten fasteners to 14 N´m (120
in. lbs.) torque.
(c) Verify throttle body duct is fully seated to
intake manifold and tighten clamp to 5 N´m (40 in.
lbs.) torque.(d) Connect the Throttle Position Sensor (TPS)
and Idle Air Control (IAC) connectors.
(e) Connect proportional purge solenoid (PPS)
and crankcase vent hose from throttle body.
(17) Connect battery negative cable.
GEARSHIFT MECHANISM REPLACEMENT
REMOVAL
(1) Pull shifter boot down and away from shifter
knob.
(2) Push down on knob and rotate clockwise to
remove (Fig. 23).
Fig. 20 Crossover Cable Adjustment Screw
1 ± CROSSOVER ADJUSTMENT SCREW
Fig. 21 Crossover Lever Pin Procedure
1±1¤488DRILL BIT
2 ± SELECTOR CABLE
3 ± CROSSOVER CABLE
Fig. 22 Gearshift Knob Installation
1 ± GEARSHIFT KNOB
2 ± SPRING
Fig. 23 Gearshift Knob Removal
1 ± GEARSHIFT KNOB
PLTRANSAXLE 21 - 9
REMOVAL AND INSTALLATION (Continued)
Page 942 of 1285
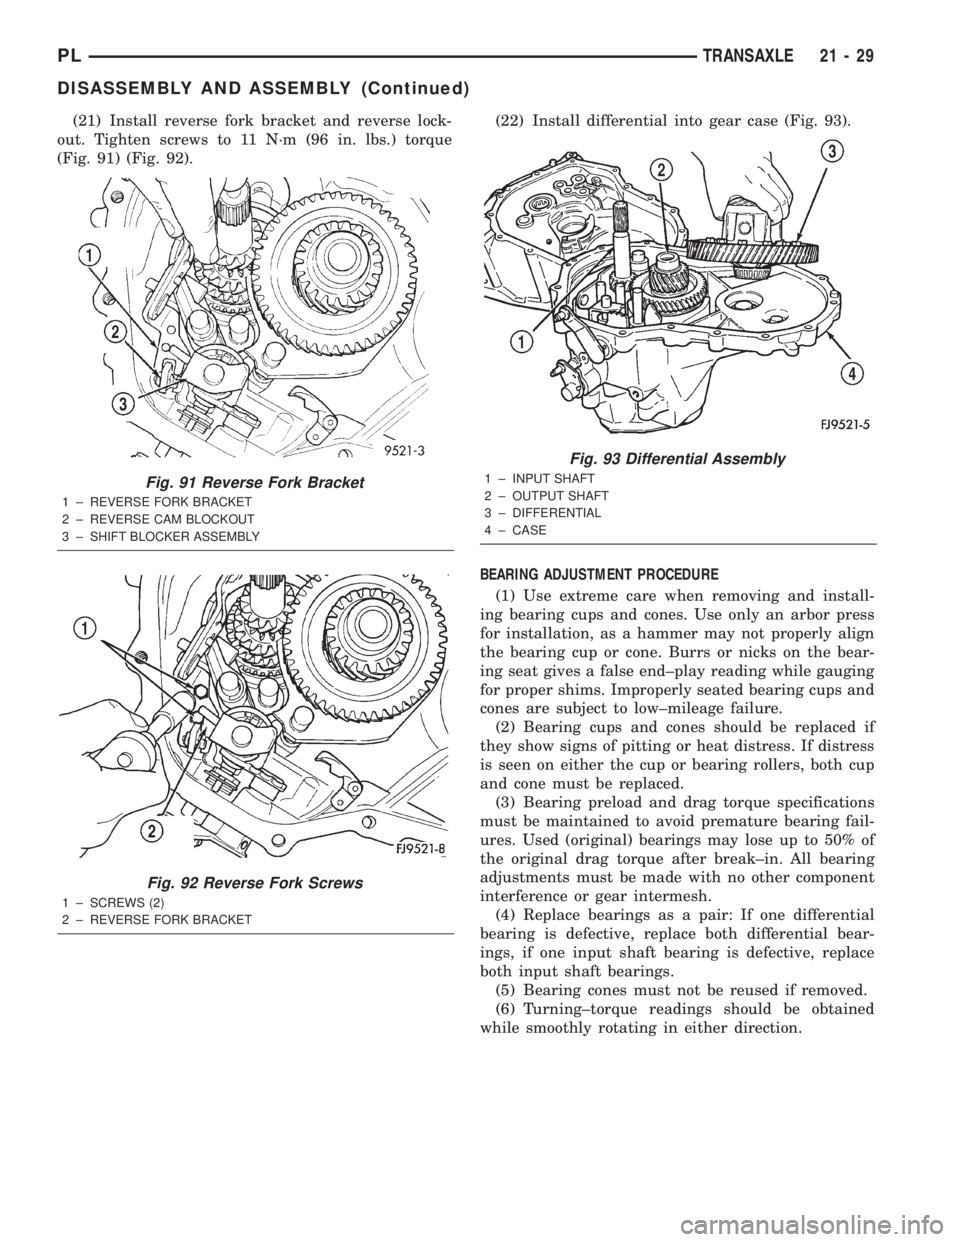
(21) Install reverse fork bracket and reverse lock-
out. Tighten screws to 11 N´m (96 in. lbs.) torque
(Fig. 91) (Fig. 92).(22) Install differential into gear case (Fig. 93).
BEARING ADJUSTMENT PROCEDURE
(1) Use extreme care when removing and install-
ing bearing cups and cones. Use only an arbor press
for installation, as a hammer may not properly align
the bearing cup or cone. Burrs or nicks on the bear-
ing seat gives a false end±play reading while gauging
for proper shims. Improperly seated bearing cups and
cones are subject to low±mileage failure.
(2) Bearing cups and cones should be replaced if
they show signs of pitting or heat distress. If distress
is seen on either the cup or bearing rollers, both cup
and cone must be replaced.
(3) Bearing preload and drag torque specifications
must be maintained to avoid premature bearing fail-
ures. Used (original) bearings may lose up to 50% of
the original drag torque after break±in. All bearing
adjustments must be made with no other component
interference or gear intermesh.
(4) Replace bearings as a pair: If one differential
bearing is defective, replace both differential bear-
ings, if one input shaft bearing is defective, replace
both input shaft bearings.
(5) Bearing cones must not be reused if removed.
(6) Turning±torque readings should be obtained
while smoothly rotating in either direction.
Fig. 91 Reverse Fork Bracket
1 ± REVERSE FORK BRACKET
2 ± REVERSE CAM BLOCKOUT
3 ± SHIFT BLOCKER ASSEMBLY
Fig. 92 Reverse Fork Screws
1 ± SCREWS (2)
2 ± REVERSE FORK BRACKET
Fig. 93 Differential Assembly
1 ± INPUT SHAFT
2 ± OUTPUT SHAFT
3 ± DIFFERENTIAL
4 ± CASE
PLTRANSAXLE 21 - 29
DISASSEMBLY AND ASSEMBLY (Continued)
Page 963 of 1285
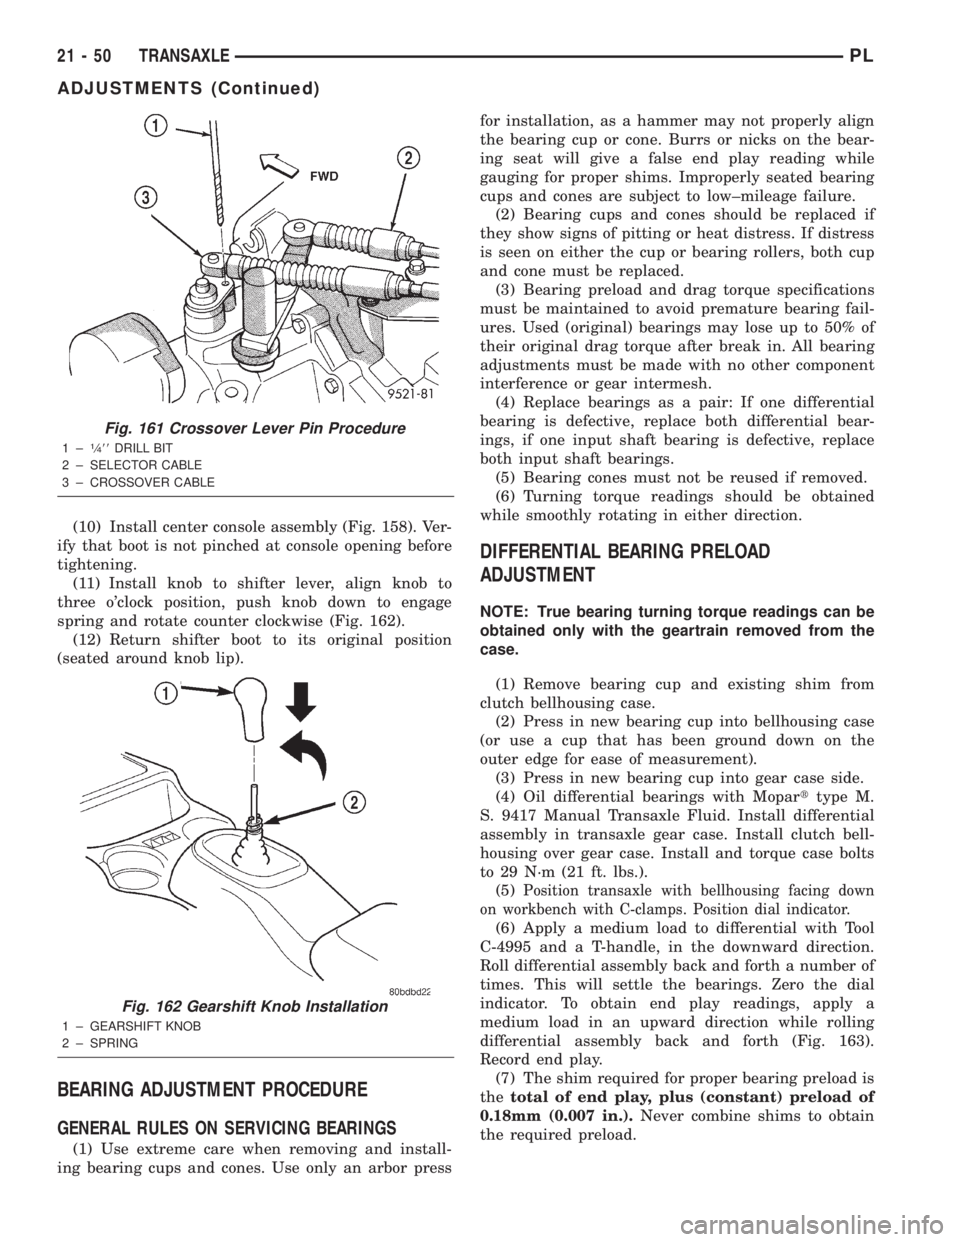
(10) Install center console assembly (Fig. 158). Ver-
ify that boot is not pinched at console opening before
tightening.
(11) Install knob to shifter lever, align knob to
three o'clock position, push knob down to engage
spring and rotate counter clockwise (Fig. 162).
(12) Return shifter boot to its original position
(seated around knob lip).
BEARING ADJUSTMENT PROCEDURE
GENERAL RULES ON SERVICING BEARINGS
(1) Use extreme care when removing and install-
ing bearing cups and cones. Use only an arbor pressfor installation, as a hammer may not properly align
the bearing cup or cone. Burrs or nicks on the bear-
ing seat will give a false end play reading while
gauging for proper shims. Improperly seated bearing
cups and cones are subject to low±mileage failure.
(2) Bearing cups and cones should be replaced if
they show signs of pitting or heat distress. If distress
is seen on either the cup or bearing rollers, both cup
and cone must be replaced.
(3) Bearing preload and drag torque specifications
must be maintained to avoid premature bearing fail-
ures. Used (original) bearings may lose up to 50% of
their original drag torque after break in. All bearing
adjustments must be made with no other component
interference or gear intermesh.
(4) Replace bearings as a pair: If one differential
bearing is defective, replace both differential bear-
ings, if one input shaft bearing is defective, replace
both input shaft bearings.
(5) Bearing cones must not be reused if removed.
(6) Turning torque readings should be obtained
while smoothly rotating in either direction.
DIFFERENTIAL BEARING PRELOAD
ADJUSTMENT
NOTE: True bearing turning torque readings can be
obtained only with the geartrain removed from the
case.
(1) Remove bearing cup and existing shim from
clutch bellhousing case.
(2) Press in new bearing cup into bellhousing case
(or use a cup that has been ground down on the
outer edge for ease of measurement).
(3) Press in new bearing cup into gear case side.
(4) Oil differential bearings with Moparttype M.
S. 9417 Manual Transaxle Fluid. Install differential
assembly in transaxle gear case. Install clutch bell-
housing over gear case. Install and torque case bolts
to 29 N´m (21 ft. lbs.).
(5)
Position transaxle with bellhousing facing down
on workbench with C-clamps. Position dial indicator.
(6) Apply a medium load to differential with Tool
C-4995 and a T-handle, in the downward direction.
Roll differential assembly back and forth a number of
times. This will settle the bearings. Zero the dial
indicator. To obtain end play readings, apply a
medium load in an upward direction while rolling
differential assembly back and forth (Fig. 163).
Record end play.
(7) The shim required for proper bearing preload is
thetotal of end play, plus (constant) preload of
0.18mm (0.007 in.).Never combine shims to obtain
the required preload.
Fig. 161 Crossover Lever Pin Procedure
1±1¤488DRILL BIT
2 ± SELECTOR CABLE
3 ± CROSSOVER CABLE
Fig. 162 Gearshift Knob Installation
1 ± GEARSHIFT KNOB
2 ± SPRING
21 - 50 TRANSAXLEPL
ADJUSTMENTS (Continued)
Page 988 of 1285
INSTALLATION
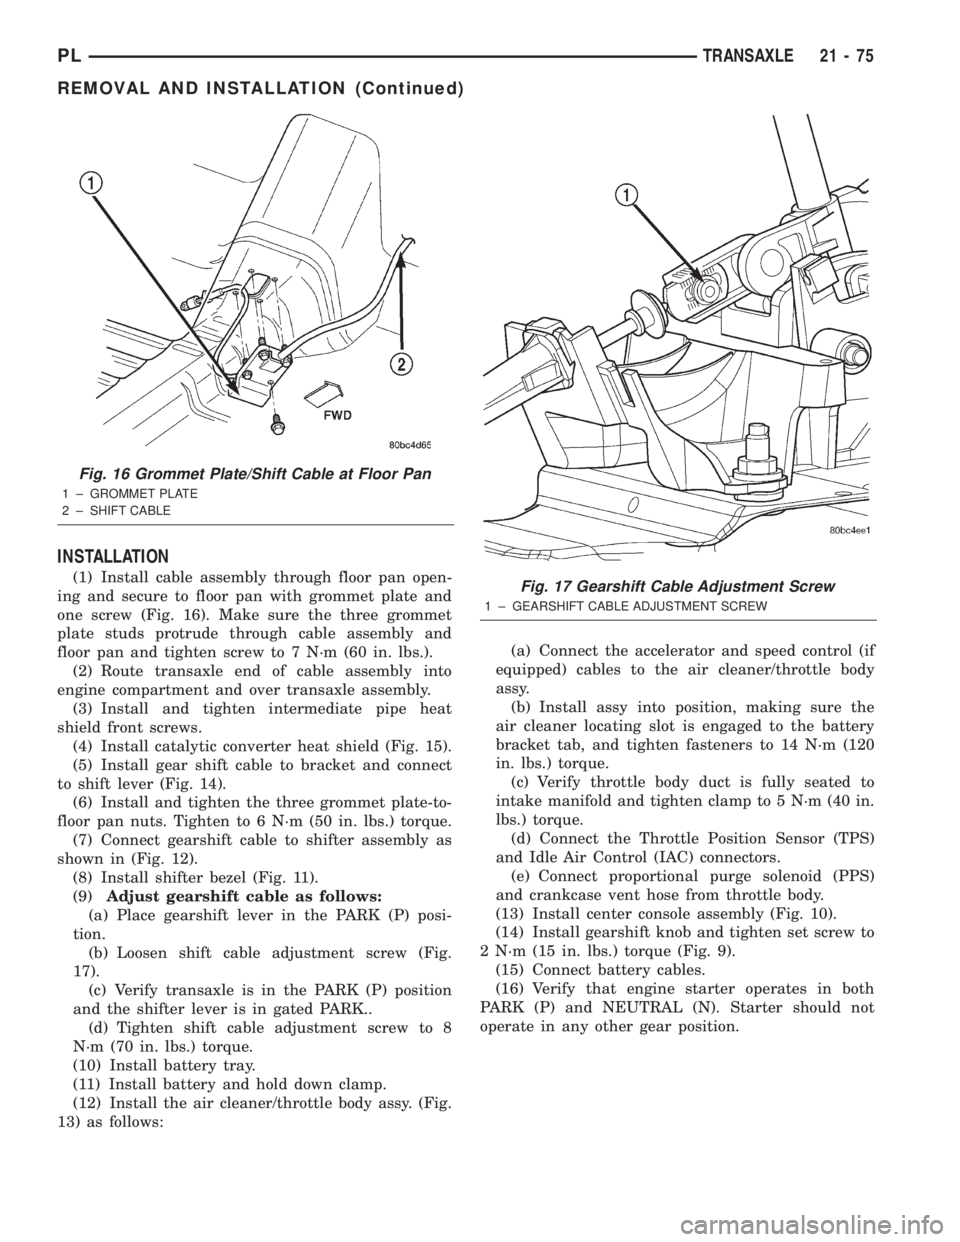
(1) Install cable assembly through floor pan open-
ing and secure to floor pan with grommet plate and
one screw (Fig. 16). Make sure the three grommet
plate studs protrude through cable assembly and
floor pan and tighten screw to 7 N´m (60 in. lbs.).
(2) Route transaxle end of cable assembly into
engine compartment and over transaxle assembly.
(3) Install and tighten intermediate pipe heat
shield front screws.
(4) Install catalytic converter heat shield (Fig. 15).
(5) Install gear shift cable to bracket and connect
to shift lever (Fig. 14).
(6) Install and tighten the three grommet plate-to-
floor pan nuts. Tighten to 6 N´m (50 in. lbs.) torque.
(7) Connect gearshift cable to shifter assembly as
shown in (Fig. 12).
(8) Install shifter bezel (Fig. 11).
(9)Adjust gearshift cable as follows:
(a) Place gearshift lever in the PARK (P) posi-
tion.
(b) Loosen shift cable adjustment screw (Fig.
17).
(c) Verify transaxle is in the PARK (P) position
and the shifter lever is in gated PARK..
(d) Tighten shift cable adjustment screw to 8
N´m (70 in. lbs.) torque.
(10) Install battery tray.
(11) Install battery and hold down clamp.
(12) Install the air cleaner/throttle body assy. (Fig.
13) as follows:(a) Connect the accelerator and speed control (if
equipped) cables to the air cleaner/throttle body
assy.
(b) Install assy into position, making sure the
air cleaner locating slot is engaged to the battery
bracket tab, and tighten fasteners to 14 N´m (120
in. lbs.) torque.
(c) Verify throttle body duct is fully seated to
intake manifold and tighten clamp to 5 N´m (40 in.
lbs.) torque.
(d) Connect the Throttle Position Sensor (TPS)
and Idle Air Control (IAC) connectors.
(e) Connect proportional purge solenoid (PPS)
and crankcase vent hose from throttle body.
(13) Install center console assembly (Fig. 10).
(14) Install gearshift knob and tighten set screw to
2 N´m (15 in. lbs.) torque (Fig. 9).
(15) Connect battery cables.
(16) Verify that engine starter operates in both
PARK (P) and NEUTRAL (N). Starter should not
operate in any other gear position.
Fig. 16 Grommet Plate/Shift Cable at Floor Pan
1 ± GROMMET PLATE
2 ± SHIFT CABLE
Fig. 17 Gearshift Cable Adjustment Screw
1 ± GEARSHIFT CABLE ADJUSTMENT SCREW
PLTRANSAXLE 21 - 75
REMOVAL AND INSTALLATION (Continued)
Page 991 of 1285
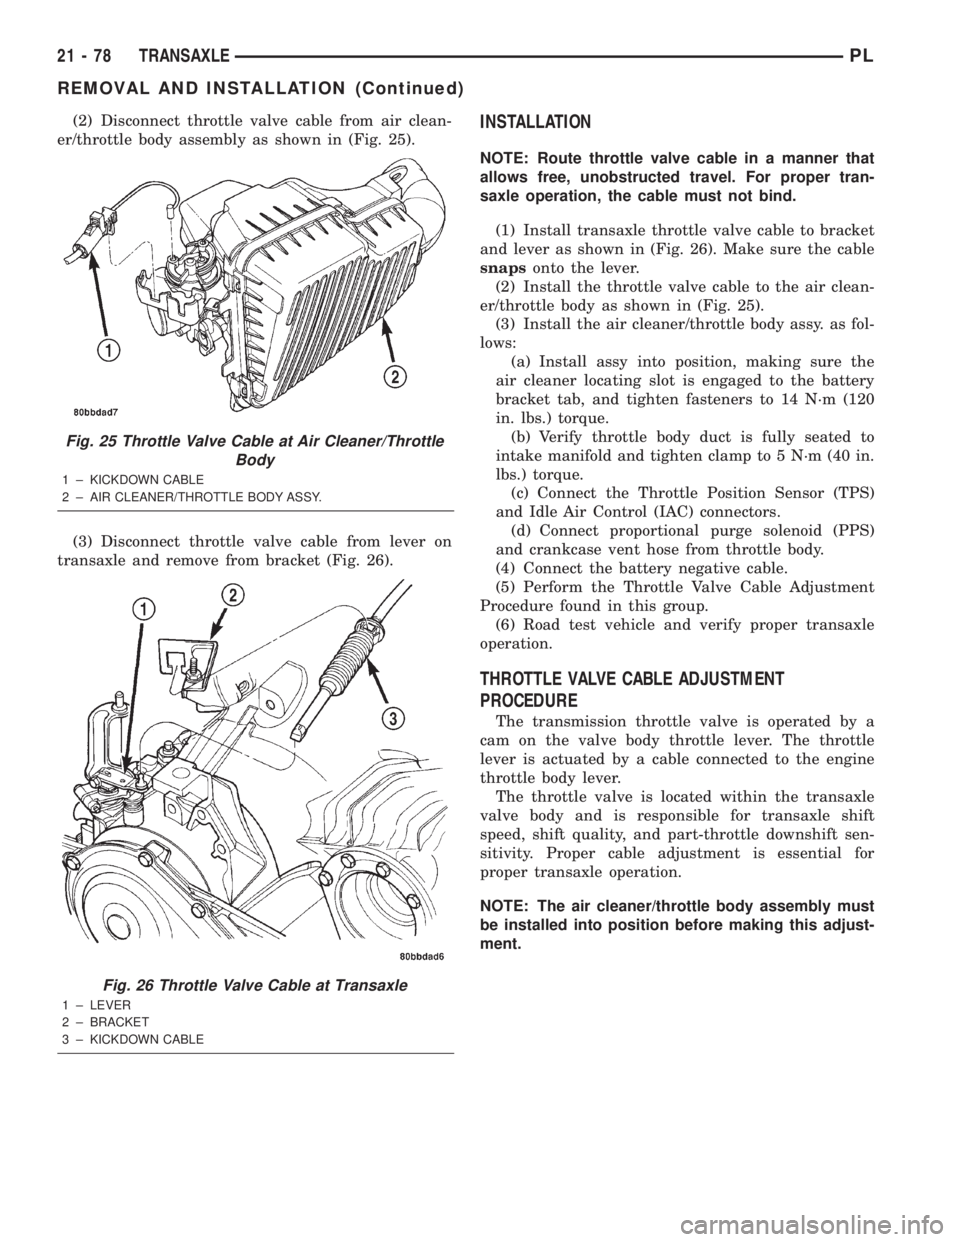
(2) Disconnect throttle valve cable from air clean-
er/throttle body assembly as shown in (Fig. 25).
(3) Disconnect throttle valve cable from lever on
transaxle and remove from bracket (Fig. 26).INSTALLATION
NOTE: Route throttle valve cable in a manner that
allows free, unobstructed travel. For proper tran-
saxle operation, the cable must not bind.
(1) Install transaxle throttle valve cable to bracket
and lever as shown in (Fig. 26). Make sure the cable
snapsonto the lever.
(2) Install the throttle valve cable to the air clean-
er/throttle body as shown in (Fig. 25).
(3) Install the air cleaner/throttle body assy. as fol-
lows:
(a) Install assy into position, making sure the
air cleaner locating slot is engaged to the battery
bracket tab, and tighten fasteners to 14 N´m (120
in. lbs.) torque.
(b) Verify throttle body duct is fully seated to
intake manifold and tighten clamp to 5 N´m (40 in.
lbs.) torque.
(c) Connect the Throttle Position Sensor (TPS)
and Idle Air Control (IAC) connectors.
(d) Connect proportional purge solenoid (PPS)
and crankcase vent hose from throttle body.
(4) Connect the battery negative cable.
(5) Perform the Throttle Valve Cable Adjustment
Procedure found in this group.
(6) Road test vehicle and verify proper transaxle
operation.
THROTTLE VALVE CABLE ADJUSTMENT
PROCEDURE
The transmission throttle valve is operated by a
cam on the valve body throttle lever. The throttle
lever is actuated by a cable connected to the engine
throttle body lever.
The throttle valve is located within the transaxle
valve body and is responsible for transaxle shift
speed, shift quality, and part-throttle downshift sen-
sitivity. Proper cable adjustment is essential for
proper transaxle operation.
NOTE: The air cleaner/throttle body assembly must
be installed into position before making this adjust-
ment.
Fig. 25 Throttle Valve Cable at Air Cleaner/Throttle
Body
1 ± KICKDOWN CABLE
2 ± AIR CLEANER/THROTTLE BODY ASSY.
Fig. 26 Throttle Valve Cable at Transaxle
1 ± LEVER
2 ± BRACKET
3 ± KICKDOWN CABLE
21 - 78 TRANSAXLEPL
REMOVAL AND INSTALLATION (Continued)
Page 1051 of 1285
BAND ADJUSTMENT
KICKDOWN BAND (FRONT)
The kickdown band adjusting screw is located on
left side (top front) of the transaxle case.
(1) Loosen locknut and back±off nut approximately
five turns. Test adjusting screw for free turning in
the transaxle case.
(2) Using wrench, tighten adjusting screw to 8
N´m (72 in. lbs.).
(3) Back±off adjusting screw the number of turns
listed in Specifications. Hold adjusting screw in this
position and tighten locknut to 47 N´m (35ft. lbs.)
LOW/REVERSE BAND (REAR)
To adjust low/reverse band, proceed as follows:
(1) Loosen and back off locknut approximately five
turns.
(2) Using an inch-pound torque wrench, tighten
adjusting screw to 5 N´m (41 in. lbs.) true torque.
(3) Back±off adjusting screw the number of turns
listed under Specifications. A chart is located at the
rear of this section.
(4) Tighten locknut to 14 N´m (10 ft. lbs.).
HYDRAULIC CONTROL PRESSURE
ADJUSTMENTS
LINE PRESSURE
An incorrect throttle pressure setting will cause
incorrect line pressure readings even though line
pressure adjustment is correct. Always inspect andcorrect throttle pressure adjustment before adjusting
the line pressure.
The approximate adjustment for line pressure is
1-5/16 inches, measured from valve body to inner
edge of adjusting nut. However, due to manufactur-
ing tolerances, the adjustment can be varied to
obtain specified line pressure.
The adjusting screw may be turned with an Allen
wrench. One complete turn of adjusting screw
changes closed throttle line pressure approximately
1-2/3 psi. Turning adjusting screw counterclockwise
increases pressure, and clockwise decreases pressure.
THROTTLE PRESSURE
Throttle pressures cannot be tested accurately;
therefore, the adjustment should be measured if a
malfunction is evident.
(1) Insert gauge pin of Tool C-3763 between the
throttle lever cam and kickdown valve.
(2) By pushing in on tool, compress kickdown
valve against its spring so throttle valve is com-
pletely bottomed inside the valve body.
(3) While compressing spring, turn throttle lever
stop screw with adapter C-4553. Turn until head of
screw touches throttle lever tang, with throttle lever
cam touching tool and throttle valve bottomed. Be
sure adjustment is made with spring fully com-
pressed and valve bottomed in the valve body.
BEARING ADJUSTMENT PROCEDURES
(1) Take extreme care when removing and install-
ing bearing cups and cones.Use only an arbor
press for installation, as a hammer may not
properly align the bearing cup or cone.Burrs or
nicks on the bearing seat will give a false end play
reading, while gauging for proper shims. Improperly
seated bearing cup and cones are subject to low-mile-
age failure.
(2) Bearing cups and cones should be replaced if
they show signs of pitting or heat distress.
(3) If distress is seen on either the cup or bearing
rollers, both cup and cone must be replaced.
NOTE: Bearing end play and drag torque specifica-
tions must be maintained to avoid premature bear-
ing failures.
(4) Used (original) bearing may lose up to 50 per-
cent of the original drag torque after break-in.
NOTE: All bearing adjustments must be made with
no other component interference or gear inter-
mesh, except the transfer gear bearing.
(5) Refer to the conversion chart in specifications
to convert inches to millimeter measurements. Refer
to bearing shim chart for proper shim thicknesses.
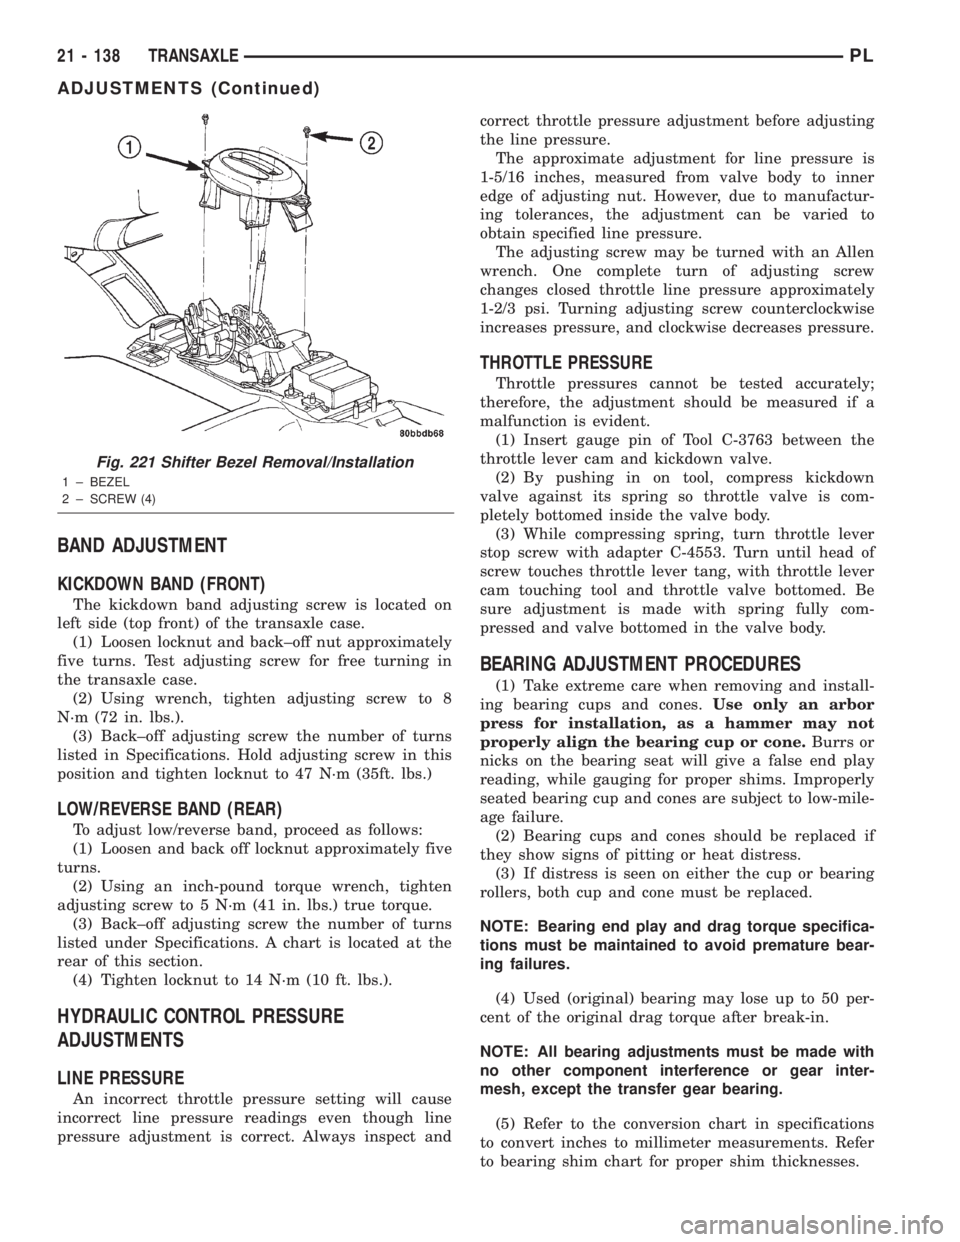
Fig. 221 Shifter Bezel Removal/Installation
1 ± BEZEL
2 ± SCREW (4)
21 - 138 TRANSAXLEPL
ADJUSTMENTS (Continued)
Page 1052 of 1285
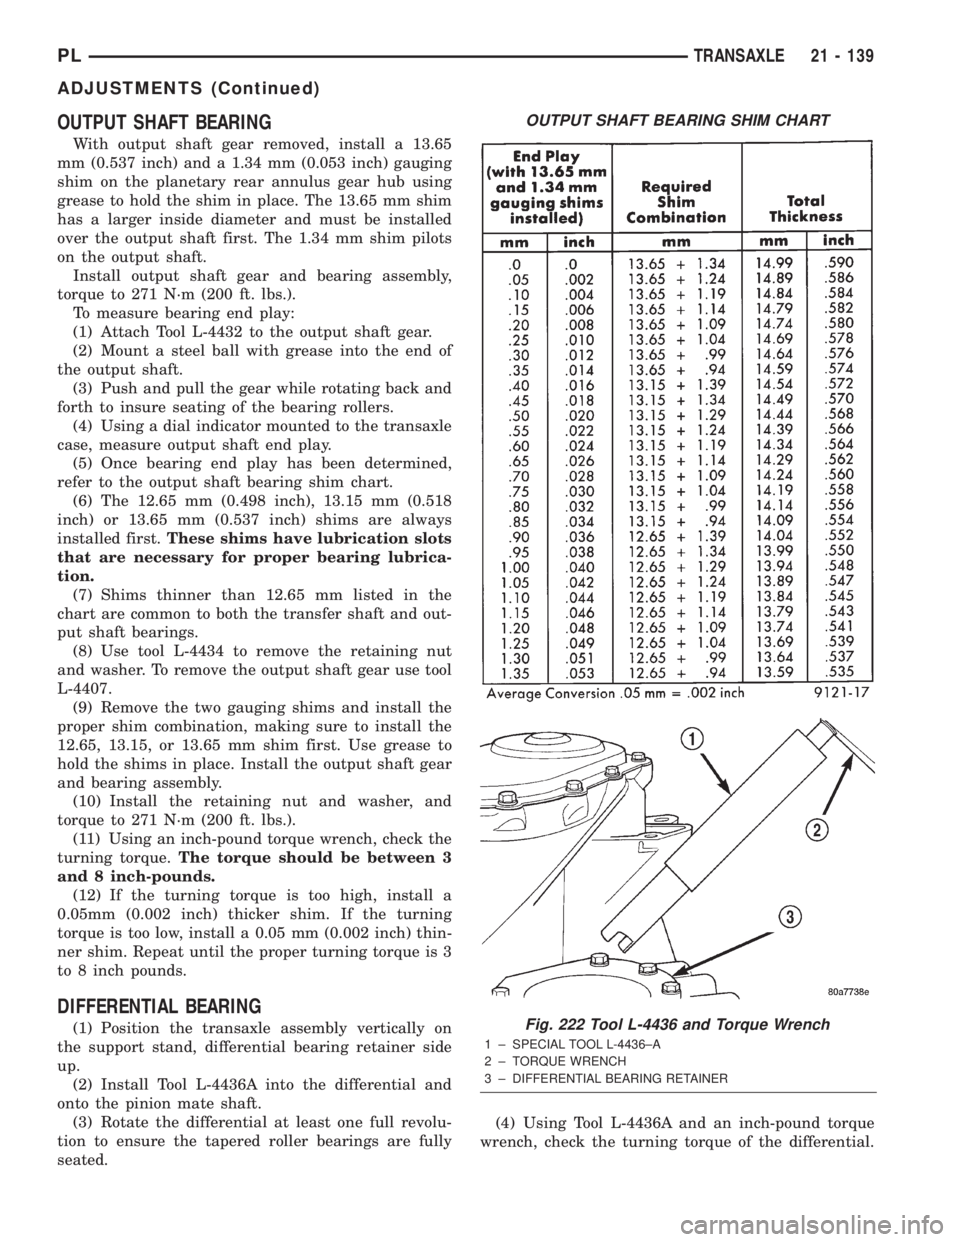
OUTPUT SHAFT BEARING
With output shaft gear removed, install a 13.65
mm (0.537 inch) and a 1.34 mm (0.053 inch) gauging
shim on the planetary rear annulus gear hub using
grease to hold the shim in place. The 13.65 mm shim
has a larger inside diameter and must be installed
over the output shaft first. The 1.34 mm shim pilots
on the output shaft.
Install output shaft gear and bearing assembly,
torque to 271 N´m (200 ft. lbs.).
To measure bearing end play:
(1) Attach Tool L-4432 to the output shaft gear.
(2) Mount a steel ball with grease into the end of
the output shaft.
(3) Push and pull the gear while rotating back and
forth to insure seating of the bearing rollers.
(4) Using a dial indicator mounted to the transaxle
case, measure output shaft end play.
(5) Once bearing end play has been determined,
refer to the output shaft bearing shim chart.
(6) The 12.65 mm (0.498 inch), 13.15 mm (0.518
inch) or 13.65 mm (0.537 inch) shims are always
installed first.These shims have lubrication slots
that are necessary for proper bearing lubrica-
tion.
(7) Shims thinner than 12.65 mm listed in the
chart are common to both the transfer shaft and out-
put shaft bearings.
(8) Use tool L-4434 to remove the retaining nut
and washer. To remove the output shaft gear use tool
L-4407.
(9) Remove the two gauging shims and install the
proper shim combination, making sure to install the
12.65, 13.15, or 13.65 mm shim first. Use grease to
hold the shims in place. Install the output shaft gear
and bearing assembly.
(10) Install the retaining nut and washer, and
torque to 271 N´m (200 ft. lbs.).
(11) Using an inch-pound torque wrench, check the
turning torque.The torque should be between 3
and 8 inch-pounds.
(12) If the turning torque is too high, install a
0.05mm (0.002 inch) thicker shim. If the turning
torque is too low, install a 0.05 mm (0.002 inch) thin-
ner shim. Repeat until the proper turning torque is 3
to 8 inch pounds.
DIFFERENTIAL BEARING
(1) Position the transaxle assembly vertically on
the support stand, differential bearing retainer side
up.
(2) Install Tool L-4436A into the differential and
onto the pinion mate shaft.
(3) Rotate the differential at least one full revolu-
tion to ensure the tapered roller bearings are fully
seated.(4) Using Tool L-4436A and an inch-pound torque
wrench, check the turning torque of the differential.
OUTPUT SHAFT BEARING SHIM CHART
Fig. 222 Tool L-4436 and Torque Wrench
1 ± SPECIAL TOOL L-4436±A
2 ± TORQUE WRENCH
3 ± DIFFERENTIAL BEARING RETAINER
PLTRANSAXLE 21 - 139
ADJUSTMENTS (Continued)
Page 1053 of 1285
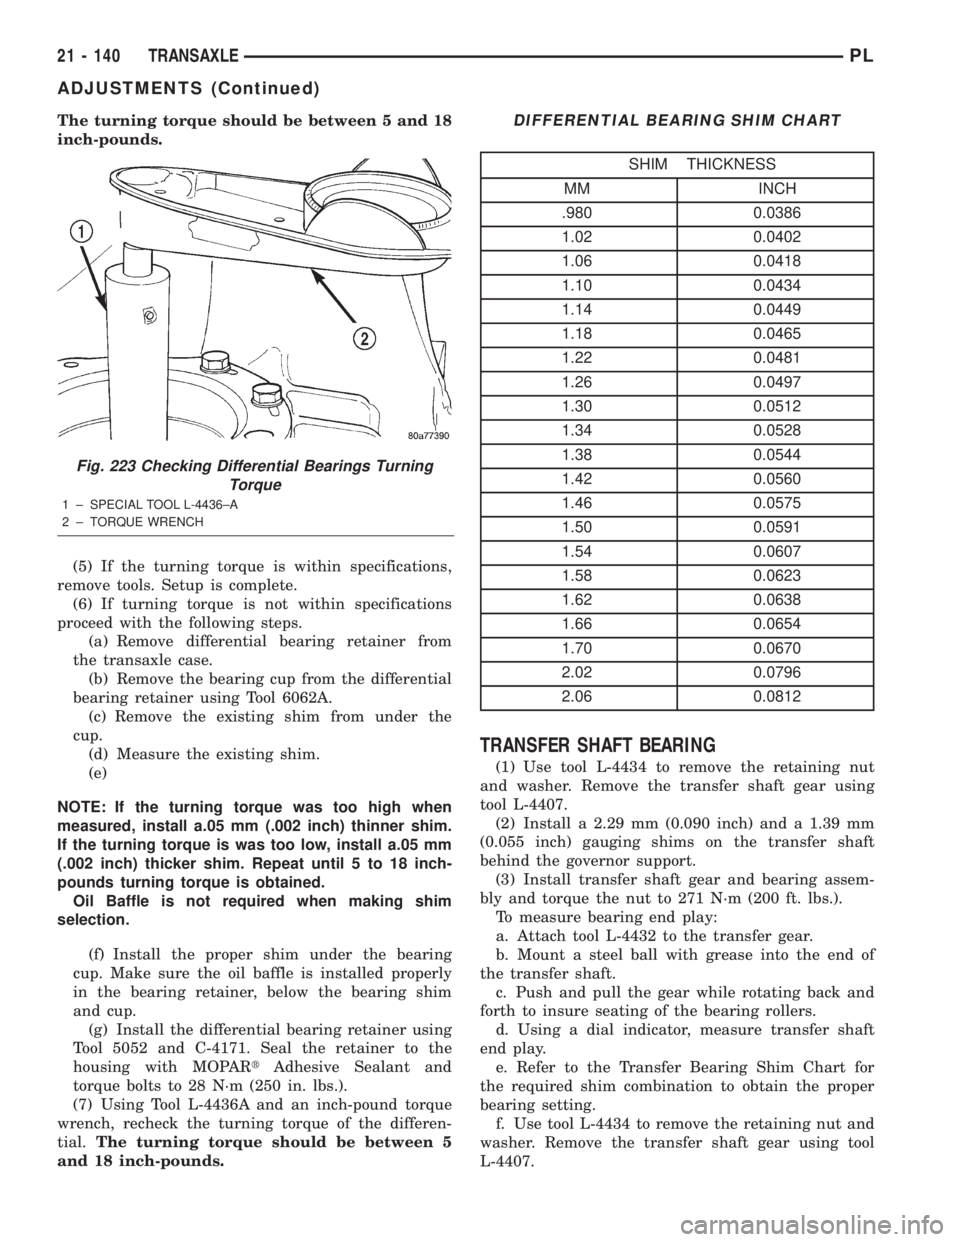
The turning torque should be between 5 and 18
inch-pounds.
(5) If the turning torque is within specifications,
remove tools. Setup is complete.
(6) If turning torque is not within specifications
proceed with the following steps.
(a) Remove differential bearing retainer from
the transaxle case.
(b) Remove the bearing cup from the differential
bearing retainer using Tool 6062A.
(c) Remove the existing shim from under the
cup.
(d) Measure the existing shim.
(e)
NOTE: If the turning torque was too high when
measured, install a.05 mm (.002 inch) thinner shim.
If the turning torque is was too low, install a.05 mm
(.002 inch) thicker shim. Repeat until 5 to 18 inch-
pounds turning torque is obtained.
Oil Baffle is not required when making shim
selection.
(f) Install the proper shim under the bearing
cup. Make sure the oil baffle is installed properly
in the bearing retainer, below the bearing shim
and cup.
(g) Install the differential bearing retainer using
Tool 5052 and C-4171. Seal the retainer to the
housing with MOPARtAdhesive Sealant and
torque bolts to 28 N´m (250 in. lbs.).
(7) Using Tool L-4436A and an inch-pound torque
wrench, recheck the turning torque of the differen-
tial.The turning torque should be between 5
and 18 inch-pounds.
TRANSFER SHAFT BEARING
(1) Use tool L-4434 to remove the retaining nut
and washer. Remove the transfer shaft gear using
tool L-4407.
(2) Install a 2.29 mm (0.090 inch) and a 1.39 mm
(0.055 inch) gauging shims on the transfer shaft
behind the governor support.
(3) Install transfer shaft gear and bearing assem-
bly and torque the nut to 271 N´m (200 ft. lbs.).
To measure bearing end play:
a. Attach tool L-4432 to the transfer gear.
b. Mount a steel ball with grease into the end of
the transfer shaft.
c. Push and pull the gear while rotating back and
forth to insure seating of the bearing rollers.
d. Using a dial indicator, measure transfer shaft
end play.
e. Refer to the Transfer Bearing Shim Chart for
the required shim combination to obtain the proper
bearing setting.
f. Use tool L-4434 to remove the retaining nut and
washer. Remove the transfer shaft gear using tool
L-4407.
Fig. 223 Checking Differential Bearings Turning
Torque
1 ± SPECIAL TOOL L-4436±A
2 ± TORQUE WRENCH
DIFFERENTIAL BEARING SHIM CHART
SHIM THICKNESS
MM INCH
.980 0.0386
1.02 0.0402
1.06 0.0418
1.10 0.0434
1.14 0.0449
1.18 0.0465
1.22 0.0481
1.26 0.0497
1.30 0.0512
1.34 0.0528
1.38 0.0544
1.42 0.0560
1.46 0.0575
1.50 0.0591
1.54 0.0607
1.58 0.0623
1.62 0.0638
1.66 0.0654
1.70 0.0670
2.02 0.0796
2.06 0.0812
21 - 140 TRANSAXLEPL
ADJUSTMENTS (Continued)