check engine DODGE NEON SRT 2004 2.G User Guide
[x] Cancel search | Manufacturer: DODGE, Model Year: 2004, Model line: NEON SRT, Model: DODGE NEON SRT 2004 2.GPages: 200, PDF Size: 3.23 MB
Page 131 of 200
MAINTAINING YOUR VEHICLE
CONTENTS
m2.4L Turbo Charged Engine Compartment....133
mOnboard Diagnostic System Ð OBD II......134
mEmissions Inspection And Maintenance
Programs
............................134
mReplacement Parts.....................136
mDealer Service........................136
mMaintenance Procedures.................136
NEngine Oil..........................137
NIgnition Wiring System.................142
NCrankcase Emission Control System........142
NFuel Filter..........................142
NAir Cleaner Element (Filter)..............142NMaintenance-Free Battery................142
NAir Conditioner......................144
NPower Steering Fluid Check..............145
NFront Suspension Ball Joints..............145
NBody Lubrication.....................145
NWindshield Wiper Blades................146
NWindshield Wiper Blade Replacement.......146
NWindshield Washer Aiming..............146
NWindshield Washer Reservoir.............147
NExhaust System......................147
NCooling System.......................148
7
Page 134 of 200
ONBOARD DIAGNOSTIC SYSTEM Ð OBD II
Your vehicle is equipped with a sophisticated onboard
diagnostic system called OBD II. This system monitors
the performance of the emissions, and engine control
systems. When these systems are operating properly,
your vehicle will provide excellent performance and fuel
economy, as well as engine emissions well within current
government regulations.
If any of these systems require service, the OBD II system
will turn on the ªMalfunction Indicator Light.º It will
also store diagnostic codes and other information to
assist your service technician in making repairs. Al-
though your vehicle will usually be driveable and not
need towing, see your dealer for service as soon as
possible.CAUTION!
Prolonged driving with the ªMalfunction Indicator
Lightº on could cause further damage to the emis-
sion control system. It could also affect fuel economy
and driveability. The vehicle must be serviced before
any emissions tests can be performed.
If the ªMalfunction Indicator Lightº is flashing,
severe catalytic converter damage and power loss
will soon occur. Immediate service is required.
EMISSIONS INSPECTION AND MAINTENANCE
PROGRAMS
In some localities, it may be a legal requirement to pass
an inspection of your vehicle's emissions control system.
Failure to pass could prevent vehicle registration.
For states which have an I/M (Inspection and
Maintenance) requirement, this check verifies the
following: the MIL (Malfunction Indicator Lamp)
is functioning and is not on when the engine is running,
and that the OBD (On Board Diagnostic) system is ready
for testing.
134 MAINTAINING YOUR VEHICLE
Page 135 of 200
Normally, the OBD system will be ready. The OBD
system maynotbe ready if your vehicle was recently
serviced, if you recently had a dead battery, or a battery
replacement. If the OBD system should be determined
not ready for the I/M test, your vehicle may fail the test.
Your vehicle has a simple ignition key actuated test
which you can use prior to going to the test station. To
check if your vehicle's OBD system is ready, you must do
the following:
1. Insert your ignition key into the ignition switch.
2. Turn the ignition to the ON position, but do not crank
or start the engine.
3. If you crank or start the engine, you will have to start
this test over.
4. As soon as you turn your key to the ON position, you
will see your MIL symbol come on as part of a normal
bulb check.
5. Approximately 15 seconds later, one of two things will
happen:a. The MIL will flash for about 10 seconds and then
return to being fully illuminated until you turn off
the ignition key or start the engine. This means that
your vehicle's OBD system isnot readyand you
shouldnotproceed to the I/M station.
b. The MIL will not flash at all and will remain fully
illuminated until you turn off the ignition key or
start the engine. This means that your vehicle's OBD
system isreadyand you can proceed to the I/M
station.
If your OBD system isnot ready,you should see your
authorized dealer or repair facility. If your vehicle was
recently serviced or had a battery failure or replacement,
you may need to do nothing more than drive your
vehicle as you normally would in order for your OBD
system to update. A recheck with the above test routine
may then indicate that the system is now ready.
Regardless of whether your vehicle's OBD system is
ready or not ready, if the MIL symbol is illuminated
during normal vehicle operation, you should have your
MAINTAINING YOUR VEHICLE 135
7
Page 137 of 200
Engine Oil
Checking Oil Level
To assure proper engine lubrication, the engine oil must
be maintained at the correct level. Check the oil level at
regular intervals, such as every fuel stop.
The best time to check the engine oil level is about 5
minutes after a fully warmed engine is shut off, or before
starting the engine after it has sat overnight.
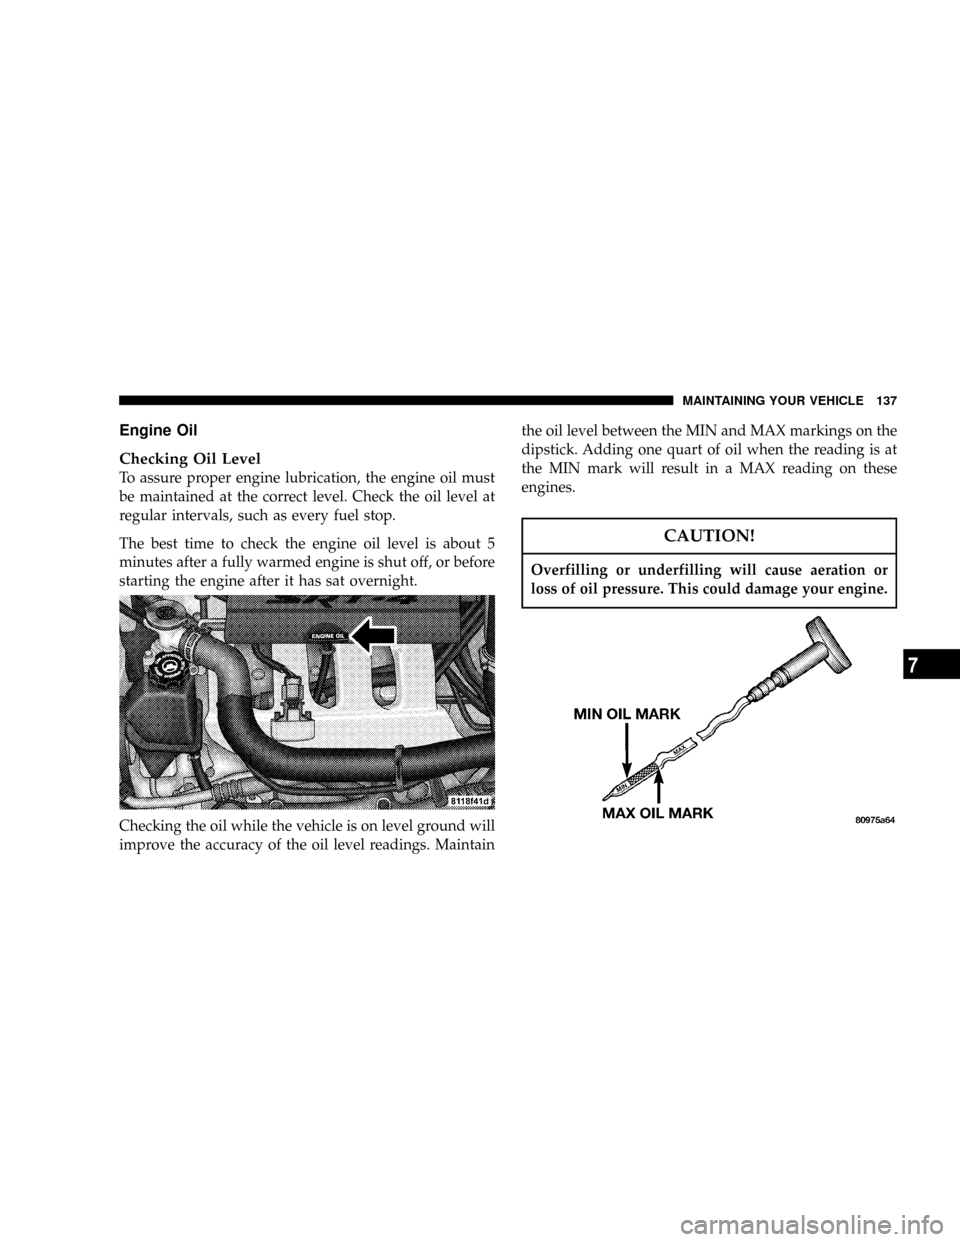
Checking the oil while the vehicle is on level ground will
improve the accuracy of the oil level readings. Maintainthe oil level between the MIN and MAX markings on the
dipstick. Adding one quart of oil when the reading is at
the MIN mark will result in a MAX reading on these
engines.
CAUTION!
Overfilling or underfilling will cause aeration or
loss of oil pressure. This could damage your engine.
MAINTAINING YOUR VEHICLE 137
7
Page 138 of 200

Change Engine Oil
Road conditions and your kind of driving affects the
interval at which your oil should be changed. Check the
following list to decide if any apply to you.
²Day and night temperatures are below 32ÉF (0ÉC)
²Stop and Go driving
²Extensive engine idling
²Driving in dusty conditions
²Short trips of less than 10 miles (16.2 km)
²More than 50% of your driving is at sustained high
speeds during hot weather, above 90ÉF (32ÉC)
²Trailer towing
²Taxi, Police, or delivery service (commercial service)
²Off-road or desert operation
²If equipped for and operating with E-85 (ethanol) fuel
NOTE:IfANYof these apply to you then change your
engine oil every 3,000 miles (5 000 km) or 3 months,whichever comes first and follow schedule ªBº of the
9Maintenance Schedules9section of this manual.
If none of these apply to you, then change your engine oil
at every interval shown on schedule9A9of the9Mainte-
nance Schedules9section of this manual.
Engine Oil Selection
For best performance and maximum protection under all
types of operating conditions, the manufacture only
recommends engine oils that are API certified and meet
138 MAINTAINING YOUR VEHICLE
Page 140 of 200

the engine oil. Engine oil is an engineered product and
it's performance may be impaired by supplemental ad-
ditives.
Disposing of Used Engine Oil
Care should be taken in disposing of used engine oil from
your vehicle. Used oil, indiscriminately discarded, can
present a problem to the environment. Contact your
dealer, service station, or governmental agency for advice
on how and where used oil can be safely discarded in
your area.
Engine Oil Filter
The engine oil filter should be replaced at every engine
oil change.
Engine Oil Filter Selection
All of this manufacturers engines have a full-flow type
disposable oil filter. Use a filter of this type for replace-
ment. The quality of replacement filters varies consider-
ably. Only high quality filters should be used to assure
most efficient service. Mopar Engine Oil Filters are high
quality oil filters and are recommended.
Drive Belts Ð Check Condition and Tension
At the mileage shown in the maintenance schedules,
check all drive belts for condition and proper tension.
Improper belt tension can cause belt slippage and failure.
Inspect the drive belts for evidence of cuts, cracks, or
glazing and replace them if there is any sign of damage
which could result in belt failure. If adjustment is re-
quired, adjust the belts according to the specifications
and procedures shown in the Service Manual.
Special tools are required to properly measure tension
and to restore belt tension to factory specifications. Also,
check belt routing to make sure there is no interference
between the belts and other engine components.
Spark Plugs
Spark plugs must fire properly to assure engine perfor-
mance and emission control. New plugs should be in-
stalled at the specified mileage. The entire set should be
replaced if there is any malfunction due to a faulty spark
plug. Check the specifications section for the proper type
of spark plug for use in your vehicle.
140 MAINTAINING YOUR VEHICLE
Page 142 of 200
Engine Timing Belt
Replace the engine timing belt at the intervals described
in the appropriate maintenance schedule.
Ignition Wiring System
The ignition cables should be kept clean and properly
connected. Terminals should be fully seated. Cracked,
damaged, or faulty cables should be replaced.
Crankcase Emission Control System
Proper operation of this system depends on freedom
from sticking or plugging due to deposits. As vehicle
mileage builds up, the PCV valve and passages may
accumulate deposits. If a valve is not working properly,
replace it with a new valve. DO NOT ATTEMPT TO
CLEAN THE OLD PCV VALVE!
Check ventilation hose for indication of damage or
plugging deposits. Replace if necessary.
Fuel Filter
A plugged fuel filter can cause hard starting or limit the
speed at which a vehicle can be driven. Should an
excessive amount of dirt accumulate in the fuel tank,
frequent filter replacement may be necessary.
Air Cleaner Element (Filter)
Under normal driving conditions, replace the filter at the
intervals shown on Schedule ªAº. If, however, you drive
the vehicle frequently under dusty or severe conditions,
the filter element should be inspected periodically and
replaced if necessary at the intervals shown on Schedule
ªBº.
WARNING!
The air cleaner can provide a measure of protection
in the case of engine backfire. Do not remove the air
cleaner unless such removal is necessary for repair or
maintenance. Make sure that no one is near the
engine compartment before starting the vehicle with
the air cleaner removed. Failure to do so can result in
serious personal injury.
Maintenance-Free Battery
The top of the MAINTENANCE-FREE battery is perma-
nently sealed. You will never have to add water, nor is
periodic maintenance required.
142 MAINTAINING YOUR VEHICLE
Page 145 of 200
Power Steering Fluid Check
Checking the power steering fluid level at a defined
service interval is not required. The fluid should only be
checked if a leak is suspected, abnormal noises are
apparent, and/or the system is not functioning as antici-
pated. Coordinate inspection efforts through a certified
DaimlerChrysler Dealership.9
WARNING!
Fluid level should be checked on a level surface and
with the engine off to prevent injury from moving
parts and to insure accurate fluid level reading. Do
not overfill. Use only manufacturers recommended
power steering fluid.
If necessary, add fluid to restore to the proper indicated
level. With a clean cloth, wipe any spilled fluid from all
surfaces. Refer to Recommended Fluids, Lubricants, and
Genuine Parts for correct fluid types.
Front Suspension Ball Joints
There are two front suspension lower ball joints that are
permanently lubricated. Inspect these ball joints when-
ever under-vehicle service is done. Damaged seals
should be replaced to prevent leakage or grease contami-
nation.
Body Lubrication
Locks and all body pivot points, including such items as
seat tracks, doors, trunk and hood hinges, should be
lubricated periodically to assure quiet, easy operation
and to protect against rust and wear. Prior to the appli-
cation of any lubricant, the parts concerned should be
wiped clean to remove dust and grit; after lubricating
excess oil and grease should be removed. Particular
attention should also be given to hood latching compo-
nents to insure proper function. When performing other
underhood services, the hood latch, release mechanism
and safety catch should be cleaned and lubricated.
The external lock cylinders should be lubricated twice a
year, preferably in the fall and spring. Apply a small
amount of a high quality lubricant such as MopartLock
Cylinder Lubricant directly into the lock cylinder.
MAINTAINING YOUR VEHICLE 145
7
Page 147 of 200
Windshield Washer Reservoir
The washer fluid reservoir is located in the engine
compartment and should be checked for fluid level at
regular intervals. Fill the reservoir with windshield
washer solvent (not radiator antifreeze)
Exhaust System
The best protection against carbon monoxide entry into
the vehicle body is a properly maintained engine exhaust
system.
If you notice a change in the sound of the exhaust system;
or if exhaust fumes can be detected inside the vehicle; or
when the underside or rear of the vehicle is damaged;
have a competent mechanic inspect the complete exhaust
system and adjacent body areas of broken, damaged,
deteriorated, or mispositioned parts. Open seams or
loose connections could permit exhaust fumes to seep
into the passenger compartment. In addition, inspect the
exhaust system each time the vehicle is raised for lubri-
cation or oil change. Replace as required.
WARNING!
Exhaust gases can injure or kill. They contain carbon
monoxide which is colorless and odorless. Breathing
it can make you unconscious and can eventually
poison you. Follow the above precautions to keep
your exhaust system as safe as possible.
MAINTAINING YOUR VEHICLE 147
7
Page 148 of 200
Cooling System
WARNING!
²When working near the radiator cooling fan, dis-
connect the fan motor lead or turn the ignition key
to the OFF position. The fan is temperature con-
trolled and can start at any time the ignition key is
in the ON position.
²You or others can be badly burned by hot coolant
or steam from your radiator. If you see or hear
steam coming from under the hood, don't open
the hood until the radiator has had time to cool.
Never try to open a cooling system pressure cap
when the radiator is hot.
Coolant Checks
Check coolant protection every 12 months (before the
onset of freezing weather, where applicable). If coolant is
dirty or rusty in appearance, the system should be
drained, flushed and refilled with fresh coolant.Check the front of the radiator for an accumulation of
bugs, leaves, etc. Clean the radiator by gently spraying
water from a garden hose at the back of the core.
Check the recovery bottle tank tubing for condition and
tightness of connection at the bottle and radiator. Inspect
the entire system for leaks.
With the engine at normal operating temperature (but
not running), check the cooling system pressure cap for
proper vacuum sealing by draining a small amount of
coolant from the radiator drain cock. If the cap is sealing
properly, the coolant will begin to drain from the reserve
tank. Do not remove the cap when the cooling system is
hot.
Cooling System Ð Drain, Flush and Refill
At the intervals shown on the Maintenance Schedules,
the system should be drained, flushed and refilled.
If the solution is dirty and contains a considerable
amount of sediment, clean and flush with a reliable
cooling system cleaner. Follow with a thorough rinsing to
remove all deposits and chemicals. Discard oil antifreeze
solution.
148 MAINTAINING YOUR VEHICLE