Front lamp DODGE RAM 1500 1998 2.G Workshop Manual
[x] Cancel search | Manufacturer: DODGE, Model Year: 1998, Model line: RAM 1500, Model: DODGE RAM 1500 1998 2.GPages: 2627
Page 2333 of 2627
CARGO BOX - TIE DOWN
REMOVAL
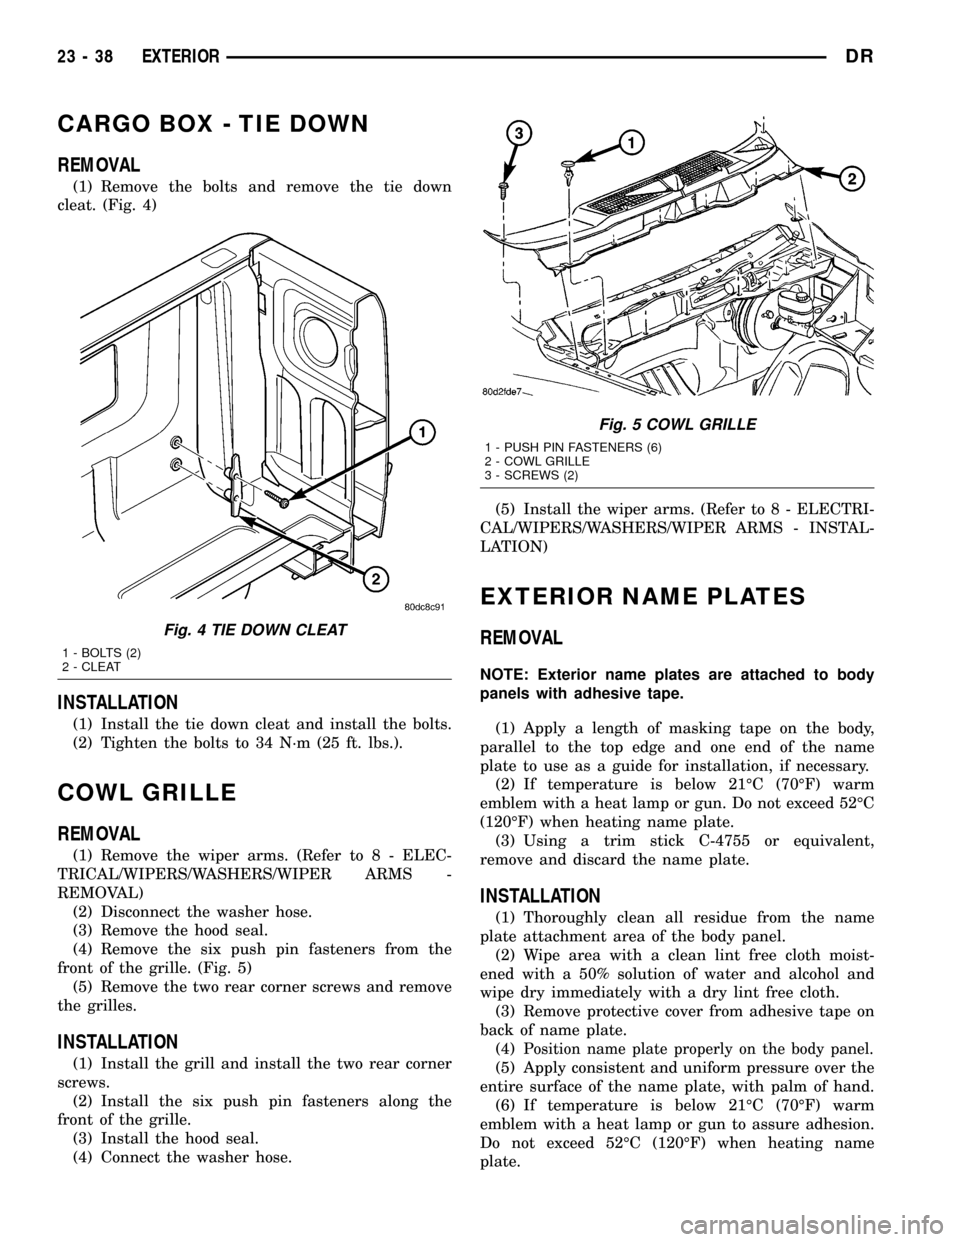
(1) Remove the bolts and remove the tie down
cleat. (Fig. 4)
INSTALLATION
(1) Install the tie down cleat and install the bolts.
(2) Tighten the bolts to 34 N´m (25 ft. lbs.).
COWL GRILLE
REMOVAL
(1) Remove the wiper arms. (Refer to 8 - ELEC-
TRICAL/WIPERS/WASHERS/WIPER ARMS -
REMOVAL)
(2) Disconnect the washer hose.
(3) Remove the hood seal.
(4) Remove the six push pin fasteners from the
front of the grille. (Fig. 5)
(5) Remove the two rear corner screws and remove
the grilles.
INSTALLATION
(1) Install the grill and install the two rear corner
screws.
(2) Install the six push pin fasteners along the
front of the grille.
(3) Install the hood seal.
(4) Connect the washer hose.(5) Install the wiper arms. (Refer to 8 - ELECTRI-
CAL/WIPERS/WASHERS/WIPER ARMS - INSTAL-
LATION)
EXTERIOR NAME PLATES
REMOVAL
NOTE: Exterior name plates are attached to body
panels with adhesive tape.
(1) Apply a length of masking tape on the body,
parallel to the top edge and one end of the name
plate to use as a guide for installation, if necessary.
(2) If temperature is below 21ÉC (70ÉF) warm
emblem with a heat lamp or gun. Do not exceed 52ÉC
(120ÉF) when heating name plate.
(3) Using a trim stick C-4755 or equivalent,
remove and discard the name plate.
INSTALLATION
(1) Thoroughly clean all residue from the name
plate attachment area of the body panel.
(2) Wipe area with a clean lint free cloth moist-
ened with a 50% solution of water and alcohol and
wipe dry immediately with a dry lint free cloth.
(3) Remove protective cover from adhesive tape on
back of name plate.
(4)
Position name plate properly on the body panel.
(5) Apply consistent and uniform pressure over the
entire surface of the name plate, with palm of hand.
(6) If temperature is below 21ÉC (70ÉF) warm
emblem with a heat lamp or gun to assure adhesion.
Do not exceed 52ÉC (120ÉF) when heating name
plate.
Fig. 4 TIE DOWN CLEAT
1 - BOLTS (2)
2 - CLEAT
Fig. 5 COWL GRILLE
1 - PUSH PIN FASTENERS (6)
2 - COWL GRILLE
3 - SCREWS (2)
23 - 38 EXTERIORDR
Page 2334 of 2627

FRONT FENDER
REMOVAL
(1) Remove the antenna, if equipped. (Refer to 8 -
ELECTRICAL/AUDIO/ANTENNA BODY & CABLE -
REMOVAL)
(2) Remove the battery tray, if required. (Refer to 8
- ELECTRICAL/BATTERY SYSTEM/TRAY -
REMOVAL)
(3) Remove the cowl grille. (Refer to 23 - BODY/
EXTERIOR/COWL GRILLE - REMOVAL)
(4) Remove the headlamp unit. (Refer to 8 - ELEC-
TRICAL/LAMPS/LIGHTING - EXTERIOR/HEAD-
LAMP UNIT - REMOVAL)
(5) Remove the wheelhouse splash shield. (Refer to
23 - BODY/EXTERIOR/FRONT WHEELHOUSE
SPLASH SHIELD - REMOVAL)
(6) Remove the inside and lower bolts. (Fig. 6)
(7) Remove the two bolts below the headlamp.
(8) Remove the hinge support bolt at the cowl.
(9) Remove the three bolts along the fender rail.
INSTALLATION
(1) Install the three bolts along the upper fender
rail and tighten to 9 N´m (80 in. lbs.).
(2) Install the upper hinge support bolt at the cowl
and tighten to 17 N´m (13 ft. lbs.).
(3) Install the two bolts below the headlamp and
tighten to 9 N´m (80 in. lbs.).(4) Install the inside and lower bolts and tighten
to 17 N´m (13 ft. lbs.).
(5) Check the fender positioning and adjust as
required by adding shims. (Refer to 23 - BODY/
BODY STRUCTURE/GAP AND FLUSH - SPECIFI-
CATIONS)
(6) Install the wheelhouse splash shield. (Refer to
23 - BODY/EXTERIOR/FRONT WHEELHOUSE
SPLASH SHIELD - INSTALLATION)
(7) Install the headlamp unit. (Refer to 8 - ELEC-
TRICAL/LAMPS/LIGHTING - EXTERIOR/HEAD-
LAMP UNIT - INSTALLATION)
(8) Install the cowl grille. (Refer to 23 - BODY/EX-
TERIOR/COWL GRILLE - INSTALLATION)
(9) Install the battery tray, if required. (Refer to 8
- ELECTRICAL/BATTERY SYSTEM/TRAY -
INSTALLATION)
(10) Install the antenna, if required. (Refer to 8 -
ELECTRICAL/AUDIO/ANTENNA BODY & CABLE -
INSTALLATION)
FUEL FILL DOOR
REMOVAL
(1) Open fill door and remove the bolts. (Fig. 7)
(2) Remove the door.
INSTALLATION
(1) Install the fuel fill door.
(2) Install the bolts and tighten to 9 N´m (80 in.
lbs.).
Fig. 6 FRONT FENDER
1 - HOOD HINGE SUPPORT BOLT (1)
2 - HOOD HINGE
3 - INNER BOLT (1)
4 - FRONT BOLTS (2)
5 - LOWER BOLT INSERT
6 - FENDER
7 - UPPER BOLTS (3)
Fig. 7 FUEL FILL DOOR
1 - FUEL FILL DOOR
2 - BOLTS (2)
DREXTERIOR 23 - 39
Page 2339 of 2627
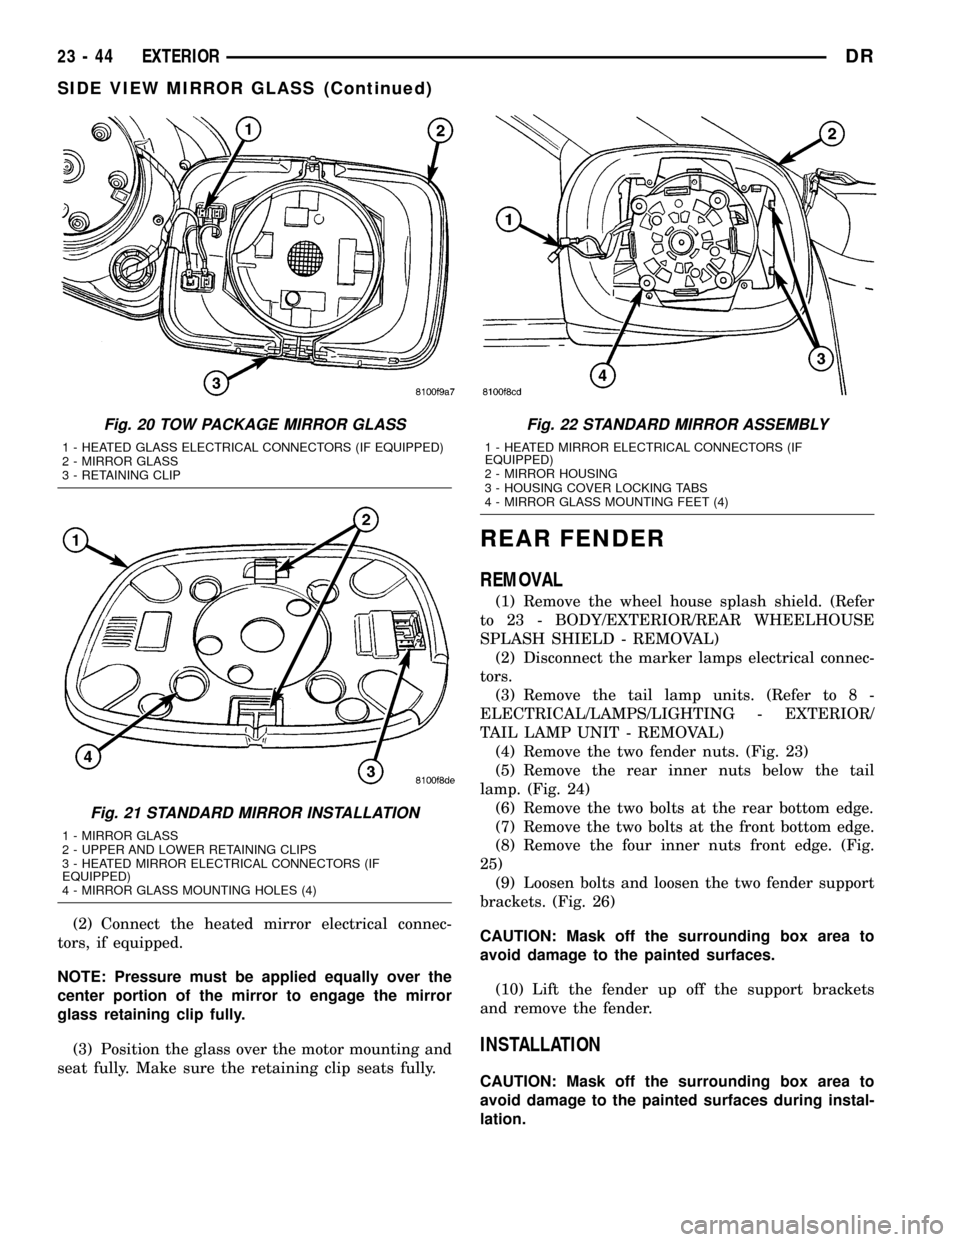
(2) Connect the heated mirror electrical connec-
tors, if equipped.
NOTE: Pressure must be applied equally over the
center portion of the mirror to engage the mirror
glass retaining clip fully.
(3) Position the glass over the motor mounting and
seat fully. Make sure the retaining clip seats fully.
REAR FENDER
REMOVAL
(1) Remove the wheel house splash shield. (Refer
to 23 - BODY/EXTERIOR/REAR WHEELHOUSE
SPLASH SHIELD - REMOVAL)
(2) Disconnect the marker lamps electrical connec-
tors.
(3) Remove the tail lamp units. (Refer to 8 -
ELECTRICAL/LAMPS/LIGHTING - EXTERIOR/
TAIL LAMP UNIT - REMOVAL)
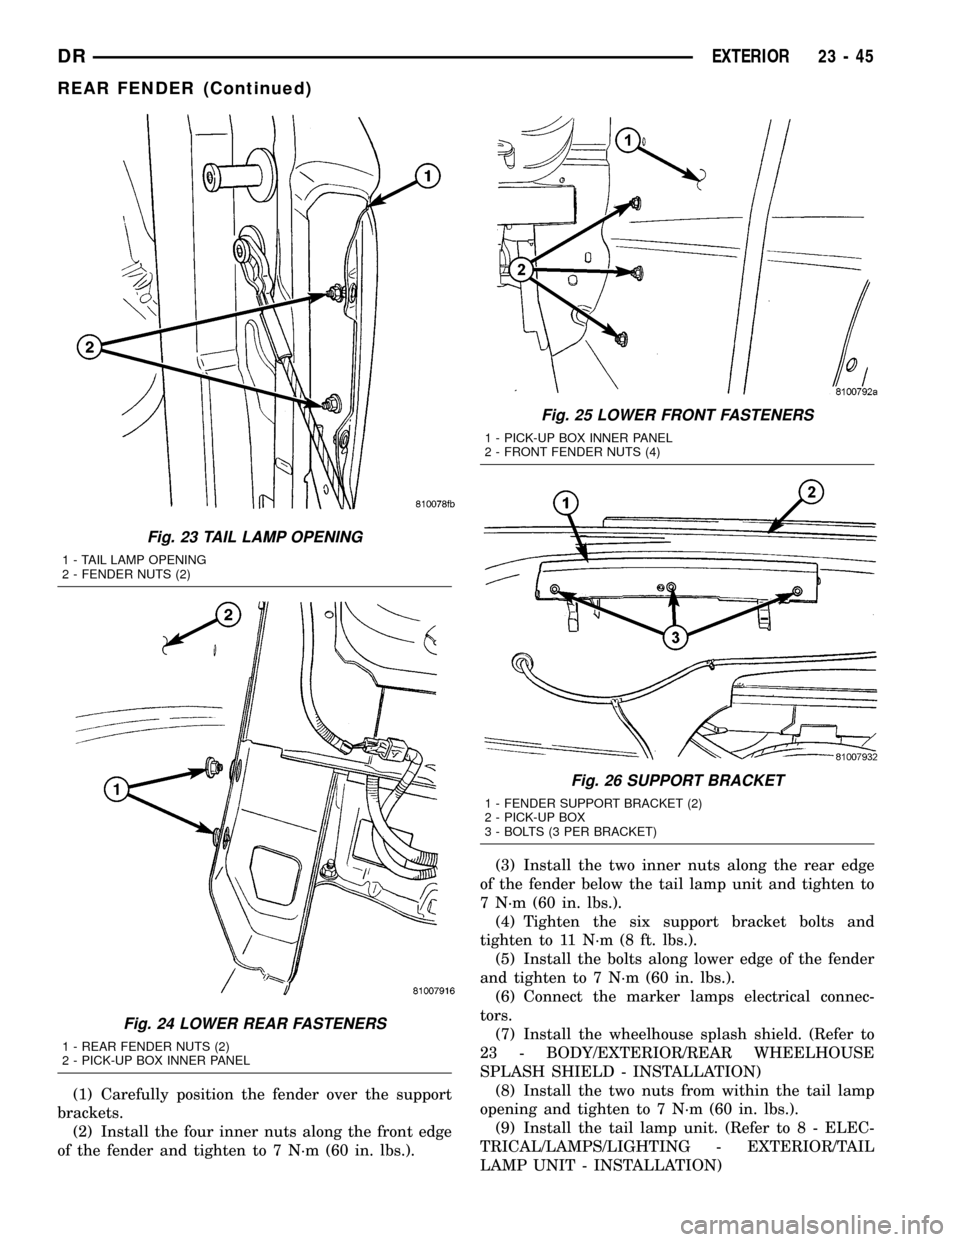
(4) Remove the two fender nuts. (Fig. 23)
(5) Remove the rear inner nuts below the tail
lamp. (Fig. 24)
(6) Remove the two bolts at the rear bottom edge.
(7) Remove the two bolts at the front bottom edge.
(8) Remove the four inner nuts front edge. (Fig.
25)
(9) Loosen bolts and loosen the two fender support
brackets. (Fig. 26)
CAUTION: Mask off the surrounding box area to
avoid damage to the painted surfaces.
(10) Lift the fender up off the support brackets
and remove the fender.
INSTALLATION
CAUTION: Mask off the surrounding box area to
avoid damage to the painted surfaces during instal-
lation.
Fig. 20 TOW PACKAGE MIRROR GLASS
1 - HEATED GLASS ELECTRICAL CONNECTORS (IF EQUIPPED)
2 - MIRROR GLASS
3 - RETAINING CLIP
Fig. 21 STANDARD MIRROR INSTALLATION
1 - MIRROR GLASS
2 - UPPER AND LOWER RETAINING CLIPS
3 - HEATED MIRROR ELECTRICAL CONNECTORS (IF
EQUIPPED)
4 - MIRROR GLASS MOUNTING HOLES (4)
Fig. 22 STANDARD MIRROR ASSEMBLY
1 - HEATED MIRROR ELECTRICAL CONNECTORS (IF
EQUIPPED)
2 - MIRROR HOUSING
3 - HOUSING COVER LOCKING TABS
4 - MIRROR GLASS MOUNTING FEET (4)
23 - 44 EXTERIORDR
SIDE VIEW MIRROR GLASS (Continued)
Page 2340 of 2627
(1) Carefully position the fender over the support
brackets.
(2) Install the four inner nuts along the front edge
of the fender and tighten to 7 N´m (60 in. lbs.).(3) Install the two inner nuts along the rear edge
of the fender below the tail lamp unit and tighten to
7 N´m (60 in. lbs.).
(4) Tighten the six support bracket bolts and
tighten to 11 N´m (8 ft. lbs.).
(5) Install the bolts along lower edge of the fender
and tighten to 7 N´m (60 in. lbs.).
(6) Connect the marker lamps electrical connec-
tors.
(7) Install the wheelhouse splash shield. (Refer to
23 - BODY/EXTERIOR/REAR WHEELHOUSE
SPLASH SHIELD - INSTALLATION)
(8) Install the two nuts from within the tail lamp
opening and tighten to 7 N´m (60 in. lbs.).
(9) Install the tail lamp unit. (Refer to 8 - ELEC-
TRICAL/LAMPS/LIGHTING - EXTERIOR/TAIL
LAMP UNIT - INSTALLATION)
Fig. 23 TAIL LAMP OPENING
1 - TAIL LAMP OPENING
2 - FENDER NUTS (2)
Fig. 24 LOWER REAR FASTENERS
1 - REAR FENDER NUTS (2)
2 - PICK-UP BOX INNER PANEL
Fig. 25 LOWER FRONT FASTENERS
1 - PICK-UP BOX INNER PANEL
2 - FRONT FENDER NUTS (4)
Fig. 26 SUPPORT BRACKET
1 - FENDER SUPPORT BRACKET (2)
2 - PICK-UP BOX
3 - BOLTS (3 PER BRACKET)
DREXTERIOR 23 - 45
REAR FENDER (Continued)
Page 2363 of 2627
HEADLINER
REMOVAL
(1) Remove the a-pillar trim. (Refer to 23 - BODY/
INTERIOR/A-PILLAR TRIM - REMOVAL)
(2) Remove the upper b-pillar trim. (Refer to 23 -
BODY/INTERIOR/B-PILLAR UPPER TRIM -
REMOVAL)
(3) Remove the upper c-pillar trim, if equipped.
(Refer to 23 - BODY/INTERIOR/C-PILLAR TRIM -
REMOVAL)
(4) Remove the coat hooks. (Refer to 23 - BODY/
INTERIOR/COAT HOOK - REMOVAL)
(5) Disconnect the headliner harness electrical con-
nector at the left a-pillar.
(6) Remove the dome lamp. (Refer to 8 - ELEC-
TRICAL/LAMPS/LIGHTING - INTERIOR/DOME
LAMP - REMOVAL)
(7) Remove the overhead console. (Refer to 8 -
ELECTRICAL/OVERHEAD CONSOLE - REMOVAL)
(8) Remove the sun visors. (Refer to 23 - BODY/
INTERIOR/SUN VISOR - REMOVAL)
(9) Remove the sun visor supports. (Refer to 23 -
BODY/INTERIOR/SUN VISOR SUPPORT -
REMOVAL)
(10) Lower the headliner and disconnect the center
high mounted stop light.
(11) Lower the front of the headliner down to the
floor just in front of the instrument panel and
remove through the passenger door.
INSTALLATION
(1) Install the headliner into the vehicle through
the passenger door.
(2) Raise the headliner and insert the right side
above right side pillar trim pieces.
(3) Connect the center high mounted stop light
electrical connector.
(4) Install the sun visor supports. (Refer to 23 -
BODY/INTERIOR/SUN VISOR SUPPORT - INSTAL-
LATION)
(5) Install the coat hooks. (Refer to 23 - BODY/IN-
TERIOR/COAT HOOK - INSTALLATION)
(6) Install the sun visors. (Refer to 23 - BODY/IN-
TERIOR/SUN VISOR - INSTALLATION)
(7) Install the overhead console. (Refer to 8 -
ELECTRICAL/OVERHEAD CONSOLE - INSTALLA-
TION)
(8) Install the dome lamp. (Refer to 8 - ELECTRI-
CAL/LAMPS/LIGHTING - INTERIOR/DOME LAMP
- INSTALLATION)
(9) Connect the headliner harness electrical con-
nector at the left a-pillar.
(10) Install the upper c-pillar trim, if equipped.
(Refer to 23 - BODY/INTERIOR/C-PILLAR TRIM -
INSTALLATION)(11) Install the upper b-pillar trim. (Refer to 23 -
BODY/INTERIOR/B-PILLAR UPPER TRIM -
INSTALLATION)
(12) Install the upper a-pillar trim. (Refer to 23 -
BODY/INTERIOR/A-PILLAR TRIM - INSTALLA-
TION)
B-PILLAR GRAB HANDLE
REMOVAL
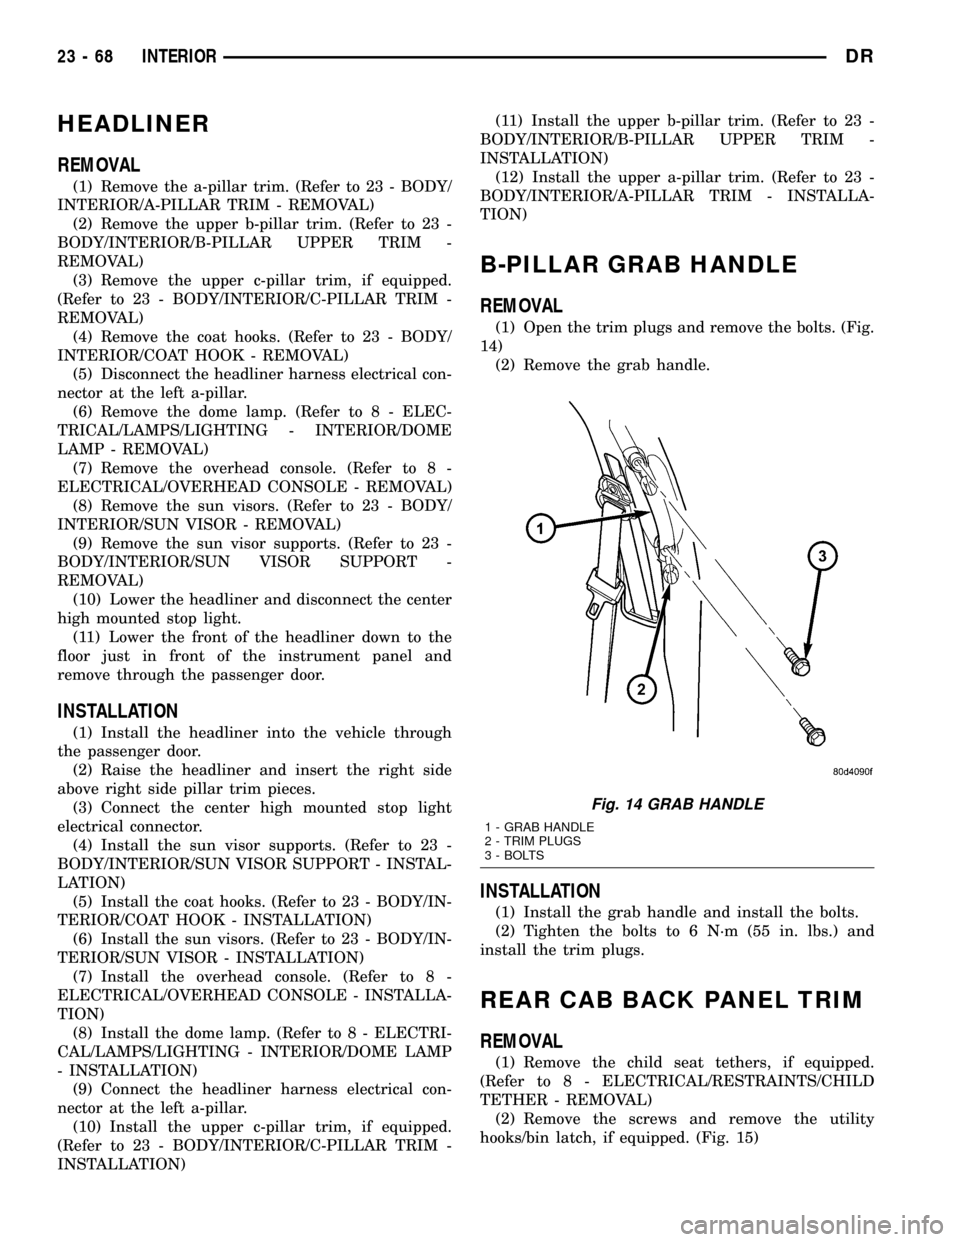
(1) Open the trim plugs and remove the bolts. (Fig.
14)
(2) Remove the grab handle.
INSTALLATION
(1) Install the grab handle and install the bolts.
(2) Tighten the bolts to 6 N´m (55 in. lbs.) and
install the trim plugs.
REAR CAB BACK PANEL TRIM
REMOVAL
(1) Remove the child seat tethers, if equipped.
(Refer to 8 - ELECTRICAL/RESTRAINTS/CHILD
TETHER - REMOVAL)
(2) Remove the screws and remove the utility
hooks/bin latch, if equipped. (Fig. 15)
Fig. 14 GRAB HANDLE
1 - GRAB HANDLE
2 - TRIM PLUGS
3 - BOLTS
23 - 68 INTERIORDR
Page 2391 of 2627
NOTE:
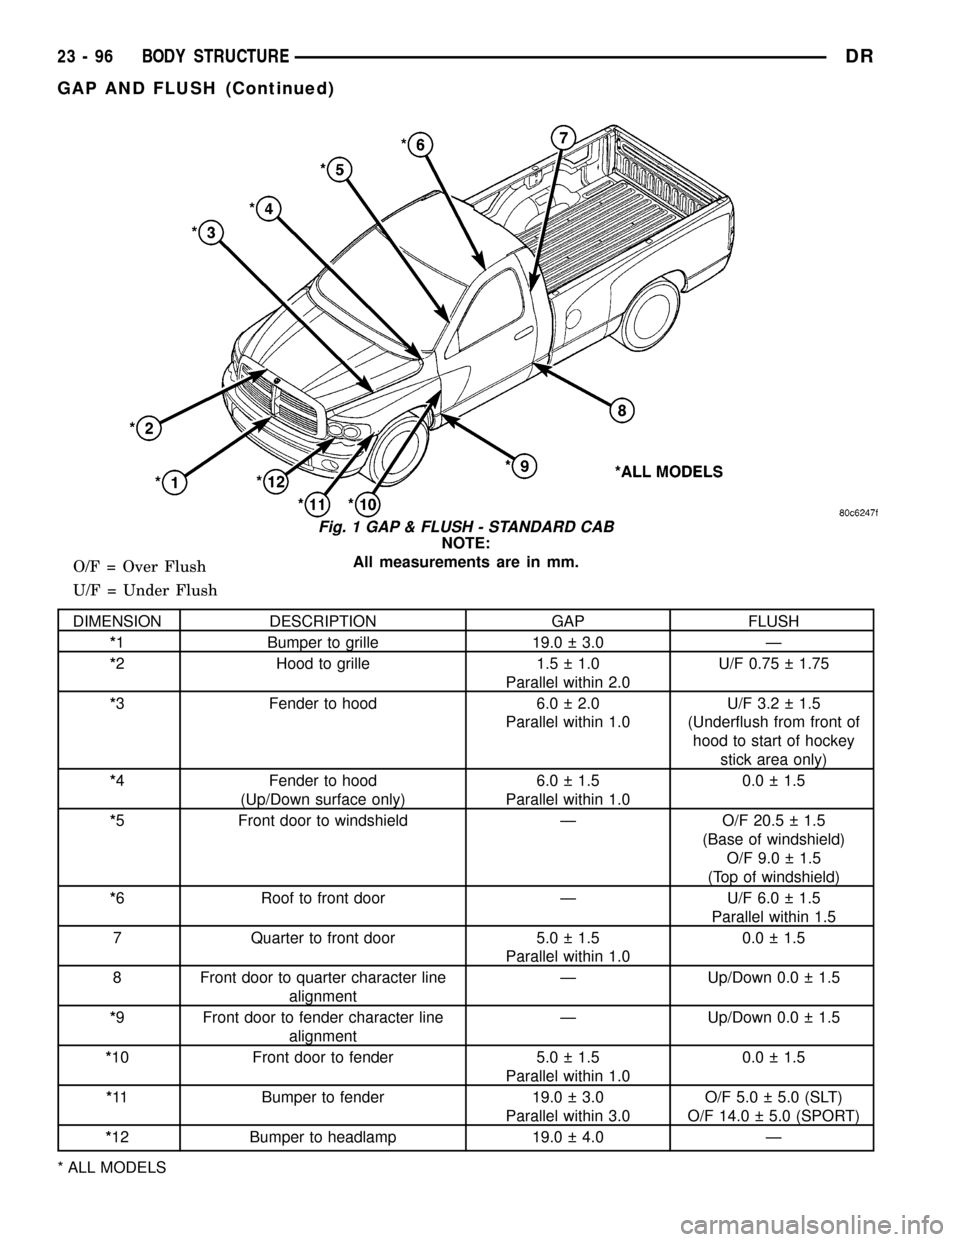
All measurements are in mm.
O/F = Over Flush
U/F = Under Flush
DIMENSION DESCRIPTION GAP FLUSH
*1 Bumper to grille 19.0 3.0 Ð
*2 Hood to grille 1.5 1.0
Parallel within 2.0U/F 0.75 1.75
*3 Fender to hood 6.0 2.0
Parallel within 1.0U/F 3.2 1.5
(Underflush from front of
hood to start of hockey
stick area only)
*4 Fender to hood
(Up/Down surface only)6.0 1.5
Parallel within 1.00.0 1.5
*5 Front door to windshield Ð O/F 20.5 1.5
(Base of windshield)
O/F 9.0 1.5
(Top of windshield)
*6 Roof to front door Ð U/F 6.0 1.5
Parallel within 1.5
7 Quarter to front door 5.0 1.5
Parallel within 1.00.0 1.5
8 Front door to quarter character line
alignmentÐ Up/Down 0.0 1.5
*9 Front door to fender character line
alignmentÐ Up/Down 0.0 1.5
*10 Front door to fender 5.0 1.5
Parallel within 1.00.0 1.5
*11 Bumper to fender 19.0 3.0
Parallel within 3.0O/F 5.0 5.0 (SLT)
O/F 14.0 5.0 (SPORT)
*12 Bumper to headlamp 19.0 4.0 Ð
* ALL MODELS
Fig. 1 GAP & FLUSH - STANDARD CAB
23 - 96 BODY STRUCTUREDR
GAP AND FLUSH (Continued)
Page 2415 of 2627

WELD LOCATIONS
SPECIFICATIONS
INDEX
DESCRIPTION FIGURE
FENDER BRACE, CLOSURE TUBE AND FRAME MOUNTING BRACKET TO FRONT
FENDER SUPPORT, FRONT FENDER AND RADIATOR TUBE31
STEERING COLUMN SUPPORT, CONNECTOR WIRING BRACKET AND WELD NUTS
TO LOWER PLENUM PANEL32
WIPER ATTACHING WELD NUTS AND VACUUM RESERVOIR ATTACHING STUDS TO
COWL PAR PANEL33
DASH PANEL TO FRONT FLOOR PAN 34
DASH PANEL TO LOWER PLENUM PANEL 35
LOWER PLENUM PANEL TO COWL BACK PANEL 36
FRONT FENDER AND RADIATOR TUBE DASH PANEL, INSTRUMENT PANEL
MOUNTING BRACKET, AND WELD NUTS TO COWL SIDE PANEL - LEFT SIDE37
DASH PANEL, LOWER PLENUM PANEL AND COWL PANEL BAR TO COWL SIDE
PANEL - LEFT SIDE38
FRONT FENDER AND RADIATOR TUBE DASH PANEL, INSTRUMENT PANEL
MOUNTING BRACKET AND WELD NUTS TO COWL SIDE PANEL - RIGHT SIDE39
DASH PANEL, LOWER PLENUM PANEL AND COWL PANEL BAR TO COWL SIDE
PANEL - RIGHT SIDE40
REINFORCEMENT AND HEADLAMP MOUNTING PANEL TO OUTER FENDER PANEL 41
SEAT MOUNTING FRONT BRACKETS TO SEAT MOUNTING FRONT CROSSMEMBER
TO FRONT FLOOR PAN42
AIR BAG MODULE BRACKET SHIFTER MOUNTING PLATE AND REAR FLOOR PANE
TO FRONT FLOOR PAN43
RIGHT TO LEFT REAR FLOOR CROSSMEMBER AND RIGHT TO LEFT SEAT
MOUNTING CROSSMEMBER44
REAR FLOOR CROSSMEMBER, SEAT MOUNTING CROSSMEMBER AND
UNDERBODY SUPPORT TO FLOOR SILL45
SEAT MOUNTING FRONT CROSSMEMBER TO FRONT FLOOR PAN TO UNDERBODY
SUPPORT46
FRONT SEAT MOUNTING CROSSMEMBERS TO FRONT SEAT MOUNTING BRACKET
TO FRONT FLOOR PAN47
REAR FLOOR CROSSMEMBERS TO REAR FLOOR PAN 48
FLOOR SILL TO FRONT SEAT MOUNTING CROSSMEMBER, FRONT AND REAR
FLOOR PAN49
AIR BAG MODULE BRACKET, SHIFTER MOUNTING PLATE AND FRONT SEAT
MOUNTING CROSSMEMBER TO FRONT FLOOR PAN50
REAR SEAT MIDDLE MOUNTING PLATE TO REAR FLOOR PAN TO FRONT FLOOR
PA N51
REAR FLOOR CROSSMEMBER, SEAT MOUNTING CROSSMEMBER AND
UNDERBODY SUPPORT TO FLOOR SILL52
LEFT REAR CROSSMEMBER TO RIGHT REAR CROSSMEMBER TO REAR FLOOR
PA N53
23 - 120 BODY STRUCTUREDR
Page 2502 of 2627
The illumination lamps are available for service
replacement.
REMOVAL
WARNING: ON VEHICLES EQUIPPED WITH AIR-
BAGS, DISABLE THE AIRBAG SYSTEM BEFORE
ATTEMPTING ANY STEERING WHEEL, STEERING
COLUMN, OR INSTRUMENT PANEL COMPONENT
DIAGNOSIS OR SERVICE. DISCONNECT AND ISO-
LATE THE BATTERY NEGATIVE (GROUND) CABLE,
THEN WAIT TWO MINUTES FOR THE AIRBAG SYS-
TEM CAPACITOR TO DISCHARGE BEFORE PER-
FORMING FURTHER DIAGNOSIS OR SERVICE. THIS
IS THE ONLY SURE WAY TO DISABLE THE AIRBAG
SYSTEM. FAILURE TO TAKE THE PROPER PRE-CAUTIONS COULD RESULT IN AN ACCIDENTAL
AIRBAG DEPLOYMENT AND POSSIBLE PERSONAL
INJURY.
(1) Disconnect and isolate the battery negative
cable.
(2) Remove the center bezel from the instrument
panel (Refer to 23 - BODY/INSTRUMENT PANEL/
INSTRUMENT PANEL CENTER BEZEL -
REMOVAL).
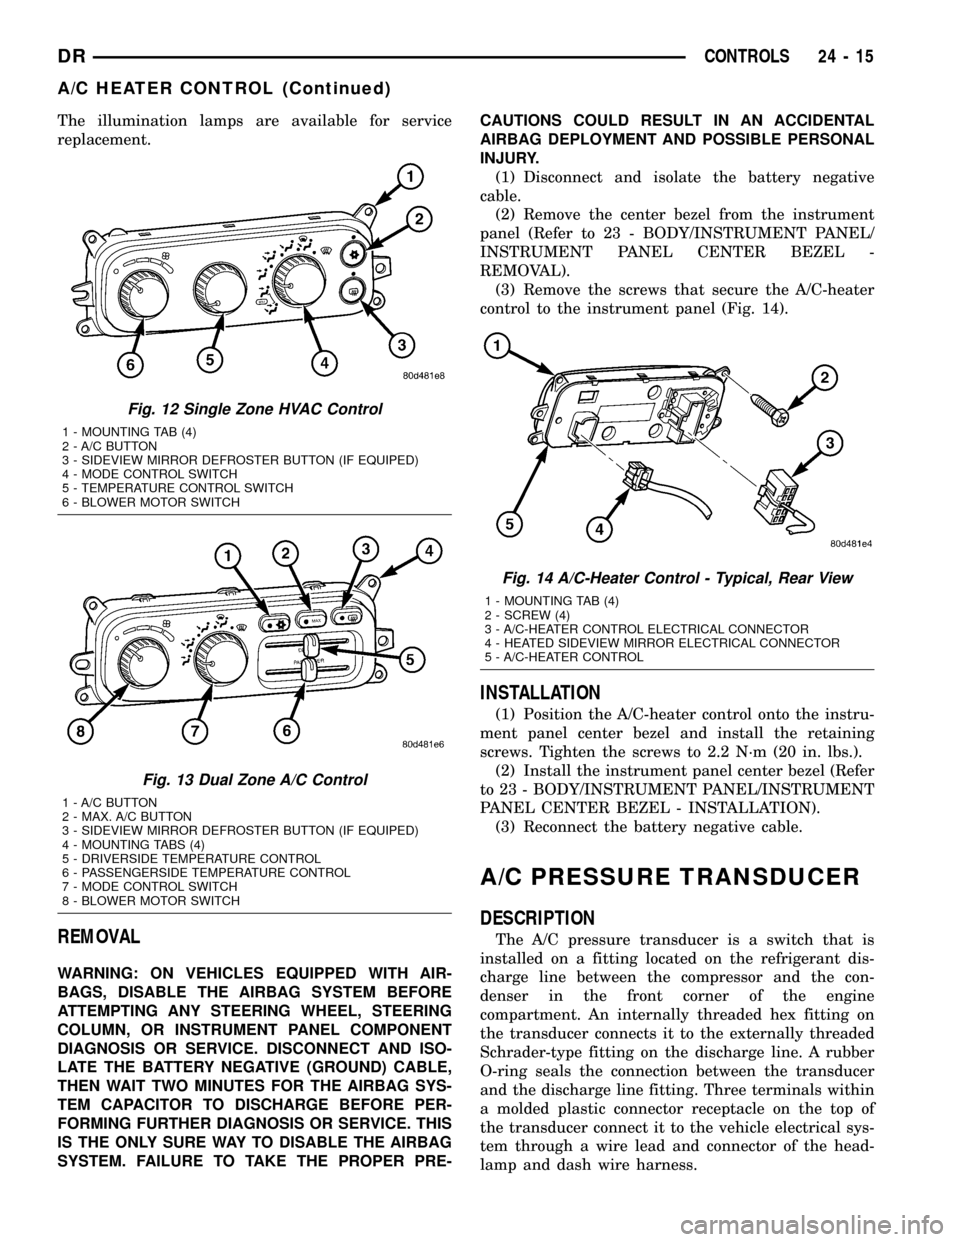
(3) Remove the screws that secure the A/C-heater
control to the instrument panel (Fig. 14).
INSTALLATION
(1) Position the A/C-heater control onto the instru-
ment panel center bezel and install the retaining
screws. Tighten the screws to 2.2 N´m (20 in. lbs.).
(2) Install the instrument panel center bezel (Refer
to 23 - BODY/INSTRUMENT PANEL/INSTRUMENT
PANEL CENTER BEZEL - INSTALLATION).
(3) Reconnect the battery negative cable.
A/C PRESSURE TRANSDUCER
DESCRIPTION
The A/C pressure transducer is a switch that is
installed on a fitting located on the refrigerant dis-
charge line between the compressor and the con-
denser in the front corner of the engine
compartment. An internally threaded hex fitting on
the transducer connects it to the externally threaded
Schrader-type fitting on the discharge line. A rubber
O-ring seals the connection between the transducer
and the discharge line fitting. Three terminals within
a molded plastic connector receptacle on the top of
the transducer connect it to the vehicle electrical sys-
tem through a wire lead and connector of the head-
lamp and dash wire harness.
Fig. 12 Single Zone HVAC Control
1 - MOUNTING TAB (4)
2 - A/C BUTTON
3 - SIDEVIEW MIRROR DEFROSTER BUTTON (IF EQUIPED)
4 - MODE CONTROL SWITCH
5 - TEMPERATURE CONTROL SWITCH
6 - BLOWER MOTOR SWITCH
Fig. 13 Dual Zone A/C Control
1 - A/C BUTTON
2 - MAX. A/C BUTTON
3 - SIDEVIEW MIRROR DEFROSTER BUTTON (IF EQUIPED)
4 - MOUNTING TABS (4)
5 - DRIVERSIDE TEMPERATURE CONTROL
6 - PASSENGERSIDE TEMPERATURE CONTROL
7 - MODE CONTROL SWITCH
8 - BLOWER MOTOR SWITCH
Fig. 14 A/C-Heater Control - Typical, Rear View
1 - MOUNTING TAB (4)
2 - SCREW (4)
3 - A/C-HEATER CONTROL ELECTRICAL CONNECTOR
4 - HEATED SIDEVIEW MIRROR ELECTRICAL CONNECTOR
5 - A/C-HEATER CONTROL
DRCONTROLS 24 - 15
A/C HEATER CONTROL (Continued)
Page 2551 of 2627
HEATER INLET HOSE
REMOVAL
The heater inlet hose is constructed from rubber
hoses and plastic hose connectors. The ends are
secured to the heater core, engine and engine coolant
reservoir (depending on engine application) by spring
tension clamps.
WARNING: REVIEW THE WARNINGS AND CAU-
TIONS IN THE FRONT OF THIS SECTION BEFORE
PERFORMING THE FOLLOWING OPERATION (Refer
to 24 - HEATING & AIR CONDITIONING/PLUMBING -
WARNING) and (Refer to 24 - HEATING & AIR CON-
DITIONING/PLUMBING - CAUTION).
(1) Drain the engine cooling system (Refer to 7 -
COOLING - STANDARD PROCEDURE - COOLING
SYSTEM DRAIN).
(2) Remove the heater hose retaining brackets as
required (depending on engine application).
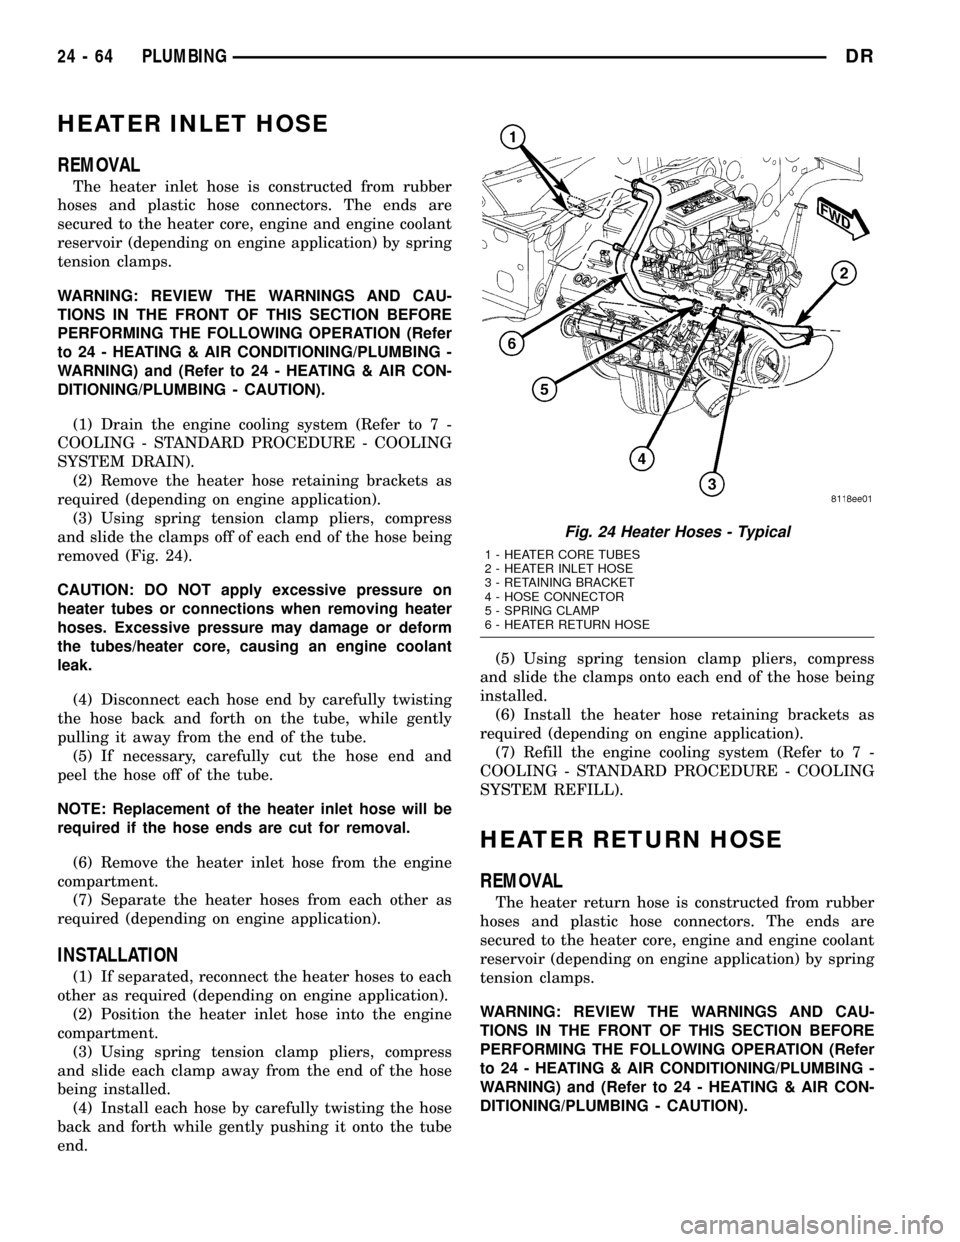
(3) Using spring tension clamp pliers, compress
and slide the clamps off of each end of the hose being
removed (Fig. 24).
CAUTION: DO NOT apply excessive pressure on
heater tubes or connections when removing heater
hoses. Excessive pressure may damage or deform
the tubes/heater core, causing an engine coolant
leak.
(4) Disconnect each hose end by carefully twisting
the hose back and forth on the tube, while gently
pulling it away from the end of the tube.
(5) If necessary, carefully cut the hose end and
peel the hose off of the tube.
NOTE: Replacement of the heater inlet hose will be
required if the hose ends are cut for removal.
(6) Remove the heater inlet hose from the engine
compartment.
(7) Separate the heater hoses from each other as
required (depending on engine application).
INSTALLATION
(1) If separated, reconnect the heater hoses to each
other as required (depending on engine application).
(2) Position the heater inlet hose into the engine
compartment.
(3) Using spring tension clamp pliers, compress
and slide each clamp away from the end of the hose
being installed.
(4) Install each hose by carefully twisting the hose
back and forth while gently pushing it onto the tube
end.(5) Using spring tension clamp pliers, compress
and slide the clamps onto each end of the hose being
installed.
(6) Install the heater hose retaining brackets as
required (depending on engine application).
(7) Refill the engine cooling system (Refer to 7 -
COOLING - STANDARD PROCEDURE - COOLING
SYSTEM REFILL).
HEATER RETURN HOSE
REMOVAL
The heater return hose is constructed from rubber
hoses and plastic hose connectors. The ends are
secured to the heater core, engine and engine coolant
reservoir (depending on engine application) by spring
tension clamps.
WARNING: REVIEW THE WARNINGS AND CAU-
TIONS IN THE FRONT OF THIS SECTION BEFORE
PERFORMING THE FOLLOWING OPERATION (Refer
to 24 - HEATING & AIR CONDITIONING/PLUMBING -
WARNING) and (Refer to 24 - HEATING & AIR CON-
DITIONING/PLUMBING - CAUTION).
Fig. 24 Heater Hoses - Typical
1 - HEATER CORE TUBES
2 - HEATER INLET HOSE
3 - RETAINING BRACKET
4 - HOSE CONNECTOR
5 - SPRING CLAMP
6 - HEATER RETURN HOSE
24 - 64 PLUMBINGDR
Page 2552 of 2627
(1) Drain the engine cooling system (Refer to 7 -
COOLING - STANDARD PROCEDURE - COOLING
SYSTEM DRAIN).
(2) Remove the heater hose retaining brackets as
required (depending on engine application).
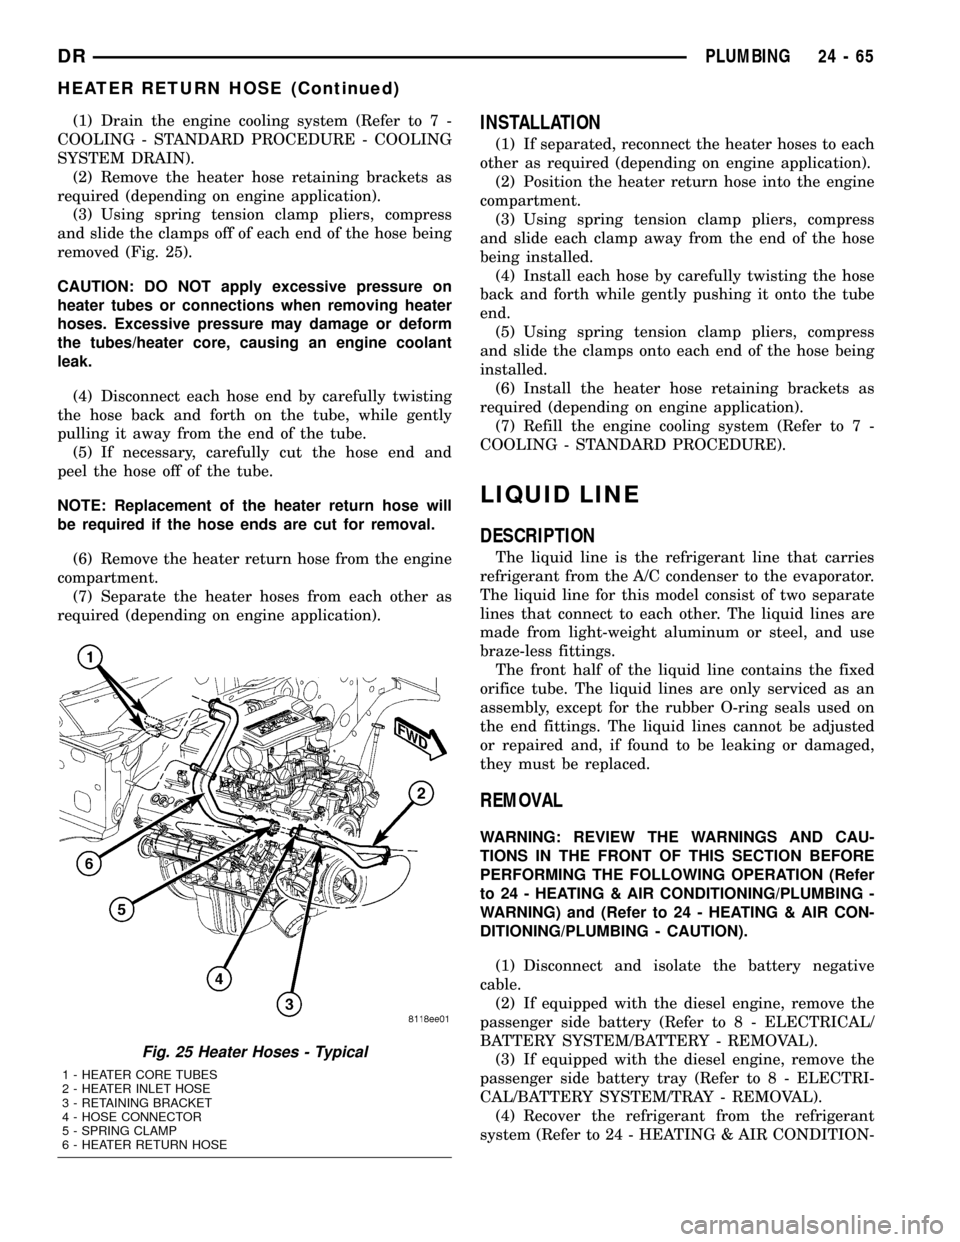
(3) Using spring tension clamp pliers, compress
and slide the clamps off of each end of the hose being
removed (Fig. 25).
CAUTION: DO NOT apply excessive pressure on
heater tubes or connections when removing heater
hoses. Excessive pressure may damage or deform
the tubes/heater core, causing an engine coolant
leak.
(4) Disconnect each hose end by carefully twisting
the hose back and forth on the tube, while gently
pulling it away from the end of the tube.
(5) If necessary, carefully cut the hose end and
peel the hose off of the tube.
NOTE: Replacement of the heater return hose will
be required if the hose ends are cut for removal.
(6) Remove the heater return hose from the engine
compartment.
(7) Separate the heater hoses from each other as
required (depending on engine application).INSTALLATION
(1) If separated, reconnect the heater hoses to each
other as required (depending on engine application).
(2) Position the heater return hose into the engine
compartment.
(3) Using spring tension clamp pliers, compress
and slide each clamp away from the end of the hose
being installed.
(4) Install each hose by carefully twisting the hose
back and forth while gently pushing it onto the tube
end.
(5) Using spring tension clamp pliers, compress
and slide the clamps onto each end of the hose being
installed.
(6) Install the heater hose retaining brackets as
required (depending on engine application).
(7) Refill the engine cooling system (Refer to 7 -
COOLING - STANDARD PROCEDURE).
LIQUID LINE
DESCRIPTION
The liquid line is the refrigerant line that carries
refrigerant from the A/C condenser to the evaporator.
The liquid line for this model consist of two separate
lines that connect to each other. The liquid lines are
made from light-weight aluminum or steel, and use
braze-less fittings.
The front half of the liquid line contains the fixed
orifice tube. The liquid lines are only serviced as an
assembly, except for the rubber O-ring seals used on
the end fittings. The liquid lines cannot be adjusted
or repaired and, if found to be leaking or damaged,
they must be replaced.
REMOVAL
WARNING: REVIEW THE WARNINGS AND CAU-
TIONS IN THE FRONT OF THIS SECTION BEFORE
PERFORMING THE FOLLOWING OPERATION (Refer
to 24 - HEATING & AIR CONDITIONING/PLUMBING -
WARNING) and (Refer to 24 - HEATING & AIR CON-
DITIONING/PLUMBING - CAUTION).
(1) Disconnect and isolate the battery negative
cable.
(2) If equipped with the diesel engine, remove the
passenger side battery (Refer to 8 - ELECTRICAL/
BATTERY SYSTEM/BATTERY - REMOVAL).
(3) If equipped with the diesel engine, remove the
passenger side battery tray (Refer to 8 - ELECTRI-
CAL/BATTERY SYSTEM/TRAY - REMOVAL).
(4) Recover the refrigerant from the refrigerant
system (Refer to 24 - HEATING & AIR CONDITION-
Fig. 25 Heater Hoses - Typical
1 - HEATER CORE TUBES
2 - HEATER INLET HOSE
3 - RETAINING BRACKET
4 - HOSE CONNECTOR
5 - SPRING CLAMP
6 - HEATER RETURN HOSE
DRPLUMBING 24 - 65
HEATER RETURN HOSE (Continued)