Alignment DODGE RAM 1500 1998 2.G User Guide
[x] Cancel search | Manufacturer: DODGE, Model Year: 1998, Model line: RAM 1500, Model: DODGE RAM 1500 1998 2.GPages: 2627
Page 55 of 2627
(6) Remove the snap ring, from the lower control
arm (HD 4X2 only)
NOTE: Extreme pressure lubrication must be used
on the threaded portions of the tool. This will
increase the longevity of the tool and insure proper
operation during the removal and installation pro-
cess.
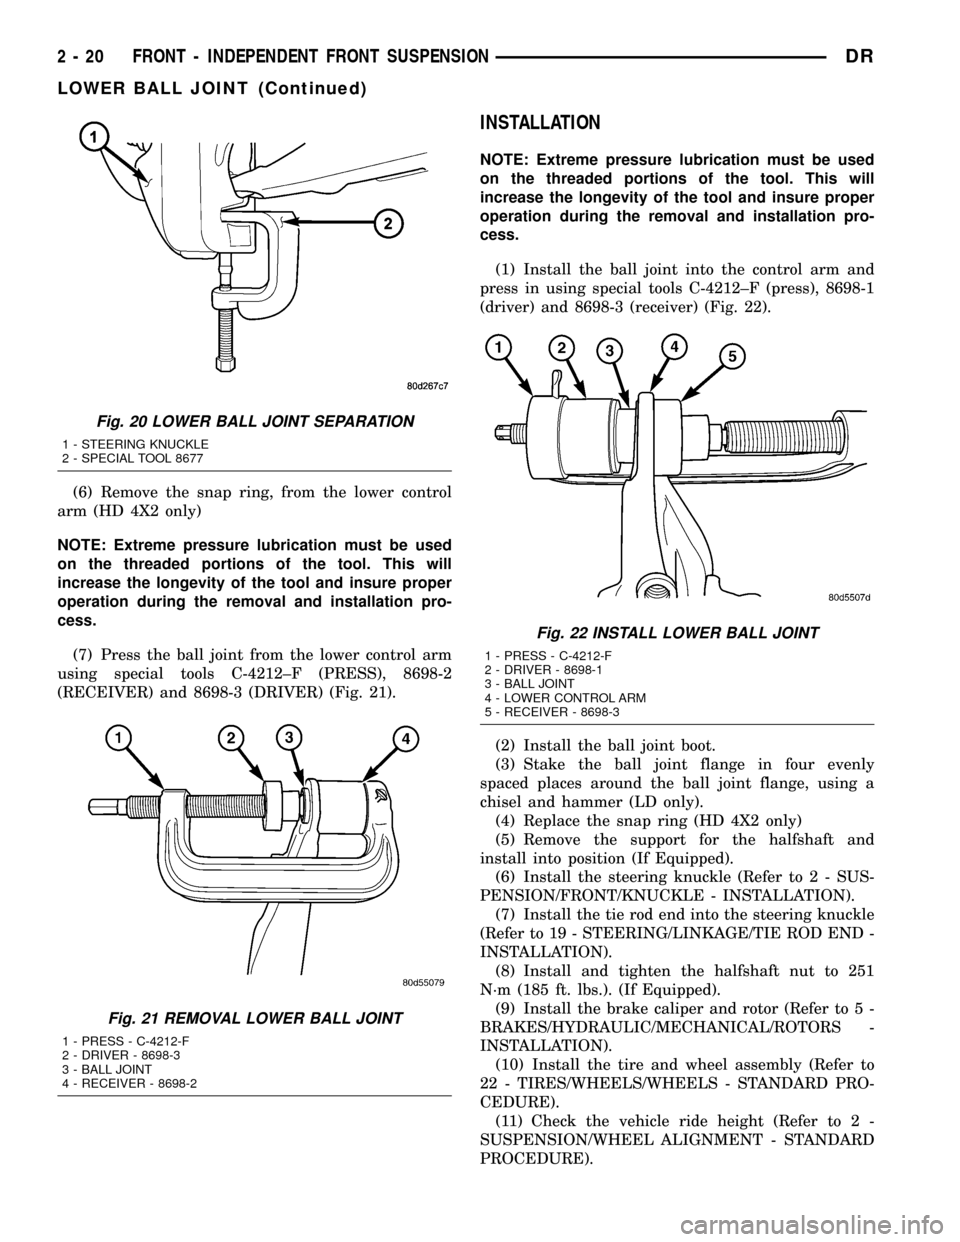
(7) Press the ball joint from the lower control arm
using special tools C-4212±F (PRESS), 8698-2
(RECEIVER) and 8698-3 (DRIVER) (Fig. 21).
INSTALLATION
NOTE: Extreme pressure lubrication must be used
on the threaded portions of the tool. This will
increase the longevity of the tool and insure proper
operation during the removal and installation pro-
cess.
(1) Install the ball joint into the control arm and
press in using special tools C-4212±F (press), 8698-1
(driver) and 8698-3 (receiver) (Fig. 22).
(2) Install the ball joint boot.
(3) Stake the ball joint flange in four evenly
spaced places around the ball joint flange, using a
chisel and hammer (LD only).
(4) Replace the snap ring (HD 4X2 only)
(5) Remove the support for the halfshaft and
install into position (If Equipped).
(6) Install the steering knuckle (Refer to 2 - SUS-
PENSION/FRONT/KNUCKLE - INSTALLATION).
(7) Install the tie rod end into the steering knuckle
(Refer to 19 - STEERING/LINKAGE/TIE ROD END -
INSTALLATION).
(8) Install and tighten the halfshaft nut to 251
N´m (185 ft. lbs.). (If Equipped).
(9) Install the brake caliper and rotor (Refer to 5 -
BRAKES/HYDRAULIC/MECHANICAL/ROTORS -
INSTALLATION).
(10) Install the tire and wheel assembly (Refer to
22 - TIRES/WHEELS/WHEELS - STANDARD PRO-
CEDURE).
(11) Check the vehicle ride height (Refer to 2 -
SUSPENSION/WHEEL ALIGNMENT - STANDARD
PROCEDURE).
Fig. 20 LOWER BALL JOINT SEPARATION
1 - STEERING KNUCKLE
2 - SPECIAL TOOL 8677
Fig. 21 REMOVAL LOWER BALL JOINT
1 - PRESS - C-4212-F
2 - DRIVER - 8698-3
3 - BALL JOINT
4 - RECEIVER - 8698-2
Fig. 22 INSTALL LOWER BALL JOINT
1 - PRESS - C-4212-F
2 - DRIVER - 8698-1
3 - BALL JOINT
4 - LOWER CONTROL ARM
5 - RECEIVER - 8698-3
2 - 20 FRONT - INDEPENDENT FRONT SUSPENSIONDR
LOWER BALL JOINT (Continued)
Page 56 of 2627

(12) Perform a wheel alignment (Refer to 2 - SUS-
PENSION/WHEEL ALIGNMENT - STANDARD
PROCEDURE).
LOWER CONTROL ARM
REMOVAL
REMOVAL - 4X4 (LD)
(1) Raise and support the vehicle.
(2) Remove the wheel and tire assembly.
(3) Remove the upper ball joint nut. Separate ball
joint from the steering knuckle with Remover 8677.
(4) Remove the front halfshaft, (Refer to 3 - DIF-
FERENTIAL & DRIVELINE/HALF SHAFT -
REMOVAL).
(5) Remove the torsion bar, (Refer to 2 - SUSPEN-
SION/FRONT/TRACK BAR - REMOVAL).
(6) Remove the shock absorber lower bolt.
(7) Remove the stabilizer bar link (Refer to 2 -
SUSPENSION/FRONT/STABILIZER LINK -
REMOVAL).
(8) Remove the lower ball joint nut. Separate ball
joint from the steering knuckle with Remover 8677.
(9) Remove the control arm pivot bolts and suspen-
sion arm from frame rail brackets (Fig. 23).
REMOVAL - 4X2
(1) Raise and support the vehicle.
(2) Remove the tire and wheel assembly.
(3) Support the lower control arm at the outboard
side of the lower control arm to support vehicle
weight.(4) Remove the shock (Refer to 2 - SUSPENSION/
FRONT/SHOCK - REMOVAL).
(5) Install Spring Compressor DD-1278 up through
the lower suspension arm, coil spring and shock hole
in the frame. The bell-shaped adapter goes against
the lower suspension arm. Install the nut on top of
the tool at the shock hole.
(6) Tighten the spring compressor nut against bell-
shaped adapter finger tight then loosen 1/2 turn.
NOTE: This will hold the spring in place until the
lower suspension arm is separated from the steer-
ing knuckle.
(7) Remove the stabilizer link (Refer to 2 - SUS-
PENSION/FRONT/STABILIZER LINK - REMOVAL).
(8) Remove the lower ball joint nut at the steering
knuckle.
(9) Install Ball Joint Remover tool 8677 on the
lower ball joint and separate the ball joint from the
knuckle.
NOTE: Do not allow the upper control arm and
steering knuckle to rebound downwards they must
be supported.
(10) Support the upper control arm and steering
knuckle out of the way.
(11) Remove the lower control arm support.
(12) Tighten the spring compressor tool to allow
clearance for the lower ball joint to be removed out of
the knuckle.
(13) Loosen the tension on the spring compressor
tool slowly allowing the lower suspension arm to
pivot downward.
(14) Remove the spring compressor tool.
(15) Remove coil spring and isolator pad from the
vehicle (Fig. 26).
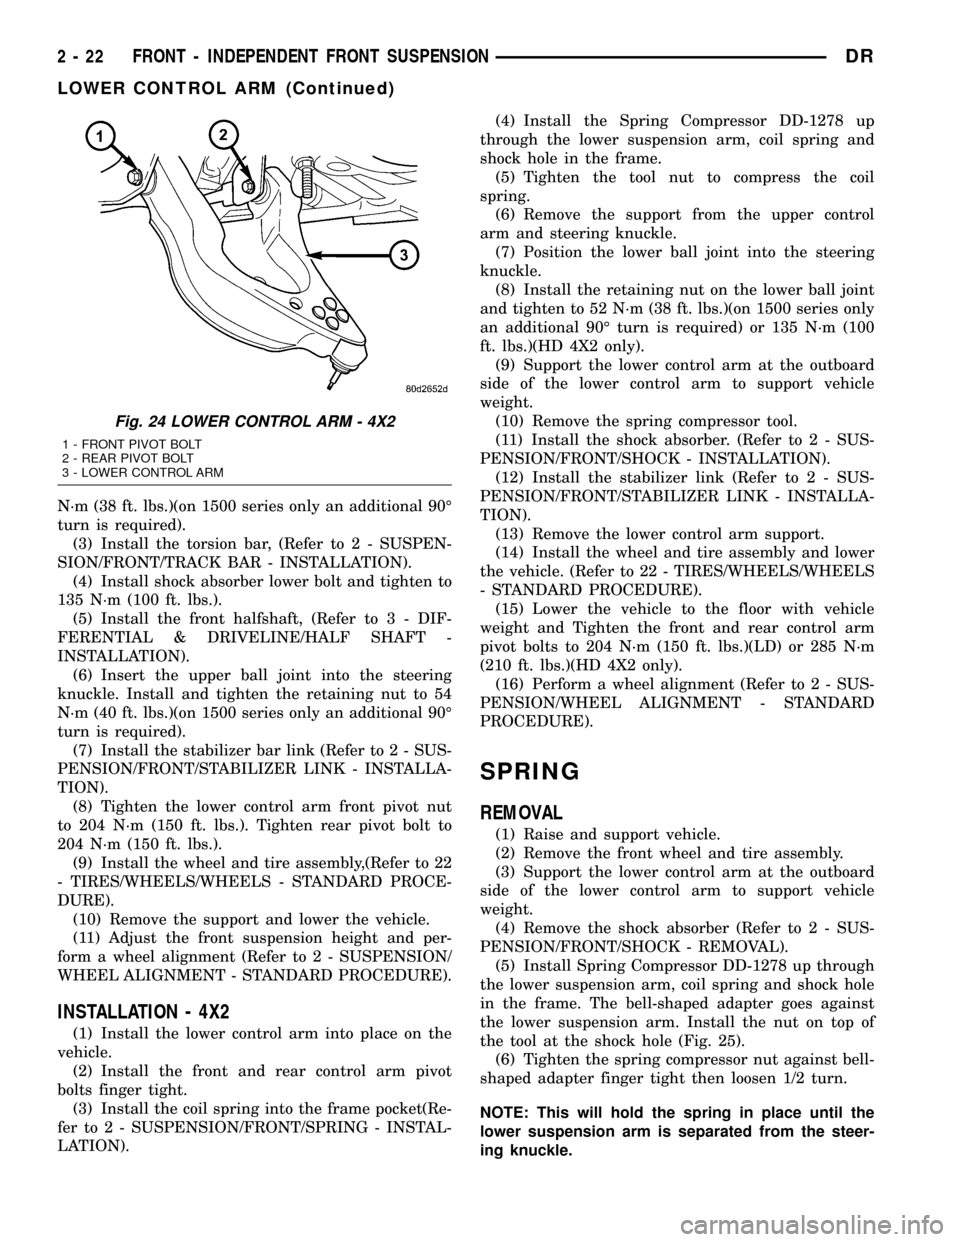
(16) Remove the front and rear pivot bolts (Fig.
24).
(17) Remove the lower control arm.
INSTALLATION
INSTALLATION - 4X4 (LD)
(1) Position the lower control arm at the frame rail
brackets. Install the pivot bolts and nuts. Tighten the
nuts finger-tight.
CAUTION: The ball joint stud taper must be CLEAN
and DRY before installing the knuckle. Clean the
stud taper with mineral spirits to remove dirt and
grease.
(2) Insert the lower ball joint into the steering
knuckle. Install and tighten the retaining nut to 52
Fig. 23 LOWER CONTROL ARM
1 - LOWER CONTROL ARM
2 - UPPER CONTROL ARM
3 - FRONT BOLT
4 - NUTS
5 - REAR BOLT
DRFRONT - INDEPENDENT FRONT SUSPENSION 2 - 21
LOWER BALL JOINT (Continued)
Page 57 of 2627
N´m (38 ft. lbs.)(on 1500 series only an additional 90É
turn is required).
(3) Install the torsion bar, (Refer to 2 - SUSPEN-
SION/FRONT/TRACK BAR - INSTALLATION).
(4) Install shock absorber lower bolt and tighten to
135 N´m (100 ft. lbs.).
(5) Install the front halfshaft, (Refer to 3 - DIF-
FERENTIAL & DRIVELINE/HALF SHAFT -
INSTALLATION).
(6) Insert the upper ball joint into the steering
knuckle. Install and tighten the retaining nut to 54
N´m (40 ft. lbs.)(on 1500 series only an additional 90É
turn is required).
(7) Install the stabilizer bar link (Refer to 2 - SUS-
PENSION/FRONT/STABILIZER LINK - INSTALLA-
TION).
(8) Tighten the lower control arm front pivot nut
to 204 N´m (150 ft. lbs.). Tighten rear pivot bolt to
204 N´m (150 ft. lbs.).
(9) Install the wheel and tire assembly,(Refer to 22
- TIRES/WHEELS/WHEELS - STANDARD PROCE-
DURE).
(10) Remove the support and lower the vehicle.
(11) Adjust the front suspension height and per-
form a wheel alignment (Refer to 2 - SUSPENSION/
WHEEL ALIGNMENT - STANDARD PROCEDURE).
INSTALLATION - 4X2
(1) Install the lower control arm into place on the
vehicle.
(2) Install the front and rear control arm pivot
bolts finger tight.
(3) Install the coil spring into the frame pocket(Re-
fer to 2 - SUSPENSION/FRONT/SPRING - INSTAL-
LATION).(4) Install the Spring Compressor DD-1278 up
through the lower suspension arm, coil spring and
shock hole in the frame.
(5) Tighten the tool nut to compress the coil
spring.
(6) Remove the support from the upper control
arm and steering knuckle.
(7) Position the lower ball joint into the steering
knuckle.
(8) Install the retaining nut on the lower ball joint
and tighten to 52 N´m (38 ft. lbs.)(on 1500 series only
an additional 90É turn is required) or 135 N´m (100
ft. lbs.)(HD 4X2 only).
(9) Support the lower control arm at the outboard
side of the lower control arm to support vehicle
weight.
(10) Remove the spring compressor tool.
(11) Install the shock absorber. (Refer to 2 - SUS-
PENSION/FRONT/SHOCK - INSTALLATION).
(12) Install the stabilizer link (Refer to 2 - SUS-
PENSION/FRONT/STABILIZER LINK - INSTALLA-
TION).
(13) Remove the lower control arm support.
(14) Install the wheel and tire assembly and lower
the vehicle. (Refer to 22 - TIRES/WHEELS/WHEELS
- STANDARD PROCEDURE).
(15) Lower the vehicle to the floor with vehicle
weight and Tighten the front and rear control arm
pivot bolts to 204 N´m (150 ft. lbs.)(LD) or 285 N´m
(210 ft. lbs.)(HD 4X2 only).
(16) Perform a wheel alignment (Refer to 2 - SUS-
PENSION/WHEEL ALIGNMENT - STANDARD
PROCEDURE).
SPRING
REMOVAL
(1) Raise and support vehicle.
(2) Remove the front wheel and tire assembly.
(3) Support the lower control arm at the outboard
side of the lower control arm to support vehicle
weight.
(4) Remove the shock absorber (Refer to 2 - SUS-
PENSION/FRONT/SHOCK - REMOVAL).
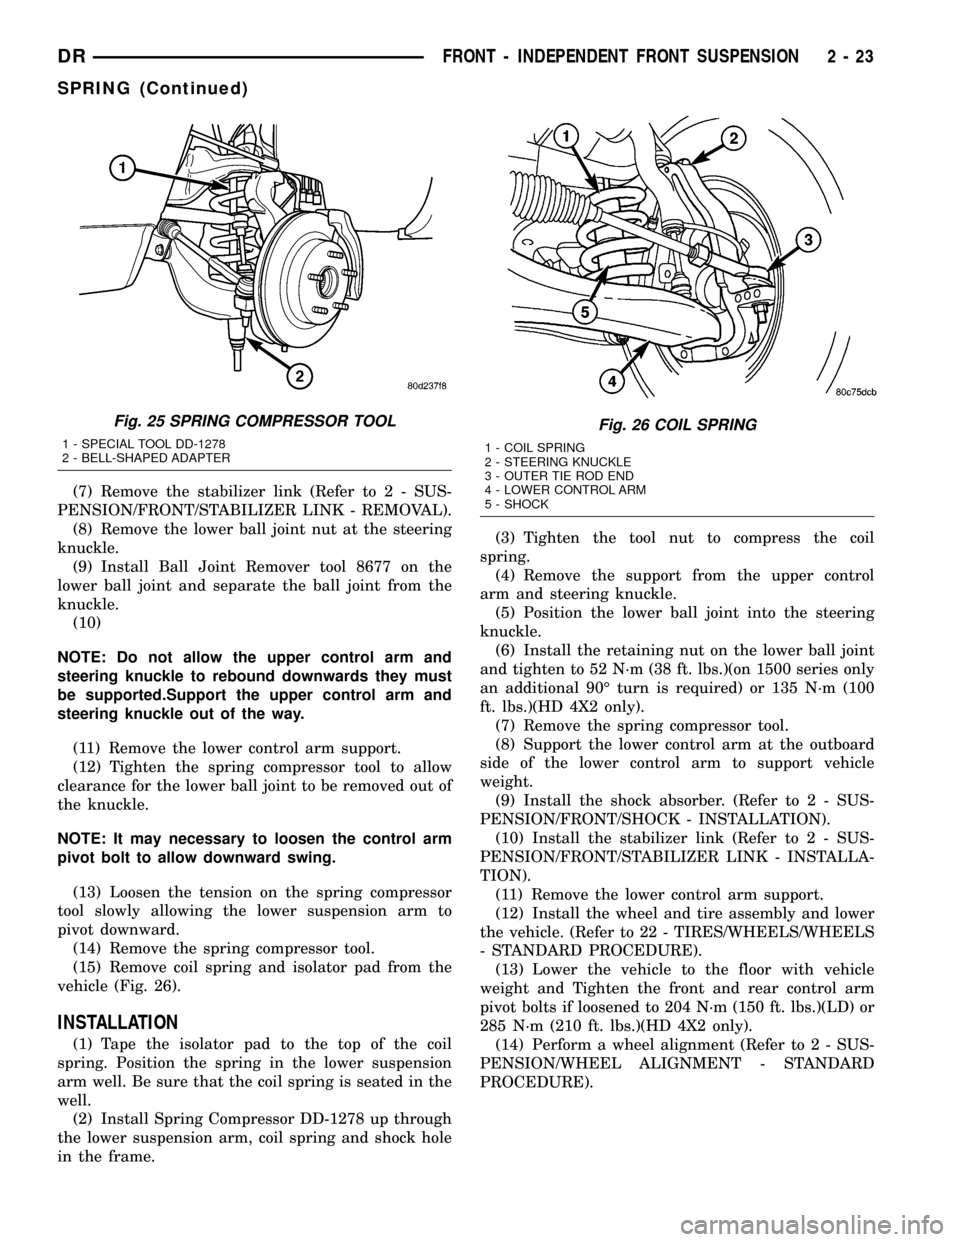
(5) Install Spring Compressor DD-1278 up through
the lower suspension arm, coil spring and shock hole
in the frame. The bell-shaped adapter goes against
the lower suspension arm. Install the nut on top of
the tool at the shock hole (Fig. 25).
(6) Tighten the spring compressor nut against bell-
shaped adapter finger tight then loosen 1/2 turn.
NOTE: This will hold the spring in place until the
lower suspension arm is separated from the steer-
ing knuckle.
Fig. 24 LOWER CONTROL ARM - 4X2
1 - FRONT PIVOT BOLT
2 - REAR PIVOT BOLT
3 - LOWER CONTROL ARM
2 - 22 FRONT - INDEPENDENT FRONT SUSPENSIONDR
LOWER CONTROL ARM (Continued)
Page 58 of 2627
(7) Remove the stabilizer link (Refer to 2 - SUS-
PENSION/FRONT/STABILIZER LINK - REMOVAL).
(8) Remove the lower ball joint nut at the steering
knuckle.
(9) Install Ball Joint Remover tool 8677 on the
lower ball joint and separate the ball joint from the
knuckle.
(10)
NOTE: Do not allow the upper control arm and
steering knuckle to rebound downwards they must
be supported.Support the upper control arm and
steering knuckle out of the way.
(11) Remove the lower control arm support.
(12) Tighten the spring compressor tool to allow
clearance for the lower ball joint to be removed out of
the knuckle.
NOTE: It may necessary to loosen the control arm
pivot bolt to allow downward swing.
(13) Loosen the tension on the spring compressor
tool slowly allowing the lower suspension arm to
pivot downward.
(14) Remove the spring compressor tool.
(15) Remove coil spring and isolator pad from the
vehicle (Fig. 26).
INSTALLATION
(1) Tape the isolator pad to the top of the coil
spring. Position the spring in the lower suspension
arm well. Be sure that the coil spring is seated in the
well.
(2) Install Spring Compressor DD-1278 up through
the lower suspension arm, coil spring and shock hole
in the frame.(3) Tighten the tool nut to compress the coil
spring.
(4) Remove the support from the upper control
arm and steering knuckle.
(5) Position the lower ball joint into the steering
knuckle.
(6) Install the retaining nut on the lower ball joint
and tighten to 52 N´m (38 ft. lbs.)(on 1500 series only
an additional 90É turn is required) or 135 N´m (100
ft. lbs.)(HD 4X2 only).
(7) Remove the spring compressor tool.
(8) Support the lower control arm at the outboard
side of the lower control arm to support vehicle
weight.
(9) Install the shock absorber. (Refer to 2 - SUS-
PENSION/FRONT/SHOCK - INSTALLATION).
(10) Install the stabilizer link (Refer to 2 - SUS-
PENSION/FRONT/STABILIZER LINK - INSTALLA-
TION).
(11) Remove the lower control arm support.
(12) Install the wheel and tire assembly and lower
the vehicle. (Refer to 22 - TIRES/WHEELS/WHEELS
- STANDARD PROCEDURE).
(13) Lower the vehicle to the floor with vehicle
weight and Tighten the front and rear control arm
pivot bolts if loosened to 204 N´m (150 ft. lbs.)(LD) or
285 N´m (210 ft. lbs.)(HD 4X2 only).
(14) Perform a wheel alignment (Refer to 2 - SUS-
PENSION/WHEEL ALIGNMENT - STANDARD
PROCEDURE).
Fig. 25 SPRING COMPRESSOR TOOL
1 - SPECIAL TOOL DD-1278
2 - BELL-SHAPED ADAPTER
Fig. 26 COIL SPRING
1 - COIL SPRING
2 - STEERING KNUCKLE
3 - OUTER TIE ROD END
4 - LOWER CONTROL ARM
5 - SHOCK
DRFRONT - INDEPENDENT FRONT SUSPENSION 2 - 23
SPRING (Continued)
Page 60 of 2627

ends of the bar mount to the lower suspension arm.
All mounting points of the stabilizer bar are isolated
by bushings (Fig. 28).
OPERATION
The stabilizer bar is used to minimize vehicle front
sway during turns. The bar helps to maintain a flat
attitude to the road surface.
REMOVAL
NOTE: To service the stabilizer bar the vehicle
should be on a drive on hoist. The vehicle suspen-
sion must be at curb height for stabilizer bar instal-
lation.
(1) Remove the stabilizer bar link upper nuts and
remove the retainers and grommets (Fig. 29).
(2) Remove the stabilizer bar retainer, bolts and
retainers from the frame crossmember (Fig. 29) and
remove the bar.
(3) If necessary, remove the bushings from the sta-
bilizer barDo not cut the old bushings off the
stabilizer bar use a mixture of soapy water in
order to aid in sliding the bushing off.
INSTALLATION
NOTE: To service the stabilizer bar the vehicle must
be on a drive on hoist. The vehicle suspension
must be at curb height for stabilizer bar installation.
(1) If removed, Install the bushings on the stabi-
lizer bar using a mixture of soapy water or equiva-
lent in order to slide the bushing over the bar with
easeDo not cut the new bushing for installa-
tion.
(2) Position the stabilizer bar on the frame cross-
member brackets and install the bracket and bolts
finger-tight (Fig. 29).NOTE: Check the alignment of the bar to ensure
there is no interference with the either frame rail or
chassis component. Spacing should be equal on
both sides.
(3) Install the stabilizer bar to the stabilizer link
and install the grommets and retainers.
(4) Install the nuts to the stabilizer link and
tighten to 38 N´m (27 ft. lbs.).
(5) Tighten the brackets to the frame to 61 N´m
(45 ft. lbs.).
STABILIZER LINK
REMOVAL
REMOVAL - 4X4
(1) Raise and support the vehicle.
(2) Remove the lower nut (Fig. 29).
(3) Remove the upper nut, retainers and grommets
(Fig. 29).
(4) Remove the stabilizer link from the vehicle
(Fig. 29).
REMOVAL - 4X2
(1) Raise and support the vehicle.
(2) Remove the lower nut (Fig. 29).
(3) Remove the upper nut, retainer and grommets
(Fig. 29).
(4) Remove the stabilizer link from the vehicle
(Fig. 29).
Fig. 28 STABILIZER BAR
Fig. 29 STABILIZER LINK
1 - STABILIZER LINK
2 - SWAY BAR BRACKET
DRFRONT - INDEPENDENT FRONT SUSPENSION 2 - 25
STABILIZER BAR (Continued)
Page 62 of 2627
INSTALLATION
CAUTION: The left and right side torsion bars are
NOT interchangeable. The bars are identified and
stamped R or L, for right or left. The bars do not
have a front or rear end and can be installed with
either end facing forward.
(1) Insert torsion bar ends into anchor and suspen-
sion arm.
(2) Position the anchor in the frame crossmember.
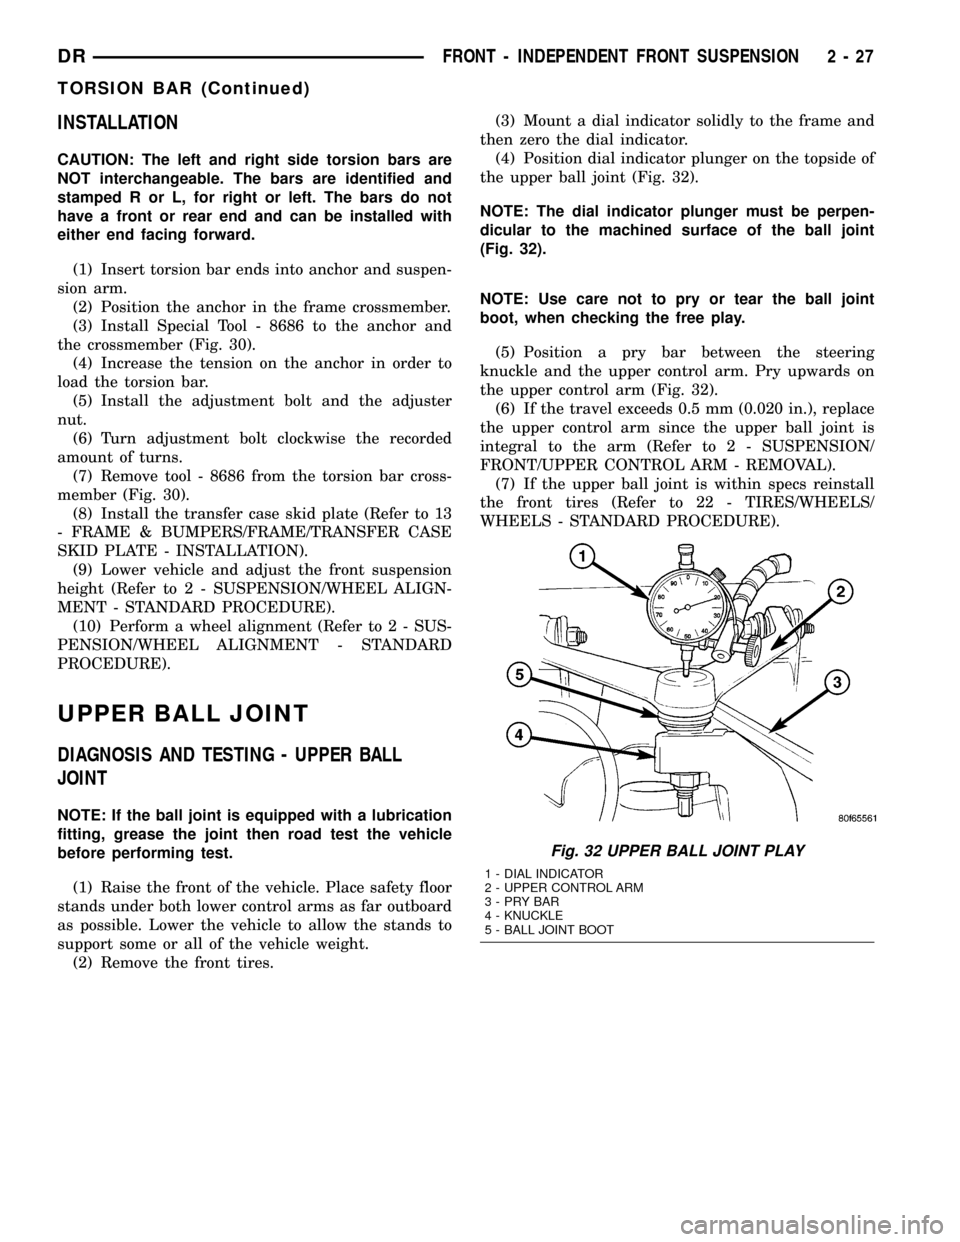
(3) Install Special Tool - 8686 to the anchor and
the crossmember (Fig. 30).
(4) Increase the tension on the anchor in order to
load the torsion bar.
(5) Install the adjustment bolt and the adjuster
nut.
(6) Turn adjustment bolt clockwise the recorded
amount of turns.
(7) Remove tool - 8686 from the torsion bar cross-
member (Fig. 30).
(8) Install the transfer case skid plate (Refer to 13
- FRAME & BUMPERS/FRAME/TRANSFER CASE
SKID PLATE - INSTALLATION).
(9) Lower vehicle and adjust the front suspension
height (Refer to 2 - SUSPENSION/WHEEL ALIGN-
MENT - STANDARD PROCEDURE).
(10) Perform a wheel alignment (Refer to 2 - SUS-
PENSION/WHEEL ALIGNMENT - STANDARD
PROCEDURE).
UPPER BALL JOINT
DIAGNOSIS AND TESTING - UPPER BALL
JOINT
NOTE: If the ball joint is equipped with a lubrication
fitting, grease the joint then road test the vehicle
before performing test.
(1) Raise the front of the vehicle. Place safety floor
stands under both lower control arms as far outboard
as possible. Lower the vehicle to allow the stands to
support some or all of the vehicle weight.
(2) Remove the front tires.(3) Mount a dial indicator solidly to the frame and
then zero the dial indicator.
(4) Position dial indicator plunger on the topside of
the upper ball joint (Fig. 32).
NOTE: The dial indicator plunger must be perpen-
dicular to the machined surface of the ball joint
(Fig. 32).
NOTE: Use care not to pry or tear the ball joint
boot, when checking the free play.
(5) Position a pry bar between the steering
knuckle and the upper control arm. Pry upwards on
the upper control arm (Fig. 32).
(6) If the travel exceeds 0.5 mm (0.020 in.), replace
the upper control arm since the upper ball joint is
integral to the arm (Refer to 2 - SUSPENSION/
FRONT/UPPER CONTROL ARM - REMOVAL).
(7) If the upper ball joint is within specs reinstall
the front tires (Refer to 22 - TIRES/WHEELS/
WHEELS - STANDARD PROCEDURE).
Fig. 32 UPPER BALL JOINT PLAY
1 - DIAL INDICATOR
2 - UPPER CONTROL ARM
3-PRYBAR
4 - KNUCKLE
5 - BALL JOINT BOOT
DRFRONT - INDEPENDENT FRONT SUSPENSION 2 - 27
TORSION BAR (Continued)
Page 63 of 2627
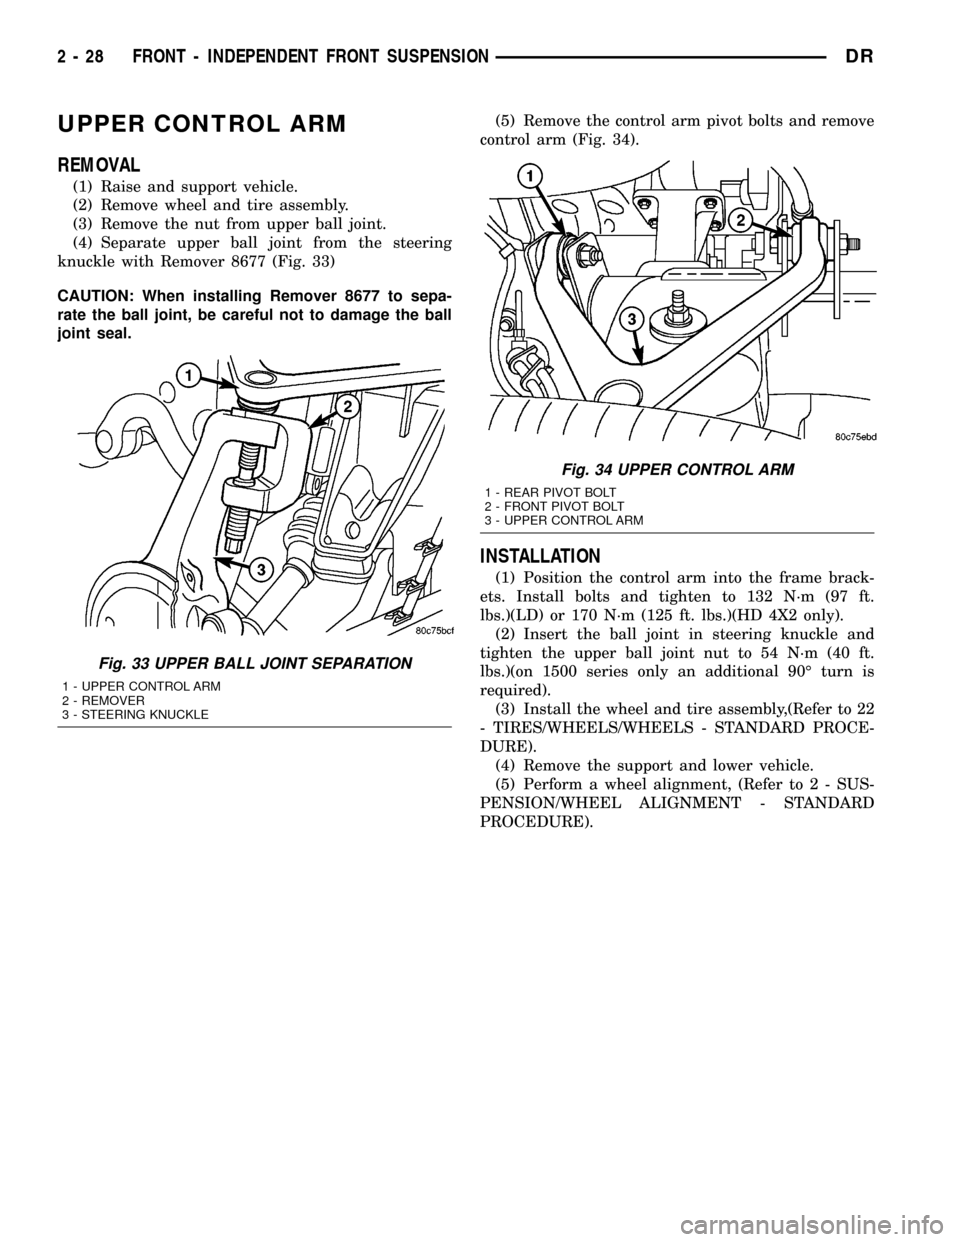
UPPER CONTROL ARM
REMOVAL
(1) Raise and support vehicle.
(2) Remove wheel and tire assembly.
(3) Remove the nut from upper ball joint.
(4) Separate upper ball joint from the steering
knuckle with Remover 8677 (Fig. 33)
CAUTION: When installing Remover 8677 to sepa-
rate the ball joint, be careful not to damage the ball
joint seal.(5) Remove the control arm pivot bolts and remove
control arm (Fig. 34).
INSTALLATION
(1) Position the control arm into the frame brack-
ets. Install bolts and tighten to 132 N´m (97 ft.
lbs.)(LD) or 170 N´m (125 ft. lbs.)(HD 4X2 only).
(2) Insert the ball joint in steering knuckle and
tighten the upper ball joint nut to 54 N´m (40 ft.
lbs.)(on 1500 series only an additional 90É turn is
required).
(3) Install the wheel and tire assembly,(Refer to 22
- TIRES/WHEELS/WHEELS - STANDARD PROCE-
DURE).
(4) Remove the support and lower vehicle.
(5) Perform a wheel alignment, (Refer to 2 - SUS-
PENSION/WHEEL ALIGNMENT - STANDARD
PROCEDURE).
Fig. 33 UPPER BALL JOINT SEPARATION
1 - UPPER CONTROL ARM
2 - REMOVER
3 - STEERING KNUCKLE
Fig. 34 UPPER CONTROL ARM
1 - REAR PIVOT BOLT
2 - FRONT PIVOT BOLT
3 - UPPER CONTROL ARM
2 - 28 FRONT - INDEPENDENT FRONT SUSPENSIONDR
Page 73 of 2627
LOWER SUSPENSION ARM
REMOVAL
(1) Raise and support the vehicle.
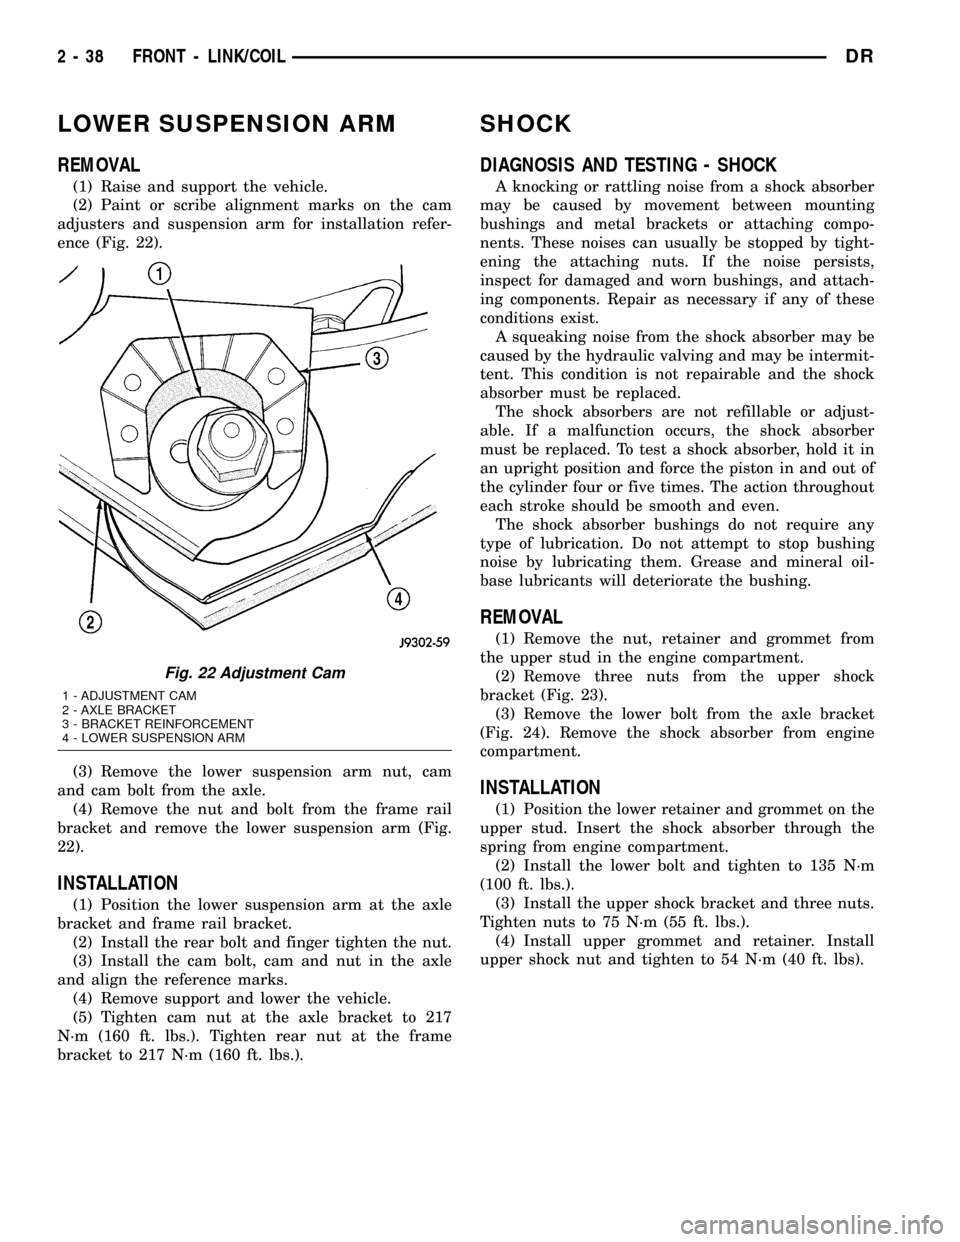
(2) Paint or scribe alignment marks on the cam
adjusters and suspension arm for installation refer-
ence (Fig. 22).
(3) Remove the lower suspension arm nut, cam
and cam bolt from the axle.
(4) Remove the nut and bolt from the frame rail
bracket and remove the lower suspension arm (Fig.
22).
INSTALLATION
(1) Position the lower suspension arm at the axle
bracket and frame rail bracket.
(2) Install the rear bolt and finger tighten the nut.
(3) Install the cam bolt, cam and nut in the axle
and align the reference marks.
(4) Remove support and lower the vehicle.
(5) Tighten cam nut at the axle bracket to 217
N´m (160 ft. lbs.). Tighten rear nut at the frame
bracket to 217 N´m (160 ft. lbs.).
SHOCK
DIAGNOSIS AND TESTING - SHOCK
A knocking or rattling noise from a shock absorber
may be caused by movement between mounting
bushings and metal brackets or attaching compo-
nents. These noises can usually be stopped by tight-
ening the attaching nuts. If the noise persists,
inspect for damaged and worn bushings, and attach-
ing components. Repair as necessary if any of these
conditions exist.
A squeaking noise from the shock absorber may be
caused by the hydraulic valving and may be intermit-
tent. This condition is not repairable and the shock
absorber must be replaced.
The shock absorbers are not refillable or adjust-
able. If a malfunction occurs, the shock absorber
must be replaced. To test a shock absorber, hold it in
an upright position and force the piston in and out of
the cylinder four or five times. The action throughout
each stroke should be smooth and even.
The shock absorber bushings do not require any
type of lubrication. Do not attempt to stop bushing
noise by lubricating them. Grease and mineral oil-
base lubricants will deteriorate the bushing.
REMOVAL
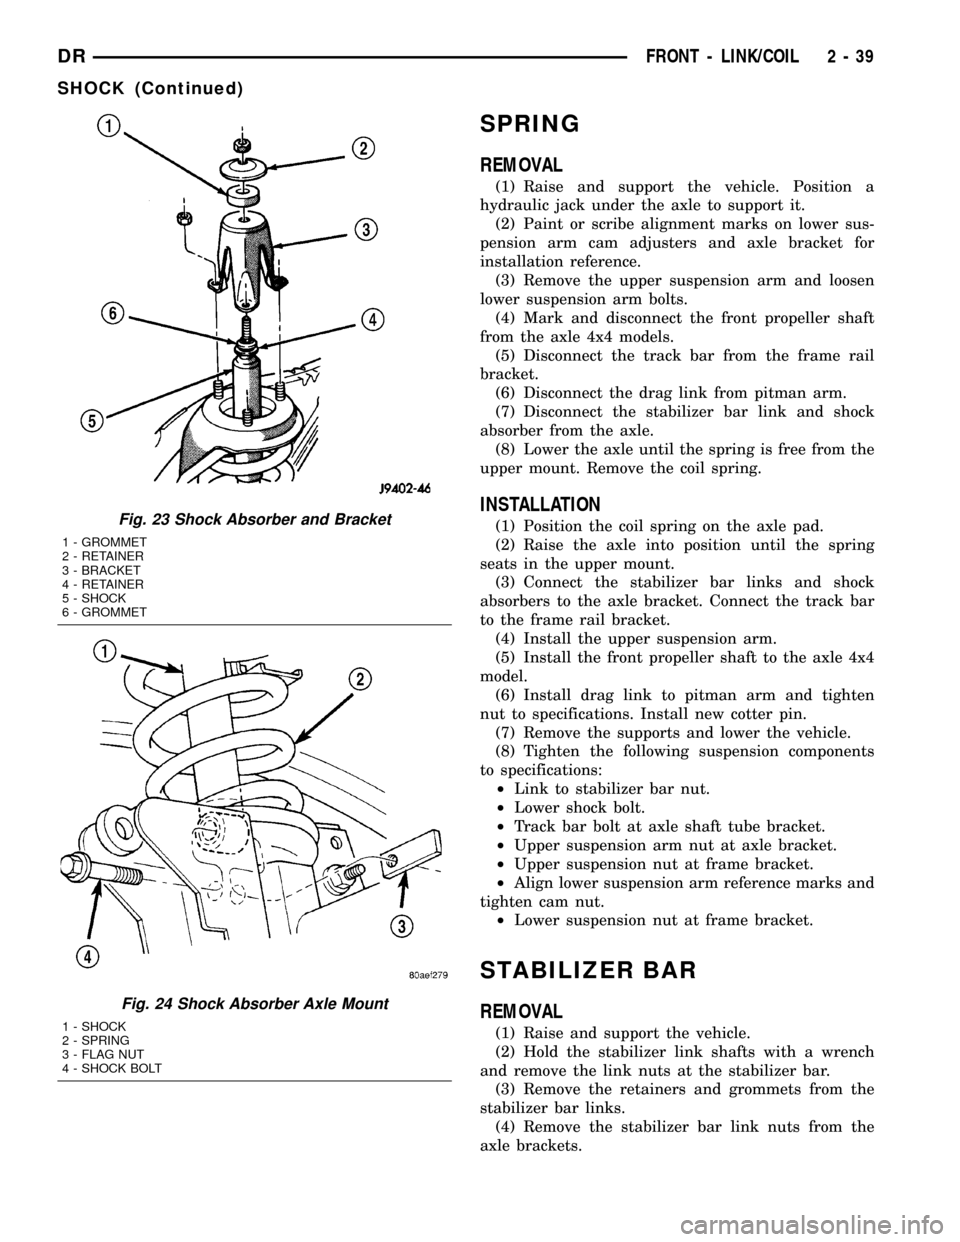
(1) Remove the nut, retainer and grommet from
the upper stud in the engine compartment.
(2) Remove three nuts from the upper shock
bracket (Fig. 23).
(3) Remove the lower bolt from the axle bracket
(Fig. 24). Remove the shock absorber from engine
compartment.
INSTALLATION
(1) Position the lower retainer and grommet on the
upper stud. Insert the shock absorber through the
spring from engine compartment.
(2) Install the lower bolt and tighten to 135 N´m
(100 ft. lbs.).
(3) Install the upper shock bracket and three nuts.
Tighten nuts to 75 N´m (55 ft. lbs.).
(4) Install upper grommet and retainer. Install
upper shock nut and tighten to 54 N´m (40 ft. lbs).
Fig. 22 Adjustment Cam
1 - ADJUSTMENT CAM
2 - AXLE BRACKET
3 - BRACKET REINFORCEMENT
4 - LOWER SUSPENSION ARM
2 - 38 FRONT - LINK/COILDR
Page 74 of 2627
SPRING
REMOVAL
(1) Raise and support the vehicle. Position a
hydraulic jack under the axle to support it.
(2) Paint or scribe alignment marks on lower sus-
pension arm cam adjusters and axle bracket for
installation reference.
(3) Remove the upper suspension arm and loosen
lower suspension arm bolts.
(4) Mark and disconnect the front propeller shaft
from the axle 4x4 models.
(5) Disconnect the track bar from the frame rail
bracket.
(6) Disconnect the drag link from pitman arm.
(7) Disconnect the stabilizer bar link and shock
absorber from the axle.
(8) Lower the axle until the spring is free from the
upper mount. Remove the coil spring.
INSTALLATION
(1) Position the coil spring on the axle pad.
(2) Raise the axle into position until the spring
seats in the upper mount.
(3) Connect the stabilizer bar links and shock
absorbers to the axle bracket. Connect the track bar
to the frame rail bracket.
(4) Install the upper suspension arm.
(5) Install the front propeller shaft to the axle 4x4
model.
(6) Install drag link to pitman arm and tighten
nut to specifications. Install new cotter pin.
(7) Remove the supports and lower the vehicle.
(8) Tighten the following suspension components
to specifications:
²Link to stabilizer bar nut.
²Lower shock bolt.
²Track bar bolt at axle shaft tube bracket.
²Upper suspension arm nut at axle bracket.
²Upper suspension nut at frame bracket.
²Align lower suspension arm reference marks and
tighten cam nut.
²Lower suspension nut at frame bracket.
STABILIZER BAR
REMOVAL
(1) Raise and support the vehicle.
(2) Hold the stabilizer link shafts with a wrench
and remove the link nuts at the stabilizer bar.
(3) Remove the retainers and grommets from the
stabilizer bar links.
(4) Remove the stabilizer bar link nuts from the
axle brackets.
Fig. 23 Shock Absorber and Bracket
1 - GROMMET
2 - RETAINER
3 - BRACKET
4 - RETAINER
5 - SHOCK
6 - GROMMET
Fig. 24 Shock Absorber Axle Mount
1 - SHOCK
2 - SPRING
3 - FLAG NUT
4 - SHOCK BOLT
DRFRONT - LINK/COIL 2 - 39
SHOCK (Continued)
Page 98 of 2627

(10) Flip assembly and repeat Step 6, Step 7, Step
8 and Step 9 to remove the opposite bearing cap.
(11) Remove cross centering kit assembly and
spring (Fig. 42).
(12) Press remaining bearing caps out the other
end of the link yoke.
ASSEMBLY
CAUTION: All alignment marks on the link yoke and
propeller shaft yoke must be aligned during assem-
bled.
(1) Apply (EP) N.L.G.I. Grade 1 or 2 grease to
inside of yoke bores.
(2) Fit cross into the propeller shaft yoke (Fig. 43).(3) Place bearing cap over the trunnion and align
cap with the yoke bore (Fig. 44). Keep needle bear-
ings upright in the bearing cap.
(4) Press bearing cap into yoke bore enough to
clear snap ring groove and install snap-ring (Fig. 45).
Fig. 42 REMOVE CENTERING KIT
Fig. 43 INSTALL CROSS IN YOKE
Fig. 44 INSTALL BEARING CAP
Fig. 45 PRESS IN BEARING CAP
DRPROPELLER SHAFT 3 - 17
DOUBLE CARDAN UNIVERSAL JOINTS (Continued)