Fig DODGE RAM 1500 1998 2.G Workshop Manual
[x] Cancel search | Manufacturer: DODGE, Model Year: 1998, Model line: RAM 1500, Model: DODGE RAM 1500 1998 2.GPages: 2627
Page 381 of 2627
(15) Remove the heater hose fitting from water
pump if pump replacement is necessary. Note posi-
tion (direction) of fitting before removal. Fitting must
be re-installed to same position.
CAUTION: Do not pry the water pump at timing
chain case/cover. The machined surfaces may be
damaged resulting in leaks.
CLEANING
Clean gasket mating surfaces as necessary.
INSPECTION
Visually inspect the water pump and replace if it
has any of the following conditions:
²The body is cracked or damaged
²Water leaks from the shaft seal. This is evident
by traces of coolant below the vent hole
²Loose or rough turning bearing. Also inspect
thermal fan drive
²Impeller rubbing the pump body
INSTALLATION
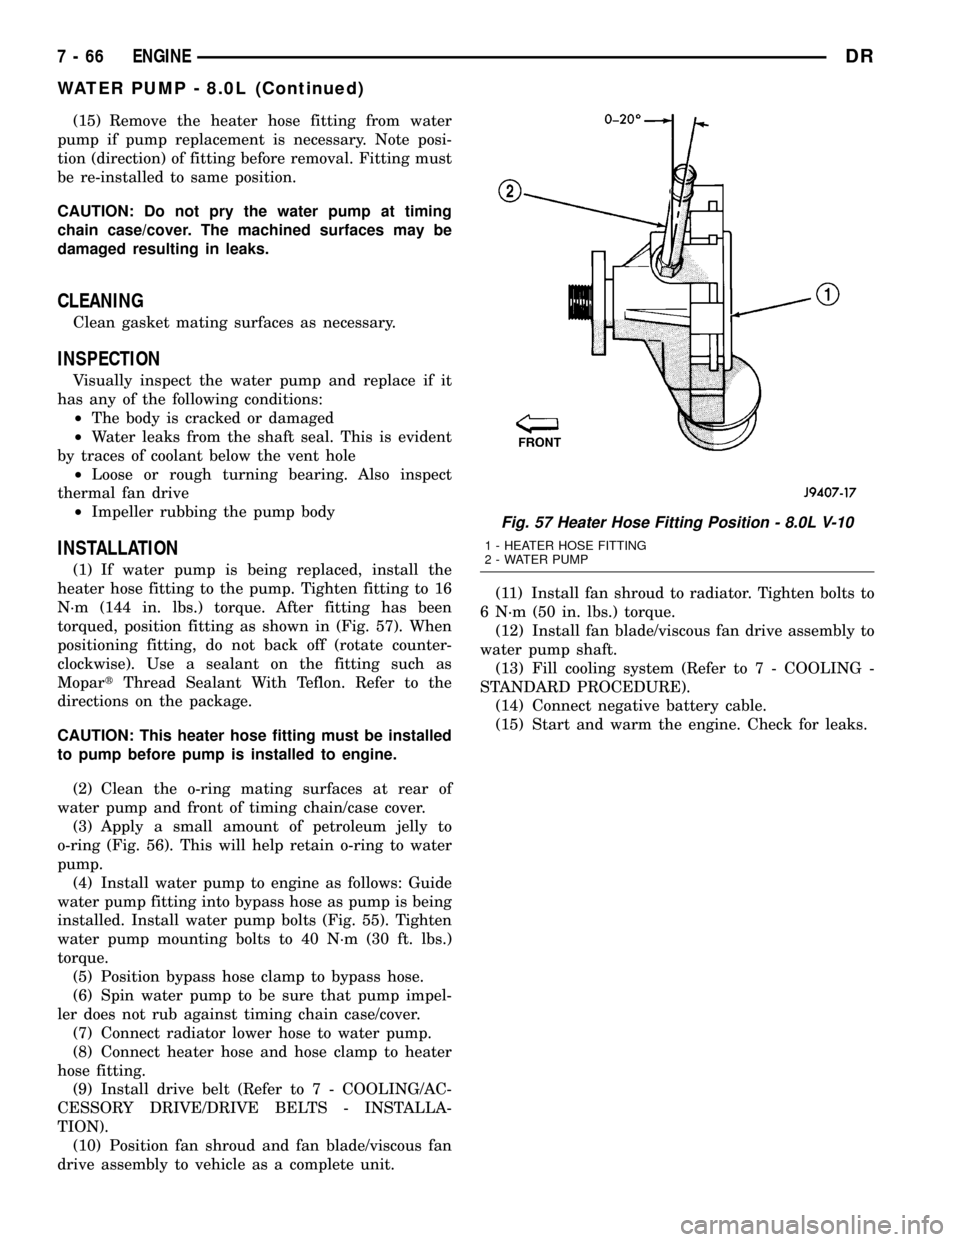
(1) If water pump is being replaced, install the
heater hose fitting to the pump. Tighten fitting to 16
N´m (144 in. lbs.) torque. After fitting has been
torqued, position fitting as shown in (Fig. 57). When
positioning fitting, do not back off (rotate counter-
clockwise). Use a sealant on the fitting such as
MopartThread Sealant With Teflon. Refer to the
directions on the package.
CAUTION: This heater hose fitting must be installed
to pump before pump is installed to engine.
(2) Clean the o-ring mating surfaces at rear of
water pump and front of timing chain/case cover.
(3) Apply a small amount of petroleum jelly to
o-ring (Fig. 56). This will help retain o-ring to water
pump.
(4) Install water pump to engine as follows: Guide
water pump fitting into bypass hose as pump is being
installed. Install water pump bolts (Fig. 55). Tighten
water pump mounting bolts to 40 N´m (30 ft. lbs.)
torque.
(5) Position bypass hose clamp to bypass hose.
(6) Spin water pump to be sure that pump impel-
ler does not rub against timing chain case/cover.
(7) Connect radiator lower hose to water pump.
(8) Connect heater hose and hose clamp to heater
hose fitting.
(9) Install drive belt (Refer to 7 - COOLING/AC-
CESSORY DRIVE/DRIVE BELTS - INSTALLA-
TION).
(10) Position fan shroud and fan blade/viscous fan
drive assembly to vehicle as a complete unit.(11) Install fan shroud to radiator. Tighten bolts to
6 N´m (50 in. lbs.) torque.
(12) Install fan blade/viscous fan drive assembly to
water pump shaft.
(13) Fill cooling system (Refer to 7 - COOLING -
STANDARD PROCEDURE).
(14) Connect negative battery cable.
(15) Start and warm the engine. Check for leaks.
Fig. 57 Heater Hose Fitting Position - 8.0L V-10
1 - HEATER HOSE FITTING
2 - WATER PUMP
7 - 66 ENGINEDR
WATER PUMP - 8.0L (Continued)
Page 382 of 2627
TRANSMISSION
TABLE OF CONTENTS
page page
TRANS COOLER
DESCRIPTION.........................67
OPERATION...........................67
REMOVAL.............................68
INSTALLATION.........................68
TRANS COOLER - 5.9L DIESEL
DESCRIPTION.........................68
OPERATION...........................69REMOVAL
REMOVAL - AIR TO OIL COOLER.........69
REMOVAL - WATER TO OIL COOLER......69
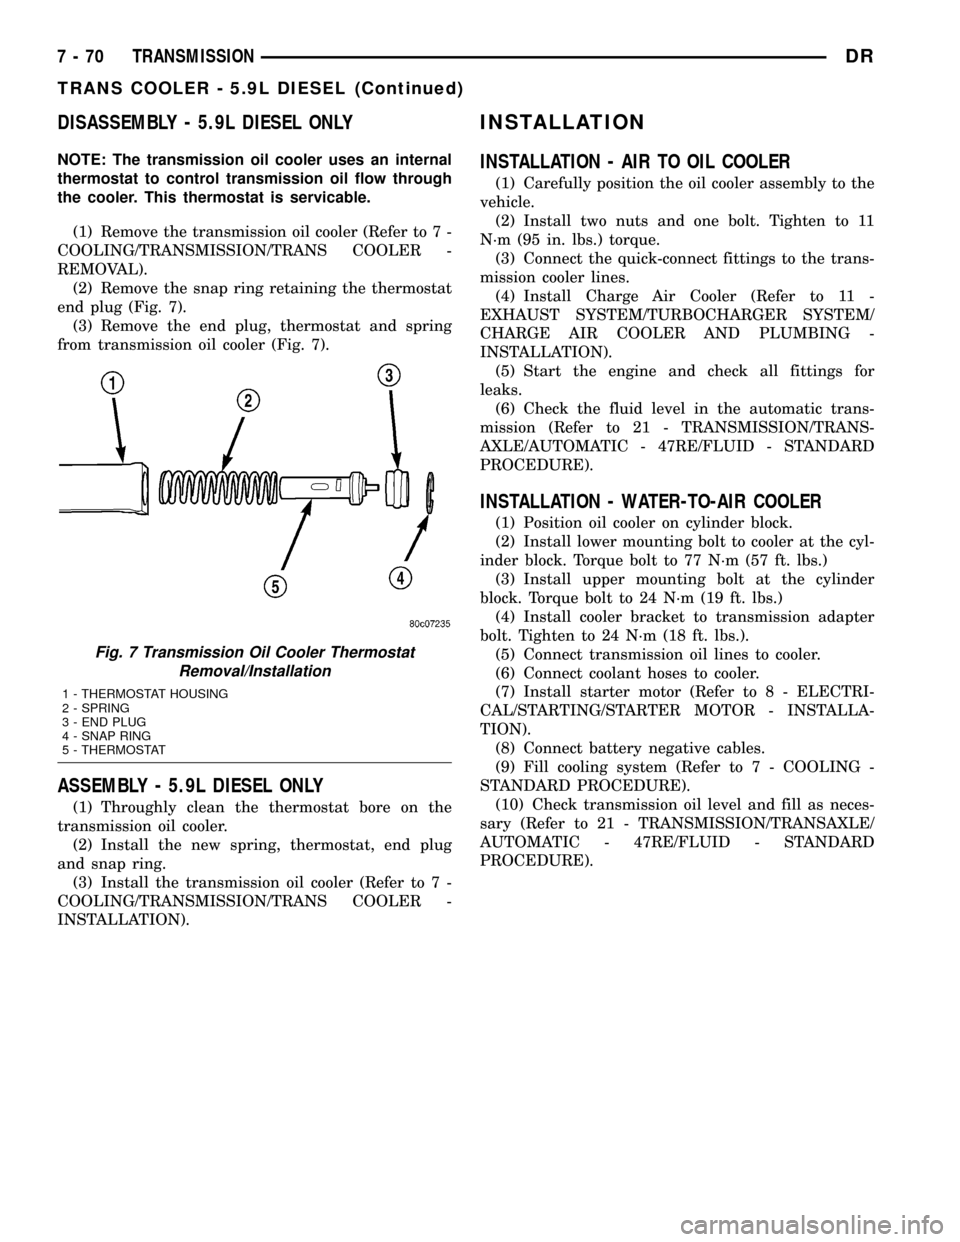
DISASSEMBLY - 5.9L DIESEL ONLY.........70
ASSEMBLY - 5.9L DIESEL ONLY...........70
INSTALLATION
INSTALLATION - AIR TO OIL COOLER.....70
INSTALLATION - WATER-TO-AIR COOLER . . 70
TRANS COOLER
DESCRIPTION
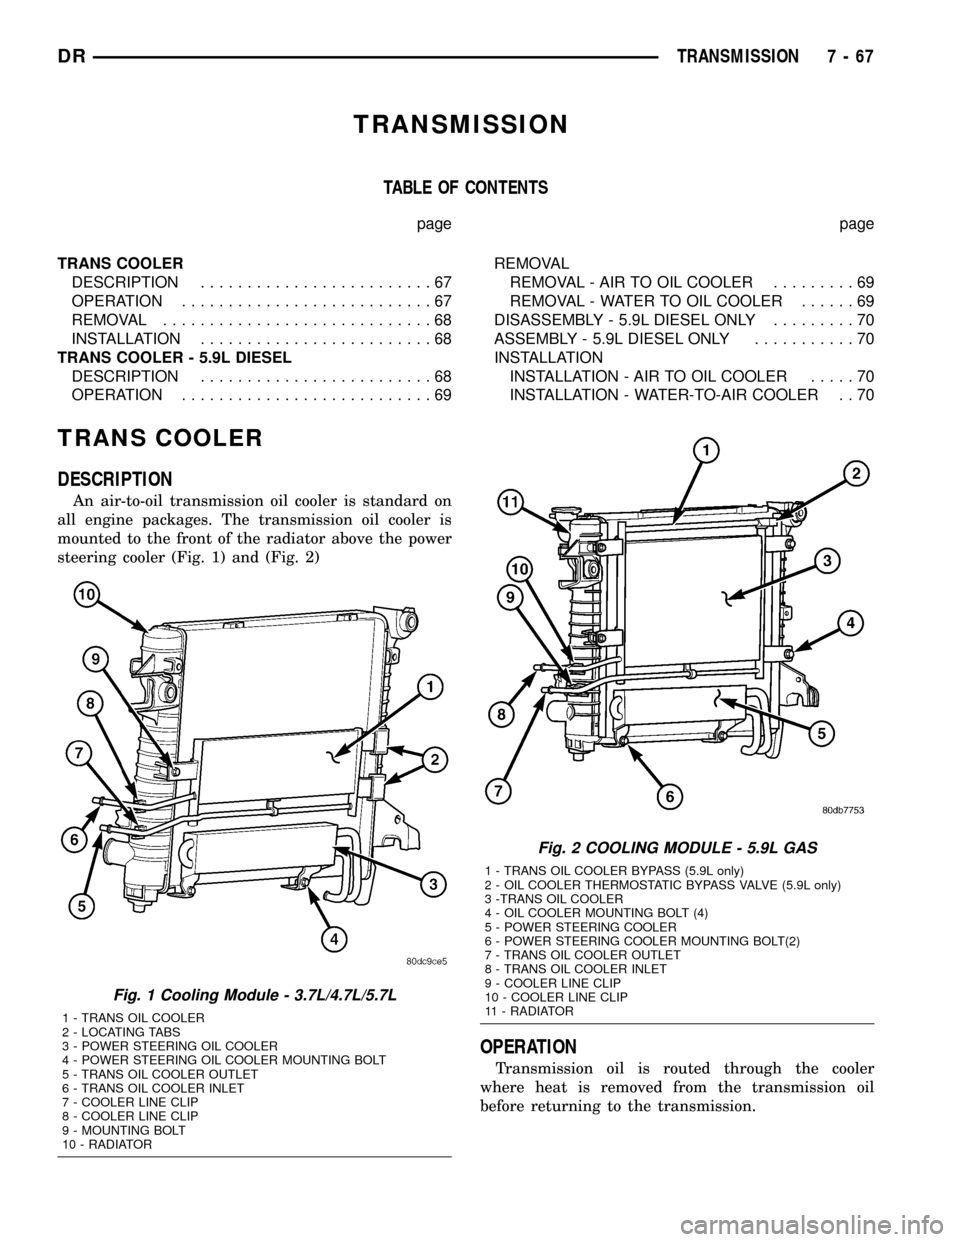
An air-to-oil transmission oil cooler is standard on
all engine packages. The transmission oil cooler is
mounted to the front of the radiator above the power
steering cooler (Fig. 1) and (Fig. 2)
OPERATION
Transmission oil is routed through the cooler
where heat is removed from the transmission oil
before returning to the transmission.
Fig. 1 Cooling Module - 3.7L/4.7L/5.7L
1 - TRANS OIL COOLER
2 - LOCATING TABS
3 - POWER STEERING OIL COOLER
4 - POWER STEERING OIL COOLER MOUNTING BOLT
5 - TRANS OIL COOLER OUTLET
6 - TRANS OIL COOLER INLET
7 - COOLER LINE CLIP
8 - COOLER LINE CLIP
9 - MOUNTING BOLT
10 - RADIATOR
Fig. 2 COOLING MODULE - 5.9L GAS
1 - TRANS OIL COOLER BYPASS (5.9L only)
2 - OIL COOLER THERMOSTATIC BYPASS VALVE (5.9L only)
3 -TRANS OIL COOLER
4 - OIL COOLER MOUNTING BOLT (4)
5 - POWER STEERING COOLER
6 - POWER STEERING COOLER MOUNTING BOLT(2)
7 - TRANS OIL COOLER OUTLET
8 - TRANS OIL COOLER INLET
9 - COOLER LINE CLIP
10 - COOLER LINE CLIP
11 - RADIATOR
DRTRANSMISSION 7 - 67
Page 383 of 2627
REMOVAL
(1) Disconnect the battery negative cable.
(2) Place a drain pan under the oil cooler lines.
(3) Disconnect the transmission oil cooler line
quick-connect fitting at the cooler outlet using the
quick connect release tool 6935. Plug the cooler lines
to prevent oil leakage.
(4) Unsnap the transmission cooler tubes from the
radiator tank clips.
(5) Remove the bolt attaching the transmission
cooler to the radiator.
(6) Remove oil cooler from the vehicle. Take care
not to damage the radiator core or transmission
cooler tubes.
INSTALLATION
(1) Position the transmission cooler tubes to the
front of the radiator by sliding brackets into slots on
radiator inlet tank.
(2) Snap the transmission cooler tubes into the
clips on the side of the radiator tank.
(3) Install the transmission cooler attaching bolt.
Tighten the bolt to 16 N´m (140 in. lbs.).
(4) Inspect the quick connect fittings for debris
and install the quick connect fitting on the cooler
tube until an audible ªclickº is heard. Pull apart the
connection to verify proper installation and install
the secondary latches.
(5) Connect the battery negative cable.
(6) Start the engine and check all fittings for
leaks.
(7) Check the fluid level in the automatic trans-
mission. Refer to the appropriate transmission sec-
tion(Refer to 21 - TRANSMISSION/TRANSAXLE/
AUTOMATIC - 45RFE/545RFE/FLUID - STANDARD
PROCEDURE) or(Refer to 21 - TRANSMISSION/
TRANSAXLE/AUTOMATIC - 46RE/FLUID - STAN-
DARD PROCEDURE).
TRANS COOLER - 5.9L DIESEL
DESCRIPTION
All diesel models equipped with an automatic
transmission are equipped with both a main water-
to-oil cooler and a separate air-to-oil cooler. Both cool-
ers are supplied as standard equipment on diesel
engine powered models when equipped with an auto-
matic transmission.
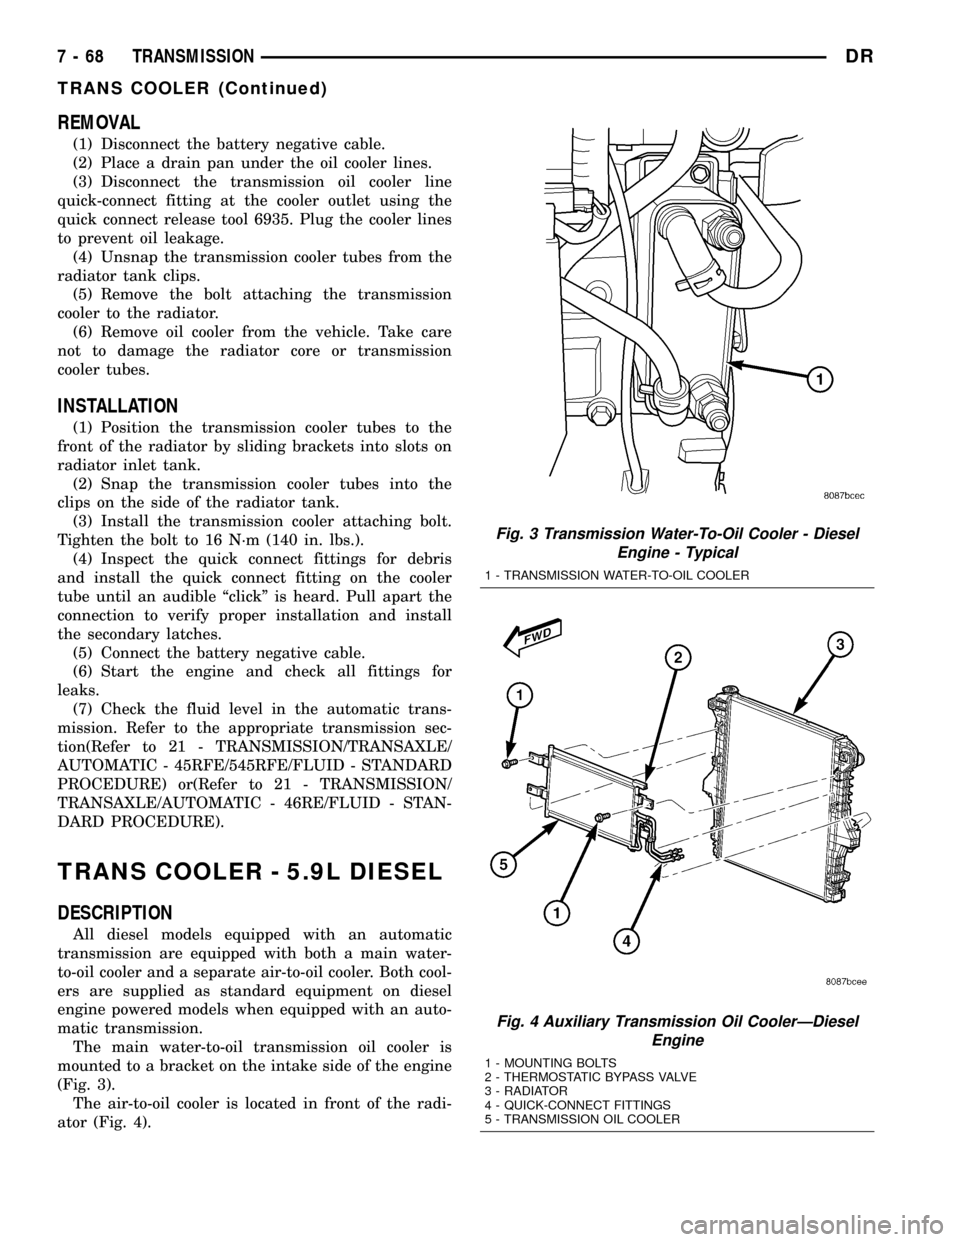
The main water-to-oil transmission oil cooler is
mounted to a bracket on the intake side of the engine
(Fig. 3).
The air-to-oil cooler is located in front of the radi-
ator (Fig. 4).
Fig. 3 Transmission Water-To-Oil Cooler - Diesel
Engine - Typical
1 - TRANSMISSION WATER-TO-OIL COOLER
Fig. 4 Auxiliary Transmission Oil CoolerÐDiesel
Engine
1 - MOUNTING BOLTS
2 - THERMOSTATIC BYPASS VALVE
3 - RADIATOR
4 - QUICK-CONNECT FITTINGS
5 - TRANSMISSION OIL COOLER
7 - 68 TRANSMISSIONDR
TRANS COOLER (Continued)
Page 384 of 2627
OPERATION
The transmission oil is routed through the main
cooler first, then the auxiliary cooler where addi-
tional heat is removed from the transmission oil
before returning to the transmission. The auxiliary
cooler has an internal thermostat that controls fluid
flow through the cooler. When the transmission fluid
is cold (less then operating temperature), the fluid is
routed through the cooler bypass. When the trans-
mission fluid reaches operating temperatures and
above, the thermostat closes off the bypass allowing
fluid flow through the cooler. The thermostat is ser-
vicable.
REMOVAL
REMOVAL - AIR TO OIL COOLER
(1) Remove Charge Air Cooler (Refer to 11 -
EXHAUST SYSTEM/TURBOCHARGER SYSTEM/
CHARGE AIR COOLER AND PLUMBING -
REMOVAL).
(2) Place a drain pan under the oil cooler.
(3) Raise the vehicle.
(4) Disconnect the oil cooler quick-connect fittings
from the transmission lines.
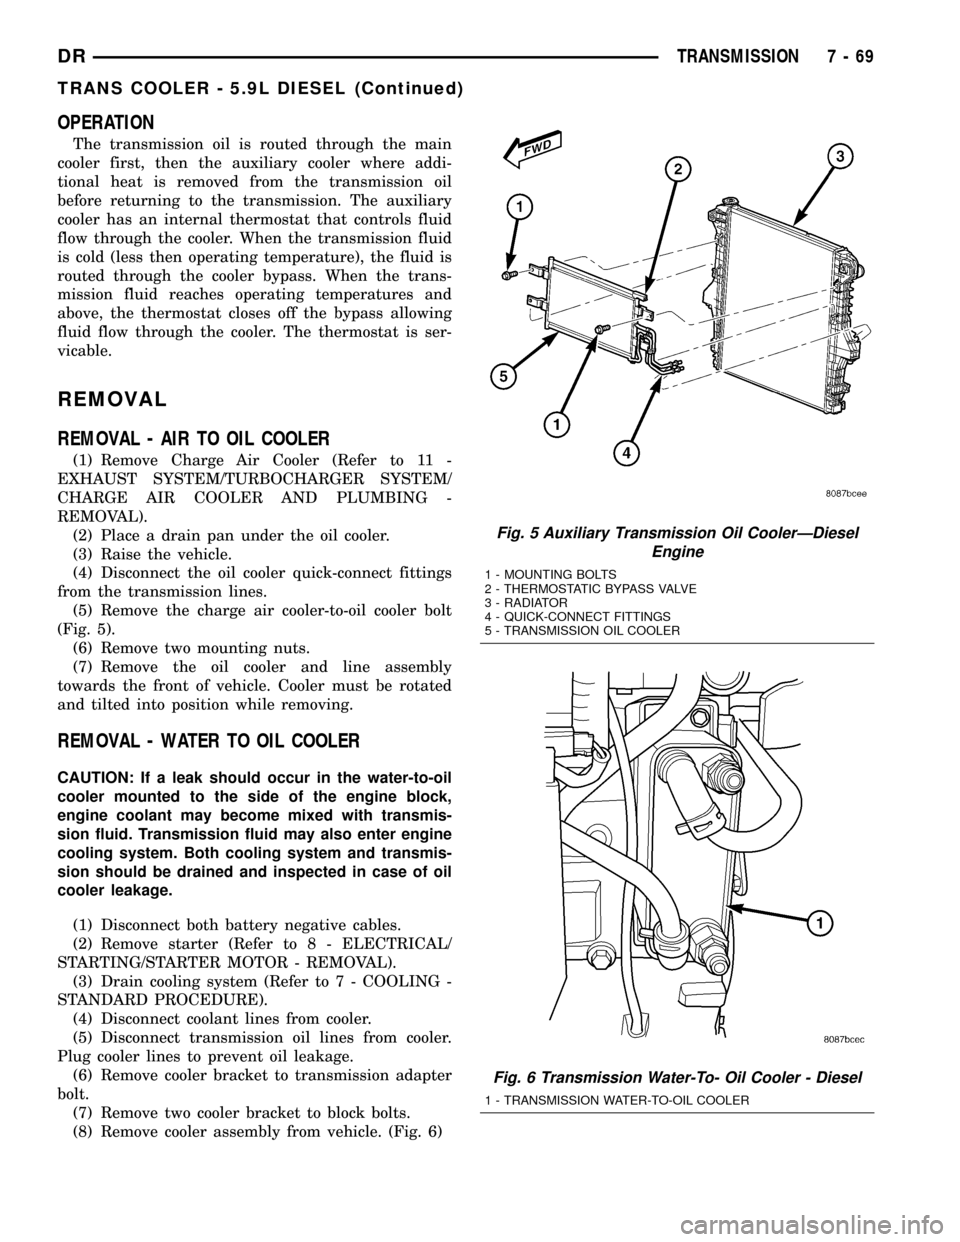
(5) Remove the charge air cooler-to-oil cooler bolt
(Fig. 5).
(6) Remove two mounting nuts.
(7) Remove the oil cooler and line assembly
towards the front of vehicle. Cooler must be rotated
and tilted into position while removing.
REMOVAL - WATER TO OIL COOLER
CAUTION: If a leak should occur in the water-to-oil
cooler mounted to the side of the engine block,
engine coolant may become mixed with transmis-
sion fluid. Transmission fluid may also enter engine
cooling system. Both cooling system and transmis-
sion should be drained and inspected in case of oil
cooler leakage.
(1) Disconnect both battery negative cables.
(2) Remove starter (Refer to 8 - ELECTRICAL/
STARTING/STARTER MOTOR - REMOVAL).
(3) Drain cooling system (Refer to 7 - COOLING -
STANDARD PROCEDURE).
(4) Disconnect coolant lines from cooler.
(5) Disconnect transmission oil lines from cooler.
Plug cooler lines to prevent oil leakage.
(6) Remove cooler bracket to transmission adapter
bolt.
(7) Remove two cooler bracket to block bolts.
(8) Remove cooler assembly from vehicle. (Fig. 6)
Fig. 5 Auxiliary Transmission Oil CoolerÐDiesel
Engine
1 - MOUNTING BOLTS
2 - THERMOSTATIC BYPASS VALVE
3 - RADIATOR
4 - QUICK-CONNECT FITTINGS
5 - TRANSMISSION OIL COOLER
Fig. 6 Transmission Water-To- Oil Cooler - Diesel
1 - TRANSMISSION WATER-TO-OIL COOLER
DRTRANSMISSION 7 - 69
TRANS COOLER - 5.9L DIESEL (Continued)
Page 385 of 2627
DISASSEMBLY - 5.9L DIESEL ONLY
NOTE: The transmission oil cooler uses an internal
thermostat to control transmission oil flow through
the cooler. This thermostat is servicable.
(1) Remove the transmission oil cooler (Refer to 7 -
COOLING/TRANSMISSION/TRANS COOLER -
REMOVAL).
(2) Remove the snap ring retaining the thermostat
end plug (Fig. 7).
(3) Remove the end plug, thermostat and spring
from transmission oil cooler (Fig. 7).
ASSEMBLY - 5.9L DIESEL ONLY
(1) Throughly clean the thermostat bore on the
transmission oil cooler.
(2) Install the new spring, thermostat, end plug
and snap ring.
(3) Install the transmission oil cooler (Refer to 7 -
COOLING/TRANSMISSION/TRANS COOLER -
INSTALLATION).
INSTALLATION
INSTALLATION - AIR TO OIL COOLER
(1) Carefully position the oil cooler assembly to the
vehicle.
(2) Install two nuts and one bolt. Tighten to 11
N´m (95 in. lbs.) torque.
(3) Connect the quick-connect fittings to the trans-
mission cooler lines.
(4) Install Charge Air Cooler (Refer to 11 -
EXHAUST SYSTEM/TURBOCHARGER SYSTEM/
CHARGE AIR COOLER AND PLUMBING -
INSTALLATION).
(5) Start the engine and check all fittings for
leaks.
(6) Check the fluid level in the automatic trans-
mission (Refer to 21 - TRANSMISSION/TRANS-
AXLE/AUTOMATIC - 47RE/FLUID - STANDARD
PROCEDURE).
INSTALLATION - WATER-TO-AIR COOLER
(1) Position oil cooler on cylinder block.
(2) Install lower mounting bolt to cooler at the cyl-
inder block. Torque bolt to 77 N´m (57 ft. lbs.)
(3) Install upper mounting bolt at the cylinder
block. Torque bolt to 24 N´m (19 ft. lbs.)
(4) Install cooler bracket to transmission adapter
bolt. Tighten to 24 N´m (18 ft. lbs.).
(5) Connect transmission oil lines to cooler.
(6) Connect coolant hoses to cooler.
(7) Install starter motor (Refer to 8 - ELECTRI-
CAL/STARTING/STARTER MOTOR - INSTALLA-
TION).
(8) Connect battery negative cables.
(9) Fill cooling system (Refer to 7 - COOLING -
STANDARD PROCEDURE).
(10) Check transmission oil level and fill as neces-
sary (Refer to 21 - TRANSMISSION/TRANSAXLE/
AUTOMATIC - 47RE/FLUID - STANDARD
PROCEDURE).
Fig. 7 Transmission Oil Cooler Thermostat
Removal/Installation
1 - THERMOSTAT HOUSING
2 - SPRING
3 - END PLUG
4 - SNAP RING
5 - THERMOSTAT
7 - 70 TRANSMISSIONDR
TRANS COOLER - 5.9L DIESEL (Continued)
Page 389 of 2627
(3) Remove instrument panel center bezel (Refer to
23 - BODY/INSTRUMENT PANEL/INSTRUMENT
PANEL CENTER BEZEL - REMOVAL).
(4) Remove instrument panel lower right center
bezel (Refer to 23 - BODY/INSTRUMENT PANEL/IP
LOWER RIGHT CENTER BEZEL - REMOVAL).
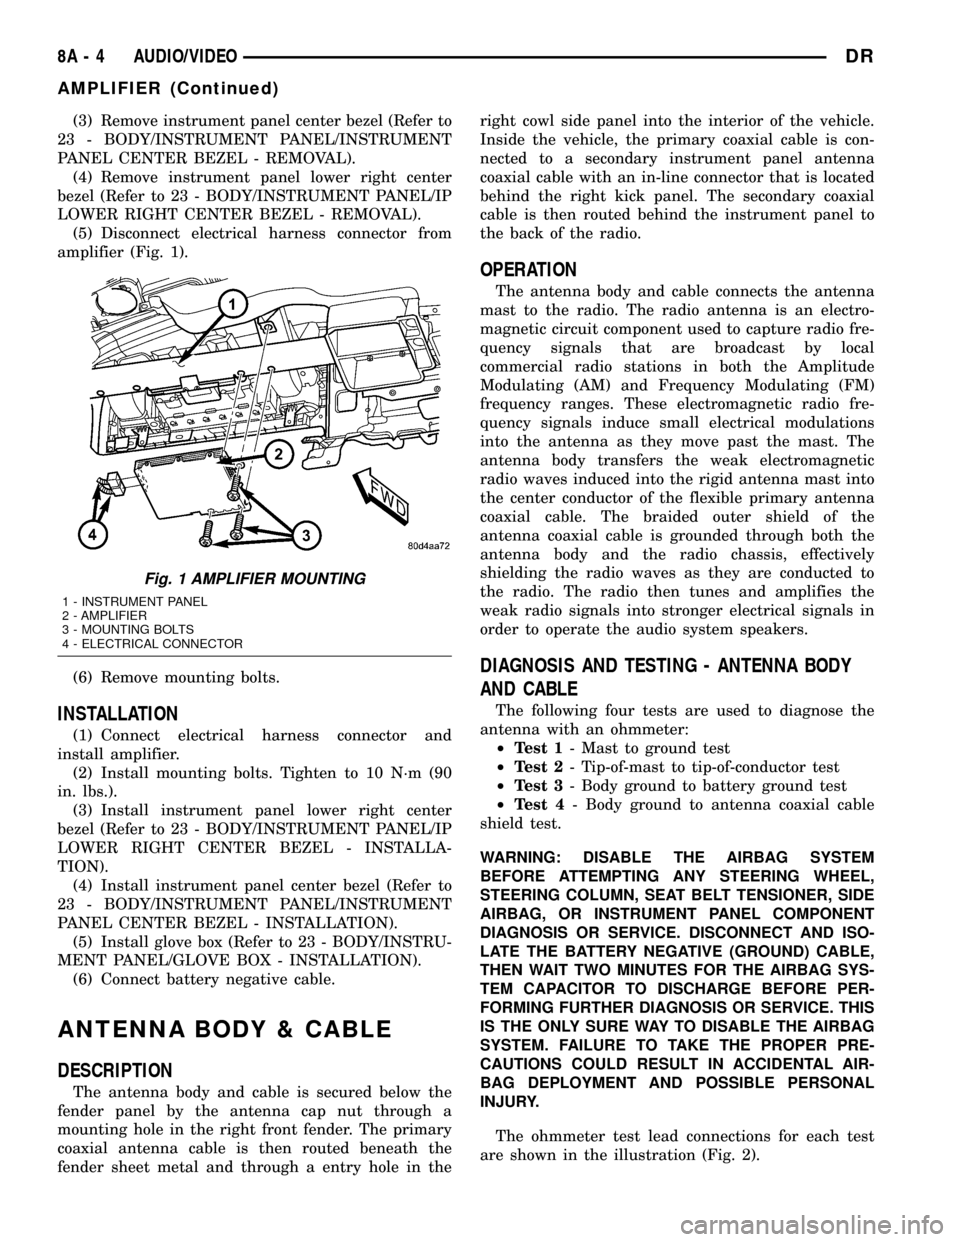
(5) Disconnect electrical harness connector from
amplifier (Fig. 1).
(6) Remove mounting bolts.
INSTALLATION
(1) Connect electrical harness connector and
install amplifier.
(2) Install mounting bolts. Tighten to 10 N´m (90
in. lbs.).
(3) Install instrument panel lower right center
bezel (Refer to 23 - BODY/INSTRUMENT PANEL/IP
LOWER RIGHT CENTER BEZEL - INSTALLA-
TION).
(4) Install instrument panel center bezel (Refer to
23 - BODY/INSTRUMENT PANEL/INSTRUMENT
PANEL CENTER BEZEL - INSTALLATION).
(5) Install glove box (Refer to 23 - BODY/INSTRU-
MENT PANEL/GLOVE BOX - INSTALLATION).
(6) Connect battery negative cable.
ANTENNA BODY & CABLE
DESCRIPTION
The antenna body and cable is secured below the
fender panel by the antenna cap nut through a
mounting hole in the right front fender. The primary
coaxial antenna cable is then routed beneath the
fender sheet metal and through a entry hole in theright cowl side panel into the interior of the vehicle.
Inside the vehicle, the primary coaxial cable is con-
nected to a secondary instrument panel antenna
coaxial cable with an in-line connector that is located
behind the right kick panel. The secondary coaxial
cable is then routed behind the instrument panel to
the back of the radio.
OPERATION
The antenna body and cable connects the antenna
mast to the radio. The radio antenna is an electro-
magnetic circuit component used to capture radio fre-
quency signals that are broadcast by local
commercial radio stations in both the Amplitude
Modulating (AM) and Frequency Modulating (FM)
frequency ranges. These electromagnetic radio fre-
quency signals induce small electrical modulations
into the antenna as they move past the mast. The
antenna body transfers the weak electromagnetic
radio waves induced into the rigid antenna mast into
the center conductor of the flexible primary antenna
coaxial cable. The braided outer shield of the
antenna coaxial cable is grounded through both the
antenna body and the radio chassis, effectively
shielding the radio waves as they are conducted to
the radio. The radio then tunes and amplifies the
weak radio signals into stronger electrical signals in
order to operate the audio system speakers.
DIAGNOSIS AND TESTING - ANTENNA BODY
AND CABLE
The following four tests are used to diagnose the
antenna with an ohmmeter:
²Test 1- Mast to ground test
²Test 2- Tip-of-mast to tip-of-conductor test
²Test 3- Body ground to battery ground test
²Test 4- Body ground to antenna coaxial cable
shield test.
WARNING: DISABLE THE AIRBAG SYSTEM
BEFORE ATTEMPTING ANY STEERING WHEEL,
STEERING COLUMN, SEAT BELT TENSIONER, SIDE
AIRBAG, OR INSTRUMENT PANEL COMPONENT
DIAGNOSIS OR SERVICE. DISCONNECT AND ISO-
LATE THE BATTERY NEGATIVE (GROUND) CABLE,
THEN WAIT TWO MINUTES FOR THE AIRBAG SYS-
TEM CAPACITOR TO DISCHARGE BEFORE PER-
FORMING FURTHER DIAGNOSIS OR SERVICE. THIS
IS THE ONLY SURE WAY TO DISABLE THE AIRBAG
SYSTEM. FAILURE TO TAKE THE PROPER PRE-
CAUTIONS COULD RESULT IN ACCIDENTAL AIR-
BAG DEPLOYMENT AND POSSIBLE PERSONAL
INJURY.
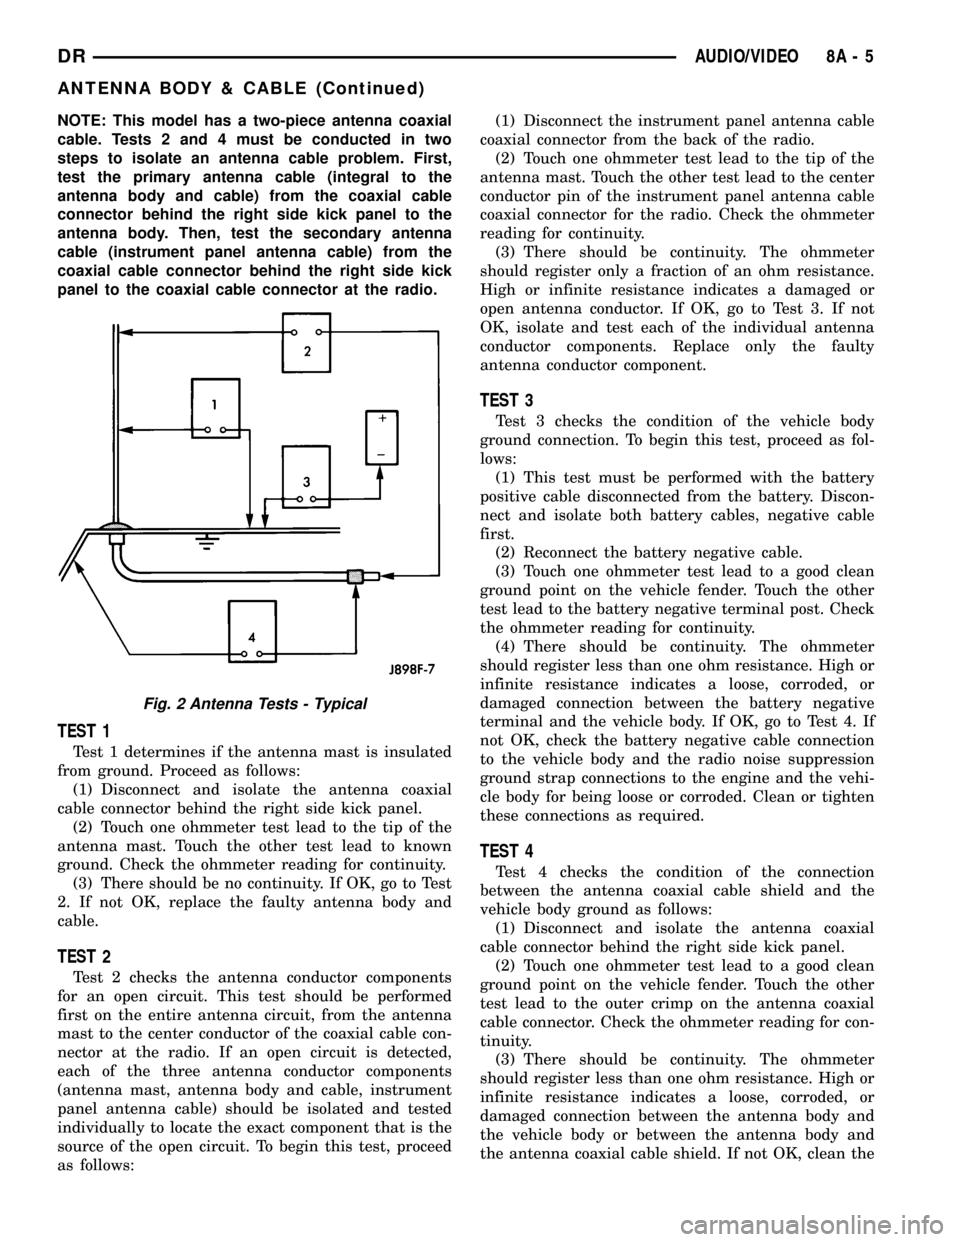
The ohmmeter test lead connections for each test
are shown in the illustration (Fig. 2).
Fig. 1 AMPLIFIER MOUNTING
1 - INSTRUMENT PANEL
2 - AMPLIFIER
3 - MOUNTING BOLTS
4 - ELECTRICAL CONNECTOR
8A - 4 AUDIO/VIDEODR
AMPLIFIER (Continued)
Page 390 of 2627
NOTE: This model has a two-piece antenna coaxial
cable. Tests 2 and 4 must be conducted in two
steps to isolate an antenna cable problem. First,
test the primary antenna cable (integral to the
antenna body and cable) from the coaxial cable
connector behind the right side kick panel to the
antenna body. Then, test the secondary antenna
cable (instrument panel antenna cable) from the
coaxial cable connector behind the right side kick
panel to the coaxial cable connector at the radio.
TEST 1
Test 1 determines if the antenna mast is insulated
from ground. Proceed as follows:
(1) Disconnect and isolate the antenna coaxial
cable connector behind the right side kick panel.
(2) Touch one ohmmeter test lead to the tip of the
antenna mast. Touch the other test lead to known
ground. Check the ohmmeter reading for continuity.
(3) There should be no continuity. If OK, go to Test
2. If not OK, replace the faulty antenna body and
cable.
TEST 2
Test 2 checks the antenna conductor components
for an open circuit. This test should be performed
first on the entire antenna circuit, from the antenna
mast to the center conductor of the coaxial cable con-
nector at the radio. If an open circuit is detected,
each of the three antenna conductor components
(antenna mast, antenna body and cable, instrument
panel antenna cable) should be isolated and tested
individually to locate the exact component that is the
source of the open circuit. To begin this test, proceed
as follows:(1) Disconnect the instrument panel antenna cable
coaxial connector from the back of the radio.
(2) Touch one ohmmeter test lead to the tip of the
antenna mast. Touch the other test lead to the center
conductor pin of the instrument panel antenna cable
coaxial connector for the radio. Check the ohmmeter
reading for continuity.
(3) There should be continuity. The ohmmeter
should register only a fraction of an ohm resistance.
High or infinite resistance indicates a damaged or
open antenna conductor. If OK, go to Test 3. If not
OK, isolate and test each of the individual antenna
conductor components. Replace only the faulty
antenna conductor component.
TEST 3
Test 3 checks the condition of the vehicle body
ground connection. To begin this test, proceed as fol-
lows:
(1) This test must be performed with the battery
positive cable disconnected from the battery. Discon-
nect and isolate both battery cables, negative cable
first.
(2) Reconnect the battery negative cable.
(3) Touch one ohmmeter test lead to a good clean
ground point on the vehicle fender. Touch the other
test lead to the battery negative terminal post. Check
the ohmmeter reading for continuity.
(4) There should be continuity. The ohmmeter
should register less than one ohm resistance. High or
infinite resistance indicates a loose, corroded, or
damaged connection between the battery negative
terminal and the vehicle body. If OK, go to Test 4. If
not OK, check the battery negative cable connection
to the vehicle body and the radio noise suppression
ground strap connections to the engine and the vehi-
cle body for being loose or corroded. Clean or tighten
these connections as required.
TEST 4
Test 4 checks the condition of the connection
between the antenna coaxial cable shield and the
vehicle body ground as follows:
(1) Disconnect and isolate the antenna coaxial
cable connector behind the right side kick panel.
(2) Touch one ohmmeter test lead to a good clean
ground point on the vehicle fender. Touch the other
test lead to the outer crimp on the antenna coaxial
cable connector. Check the ohmmeter reading for con-
tinuity.
(3) There should be continuity. The ohmmeter
should register less than one ohm resistance. High or
infinite resistance indicates a loose, corroded, or
damaged connection between the antenna body and
the vehicle body or between the antenna body and
the antenna coaxial cable shield. If not OK, clean the
Fig. 2 Antenna Tests - Typical
DRAUDIO/VIDEO 8A - 5
ANTENNA BODY & CABLE (Continued)
Page 391 of 2627
antenna body to fender mating surfaces and tighten
the antenna cap nut to specifications.
(4) Check the resistance again with an ohmmeter.
If the resistance is still more then one ohm, replace
the faulty antenna body and cable.
REMOVAL
(1) Disconnect and isolate the battery negative
cable.
(2) Remove the right side kick panel.
(3) Disconnect antenna body cable from instru-
ment panel cable.
(4) Securely tie a suitable length of cord or twine
to the antenna half of the coaxial cable connector.
This cord will be used to pull the cable back into
position during installation.
(5) Remove the antenna mast.
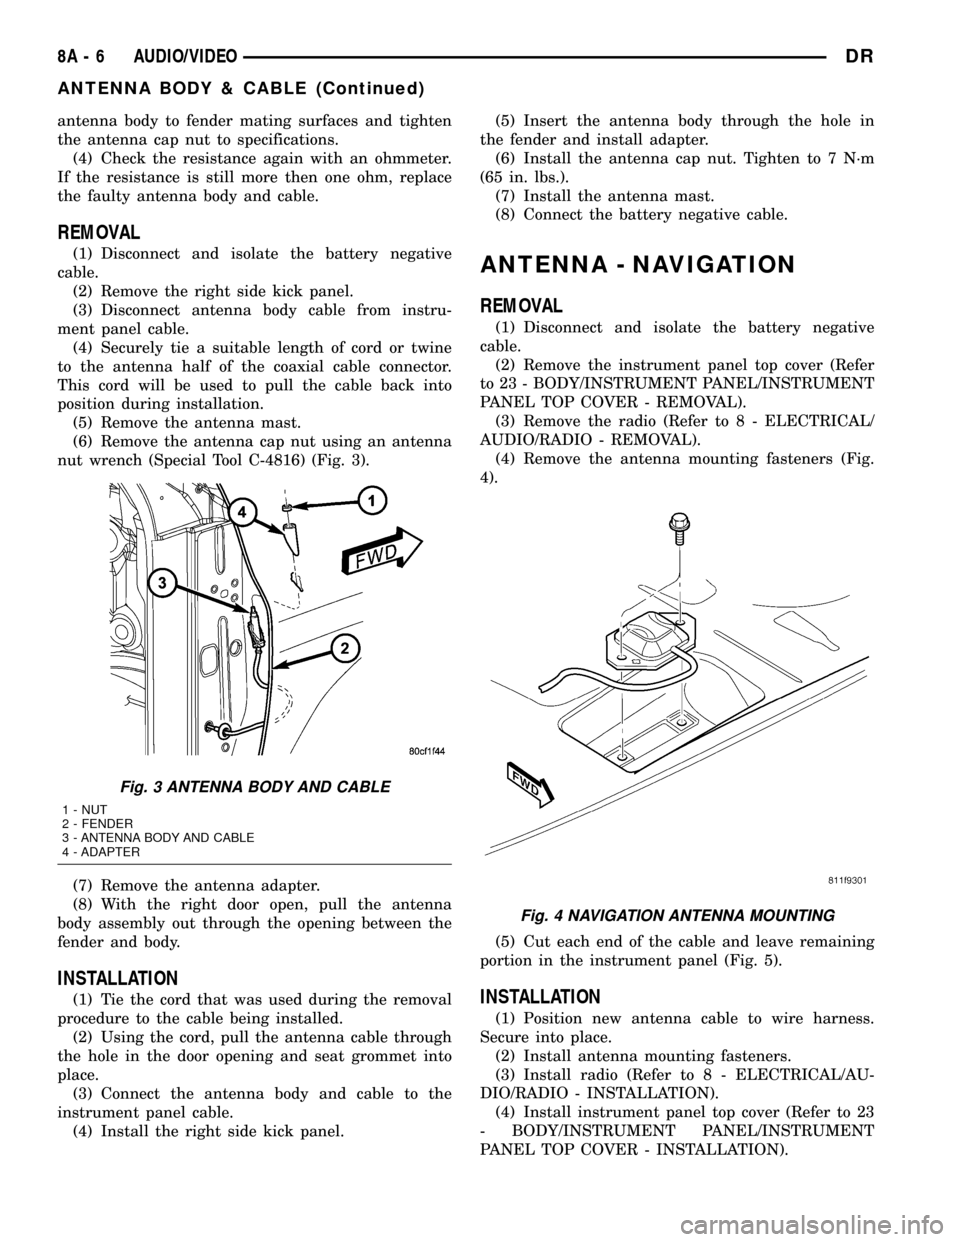
(6) Remove the antenna cap nut using an antenna
nut wrench (Special Tool C-4816) (Fig. 3).
(7) Remove the antenna adapter.
(8) With the right door open, pull the antenna
body assembly out through the opening between the
fender and body.
INSTALLATION
(1) Tie the cord that was used during the removal
procedure to the cable being installed.
(2) Using the cord, pull the antenna cable through
the hole in the door opening and seat grommet into
place.
(3) Connect the antenna body and cable to the
instrument panel cable.
(4) Install the right side kick panel.(5) Insert the antenna body through the hole in
the fender and install adapter.
(6) Install the antenna cap nut. Tighten to 7 N´m
(65 in. lbs.).
(7) Install the antenna mast.
(8) Connect the battery negative cable.
ANTENNA - NAVIGATION
REMOVAL
(1) Disconnect and isolate the battery negative
cable.
(2) Remove the instrument panel top cover (Refer
to 23 - BODY/INSTRUMENT PANEL/INSTRUMENT
PANEL TOP COVER - REMOVAL).
(3) Remove the radio (Refer to 8 - ELECTRICAL/
AUDIO/RADIO - REMOVAL).
(4) Remove the antenna mounting fasteners (Fig.
4).
(5) Cut each end of the cable and leave remaining
portion in the instrument panel (Fig. 5).
INSTALLATION
(1) Position new antenna cable to wire harness.
Secure into place.
(2) Install antenna mounting fasteners.
(3) Install radio (Refer to 8 - ELECTRICAL/AU-
DIO/RADIO - INSTALLATION).
(4) Install instrument panel top cover (Refer to 23
- BODY/INSTRUMENT PANEL/INSTRUMENT
PANEL TOP COVER - INSTALLATION).
Fig. 3 ANTENNA BODY AND CABLE
1 - NUT
2 - FENDER
3 - ANTENNA BODY AND CABLE
4 - ADAPTER
Fig. 4 NAVIGATION ANTENNA MOUNTING
8A - 6 AUDIO/VIDEODR
ANTENNA BODY & CABLE (Continued)
Page 392 of 2627
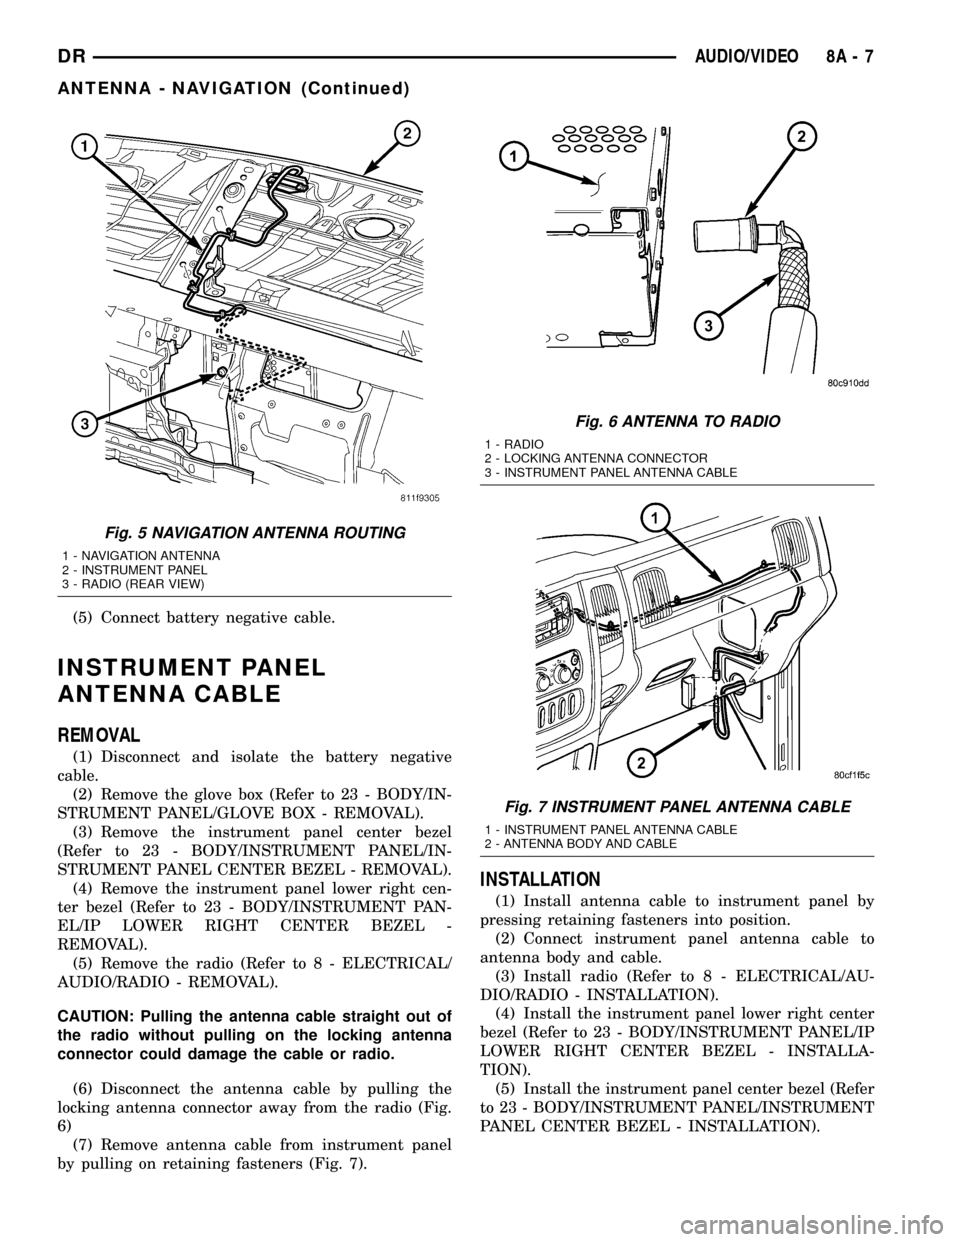
(5) Connect battery negative cable.
INSTRUMENT PANEL
ANTENNA CABLE
REMOVAL
(1) Disconnect and isolate the battery negative
cable.
(2) Remove the glove box (Refer to 23 - BODY/IN-
STRUMENT PANEL/GLOVE BOX - REMOVAL).
(3) Remove the instrument panel center bezel
(Refer to 23 - BODY/INSTRUMENT PANEL/IN-
STRUMENT PANEL CENTER BEZEL - REMOVAL).
(4) Remove the instrument panel lower right cen-
ter bezel (Refer to 23 - BODY/INSTRUMENT PAN-
EL/IP LOWER RIGHT CENTER BEZEL -
REMOVAL).
(5) Remove the radio (Refer to 8 - ELECTRICAL/
AUDIO/RADIO - REMOVAL).
CAUTION: Pulling the antenna cable straight out of
the radio without pulling on the locking antenna
connector could damage the cable or radio.
(6) Disconnect the antenna cable by pulling the
locking antenna connector away from the radio (Fig.
6)
(7) Remove antenna cable from instrument panel
by pulling on retaining fasteners (Fig. 7).
INSTALLATION
(1) Install antenna cable to instrument panel by
pressing retaining fasteners into position.
(2) Connect instrument panel antenna cable to
antenna body and cable.
(3) Install radio (Refer to 8 - ELECTRICAL/AU-
DIO/RADIO - INSTALLATION).
(4) Install the instrument panel lower right center
bezel (Refer to 23 - BODY/INSTRUMENT PANEL/IP
LOWER RIGHT CENTER BEZEL - INSTALLA-
TION).
(5) Install the instrument panel center bezel (Refer
to 23 - BODY/INSTRUMENT PANEL/INSTRUMENT
PANEL CENTER BEZEL - INSTALLATION).
Fig. 5 NAVIGATION ANTENNA ROUTING
1 - NAVIGATION ANTENNA
2 - INSTRUMENT PANEL
3 - RADIO (REAR VIEW)
Fig. 6 ANTENNA TO RADIO
1 - RADIO
2 - LOCKING ANTENNA CONNECTOR
3 - INSTRUMENT PANEL ANTENNA CABLE
Fig. 7 INSTRUMENT PANEL ANTENNA CABLE
1 - INSTRUMENT PANEL ANTENNA CABLE
2 - ANTENNA BODY AND CABLE
DRAUDIO/VIDEO 8A - 7
ANTENNA - NAVIGATION (Continued)
Page 393 of 2627
(6) Install the glove box (Refer to 23 - BODY/IN-
STRUMENT PANEL/GLOVE BOX - INSTALLA-
TION).
(7) Connect the battery negative cable.
RADIO
DESCRIPTION
Available radio receivers for this vehicle include:
²AM/FM/cassette with CD changer control fea-
ture (RBB sales code)
²AM/FM/cassette/CD/ with CD changer control
feature (RAZ sales code)
²AM/FM/CD with CD changer control feature
(RBK sales code)
²AM/FM/cassette/CD with CD changer control
(RBY sales code)
²AM/FM/CD with GPS navigation (RB4 sales
code)
²AM/FM/cassette/CD (RBY sales code) - export
only
All factory-installed radio receivers can communi-
cate on the Programmable Communications Interface
(PCI) data bus network. All factory-installed receiv-
ers are stereo Electronically Tuned Radios (ETR) and
include an electronic digital clock function.
OPERATION
The radio receiver operates on ignition switched
battery current that is available only when the igni-
tion switch is in the On or Accessory positions. The
electronic digital clock function of the radio operates
on fused battery current supplied through the IOD
fuse, regardless of the ignition switch position.
REMOVAL
(1) Disconnect and isolate the battery negative
cable.
(2) Remove center instrument panel bezel (Refer to
23 - BODY/INSTRUMENT PANEL/INSTRUMENT
PANEL CENTER BEZEL - REMOVAL).
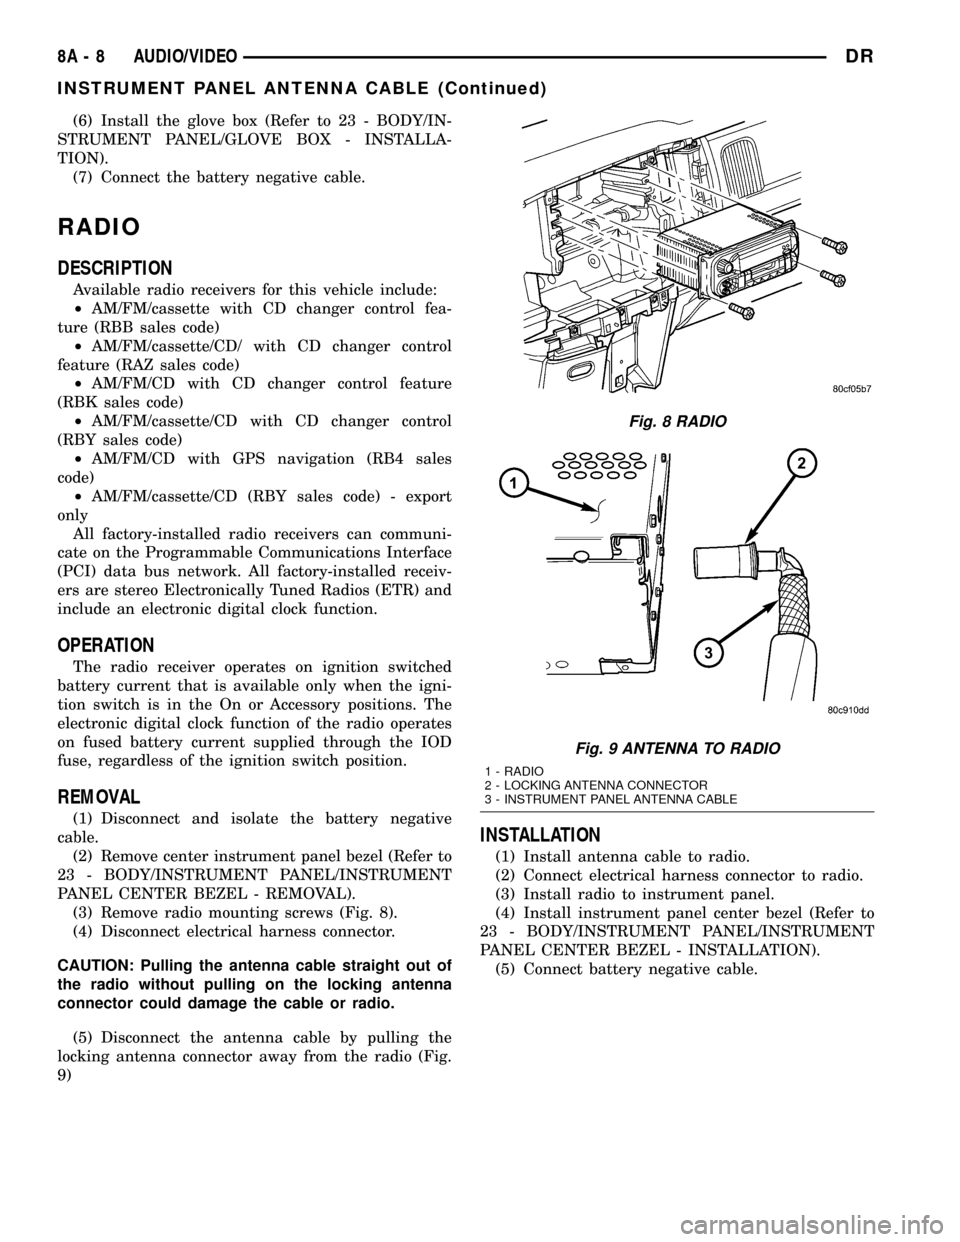
(3) Remove radio mounting screws (Fig. 8).
(4) Disconnect electrical harness connector.
CAUTION: Pulling the antenna cable straight out of
the radio without pulling on the locking antenna
connector could damage the cable or radio.
(5) Disconnect the antenna cable by pulling the
locking antenna connector away from the radio (Fig.
9)
INSTALLATION
(1) Install antenna cable to radio.
(2) Connect electrical harness connector to radio.
(3) Install radio to instrument panel.
(4) Install instrument panel center bezel (Refer to
23 - BODY/INSTRUMENT PANEL/INSTRUMENT
PANEL CENTER BEZEL - INSTALLATION).
(5) Connect battery negative cable.
Fig. 8 RADIO
Fig. 9 ANTENNA TO RADIO
1 - RADIO
2 - LOCKING ANTENNA CONNECTOR
3 - INSTRUMENT PANEL ANTENNA CABLE
8A - 8 AUDIO/VIDEODR
INSTRUMENT PANEL ANTENNA CABLE (Continued)