One DODGE RAM 1500 1998 2.G Owner's Manual
[x] Cancel search | Manufacturer: DODGE, Model Year: 1998, Model line: RAM 1500, Model: DODGE RAM 1500 1998 2.GPages: 2627
Page 65 of 2627
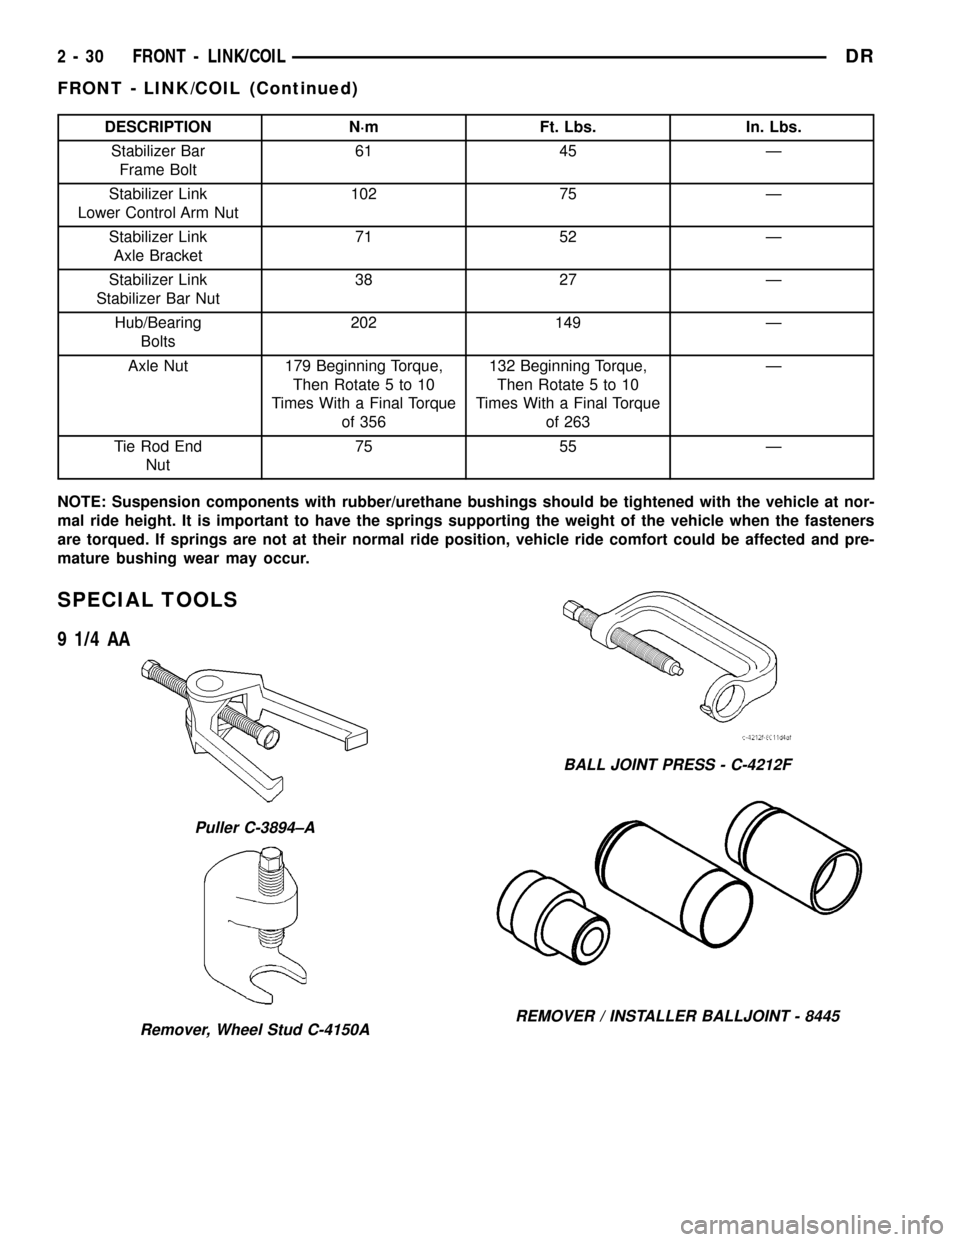
DESCRIPTION N´m Ft. Lbs. In. Lbs.
Stabilizer Bar
Frame Bolt61 45 Ð
Stabilizer Link
Lower Control Arm Nut102 75 Ð
Stabilizer Link
Axle Bracket71 52 Ð
Stabilizer Link
Stabilizer Bar Nut38 27 Ð
Hub/Bearing
Bolts202 149 Ð
Axle Nut 179 Beginning Torque,
Then Rotate 5 to 10
Times With a Final Torque
of 356132 Beginning Torque,
Then Rotate 5 to 10
Times With a Final Torque
of 263Ð
Tie Rod End
Nut75 55 Ð
NOTE: Suspension components with rubber/urethane bushings should be tightened with the vehicle at nor-
mal ride height. It is important to have the springs supporting the weight of the vehicle when the fasteners
are torqued. If springs are not at their normal ride position, vehicle ride comfort could be affected and pre-
mature bushing wear may occur.
SPECIAL TOOLS
9 1/4 AA
Puller C-3894±A
Remover, Wheel Stud C-4150A
BALL JOINT PRESS - C-4212F
REMOVER / INSTALLER BALLJOINT - 8445
2 - 30 FRONT - LINK/COILDR
FRONT - LINK/COIL (Continued)
Page 68 of 2627
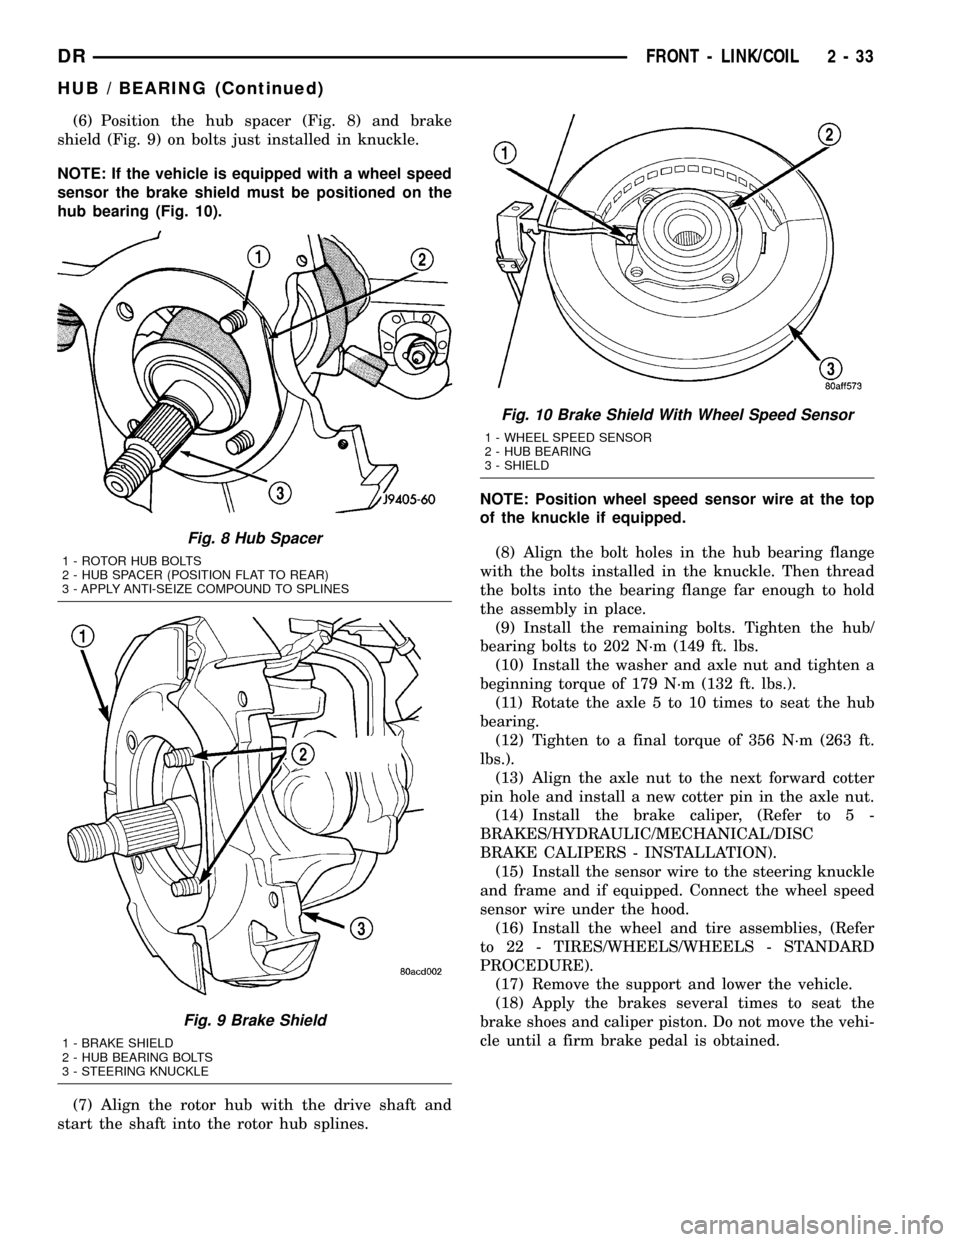
(6) Position the hub spacer (Fig. 8) and brake
shield (Fig. 9) on bolts just installed in knuckle.
NOTE: If the vehicle is equipped with a wheel speed
sensor the brake shield must be positioned on the
hub bearing (Fig. 10).
(7) Align the rotor hub with the drive shaft and
start the shaft into the rotor hub splines.NOTE: Position wheel speed sensor wire at the top
of the knuckle if equipped.
(8) Align the bolt holes in the hub bearing flange
with the bolts installed in the knuckle. Then thread
the bolts into the bearing flange far enough to hold
the assembly in place.
(9) Install the remaining bolts. Tighten the hub/
bearing bolts to 202 N´m (149 ft. lbs.
(10) Install the washer and axle nut and tighten a
beginning torque of 179 N´m (132 ft. lbs.).
(11) Rotate the axle 5 to 10 times to seat the hub
bearing.
(12) Tighten to a final torque of 356 N´m (263 ft.
lbs.).
(13) Align the axle nut to the next forward cotter
pin hole and install a new cotter pin in the axle nut.
(14) Install the brake caliper, (Refer to 5 -
BRAKES/HYDRAULIC/MECHANICAL/DISC
BRAKE CALIPERS - INSTALLATION).
(15) Install the sensor wire to the steering knuckle
and frame and if equipped. Connect the wheel speed
sensor wire under the hood.
(16) Install the wheel and tire assemblies, (Refer
to 22 - TIRES/WHEELS/WHEELS - STANDARD
PROCEDURE).
(17) Remove the support and lower the vehicle.
(18) Apply the brakes several times to seat the
brake shoes and caliper piston. Do not move the vehi-
cle until a firm brake pedal is obtained.
Fig. 8 Hub Spacer
1 - ROTOR HUB BOLTS
2 - HUB SPACER (POSITION FLAT TO REAR)
3 - APPLY ANTI-SEIZE COMPOUND TO SPLINES
Fig. 9 Brake Shield
1 - BRAKE SHIELD
2 - HUB BEARING BOLTS
3 - STEERING KNUCKLE
Fig. 10 Brake Shield With Wheel Speed Sensor
1 - WHEEL SPEED SENSOR
2 - HUB BEARING
3 - SHIELD
DRFRONT - LINK/COIL 2 - 33
HUB / BEARING (Continued)
Page 73 of 2627
LOWER SUSPENSION ARM
REMOVAL
(1) Raise and support the vehicle.
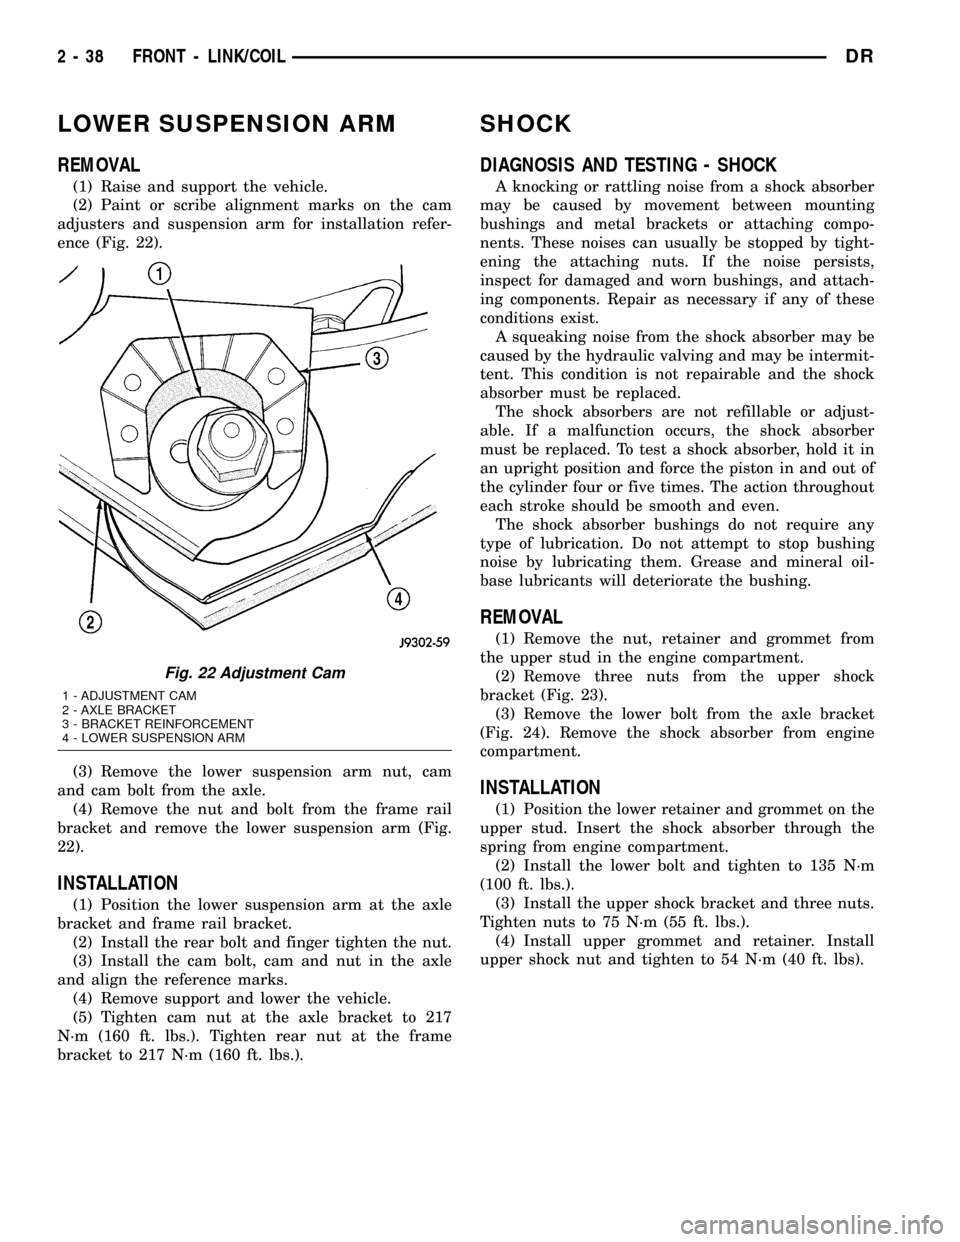
(2) Paint or scribe alignment marks on the cam
adjusters and suspension arm for installation refer-
ence (Fig. 22).
(3) Remove the lower suspension arm nut, cam
and cam bolt from the axle.
(4) Remove the nut and bolt from the frame rail
bracket and remove the lower suspension arm (Fig.
22).
INSTALLATION
(1) Position the lower suspension arm at the axle
bracket and frame rail bracket.
(2) Install the rear bolt and finger tighten the nut.
(3) Install the cam bolt, cam and nut in the axle
and align the reference marks.
(4) Remove support and lower the vehicle.
(5) Tighten cam nut at the axle bracket to 217
N´m (160 ft. lbs.). Tighten rear nut at the frame
bracket to 217 N´m (160 ft. lbs.).
SHOCK
DIAGNOSIS AND TESTING - SHOCK
A knocking or rattling noise from a shock absorber
may be caused by movement between mounting
bushings and metal brackets or attaching compo-
nents. These noises can usually be stopped by tight-
ening the attaching nuts. If the noise persists,
inspect for damaged and worn bushings, and attach-
ing components. Repair as necessary if any of these
conditions exist.
A squeaking noise from the shock absorber may be
caused by the hydraulic valving and may be intermit-
tent. This condition is not repairable and the shock
absorber must be replaced.
The shock absorbers are not refillable or adjust-
able. If a malfunction occurs, the shock absorber
must be replaced. To test a shock absorber, hold it in
an upright position and force the piston in and out of
the cylinder four or five times. The action throughout
each stroke should be smooth and even.
The shock absorber bushings do not require any
type of lubrication. Do not attempt to stop bushing
noise by lubricating them. Grease and mineral oil-
base lubricants will deteriorate the bushing.
REMOVAL
(1) Remove the nut, retainer and grommet from
the upper stud in the engine compartment.
(2) Remove three nuts from the upper shock
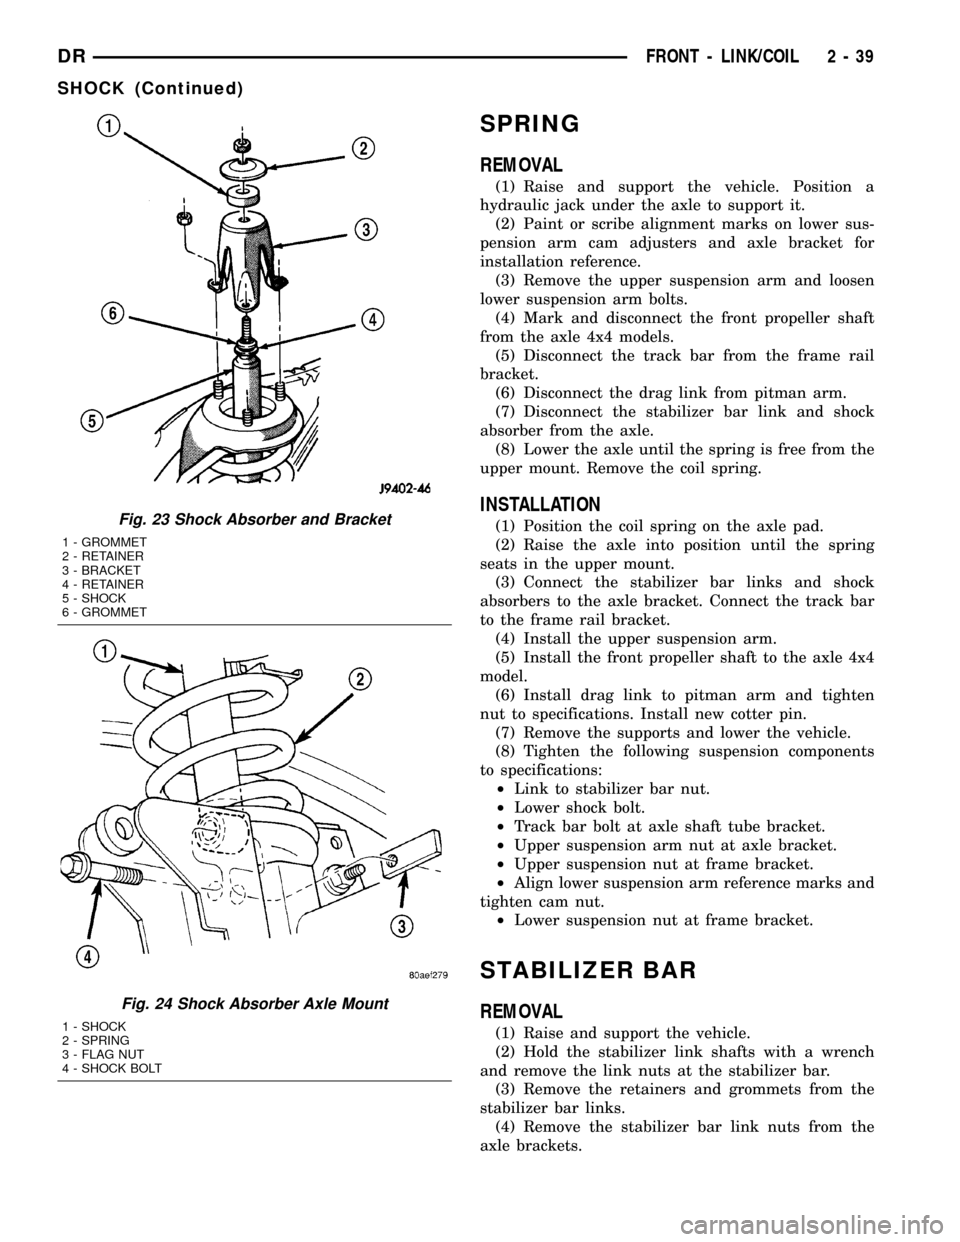
bracket (Fig. 23).
(3) Remove the lower bolt from the axle bracket
(Fig. 24). Remove the shock absorber from engine
compartment.
INSTALLATION
(1) Position the lower retainer and grommet on the
upper stud. Insert the shock absorber through the
spring from engine compartment.
(2) Install the lower bolt and tighten to 135 N´m
(100 ft. lbs.).
(3) Install the upper shock bracket and three nuts.
Tighten nuts to 75 N´m (55 ft. lbs.).
(4) Install upper grommet and retainer. Install
upper shock nut and tighten to 54 N´m (40 ft. lbs).
Fig. 22 Adjustment Cam
1 - ADJUSTMENT CAM
2 - AXLE BRACKET
3 - BRACKET REINFORCEMENT
4 - LOWER SUSPENSION ARM
2 - 38 FRONT - LINK/COILDR
Page 74 of 2627
SPRING
REMOVAL
(1) Raise and support the vehicle. Position a
hydraulic jack under the axle to support it.
(2) Paint or scribe alignment marks on lower sus-
pension arm cam adjusters and axle bracket for
installation reference.
(3) Remove the upper suspension arm and loosen
lower suspension arm bolts.
(4) Mark and disconnect the front propeller shaft
from the axle 4x4 models.
(5) Disconnect the track bar from the frame rail
bracket.
(6) Disconnect the drag link from pitman arm.
(7) Disconnect the stabilizer bar link and shock
absorber from the axle.
(8) Lower the axle until the spring is free from the
upper mount. Remove the coil spring.
INSTALLATION
(1) Position the coil spring on the axle pad.
(2) Raise the axle into position until the spring
seats in the upper mount.
(3) Connect the stabilizer bar links and shock
absorbers to the axle bracket. Connect the track bar
to the frame rail bracket.
(4) Install the upper suspension arm.
(5) Install the front propeller shaft to the axle 4x4
model.
(6) Install drag link to pitman arm and tighten
nut to specifications. Install new cotter pin.
(7) Remove the supports and lower the vehicle.
(8) Tighten the following suspension components
to specifications:
²Link to stabilizer bar nut.
²Lower shock bolt.
²Track bar bolt at axle shaft tube bracket.
²Upper suspension arm nut at axle bracket.
²Upper suspension nut at frame bracket.
²Align lower suspension arm reference marks and
tighten cam nut.
²Lower suspension nut at frame bracket.
STABILIZER BAR
REMOVAL
(1) Raise and support the vehicle.
(2) Hold the stabilizer link shafts with a wrench
and remove the link nuts at the stabilizer bar.
(3) Remove the retainers and grommets from the
stabilizer bar links.
(4) Remove the stabilizer bar link nuts from the
axle brackets.
Fig. 23 Shock Absorber and Bracket
1 - GROMMET
2 - RETAINER
3 - BRACKET
4 - RETAINER
5 - SHOCK
6 - GROMMET
Fig. 24 Shock Absorber Axle Mount
1 - SHOCK
2 - SPRING
3 - FLAG NUT
4 - SHOCK BOLT
DRFRONT - LINK/COIL 2 - 39
SHOCK (Continued)
Page 76 of 2627
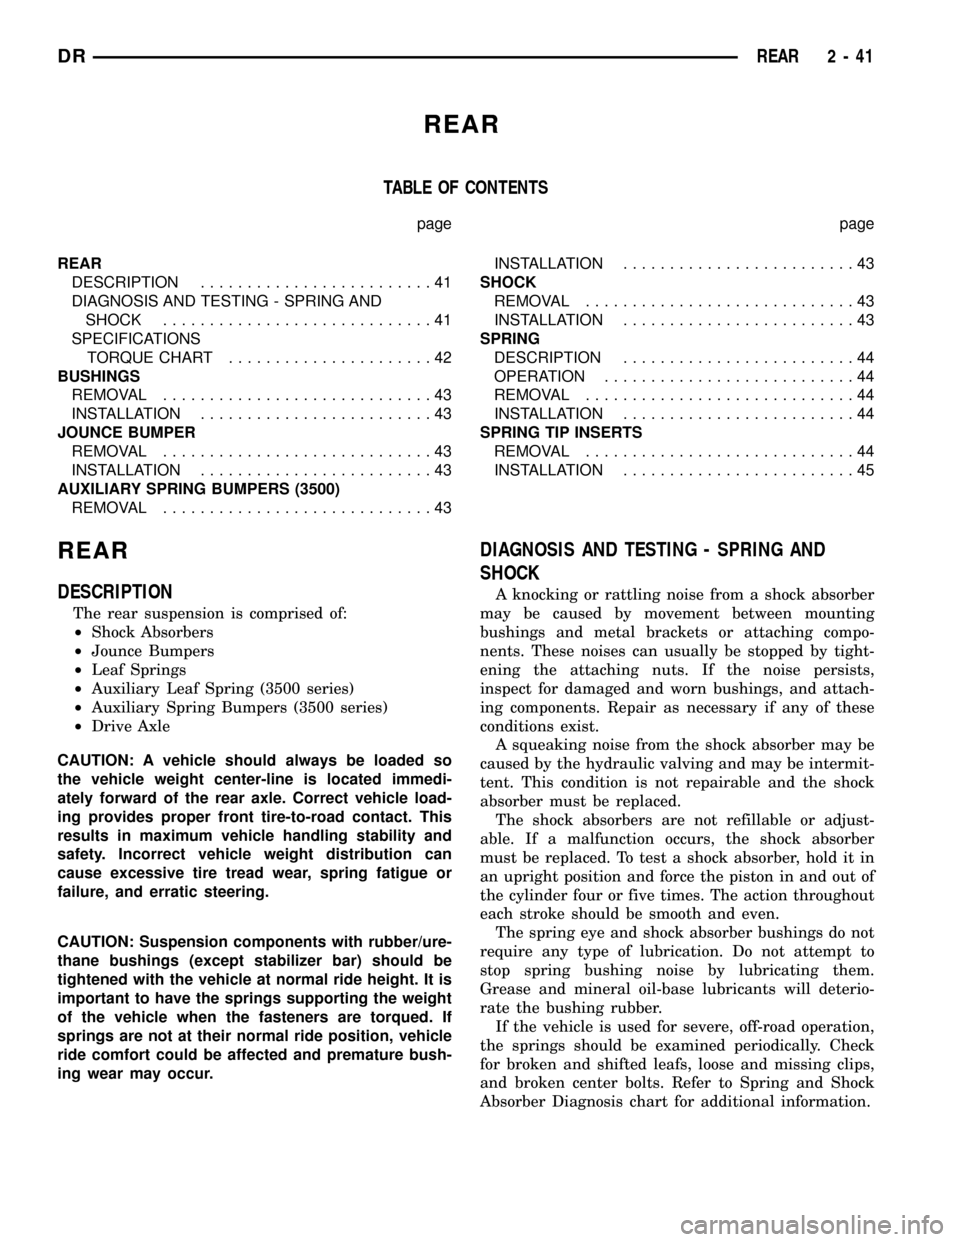
REAR
TABLE OF CONTENTS
page page
REAR
DESCRIPTION.........................41
DIAGNOSIS AND TESTING - SPRING AND
SHOCK.............................41
SPECIFICATIONS
TORQUE CHART......................42
BUSHINGS
REMOVAL.............................43
INSTALLATION.........................43
JOUNCE BUMPER
REMOVAL.............................43
INSTALLATION.........................43
AUXILIARY SPRING BUMPERS (3500)
REMOVAL.............................43INSTALLATION.........................43
SHOCK
REMOVAL.............................43
INSTALLATION.........................43
SPRING
DESCRIPTION.........................44
OPERATION...........................44
REMOVAL.............................44
INSTALLATION.........................44
SPRING TIP INSERTS
REMOVAL.............................44
INSTALLATION.........................45
REAR
DESCRIPTION
The rear suspension is comprised of:
²Shock Absorbers
²Jounce Bumpers
²Leaf Springs
²Auxiliary Leaf Spring (3500 series)
²Auxiliary Spring Bumpers (3500 series)
²Drive Axle
CAUTION: A vehicle should always be loaded so
the vehicle weight center-line is located immedi-
ately forward of the rear axle. Correct vehicle load-
ing provides proper front tire-to-road contact. This
results in maximum vehicle handling stability and
safety. Incorrect vehicle weight distribution can
cause excessive tire tread wear, spring fatigue or
failure, and erratic steering.
CAUTION: Suspension components with rubber/ure-
thane bushings (except stabilizer bar) should be
tightened with the vehicle at normal ride height. It is
important to have the springs supporting the weight
of the vehicle when the fasteners are torqued. If
springs are not at their normal ride position, vehicle
ride comfort could be affected and premature bush-
ing wear may occur.
DIAGNOSIS AND TESTING - SPRING AND
SHOCK
A knocking or rattling noise from a shock absorber
may be caused by movement between mounting
bushings and metal brackets or attaching compo-
nents. These noises can usually be stopped by tight-
ening the attaching nuts. If the noise persists,
inspect for damaged and worn bushings, and attach-
ing components. Repair as necessary if any of these
conditions exist.
A squeaking noise from the shock absorber may be
caused by the hydraulic valving and may be intermit-
tent. This condition is not repairable and the shock
absorber must be replaced.
The shock absorbers are not refillable or adjust-
able. If a malfunction occurs, the shock absorber
must be replaced. To test a shock absorber, hold it in
an upright position and force the piston in and out of
the cylinder four or five times. The action throughout
each stroke should be smooth and even.
The spring eye and shock absorber bushings do not
require any type of lubrication. Do not attempt to
stop spring bushing noise by lubricating them.
Grease and mineral oil-base lubricants will deterio-
rate the bushing rubber.
If the vehicle is used for severe, off-road operation,
the springs should be examined periodically. Check
for broken and shifted leafs, loose and missing clips,
and broken center bolts. Refer to Spring and Shock
Absorber Diagnosis chart for additional information.
DRREAR 2 - 41
Page 81 of 2627
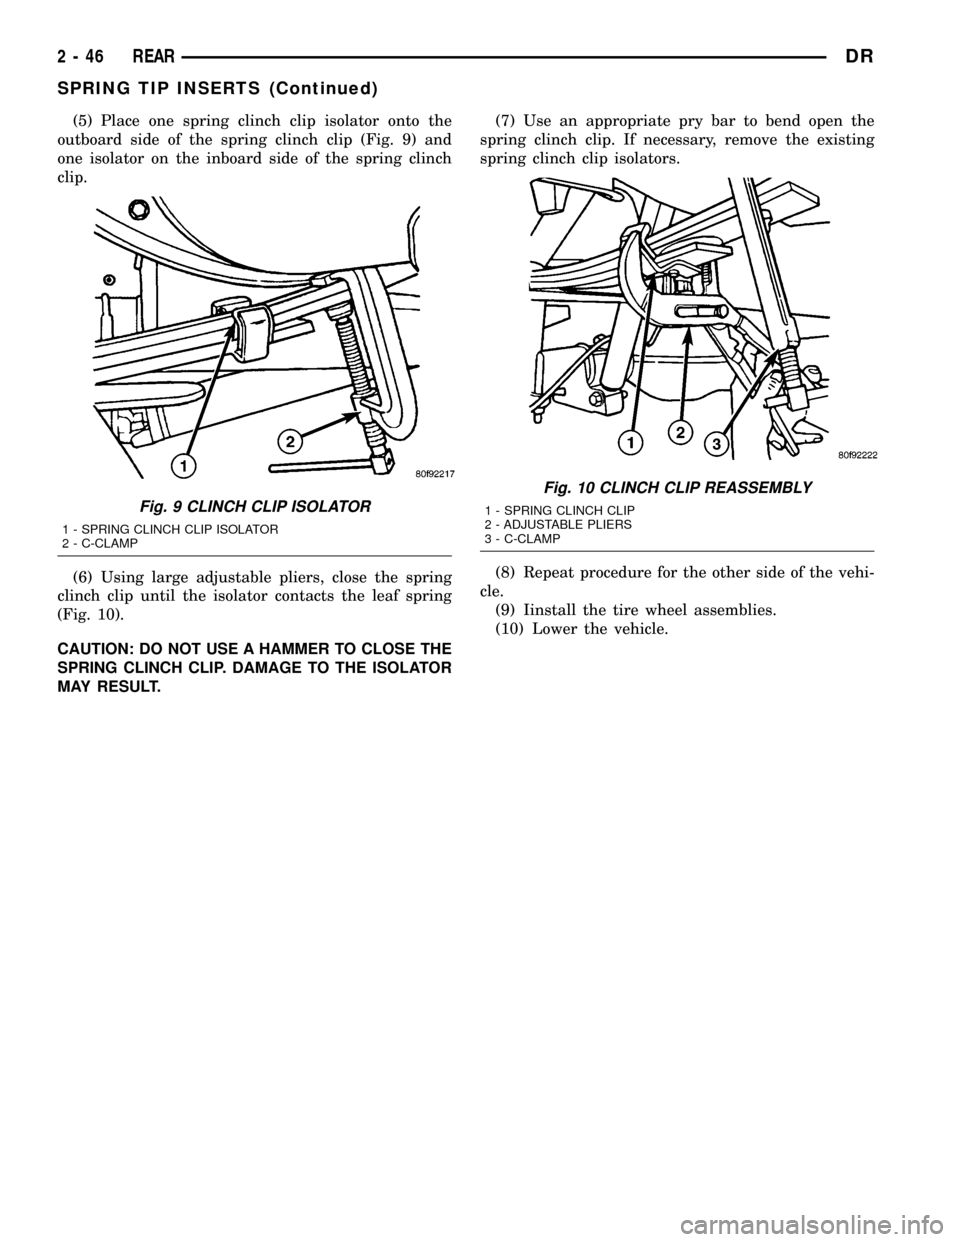
(5) Place one spring clinch clip isolator onto the
outboard side of the spring clinch clip (Fig. 9) and
one isolator on the inboard side of the spring clinch
clip.
(6) Using large adjustable pliers, close the spring
clinch clip until the isolator contacts the leaf spring
(Fig. 10).
CAUTION: DO NOT USE A HAMMER TO CLOSE THE
SPRING CLINCH CLIP. DAMAGE TO THE ISOLATOR
MAY RESULT.(7) Use an appropriate pry bar to bend open the
spring clinch clip. If necessary, remove the existing
spring clinch clip isolators.
(8) Repeat procedure for the other side of the vehi-
cle.
(9) Iinstall the tire wheel assemblies.
(10) Lower the vehicle.
Fig. 9 CLINCH CLIP ISOLATOR
1 - SPRING CLINCH CLIP ISOLATOR
2 - C-CLAMP
Fig. 10 CLINCH CLIP REASSEMBLY
1 - SPRING CLINCH CLIP
2 - ADJUSTABLE PLIERS
3 - C-CLAMP
2 - 46 REARDR
SPRING TIP INSERTS (Continued)
Page 85 of 2627
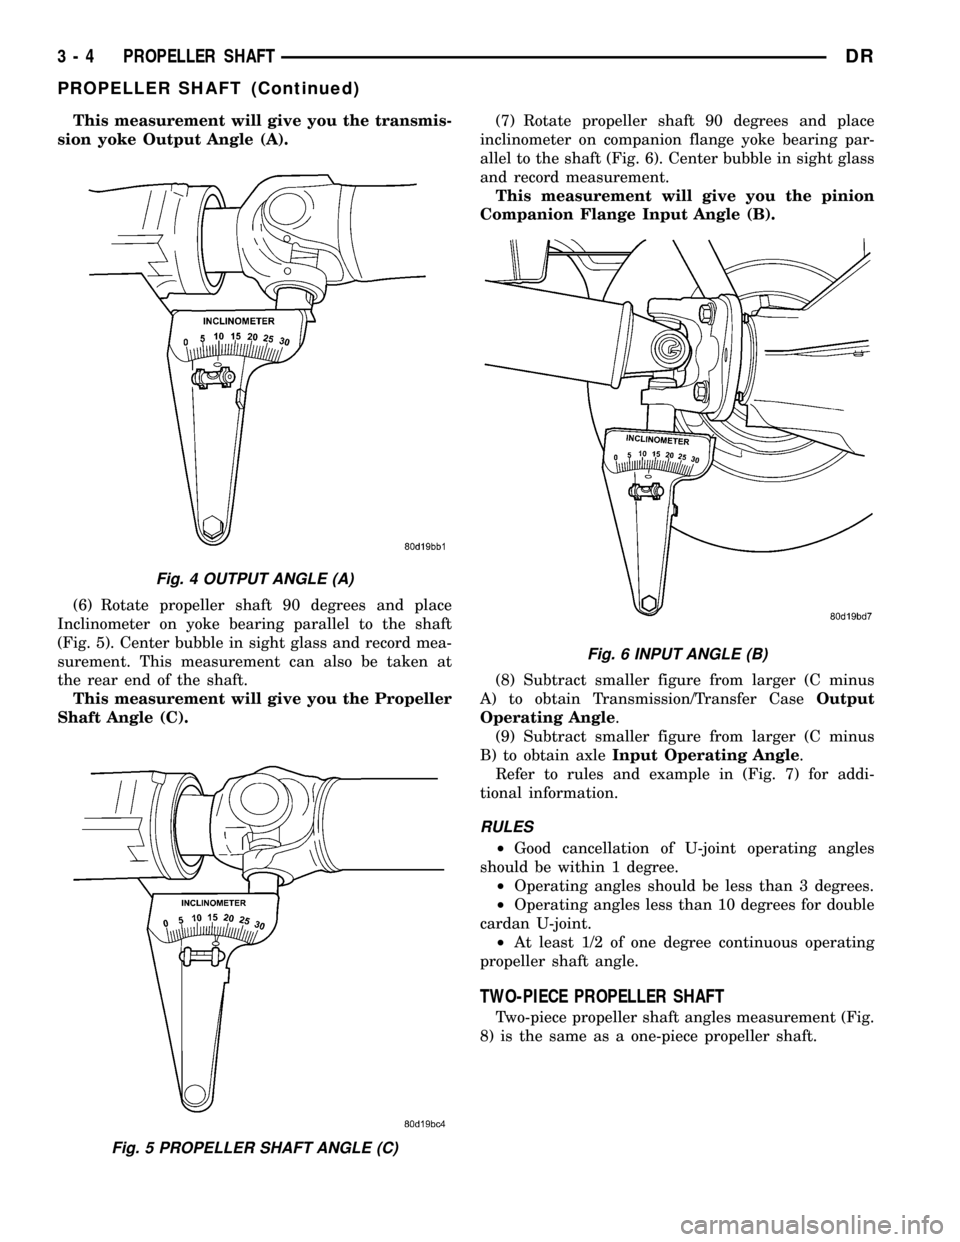
This measurement will give you the transmis-
sion yoke Output Angle (A).
(6) Rotate propeller shaft 90 degrees and place
Inclinometer on yoke bearing parallel to the shaft
(Fig. 5). Center bubble in sight glass and record mea-
surement. This measurement can also be taken at
the rear end of the shaft.
This measurement will give you the Propeller
Shaft Angle (C).(7) Rotate propeller shaft 90 degrees and place
inclinometer on companion flange yoke bearing par-
allel to the shaft (Fig. 6). Center bubble in sight glass
and record measurement.
This measurement will give you the pinion
Companion Flange Input Angle (B).
(8) Subtract smaller figure from larger (C minus
A) to obtain Transmission/Transfer CaseOutput
Operating Angle.
(9) Subtract smaller figure from larger (C minus
B) to obtain axleInput Operating Angle.
Refer to rules and example in (Fig. 7) for addi-
tional information.
RULES
²Good cancellation of U-joint operating angles
should be within 1 degree.
²Operating angles should be less than 3 degrees.
²Operating angles less than 10 degrees for double
cardan U-joint.
²At least 1/2 of one degree continuous operating
propeller shaft angle.
TWO-PIECE PROPELLER SHAFT
Two-piece propeller shaft angles measurement (Fig.
8) is the same as a one-piece propeller shaft.
Fig. 4 OUTPUT ANGLE (A)
Fig. 5 PROPELLER SHAFT ANGLE (C)
Fig. 6 INPUT ANGLE (B)
3 - 4 PROPELLER SHAFTDR
PROPELLER SHAFT (Continued)
Page 94 of 2627
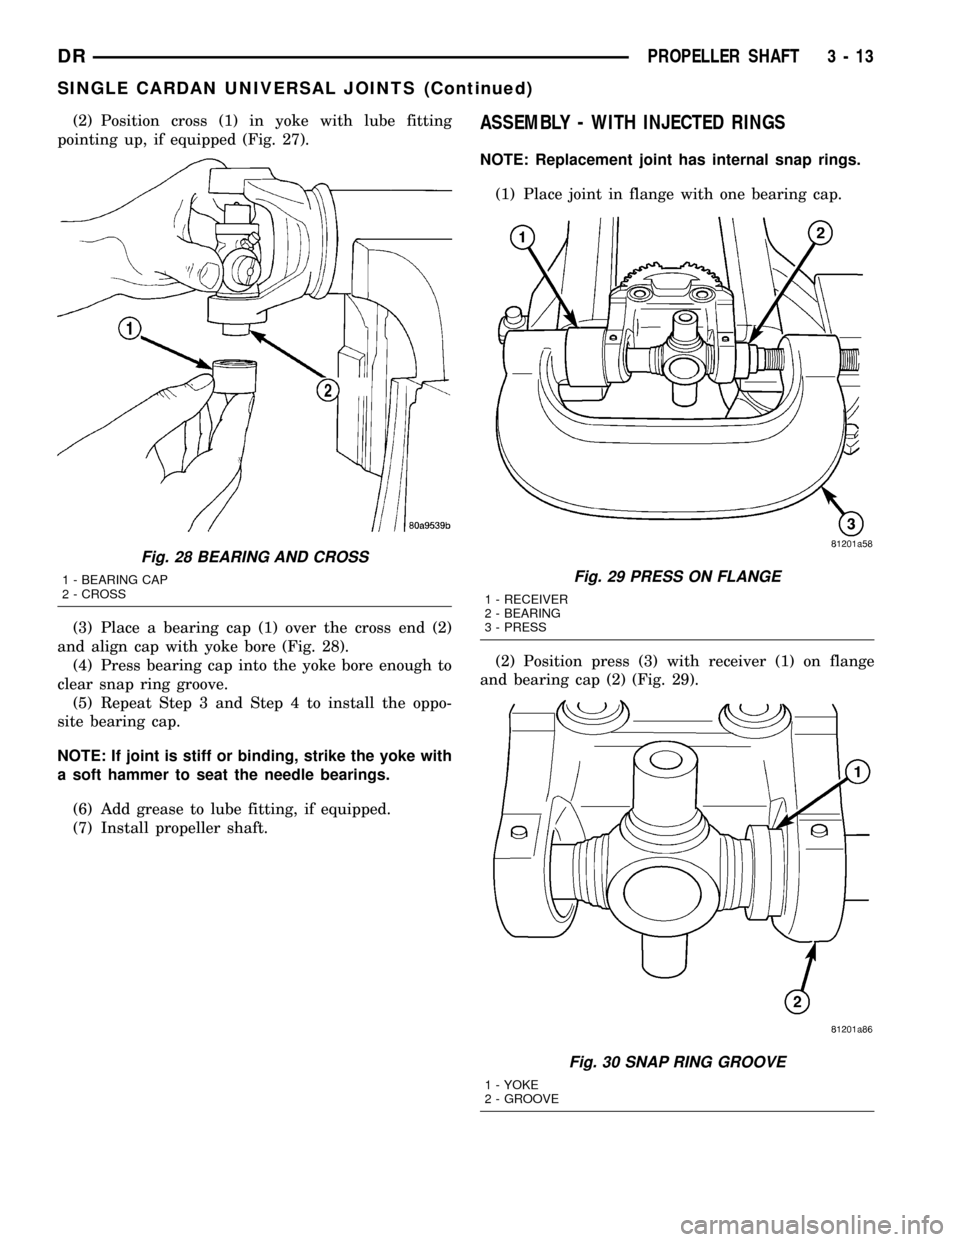
(2) Position cross (1) in yoke with lube fitting
pointing up, if equipped (Fig. 27).
(3) Place a bearing cap (1) over the cross end (2)
and align cap with yoke bore (Fig. 28).
(4) Press bearing cap into the yoke bore enough to
clear snap ring groove.
(5) Repeat Step 3 and Step 4 to install the oppo-
site bearing cap.
NOTE: If joint is stiff or binding, strike the yoke with
a soft hammer to seat the needle bearings.
(6) Add grease to lube fitting, if equipped.
(7) Install propeller shaft.ASSEMBLY - WITH INJECTED RINGS
NOTE: Replacement joint has internal snap rings.
(1) Place joint in flange with one bearing cap.
(2) Position press (3) with receiver (1) on flange
and bearing cap (2) (Fig. 29).
Fig. 28 BEARING AND CROSS
1 - BEARING CAP
2 - CROSSFig. 29 PRESS ON FLANGE
1 - RECEIVER
2 - BEARING
3 - PRESS
Fig. 30 SNAP RING GROOVE
1 - YOKE
2 - GROOVE
DRPROPELLER SHAFT 3 - 13
SINGLE CARDAN UNIVERSAL JOINTS (Continued)
Page 97 of 2627
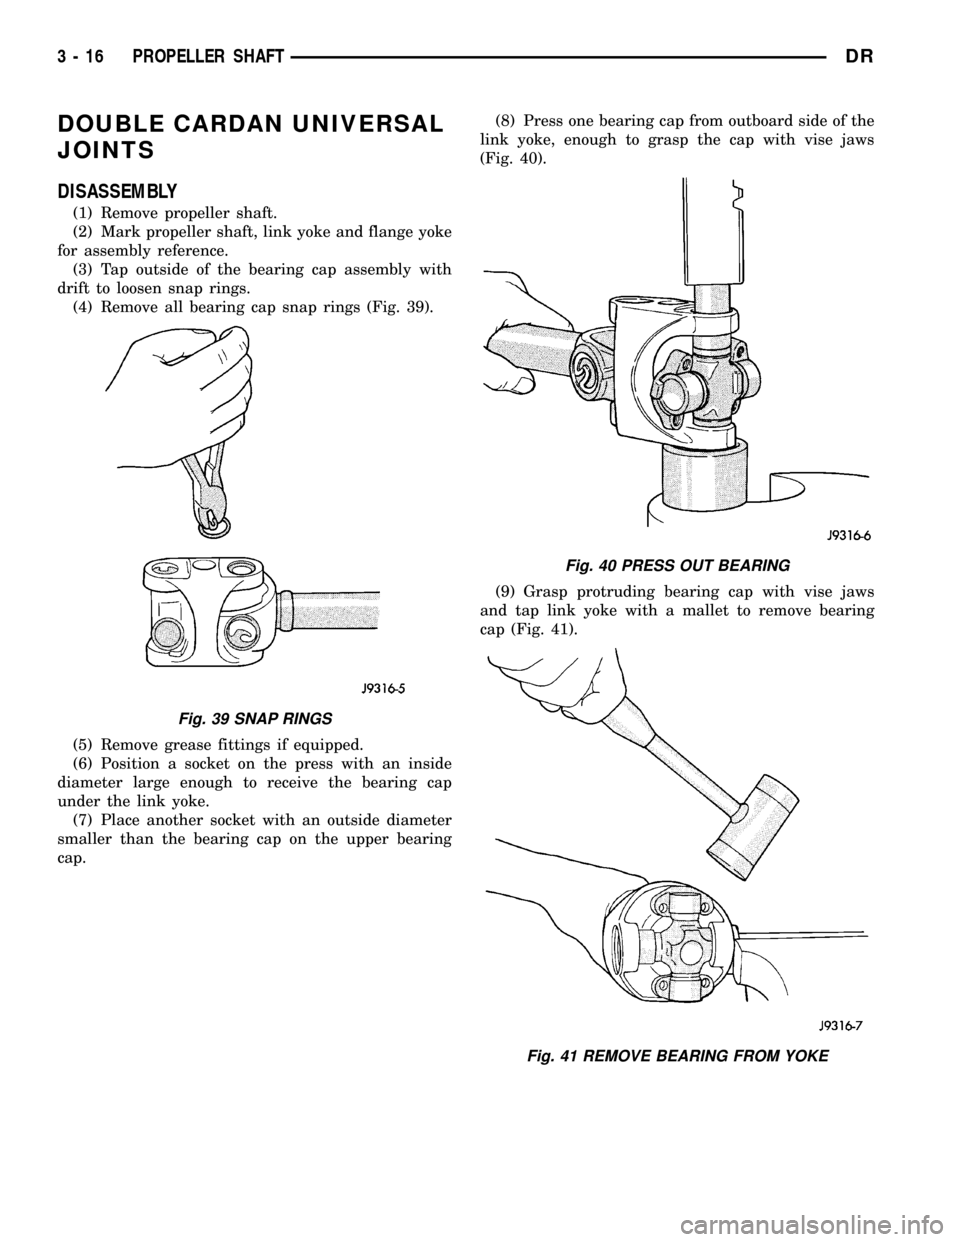
DOUBLE CARDAN UNIVERSAL
JOINTS
DISASSEMBLY
(1) Remove propeller shaft.
(2) Mark propeller shaft, link yoke and flange yoke
for assembly reference.
(3) Tap outside of the bearing cap assembly with
drift to loosen snap rings.
(4) Remove all bearing cap snap rings (Fig. 39).
(5) Remove grease fittings if equipped.
(6) Position a socket on the press with an inside
diameter large enough to receive the bearing cap
under the link yoke.
(7) Place another socket with an outside diameter
smaller than the bearing cap on the upper bearing
cap.(8) Press one bearing cap from outboard side of the
link yoke, enough to grasp the cap with vise jaws
(Fig. 40).
(9) Grasp protruding bearing cap with vise jaws
and tap link yoke with a mallet to remove bearing
cap (Fig. 41).
Fig. 39 SNAP RINGS
Fig. 40 PRESS OUT BEARING
Fig. 41 REMOVE BEARING FROM YOKE
3 - 16 PROPELLER SHAFTDR
Page 99 of 2627
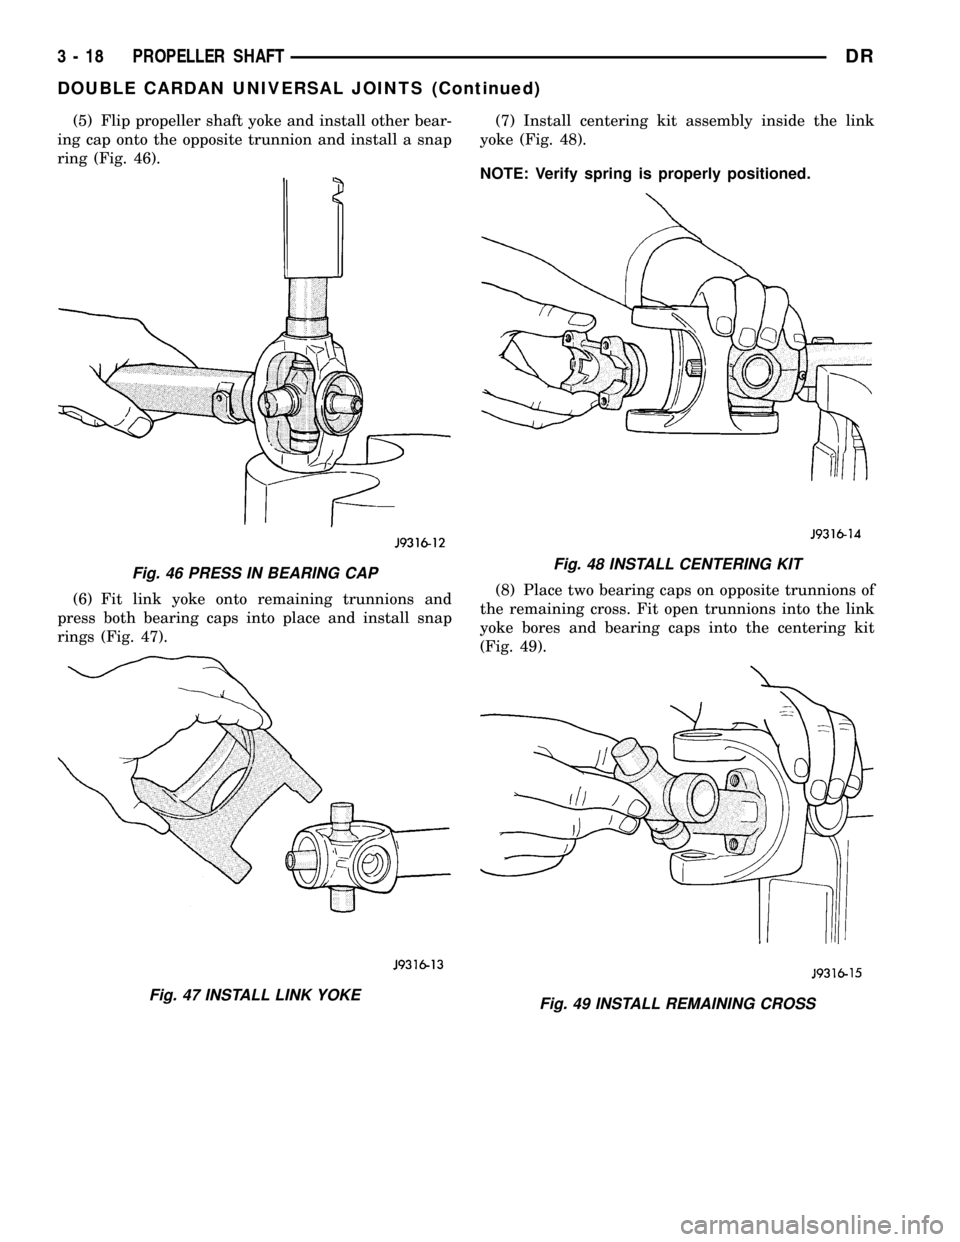
(5) Flip propeller shaft yoke and install other bear-
ing cap onto the opposite trunnion and install a snap
ring (Fig. 46).
(6) Fit link yoke onto remaining trunnions and
press both bearing caps into place and install snap
rings (Fig. 47).(7) Install centering kit assembly inside the link
yoke (Fig. 48).
NOTE: Verify spring is properly positioned.
(8) Place two bearing caps on opposite trunnions of
the remaining cross. Fit open trunnions into the link
yoke bores and bearing caps into the centering kit
(Fig. 49).
Fig. 46 PRESS IN BEARING CAP
Fig. 47 INSTALL LINK YOKE
Fig. 48 INSTALL CENTERING KIT
Fig. 49 INSTALL REMAINING CROSS
3 - 18 PROPELLER SHAFTDR
DOUBLE CARDAN UNIVERSAL JOINTS (Continued)