Removal DODGE RAM 1500 1998 2.G Service Manual
[x] Cancel search | Manufacturer: DODGE, Model Year: 1998, Model line: RAM 1500, Model: DODGE RAM 1500 1998 2.GPages: 2627
Page 112 of 2627
REMOVAL
(1) With vehicle in neutral, position vehicle on
hoist.
(2) Remove axle half shafts.
(3) Remove exhaust crossover.
(4) Mark front propeller shaft and remove shaft.
(5) Remove suspension crossmember mounting
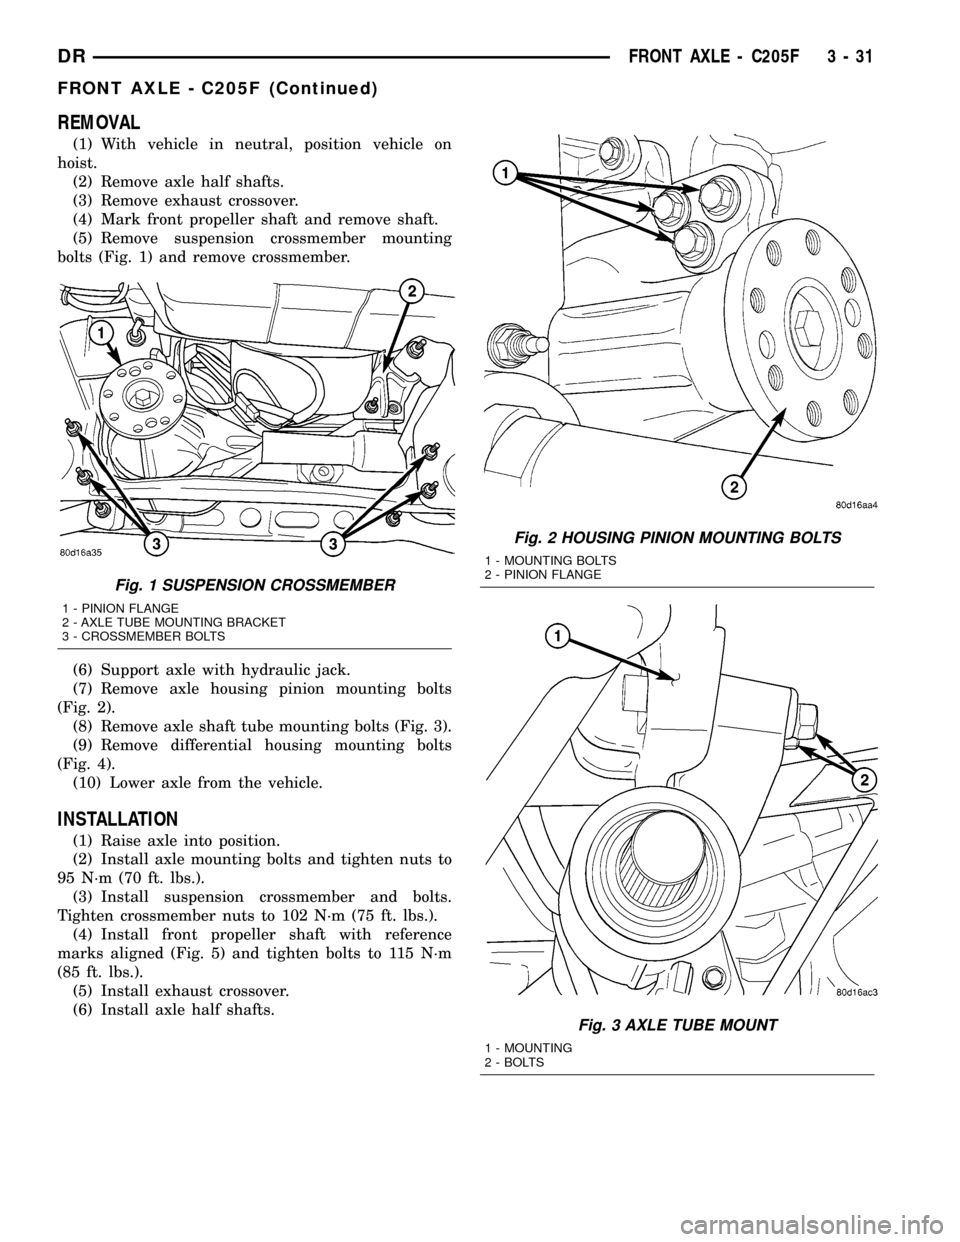
bolts (Fig. 1) and remove crossmember.
(6) Support axle with hydraulic jack.
(7) Remove axle housing pinion mounting bolts
(Fig. 2).
(8) Remove axle shaft tube mounting bolts (Fig. 3).
(9) Remove differential housing mounting bolts
(Fig. 4).
(10) Lower axle from the vehicle.
INSTALLATION
(1) Raise axle into position.
(2) Install axle mounting bolts and tighten nuts to
95 N´m (70 ft. lbs.).
(3) Install suspension crossmember and bolts.
Tighten crossmember nuts to 102 N´m (75 ft. lbs.).
(4) Install front propeller shaft with reference
marks aligned (Fig. 5) and tighten bolts to 115 N´m
(85 ft. lbs.).
(5) Install exhaust crossover.
(6) Install axle half shafts.
Fig. 1 SUSPENSION CROSSMEMBER
1 - PINION FLANGE
2 - AXLE TUBE MOUNTING BRACKET
3 - CROSSMEMBER BOLTS
Fig. 2 HOUSING PINION MOUNTING BOLTS
1 - MOUNTING BOLTS
2 - PINION FLANGE
Fig. 3 AXLE TUBE MOUNT
1 - MOUNTING
2 - BOLTS
DRFRONT AXLE - C205F 3 - 31
FRONT AXLE - C205F (Continued)
Page 116 of 2627
SHIM SELECTION
NOTE: It is difficult to salvage the differential side
bearings during the removal procedure. Install
replacement bearings if necessary.
(1) Remove side bearings from differential case.
(2) Install ring gear if necessary, on differential
case and tighten bolts to specification.
(3) Install Dummy Bearings 8398 on differential
case.
(4) Install differential case in the housing.
(5) Insert Dummy Shims 8107 3.0 mm (0.118 in.)
starting point shims between both dummy bearings
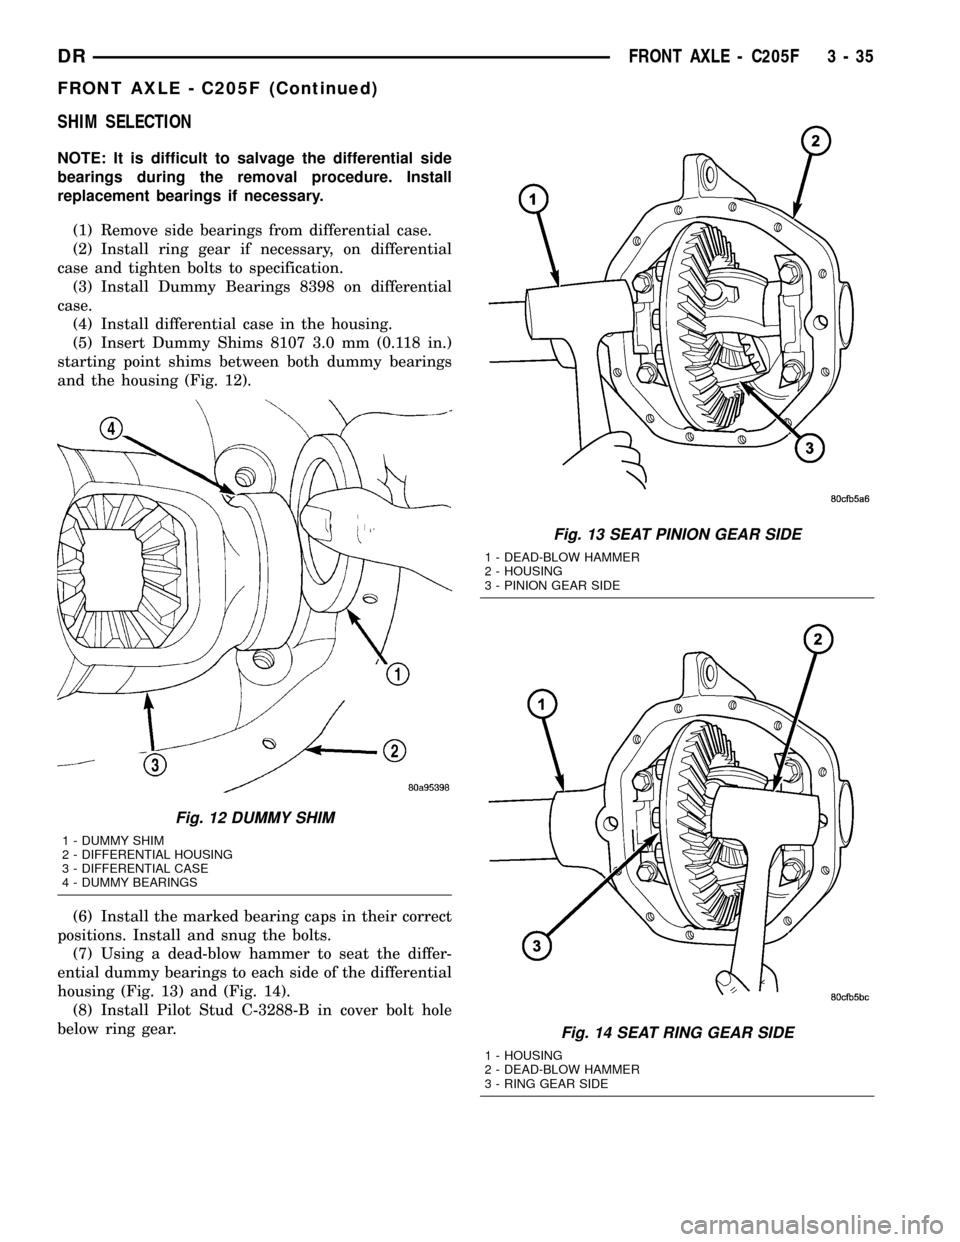
and the housing (Fig. 12).
(6) Install the marked bearing caps in their correct
positions. Install and snug the bolts.
(7) Using a dead-blow hammer to seat the differ-
ential dummy bearings to each side of the differential
housing (Fig. 13) and (Fig. 14).
(8) Install Pilot Stud C-3288-B in cover bolt hole
below ring gear.
Fig. 12 DUMMY SHIM
1 - DUMMY SHIM
2 - DIFFERENTIAL HOUSING
3 - DIFFERENTIAL CASE
4 - DUMMY BEARINGS
Fig. 13 SEAT PINION GEAR SIDE
1 - DEAD-BLOW HAMMER
2 - HOUSING
3 - PINION GEAR SIDE
Fig. 14 SEAT RING GEAR SIDE
1 - HOUSING
2 - DEAD-BLOW HAMMER
3 - RING GEAR SIDE
DRFRONT AXLE - C205F 3 - 35
FRONT AXLE - C205F (Continued)
Page 124 of 2627
AXLE SHAFTS
REMOVAL
(1) Remove half shaft from vehicle.
(2) Remove skid plate, if equipped.
(3) Clean axle seal area.
(4) Remove snap ring from the axle shaft.
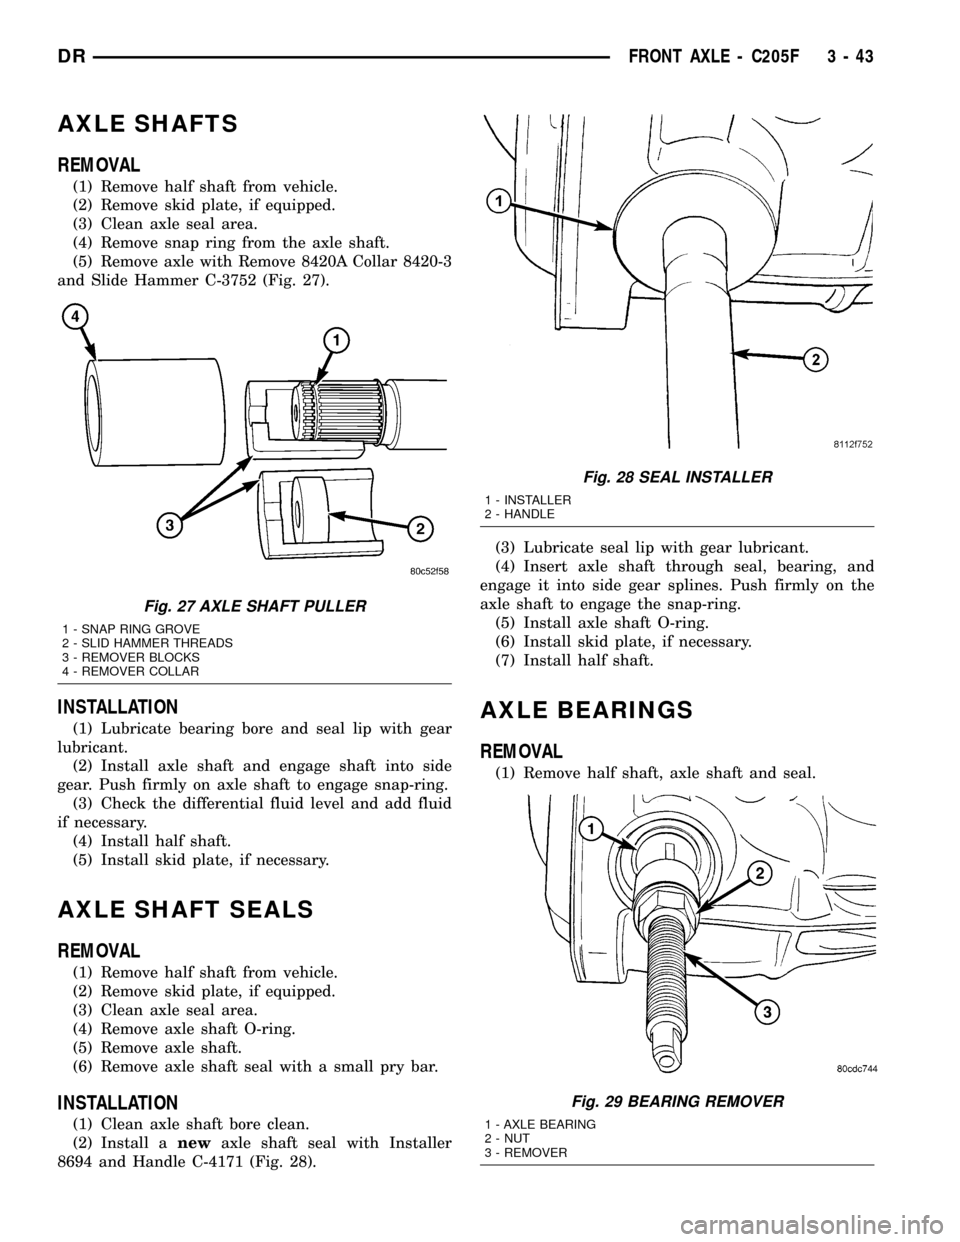
(5) Remove axle with Remove 8420A Collar 8420-3
and Slide Hammer C-3752 (Fig. 27).
INSTALLATION
(1) Lubricate bearing bore and seal lip with gear
lubricant.
(2) Install axle shaft and engage shaft into side
gear. Push firmly on axle shaft to engage snap-ring.
(3) Check the differential fluid level and add fluid
if necessary.
(4) Install half shaft.
(5) Install skid plate, if necessary.
AXLE SHAFT SEALS
REMOVAL
(1) Remove half shaft from vehicle.
(2) Remove skid plate, if equipped.
(3) Clean axle seal area.
(4) Remove axle shaft O-ring.
(5) Remove axle shaft.
(6) Remove axle shaft seal with a small pry bar.
INSTALLATION
(1) Clean axle shaft bore clean.
(2) Install anewaxle shaft seal with Installer
8694 and Handle C-4171 (Fig. 28).(3) Lubricate seal lip with gear lubricant.
(4) Insert axle shaft through seal, bearing, and
engage it into side gear splines. Push firmly on the
axle shaft to engage the snap-ring.
(5) Install axle shaft O-ring.
(6) Install skid plate, if necessary.
(7) Install half shaft.
AXLE BEARINGS
REMOVAL
(1) Remove half shaft, axle shaft and seal.
Fig. 27 AXLE SHAFT PULLER
1 - SNAP RING GROVE
2 - SLID HAMMER THREADS
3 - REMOVER BLOCKS
4 - REMOVER COLLAR
Fig. 28 SEAL INSTALLER
1 - INSTALLER
2 - HANDLE
Fig. 29 BEARING REMOVER
1 - AXLE BEARING
2 - NUT
3 - REMOVER
DRFRONT AXLE - C205F 3 - 43
Page 125 of 2627
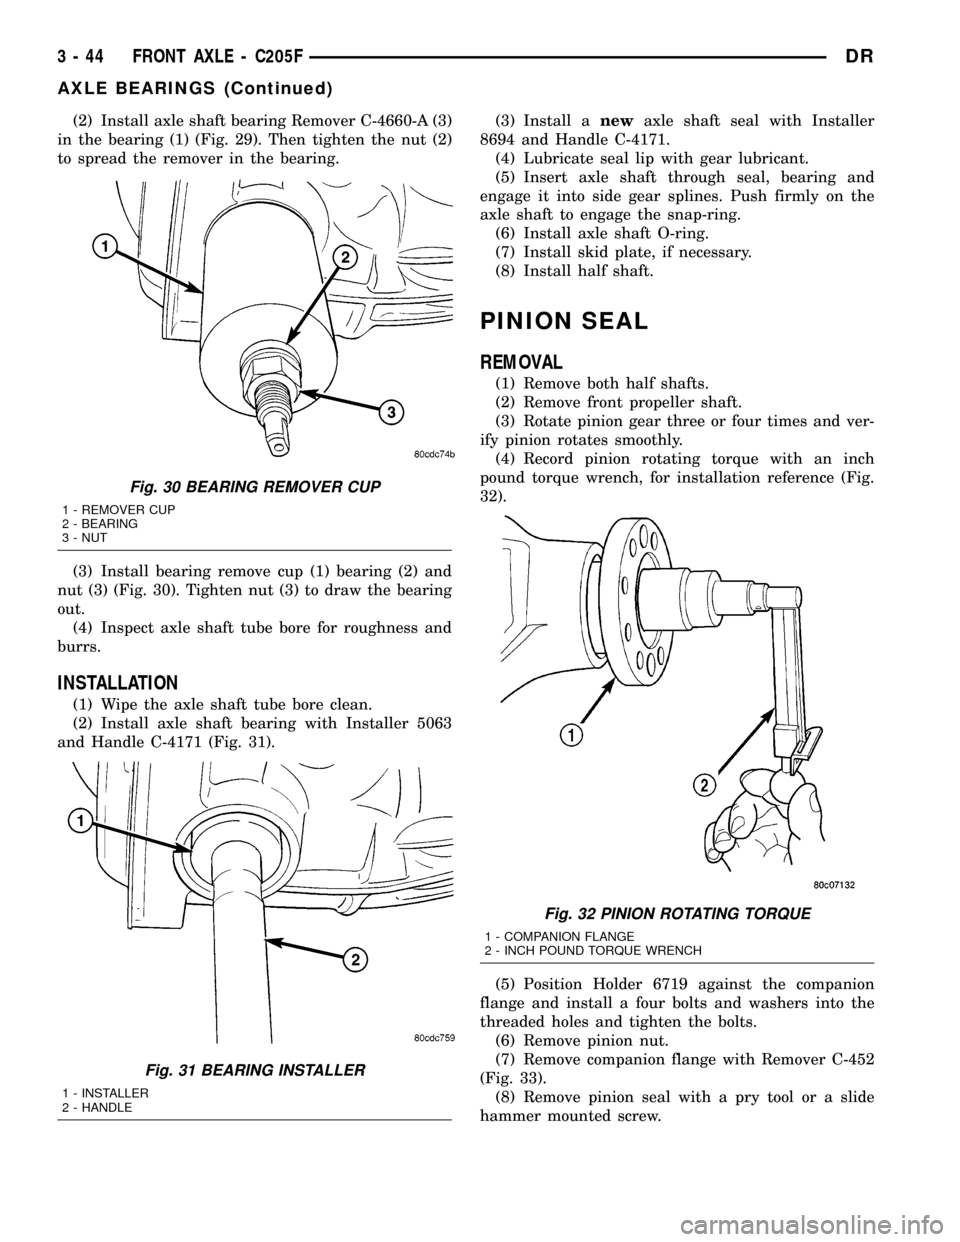
(2) Install axle shaft bearing Remover C-4660-A (3)
in the bearing (1) (Fig. 29). Then tighten the nut (2)
to spread the remover in the bearing.
(3) Install bearing remove cup (1) bearing (2) and
nut (3) (Fig. 30). Tighten nut (3) to draw the bearing
out.
(4) Inspect axle shaft tube bore for roughness and
burrs.
INSTALLATION
(1) Wipe the axle shaft tube bore clean.
(2) Install axle shaft bearing with Installer 5063
and Handle C-4171 (Fig. 31).(3) Install anewaxle shaft seal with Installer
8694 and Handle C-4171.
(4) Lubricate seal lip with gear lubricant.
(5) Insert axle shaft through seal, bearing and
engage it into side gear splines. Push firmly on the
axle shaft to engage the snap-ring.
(6) Install axle shaft O-ring.
(7) Install skid plate, if necessary.
(8) Install half shaft.
PINION SEAL
REMOVAL
(1) Remove both half shafts.
(2) Remove front propeller shaft.
(3) Rotate pinion gear three or four times and ver-
ify pinion rotates smoothly.
(4) Record pinion rotating torque with an inch
pound torque wrench, for installation reference (Fig.
32).
(5) Position Holder 6719 against the companion
flange and install a four bolts and washers into the
threaded holes and tighten the bolts.
(6) Remove pinion nut.
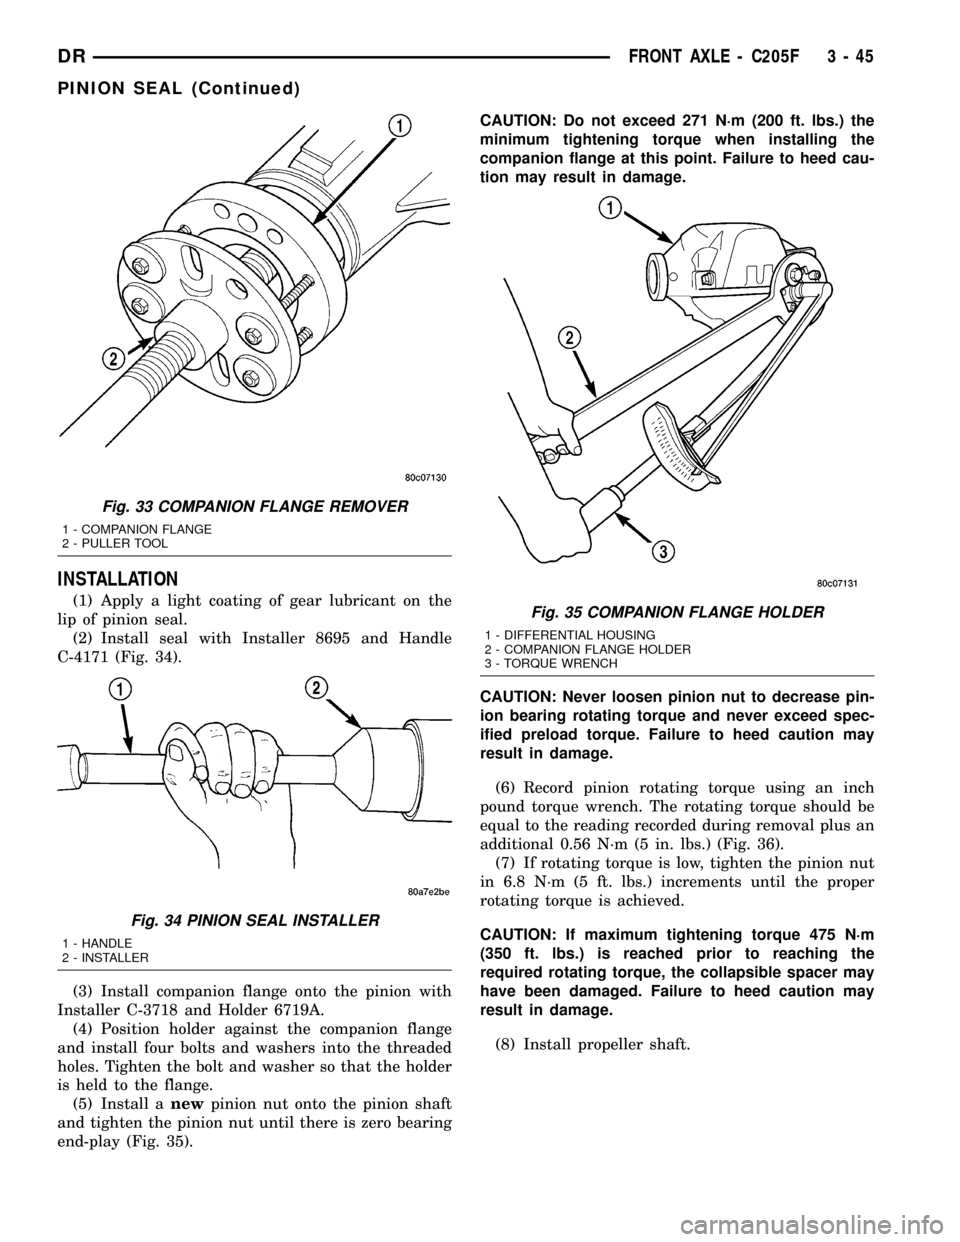
(7) Remove companion flange with Remover C-452
(Fig. 33).
(8) Remove pinion seal with a pry tool or a slide
hammer mounted screw.
Fig. 30 BEARING REMOVER CUP
1 - REMOVER CUP
2 - BEARING
3 - NUT
Fig. 31 BEARING INSTALLER
1 - INSTALLER
2 - HANDLE
Fig. 32 PINION ROTATING TORQUE
1 - COMPANION FLANGE
2 - INCH POUND TORQUE WRENCH
3 - 44 FRONT AXLE - C205FDR
AXLE BEARINGS (Continued)
Page 126 of 2627
INSTALLATION
(1) Apply a light coating of gear lubricant on the
lip of pinion seal.
(2) Install seal with Installer 8695 and Handle
C-4171 (Fig. 34).
(3) Install companion flange onto the pinion with
Installer C-3718 and Holder 6719A.
(4) Position holder against the companion flange
and install four bolts and washers into the threaded
holes. Tighten the bolt and washer so that the holder
is held to the flange.
(5) Install anewpinion nut onto the pinion shaft
and tighten the pinion nut until there is zero bearing
end-play (Fig. 35).CAUTION: Do not exceed 271 N´m (200 ft. lbs.) the
minimum tightening torque when installing the
companion flange at this point. Failure to heed cau-
tion may result in damage.
CAUTION: Never loosen pinion nut to decrease pin-
ion bearing rotating torque and never exceed spec-
ified preload torque. Failure to heed caution may
result in damage.
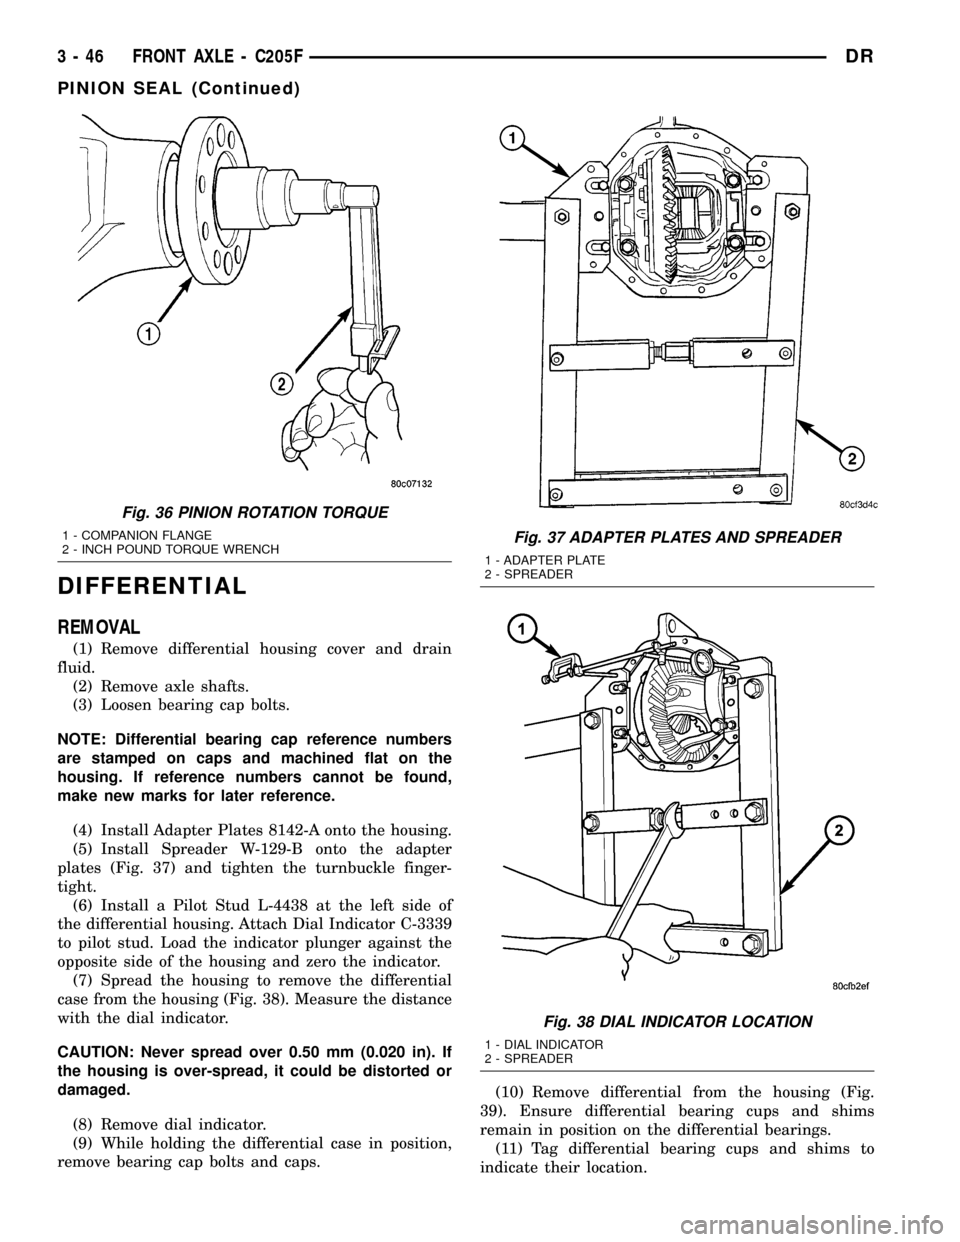
(6) Record pinion rotating torque using an inch
pound torque wrench. The rotating torque should be
equal to the reading recorded during removal plus an
additional 0.56 N´m (5 in. lbs.) (Fig. 36).
(7) If rotating torque is low, tighten the pinion nut
in 6.8 N´m (5 ft. lbs.) increments until the proper
rotating torque is achieved.
CAUTION: If maximum tightening torque 475 N´m
(350 ft. lbs.) is reached prior to reaching the
required rotating torque, the collapsible spacer may
have been damaged. Failure to heed caution may
result in damage.
(8) Install propeller shaft.
Fig. 33 COMPANION FLANGE REMOVER
1 - COMPANION FLANGE
2 - PULLER TOOL
Fig. 34 PINION SEAL INSTALLER
1 - HANDLE
2 - INSTALLER
Fig. 35 COMPANION FLANGE HOLDER
1 - DIFFERENTIAL HOUSING
2 - COMPANION FLANGE HOLDER
3 - TORQUE WRENCH
DRFRONT AXLE - C205F 3 - 45
PINION SEAL (Continued)
Page 127 of 2627
DIFFERENTIAL
REMOVAL
(1) Remove differential housing cover and drain
fluid.
(2) Remove axle shafts.
(3) Loosen bearing cap bolts.
NOTE: Differential bearing cap reference numbers
are stamped on caps and machined flat on the
housing. If reference numbers cannot be found,
make new marks for later reference.
(4) Install Adapter Plates 8142-A onto the housing.
(5) Install Spreader W-129-B onto the adapter
plates (Fig. 37) and tighten the turnbuckle finger-
tight.
(6) Install a Pilot Stud L-4438 at the left side of
the differential housing. Attach Dial Indicator C-3339
to pilot stud. Load the indicator plunger against the
opposite side of the housing and zero the indicator.
(7) Spread the housing to remove the differential
case from the housing (Fig. 38). Measure the distance
with the dial indicator.
CAUTION: Never spread over 0.50 mm (0.020 in). If
the housing is over-spread, it could be distorted or
damaged.
(8) Remove dial indicator.
(9) While holding the differential case in position,
remove bearing cap bolts and caps.(10) Remove differential from the housing (Fig.
39). Ensure differential bearing cups and shims
remain in position on the differential bearings.
(11) Tag differential bearing cups and shims to
indicate their location.
Fig. 36 PINION ROTATION TORQUE
1 - COMPANION FLANGE
2 - INCH POUND TORQUE WRENCHFig. 37 ADAPTER PLATES AND SPREADER
1 - ADAPTER PLATE
2 - SPREADER
Fig. 38 DIAL INDICATOR LOCATION
1 - DIAL INDICATOR
2 - SPREADER
3 - 46 FRONT AXLE - C205FDR
PINION SEAL (Continued)
Page 129 of 2627
INSTALLATION
NOTE: If replacement differential bearings or differ-
ential case are replaced, Refer to adjustments for
Differential Bearing Preload and Gear Backlash pro-
cedures.
(1) Install Spreader W-129-B with the Adapter
Plates 8142-A and install the safety holddown
clamps. Tighten the tool turnbuckle finger-tight.
(2) Install a Pilot Stud L-4438 at the left side of
the differential housing. Attach Dial Indicator C-3339
to pilot stud. Load indicator plunger against the
opposite side of the housing and zero the indicator.
(3) Spread housing and measure the distance with
the dial indicator.
CAUTION: Never spread housing over 0.50 mm
(0.020 in). Failure to heed caution may result in
damage.
(4) Remove dial indicator.
(5) Install differential case in the housing. Ensure
differential bearing cups remain in position on the
bearings and the differential preload shims are
seated in the housing. Tap differential case to ensure
bearings cups are seated in the housing.
(6) Install bearing caps to their original locations
and loosely install cap bolts.
(7) Remove housing spreader.
(8) Tighten the bearing cap bolts to 61 N´m (45 ft.
lbs.).
(9) Install axle shafts.
(10) Apply a bead of orange Mopar Axle RTV seal-
ant or equivalent to the housing cover.
CAUTION: If cover is not installed within 3 to 5 min-
utes, the cover must be cleaned and new RTV
applied. Failure to heed caution may result in dam-
age.
(11) Install cover and tighten bolts in a criss-cross
pattern to 22 N´m (15 ft. lbs.).
(12) Fill differential with lubricant.
DIFFERENTIAL CASE
BEARINGS
REMOVAL
(1) Remove differential from housing.
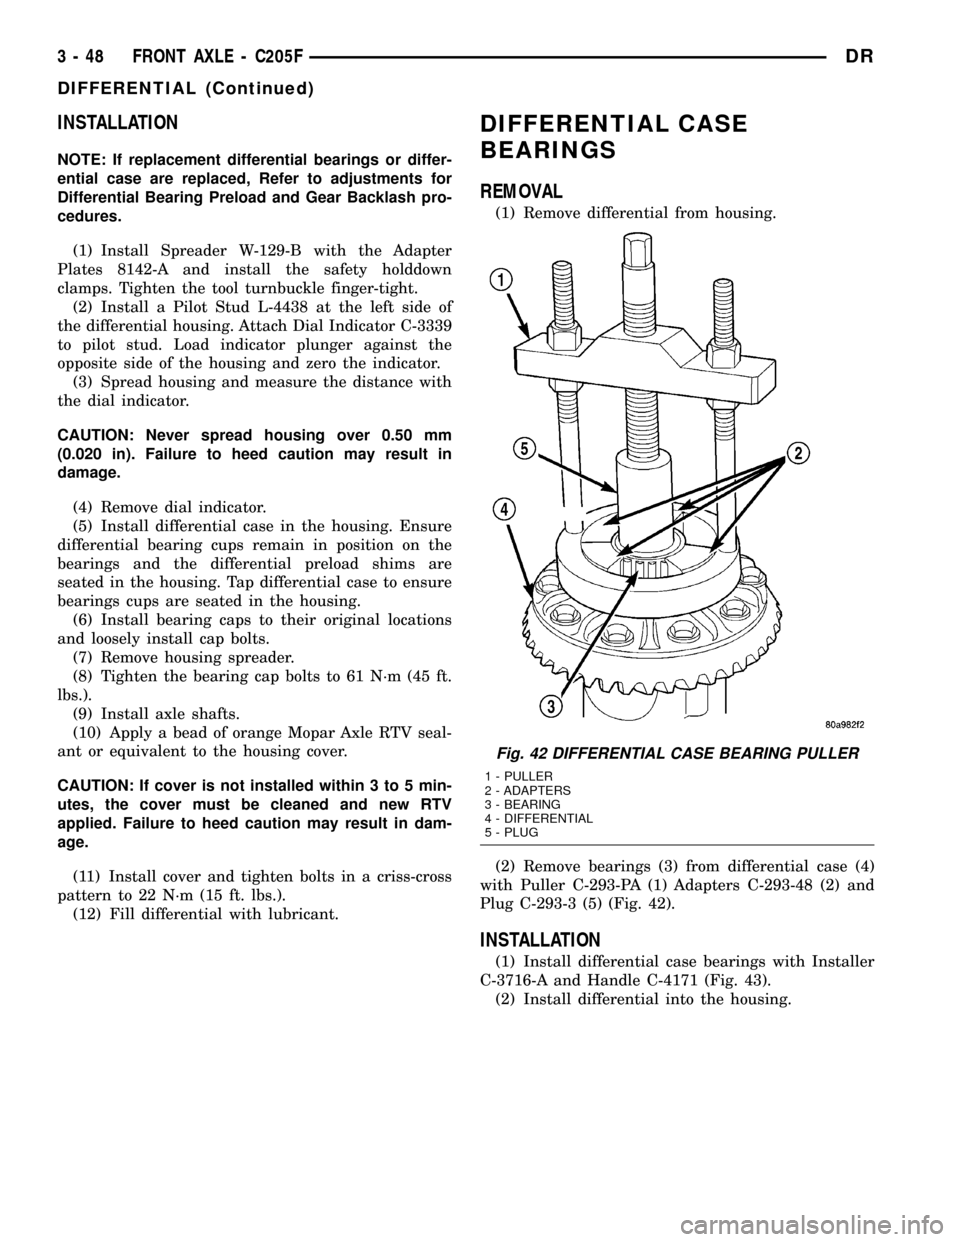
(2) Remove bearings (3) from differential case (4)
with Puller C-293-PA (1) Adapters C-293-48 (2) and
Plug C-293-3 (5) (Fig. 42).
INSTALLATION
(1) Install differential case bearings with Installer
C-3716-A and Handle C-4171 (Fig. 43).
(2) Install differential into the housing.
Fig. 42 DIFFERENTIAL CASE BEARING PULLER
1 - PULLER
2 - ADAPTERS
3 - BEARING
4 - DIFFERENTIAL
5 - PLUG
3 - 48 FRONT AXLE - C205FDR
DIFFERENTIAL (Continued)
Page 130 of 2627
PINION GEAR/RING GEAR
REMOVAL
NOTE: The ring gear and pinion are serviced in a
matched set. Never replace one without replacing
the other.
(1) Remove differential from housing.
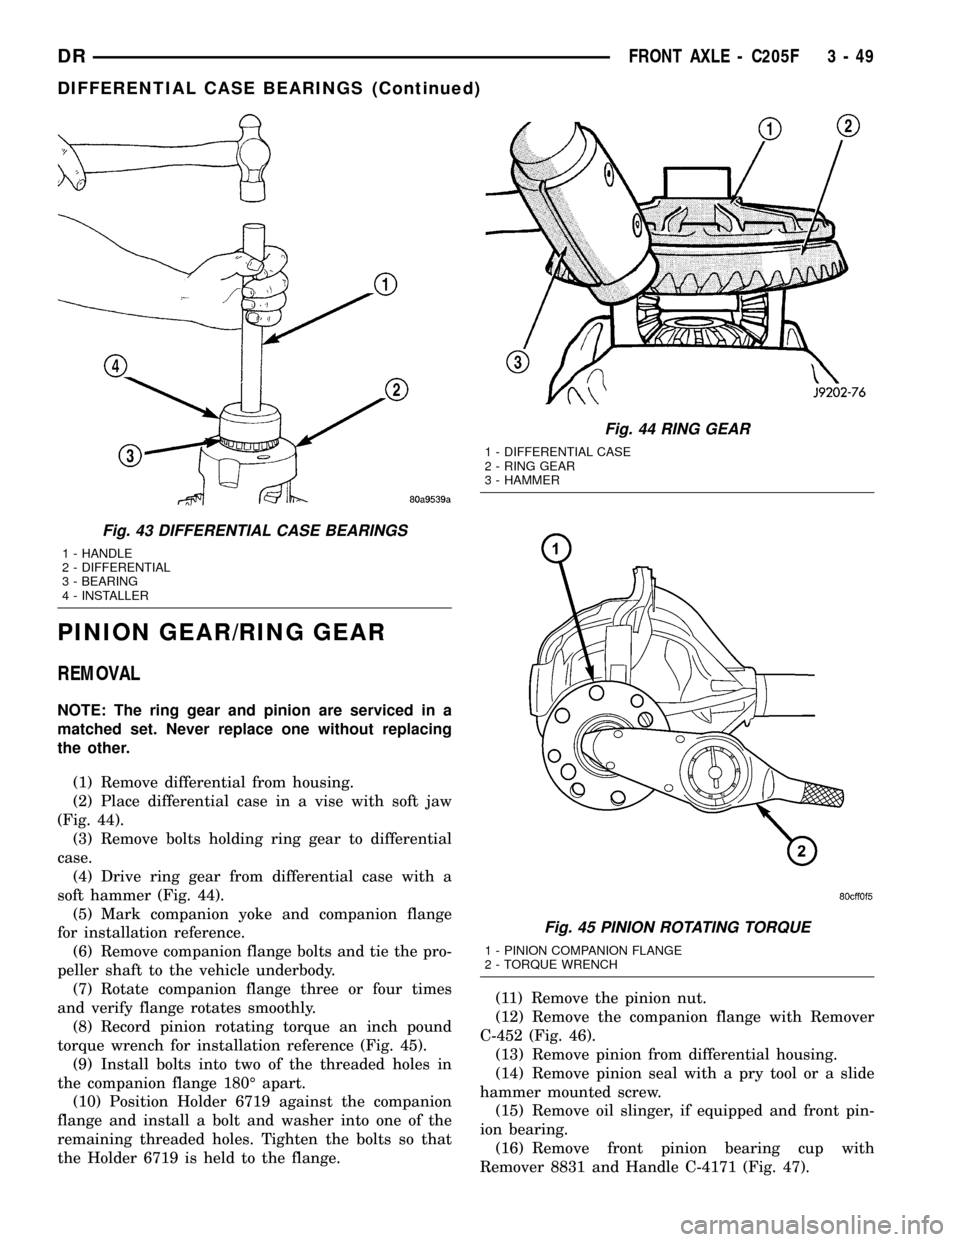
(2) Place differential case in a vise with soft jaw
(Fig. 44).
(3) Remove bolts holding ring gear to differential
case.
(4) Drive ring gear from differential case with a
soft hammer (Fig. 44).
(5) Mark companion yoke and companion flange
for installation reference.
(6) Remove companion flange bolts and tie the pro-
peller shaft to the vehicle underbody.
(7) Rotate companion flange three or four times
and verify flange rotates smoothly.
(8) Record pinion rotating torque an inch pound
torque wrench for installation reference (Fig. 45).
(9) Install bolts into two of the threaded holes in
the companion flange 180É apart.
(10) Position Holder 6719 against the companion
flange and install a bolt and washer into one of the
remaining threaded holes. Tighten the bolts so that
the Holder 6719 is held to the flange.(11) Remove the pinion nut.
(12) Remove the companion flange with Remover
C-452 (Fig. 46).
(13) Remove pinion from differential housing.
(14) Remove pinion seal with a pry tool or a slide
hammer mounted screw.
(15) Remove oil slinger, if equipped and front pin-
ion bearing.
(16) Remove front pinion bearing cup with
Remover 8831 and Handle C-4171 (Fig. 47).
Fig. 43 DIFFERENTIAL CASE BEARINGS
1 - HANDLE
2 - DIFFERENTIAL
3 - BEARING
4 - INSTALLER
Fig. 44 RING GEAR
1 - DIFFERENTIAL CASE
2 - RING GEAR
3 - HAMMER
Fig. 45 PINION ROTATING TORQUE
1 - PINION COMPANION FLANGE
2 - TORQUE WRENCH
DRFRONT AXLE - C205F 3 - 49
DIFFERENTIAL CASE BEARINGS (Continued)
Page 135 of 2627
FRONT AXLE - 9 1/4 AA
TABLE OF CONTENTS
page page
FRONT AXLE - 9 1/4 AA
DIAGNOSIS AND TESTING................54
REMOVAL.............................57
INSTALLATION.........................58
ADJUSTMENTS........................59
SPECIFICATIONS.......................63
SPECIAL TOOLS.......................64
AXLE SHAFTS
REMOVAL.............................67
DISASSEMBLY.........................68
ASSEMBLY............................69
INSTALLATION.........................69
AXLE SHAFT SEALS
REMOVAL.............................69
INSTALLATION.........................70PINION SEAL
REMOVAL.............................70
INSTALLATION.........................71
DIFFERENTIAL
REMOVAL.............................72
DISASSEMBLY.........................72
ASSEMBLY............................73
INSTALLATION.........................74
DIFFERENTIAL CASE BEARINGS
REMOVAL.............................75
INSTALLATION.........................75
PINION GEAR/RING GEAR
REMOVAL.............................75
INSTALLATION.........................77
FRONT AXLE - 9 1/4 AA
DIAGNOSIS AND TESTING
GEAR NOISE
Axle gear noise can be caused by insufficient lubri-
cant, incorrect backlash, tooth contact, worn/damaged
gears or the carrier housing not having the proper
offset and squareness.
Gear noise usually happens at a specific speed
range. The noise can also occur during a specific type
of driving condition. These conditions are accelera-
tion, deceleration, coast, or constant load.
When road testing, first warm-up the axle fluid by
driving the vehicle at least 5 miles and then acceler-
ate the vehicle to the speed range where the noise is
the greatest. Shift out-of-gear and coast through the
peak-noise range. If the noise stops or changes
greatly check for:
²Insufficient lubricant.
²Incorrect ring gear backlash.
²Gear damage.
Differential side gears and pinions can be checked
by turning the vehicle. The side gears are loaded dur-
ing turns. They usually do not cause noise during
straight-ahead driving when the gears are unloaded.
A worn pinion mate shaft can also cause a snapping
or a knocking noise.
BEARING NOISE
The axle shaft, differential and pinion bearings can
all produce noise when worn or damaged. Bearing
noise can be either a whining, or a growling sound.
Pinion bearingshave a constant-pitch noise. This
noise changes only with vehicle speed. Pinion bearing
noise will be higher pitched because it rotates at a
faster rate. Drive the vehicle and load the differen-
tial. If bearing noise occurs, the rear pinion bearing
is the source of the noise. If the bearing noise is
heard during a coast, the front pinion bearing is the
source.
Differential bearingsusually produce a low pitch
noise. Differential bearing noise is similar to pinion
bearing noise. The pitch of differential bearing noise
is also constant and varies only with vehicle speed.
Axle shaft bearingsproduce noise and vibration
when worn or damaged. The noise generally changes
when the bearings are loaded. Road test the vehicle.
Turn the vehicle sharply to the left and to the right.
This will load the bearings and change the noise
level. Where axle bearing damage is slight, the noise
is usually not noticeable at speeds above 30 m.p.h.
LOW SPEED KNOCK
Low speed knock is generally caused by:
²Worn U-joint(s).
²Worn side-gear thrust washers.
²Worn pinion shaft bore.
3 - 54 FRONT AXLE - 9 1/4 AADR
Page 138 of 2627
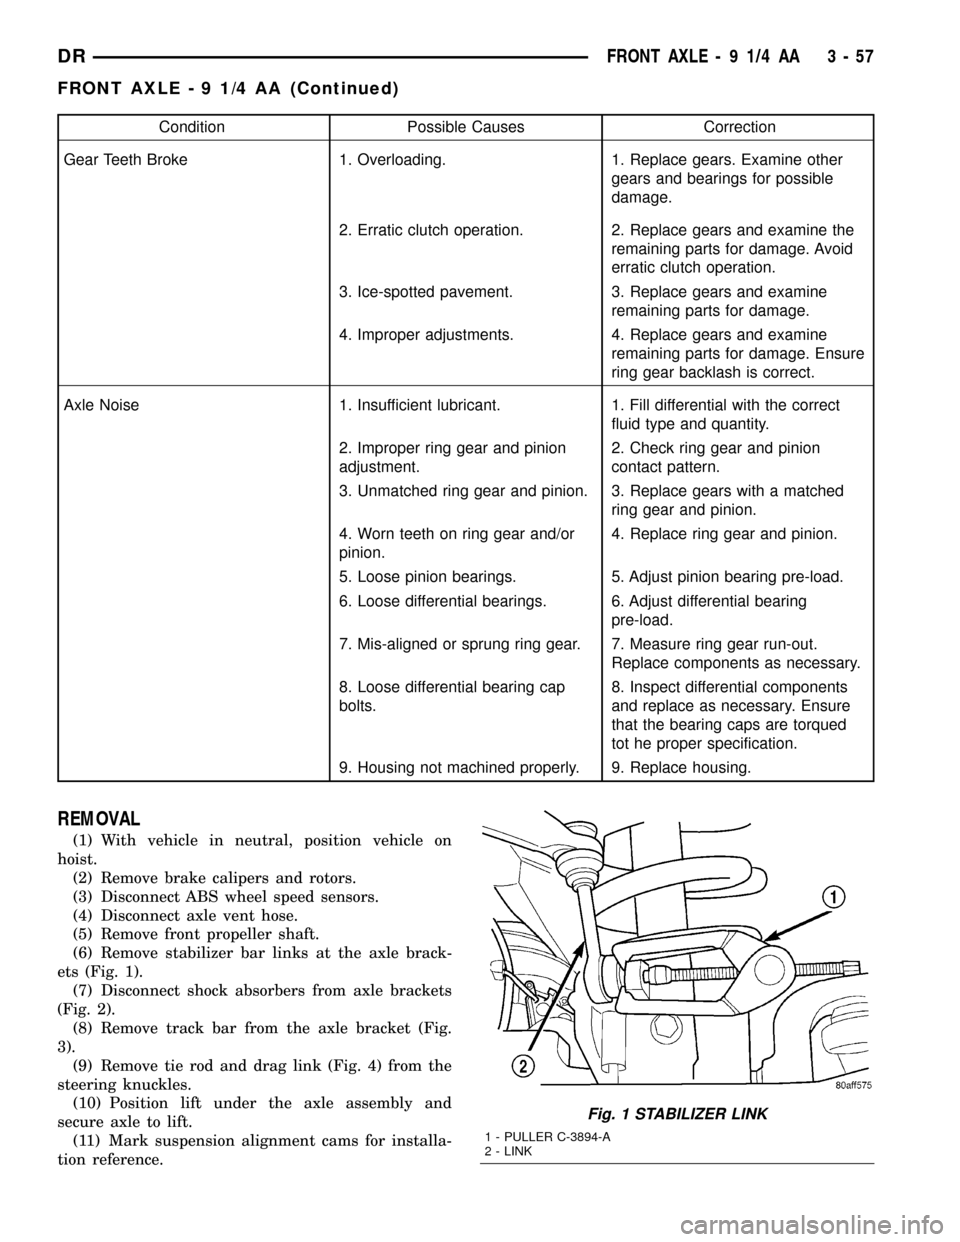
Condition Possible Causes Correction
Gear Teeth Broke 1. Overloading. 1. Replace gears. Examine other
gears and bearings for possible
damage.
2. Erratic clutch operation. 2. Replace gears and examine the
remaining parts for damage. Avoid
erratic clutch operation.
3. Ice-spotted pavement. 3. Replace gears and examine
remaining parts for damage.
4. Improper adjustments. 4. Replace gears and examine
remaining parts for damage. Ensure
ring gear backlash is correct.
Axle Noise 1. Insufficient lubricant. 1. Fill differential with the correct
fluid type and quantity.
2. Improper ring gear and pinion
adjustment.2. Check ring gear and pinion
contact pattern.
3. Unmatched ring gear and pinion. 3. Replace gears with a matched
ring gear and pinion.
4. Worn teeth on ring gear and/or
pinion.4. Replace ring gear and pinion.
5. Loose pinion bearings. 5. Adjust pinion bearing pre-load.
6. Loose differential bearings. 6. Adjust differential bearing
pre-load.
7. Mis-aligned or sprung ring gear. 7. Measure ring gear run-out.
Replace components as necessary.
8. Loose differential bearing cap
bolts.8. Inspect differential components
and replace as necessary. Ensure
that the bearing caps are torqued
tot he proper specification.
9. Housing not machined properly. 9. Replace housing.
REMOVAL
(1) With vehicle in neutral, position vehicle on
hoist.
(2) Remove brake calipers and rotors.
(3) Disconnect ABS wheel speed sensors.
(4) Disconnect axle vent hose.
(5) Remove front propeller shaft.
(6) Remove stabilizer bar links at the axle brack-
ets (Fig. 1).
(7) Disconnect shock absorbers from axle brackets
(Fig. 2).
(8) Remove track bar from the axle bracket (Fig.
3).
(9) Remove tie rod and drag link (Fig. 4) from the
steering knuckles.
(10) Position lift under the axle assembly and
secure axle to lift.
(11) Mark suspension alignment cams for installa-
tion reference.
Fig. 1 STABILIZER LINK
1 - PULLER C-3894-A
2 - LINK
DRFRONT AXLE - 9 1/4 AA 3 - 57
FRONT AXLE - 9 1/4 AA (Continued)