Temperature sensor DODGE RAM 2001 Service Owner's Guide
[x] Cancel search | Manufacturer: DODGE, Model Year: 2001, Model line: RAM, Model: DODGE RAM 2001Pages: 2889, PDF Size: 68.07 MB
Page 644 of 2889
Compass mini-trip computer units for vehicles
equipped with the VTSS include a red Light-Emit-
ting Diode (LED) on their electronic circuit board.
This LED protrudes through the bottom of the lens
on the front of the overhead console unit, and serves
as the security indicator lamp. Refer toSecurity
Indicator Lampin Vehicle Theft/Security Systems
for more information on this feature.
The compass mini-trip computer module contains a
central processing unit and interfaces with other
electronic modules in the vehicle on the Chrysler Col-
lision Detection (CCD) data bus network. The CCD
data bus network allows the sharing of sensor infor-
mation. This helps to reduce wire harness complexity,
reduce internal controller hardware, and reduce com-
ponent sensor current loads. At the same time, this
system provides increased reliability, enhanced diag-
nostics, and allows the addition of many new feature
capabilities.
The compass mini-trip computer provides several
electronic functions and features. Some of the func-
tions and features that the compass mini-trip com-
puter module supports and/or controls, include the
following display options:
²Compass and temperature- provides the out-
side temperature and one of eight compass readings
to indicate the direction the vehicle is facing.
²Compass and compass in degrees- provides
one of eight compass readings to indicate the direc-
tion the vehicle is facing and provides the compass
direction in degrees.
²Trip odometer (ODO)- shows the distance
travelled since the last trip computer reset.
²Average fuel economy (AVG ECO)- shows
the average fuel economy since the last trip computer
reset.
²Instant fuel economy (ECO)- shows the
present fuel economy based upon the current vehicle
distance and fuel used information.
²Distance to empty (DTE)- shows the esti-
mated distance that can be travelled with the fuel
remaining in the fuel tank. This estimated distance
is computed using the average miles-per-gallon from
the last 30 gallons of fuel used.
²Elapsed time (ET)- shows the accumulated
ignition-on time since the last trip computer reset.
²Blank screen- the compass mini-trip VFD is
turned off.
The ambient temperature sensor is hard wired to
the compass mini-trip computer module. Data input
for all other compass mini-trip computer functions,
including VFD dimming level, is received through
CCD data bus messages. The compass mini-trip com-
puter uses its internal programming and all of these
inputs to calculate and display the requested data. If
the data displayed is incorrect, perform the self-diag-nostic tests as described in this group. If these tests
prove inconclusive, the use of a DRBIIItscan tool
and the proper Diagnostic Procedures manual are
recommended for further testing of the compass
mini-trip computer module and the CCD data bus.
The compass mini-trip computer module cannot be
repaired, and is available for service only as a unit. If
faulty or damaged, the complete module must be
replaced.
OPERATION
The compass mini-trip computer only operates with
the ignition switch in the On position. When the igni-
tion switch is turned to the On position, all of the
segments in the compass mini-trip computer VFD
will be turned on for one second, then the display
will return to the last function being displayed before
the ignition was turned to the Off position. With the
ignition switch in the On position, momentarily
depressing and releasing the Step push button switch
will cause the compass-mini-trip computer to change
its mode of operation, and momentarily depressing
and releasing the U.S./Metric push button will cause
the unit to toggle between U.S. and Metric measure-
ments. While in either compass mode, depressing the
U.S./Metric push button for more than ten seconds
will toggle the display between the compass/temper-
ature and the compass/compass in degrees modes.
This compass mini-trip computer features several
functions that can be reset. If both the Step and U.S./
Metric push buttons are depressed at the same time
with the ignition switch in the On position, the trip
computer information that can be reset is reset.
Depressing and releasing the Step and U.S./Metric
push buttons at the same time for more than 100
milliseconds, but not more than one second while in
any display mode (except the compass/temperature
mode) will cause a local reset. A local reset affects
only the function currently displayed. See the Reset
Chart below for more information on this feature.
Performing a local reset while in the compass/tem-
perature mode enters the module into the compass
variance setting mode.
Depressing and releasing the Step and U.S./Metric
push buttons at the same time for more than two
seconds while in any display mode (except the com-
pass/temperature mode) will cause a global reset. A
global reset changes all of the trip computer func-
tions that can be reset.
For more information on the features and control
functions of the compass mini-trip computer, see the
owner's manual in the vehicle glove box.
BR/BEMESSAGE SYSTEMS 8M - 9
COMPASS/MINI-TRIP COMPUTER (Continued)
Page 645 of 2889
DIAGNOSIS & TESTING - COMPASS MINI-TRIP
COMPUTER
If the problem with the compass mini-trip com-
puter module is an inoperative security indicator
lamp, refer toSecurity Indicator Lampin Vehicle
Theft/Security Systems. If the problem with the com-
pass mini-trip computer module is an ªOCº or ªSCº in
the compass/thermometer display, refer toAmbient
Temperature Sensorin the Diagnosis and Testing
section of this group. If the problem with the com-
pass mini-trip computer module is an inaccurate or
scrambled display, refer toSelf-Diagnostic Testin
the Diagnosis and Testing section of this group. If the
problem with the compass mini-trip computer module
is incorrect Vacuum Fluorescent Display (VFD) dim-
ming levels, use a DRBtscan tool and the proper
Diagnostic Procedures manual to test for the correct
dimming message inputs being received from the
instrument cluster over the Chrysler Collision Detec-
tion (CCD) data bus. If the problem is a no-display
condition, use the following procedures. For complete
circuit diagrams, refer toOverhead Consolein the
Contents of Wiring Diagrams.
(1) Check the fused B(+) fuse in the junction block.
If OK, go to Step 2. If not OK, repair the shorted cir-
cuit or component as required and replace the faulty
fuse.
(2) Check for battery voltage at the fused B(+) fuse
in the junction block. If OK, go to Step 3. If not OK,
repair the open fused B(+) circuit to the battery as
required.
(3) Check the fused ignition switch output (run/
start) fuse in the junction block. If OK, go to Step 4.
If not OK, repair the shorted circuit or component as
required and replace the faulty fuse.
(4) Turn the ignition switch to the On position.
Check for battery voltage at the fused ignition switch
output (run/start) fuse in the junction block. If OK,
go to Step 5. If not OK, repair the open fused ignition
switch output (run/start) circuit to the ignition switch
as required.
(5) Turn the ignition switch to the Off position.
Disconnect and isolate the battery negative cable.
Remove the overhead console. Check for continuity
between the ground circuit cavities of the roof wire
harness connector for the overhead console and a
good ground. There should be continuity. If OK, go to
Step 6. If not OK, repair the open ground circuit to
ground as required.
(6) Connect the battery negative cable. Check for
battery voltage at the fused B(+) circuit cavity of the
roof wire harness connector for the overhead console.
If OK, go to Step 7. If not OK, repair the open fused
B(+) circuit to the junction block fuse as required.(7) Turn the ignition switch to the On position.
Check for battery voltage at the fused ignition switch
output (run/start) circuit cavity of the roof wire har-
ness connector for the overhead console. If OK, refer
toSelf-Diagnostic Testin the Diagnosis and Test-
ing section of this group for further diagnosis of the
compass mini-trip computer module and the CCD
data bus. If not OK, repair the open fused ignition
switch output (run/start) circuit to the junction block
fuse as required.
SELF-DIAGNOSTIC TEST
A self-diagnostic test is used to determine that the
compass mini-trip computer module is operating
properly electrically. Initiate the self-diagnostic test
as follows:
(1) With the ignition switch in the Off position,
simultaneously depress and hold the Step button and
the U.S./Metric button.
(2) Turn the ignition switch to the On position.
(3) Continue to hold both buttons depressed until
the compass mini-trip computer module enters the
display segment test. In this test, all of the Vacuum
Fluorescent Display (VFD) segments are lighted
while the compass mini-trip computer module per-
forms the following checks:
²Microprocessor RAM read/write test
²Non-volatile memory read/write test
²Microprocessor ROM verification test
²CCD communications test.
(4) Following completion of these tests, the com-
pass mini-trip computer will display one of three
messages: ªPASS,º ªFAIL,º or ªCCd.º Respond to the
respective test results as follows:
²If the ªPASSº message is displayed, but compass
mini-trip computer operation is still improper, the
use of a DRB scan tool and the proper Diagnostic
Procedures manual are required for further diagno-
sis.
²If the ªFAILº message is displayed, the compass
mini-trip computer module is faulty and must be
replaced.
²If the ªCCdº message is displayed, the use of a
DRBtscan tool and the proper Diagnostic Proce-
dures manual are required for further diagnosis.
²If any VFD segment should fail to light during
the display segment test, the compass mini-trip com-
puter module is faulty and must be replaced.
(5) If all tests are passed, or if the ignition switch
is turned to the Off position, the compass mini-trip
computer module will automatically return to normal
operation.
8M - 10 MESSAGE SYSTEMSBR/BE
COMPASS/MINI-TRIP COMPUTER (Continued)
Page 646 of 2889
NOTE: If the compass functions, but accuracy is
suspect, it may be necessary to perform a variation
adjustment. This procedure allows the compass
unit to accommodate variations in the earth's mag-
netic field strength, based on geographic location.
Refer to Compass Variation Adjustment in the Ser-
vice Procedures section of this group.
NOTE: If the compass reading has blanked out, and
only ªCALº appears in the display, demagnetizing
may be necessary to remove excessive residual
magnetic fields from the vehicle. Refer to Compass
Demagnetizing in the Service Procedures section of
this group.
REMOVAL
(1) Disconnect and isolate the battery negative
cable.
(2) Remove the overhead console from the head-
liner. Refer toOverhead Consolein the Removal
and Installation section of this group for the proce-
dures.
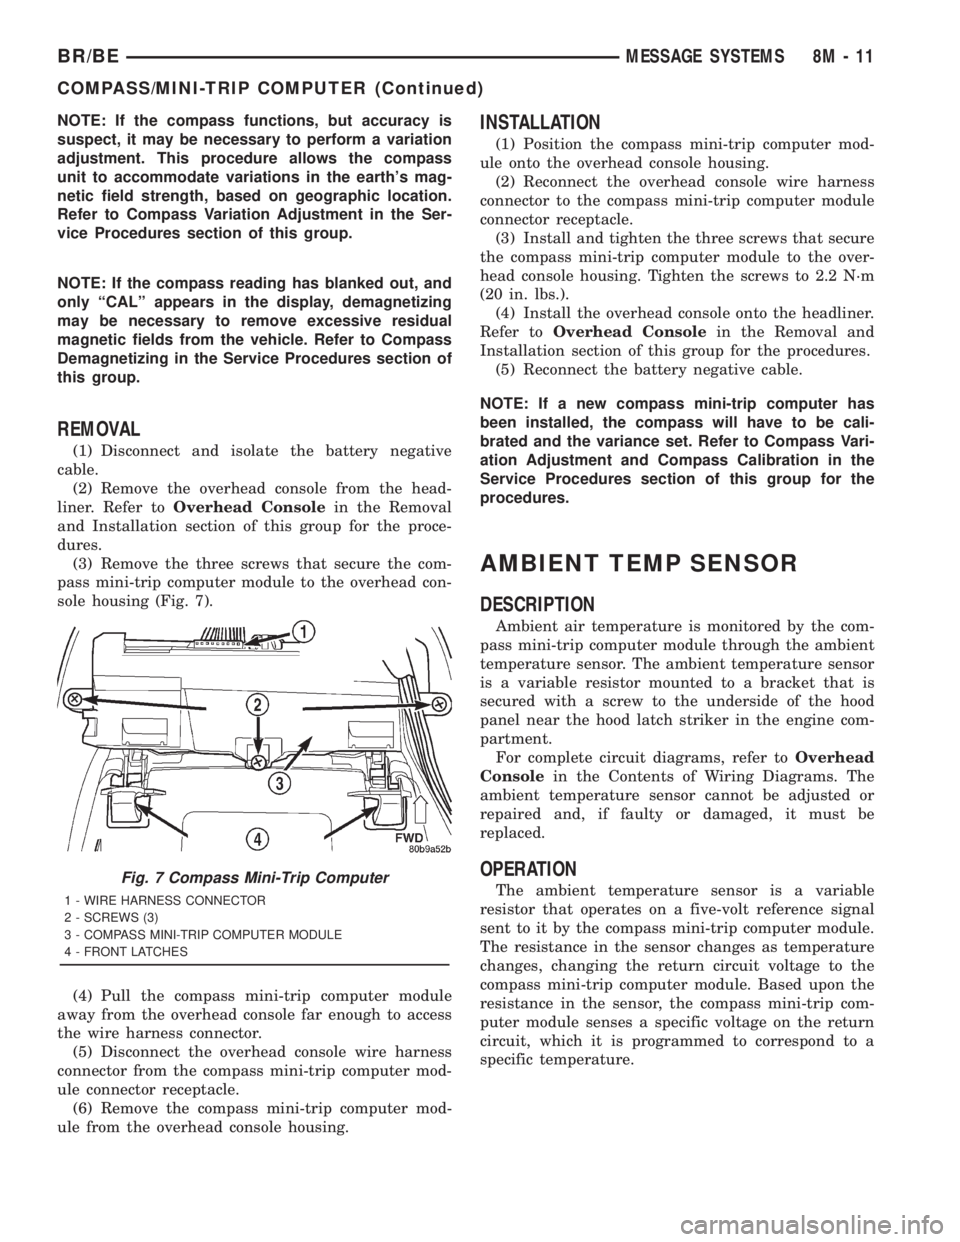
(3) Remove the three screws that secure the com-
pass mini-trip computer module to the overhead con-
sole housing (Fig. 7).
(4) Pull the compass mini-trip computer module
away from the overhead console far enough to access
the wire harness connector.
(5) Disconnect the overhead console wire harness
connector from the compass mini-trip computer mod-
ule connector receptacle.
(6) Remove the compass mini-trip computer mod-
ule from the overhead console housing.
INSTALLATION
(1) Position the compass mini-trip computer mod-
ule onto the overhead console housing.
(2) Reconnect the overhead console wire harness
connector to the compass mini-trip computer module
connector receptacle.
(3) Install and tighten the three screws that secure
the compass mini-trip computer module to the over-
head console housing. Tighten the screws to 2.2 N´m
(20 in. lbs.).
(4) Install the overhead console onto the headliner.
Refer toOverhead Consolein the Removal and
Installation section of this group for the procedures.
(5) Reconnect the battery negative cable.
NOTE: If a new compass mini-trip computer has
been installed, the compass will have to be cali-
brated and the variance set. Refer to Compass Vari-
ation Adjustment and Compass Calibration in the
Service Procedures section of this group for the
procedures.
AMBIENT TEMP SENSOR
DESCRIPTION
Ambient air temperature is monitored by the com-
pass mini-trip computer module through the ambient
temperature sensor. The ambient temperature sensor
is a variable resistor mounted to a bracket that is
secured with a screw to the underside of the hood
panel near the hood latch striker in the engine com-
partment.
For complete circuit diagrams, refer toOverhead
Consolein the Contents of Wiring Diagrams. The
ambient temperature sensor cannot be adjusted or
repaired and, if faulty or damaged, it must be
replaced.
OPERATION
The ambient temperature sensor is a variable
resistor that operates on a five-volt reference signal
sent to it by the compass mini-trip computer module.
The resistance in the sensor changes as temperature
changes, changing the return circuit voltage to the
compass mini-trip computer module. Based upon the
resistance in the sensor, the compass mini-trip com-
puter module senses a specific voltage on the return
circuit, which it is programmed to correspond to a
specific temperature.Fig. 7 Compass Mini-Trip Computer
1 - WIRE HARNESS CONNECTOR
2 - SCREWS (3)
3 - COMPASS MINI-TRIP COMPUTER MODULE
4 - FRONT LATCHES
BR/BEMESSAGE SYSTEMS 8M - 11
COMPASS/MINI-TRIP COMPUTER (Continued)
Page 647 of 2889
DIAGNOSIS & TESTING - AMBIENT
TEMPERATURE SENSOR
The thermometer function is supported by the
ambient temperature sensor, a wiring circuit, and a
portion of the compass mini-trip computer module. If
any portion of the ambient temperature sensor cir-
cuit fails, the compass/thermometer display function
will self-diagnose the circuit. If 55É C (131É F)
appears in the display, the sensor is being exposed to
temperatures above 55É C (131É F), or the sensor cir-
cuit is shorted. If ±40É C (±40É F) appears in the dis-
play, the sensor is being exposed to temperatures
below ±40É C (±40É F), or the sensor circuit is open.
The ambient temperature sensor circuit can also be
diagnosed using the following Sensor Test, and Sen-
sor Circuit Test. If the temperature sensor and cir-
cuit are confirmed to be OK, but the temperature
display is inoperative or incorrect, refer toCompass
Mini-Trip Computerin the Diagnosis and Testing
section of this group. For complete circuit diagrams,
refer toOverhead Consolein the Contents of Wir-
ing Diagrams.
SENSOR TEST
(1) Turn the ignition switch to the Off position.
Disconnect and isolate the battery negative cable.
Disconnect the ambient temperature sensor wire har-
ness connector.
(2) Measure the resistance of the ambient temper-
ature sensor. At ±40É C (±40É F), the sensor resis-
tance is 336 kilohms. At 55É C (131É F), the sensor
resistance is 2.488 kilohms. The sensor resistance
should read between these two values. If OK, refer to
Sensor Circuit Testin the Diagnosis and Testing
section of this group. If not OK, replace the faulty
ambient temperature sensor.
SENSOR CIRCUIT TEST
(1) Turn the ignition switch to the Off position.
Disconnect and isolate the battery negative cable.
Disconnect the ambient temperature sensor wire har-
ness connector and the overhead console wire har-
ness connector.
(2) Connect a jumper wire between the two termi-
nals in the body half of the ambient temperature sen-
sor wire harness connector.
(3) Check for continuity between the sensor return
circuit and the ambient temperature sensor signal
circuit cavities of the roof wire harness overhead con-
sole connector. There should be continuity. If OK, go
to Step 4. If not OK, repair the open sensor return
circuit or ambient temperature sensor signal circuit
to the ambient temperature sensor as required.(4) Remove the jumper wire from the body half of
the ambient temperature sensor wire harness con-
nector. Check for continuity between the sensor
return circuit cavity of the roof wire harness over-
head console connector and a good ground. There
should be no continuity. If OK, go to Step 5. If not
OK, repair the shorted sensor return circuit as
required.
(5) Check for continuity between the ambient tem-
perature sensor signal circuit cavity of the roof wire
harness overhead console connector and a good
ground. There should be no continuity. If OK, refer to
Compass Mini-Trip Computerin the Diagnosis
and Testing section of this group. If not OK, repair
the shorted ambient temperature sensor signal cir-
cuit as required.
REMOVAL
(1) Disconnect and isolate the battery negative
cable.
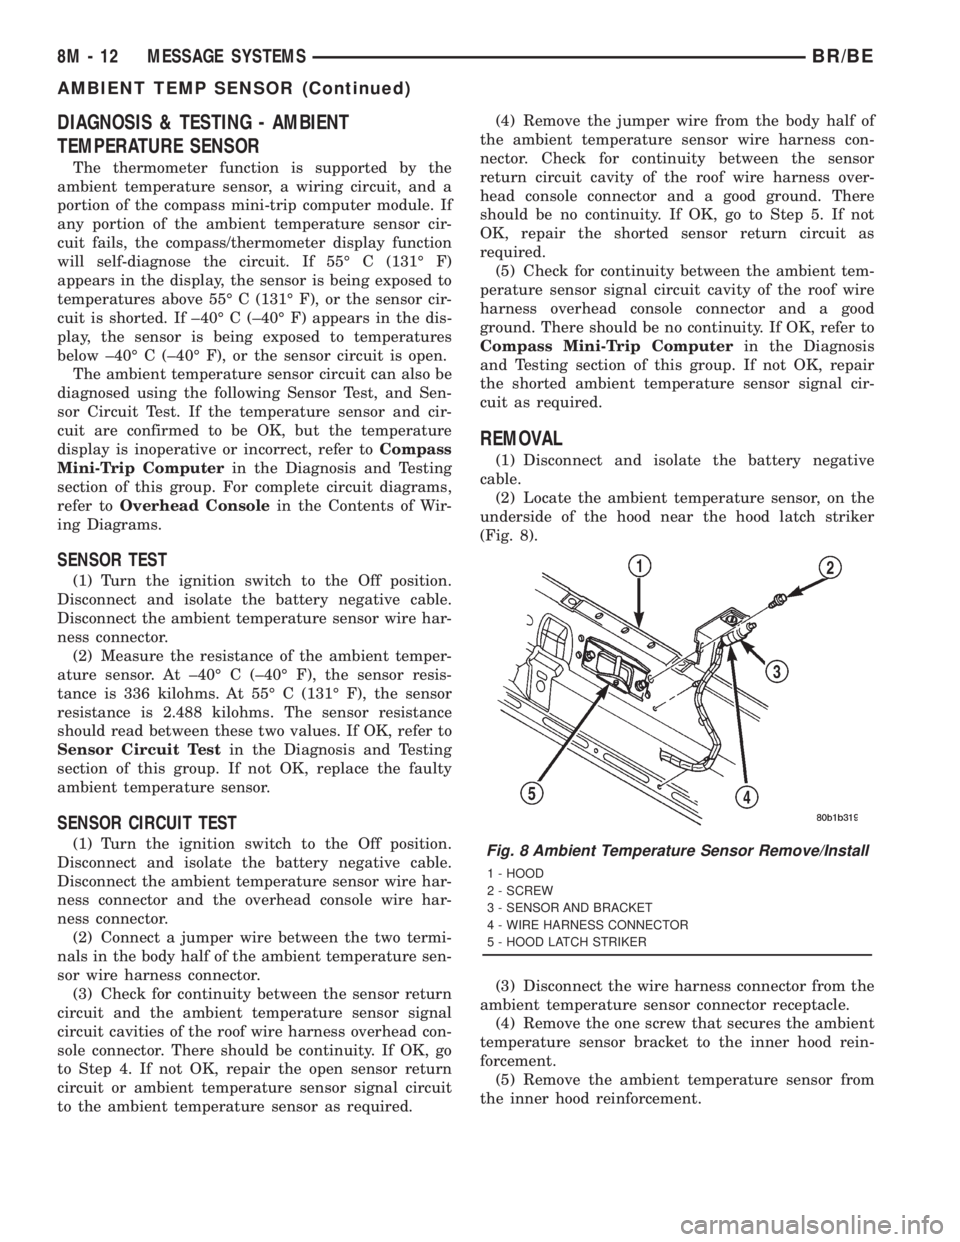
(2) Locate the ambient temperature sensor, on the
underside of the hood near the hood latch striker
(Fig. 8).
(3) Disconnect the wire harness connector from the
ambient temperature sensor connector receptacle.
(4) Remove the one screw that secures the ambient
temperature sensor bracket to the inner hood rein-
forcement.
(5) Remove the ambient temperature sensor from
the inner hood reinforcement.
Fig. 8 Ambient Temperature Sensor Remove/Install
1 - HOOD
2 - SCREW
3 - SENSOR AND BRACKET
4 - WIRE HARNESS CONNECTOR
5 - HOOD LATCH STRIKER
8M - 12 MESSAGE SYSTEMSBR/BE
AMBIENT TEMP SENSOR (Continued)
Page 648 of 2889
INSTALLATION
(1) Position the ambient temperature sensor onto
the inner hood reinforcement.
(2) Install and tighten the one screw that secures
the ambient temperature sensor bracket to the inner
hood reinforcement. Tighten the screw to 5.6 N´m (50
in. lbs.).(3) Reconnect the wire harness connector to the
ambient temperature sensor connector receptacle.
(4) Reconnect the battery negative cable.
BR/BEMESSAGE SYSTEMS 8M - 13
AMBIENT TEMP SENSOR (Continued)
Page 678 of 2889
Deployment of the airbags depends upon the angle
and severity of the impact. The airbag system is
designed to deploy upon a frontal impact within a
thirty degree angle from either side of the vehicle
center line. Deployment is not based upon vehicle
speed; rather, deployment is based upon the rate of
deceleration as measured by the forces of gravity (G
force) upon the airbag system impact sensor, which is
integral to the ACM. When a frontal impact is severe
enough, the microprocessor in the ACM signals the
inflator units of both airbag modules to deploy the
airbags. During a frontal vehicle impact, the knee
blockers work in concert with properly fastened and
adjusted seat belts to restrain both the driver and
the front seat passenger in the proper position for an
airbag deployment. The knee blockers also absorb
and distribute the crash energy from the driver and
the front seat passenger to the structure of the
instrument panel.
Typically, the driver and front seat passenger recall
more about the events preceding and following a col-
lision than they have of the airbag deployment itself.
This is because the airbag deployment and deflation
occur so rapidly. In a typical 48 kilometer-per-hour
(30 mile-per-hour) barrier impact, from the moment
of impact until both airbags are fully inflated takes
about 40 milliseconds. Within one to two seconds
from the moment of impact, both airbags are almost
entirely deflated. The times cited for these events are
approximations, which apply only to a barrier impact
at the given speed. Actual times will vary somewhat,
depending upon the vehicle speed, impact angle,
severity of the impact, and the type of collision.
When the ACM monitors a problem in any of the
airbag system circuits or components, it stores a
fault code or Diagnostic Trouble Code (DTC) in its
memory circuit and sends an electronic message to
the EMIC to turn on the airbag indicator. Proper
testing of the airbag system components, the
Chrysler Collision Detection (CCD) data bus, the
data bus message inputs to and outputs from the
EMIC or the ACM, as well as the retrieval or erasure
of a DTC from the ACM requires the use of a
DRBIIItscan tool. Refer to the appropriate diagnos-
tic information.
See the owner's manual in the vehicle glove box for
more information on the features, use and operation
of all of the factory-installed passenger restraints,
including the airbag system.
WARNING
WARNING: THE AIRBAG SYSTEM IS A SENSITIVE,
COMPLEX ELECTROMECHANICAL UNIT. BEFORE
ATTEMPTING TO DIAGNOSE OR SERVICE ANY AIR-
BAG SYSTEM OR RELATED STEERING WHEEL,STEERING COLUMN, OR INSTRUMENT PANEL
COMPONENTS YOU MUST FIRST DISCONNECT
AND ISOLATE THE BATTERY NEGATIVE (GROUND)
CABLE. THEN WAIT TWO MINUTES FOR THE SYS-
TEM CAPACITOR TO DISCHARGE BEFORE FUR-
THER SYSTEM SERVICE. THIS IS THE ONLY SURE
WAY TO DISABLE THE AIRBAG SYSTEM. FAILURE
TO DO THIS COULD RESULT IN ACCIDENTAL AIR-
BAG DEPLOYMENT AND POSSIBLE PERSONAL
INJURY.
WARNING: THE DRIVER AIRBAG INFLATOR UNIT
CONTAINS SODIUM AZIDE AND POTASSIUM
NITRATE. THESE MATERIALS ARE POISONOUS
AND EXTREMELY FLAMMABLE. CONTACT WITH
ACID, WATER, OR HEAVY METALS MAY PRODUCE
HARMFUL AND IRRITATING GASES (SODIUM
HYDROXIDE IS FORMED IN THE PRESENCE OF
MOISTURE) OR COMBUSTIBLE COMPOUNDS. THE
PASSENGER AIRBAG UNIT CONTAINS ARGON GAS
PRESSURIZED TO OVER 2500 PSI. DO NOT
ATTEMPT TO DISMANTLE AN AIRBAG UNIT OR
TAMPER WITH ITS INFLATOR. DO NOT PUNCTURE,
INCINERATE, OR BRING INTO CONTACT WITH
ELECTRICITY. DO NOT STORE AT TEMPERATURES
EXCEEDING 93É C (200É F).
WARNING: REPLACE AIRBAG SYSTEM COMPO-
NENTS ONLY WITH PARTS SPECIFIED IN THE
DAIMLERCHRYSLER MOPAR PARTS CATALOG.
SUBSTITUTE PARTS MAY APPEAR INTERCHANGE-
ABLE, BUT INTERNAL DIFFERENCES MAY RESULT
IN INFERIOR OCCUPANT PROTECTION.
WARNING: THE FASTENERS, SCREWS, AND
BOLTS ORIGINALLY USED FOR THE AIRBAG SYS-
TEM COMPONENTS HAVE SPECIAL COATINGS
AND ARE SPECIFICALLY DESIGNED FOR THE AIR-
BAG SYSTEM. THEY MUST NEVER BE REPLACED
WITH ANY SUBSTITUTES. ANY TIME A NEW FAS-
TENER IS NEEDED, REPLACE IT WITH THE COR-
RECT FASTENERS PROVIDED IN THE SERVICE
PACKAGE OR SPECIFIED IN THE DAIMLER-
CHRYSLER MOPAR PARTS CATALOG.
WARNING: WHEN A STEERING COLUMN HAS AN
AIRBAG UNIT ATTACHED, NEVER PLACE THE COL-
UMN ON THE FLOOR OR ANY OTHER SURFACE
WITH THE STEERING WHEEL OR AIRBAG UNIT
FACE DOWN.
BR/BERESTRAINTS 8O - 3
RESTRAINTS (Continued)
Page 756 of 2889
8W-02 COMPONENT INDEX
Component Page
4WD Switch.......................... 8W-31
A/C Compressor Clutch Relay............ 8W-42
A/C Compressor Clutch................. 8W-42
A/C-Heater Control.................... 8W-42
A/C Heater Temperature Select........... 8W-42
A/C High Pressure Switch............... 8W-42
A/C Low Pressure Switch................ 8W-42
Accelerator Pedal Position Sensor......... 8W-30
Aftermarket Center High Mounted
Stop Lamp......................... 8W-51
Aftermarket Trailer Tow Connector........ 8W-54
Airbag Control Module.................. 8W-43
Ambient Temperature Sensor............ 8W-49
Ash Receiver Lamp.................... 8W-44
Automatic Day/Night Mirror............. 8W-49
Automatic Shut Down Relay............. 8W-30
Auxiliary Battery...................... 8W-20
Back-Up Lamp Switch.................. 8W-51
Back-Up Lamps....................... 8W-51
Battery Temperature Sensor............. 8W-30
Battery............................. 8W-20
Blend Door Actuator................... 8W-42
Blower Motor Relay.................... 8W-42
Blower Motor Resistor Block............. 8W-42
Blower Motor......................... 8W-42
Brake Lamp Switch.................... 8W-51
Brake Pressure Switch............... 8W-34, 35
Bypass Jumper....................... 8W-21
Camshaft Position Sensor............... 8W-30
Capacitor......................... 8W-10, 30
Cargo Lamps......................... 8W-44
Center High Mounted Stop Lamps........ 8W-51
Center Identification Lamp.............. 8W-50
Central Timer Module.................. 8W-45
Cigar Lighter......................... 8W-41
Circuit Breakers...................... 8W-12
Clockspring.................. 8W-33, 41, 43, 47
Clutch Pedal Position Switch............. 8W-21
Combination Flasher................... 8W-52
Controller Antilock Brake............ 8W-34, 35
Crankshaft Position Sensor.............. 8W-30
Cummins Bus........................ 8W-18
Cup Holder Lamp..................... 8W-44
Cylinder Lock Switches................ 8W-39
Data Link Connector................... 8W-18
Daytime Running Lamp Module.......... 8W-50
Dome Lamp.......................... 8W-44
Door Ajar Switches.................... 8W-45
Door Lock Motors..................... 8W-61
Door Window/Lock Switches.......... 8W-60, 61
Driver Airbag......................... 8W-43
Duty Cycle EVAP/Purge Solenoid......... 8W-30Component Page
Electric Brake Provision................ 8W-54
Engine Control Module.............. 8W-30, 70
Engine Coolant Temperature Sensor....... 8W-30
Engine Oil Pressure Sensor.............. 8W-30
Engine Starter Motor Relay.............. 8W-21
Engine Starter Motor................... 8W-21
Fender Lamp......................... 8W-51
Fog Lamp Indicator.................... 8W-50
Fog Lamp Relay....................... 8W-50
Fog Lamp............................ 8W-50
Fuel Heater Relay..................... 8W-30
Fuel Heater.......................... 8W-30
Fuel Injection Pump................... 8W-30
Fuel Injectors......................... 8W-30
Fuel Transfer Pump.................... 8W-30
Fuses (JB)........................... 8W-12
Fuses (PDC).......................... 8W-10
Fusible Link....................... 8W-20, 30
Generator............................ 8W-20
Glove Box Lamp And Switch............. 8W-44
Grounds............................. 8W-15
Headlamp Beam Select Switch........... 8W-50
Headlamp Switch...................... 8W-50
Headlamp........................... 8W-50
Heated Mirror Relay................... 8W-62
Heated Mirror Switch.................. 8W-62
Heated Seat Cushions.................. 8W-63
Heated Seat Relay..................... 8W-12
Heated Seat Switches.................. 8W-63
High Beam Indicator................... 8W-40
High Note Horn....................... 8W-41
Horn Relay.......................... 8W-41
Horn Switch.......................... 8W-41
Idle Air Control Motor.................. 8W-30
Ignition Coil 4-Pack.................... 8W-30
Ignition Coil 6-Pack.................... 8W-30
Ignition Coil.......................... 8W-30
Ignition Switch....................... 8W-10
Instrument Cluster.................... 8W-40
Intake Air Heater Relays................ 8W-30
Intake Air Heater..................... 8W-30
Intake Air Temperature Sensor........... 8W-30
Intermittent Wiper Switch............... 8W-53
Joint Connectors . . 8W-10, 12, 15, 30, 31, 34, 35, 40,
44, 45, 51, 53, 70
Junction Block........................ 8W-12
Leak Detection Pump.................. 8W-30
License Lamp......................... 8W-51
Low Note Horn....................... 8W-41
Lumbar Motors....................... 8W-63
Manifold Absolute Pressure Sensor........ 8W-30
Manifold Air Pressure Sensor............ 8W-30
BR/BE8W-02 COMPONENT INDEX 8W - 02 - 1
Page 786 of 2889

8W-12 JUNCTION BLOCK
Component Page
A/C Compressor Clutch Relay.......... 8W-12-13
A/C-Heater Control................... 8W-12-9
A/C Heater Temperature Select......... 8W-12-8
Airbag Control Module............... 8W-12-17
Ambient Temperature Sensor.......... 8W-12-19
Ash Receiver Lamp................... 8W-12-9
Automatic Day/Night Mirror..... 8W-12-13, 15, 21
Back-Up Lamp Switch............. 8W-12-11, 21
Blend Door Actuator.................. 8W-12-8
Blower Motor Relay.................. 8W-12-8
Cargo Lamp No. 1................... 8W-12-14
Cargo Lamp No. 2................... 8W-12-14
Central Timer Module C1....... 8W-12-10, 13, 15
Central Timer Module C2........... 8W-12-8, 13
Cigar Lighter...................... 8W-12-16
Circuit Breaker 1.................. 8W-12-6, 7
Circuit Breaker 2.................... 8W-12-7
Combination Flasher......... 8W-12-6, 12, 15, 20
Controller Antilock Brake.............. 8W-12-8
Cup Holder Lamp.................... 8W-12-9
Data Link Connector................. 8W-12-14
Daytime Running Lamp Module........ 8W-12-11
Dome Lamp....................... 8W-12-14
Driver Door Window/Lock Switch..... 8W-12-15, 7
Driver Heated Seat Switch........... 8W-12-8, 9
Driver Power Seat Switch.............. 8W-12-7
Duty Cycle EVAP/Purge Solenoid....... 8W-12-13
Engine Control Module............... 8W-12-12
Fuel Heater Relay................... 8W-12-13
Fuel Pump Relay................... 8W-12-12
Fuse 1 (JB)......................... 8W-12-8
Fuse 1 (PDC)...................... 8W-12-16
Fuse 2 (JB)....................... 8W-12-6, 8
Fuse 3 (JB)....................... 8W-12-6, 8
Fuse 4 (JB)........................ 8W-12-10
Fuse 4 (PDC)...................... 8W-12-20
Fuse 5 (JB)......................... 8W-12-9
Fuse 6 (JB)...................... 8W-12-6, 10
Fuse 7 (JB)...................... 8W-12-6, 11
Fuse 8 (JB)...................... 8W-12-6, 11
Fuse 9 (JB)...................... 8W-12-6, 12
Fuse 10 (JB).................. 8W-12-6, 12, 20
Fuse 11 (JB)..................... 8W-12-6, 13
Fuse 12 (JB)....................... 8W-12-14
Fuse 13 (JB)....................... 8W-12-15
Fuse 14 (JB)....................... 8W-12-16Component Page
Fuse 15 (JB)..................... 8W-12-6, 16
Fuse 16 (JB)..................... 8W-12-6, 16
Fuse 17 (JB)..................... 8W-12-6, 17
Fuse 18 (JB)..................... 8W-12-6, 17
Fuse 19 (JB)..................... 8W-12-6, 17
G100............................. 8W-12-18
G200.......................... 8W-12-15, 19
G201....................... 8W-12-15, 18, 20
Glove Box Lamp And Switch........... 8W-12-14
Headlamp Switch.................... 8W-12-9
Heated Mirror Switch................. 8W-12-8
Heated Seat Relay................... 8W-12-8
Ignition Switch................... 8W-12-6, 20
Instrument Cluster.......... 8W-12-9, 16, 17, 18
Intermittent Wiper Switch............ 8W-12-10
Joint Connector No. 1............. 8W-12-11, 21
Joint Connector No. 3................ 8W-12-18
Joint Connector No. 4................ 8W-12-18
Joint Connector No. 5.............. 8W-12-9, 14
Joint Connector No. 6................ 8W-12-10
Joint Connector No. 8........... 8W-12- 8, 9, 17
Junction Block............ 8W-12-2, 3, 6, 7, 8, 9,
10, 11, 12, 13, 14, 15, 16,
17, 18, 19, 20, 21
Left Park/Turn Signal Lamp........... 8W-12-18
Left Visor/Vanity Lamp............ 8W-12-14, 15
Overhead Console.......... 8W-12-13, 14, 19, 21
Park/Neutral Position Switch....... 8W-12-11, 21
Passenger Airbag On/Off Switch........ 8W-12-17
Passenger Door Window/Lock Switch . . 8W-12-7, 15
Passenger Heated Seat Switch........ 8W-12-8, 9
Passenger Power Seat Switch........... 8W-12-7
Power Distribution Center......... 8W-12-16, 20
Power Mirror Switch.............. 8W-12-14, 21
Powertrain Control Module............ 8W-12-12
Radio Choke Relay.................. 8W-12-10
Radio....................... 8W-12-9, 11, 14,
Right Park/Turn Signal Lamp.......... 8W-12-18
Right Visor/Vanity Lamp........... 8W-12-14, 15
Seat Heat Interface Module............ 8W-12-8
Turn Signal/Hazard Switch......... 8W-12-18, 20
Underhood Lamp................... 8W-12-14
Windshield Washer Pump............. 8W-12-10
Wiper Motor Relay.................. 8W-12-10
Wiper Motor....................... 8W-12-10
BR/BE8W-12 JUNCTION BLOCK 8W - 12 - 1
Page 808 of 2889
8W-15 GROUND DISTRIBUTION
Component Page
A/C Compressor Clutch............... 8W-15-10, 8
A/C-Heater Control.................... 8W-15-14
A/C Heater Temperature Select........... 8W-15-12
Aftermarket Trailer Tow Connector......... 8W-15-6
Airbag Control Module.................. 8W-15-5
Ash Receiver Lamp.................... 8W-15-14
Automatic Day/Night Mirror............. 8W-15-13
Auxiliary Battery..................... 8W-15-11
Battery............................ 8W-15-11
Blend Door Actuator................... 8W-15-12
Blower Motor Relay.................... 8W-15-2
Brake Lamp Switch................... 8W-15-12
Brake Pressure Switch.................. 8W-15-3
Center High Mounted Stop Lamp No. 1..... 8W-15-17
Center High Mounted Stop Lamp No. 2..... 8W-15-17
Center Identification Lamp.............. 8W-15-18
Central Timer Module C1............... 8W-15-12
Central Timer Module C2............... 8W-15-13
Cigar Lighter........................ 8W-15-14
Clockspring.......................... 8W-15-4
Combination Flasher.................. 8W-15-13
Controller Antilock Brake................ 8W-15-5
Cummins Bus....................... 8W-15-10
Cup Holder Lamp..................... 8W-15-14
Data Link Connector.............. 8W-15-8, 10, 12
Daytime Running Lamp Module......... 8W-15-2, 3
Driver Cylinder Lock Switch............. 8W-15-16
Driver Door Ajar Switch................ 8W-15-16
Driver Door Window/Lock Switch....... 8W-15-16, 17
Driver Heated Seat Cushion............. 8W-15-15
Driver Heated Seat Switch.............. 8W-15-13
Driver Power Seat Switch............ 8W-15-15, 17
Electric Brake Provision................ 8W-15-14
Engine Control Module.................. 8W-15-9
Engine Starter Motor Relay............. 8W-15-8, 9
Fuel Heater Relay..................... 8W-15-2
Fuel Heater......................... 8W-15-10
Fuel Injection Pump.................... 8W-15-9
Fuel Pump Module..................... 8W-15-7
Fuel Pump Relay...................... 8W-15-2
Fuel Transfer Pump................... 8W-15-10
G100.......................... 8W-15-12, 5, 7
G101............................... 8W-15-5
G102............................... 8W-15-2
G105............................... 8W-15-8
G107.............................. 8W-15-10
G113 .............................. 8W-15-11
G114 .............................. 8W-15-11
G115 .............................. 8W-15-11
G116 .............................. 8W-15-11
G117 .............................. 8W-15-11
G118 .............................. 8W-15-11
G120.............................. 8W-15-11
G200......................... 8W-15-7, 12, 14
G201........................... 8W-15-12, 14
G300.............................. 8W-15-16
G301.............................. 8W-15-17
G302.............................. 8W-15-18
Glove Box Lamp And Switch............. 8W-15-14
Headlamp Beam Select Switch............ 8W-15-14
Headlamp Switch.................. 8W-15-13, 14
Heated Mirror Switch.................. 8W-15-13
High Note Horn....................... 8W-15-7
Ignition Switch....................... 8W-15-13
Instrument Cluster................. 8W-15-12, 14
Intake Air Heater Relay No. 1............. 8W-15-9Component Page
Intake Air Heater Relay No. 2............. 8W-15-9
Joint Connector No. 1................... 8W-15-2
Joint Connector No. 2................... 8W-15-9
Joint Connector No. 3................... 8W-15-7
Joint Connector No. 4................... 8W-15-3
Joint Connector No. 5.................. 8W-15-13
Joint Connector No. 6................... 8W-15-4
Joint Connector No. 8................ 8W-15-13, 5
Junction Block.................... 8W-15-12, 13
Left Back-Up Lamp.................... 8W-15-6
Left Front Door Speaker................. 8W-15-4
Left Front Fender Lamp................. 8W-15-6
Left License Lamp..................... 8W-15-6
Left Outboard Clearance Lamp........... 8W-15-18
Left Outboard Identification Lamp......... 8W-15-18
Left Park/Turn Signal Lamp.............. 8W-15-3
Left Power Mirror..................... 8W-15-16
Left Rear Fender Lamp................. 8W-15-6
Left Remote Radio Switch................ 8W-15-4
Left Tail/Stop/Turn Signal Lamp........... 8W-15-6
Left Visor/Vanity Lamp................. 8W-15-13
Low Note Horn....................... 8W-15-7
Overdrive Switch..................... 8W-15-12
Overhead Console..................... 8W-15-12
Oxygen Sensor 1/2 Left Bank Down......... 8W-15-8
Oxygen Sensor 1/2 Pre-Catalyst............ 8W-15-8
Oxygen Sensor 1/3 Post-Catalyst........... 8W-15-8
Oxygen Sensor 2/2 Right Bank Down........ 8W-15-8
Passenger Airbag On/Off Switch........... 8W-15-5
Passenger Cylinder Lock Switch.......... 8W-15-16
Passenger Door Ajar Switch.............. 8W-15-16
Passenger Door Window/Lock Switch....... 8W-15-16
Passenger Heated Seat Cushion........... 8W-15-15
Passenger Heated Seat Switch............ 8W-15-13
Passenger Power Seat Switch............ 8W-15-15
Power Distribution Center............... 8W-15-2
Power Mirror Switch................... 8W-15-16
Power Outlet........................ 8W-15-14
Powertrain Control Module............ 8W-15-8 , 10
Quad High Beam Relay................. 8W-15-2
Radio Choke Relay..................... 8W-15-4
Radio.............................. 8W-15-5
Right Back-Up Lamp................... 8W-15-6
Right Front Door Speaker................ 8W-15-4
Right Front Fender Lamp................ 8W-15-6
Right License Lamp.................... 8W-15-6
Right Outboard Clearance Lamp.......... 8W-15-18
Right Outboard Identification Lamp........ 8W-15-18
Right Park/Turn Signal Lamp............. 8W-15-7
Right Power Mirror................... 8W-15-16
Right Rear Fender Lamp................ 8W-15-6
Right Remote Radio Switch............... 8W-15-4
Right Tail/Stop/Turn Signal Lamp.......... 8W-15-6
Right Visor/Vanity Lamp................ 8W-15-13
Seat Belt Switch................... 8W-15-15, 17
Seat Heat Interface Module.............. 8W-15-15
Security Relay........................ 8W-15-2
Speed Control Servo.................... 8W-15-3
Tailgate Lamp........................ 8W-15-6
Trailer Tow Connector.................. 8W-15-6
Trailer Tow Relay...................... 8W-15-2
Underhood Lamp...................... 8W-15-3
Washer Fluid Level Switch............... 8W-15-3
Windshield Washer Pump................ 8W-15-7
Wiper Motor......................... 8W-15-7
BR/BE8W-15 GROUND DISTRIBUTION 8W - 15 - 1
Page 830 of 2889
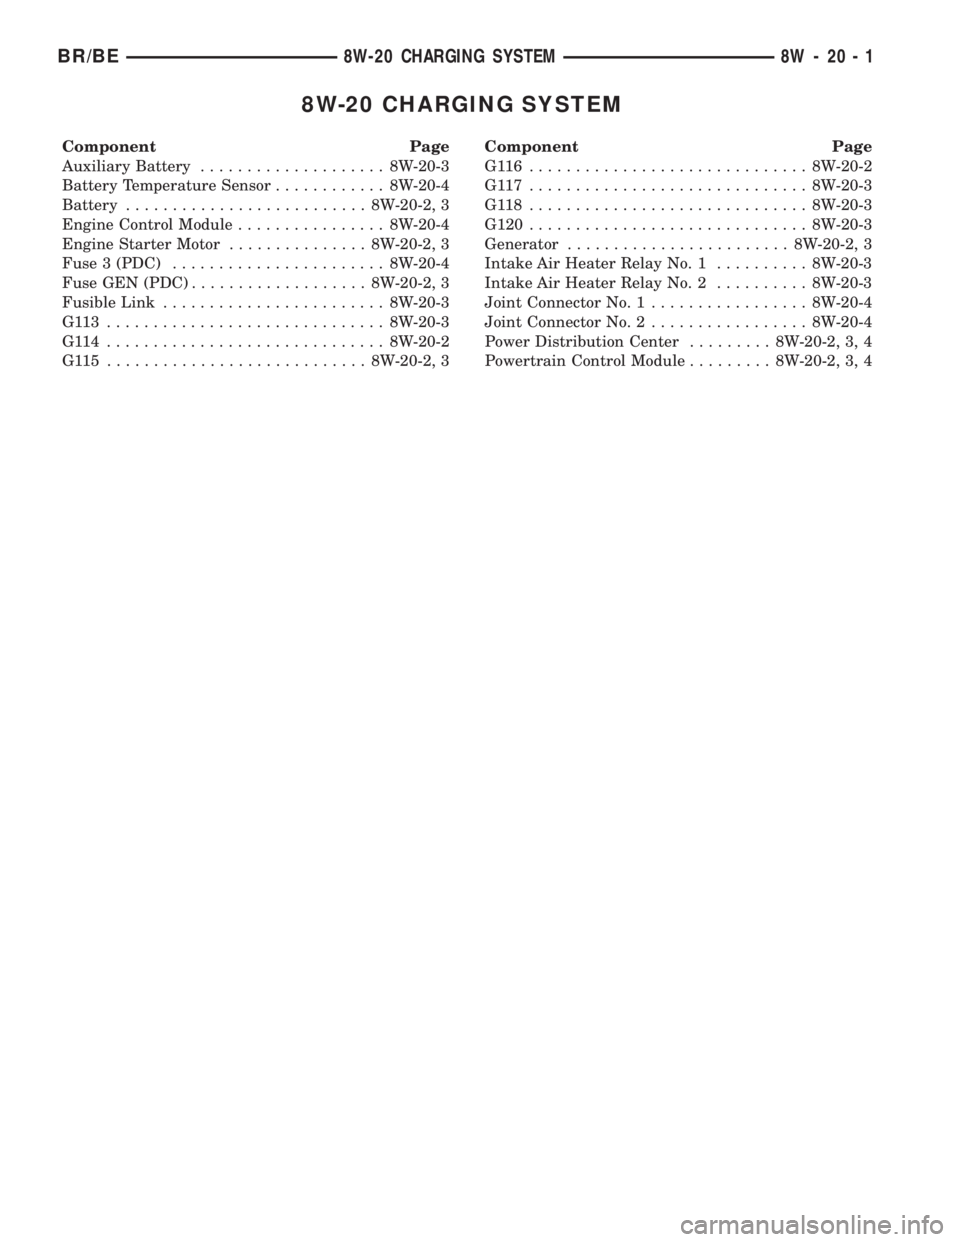
8W-20 CHARGING SYSTEM
Component Page
Auxiliary Battery.................... 8W-20-3
Battery Temperature Sensor............ 8W-20-4
Battery.......................... 8W-20-2, 3
Engine Control Module................ 8W-20-4
Engine Starter Motor............... 8W-20-2, 3
Fuse 3 (PDC)....................... 8W-20-4
Fuse GEN (PDC)................... 8W-20-2, 3
Fusible Link........................ 8W-20-3
G113 .............................. 8W-20-3
G114 .............................. 8W-20-2
G115 ............................ 8W-20-2, 3Component Page
G116 .............................. 8W-20-2
G117 .............................. 8W-20-3
G118 .............................. 8W-20-3
G120.............................. 8W-20-3
Generator........................ 8W-20-2, 3
Intake Air Heater Relay No. 1.......... 8W-20-3
Intake Air Heater Relay No. 2.......... 8W-20-3
Joint Connector No. 1................. 8W-20-4
Joint Connector No. 2................. 8W-20-4
Power Distribution Center......... 8W-20-2, 3, 4
Powertrain Control Module......... 8W-20-2, 3, 4
BR/BE8W-20 CHARGING SYSTEM 8W - 20 - 1