fuel cap DODGE RAM 2002 Service Service Manual
[x] Cancel search | Manufacturer: DODGE, Model Year: 2002, Model line: RAM, Model: DODGE RAM 2002Pages: 2255, PDF Size: 62.07 MB
Page 1322 of 2255

If equipped with a 35 gallon fuel tank, two check
valves are also used, but both valves are permanently
mounted to top of fuel tank (Fig. 42). If replacement is
necessary, fuel tank must be replaced. Refer to Fuel
Tank Removal/Installation in Group 14, Fuel System.
(a) Disconnect negative battery cable at battery.
(b) Remove fuel filler cap and drain fuel tank.
(c) Remove fuel tank. Refer to Fuel Tank Remov-
al/Installation in Fuel System.
(d) Disconnect tube (line) at valve.
(e) The check valve is seated into a rubber grom-
met. Remove valve by prying one side upward and
then roll valve out of grommet.
(f) Discard old grommet.
INSTALLATION
(1) Install new grommet into fuel pump (or fuel
tank) module.
(2) Using finger pressure only, press valve into
place.
(3) Install fuel tank. Refer to Fuel Tank Installa-
tion.
(4) Fill fuel tank. Install fuel tank filler cap.
(5) Connect negative battery cable(s).
(6) Start vehicle and check for leaks.
INLET FILTER
REMOVAL
The fuel pump inlet filter (strainer) is located on
the bottom of the fuel pump module (Fig. 43). The
fuel pump module is located inside of fuel tank.
(1) Remove fuel tank. Refer to Fuel Tank Removal/
Installation.
(2) Remove fuel pump module. Refer to Fuel Pump
Module Removal/Installation.
(3) Remove filter by carefully prying 2 lock tabs at
bottom of module with 2 screwdrivers. Filter is
snapped to module.
(4) Clean bottom of pump module.
INSTALLATION
The fuel pump inlet filter (strainer) is located on
the bottom of the fuel pump module (Fig. 43) . The
fuel pump module is located inside of fuel tank.
(1) Snap new filter to bottom of module. Be sure
o-ring is in correct position.
(2) Install fuel pump module. Refer to Fuel Pump
Module Removal/Installation.
(3) Install fuel tank. Refer to Fuel Tank Removal/
Installation.
Fig. 42 Check Valve Locations - Gas Powered with
35 Gallon Tank
1 - FRONT FUEL TANK CHECK VALVE
2 - FUEL PUMP MODULE
3 - REAR FUEL TANK CHECK VALVE
4 - FUEL TANK
Fig. 43 Fuel Pump Inlet Filter
1 - FUEL PUMP INLET FILTER
2 - LOCK TABS (2)
3 - FUEL PUMP MODULE (BOTTOM)
BR/BEFUEL DELIVERY - GASOLINE 14 - 23
FUEL TANK CHECK VALVE (Continued)
Page 1328 of 2255
FUEL INJECTION - GASOLINE
DIAGNOSIS AND TESTING
VISUAL INSPECTIONÐ5.9L ENGINES
A visual inspection for loose, disconnected or incor-
rectly routed wires and hoses should be made. This
should be done before attempting to diagnose or ser-
vice the fuel injection system. A visual check will
help spot these faults and save unnecessary test and
diagnostic time. A thorough visual inspection will
include the following checks:
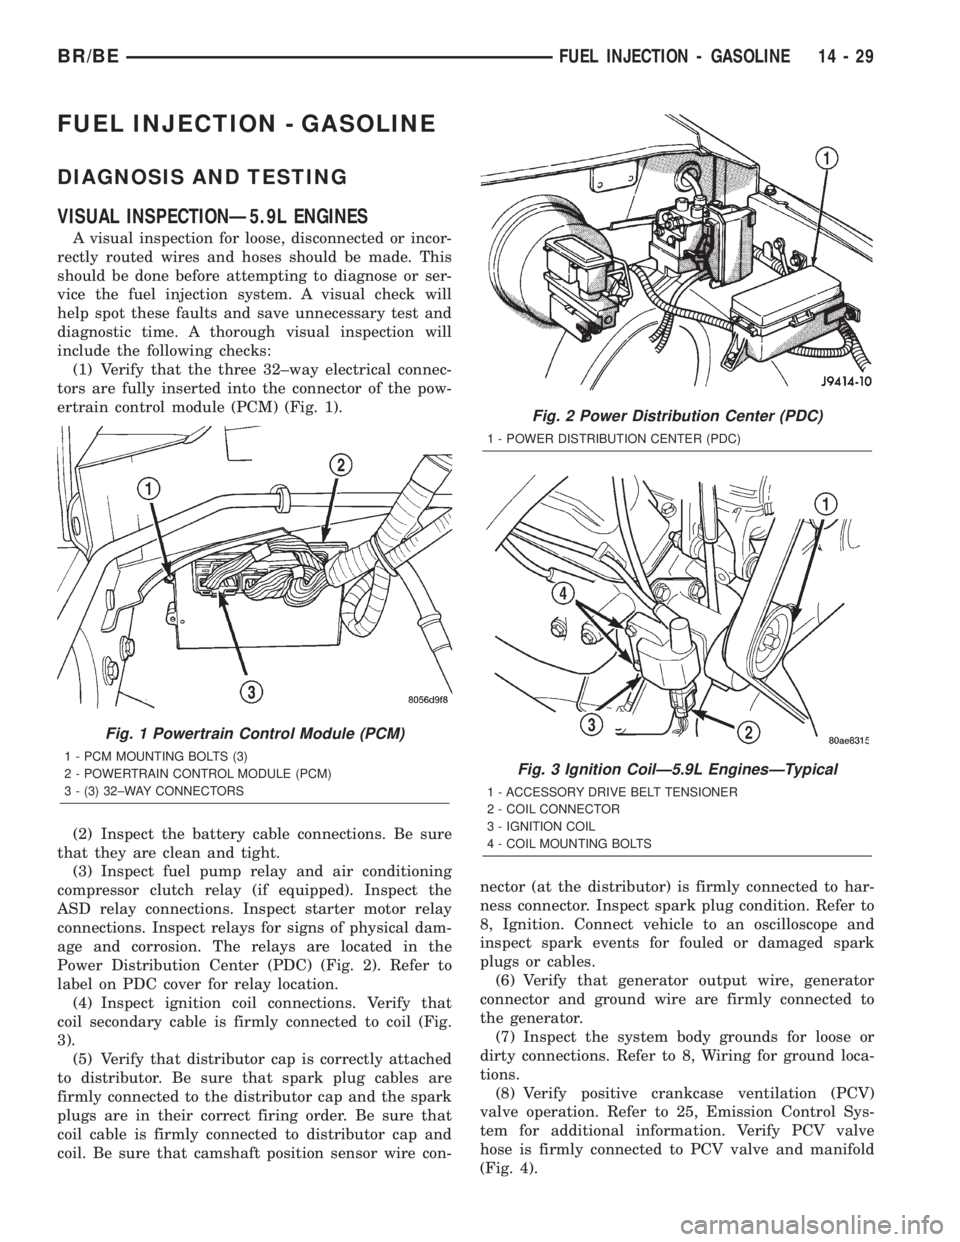
(1) Verify that the three 32±way electrical connec-
tors are fully inserted into the connector of the pow-
ertrain control module (PCM) (Fig. 1).
(2) Inspect the battery cable connections. Be sure
that they are clean and tight.
(3) Inspect fuel pump relay and air conditioning
compressor clutch relay (if equipped). Inspect the
ASD relay connections. Inspect starter motor relay
connections. Inspect relays for signs of physical dam-
age and corrosion. The relays are located in the
Power Distribution Center (PDC) (Fig. 2). Refer to
label on PDC cover for relay location.
(4) Inspect ignition coil connections. Verify that
coil secondary cable is firmly connected to coil (Fig.
3).
(5) Verify that distributor cap is correctly attached
to distributor. Be sure that spark plug cables are
firmly connected to the distributor cap and the spark
plugs are in their correct firing order. Be sure that
coil cable is firmly connected to distributor cap and
coil. Be sure that camshaft position sensor wire con-nector (at the distributor) is firmly connected to har-
ness connector. Inspect spark plug condition. Refer to
8, Ignition. Connect vehicle to an oscilloscope and
inspect spark events for fouled or damaged spark
plugs or cables.
(6) Verify that generator output wire, generator
connector and ground wire are firmly connected to
the generator.
(7) Inspect the system body grounds for loose or
dirty connections. Refer to 8, Wiring for ground loca-
tions.
(8) Verify positive crankcase ventilation (PCV)
valve operation. Refer to 25, Emission Control Sys-
tem for additional information. Verify PCV valve
hose is firmly connected to PCV valve and manifold
(Fig. 4).
Fig. 1 Powertrain Control Module (PCM)
1 - PCM MOUNTING BOLTS (3)
2 - POWERTRAIN CONTROL MODULE (PCM)
3 - (3) 32±WAY CONNECTORS
Fig. 2 Power Distribution Center (PDC)
1 - POWER DISTRIBUTION CENTER (PDC)
Fig. 3 Ignition CoilÐ5.9L EnginesÐTypical
1 - ACCESSORY DRIVE BELT TENSIONER
2 - COIL CONNECTOR
3 - IGNITION COIL
4 - COIL MOUNTING BOLTS
BR/BEFUEL INJECTION - GASOLINE 14 - 29
Page 1354 of 2255
FUEL DELIVERY - DIESEL
DESCRIPTION
DESCRIPTION - DIESEL FUEL DELIVERY
SYSTEM
The fuel system on the Cummins 24 valveÐTurbo
Diesel Engine uses anelectronically controlled
fuel injection pump with three control modules.
Also refer to the Powertrain Control Module (PCM)
or Engine Control Module sections.
Some fuel system components are shown in (Fig.
1).
The fuel delivery system consists of the:
²Accelerator pedal
²Air cleaner housing/element
²Fuel drain manifold (passage)
²Fuel filter/water separator
²Fuel heater
²Fuel heater relay
²Fuel transfer (lift) pump
²Fuel injection pump
²Fuel injectors
²Fuel heater temperature sensor
²Fuel tank
²Fuel tank filler/vent tube assembly²Fuel tank filler tube cap
²Fuel tank module containing the rollover valve,
fuel gauge sending unit (fuel level sensor) and a sep-
arate fuel filter located at bottom of tank module
²Fuel tubes/lines/hoses
²High-pressure fuel injector lines
²In-tank fuel filter (at bottom of fuel tank mod-
ule)
²Low-pressure fuel supply lines
²Low-pressure fuel return line
²Overflow valve
²Quick-connect fittings
²Throttle cable
²Water draining
OPERATION
WARNING: HIGH-PRESSURE FUEL LINES DELIVER
DIESEL FUEL UNDER EXTREME PRESSURE FROM
THE INJECTION PUMP TO THE FUEL INJECTORS.
THIS MAY BE AS HIGH AS 120,000 KPA (17,405
PSI). USE EXTREME CAUTION WHEN INSPECTING
FOR HIGH-PRESSURE FUEL LEAKS. INSPECT FOR
HIGH-PRESSURE FUEL LEAKS WITH A SHEET OF
CARDBOARD. HIGH FUEL INJECTION PRESSURE
CAN CAUSE PERSONAL INJURY IF CONTACT IS
MADE WITH THE SKIN.
BR/BEFUEL DELIVERY - DIESEL 14 - 55
Page 1356 of 2255
DIAGNOSIS AND TESTING
DIAGNOSIS AND TESTING - FUEL SYSTEM AIR
LEAK VACUUM TEST
The proceeding test will determine if a fuel system
air leak exists at the engine. Air leaks will cause
hard starting and/or poor performance.
A hand-operated vacuum pump/gauge equipped
with a remote or built-on fluid container will be used.
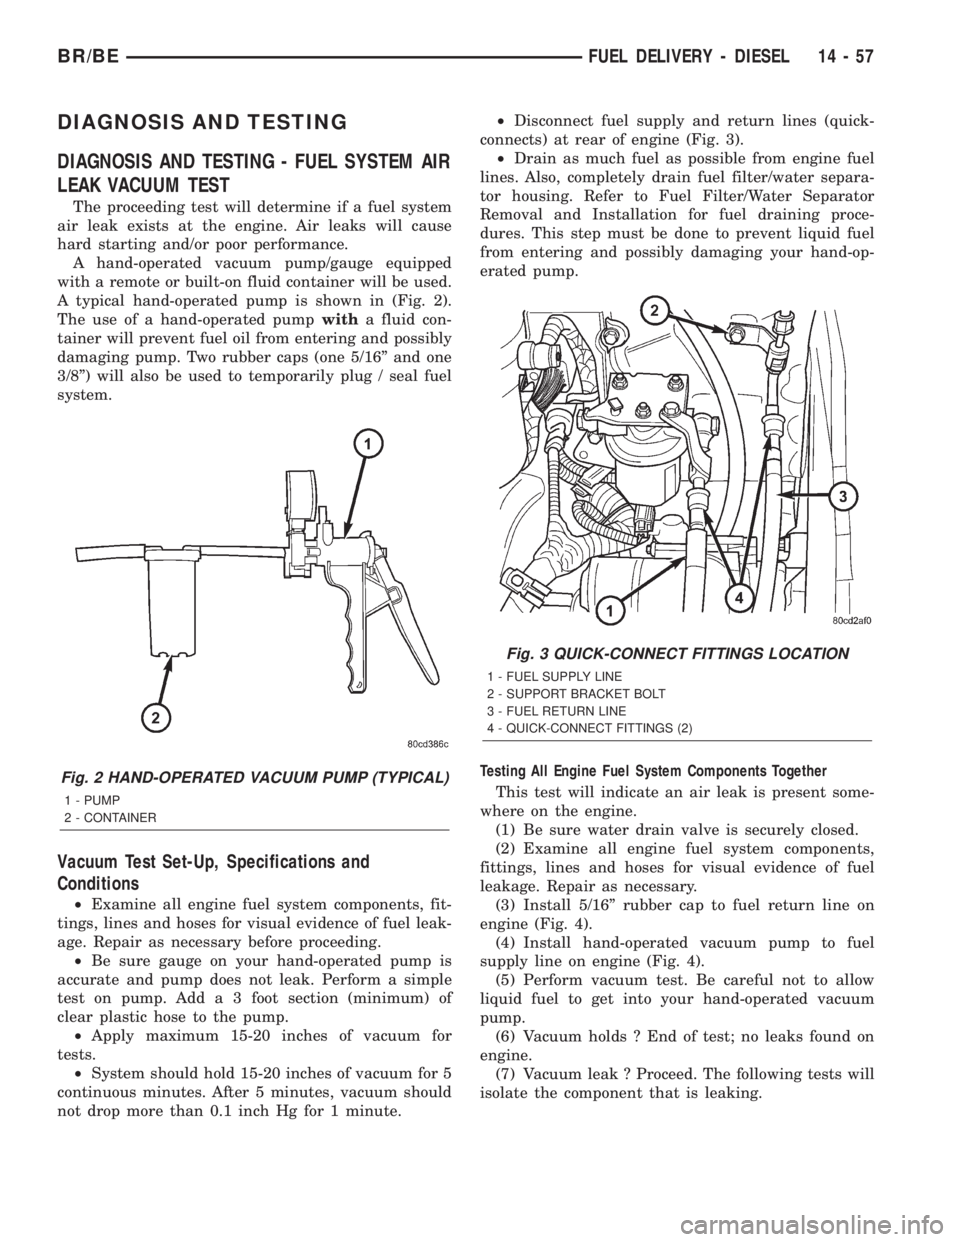
A typical hand-operated pump is shown in (Fig. 2).
The use of a hand-operated pumpwitha fluid con-
tainer will prevent fuel oil from entering and possibly
damaging pump. Two rubber caps (one 5/16º and one
3/8º) will also be used to temporarily plug / seal fuel
system.
Vacuum Test Set-Up, Specifications and
Conditions
²Examine all engine fuel system components, fit-
tings, lines and hoses for visual evidence of fuel leak-
age. Repair as necessary before proceeding.
²Be sure gauge on your hand-operated pump is
accurate and pump does not leak. Perform a simple
test on pump. Add a 3 foot section (minimum) of
clear plastic hose to the pump.
²Apply maximum 15-20 inches of vacuum for
tests.
²System should hold 15-20 inches of vacuum for 5
continuous minutes. After 5 minutes, vacuum should
not drop more than 0.1 inch Hg for 1 minute.²Disconnect fuel supply and return lines (quick-
connects) at rear of engine (Fig. 3).
²Drain as much fuel as possible from engine fuel
lines. Also, completely drain fuel filter/water separa-
tor housing. Refer to Fuel Filter/Water Separator
Removal and Installation for fuel draining proce-
dures. This step must be done to prevent liquid fuel
from entering and possibly damaging your hand-op-
erated pump.
Testing All Engine Fuel System Components Together
This test will indicate an air leak is present some-
where on the engine.
(1) Be sure water drain valve is securely closed.
(2) Examine all engine fuel system components,
fittings, lines and hoses for visual evidence of fuel
leakage. Repair as necessary.
(3) Install 5/16º rubber cap to fuel return line on
engine (Fig. 4).
(4) Install hand-operated vacuum pump to fuel
supply line on engine (Fig. 4).
(5) Perform vacuum test. Be careful not to allow
liquid fuel to get into your hand-operated vacuum
pump.
(6) Vacuum holds ? End of test; no leaks found on
engine.
(7) Vacuum leak ? Proceed. The following tests will
isolate the component that is leaking.
Fig. 2 HAND-OPERATED VACUUM PUMP (TYPICAL)
1 - PUMP
2 - CONTAINER
Fig. 3 QUICK-CONNECT FITTINGS LOCATION
1 - FUEL SUPPLY LINE
2 - SUPPORT BRACKET BOLT
3 - FUEL RETURN LINE
4 - QUICK-CONNECT FITTINGS (2)
BR/BEFUEL DELIVERY - DIESEL 14 - 57
Page 1357 of 2255

Testing Fuel Transfer Pump
(1) Leave vacuum pump attached to fuel supply
line (Fig. 5).
(2) Disconnect rubber fuel hose from fitting at out-
let side of fuel transfer pump (Fig. 5). To plug / seal
system, install 3/8º rubber cap to this fitting (Fig. 5).
(3) Perform vacuum test. Be careful not to allow
liquid fuel to get into your hand-operated vacuum
pump.
(4) Vacuum leak ? Check/repair all transfer pump
fittings and sealing washers for leaks. Check/repair
rubber hose and clamps at sides of transfer pump for
leaks. Perform another vacuum test. If leak still
present, replace fuel transfer pump.
(5) Vacuum holds ? Proceed.
Testing Fuel Filter / Water Separator
(1) Leave vacuum pump attached to fuel supply
line (Fig. 4).
(2) Disconnect rubber fuel hose located between
VP-44 pump and fuel filter/water separator (Fig. 6).
To allow easier hose removal, remove test port fitting
and fuel inlet line at VP-44 pump (Fig. 6). To plug /
seal system, install 3/8º rubber cap to this outline
line (Fig. 7).
(3) Reconnect rubber fuel hose to fitting at outlet
side of fuel transfer pump (Fig. 5).
(4) Perform vacuum test. Be careful not to allow
liquid fuel to get into hand-operated vacuum pump.(5) Vacuum leak ? Check/repair all fittings and
sealing washers for leaks. Check/repair rubber hose
and clamps for leaks. Check fuel heater and water-
in-fuel sensor o-rings for leaks. Check filter canister
seal at top of canister for leaks. Repair as necessary.
(6) Vacuum holds ? Proceed.
Testing VP-44 Pump and Fuel Return / Drain System Within
Cylinder Head
(1) Leave vacuum pump attached to fuel supply
line (Fig. 4).
(2) Position rubber hose and 2 clamps to VP-44
drain line. Install test port fitting and fuel drain line
to VP-44 pump. Tighten test port fitting to 24 N´m
(18 ft. lbs. or 212 in. lbs.) torque. Position 2 hose
clamps to rubber hose.
(3) Loosen, but do not remove, fuel line support
bracket bolt (Fig. 8).
(4) Disconnect and separate fuel drain line at top
of ªTº fitting (Fig. 8). To plug / seal system, install
3/8º rubber cap to this disconnected line (Fig. 8).
(5) Perform vacuum test. Be careful not to allow
liquid fuel to get into your hand-operated vacuum
pump.
(6) Vacuum leak ?
(a) Check return line banjo bolt and sealing
washers at rear of cylinder head for leaks. Repair
as necessary.
Fig. 4 VACUUM PUMP INSTALLED TO FUEL LINE
1 - FUEL SUPPLY LINE
2 - FUEL TRANSFER PUMP
3 - FUEL RETURN LINE
4 - RUBBER CAP
5 - FLUID CONTAINER
6 - HAND-OPERATED PUMP
Fig. 5 FUEL HOSE AT TRANSFER PUMP
1 - HAND-OPERATED PUMP
2 - RUBBER CAP TO FUEL TRANSFER PUMP OUTLET FITTING
3 - DISCONNECTED FUEL OUTLET HOSE
4 - FUEL TRANSFER PUMP
5 - TRANSFER PUMP INLET FITTING
14 - 58 FUEL DELIVERY - DIESELBR/BE
FUEL DELIVERY - DIESEL (Continued)
Page 1358 of 2255

(b) Remove all high-pressure fuel lines at injec-
tor high-pressure connectors. Examine all injector
connector o-rings. If any damage to o-ring exists,
replace connector.
(c) If no damage is found at connectors, remove
all 6 fuel injectors to inspect o-rings and sealing
washers. Also inspect cylinder head bores where
these sealing washers make contact. The bore con-
tact area should be smooth and uniform.
(7) Vacuum holds ? Proceed.
Testing VP-44 Pump and its Return Line
(1) Remove rubber 3/8º sealing cap and reconnect /
tighten fuel drain line to top of ªTº fitting (Fig. 8).
(2) Disconnect and separate VP-44 drain line at
front of ªTº fitting (Fig. 9). To plug / seal system,
install 3/8º rubber cap to this disconnected line (Fig.
9).
(3) Disconnect rubber fuel hose at VP-44 inlet (Fig.
10). Connect your hand-operated vacuum pump at
this inlet point.
(4) Perform vacuum test. Be careful not to allow
liquid fuel to get into your hand-operated vacuum
pump.
Fig. 6 FUEL HOSE AT FUEL FILTER
1 - TEST PORT FITTING
2 - VP-44 FUEL INLET LINE
3 - RUBBER FUEL HOSE
4 - FUEL FILTER OUTLET LINE
5 - HOSE CLAMPS (2)
6 - VP-44 INJECTION PUMP
Fig. 7 CAPPING OFF FUEL FILTER OUTLET LINE
1 - FUEL FILTER / WATER SEPARATOR
2 - OUTLET LINE
3 - RUBBER CAP
Fig. 8(T(FITTING - TOP DISCONNECTED
1 - RUBBER SEAL/GASKET
2 - FUEL DRAIN LINE AT TOP OF9T9FITTING (FROM REAR OF
CYLINDER HEAD)
3 - RUBBER CAP
4-9T9FITTING
5 - LEFT REAR CORNER OF ENGINE
6 - SUPPORT BRACKET BOLT
BR/BEFUEL DELIVERY - DIESEL 14 - 59
FUEL DELIVERY - DIESEL (Continued)
Page 1359 of 2255
(5) Vacuum leak ? Check condition of banjo fit-
tings, banjo bolts, and sealing washers. If leaks are
not present, a leak exists within VP-44 pump.
Replacement of VP-44 requires authorization.DIAGNOSIS AND TESTING - AIR IN FUEL
SYSTEM
Air will enter the fuel system whenever fuel supply
lines, separator filters, injection pump, high-pressure
lines or injectors are removed or disconnected. Air
trapped in the fuel system can result in hard start-
ing, a rough running engine, engine misfire, low
power, excessive smoke and fuel knock. After service
is performed, air must be bled from the system
before starting the engine.
Inspect the fuel system from the fuel transfer
pump to the injectors for loose connections. Leaking
fuel is an indicator of loose connections or defective
seals. Air can also enter the fuel system between the
fuel tank and the transfer pump. Inspect the fuel
tank and fuel lines for damage that might allow air
into the system.
For air bleeding, refer to the Air Bleed Procedure.
DIAGNOSIS AND TESTING - FUEL SUPPLY
RESTRICTIONS
LOW-PRESSURE LINES
Fuel supply line restrictions or a defective fuel
transfer pump can cause starting problems and pre-
vent engine from accelerating. The starting problems
include; low power and/or white fog like exhaust.
Test all fuel supply lines for restrictions or block-
age. Flush or replace as necessary. Bleed fuel system
of air once a fuel supply line has been replaced. Refer
to Air Bleed Procedure for procedures.
To test for fuel line restrictions, a vacuum restric-
tion test may be performed. Refer to Fuel Transfer
Pump Pressure Test.
HIGH-PRESSURE LINES
Restricted (kinked or bent) high-pressure lines can
cause starting problems, poor engine performance,
engine mis-fire and white smoke from exhaust.
Examine all high-pressure lines for any damage.
Each radius on each high-pressure line must be
smooth and free of any bends or kinks.
Replace damaged, restricted or leaking high-pres-
sure fuel lines with correct replacement line.
CAUTION: All high-pressure fuel lines must be
clamped securely in place in holders. Lines cannot
contact each other or other components. Do not
attempt to weld high-pressure fuel lines or to repair
lines that are damaged. If line is kinked or bent, it
must be replaced. Use only recommended lines
when replacement of high-pressure fuel line is nec-
essary.
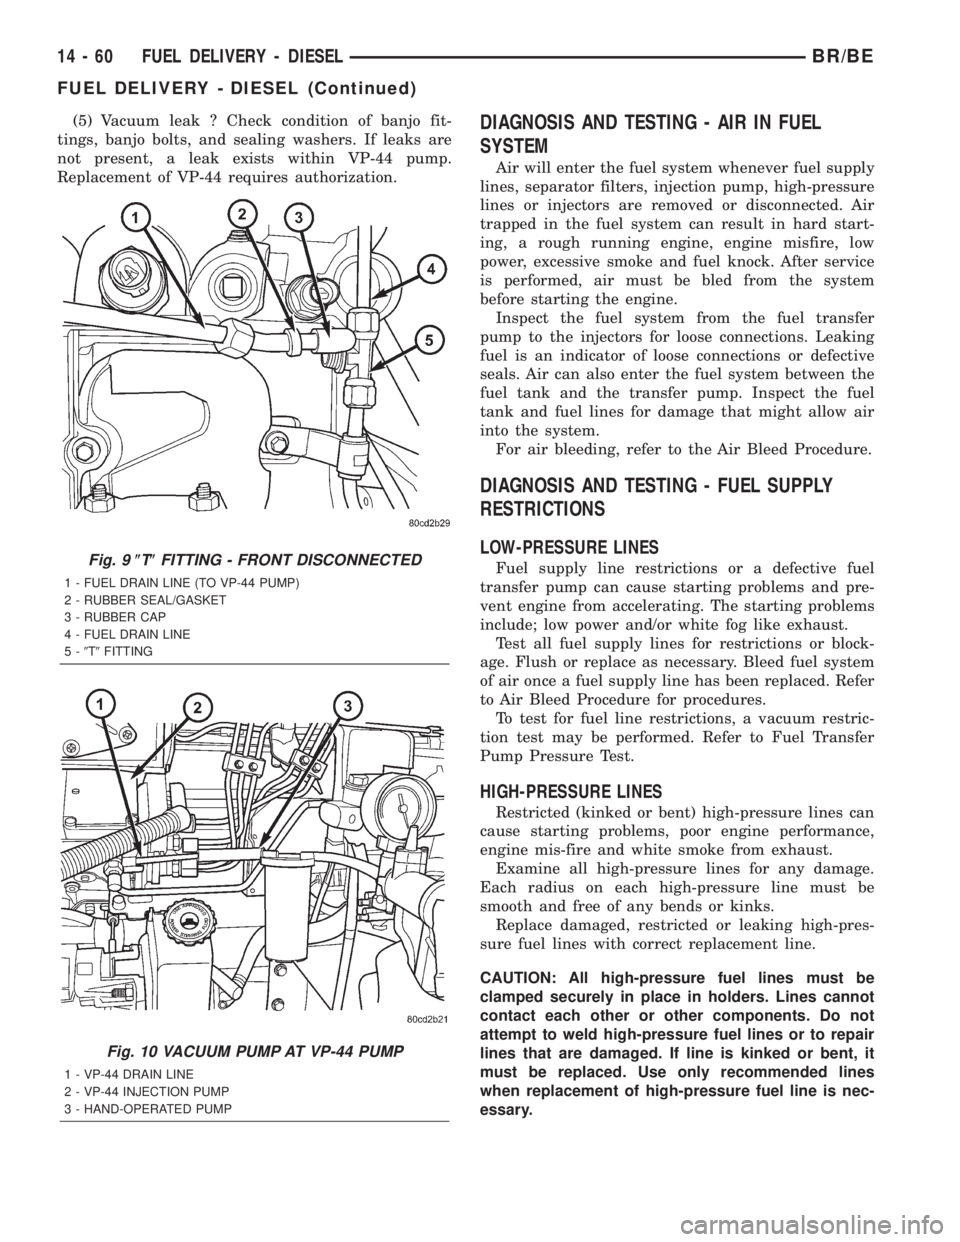
Fig. 9(T(FITTING - FRONT DISCONNECTED
1 - FUEL DRAIN LINE (TO VP-44 PUMP)
2 - RUBBER SEAL/GASKET
3 - RUBBER CAP
4 - FUEL DRAIN LINE
5-9T9FITTING
Fig. 10 VACUUM PUMP AT VP-44 PUMP
1 - VP-44 DRAIN LINE
2 - VP-44 INJECTION PUMP
3 - HAND-OPERATED PUMP
14 - 60 FUEL DELIVERY - DIESELBR/BE
FUEL DELIVERY - DIESEL (Continued)
Page 1360 of 2255
STANDARD PROCEDURE
STANDARD PROCEDURES - WATER DRAINING
AT FUEL FILTER
Refer to Fuel Filter/Water Separator removal/in-
stallation for procedures.
STANDARD PROCEDURES - CLEANING FUEL
SYSTEM PARTS
CAUTION: Cleanliness cannot be overemphasized
when handling or replacing diesel fuel system com-
ponents. This especially includes the fuel injectors,
high-pressure fuel lines and fuel injection pump.
Very tight tolerances are used with these parts. Dirt
contamination could cause rapid part wear and pos-
sible plugging of fuel injector nozzle tip holes. This
in turn could lead to possible engine misfire.
Always wash/clean any fuel system component
thoroughly before disassembly and then air dry.
Cap or cover any open part after disassembly.
Before assembly, examine each part for dirt, grease
or other contaminants and clean if necessary. When
installing new parts, lubricate them with clean
engine oil or clean diesel fuel only.
STANDARD PROCEDURE - AIR BLEED
A certain amount of air becomes trapped in the
fuel system when fuel system components on the
supply and/or high-pressure side are serviced or
replaced. Primary air bleeding is accomplished using
the electric fuel transfer (lift) pump. If the vehicle
has been allowed to run completely out of fuel, the
fuel injectors must also be bled as the fuel injection
pumpis notself-bleeding (priming).
Servicing or replacing components on the fuel
return side will not require air bleeding.
WARNING: DO NOT BLEED AIR FROM THE FUEL
SYSTEM OF A HOT ENGINE.
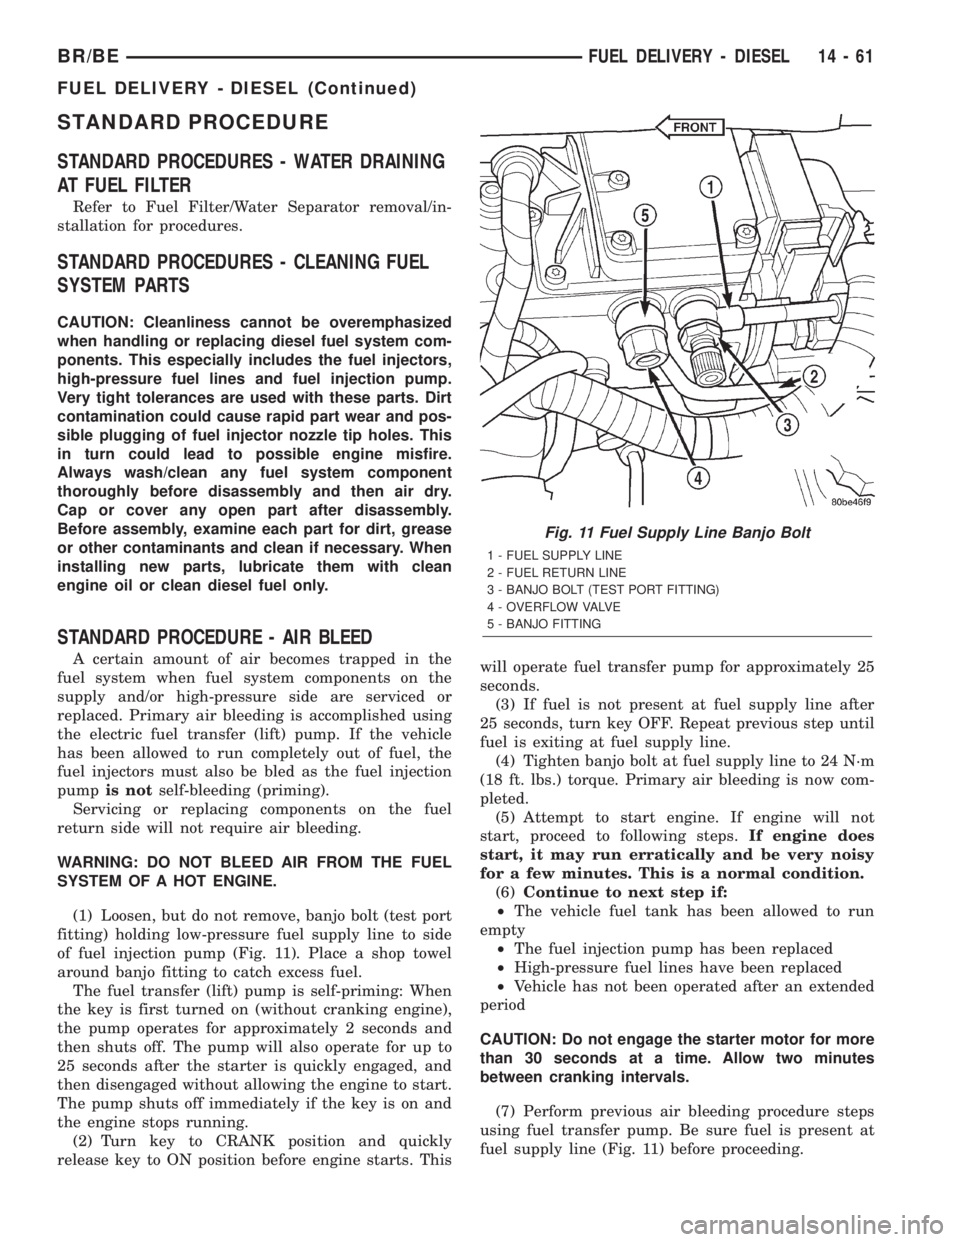
(1) Loosen, but do not remove, banjo bolt (test port
fitting) holding low-pressure fuel supply line to side
of fuel injection pump (Fig. 11). Place a shop towel
around banjo fitting to catch excess fuel.
The fuel transfer (lift) pump is self-priming: When
the key is first turned on (without cranking engine),
the pump operates for approximately 2 seconds and
then shuts off. The pump will also operate for up to
25 seconds after the starter is quickly engaged, and
then disengaged without allowing the engine to start.
The pump shuts off immediately if the key is on and
the engine stops running.
(2) Turn key to CRANK position and quickly
release key to ON position before engine starts. Thiswill operate fuel transfer pump for approximately 25
seconds.
(3) If fuel is not present at fuel supply line after
25 seconds, turn key OFF. Repeat previous step until
fuel is exiting at fuel supply line.
(4) Tighten banjo bolt at fuel supply line to 24 N´m
(18 ft. lbs.) torque. Primary air bleeding is now com-
pleted.
(5) Attempt to start engine. If engine will not
start, proceed to following steps.If engine does
start, it may run erratically and be very noisy
for a few minutes. This is a normal condition.
(6)Continue to next step if:
²The vehicle fuel tank has been allowed to run
empty
²The fuel injection pump has been replaced
²High-pressure fuel lines have been replaced
²Vehicle has not been operated after an extended
period
CAUTION: Do not engage the starter motor for more
than 30 seconds at a time. Allow two minutes
between cranking intervals.
(7) Perform previous air bleeding procedure steps
using fuel transfer pump. Be sure fuel is present at
fuel supply line (Fig. 11) before proceeding.
Fig. 11 Fuel Supply Line Banjo Bolt
1 - FUEL SUPPLY LINE
2 - FUEL RETURN LINE
3 - BANJO BOLT (TEST PORT FITTING)
4 - OVERFLOW VALVE
5 - BANJO FITTING
BR/BEFUEL DELIVERY - DIESEL 14 - 61
FUEL DELIVERY - DIESEL (Continued)
Page 1363 of 2255
REMOVAL
Refer to maintenance schedules in this manual for
recommended fuel filter replacement intervals.
Draining water from fuel filter/water separa-
tor housing:
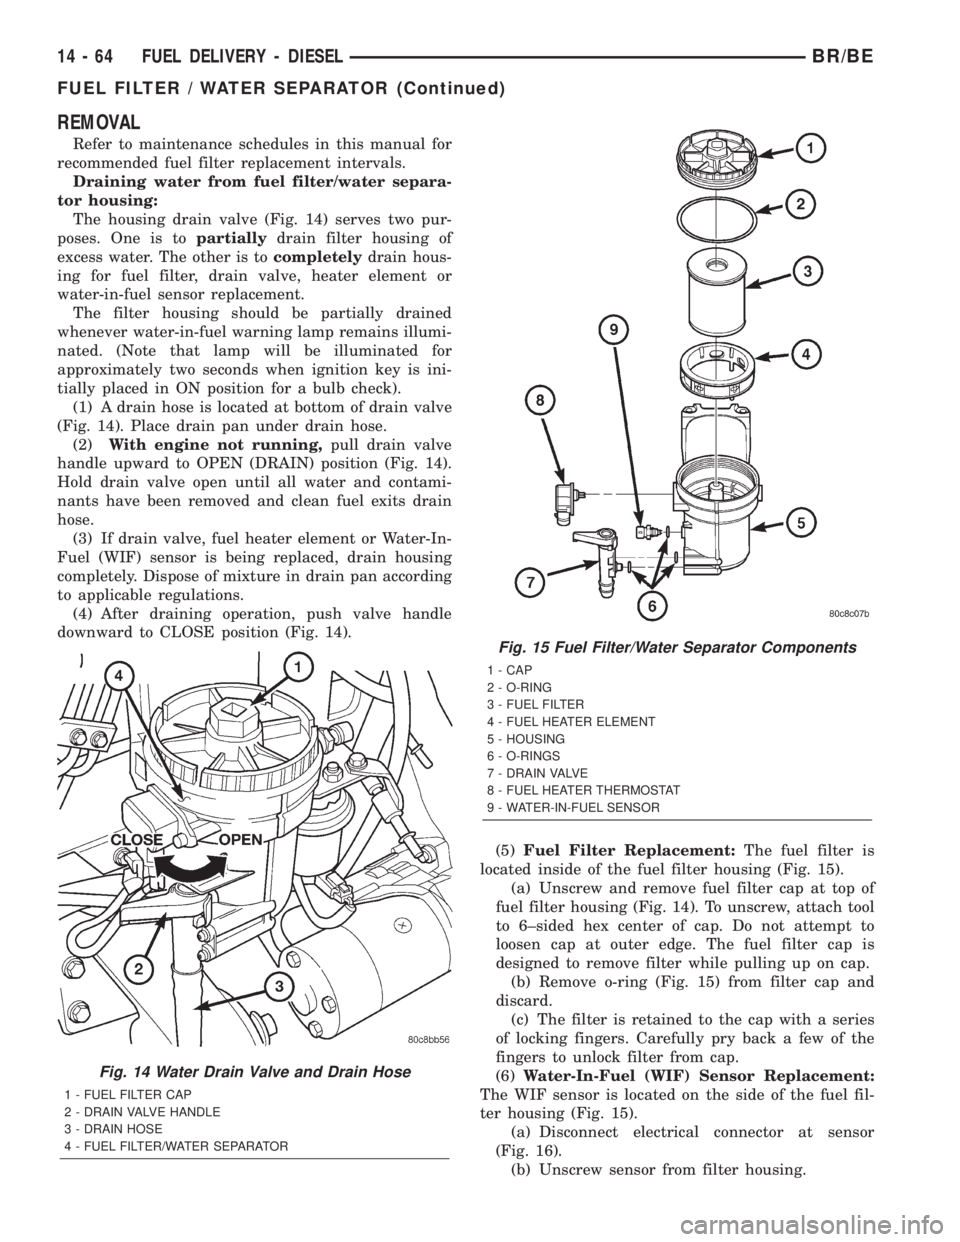
The housing drain valve (Fig. 14) serves two pur-
poses. One is topartiallydrain filter housing of
excess water. The other is tocompletelydrain hous-
ing for fuel filter, drain valve, heater element or
water-in-fuel sensor replacement.
The filter housing should be partially drained
whenever water-in-fuel warning lamp remains illumi-
nated. (Note that lamp will be illuminated for
approximately two seconds when ignition key is ini-
tially placed in ON position for a bulb check).
(1) A drain hose is located at bottom of drain valve
(Fig. 14). Place drain pan under drain hose.
(2)With engine not running,pull drain valve
handle upward to OPEN (DRAIN) position (Fig. 14).
Hold drain valve open until all water and contami-
nants have been removed and clean fuel exits drain
hose.
(3) If drain valve, fuel heater element or Water-In-
Fuel (WIF) sensor is being replaced, drain housing
completely. Dispose of mixture in drain pan according
to applicable regulations.
(4) After draining operation, push valve handle
downward to CLOSE position (Fig. 14).
(5)Fuel Filter Replacement:The fuel filter is
located inside of the fuel filter housing (Fig. 15).
(a) Unscrew and remove fuel filter cap at top of
fuel filter housing (Fig. 14). To unscrew, attach tool
to 6±sided hex center of cap. Do not attempt to
loosen cap at outer edge. The fuel filter cap is
designed to remove filter while pulling up on cap.
(b) Remove o-ring (Fig. 15) from filter cap and
discard.
(c) The filter is retained to the cap with a series
of locking fingers. Carefully pry back a few of the
fingers to unlock filter from cap.
(6)Water-In-Fuel (WIF) Sensor Replacement:
The WIF sensor is located on the side of the fuel fil-
ter housing (Fig. 15).
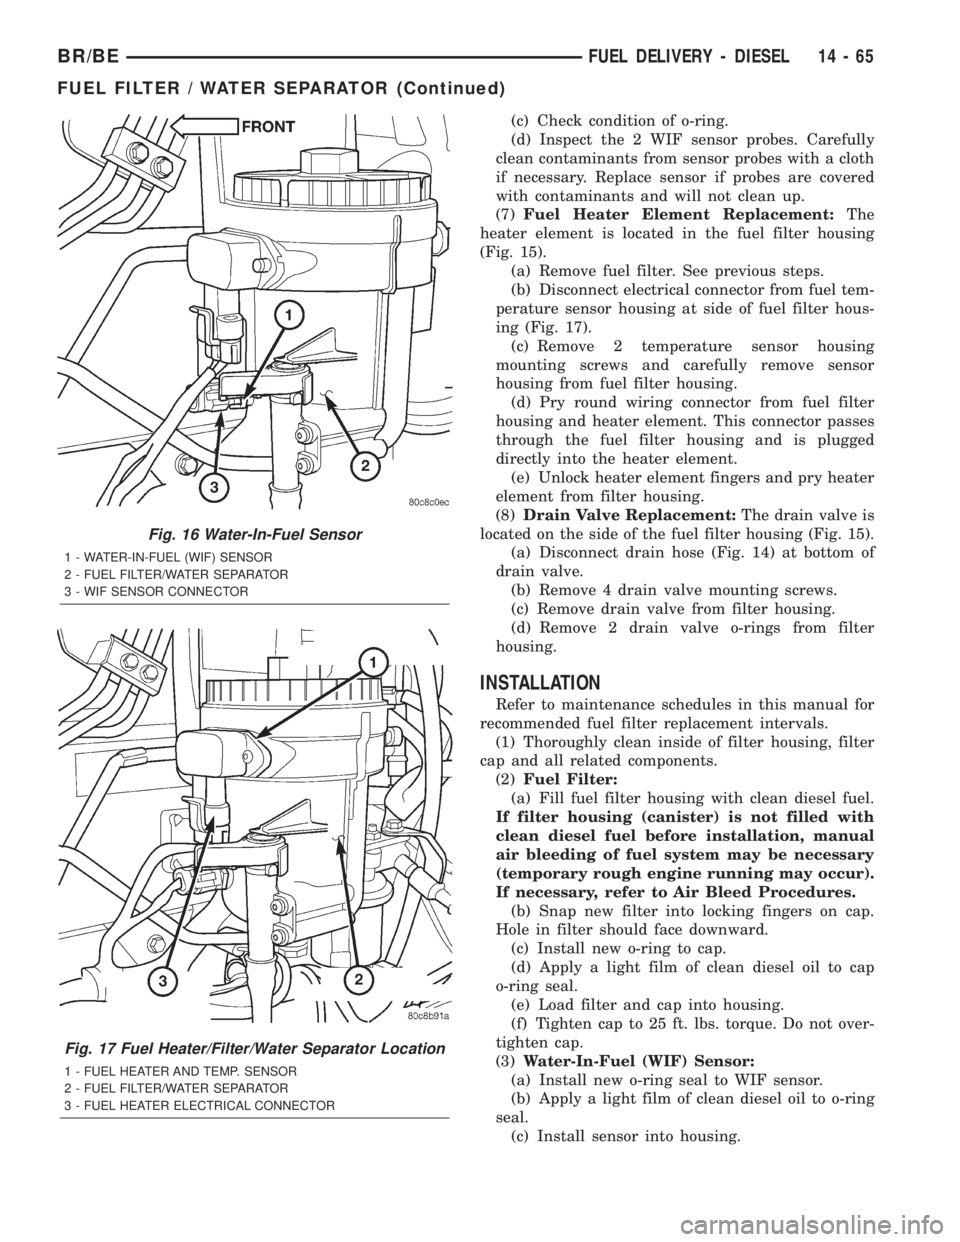
(a) Disconnect electrical connector at sensor
(Fig. 16).
(b) Unscrew sensor from filter housing.
Fig. 14 Water Drain Valve and Drain Hose
1 - FUEL FILTER CAP
2 - DRAIN VALVE HANDLE
3 - DRAIN HOSE
4 - FUEL FILTER/WATER SEPARATOR
Fig. 15 Fuel Filter/Water Separator Components
1 - CAP
2 - O-RING
3 - FUEL FILTER
4 - FUEL HEATER ELEMENT
5 - HOUSING
6 - O-RINGS
7 - DRAIN VALVE
8 - FUEL HEATER THERMOSTAT
9 - WATER-IN-FUEL SENSOR
14 - 64 FUEL DELIVERY - DIESELBR/BE
FUEL FILTER / WATER SEPARATOR (Continued)
Page 1364 of 2255
(c) Check condition of o-ring.
(d) Inspect the 2 WIF sensor probes. Carefully
clean contaminants from sensor probes with a cloth
if necessary. Replace sensor if probes are covered
with contaminants and will not clean up.
(7)Fuel Heater Element Replacement:The
heater element is located in the fuel filter housing
(Fig. 15).
(a) Remove fuel filter. See previous steps.
(b) Disconnect electrical connector from fuel tem-
perature sensor housing at side of fuel filter hous-
ing (Fig. 17).
(c) Remove 2 temperature sensor housing
mounting screws and carefully remove sensor
housing from fuel filter housing.
(d) Pry round wiring connector from fuel filter
housing and heater element. This connector passes
through the fuel filter housing and is plugged
directly into the heater element.
(e) Unlock heater element fingers and pry heater
element from filter housing.
(8)Drain Valve Replacement:The drain valve is
located on the side of the fuel filter housing (Fig. 15).
(a) Disconnect drain hose (Fig. 14) at bottom of
drain valve.
(b) Remove 4 drain valve mounting screws.
(c) Remove drain valve from filter housing.
(d) Remove 2 drain valve o-rings from filter
housing.
INSTALLATION
Refer to maintenance schedules in this manual for
recommended fuel filter replacement intervals.
(1) Thoroughly clean inside of filter housing, filter
cap and all related components.
(2)Fuel Filter:
(a) Fill fuel filter housing with clean diesel fuel.
If filter housing (canister) is not filled with
clean diesel fuel before installation, manual
air bleeding of fuel system may be necessary
(temporary rough engine running may occur).
If necessary, refer to Air Bleed Procedures.
(b) Snap new filter into locking fingers on cap.
Hole in filter should face downward.
(c) Install new o-ring to cap.
(d) Apply a light film of clean diesel oil to cap
o-ring seal.
(e) Load filter and cap into housing.
(f) Tighten cap to 25 ft. lbs. torque. Do not over-
tighten cap.
(3)Water-In-Fuel (WIF) Sensor:
(a) Install new o-ring seal to WIF sensor.
(b) Apply a light film of clean diesel oil to o-ring
seal.
(c) Install sensor into housing.
Fig. 16 Water-In-Fuel Sensor
1 - WATER-IN-FUEL (WIF) SENSOR
2 - FUEL FILTER/WATER SEPARATOR
3 - WIF SENSOR CONNECTOR
Fig. 17 Fuel Heater/Filter/Water Separator Location
1 - FUEL HEATER AND TEMP. SENSOR
2 - FUEL FILTER/WATER SEPARATOR
3 - FUEL HEATER ELECTRICAL CONNECTOR
BR/BEFUEL DELIVERY - DIESEL 14 - 65
FUEL FILTER / WATER SEPARATOR (Continued)