automatic transmission fluid DODGE RAM 2002 Service Manual PDF
[x] Cancel search | Manufacturer: DODGE, Model Year: 2002, Model line: RAM, Model: DODGE RAM 2002Pages: 2255, PDF Size: 62.07 MB
Page 1634 of 2255

(2) Install new pilot bushing and clutch hub bush-
ing in output shaft if necessary (Fig. 148). Lubricate
bushings with petroleum jelly, or transmission fluid.
(3) Install annulus gear on output shaft, if
removed. Then install annulus gear retaining snap-
ring (Fig. 149).
(4) Align and install clutch drum on annulus gear
(Fig. 150). Be sure drum is engaged in annulus gear
lugs.
(5) Install clutch drum outer retaining ring (Fig.
150).
(6) Slide clutch drum forward and install inner
retaining ring (Fig. 151).(7) Install rear bearing and snap ring on output
shaft (Fig. 152). Be sure locating ring groove in bear-
ing is toward rear.
(8) Install overrunning clutch on hub (Fig. 153).
Note that clutch only fits one way. Shoulder on clutch
should seat in small recess at edge of hub.
(9) Install thrust bearing on overrunning clutch
hub. Use generous amount of petroleum jelly to hold
bearing in place for installation. Bearing fits one way
only. Be sure bearing is seated squarely against hub.
Reinstall bearing if it does not seat squarely.
Fig. 148 Output Shaft Pilot Bushing
1 - OUTPUT SHAFT HUB
2 - OVERRUNNING CLUTCH HUB BUSHING
3 - INTERMEDIATE SHAFT PILOT BUSHING
Fig. 149 Annulus Gear Installation
1 - SNAP-RING
2 - OUTPUT SHAFT FRONT BEARING
3 - ANNULUS GEAR
Fig. 150 Clutch Drum And Outer Retaining Ring
Installation
1 - ANNULUS GEAR
2 - OUTER SNAP-RING
3 - CLUTCH DRUM
Fig. 151 Clutch Drum Inner Retaining Ring
Installation
1 - ANNULUS GEAR
2 - INNER SNAP-RING
3 - CLUTCH DRUM
BR/BEAUTOMATIC TRANSMISSION - 46RE 21 - 181
OVERDRIVE UNIT (Continued)
Page 1648 of 2255
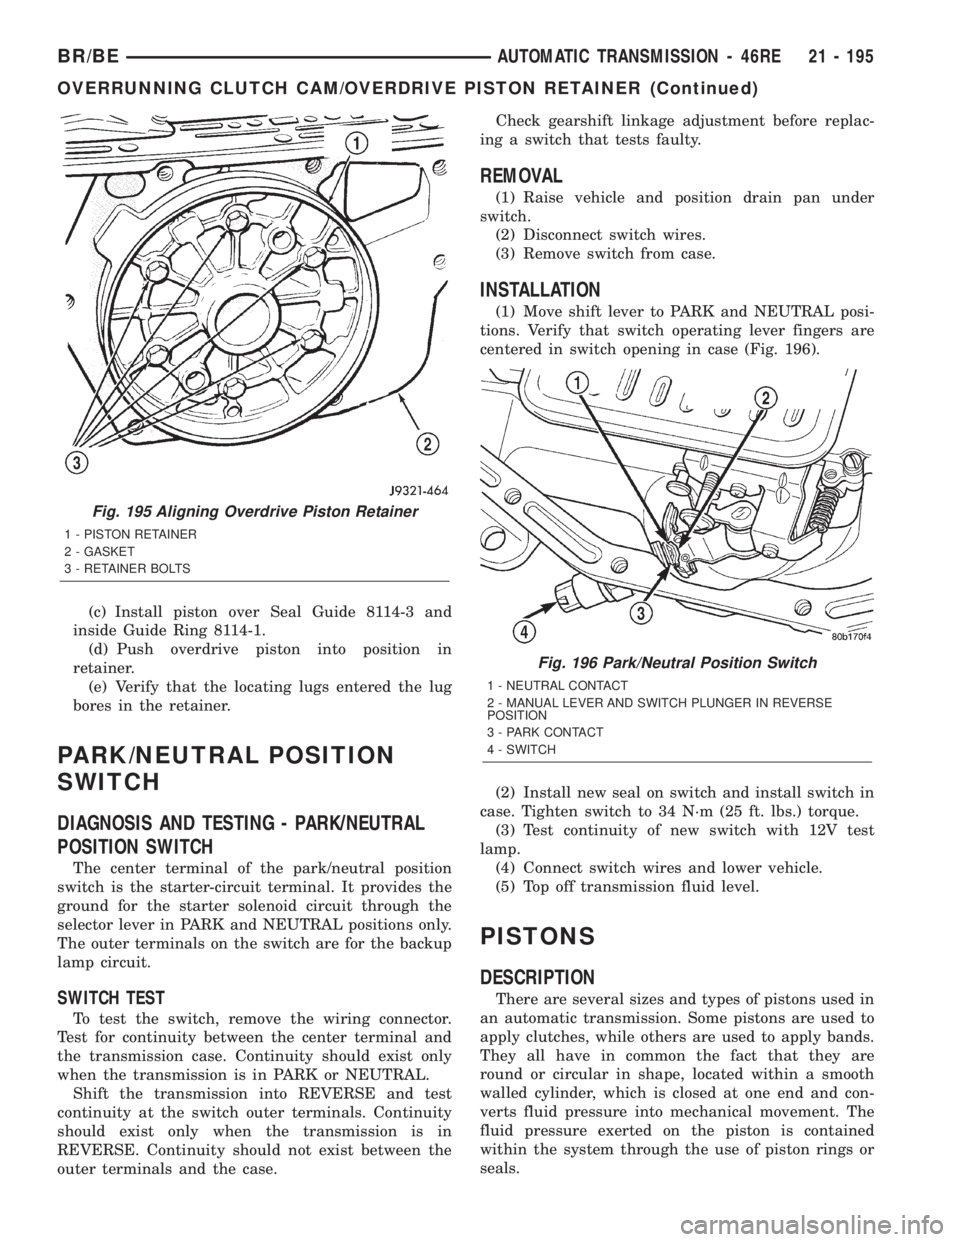
(c) Install piston over Seal Guide 8114-3 and
inside Guide Ring 8114-1.
(d) Push overdrive piston into position in
retainer.
(e) Verify that the locating lugs entered the lug
bores in the retainer.
PARK/NEUTRAL POSITION
SWITCH
DIAGNOSIS AND TESTING - PARK/NEUTRAL
POSITION SWITCH
The center terminal of the park/neutral position
switch is the starter-circuit terminal. It provides the
ground for the starter solenoid circuit through the
selector lever in PARK and NEUTRAL positions only.
The outer terminals on the switch are for the backup
lamp circuit.
SWITCH TEST
To test the switch, remove the wiring connector.
Test for continuity between the center terminal and
the transmission case. Continuity should exist only
when the transmission is in PARK or NEUTRAL.
Shift the transmission into REVERSE and test
continuity at the switch outer terminals. Continuity
should exist only when the transmission is in
REVERSE. Continuity should not exist between the
outer terminals and the case.Check gearshift linkage adjustment before replac-
ing a switch that tests faulty.
REMOVAL
(1) Raise vehicle and position drain pan under
switch.
(2) Disconnect switch wires.
(3) Remove switch from case.
INSTALLATION
(1) Move shift lever to PARK and NEUTRAL posi-
tions. Verify that switch operating lever fingers are
centered in switch opening in case (Fig. 196).
(2) Install new seal on switch and install switch in
case. Tighten switch to 34 N´m (25 ft. lbs.) torque.
(3) Test continuity of new switch with 12V test
lamp.
(4) Connect switch wires and lower vehicle.
(5) Top off transmission fluid level.
PISTONS
DESCRIPTION
There are several sizes and types of pistons used in
an automatic transmission. Some pistons are used to
apply clutches, while others are used to apply bands.
They all have in common the fact that they are
round or circular in shape, located within a smooth
walled cylinder, which is closed at one end and con-
verts fluid pressure into mechanical movement. The
fluid pressure exerted on the piston is contained
within the system through the use of piston rings or
seals.
Fig. 195 Aligning Overdrive Piston Retainer
1 - PISTON RETAINER
2 - GASKET
3 - RETAINER BOLTS
Fig. 196 Park/Neutral Position Switch
1 - NEUTRAL CONTACT
2 - MANUAL LEVER AND SWITCH PLUNGER IN REVERSE
POSITION
3 - PARK CONTACT
4 - SWITCH
BR/BEAUTOMATIC TRANSMISSION - 46RE 21 - 195
OVERRUNNING CLUTCH CAM/OVERDRIVE PISTON RETAINER (Continued)
Page 1649 of 2255
OPERATION
The principal which makes this operation possible
is known as Pascal's Law. Pascal's Law can be stated
as: ªPressure on a confined fluid is transmitted
equally in all directions and acts with equal force on
equal areas.º
PRESSURE
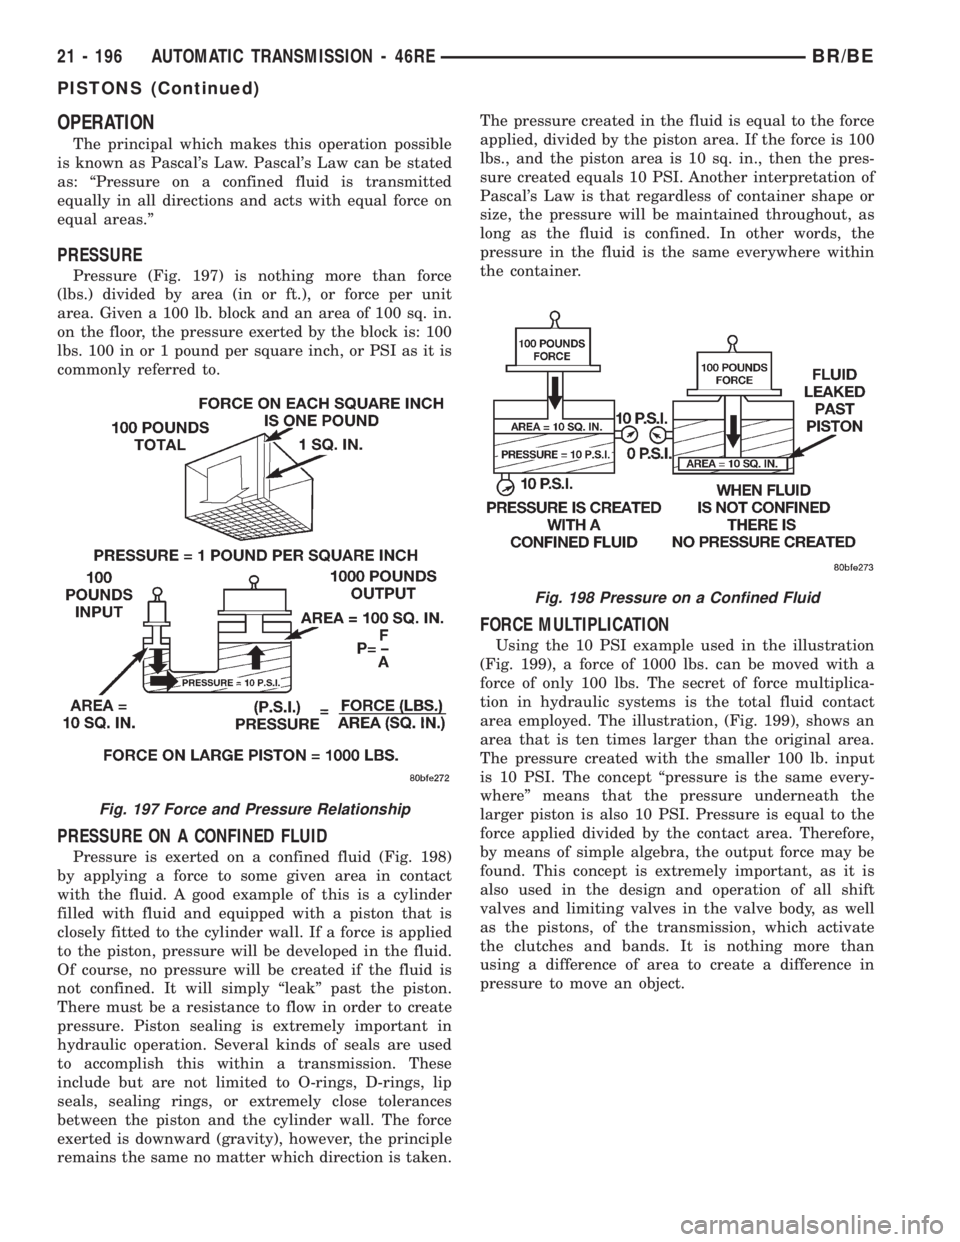
Pressure (Fig. 197) is nothing more than force
(lbs.) divided by area (in or ft.), or force per unit
area. Given a 100 lb. block and an area of 100 sq. in.
on the floor, the pressure exerted by the block is: 100
lbs. 100 in or 1 pound per square inch, or PSI as it is
commonly referred to.
PRESSURE ON A CONFINED FLUID
Pressure is exerted on a confined fluid (Fig. 198)
by applying a force to some given area in contact
with the fluid. A good example of this is a cylinder
filled with fluid and equipped with a piston that is
closely fitted to the cylinder wall. If a force is applied
to the piston, pressure will be developed in the fluid.
Of course, no pressure will be created if the fluid is
not confined. It will simply ªleakº past the piston.
There must be a resistance to flow in order to create
pressure. Piston sealing is extremely important in
hydraulic operation. Several kinds of seals are used
to accomplish this within a transmission. These
include but are not limited to O-rings, D-rings, lip
seals, sealing rings, or extremely close tolerances
between the piston and the cylinder wall. The force
exerted is downward (gravity), however, the principle
remains the same no matter which direction is taken.The pressure created in the fluid is equal to the force
applied, divided by the piston area. If the force is 100
lbs., and the piston area is 10 sq. in., then the pres-
sure created equals 10 PSI. Another interpretation of
Pascal's Law is that regardless of container shape or
size, the pressure will be maintained throughout, as
long as the fluid is confined. In other words, the
pressure in the fluid is the same everywhere within
the container.
FORCE MULTIPLICATION
Using the 10 PSI example used in the illustration
(Fig. 199), a force of 1000 lbs. can be moved with a
force of only 100 lbs. The secret of force multiplica-
tion in hydraulic systems is the total fluid contact
area employed. The illustration, (Fig. 199), shows an
area that is ten times larger than the original area.
The pressure created with the smaller 100 lb. input
is 10 PSI. The concept ªpressure is the same every-
whereº means that the pressure underneath the
larger piston is also 10 PSI. Pressure is equal to the
force applied divided by the contact area. Therefore,
by means of simple algebra, the output force may be
found. This concept is extremely important, as it is
also used in the design and operation of all shift
valves and limiting valves in the valve body, as well
as the pistons, of the transmission, which activate
the clutches and bands. It is nothing more than
using a difference of area to create a difference in
pressure to move an object.
Fig. 197 Force and Pressure Relationship
Fig. 198 Pressure on a Confined Fluid
21 - 196 AUTOMATIC TRANSMISSION - 46REBR/BE
PISTONS (Continued)
Page 1652 of 2255
INSPECTION
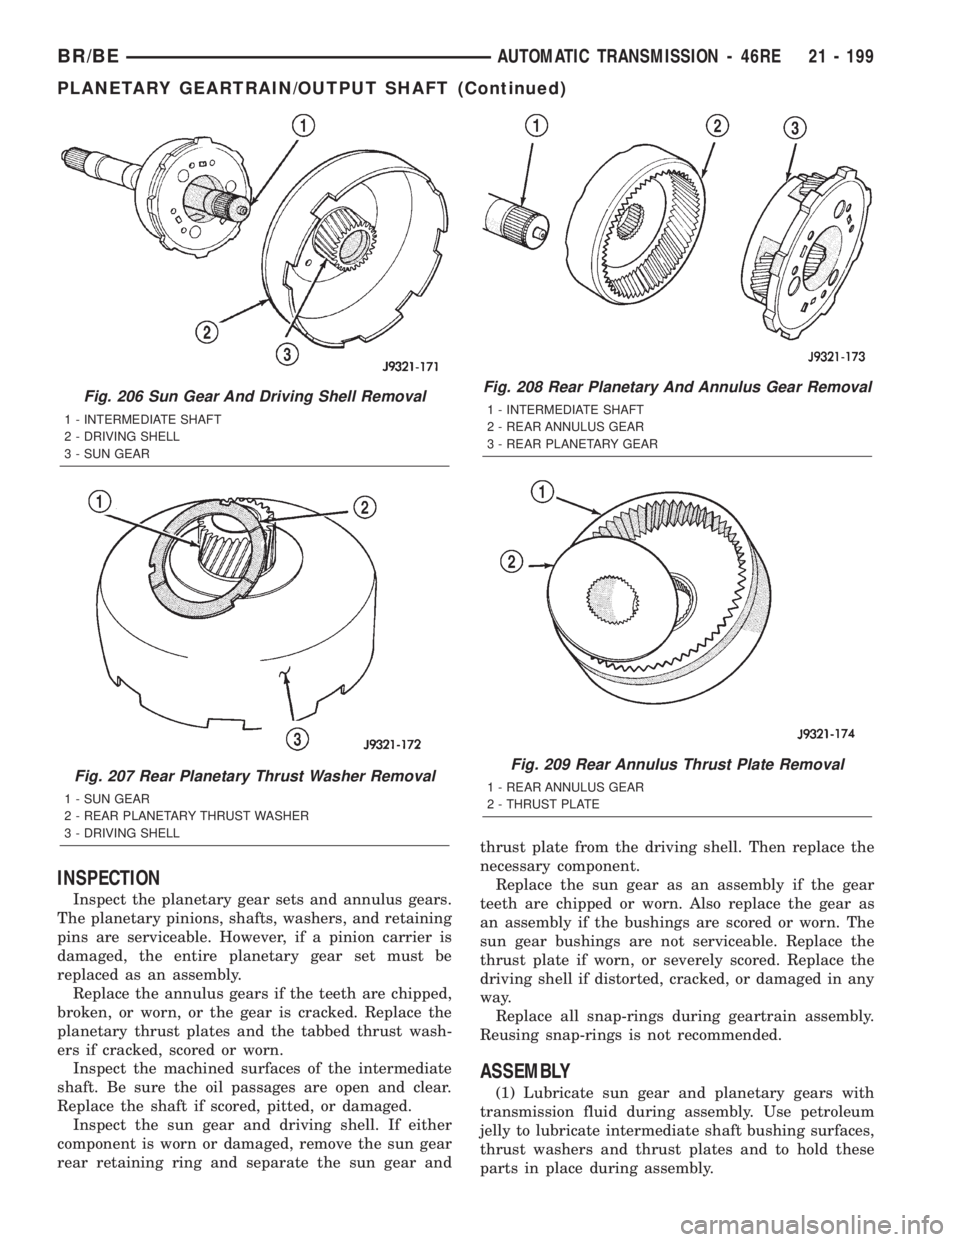
Inspect the planetary gear sets and annulus gears.
The planetary pinions, shafts, washers, and retaining
pins are serviceable. However, if a pinion carrier is
damaged, the entire planetary gear set must be
replaced as an assembly.
Replace the annulus gears if the teeth are chipped,
broken, or worn, or the gear is cracked. Replace the
planetary thrust plates and the tabbed thrust wash-
ers if cracked, scored or worn.
Inspect the machined surfaces of the intermediate
shaft. Be sure the oil passages are open and clear.
Replace the shaft if scored, pitted, or damaged.
Inspect the sun gear and driving shell. If either
component is worn or damaged, remove the sun gear
rear retaining ring and separate the sun gear andthrust plate from the driving shell. Then replace the
necessary component.
Replace the sun gear as an assembly if the gear
teeth are chipped or worn. Also replace the gear as
an assembly if the bushings are scored or worn. The
sun gear bushings are not serviceable. Replace the
thrust plate if worn, or severely scored. Replace the
driving shell if distorted, cracked, or damaged in any
way.
Replace all snap-rings during geartrain assembly.
Reusing snap-rings is not recommended.
ASSEMBLY
(1) Lubricate sun gear and planetary gears with
transmission fluid during assembly. Use petroleum
jelly to lubricate intermediate shaft bushing surfaces,
thrust washers and thrust plates and to hold these
parts in place during assembly.
Fig. 206 Sun Gear And Driving Shell Removal
1 - INTERMEDIATE SHAFT
2 - DRIVING SHELL
3 - SUN GEAR
Fig. 207 Rear Planetary Thrust Washer Removal
1 - SUN GEAR
2 - REAR PLANETARY THRUST WASHER
3 - DRIVING SHELL
Fig. 208 Rear Planetary And Annulus Gear Removal
1 - INTERMEDIATE SHAFT
2 - REAR ANNULUS GEAR
3 - REAR PLANETARY GEAR
Fig. 209 Rear Annulus Thrust Plate Removal
1 - REAR ANNULUS GEAR
2 - THRUST PLATE
BR/BEAUTOMATIC TRANSMISSION - 46RE 21 - 199
PLANETARY GEARTRAIN/OUTPUT SHAFT (Continued)
Page 1653 of 2255

(2) Install front snap-ring on sun gear and install
gear in driving shell. Then install thrust plate over
sun gear and against rear side of driving shell (Fig.
210). Install rear snap-ring to secure sun gear and
thrust plate in driving shell.
(3) Install rear annulus gear on intermediate shaft
(Fig. 211).
(4)
Install thrust plate in annulus gear (Fig. 212). Be
sure plate is seated on shaft splines and against gear.
(5) Install rear planetary gear in rear annulus
gear (Fig. 213). Be sure planetary carrier is seated
against annulus gear.
(6) Install tabbed thrust washer on front face of
rear planetary gear (Fig. 214). Seat washer tabs in
matching slots in face of gear carrier. Use extra
petroleum jelly to hold washer in place if desired.
(7) Lubricate sun gear bushings with petroleum
jelly or transmission fluid.
(8) Install sun gear and driving shell on interme-
diate shaft (Fig. 215). Seat shell against rear plane-
tary gear. Verify that thrust washer on planetary
gear was not displaced during installation.
(9) Install tabbed thrust washer in driving shell
(Fig. 216), be sure washer tabs are seated in tab slots
of driving shell. Use extra petroleum jelly to hold
washer in place if desired.
Fig. 210 Sun Gear Installation
1 - DRIVING SHELL
2 - SUN GEAR
3 - THRUST PLATE
4 - SUN GEAR REAR RETAINING RING
Fig. 211 Installing Rear Annulus Gear On
Intermediate Shaft
1 - REAR ANNULUS GEAR
2 - OUTPUT SHAFT
Fig. 212 Installing Rear Annulus Thrust Plate
1 - REAR ANNULUS GEAR
2 - THRUST PLATE
21 - 200 AUTOMATIC TRANSMISSION - 46REBR/BE
PLANETARY GEARTRAIN/OUTPUT SHAFT (Continued)
Page 1656 of 2255
REAR CLUTCH
DESCRIPTION
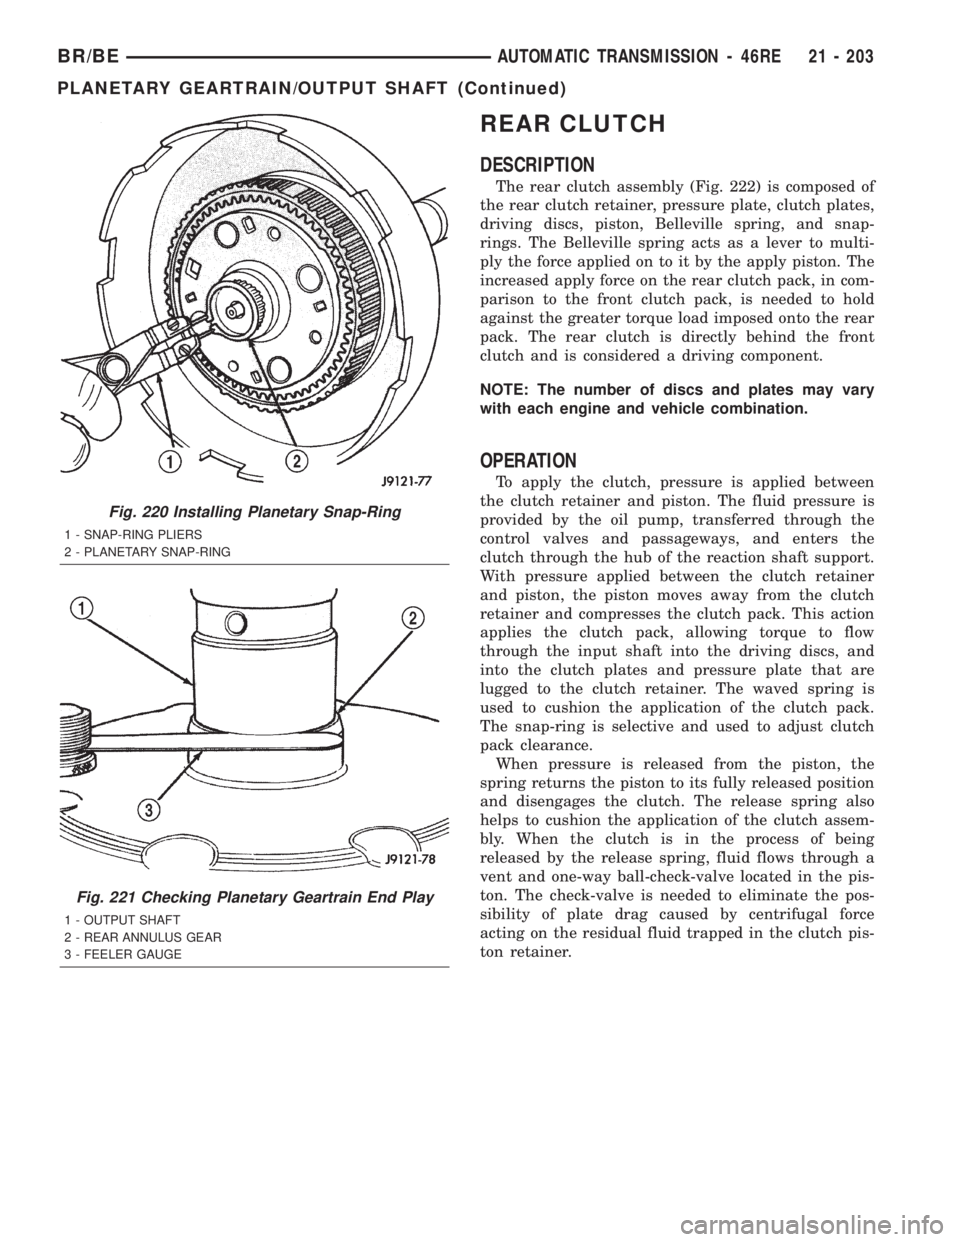
The rear clutch assembly (Fig. 222) is composed of
the rear clutch retainer, pressure plate, clutch plates,
driving discs, piston, Belleville spring, and snap-
rings. The Belleville spring acts as a lever to multi-
ply the force applied on to it by the apply piston. The
increased apply force on the rear clutch pack, in com-
parison to the front clutch pack, is needed to hold
against the greater torque load imposed onto the rear
pack. The rear clutch is directly behind the front
clutch and is considered a driving component.
NOTE: The number of discs and plates may vary
with each engine and vehicle combination.
OPERATION
To apply the clutch, pressure is applied between
the clutch retainer and piston. The fluid pressure is
provided by the oil pump, transferred through the
control valves and passageways, and enters the
clutch through the hub of the reaction shaft support.
With pressure applied between the clutch retainer
and piston, the piston moves away from the clutch
retainer and compresses the clutch pack. This action
applies the clutch pack, allowing torque to flow
through the input shaft into the driving discs, and
into the clutch plates and pressure plate that are
lugged to the clutch retainer. The waved spring is
used to cushion the application of the clutch pack.
The snap-ring is selective and used to adjust clutch
pack clearance.
When pressure is released from the piston, the
spring returns the piston to its fully released position
and disengages the clutch. The release spring also
helps to cushion the application of the clutch assem-
bly. When the clutch is in the process of being
released by the release spring, fluid flows through a
vent and one-way ball-check-valve located in the pis-
ton. The check-valve is needed to eliminate the pos-
sibility of plate drag caused by centrifugal force
acting on the residual fluid trapped in the clutch pis-
ton retainer.
Fig. 220 Installing Planetary Snap-Ring
1 - SNAP-RING PLIERS
2 - PLANETARY SNAP-RING
Fig. 221 Checking Planetary Geartrain End Play
1 - OUTPUT SHAFT
2 - REAR ANNULUS GEAR
3 - FEELER GAUGE
BR/BEAUTOMATIC TRANSMISSION - 46RE 21 - 203
PLANETARY GEARTRAIN/OUTPUT SHAFT (Continued)
Page 1657 of 2255
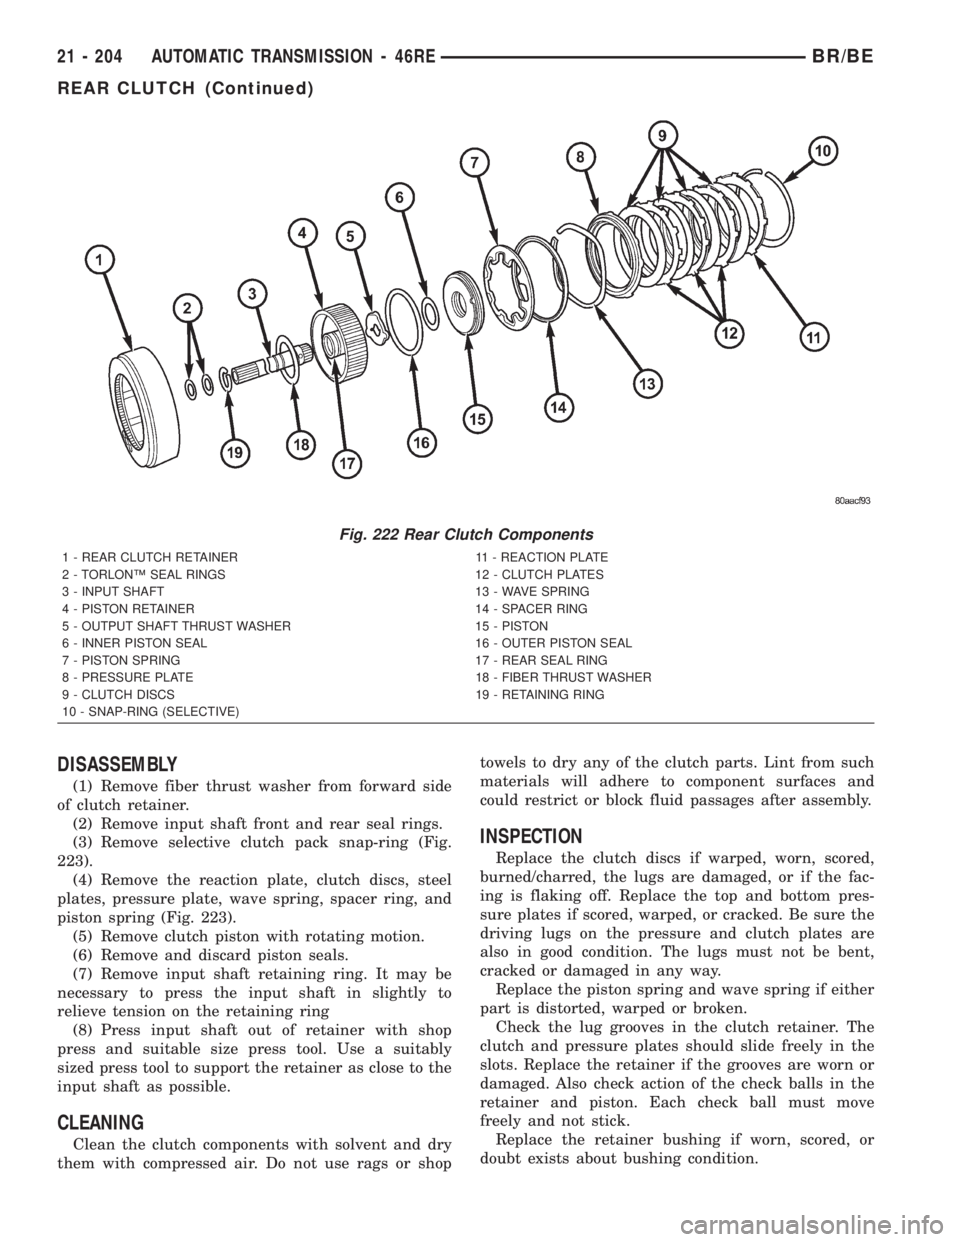
DISASSEMBLY
(1) Remove fiber thrust washer from forward side
of clutch retainer.
(2) Remove input shaft front and rear seal rings.
(3) Remove selective clutch pack snap-ring (Fig.
223).
(4) Remove the reaction plate, clutch discs, steel
plates, pressure plate, wave spring, spacer ring, and
piston spring (Fig. 223).
(5) Remove clutch piston with rotating motion.
(6) Remove and discard piston seals.
(7) Remove input shaft retaining ring. It may be
necessary to press the input shaft in slightly to
relieve tension on the retaining ring
(8) Press input shaft out of retainer with shop
press and suitable size press tool. Use a suitably
sized press tool to support the retainer as close to the
input shaft as possible.
CLEANING
Clean the clutch components with solvent and dry
them with compressed air. Do not use rags or shoptowels to dry any of the clutch parts. Lint from such
materials will adhere to component surfaces and
could restrict or block fluid passages after assembly.
INSPECTION
Replace the clutch discs if warped, worn, scored,
burned/charred, the lugs are damaged, or if the fac-
ing is flaking off. Replace the top and bottom pres-
sure plates if scored, warped, or cracked. Be sure the
driving lugs on the pressure and clutch plates are
also in good condition. The lugs must not be bent,
cracked or damaged in any way.
Replace the piston spring and wave spring if either
part is distorted, warped or broken.
Check the lug grooves in the clutch retainer. The
clutch and pressure plates should slide freely in the
slots. Replace the retainer if the grooves are worn or
damaged. Also check action of the check balls in the
retainer and piston. Each check ball must move
freely and not stick.
Replace the retainer bushing if worn, scored, or
doubt exists about bushing condition.
Fig. 222 Rear Clutch Components
1 - REAR CLUTCH RETAINER 11 - REACTION PLATE
2 - TORLONŸ SEAL RINGS 12 - CLUTCH PLATES
3 - INPUT SHAFT 13 - WAVE SPRING
4 - PISTON RETAINER 14 - SPACER RING
5 - OUTPUT SHAFT THRUST WASHER 15 - PISTON
6 - INNER PISTON SEAL 16 - OUTER PISTON SEAL
7 - PISTON SPRING 17 - REAR SEAL RING
8 - PRESSURE PLATE 18 - FIBER THRUST WASHER
9 - CLUTCH DISCS 19 - RETAINING RING
10 - SNAP-RING (SELECTIVE)
21 - 204 AUTOMATIC TRANSMISSION - 46REBR/BE
REAR CLUTCH (Continued)
Page 1658 of 2255
Inspect the piston and retainer seal surfaces for
nicks or scratches. Minor scratches can be removed
with crocus cloth. However, replace the piston and/or
retainer if the seal surfaces are seriously scored.
Check condition of the fiber thrust washer and
metal output shaft thrust washer. Replace either
washer if worn or damaged.
Check condition of the seal rings on the input shaft
and clutch retainer hub. Replace the seal rings only
if worn, distorted, or damaged. The input shaft front
seal ring is teflon with chamfered ends. The rear ring
is metal with interlocking ends.
Check the input shaft for wear, or damage. Replace
the shaft if worn, scored or damaged in any way.
ASSEMBLY
(1) Soak clutch discs in transmission fluid while
assembling other clutch parts.
(2) Install new seal rings on clutch retainer hub
and input shaft if necessary.
(a) Be sure clutch hub seal ring is fully seated in
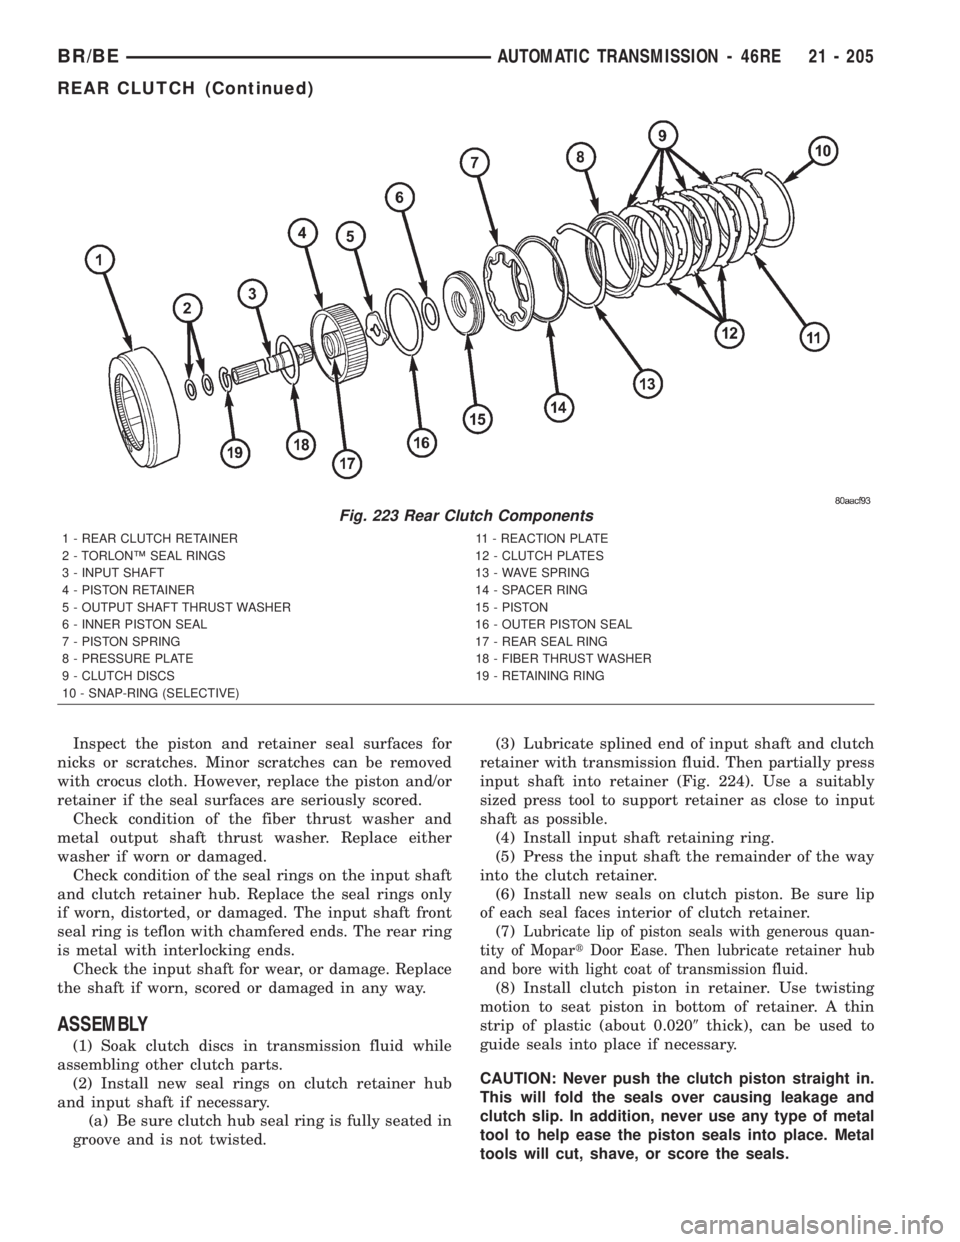
groove and is not twisted.(3) Lubricate splined end of input shaft and clutch
retainer with transmission fluid. Then partially press
input shaft into retainer (Fig. 224). Use a suitably
sized press tool to support retainer as close to input
shaft as possible.
(4) Install input shaft retaining ring.
(5) Press the input shaft the remainder of the way
into the clutch retainer.
(6) Install new seals on clutch piston. Be sure lip
of each seal faces interior of clutch retainer.
(7)
Lubricate lip of piston seals with generous quan-
tity of MopartDoor Ease. Then lubricate retainer hub
and bore with light coat of transmission fluid.
(8) Install clutch piston in retainer. Use twisting
motion to seat piston in bottom of retainer. A thin
strip of plastic (about 0.0209thick), can be used to
guide seals into place if necessary.
CAUTION: Never push the clutch piston straight in.
This will fold the seals over causing leakage and
clutch slip. In addition, never use any type of metal
tool to help ease the piston seals into place. Metal
tools will cut, shave, or score the seals.
Fig. 223 Rear Clutch Components
1 - REAR CLUTCH RETAINER 11 - REACTION PLATE
2 - TORLONŸ SEAL RINGS 12 - CLUTCH PLATES
3 - INPUT SHAFT 13 - WAVE SPRING
4 - PISTON RETAINER 14 - SPACER RING
5 - OUTPUT SHAFT THRUST WASHER 15 - PISTON
6 - INNER PISTON SEAL 16 - OUTER PISTON SEAL
7 - PISTON SPRING 17 - REAR SEAL RING
8 - PRESSURE PLATE 18 - FIBER THRUST WASHER
9 - CLUTCH DISCS 19 - RETAINING RING
10 - SNAP-RING (SELECTIVE)
BR/BEAUTOMATIC TRANSMISSION - 46RE 21 - 205
REAR CLUTCH (Continued)
Page 1660 of 2255

REAR SERVO
DESCRIPTION
The rear (low/reverse) servo consists of a single
stage or diameter piston and a spring loaded plug.
The spring is used to cushion the application of the
rear (low/reverse) band.
OPERATION
While in the de-energized state (no pressure
applied), the piston is held up in its bore by the pis-
ton spring. The plug is held down in its bore, in the
piston, by the plug spring. When pressure is applied
to the top of the piston, the plug is forced down in its
bore, taking up any clearance. As the piston moves, it
causes the plug spring to compress, and the piston
moves down over the plug. The piston continues to
move down until it hits the shoulder of the plug and
fully applies the band. The period of time from the
initial application, until the piston is against the
shoulder of the plug, represents a reduced shocking
of the band that cushions the shift.
DISASSEMBLY
(1) Remove small snap-ring and remove plug and
spring from servo piston (Fig. 227).
(2) Remove and discard servo piston seal ring.
CLEANING
Remove and discard the servo piston seal ring (Fig.
228). Then clean the servo components with solvent
and dry with compressed air. Replace either spring if
collapsed, distorted or broken. Replace the plug and
piston if cracked, bent, or worn. Discard the servo
snap-rings and use new ones at assembly.
ASSEMBLY
(1) Lubricate piston and guide seals (Fig. 229)
with petroleum jelly. Lubricate other servo parts with
MopartATF +4, type 9602, transmission fluid.
(2) Install new seal ring on servo piston.
(3) Assemble piston, plug, spring and new snap-
ring.
(4) Lubricate piston seal lip with petroleum jelly.
Fig. 227 Rear Servo Components
1 - SNAP-RING
2 - PISTON SEAL
3 - PISTON PLUG
4 - SPRING RETAINER
5 - SNAP-RING
6 - PISTON SPRING
7 - CUSHION SPRING
8 - PISTON
Fig. 228 Rear Servo Components
1 - SNAP-RING
2 - PISTON SEAL
3 - PISTON PLUG
4 - SPRING RETAINER
5 - SNAP-RING
6 - PISTON SPRING
7 - CUSHION SPRING
8 - PISTON
Fig. 229 Rear Servo Components
1 - SNAP-RING
2 - PISTON SEAL
3 - PISTON PLUG
4 - SPRING RETAINER
5 - SNAP-RING
6 - PISTON SPRING
7 - CUSHION SPRING
8 - PISTON
BR/BEAUTOMATIC TRANSMISSION - 46RE 21 - 207
Page 1661 of 2255
SHIFT MECHANISM
DESCRIPTION
The gear shift mechanism provides six shift posi-
tions which are:
²PARK (P)
²REVERSE (R)
²NEUTRAL (N)
²DRIVE (D)
²Manual SECOND (2)
²Manual LOW (1)
OPERATION
Manual LOW (1) range provides first gear only.
Overrun braking is also provided in this range. Man-
ual SECOND (2) range provides first and second gear
only.
DRIVE range provides first, second third and over-
drive fourth gear ranges. The shift into overdrive
fourth gear range occurs only after the transmission
has completed the shift into D third gear range. No
further movement of the shift mechanism is required
to complete the 3-4 shift.
The fourth gear upshift occurs automatically when
the overdrive selector switch is in the ON position.
No upshift to fourth gear will occur if any of the fol-
lowing are true:
²The transmission fluid temperature is below 10É
C (50É F) or above 121É C (250É F).
²The shift to third is not yet complete.
²Vehicle speed is too low for the 3-4 shift to occur.
²Battery temperature is below -5É C (23É F).
ADJUSTMENTS
ADJUSTMENT
Check linkage adjustment by starting engine in
PARK and NEUTRAL. Adjustment is acceptable if
the engine starts in only these two positions. Adjust-
ment is incorrect if the engine starts in one position
but not both positions
If the engine starts in any other position, or if the
engine will not start in any position, the park/neutral
switch is probably faulty.
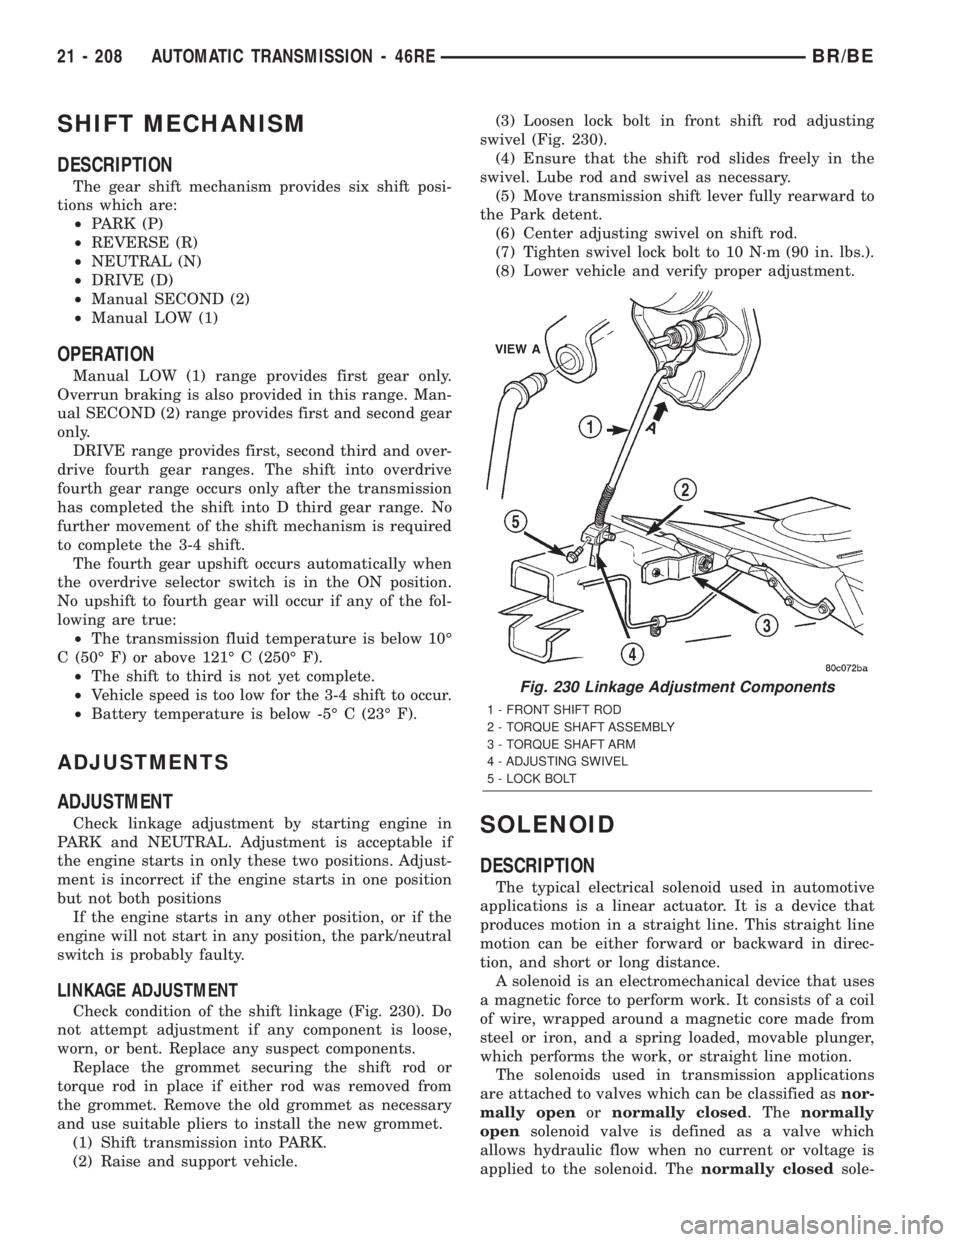
LINKAGE ADJUSTMENT
Check condition of the shift linkage (Fig. 230). Do
not attempt adjustment if any component is loose,
worn, or bent. Replace any suspect components.
Replace the grommet securing the shift rod or
torque rod in place if either rod was removed from
the grommet. Remove the old grommet as necessary
and use suitable pliers to install the new grommet.
(1) Shift transmission into PARK.
(2) Raise and support vehicle.(3) Loosen lock bolt in front shift rod adjusting
swivel (Fig. 230).
(4) Ensure that the shift rod slides freely in the
swivel. Lube rod and swivel as necessary.
(5) Move transmission shift lever fully rearward to
the Park detent.
(6) Center adjusting swivel on shift rod.
(7) Tighten swivel lock bolt to 10 N´m (90 in. lbs.).
(8) Lower vehicle and verify proper adjustment.
SOLENOID
DESCRIPTION
The typical electrical solenoid used in automotive
applications is a linear actuator. It is a device that
produces motion in a straight line. This straight line
motion can be either forward or backward in direc-
tion, and short or long distance.
A solenoid is an electromechanical device that uses
a magnetic force to perform work. It consists of a coil
of wire, wrapped around a magnetic core made from
steel or iron, and a spring loaded, movable plunger,
which performs the work, or straight line motion.
The solenoids used in transmission applications
are attached to valves which can be classified asnor-
mally openornormally closed. Thenormally
opensolenoid valve is defined as a valve which
allows hydraulic flow when no current or voltage is
applied to the solenoid. Thenormally closedsole-
Fig. 230 Linkage Adjustment Components
1 - FRONT SHIFT ROD
2 - TORQUE SHAFT ASSEMBLY
3 - TORQUE SHAFT ARM
4 - ADJUSTING SWIVEL
5 - LOCK BOLT
21 - 208 AUTOMATIC TRANSMISSION - 46REBR/BE