fog light bulb DODGE RAM 2002 Service Repair Manual
[x] Cancel search | Manufacturer: DODGE, Model Year: 2002, Model line: RAM, Model: DODGE RAM 2002Pages: 2255, PDF Size: 62.07 MB
Page 519 of 2255
(9) Disconnect the instrument panel wire harness
connector for the multi-function switch from the
switch connector receptacle. Check for continuity
between the hazard flasher signal circuit cavities in
the JB receptacle for the combination flasher and the
instrument panel wire harness connector for the
multi-function switch. There should be continuity. If
OK, go to Step 10. If not OK, repair the open hazard
flasher signal circuit between the JB and the multi-
function switch as required.
(10) Check for continuity between the flasher out-
put circuit cavities of the JB receptacle for the com-
bination flasher and in the instrument panel wire
harness connector for the multi-function switch.
There should be continuity. If OK, test the multi-
function switch. (Refer to 8 - ELECTRICAL/LAMPS/
LIGHTING - EXTERIOR/MULTI-FUNCTION
SWITCH - DIAGNOSIS AND TESTING). If not OK,
repair the open flasher output circuit between the JB
and the multi-function switch as required.
SPECIFICATIONS
EXTERIOR LAMPS
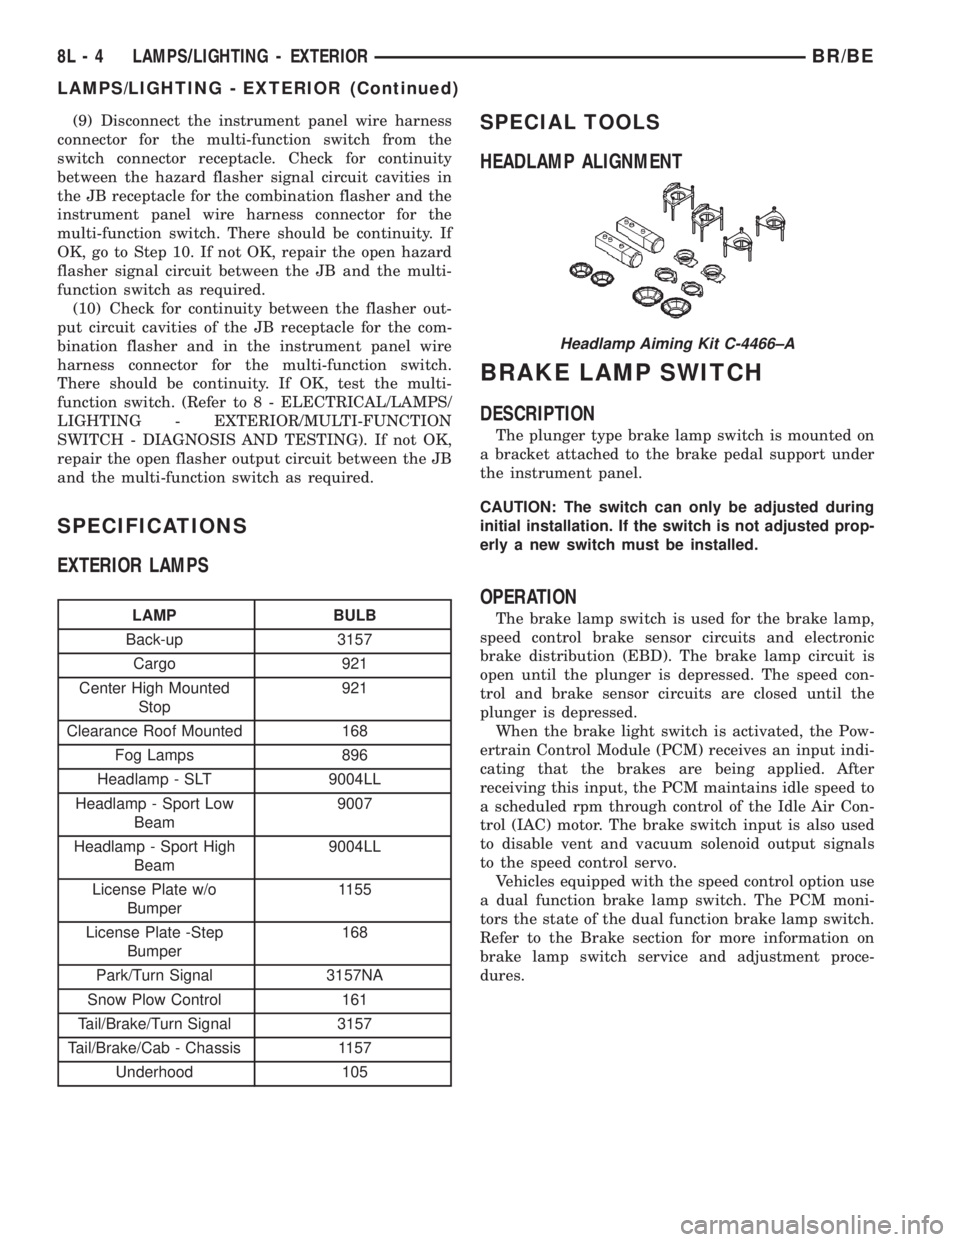
LAMP BULB
Back-up 3157
Cargo 921
Center High Mounted
Stop921
Clearance Roof Mounted 168
Fog Lamps 896
Headlamp - SLT 9004LL
Headlamp - Sport Low
Beam9007
Headlamp - Sport High
Beam9004LL
License Plate w/o
Bumper1155
License Plate -Step
Bumper168
Park/Turn Signal 3157NA
Snow Plow Control 161
Tail/Brake/Turn Signal 3157
Tail/Brake/Cab - Chassis 1157
Underhood 105
SPECIAL TOOLS
HEADLAMP ALIGNMENT
BRAKE LAMP SWITCH
DESCRIPTION
The plunger type brake lamp switch is mounted on
a bracket attached to the brake pedal support under
the instrument panel.
CAUTION: The switch can only be adjusted during
initial installation. If the switch is not adjusted prop-
erly a new switch must be installed.
OPERATION
The brake lamp switch is used for the brake lamp,
speed control brake sensor circuits and electronic
brake distribution (EBD). The brake lamp circuit is
open until the plunger is depressed. The speed con-
trol and brake sensor circuits are closed until the
plunger is depressed.
When the brake light switch is activated, the Pow-
ertrain Control Module (PCM) receives an input indi-
cating that the brakes are being applied. After
receiving this input, the PCM maintains idle speed to
a scheduled rpm through control of the Idle Air Con-
trol (IAC) motor. The brake switch input is also used
to disable vent and vacuum solenoid output signals
to the speed control servo.
Vehicles equipped with the speed control option use
a dual function brake lamp switch. The PCM moni-
tors the state of the dual function brake lamp switch.
Refer to the Brake section for more information on
brake lamp switch service and adjustment proce-
dures.
Headlamp Aiming Kit C-4466±A
8L - 4 LAMPS/LIGHTING - EXTERIORBR/BE
LAMPS/LIGHTING - EXTERIOR (Continued)
Page 525 of 2255
FOG LAMP
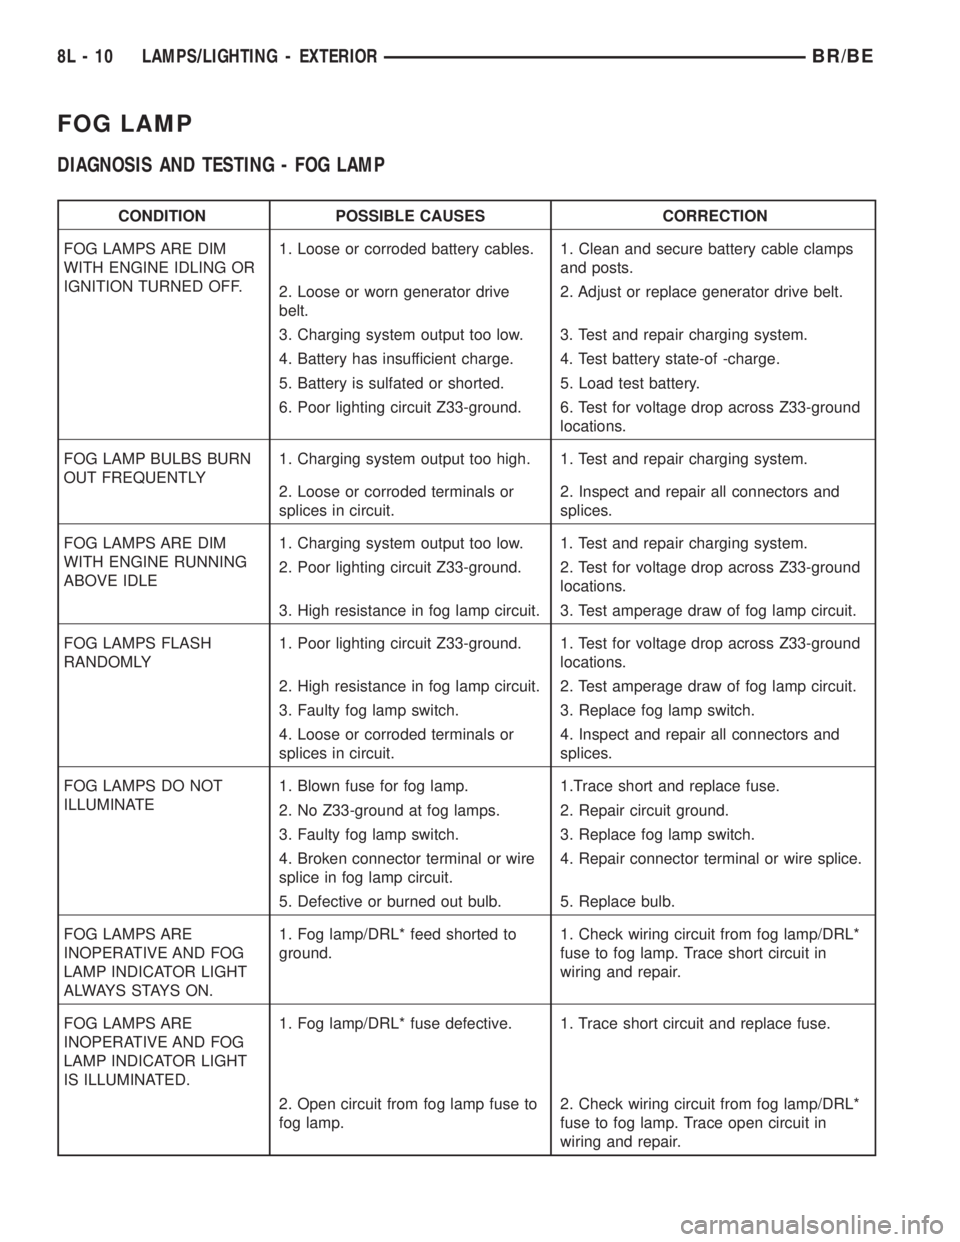
DIAGNOSIS AND TESTING - FOG LAMP
CONDITION POSSIBLE CAUSES CORRECTION
FOG LAMPS ARE DIM
WITH ENGINE IDLING OR
IGNITION TURNED OFF.1. Loose or corroded battery cables. 1. Clean and secure battery cable clamps
and posts.
2. Loose or worn generator drive
belt.2. Adjust or replace generator drive belt.
3. Charging system output too low. 3. Test and repair charging system.
4. Battery has insufficient charge. 4. Test battery state-of -charge.
5. Battery is sulfated or shorted. 5. Load test battery.
6. Poor lighting circuit Z33-ground. 6. Test for voltage drop across Z33-ground
locations.
FOG LAMP BULBS BURN
OUT FREQUENTLY1. Charging system output too high. 1. Test and repair charging system.
2. Loose or corroded terminals or
splices in circuit.2. Inspect and repair all connectors and
splices.
FOG LAMPS ARE DIM
WITH ENGINE RUNNING
ABOVE IDLE1. Charging system output too low. 1. Test and repair charging system.
2. Poor lighting circuit Z33-ground. 2. Test for voltage drop across Z33-ground
locations.
3. High resistance in fog lamp circuit. 3. Test amperage draw of fog lamp circuit.
FOG LAMPS FLASH
RANDOMLY1. Poor lighting circuit Z33-ground. 1. Test for voltage drop across Z33-ground
locations.
2. High resistance in fog lamp circuit. 2. Test amperage draw of fog lamp circuit.
3. Faulty fog lamp switch. 3. Replace fog lamp switch.
4. Loose or corroded terminals or
splices in circuit.4. Inspect and repair all connectors and
splices.
FOG LAMPS DO NOT
ILLUMINATE1. Blown fuse for fog lamp. 1.Trace short and replace fuse.
2. No Z33-ground at fog lamps. 2. Repair circuit ground.
3. Faulty fog lamp switch. 3. Replace fog lamp switch.
4. Broken connector terminal or wire
splice in fog lamp circuit.4. Repair connector terminal or wire splice.
5. Defective or burned out bulb. 5. Replace bulb.
FOG LAMPS ARE
INOPERATIVE AND FOG
LAMP INDICATOR LIGHT
ALWAYS STAYS ON.1. Fog lamp/DRL* feed shorted to
ground.1. Check wiring circuit from fog lamp/DRL*
fuse to fog lamp. Trace short circuit in
wiring and repair.
FOG LAMPS ARE
INOPERATIVE AND FOG
LAMP INDICATOR LIGHT
IS ILLUMINATED.1. Fog lamp/DRL* fuse defective. 1. Trace short circuit and replace fuse.
2. Open circuit from fog lamp fuse to
fog lamp.2. Check wiring circuit from fog lamp/DRL*
fuse to fog lamp. Trace open circuit in
wiring and repair.
8L - 10 LAMPS/LIGHTING - EXTERIORBR/BE
Page 526 of 2255
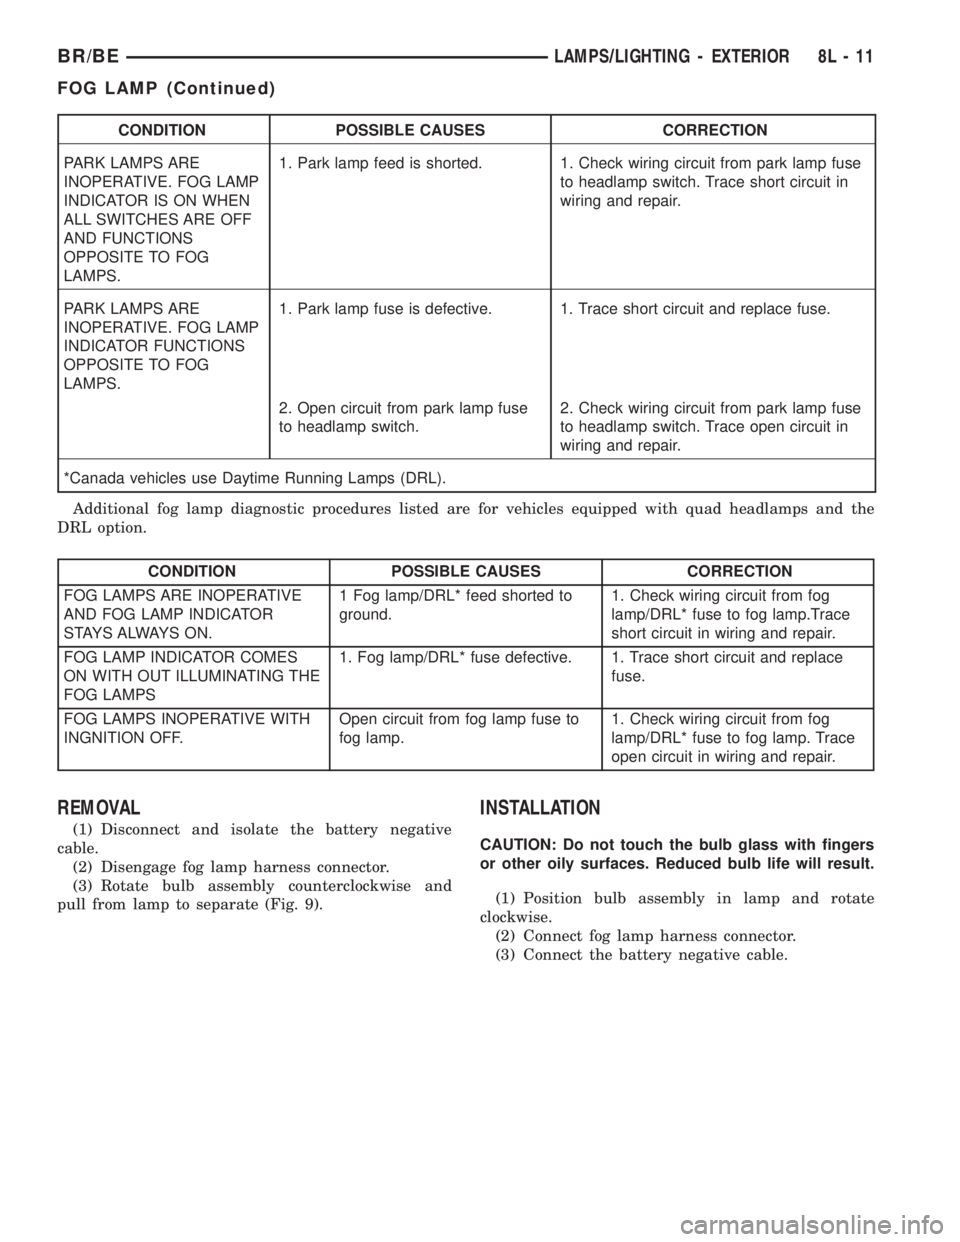
CONDITION POSSIBLE CAUSES CORRECTION
PARK LAMPS ARE
INOPERATIVE. FOG LAMP
INDICATOR IS ON WHEN
ALL SWITCHES ARE OFF
AND FUNCTIONS
OPPOSITE TO FOG
LAMPS.1. Park lamp feed is shorted. 1. Check wiring circuit from park lamp fuse
to headlamp switch. Trace short circuit in
wiring and repair.
PARK LAMPS ARE
INOPERATIVE. FOG LAMP
INDICATOR FUNCTIONS
OPPOSITE TO FOG
LAMPS.1. Park lamp fuse is defective. 1. Trace short circuit and replace fuse.
2. Open circuit from park lamp fuse
to headlamp switch.2. Check wiring circuit from park lamp fuse
to headlamp switch. Trace open circuit in
wiring and repair.
*Canada vehicles use Daytime Running Lamps (DRL).
Additional fog lamp diagnostic procedures listed are for vehicles equipped with quad headlamps and the
DRL option.
CONDITION POSSIBLE CAUSES CORRECTION
FOG LAMPS ARE INOPERATIVE
AND FOG LAMP INDICATOR
S TAY S A LWAY S O N .1 Fog lamp/DRL* feed shorted to
ground.1. Check wiring circuit from fog
lamp/DRL* fuse to fog lamp.Trace
short circuit in wiring and repair.
FOG LAMP INDICATOR COMES
ON WITH OUT ILLUMINATING THE
FOG LAMPS1. Fog lamp/DRL* fuse defective. 1. Trace short circuit and replace
fuse.
FOG LAMPS INOPERATIVE WITH
INGNITION OFF.Open circuit from fog lamp fuse to
fog lamp.1. Check wiring circuit from fog
lamp/DRL* fuse to fog lamp. Trace
open circuit in wiring and repair.
REMOVAL
(1) Disconnect and isolate the battery negative
cable.
(2) Disengage fog lamp harness connector.
(3) Rotate bulb assembly counterclockwise and
pull from lamp to separate (Fig. 9).
INSTALLATION
CAUTION: Do not touch the bulb glass with fingers
or other oily surfaces. Reduced bulb life will result.
(1) Position bulb assembly in lamp and rotate
clockwise.
(2) Connect fog lamp harness connector.
(3) Connect the battery negative cable.
BR/BELAMPS/LIGHTING - EXTERIOR 8L - 11
FOG LAMP (Continued)
Page 527 of 2255
FOG LAMP UNIT
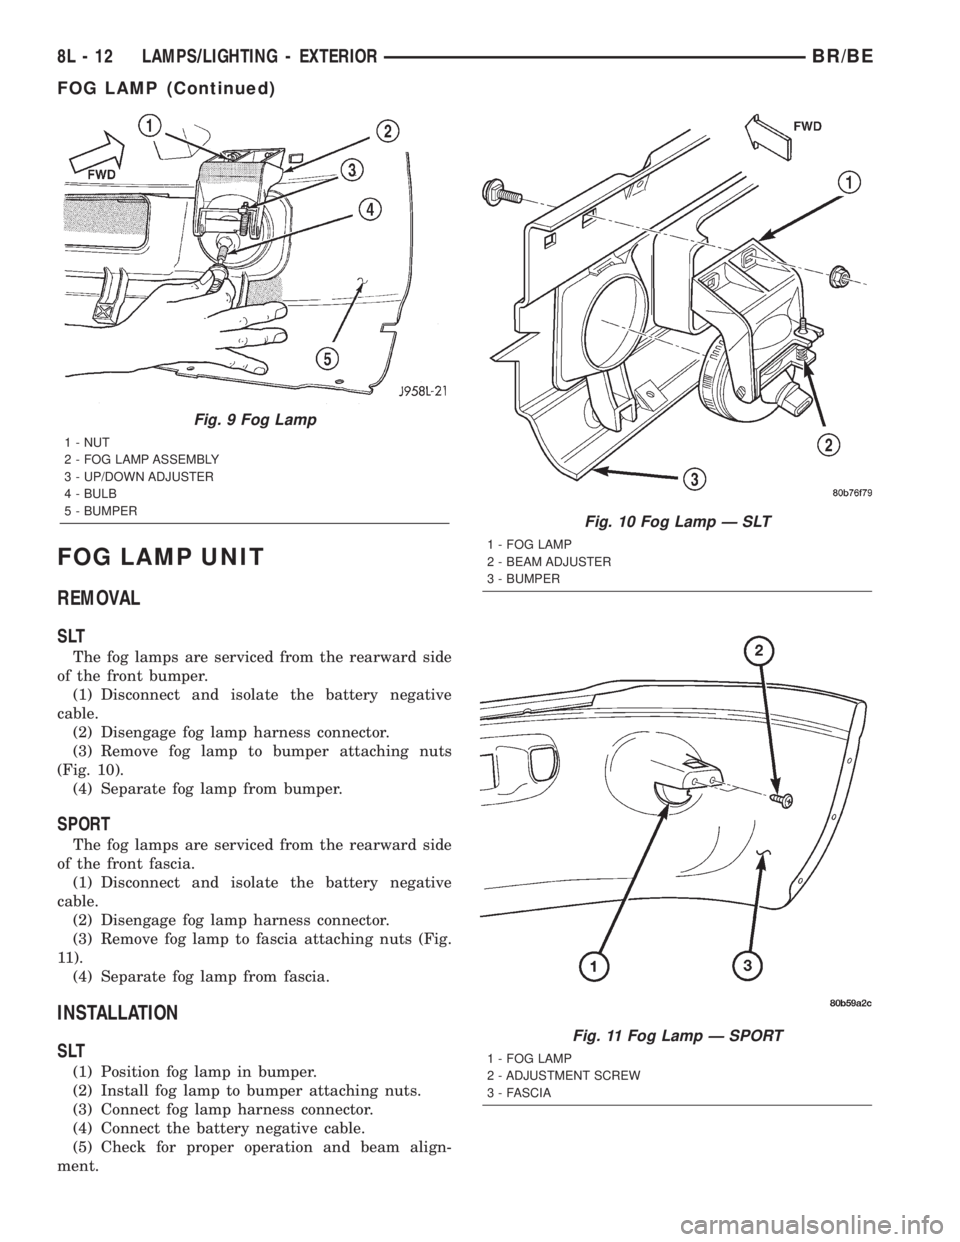
REMOVAL
SLT
The fog lamps are serviced from the rearward side
of the front bumper.
(1) Disconnect and isolate the battery negative
cable.
(2) Disengage fog lamp harness connector.
(3) Remove fog lamp to bumper attaching nuts
(Fig. 10).
(4) Separate fog lamp from bumper.
SPORT
The fog lamps are serviced from the rearward side
of the front fascia.
(1) Disconnect and isolate the battery negative
cable.
(2) Disengage fog lamp harness connector.
(3) Remove fog lamp to fascia attaching nuts (Fig.
11).
(4) Separate fog lamp from fascia.
INSTALLATION
SLT
(1) Position fog lamp in bumper.
(2) Install fog lamp to bumper attaching nuts.
(3) Connect fog lamp harness connector.
(4) Connect the battery negative cable.
(5) Check for proper operation and beam align-
ment.
Fig. 9 Fog Lamp
1 - NUT
2 - FOG LAMP ASSEMBLY
3 - UP/DOWN ADJUSTER
4 - BULB
5 - BUMPER
Fig. 10 Fog Lamp Ð SLT
1 - FOG LAMP
2 - BEAM ADJUSTER
3 - BUMPER
Fig. 11 Fog Lamp Ð SPORT
1 - FOG LAMP
2 - ADJUSTMENT SCREW
3 - FASCIA
8L - 12 LAMPS/LIGHTING - EXTERIORBR/BE
FOG LAMP (Continued)
Page 528 of 2255
SPORT
(1) Position fog lamp in fascia.
(2) Install screws attaching fog lamp to fascia.
(3) Connect wire connector to fog lamp.
(4) Connect the battery negative cable.
(5) Check for proper operation and beam align-
ment.
ADJUSTMENTS
Prepare an alignment screen. (Refer to 8 - ELEC-
TRICAL/LAMPS/LIGHTING - EXTERIOR/HEAD-
LAMP UNIT - ADJUSTMENTS)
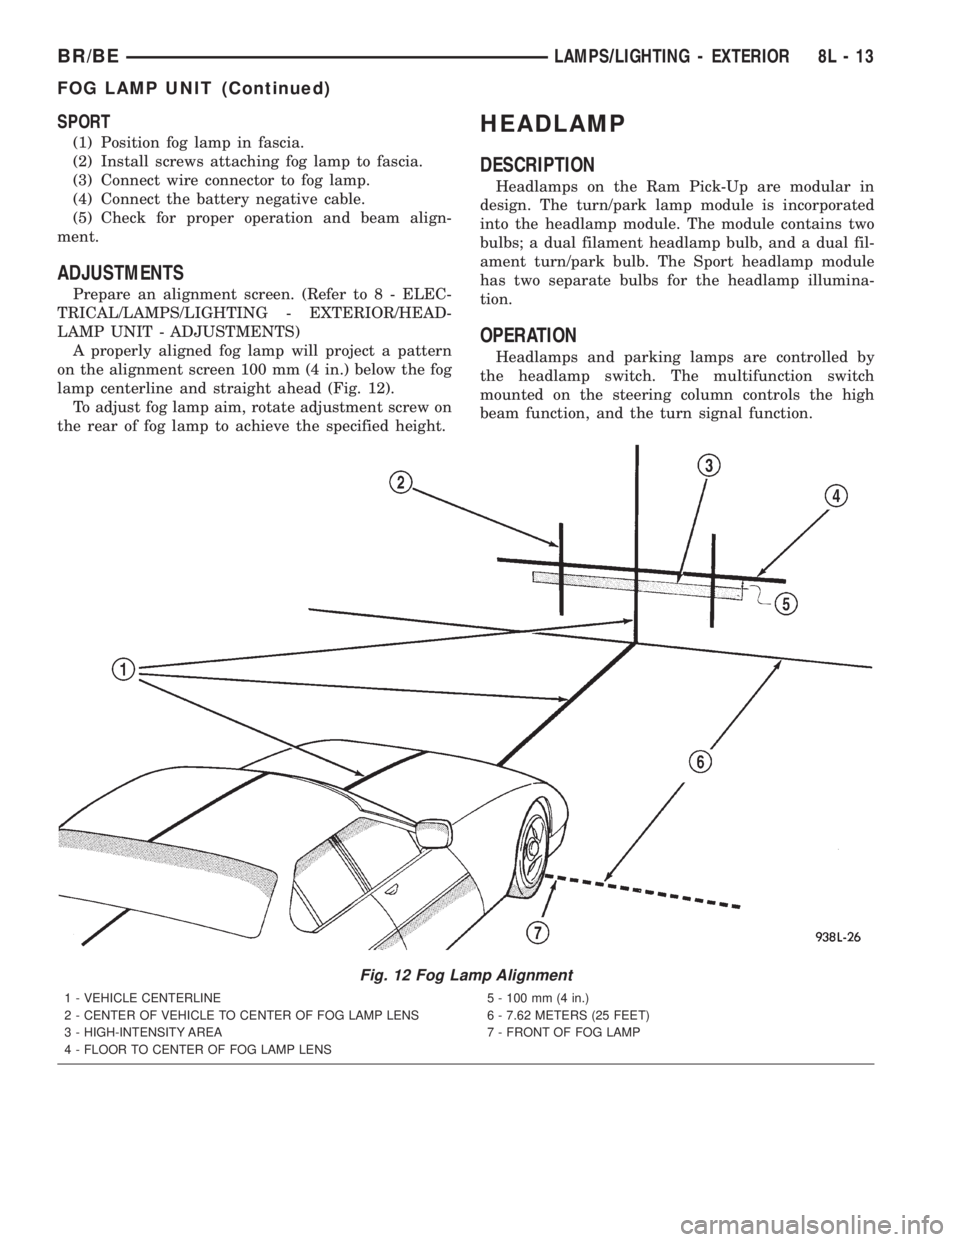
A properly aligned fog lamp will project a pattern
on the alignment screen 100 mm (4 in.) below the fog
lamp centerline and straight ahead (Fig. 12).
To adjust fog lamp aim, rotate adjustment screw on
the rear of fog lamp to achieve the specified height.
HEADLAMP
DESCRIPTION
Headlamps on the Ram Pick-Up are modular in
design. The turn/park lamp module is incorporated
into the headlamp module. The module contains two
bulbs; a dual filament headlamp bulb, and a dual fil-
ament turn/park bulb. The Sport headlamp module
has two separate bulbs for the headlamp illumina-
tion.
OPERATION
Headlamps and parking lamps are controlled by
the headlamp switch. The multifunction switch
mounted on the steering column controls the high
beam function, and the turn signal function.
Fig. 12 Fog Lamp Alignment
1 - VEHICLE CENTERLINE
2 - CENTER OF VEHICLE TO CENTER OF FOG LAMP LENS
3 - HIGH-INTENSITY AREA
4 - FLOOR TO CENTER OF FOG LAMP LENS5 - 100 mm (4 in.)
6 - 7.62 METERS (25 FEET)
7 - FRONT OF FOG LAMP
BR/BELAMPS/LIGHTING - EXTERIOR 8L - 13
FOG LAMP UNIT (Continued)