child lock DODGE RAM 2003 Service Repair Manual
[x] Cancel search | Manufacturer: DODGE, Model Year: 2003, Model line: RAM, Model: DODGE RAM 2003Pages: 2895, PDF Size: 83.15 MB
Page 16 of 2895
SPECIALIZED LUBRICANTS AND OILS
Some maintenance or repair procedures may
require the use of specialized lubricants or oils. Con-
sult the appropriate sections in this manual for the
correct application of these lubricants.
DESCRIPTION - POWER STEERING FLUID
MopartATF +4, Automatic Transmission Fluid is
required in the power steering system. Substitute
fluids can induce power steering system failure.
MopartATF +4, Automatic Transmission Fluid
when new is red in color. The ATF is dyed red so it
can be identified from other fluids used in the vehicle
such as engine oil or antifreeze. The red color is not
permanent and is not an indicator of fluid condition.
As the vehicle is driven, the ATF will begin to look
darker in color and may eventually become brown.
This is normal.ATF+4 also has a unique odor that
may change with age. Consequently, odor and color
cannot be used to indicate the fluid condition or the
need for a fluid change.
DESCRIPTION - ENGINE COOLANT
WARNING: ANTIFREEZE IS AN ETHYLENE GLYCOL
BASE COOLANT AND IS HARMFUL IF SWAL-
LOWED OR INHALED. IF SWALLOWED, DRINK
TWO GLASSES OF WATER AND INDUCE VOMIT-
ING. IF INHALED, MOVE TO FRESH AIR AREA.
SEEK MEDICAL ATTENTION IMMEDIATELY. DO NOT
STORE IN OPEN OR UNMARKED CONTAINERS.
WASH SKIN AND CLOTHING THOROUGHLY AFTER
COMING IN CONTACT WITH ETHYLENE GLYCOL.
KEEP OUT OF REACH OF CHILDREN. DISPOSE OF
GLYCOL BASE COOLANT PROPERLY, CONTACT
YOUR DEALER OR GOVERNMENT AGENCY FOR
LOCATION OF COLLECTION CENTER IN YOUR
AREA. DO NOT OPEN A COOLING SYSTEM WHEN
THE ENGINE IS AT OPERATING TEMPERATURE OR
HOT UNDER PRESSURE, PERSONAL INJURY CAN
RESULT. AVOID RADIATOR COOLING FAN WHENENGINE COMPARTMENT RELATED SERVICE IS
PERFORMED, PERSONAL INJURY CAN RESULT.
CAUTION: Use of Propylene Glycol based coolants
is not recommended, as they provide less freeze
protection and less corrosion protection.
The cooling system is designed around the coolant.
The coolant must accept heat from engine metal, in
the cylinder head area near the exhaust valves and
engine block. Then coolant carries the heat to the
radiator where the tube/fin radiator can transfer the
heat to the air.
The use of aluminum cylinder blocks, cylinder
heads, and water pumps requires special corrosion
protection. MopartAntifreeze/Coolant, 5
Year/100,000 Mile Formula (MS-9769), or the equiva-
lent ethylene glycol base coolant with organic corro-
sion inhibitors (called HOAT, for Hybrid Organic
Additive Technology) is recommended. This coolant
offers the best engine cooling without corrosion when
mixed with 50% Ethylene Glycol and 50% distilled
water to obtain a freeze point of -37ÉC (-35ÉF). If it
loses color or becomes contaminated, drain, flush,
and replace with fresh properly mixed coolant solu-
tion.
CAUTION: MoparTAntifreeze/Coolant, 5
Year/100,000 Mile Formula (MS-9769) may not be
mixed with any other type of antifreeze. Mixing of
coolants other than specified (non-HOAT or other
HOAT), may result in engine damage that may not
be covered under the new vehicle warranty, and
decreased corrosion protection.
COOLANT PERFORMANCE
The required ethylene-glycol (antifreeze) and water
mixture depends upon climate and vehicle operating
conditions. The coolant performance of various mix-
tures follows:
Pure Water-Water can absorb more heat than a
mixture of water and ethylene-glycol. This is for pur-
pose of heat transfer only. Water also freezes at a
higher temperature and allows corrosion.
100 percent Ethylene-Glycol-The corrosion
inhibiting additives in ethylene-glycol need the pres-
ence of water to dissolve. Without water, additives
form deposits in system. These act as insulation
causing temperature to rise to as high as 149ÉC
(300ÉF). This temperature is hot enough to melt plas-
tic and soften solder. The increased temperature can
result in engine detonation. In addition, 100 percent
ethylene-glycol freezes at -22ÉC (-8ÉF).
50/50 Ethylene-Glycol and Water-Is the recom-
mended mixture, it provides protection against freez-
ing to -37ÉC (-34ÉF). The antifreeze concentration
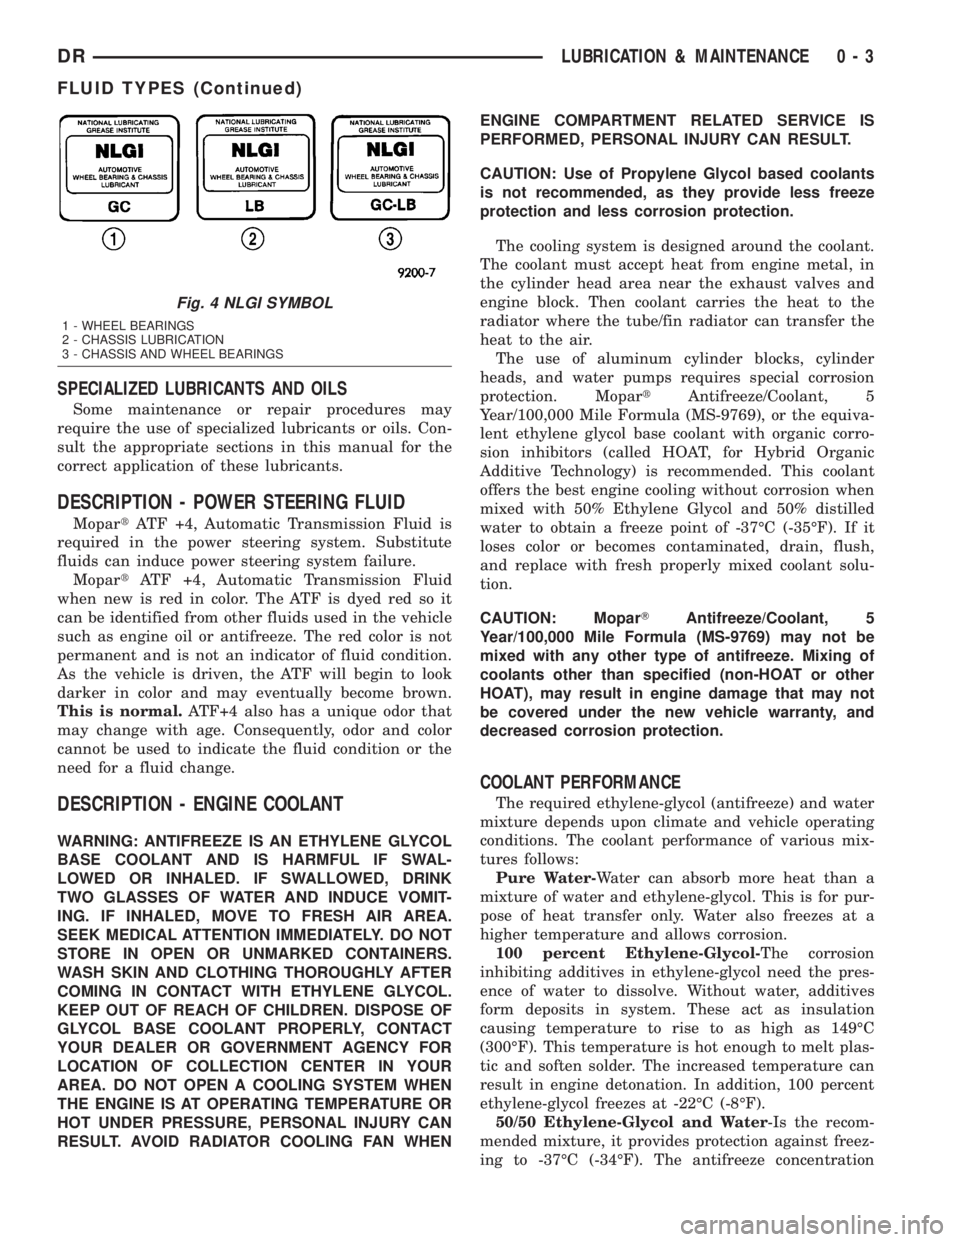
Fig. 4 NLGI SYMBOL
1 - WHEEL BEARINGS
2 - CHASSIS LUBRICATION
3 - CHASSIS AND WHEEL BEARINGS
DRLUBRICATION & MAINTENANCE 0 - 3
FLUID TYPES (Continued)
Page 324 of 2895
components. Also, once ethylene-glycol and propy-
lene-glycol based coolants are mixed in the vehicle,
conventional methods of determining freeze point will
not be accurate. Both the refractive index and spe-
cific gravity differ between ethylene glycol and propy-
lene glycol.
DESCRIPTION - HOAT COOLANT
WARNING: ANTIFREEZE IS AN ETHYLENE-GLYCOL
BASE COOLANT AND IS HARMFUL IF SWAL-
LOWED OR INHALED. IF SWALLOWED, DRINK
TWO GLASSES OF WATER AND INDUCE VOMIT-
ING. IF INHALED, MOVE TO FRESH AIR AREA.
SEEK MEDICAL ATTENTION IMMEDIATELY. DO NOT
STORE IN OPEN OR UNMARKED CONTAINERS.
WASH SKIN AND CLOTHING THOROUGHLY AFTER
COMING IN CONTACT WITH ETHYLENE-GLYCOL.
KEEP OUT OF REACH OF CHILDREN. DISPOSE OF
GLYCOL BASE COOLANT PROPERLY, CONTACT
YOUR DEALER OR GOVERNMENT AGENCY FOR
LOCATION OF COLLECTION CENTER IN YOUR
AREA. DO NOT OPEN A COOLING SYSTEM WHEN
THE ENGINE IS AT OPERATING TEMPERATURE OR
HOT UNDER PRESSURE, PERSONAL INJURY CAN
RESULT. AVOID RADIATOR COOLING FAN WHEN
ENGINE COMPARTMENT RELATED SERVICE IS
PERFORMED, PERSONAL INJURY CAN RESULT.
CAUTION: Use of Propylene-Glycol based coolants
is not recommended, as they provide less freeze
protection and less corrosion protection.
The cooling system is designed around the coolant.
The coolant must accept heat from engine metal, in
the cylinder head area near the exhaust valves and
engine block. Then coolant carries the heat to the
radiator where the tube/fin radiator can transfer the
heat to the air.
The use of aluminum cylinder blocks, cylinder
heads, and water pumps requires special corrosion
protection. MopartAntifreeze/Coolant, 5
Year/100,000 Mile Formula (MS-9769), or the equiva-
lent ethylene-glycol base coolant with organic corro-
sion inhibitors (called HOAT, for Hybrid Organic
Additive Technology) is recommended. This coolant
offers the best engine cooling without corrosion when
mixed with 50% ethylene-glycol and 50% distilled
water to obtain a freeze point of -37ÉC (-35ÉF). If it
loses color or becomes contaminated, drain, flush,
and replace with fresh properly mixed coolant solu-
tion.
CAUTION: MoparTAntifreeze/Coolant, 5
Year/100,000 Mile Formula (MS-9769) may not be
mixed with any other type of antifreeze. Mixing ofcoolants other than specified (non-HOAT or other
HOAT), may result in engine damage that may not
be covered under the new vehicle warranty, and
decreased corrosion protection.
COOLANT PERFORMANCE
The required ethylene-glycol (antifreeze) and water
mixture depends upon climate and vehicle operating
conditions. The coolant performance of various mix-
tures follows:
Pure Water-Water can absorb more heat than a
mixture of water and ethylene-glycol. This is for pur-
pose of heat transfer only. Water also freezes at a
higher temperature and allows corrosion.
100 percent Ethylene-Glycol-The corrosion
inhibiting additives in ethylene-glycol need the pres-
ence of water to dissolve. Without water, additives
form deposits in system. These act as insulation
causing temperature to rise to as high as 149ÉC
(300ÉF). This temperature is hot enough to melt plas-
tic and soften solder. The increased temperature can
result in engine detonation. In addition, 100 percent
ethylene-glycol freezes at -22ÉC (-8ÉF).
50/50 Ethylene-Glycol and Water-Is the recom-
mended mixture, it provides protection against freez-
ing to -37ÉC (-34ÉF). The antifreeze concentration
must alwaysbe a minimum of 44 percent, year-
round in all climates. If percentage is lower, engine
parts may be eroded by cavitation. Maximum protec-
tion against freezing is provided with a 68 percent
antifreeze concentration, which prevents freezing
down to -67.7ÉC (-90ÉF). A higher percentage will
freeze at a warmer temperature. Also, a higher per-
centage of antifreeze can cause the engine to over-
heat because specific heat of antifreeze is lower than
that of water.
CAUTION: Richer antifreeze mixtures cannot be
measured with normal field equipment and can
cause problems associated with 100 percent ethyl-
ene-glycol.
COOLANT SELECTION AND ADDITIVES
The use of aluminum cylinder blocks, cylinder
heads and water pumps requires special corrosion
protection. Only MopartAntifreeze/Coolant, 5
Year/100,000 Mile Formula (glycol base coolant with
corrosion inhibitors called HOAT, for Hybrid Organic
Additive Technology) is recommended. This coolant
offers the best engine cooling without corrosion when
mixed with 50% distilled water to obtain to obtain a
freeze point of -37ÉC (-35ÉF). If it loses color or
becomes contaminated, drain, flush, and replace with
fresh properly mixed coolant solution.
DRENGINE 7 - 37
COOLANT (Continued)
Page 602 of 2895
RESTRAINTS
TABLE OF CONTENTS
page page
RESTRAINTS
DESCRIPTION..........................2
OPERATION............................4
WARNING
WARNINGS - RESTRAINT SYSTEM........5
DIAGNOSIS AND TESTING - SUPPLEMENTAL
RESTRAINT SYSTEM...................6
STANDARD PROCEDURE
STANDARD PROCEDURE - HANDLING
NON-DEPLOYED SUPPLEMENTAL
RESTRAINTS.........................6
STANDARD PROCEDURE - SERVICE
AFTER A SUPPLEMENTAL RESTRAINT
DEPLOYMENT.........................7
STANDARD PROCEDURE - VERIFICATION
TEST................................8
ACM COVER
REMOVAL.............................9
INSTALLATION..........................9
AIRBAG CONTROL MODULE
DESCRIPTION.........................10
OPERATION...........................10
REMOVAL.............................11
INSTALLATION.........................12
AUTOMATIC LOCKING RETRACTOR
DESCRIPTION.........................13
OPERATION...........................14
CHILD RESTRAINT ANCHOR
DESCRIPTION.........................14
OPERATION...........................16
REMOVAL.............................16
INSTALLATION.........................17
CLOCKSPRING
DESCRIPTION.........................18
OPERATION...........................18
STANDARD PROCEDURE - CLOCKSPRING
CENTERING.........................19
REMOVAL.............................20
INSTALLATION.........................21
DRIVER AIRBAG
DESCRIPTION.........................22
OPERATION...........................23
REMOVAL.............................23
INSTALLATION.........................24
FRONT CENTER SEAT BELT & RETRACTOR
REMOVAL.............................25
INSTALLATION.........................26
FRONT CENTER SEAT BELT
REMOVAL.............................26INSTALLATION.........................27
FRONT OUTBOARD SEAT BELT &
RETRACTOR
REMOVAL
REMOVAL - STANDARD CAB............28
REMOVAL - QUAD CAB................29
INSTALLATION
INSTALLATION - STANDARD CAB.........31
INSTALLATION - QUAD CAB.............32
FRONT OUTBOARD SEAT BELT BUCKLE
REMOVAL.............................33
INSTALLATION.........................34
PASSENGER AIRBAG
DESCRIPTION.........................34
OPERATION...........................35
REMOVAL.............................35
INSTALLATION.........................37
PASSENGER AIRBAG ON/OFF SWITCH
DESCRIPTION.........................38
OPERATION...........................38
REMOVAL.............................39
INSTALLATION.........................39
REAR CENTER SEAT BELT & RETRACTOR
REMOVAL.............................39
INSTALLATION.........................40
REAR OUTBOARD SEAT BELT & RETRACTOR
REMOVAL.............................41
INSTALLATION.........................42
REAR SEAT BELT BUCKLE
REMOVAL
REMOVAL - CENTER & LEFT OUTBOARD . . 43
REMOVAL - CENTER ANCHOR & RIGHT
OUTBOARD..........................43
INSTALLATION
INSTALLATION - CENTER & LEFT
OUTBOARD..........................45
INSTALLATION - CENTER ANCHOR &
RIGHT OUTBOARD....................45
SEAT BELT SWITCH
DESCRIPTION.........................46
OPERATION...........................46
DIAGNOSIS AND TESTING - SEAT BELT
SWITCH............................47
SEAT BELT TENSIONER
DESCRIPTION.........................47
OPERATION...........................48
SEAT BELT TENSION REDUCER
DESCRIPTION.........................48
OPERATION...........................49
DRRESTRAINTS 8O - 1
Page 603 of 2895
DIAGNOSIS AND TESTING - SEAT BELT
TENSION REDUCER...................49
SEAT BELT TURNING LOOP ADJUSTER
REMOVAL.............................50
INSTALLATION.........................50
SIDE CURTAIN AIRBAG
DESCRIPTION.........................51
OPERATION...........................51
REMOVAL.............................52
INSTALLATION.........................53SIDE IMPACT AIRBAG CONTROL MODULE
DESCRIPTION.........................53
OPERATION...........................54
REMOVAL
REMOVAL...........................55
REMOVAL...........................55
INSTALLATION
INSTALLATION.......................56
INSTALLATION.......................57
RESTRAINTS
DESCRIPTION
An occupant restraint system is standard factory-
installed safety equipment on this model. Available
occupant restraints for this model include both active
and passive types. Active restraints are those which
require the vehicle occupants to take some action to
employ, such as fastening a seat belt; while passive
restraints require no action by the vehicle occupants
to be employed (Fig. 1).
ACTIVE RESTRAINTS
The active restraints for this model include:
²Front Seat Belts- Both outboard front seating
positions are equipped with three-point seat belt sys-
tems employing a lower B-pillar mounted inertia
latch-type emergency locking retractor, height-adjust-
able upper B-pillar mounted turning loops, a fixed
lower seat belt anchor secured to the lower B-pillar
(standard cab) or floor panel adjacent to the B-pillar
(quad cab), and a traveling end-release seat belt
buckle secured to the inboard seat track. The driver
side retractor for standard cab models includes an
electrically actuated seat belt tension reducer. The
passenger side front seat retractor for all models is
also switchable from an emergency locking retractor
to an automatic locking retractor. The front seat belt
buckle for the driver side of all models includes an
integral seat belt switch that detects whether its seat
belt has been fastened. The center front seating posi-
tion for standard cab models is also equipped with a
three-point seat belt employing a floor panel
mounted inertia latch-type retractor, a routing
bracket and bezel near the top of the cab back panel,
and two fixed end-release buckles secured to the cen-
ter seat cushion frame. The center front seating posi-
tion for quad cab models is equipped with a fixed lap
belt and an end-release buckle secured to the center
seat cushion frame.
²Rear Seat Belts- All three rear seating posi-
tions are equipped with three-point seat belt sys-
tems. The outboard seating position belts employ a
lower C-pillar mounted inertia latch-type emergency
locking retractor, a fixed position upper C-pillar
mounted turning loop, and a fixed lower seat beltanchor secured to the lower C-pillar. The rear seat
center seating position belt has a rear floor panel
mounted inertia latch-type emergency locking retrac-
tor and a routing bracket and bezel on the top of the
cab back panel. The end-release buckle units for the
right outboard seating position and the center seat-
ing position lower anchor are integral to the center
retractor mounting bracket on the rear floor panel.
The end-release buckle units for the center and left
outboard seating positions are individually secured to
the rear floor panel on models with the standard
equipment rear bench seat, or secured with the rear
seat mounting hardware on models with the optional
60/40 split rear bench seat.
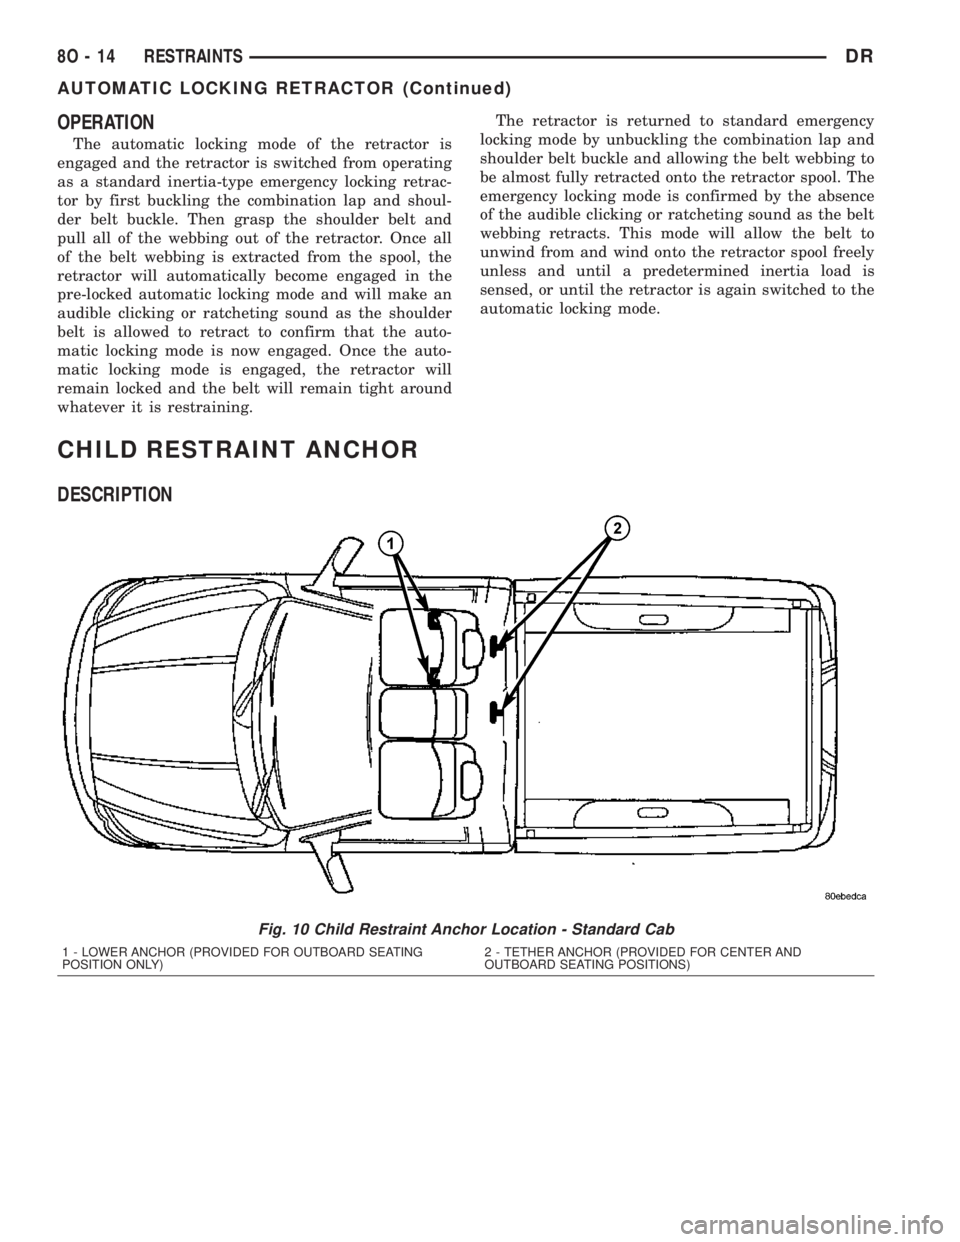
²Child Restraint Anchors- All standard cab
models are equipped with two, fixed-position, child
seat upper tether anchors that are integral to the
upper cab back panel reinforcement and concealed
behind individual trim cover and bezel units that are
integral to the cab back trim panel. All quad cab
models are equipped with three child seat upper
tether anchor straps that are secured to the upper
cab back panel reinforcement, behind the upright
rear seat back. Two lower anchors are also provided
for the front outboard seating position of standard
cab models, and for each rear outboard seating posi-
tion on quad cab models. These lower anchors are
accessed from the front of the seat where the seat
back meets the seat cushion. The child seat tether
and lower anchors for the front seat are deleted on
quad cab models.
PASSIVE RESTRAINTS
The passive restraints available for this model
include the following:
²Dual Front Airbags- Next Generation driver
and front passenger airbags are available for this
model. This airbag system is a passive, inflatable,
Supplemental Restraint System (SRS) and vehicles
with this equipment can be readily identified by the
ªSRS - AIRBAGº logo molded into the driver airbag
trim cover in the center of the steering wheel and
also into the passenger airbag door on the instru-
ment panel above the glove box (Fig. 2). Vehicles
with the airbag system can also be identified by the
airbag indicator, which will illuminate in the instru-
8O - 2 RESTRAINTSDR
Page 605 of 2895
²Clockspring- The clockspring is located near
the top of the steering column, directly beneath the
steering wheel.
²Driver Airbag- The driver airbag is located in
the center of the steering wheel, beneath the driver
airbag trim cover.
²Driver Knee Blocker- The driver knee blocker
is a structural unit secured to the back side of and
integral to the instrument panel steering column
opening cover.
²Passenger Airbag- The passenger airbag is
located on the instrument panel, beneath the passen-
ger airbag door on the instrument panel above the
glove box on the passenger side of the vehicle.
²Passenger Airbag On/Off Switch- Standard
cab models without a rear seat are equipped with a
passenger airbag on/off switch, which is located on
the right side of the instrument panel center bezel.
²Passenger Knee Blocker- The passenger knee
blocker is a structural reinforcement that is integral
to and concealed within the glove box door.
²Seat Belt Tensioner- The seat belt tensioner
is integral to the front outboard seat belt retractor
units on vehicles equipped with dual front airbags.
²Side Impact Airbag Control Module-Two
Side Impact Airbag Control Modules (SIACM) are
used on vehicles with the optional side curtain air-
bags, one left side and one right side. One SIACM is
located behind the B-pillar trim above the outboard
front seat belt retractor within each B-pillar.
²Side Curtain Airbag- In vehicles equipped
with this option, a side curtain airbag is located on
each inside roof side rail above the headliner, and
extends from the A-pillar to the B-pillar on standard
cab models, and from the A-pillar to the C-pillar on
quad cab models.
The ACM, both SIACMs, and the EMIC each con-
tain a central processing unit and programming that
allow them to communicate with each other usingthe Programmable Communications Interface (PCI)
data bus network. This method of communication is
used by the ACM for control of the airbag indicator
on all models equipped with dual front airbags.
(Refer to 8 - ELECTRICAL/ELECTRONIC CON-
TROL MODULES/COMMUNICATION - DESCRIP-
TION).
Hard wired circuitry connects the supplemental
restraint system components to each other through
the electrical system of the vehicle. These hard wired
circuits are integral to several wire harnesses, which
are routed throughout the vehicle and retained by
many different methods. These circuits may be con-
nected to each other, to the vehicle electrical system,
and to the supplemental restraint system compo-
nents through the use of a combination of soldered
splices, splice block connectors, and many different
types of wire harness terminal connectors and insu-
lators. Refer to the appropriate wiring information.
The wiring information includes wiring diagrams,
proper wire and connector repair procedures, further
details on wire harness routing and retention, as well
as pin-out and location views for the various wire
harness connectors, splices and grounds.
OPERATION
ACTIVE RESTRAINTS
The primary passenger restraints in this or any
other vehicle are the standard equipment factory-in-
stalled seat belts and child restraint anchors. Seat
belts and child restraint anchors are referred to as
an active restraint because the vehicle occupants are
required to physically fasten and properly adjust
these restraints in order to benefit from them. See
the owner's manual in the vehicle glove box for more
information on the features, use and operation of all
of the factory-installed active restraints.
PASSIVE RESTRAINTS
The passive restraints are referred to as a supple-
mental restraint system because they were designed
and are intended to enhance the protection for the
occupants of the vehicleonlywhen used in conjunc-
tion with the seat belts. They are referred to as pas-
sive restraints because the vehicle occupants are not
required to do anything to make them operate; how-
ever, the vehicle occupants must be wearing their
seat belts in order to obtain the maximum safety
benefit from the factory-installed supplemental
restraint system.
The supplemental restraint system electrical cir-
cuits are continuously monitored and controlled by a
microprocessor and software contained within the
Airbag Control Module (ACM) and, on vehicles
equipped with the side curtain airbags, both Side
Fig. 2 SRS Logo
8O - 4 RESTRAINTSDR
RESTRAINTS (Continued)
Page 606 of 2895
Impact Airbag Control Modules (SIACM). An airbag
indicator in the ElectroMechanical Instrument Clus-
ter (EMIC) illuminates for about six seconds as a
bulb test each time the ignition switch is turned to
the On or Start positions. Following the bulb test,
the airbag indicator is turned on or off by the ACM
to indicate the status of the supplemental restraint
system. If the airbag indicator comes on at any time
other than during the bulb test, it indicates that
there is a problem in the supplemental restraint sys-
tem electrical circuits. Such a problem may cause air-
bags not to deploy when required, or to deploy when
not required.
Deployment of the supplemental restraints
depends upon the angle and severity of an impact.
Deployment is not based upon vehicle speed; rather,
deployment is based upon the rate of deceleration as
measured by the forces of gravity (G force) upon the
impact sensors. When an impact is severe enough,
the microprocessor in the ACM or the SIACM signals
the inflator of the appropriate airbag units to deploy
their airbag cushions. The outboard front seat belt
tensioners are provided with a deployment signal by
the ACM in conjunction with the driver and passen-
ger airbags. During a frontal vehicle impact, the
knee blockers work in concert with properly fastened
and adjusted seat belts to restrain both the driver
and the front seat passenger in the proper position
for an airbag deployment. The knee blockers also
absorb and distribute the crash energy from the
driver and the front seat passenger to the structure
of the instrument panel. The seat belt tensioner
removes the slack from the outboard front seat belts
to provide further assurance that the driver and
front seat passenger are properly positioned and
restrained for an airbag deployment.
Typically, the vehicle occupants recall more about
the events preceding and following a collision than
they do of an airbag deployment itself. This is
because the airbag deployment and deflation occur so
rapidly. In a typical 48 kilometer-per-hour (30 mile-
per-hour) barrier impact, from the moment of impact
until the airbags are fully inflated takes about 40
milliseconds. Within one to two seconds from the
moment of impact, the airbags are almost entirely
deflated. The times cited for these events are approx-
imations, which apply only to a barrier impact at the
given speed. Actual times will vary somewhat,
depending upon the vehicle speed, impact angle,
severity of the impact, and the type of collision.When the ACM monitors a problem in any of the
dual front airbag system circuits or components,
including the seat belt tensioners, it stores a fault
code or Diagnostic Trouble Code (DTC) in its memory
circuit and sends an electronic message to the EMIC
to turn on the airbag indicator. When the SIACM
monitors a problem in any of the side curtain airbag
system circuits or component, it stores a fault code or
DTC in its memory circuit and sends an electronic
message to the ACM, and the ACM sends an elec-
tronic message to the EMIC to turn on the airbag
indicator. Proper testing of the supplemental
restraint system components, the Programmable
Communications Interface (PCI) data bus, the elec-
tronic message inputs to and outputs from the EMIC,
the SIACM, or the ACM, as well as the retrieval or
erasure of a DTC from the ACM, SIACM, or EMIC
requires the use of a DRBIIItscan tool. Refer to the
appropriate diagnostic information.
See the owner's manual in the vehicle glove box for
more information on the features, use and operation
of all of the factory-installed passive restraints.
WARNING
WARNINGS - RESTRAINT SYSTEM
WARNING: DURING AND FOLLOWING ANY SEAT
BELT OR CHILD RESTRAINT ANCHOR SERVICE,
CAREFULLY INSPECT ALL SEAT BELTS, BUCKLES,
MOUNTING HARDWARE, RETRACTORS, TETHER
STRAPS, AND ANCHORS FOR PROPER INSTALLA-
TION, OPERATION, OR DAMAGE. REPLACE ANY
BELT THAT IS CUT, FRAYED, OR TORN.
STRAIGHTEN ANY BELT THAT IS TWISTED.
TIGHTEN ANY LOOSE FASTENERS. REPLACE ANY
BELT THAT HAS A DAMAGED OR INOPERATIVE
BUCKLE OR RETRACTOR. REPLACE ANY BELT
THAT HAS A BENT OR DAMAGED LATCH PLATE
OR ANCHOR PLATE. REPLACE ANY CHILD
RESTRAINT ANCHOR OR THE UNIT TO WHICH THE
ANCHOR IS INTEGRAL THAT HAS BEEN BENT OR
DAMAGED. NEVER ATTEMPT TO REPAIR A SEAT
BELT OR CHILD RESTRAINT COMPONENT.
ALWAYS REPLACE DAMAGED OR FAULTY SEAT
BELT AND CHILD RESTRAINT COMPONENTS WITH
THE CORRECT, NEW AND UNUSED REPLACEMENT
PARTS LISTED IN THE DAIMLERCHRYSLER MOPAR
PARTS CATALOG.
DRRESTRAINTS 8O - 5
RESTRAINTS (Continued)
Page 614 of 2895
the locating pins on the bottom of the ACM mounting
flanges into the locating holes in the bracket.
(3) Still working from the left side of the floor
panel transmission tunnel, install and tighten the
two screws that secure the left ACM mounting
flanges to the bracket that is welded onto the floor
panel transmission tunnel. Tighten the screws to 14
N´m (10 ft. lbs.).
(4) From the right side of the floor panel transmis-
sion tunnel, tighten each of the two screws that
secure the right side of the ACM to the bracket on
the floor panel transmission tunnel. Tighten the
screws to 14 N´m (10 ft. lbs.).
(5) Reach through the rearward facing opening
below the instrument panel center stack support
bracket on the top of the floor panel transmission
tunnel to access and reconnect the instrument panel
wire harness connector for the ACM to the ACM con-
nector receptacle located on the rearward facing side
of the module. Be certain that the latch and the red
Connector Position Assurance (CPA) lock on the con-
nector are each fully engaged.
(6) On models with an automatic transmission,
reinstall the ACM cover onto the instrument panel.
(Refer to 8 - ELECTRICAL/RESTRAINTS/ACM
COVER - INSTALLATION).
(7) On models with a manual transmission, rein-
stall the floor console onto the top of the floor panel
transmission tunnel. (Refer to 23 - BODY/INTERI-
OR/FLOOR CONSOLE - INSTALLATION).
(8) Do not reconnect the battery negative cable at
this time. The supplemental restraint system verifi-
cation test procedure should be performed following
service of any supplemental restraint system compo-
nent. (Refer to 8 - ELECTRICAL/RESTRAINTS -
STANDARD PROCEDURE - VERIFICATION TEST).AUTOMATIC LOCKING
RETRACTOR
DESCRIPTION
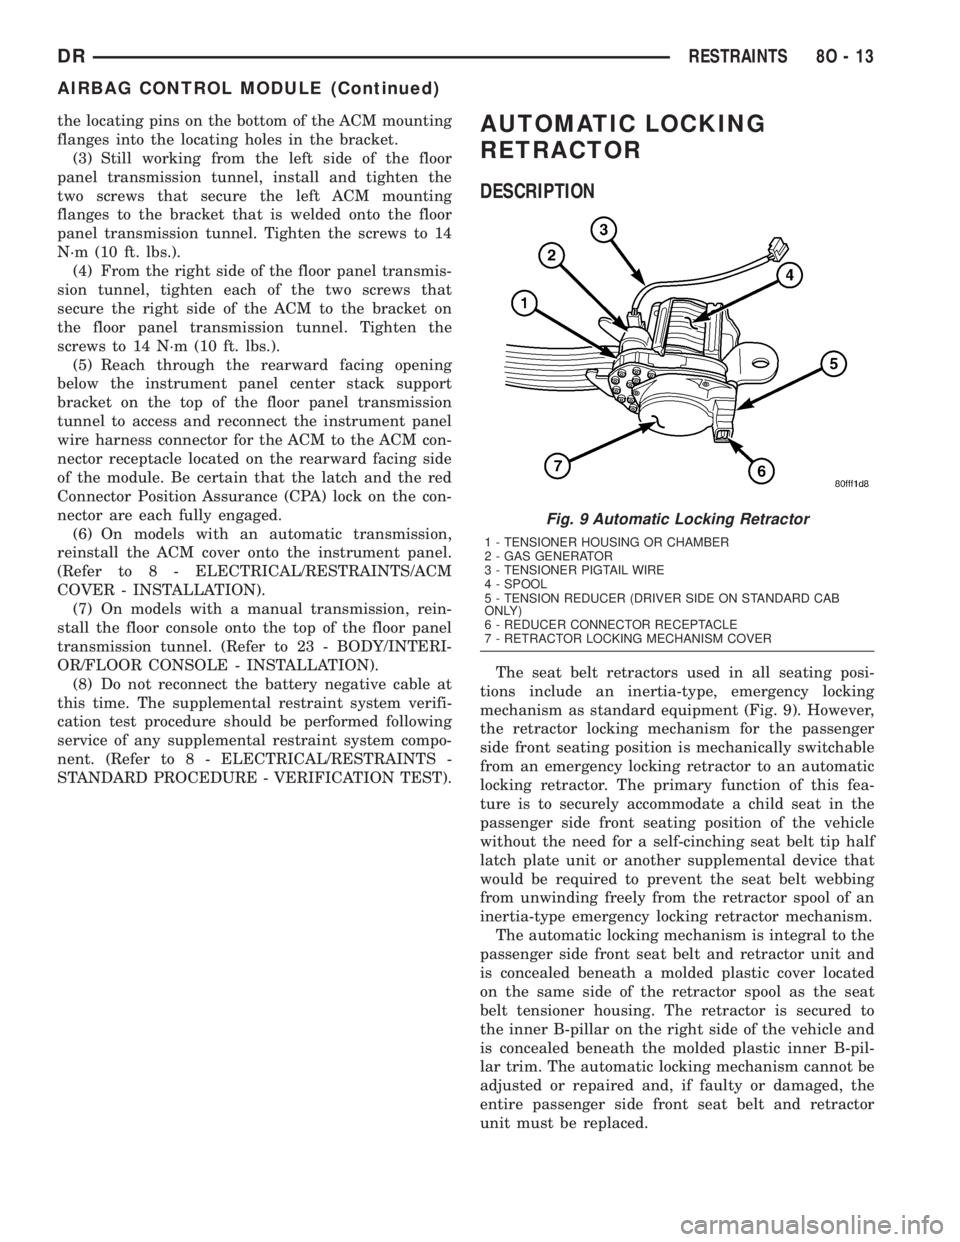
The seat belt retractors used in all seating posi-
tions include an inertia-type, emergency locking
mechanism as standard equipment (Fig. 9). However,
the retractor locking mechanism for the passenger
side front seating position is mechanically switchable
from an emergency locking retractor to an automatic
locking retractor. The primary function of this fea-
ture is to securely accommodate a child seat in the
passenger side front seating position of the vehicle
without the need for a self-cinching seat belt tip half
latch plate unit or another supplemental device that
would be required to prevent the seat belt webbing
from unwinding freely from the retractor spool of an
inertia-type emergency locking retractor mechanism.
The automatic locking mechanism is integral to the
passenger side front seat belt and retractor unit and
is concealed beneath a molded plastic cover located
on the same side of the retractor spool as the seat
belt tensioner housing. The retractor is secured to
the inner B-pillar on the right side of the vehicle and
is concealed beneath the molded plastic inner B-pil-
lar trim. The automatic locking mechanism cannot be
adjusted or repaired and, if faulty or damaged, the
entire passenger side front seat belt and retractor
unit must be replaced.
Fig. 9 Automatic Locking Retractor
1 - TENSIONER HOUSING OR CHAMBER
2 - GAS GENERATOR
3 - TENSIONER PIGTAIL WIRE
4 - SPOOL
5 - TENSION REDUCER (DRIVER SIDE ON STANDARD CAB
ONLY)
6 - REDUCER CONNECTOR RECEPTACLE
7 - RETRACTOR LOCKING MECHANISM COVER
DRRESTRAINTS 8O - 13
AIRBAG CONTROL MODULE (Continued)
Page 615 of 2895
OPERATION
The automatic locking mode of the retractor is
engaged and the retractor is switched from operating
as a standard inertia-type emergency locking retrac-
tor by first buckling the combination lap and shoul-
der belt buckle. Then grasp the shoulder belt and
pull all of the webbing out of the retractor. Once all
of the belt webbing is extracted from the spool, the
retractor will automatically become engaged in the
pre-locked automatic locking mode and will make an
audible clicking or ratcheting sound as the shoulder
belt is allowed to retract to confirm that the auto-
matic locking mode is now engaged. Once the auto-
matic locking mode is engaged, the retractor will
remain locked and the belt will remain tight around
whatever it is restraining.The retractor is returned to standard emergency
locking mode by unbuckling the combination lap and
shoulder belt buckle and allowing the belt webbing to
be almost fully retracted onto the retractor spool. The
emergency locking mode is confirmed by the absence
of the audible clicking or ratcheting sound as the belt
webbing retracts. This mode will allow the belt to
unwind from and wind onto the retractor spool freely
unless and until a predetermined inertia load is
sensed, or until the retractor is again switched to the
automatic locking mode.
CHILD RESTRAINT ANCHOR
DESCRIPTION
Fig. 10 Child Restraint Anchor Location - Standard Cab
1 - LOWER ANCHOR (PROVIDED FOR OUTBOARD SEATING
POSITION ONLY)2 - TETHER ANCHOR (PROVIDED FOR CENTER AND
OUTBOARD SEATING POSITIONS)
8O - 14 RESTRAINTSDR
AUTOMATIC LOCKING RETRACTOR (Continued)
Page 629 of 2895
buckle between the center seat cushion and the adja-
cent right or left front outboard seat cushion.
(2) From the front of the front seat, reach between
the center seat cushion and the adjacent right or left
front outboard seat cushion to route the front center
seat belt buckle, lap belt unit lower anchor, or unique
black, keyed front center seat belt lower anchor
buckle through the elastic strap on the side of the
center seat cushion (Fig. 26).
(3) From behind the front seat, position the front
center seat belt buckle, lap belt lower anchor, or
unique black, keyed front center seat belt lower
anchor buckle to the center seat support bracket.
(4) Install and tighten the screw that secures the
front center seat belt buckle, lap belt lower anchor, or
unique black, keyed front center seat belt lower
anchor buckle to the center seat support bracket.
Tighten the screw to 40 N´m (29 ft. lbs.).
(5) Move the adjacent right or left front outboard
seat section (40 percent) back to its rearward posi-
tion.
FRONT OUTBOARD SEAT
BELT & RETRACTOR
REMOVAL
REMOVAL - STANDARD CAB
The following procedure is for replacement of a
faulty or damaged front outboard seat belt and
retractor unit, which includes a seat belt tensioner
for this model.(Refer to 8 - ELECTRICAL/RE-
STRAINTS/SEAT BELT TENSIONER - DESCRIP-
TION). The only component of this seat belt and
retractor unit that is available for individual service
replacement is the plastic web stop button that pre-
vents the latch plate from falling to the floor while in
the stored position. Refer to the instructions supplied
with the service kit for the proper web stop button
replacement procedures.
The seat belt retractor on the driver's side of stan-
dard cab models only also includes a tension reducer.
(Refer to 8 - ELECTRICAL/RESTRAINTS/TENSION
REDUCER - DESCRIPTION). The seat belt retractor
on the passenger's side of all models includes a swit-
chable automatic locking mechanism. (Refer to 8 -
ELECTRICAL/RESTRAINTS/AUTOMATIC LOCK-
ING RETRACTOR - DESCRIPTION).
If the seat belt or retractor is faulty or damaged,
but the seat belt tensioner is not deployed, review
the recommended procedures for handling non-de-
ployed supplemental restraints. (Refer to 8 - ELEC-
TRICAL/RESTRAINTS - STANDARD PROCEDURE
- HANDLING NON-DEPLOYED SUPPLEMENTALRESTRAINTS). If the seat belt tensioner has been
deployed, review the recommended procedures for
service after a supplemental restraint deployment
before removing the front outboard seat belt and
retractor from the vehicle. (Refer to 8 - ELECTRI-
CAL/RESTRAINTS - STANDARD PROCEDURE -
SERVICE AFTER A SUPPLEMENTAL RESTRAINT
DEPLOYMENT).
WARNING: ON VEHICLES EQUIPPED WITH AIR-
BAGS, DISABLE THE SUPPLEMENTAL RESTRAINT
SYSTEM BEFORE ATTEMPTING ANY STEERING
WHEEL, STEERING COLUMN, DRIVER AIRBAG,
PASSENGER AIRBAG, SEAT BELT TENSIONER,
SIDE CURTAIN AIRBAG, OR INSTRUMENT PANEL
COMPONENT DIAGNOSIS OR SERVICE. DISCON-
NECT AND ISOLATE THE BATTERY NEGATIVE
(GROUND) CABLE, THEN WAIT TWO MINUTES FOR
THE SYSTEM CAPACITOR TO DISCHARGE BEFORE
PERFORMING FURTHER DIAGNOSIS OR SERVICE.
THIS IS THE ONLY SURE WAY TO DISABLE THE
SUPPLEMENTAL RESTRAINT SYSTEM. FAILURE TO
TAKE THE PROPER PRECAUTIONS COULD
RESULT IN ACCIDENTAL AIRBAG DEPLOYMENT
AND POSSIBLE PERSONAL INJURY.
WARNING: DURING AND FOLLOWING ANY SEAT
BELT OR CHILD RESTRAINT ANCHOR SERVICE,
CAREFULLY INSPECT ALL SEAT BELTS, BUCKLES,
MOUNTING HARDWARE, RETRACTORS, TETHER
STRAPS, AND ANCHORS FOR PROPER INSTALLA-
TION, OPERATION, OR DAMAGE. REPLACE ANY
BELT THAT IS CUT, FRAYED, OR TORN.
STRAIGHTEN ANY BELT THAT IS TWISTED.
TIGHTEN ANY LOOSE FASTENERS. REPLACE ANY
BELT THAT HAS A DAMAGED OR INOPERATIVE
BUCKLE OR RETRACTOR. REPLACE ANY BELT
THAT HAS A BENT OR DAMAGED LATCH PLATE
OR ANCHOR PLATE. REPLACE ANY CHILD
RESTRAINT ANCHOR OR THE UNIT TO WHICH THE
ANCHOR IS INTEGRAL THAT HAS BEEN BENT OR
DAMAGED. NEVER ATTEMPT TO REPAIR A SEAT
BELT OR CHILD RESTRAINT COMPONENT.
ALWAYS REPLACE DAMAGED OR FAULTY SEAT
BELT AND CHILD RESTRAINT COMPONENTS WITH
THE CORRECT, NEW AND UNUSED REPLACEMENT
PARTS LISTED IN THE DAIMLERCHRYSLER MOPAR
PARTS CATALOG.
(1) Move the front seat to its most forward position
for easiest access to the lower seat belt anchor and
the B-pillar trim.
(2) Disconnect and isolate the battery negative
cable. Wait two minutes for the system capacitor to
discharge before further service.
8O - 28 RESTRAINTSDR
FRONT CENTER SEAT BELT (Continued)
Page 632 of 2895
(11) Disengage the seat belt tensioner pigtail wire
retainer from the hole in the inner B-pillar sheet
metal.
(12) Disconnect the yellow seat belt tensioner pig-
tail wire connector from the body wire harness take
out and connector for the tensioner.
(13) Remove the screw that secures the lower
retractor bracket to the lower inner B-pillar below
the retractor mounting hole.
(14) Disengage the hooks on the upper retractor
bracket from the slots in the lower inner B-pillar
above the retractor mounting hole.
(15) Remove the front outboard seat belt and
retractor from the retractor mounting hole in the
lower inner B-pillar.
INSTALLATION
INSTALLATION - STANDARD CAB
The following procedure is for replacement of a
faulty or damaged front outboard seat belt and
retractor unit, which includes a seat belt tensioner
for this model. (Refer to 8 - ELECTRICAL/RE-
STRAINTS/SEAT BELT TENSIONER - DESCRIP-
TION). The only component of this seat belt and
retractor unit that is available for individual service
replacement is the plastic web stop button that pre-
vents the latch plate from falling to the floor while in
the stored position. Refer to the instructions supplied
with the service kit for the proper web stop button
replacement procedures.
The seat belt retractor on the driver's side of stan-
dard cab models only also includes a tension reducer.
(Refer to 8 - ELECTRICAL/RESTRAINTS/TENSION
REDUCER - DESCRIPTION). The seat belt retractor
on the passenger's side of all models includes a swit-
chable automatic locking mechanism. (Refer to 8 -
ELECTRICAL/RESTRAINTS/AUTOMATIC LOCK-
ING RETRACTOR - DESCRIPTION).
If the seat belt or retractor is faulty or damaged,
but the seat belt tensioner is not deployed, review
the recommended procedures for handling non-de-
ployed supplemental restraints. (Refer to 8 - ELEC-
TRICAL/RESTRAINTS - STANDARD PROCEDURE
- HANDLING NON-DEPLOYED SUPPLEMENTAL
RESTRAINTS). If the seat belt tensioner has been
deployed, review the recommended procedures for
service after a supplemental restraint deployment
before removing the front outboard seat belt and
retractor from the vehicle. (Refer to 8 - ELECTRI-
CAL/RESTRAINTS - STANDARD PROCEDURE -
SERVICE AFTER A SUPPLEMENTAL RESTRAINT
DEPLOYMENT).
WARNING: ON VEHICLES EQUIPPED WITH AIR-
BAGS, DISABLE THE SUPPLEMENTAL RESTRAINTSYSTEM BEFORE ATTEMPTING ANY STEERING
WHEEL, STEERING COLUMN, DRIVER AIRBAG,
PASSENGER AIRBAG, SEAT BELT TENSIONER,
SIDE CURTAIN AIRBAG, OR INSTRUMENT PANEL
COMPONENT DIAGNOSIS OR SERVICE. DISCON-
NECT AND ISOLATE THE BATTERY NEGATIVE
(GROUND) CABLE, THEN WAIT TWO MINUTES FOR
THE SYSTEM CAPACITOR TO DISCHARGE BEFORE
PERFORMING FURTHER DIAGNOSIS OR SERVICE.
THIS IS THE ONLY SURE WAY TO DISABLE THE
SUPPLEMENTAL RESTRAINT SYSTEM. FAILURE TO
TAKE THE PROPER PRECAUTIONS COULD
RESULT IN ACCIDENTAL AIRBAG DEPLOYMENT
AND POSSIBLE PERSONAL INJURY.
WARNING: DURING AND FOLLOWING ANY SEAT
BELT OR CHILD RESTRAINT ANCHOR SERVICE,
CAREFULLY INSPECT ALL SEAT BELTS, BUCKLES,
MOUNTING HARDWARE, RETRACTORS, TETHER
STRAPS, AND ANCHORS FOR PROPER INSTALLA-
TION, OPERATION, OR DAMAGE. REPLACE ANY
BELT THAT IS CUT, FRAYED, OR TORN.
STRAIGHTEN ANY BELT THAT IS TWISTED.
TIGHTEN ANY LOOSE FASTENERS. REPLACE ANY
BELT THAT HAS A DAMAGED OR INOPERATIVE
BUCKLE OR RETRACTOR. REPLACE ANY BELT
THAT HAS A BENT OR DAMAGED LATCH PLATE
OR ANCHOR PLATE. REPLACE ANY CHILD
RESTRAINT ANCHOR OR THE UNIT TO WHICH THE
ANCHOR IS INTEGRAL THAT HAS BEEN BENT OR
DAMAGED. NEVER ATTEMPT TO REPAIR A SEAT
BELT OR CHILD RESTRAINT COMPONENT.
ALWAYS REPLACE DAMAGED OR FAULTY SEAT
BELT AND CHILD RESTRAINT COMPONENTS WITH
THE CORRECT, NEW AND UNUSED REPLACEMENT
PARTS LISTED IN THE DAIMLERCHRYSLER MOPAR
PARTS CATALOG.
(1) Position the front outboard seat belt and
retractor to the retractor mounting hole in the lower
inner B-pillar (Fig. 27).
(2) Engage the hooks on the upper retractor
bracket into the slots in the lower inner B-pillar
above the retractor mounting hole.
(3) Install and tighten the screw that secures the
lower retractor bracket to the lower inner B-pillar
below the retractor mounting hole. Tighten the screw
to 40 N´m (29 ft. lbs.).
(4) Reconnect the yellow seat belt tensioner pigtail
wire connector to the body wire harness take out and
connector for the tensioner.
(5) Engage the seat belt tensioner pigtail wire
retainer into the hole in the inner B-pillar sheet
metal.
(6) On the driver side only, reconnect the body
wire harness take out and white connector to the
DRRESTRAINTS 8O - 31
FRONT OUTBOARD SEAT BELT & RETRACTOR (Continued)