height DODGE RAM 2003 Service Manual PDF
[x] Cancel search | Manufacturer: DODGE, Model Year: 2003, Model line: RAM, Model: DODGE RAM 2003Pages: 2895, PDF Size: 83.15 MB
Page 1628 of 2895
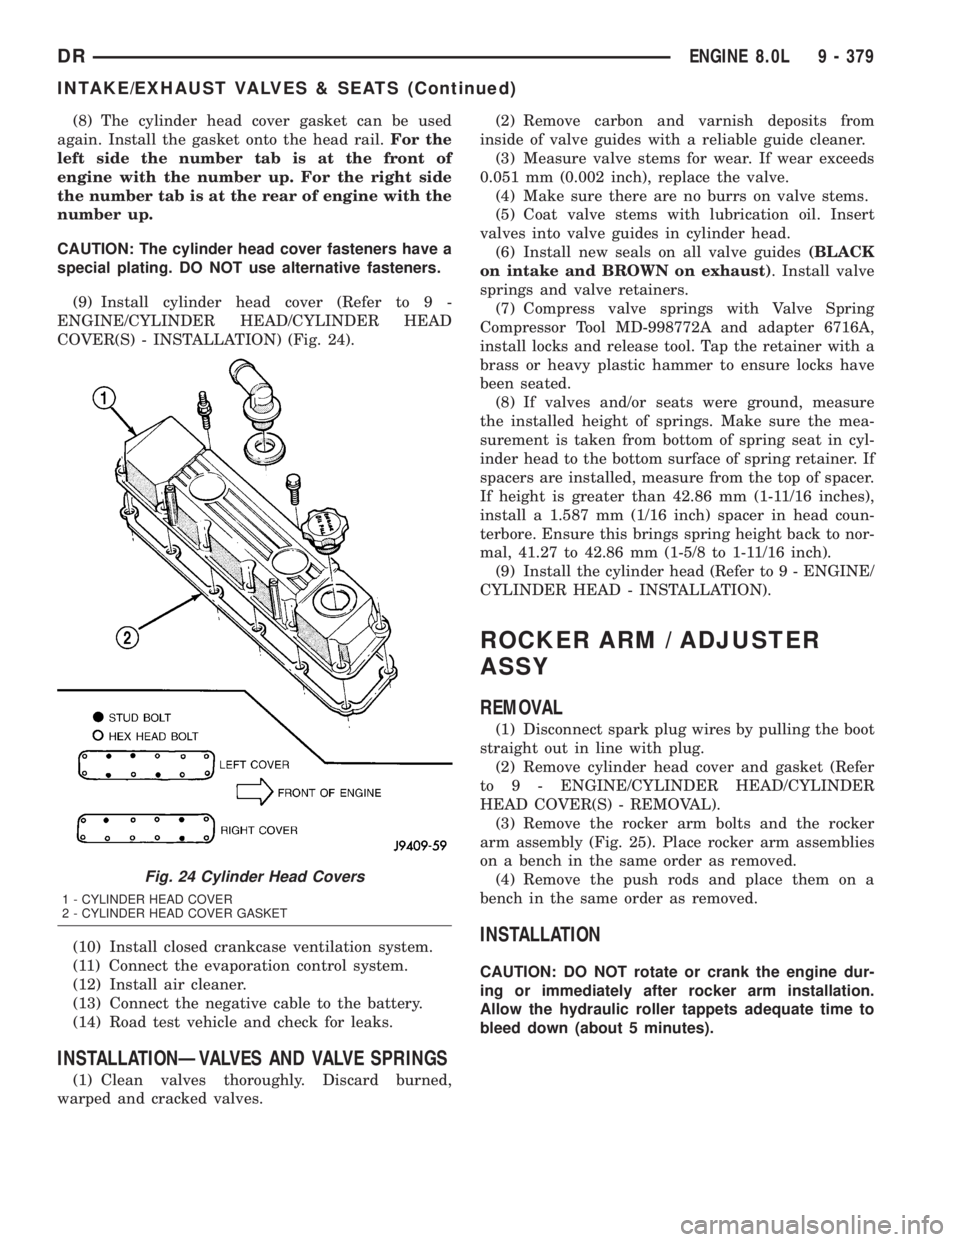
(8) The cylinder head cover gasket can be used
again. Install the gasket onto the head rail.For the
left side the number tab is at the front of
engine with the number up. For the right side
the number tab is at the rear of engine with the
number up.
CAUTION: The cylinder head cover fasteners have a
special plating. DO NOT use alternative fasteners.
(9) Install cylinder head cover (Refer to 9 -
ENGINE/CYLINDER HEAD/CYLINDER HEAD
COVER(S) - INSTALLATION) (Fig. 24).
(10) Install closed crankcase ventilation system.
(11) Connect the evaporation control system.
(12) Install air cleaner.
(13) Connect the negative cable to the battery.
(14) Road test vehicle and check for leaks.
INSTALLATIONÐVALVES AND VALVE SPRINGS
(1) Clean valves thoroughly. Discard burned,
warped and cracked valves.(2) Remove carbon and varnish deposits from
inside of valve guides with a reliable guide cleaner.
(3) Measure valve stems for wear. If wear exceeds
0.051 mm (0.002 inch), replace the valve.
(4) Make sure there are no burrs on valve stems.
(5) Coat valve stems with lubrication oil. Insert
valves into valve guides in cylinder head.
(6) Install new seals on all valve guides(BLACK
on intake and BROWN on exhaust). Install valve
springs and valve retainers.
(7) Compress valve springs with Valve Spring
Compressor Tool MD-998772A and adapter 6716A,
install locks and release tool. Tap the retainer with a
brass or heavy plastic hammer to ensure locks have
been seated.
(8) If valves and/or seats were ground, measure
the installed height of springs. Make sure the mea-
surement is taken from bottom of spring seat in cyl-
inder head to the bottom surface of spring retainer. If
spacers are installed, measure from the top of spacer.
If height is greater than 42.86 mm (1-11/16 inches),
install a 1.587 mm (1/16 inch) spacer in head coun-
terbore. Ensure this brings spring height back to nor-
mal, 41.27 to 42.86 mm (1-5/8 to 1-11/16 inch).
(9) Install the cylinder head (Refer to 9 - ENGINE/
CYLINDER HEAD - INSTALLATION).
ROCKER ARM / ADJUSTER
ASSY
REMOVAL
(1) Disconnect spark plug wires by pulling the boot
straight out in line with plug.
(2) Remove cylinder head cover and gasket (Refer
to 9 - ENGINE/CYLINDER HEAD/CYLINDER
HEAD COVER(S) - REMOVAL).
(3) Remove the rocker arm bolts and the rocker
arm assembly (Fig. 25). Place rocker arm assemblies
on a bench in the same order as removed.
(4) Remove the push rods and place them on a
bench in the same order as removed.
INSTALLATION
CAUTION: DO NOT rotate or crank the engine dur-
ing or immediately after rocker arm installation.
Allow the hydraulic roller tappets adequate time to
bleed down (about 5 minutes).
Fig. 24 Cylinder Head Covers
1 - CYLINDER HEAD COVER
2 - CYLINDER HEAD COVER GASKET
DRENGINE 8.0L 9 - 379
INTAKE/EXHAUST VALVES & SEATS (Continued)
Page 1682 of 2895
SERVICE SLEEVE ASSEMBLY
NOTE: Two sleeve halves are included with each
kit. Modifications as follow, are necessary to create
the correct sleeve assembly for each application.
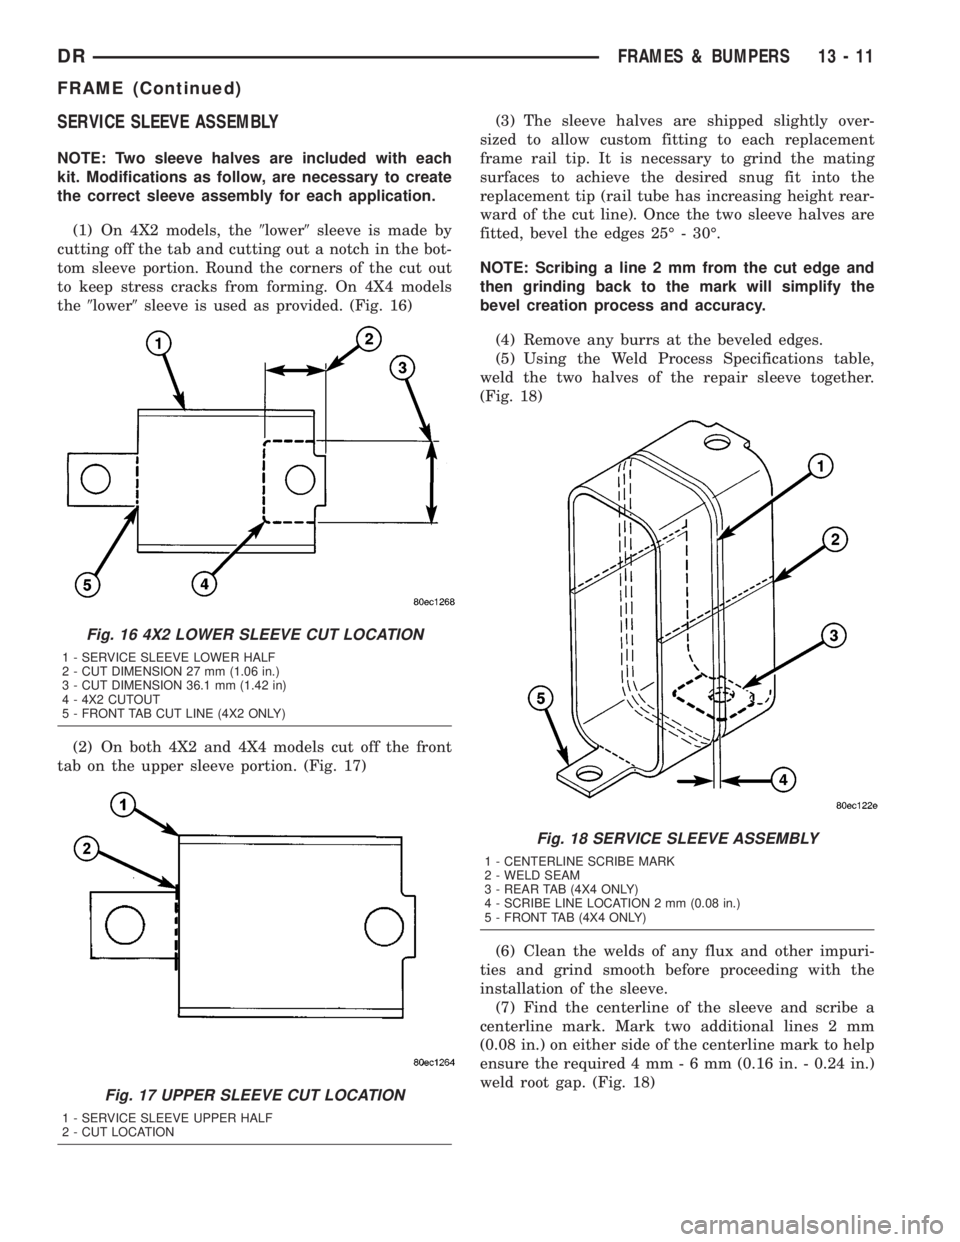
(1) On 4X2 models, the9lower9sleeve is made by
cutting off the tab and cutting out a notch in the bot-
tom sleeve portion. Round the corners of the cut out
to keep stress cracks from forming. On 4X4 models
the9lower9sleeve is used as provided. (Fig. 16)
(2) On both 4X2 and 4X4 models cut off the front
tab on the upper sleeve portion. (Fig. 17)(3) The sleeve halves are shipped slightly over-
sized to allow custom fitting to each replacement
frame rail tip. It is necessary to grind the mating
surfaces to achieve the desired snug fit into the
replacement tip (rail tube has increasing height rear-
ward of the cut line). Once the two sleeve halves are
fitted, bevel the edges 25É - 30É.
NOTE: Scribing a line 2 mm from the cut edge and
then grinding back to the mark will simplify the
bevel creation process and accuracy.
(4) Remove any burrs at the beveled edges.
(5) Using the Weld Process Specifications table,
weld the two halves of the repair sleeve together.
(Fig. 18)
(6) Clean the welds of any flux and other impuri-
ties and grind smooth before proceeding with the
installation of the sleeve.
(7) Find the centerline of the sleeve and scribe a
centerline mark. Mark two additional lines 2 mm
(0.08 in.) on either side of the centerline mark to help
ensure the required 4 mm-6mm(0.16 in. - 0.24 in.)
weld root gap. (Fig. 18)
Fig. 16 4X2 LOWER SLEEVE CUT LOCATION
1 - SERVICE SLEEVE LOWER HALF
2 - CUT DIMENSION 27 mm (1.06 in.)
3 - CUT DIMENSION 36.1 mm (1.42 in)
4 - 4X2 CUTOUT
5 - FRONT TAB CUT LINE (4X2 ONLY)
Fig. 17 UPPER SLEEVE CUT LOCATION
1 - SERVICE SLEEVE UPPER HALF
2 - CUT LOCATION
Fig. 18 SERVICE SLEEVE ASSEMBLY
1 - CENTERLINE SCRIBE MARK
2 - WELD SEAM
3 - REAR TAB (4X4 ONLY)
4 - SCRIBE LINE LOCATION 2 mm (0.08 in.)
5 - FRONT TAB (4X4 ONLY)
DRFRAMES & BUMPERS 13 - 11
FRAME (Continued)
Page 1688 of 2895
CAUTION:
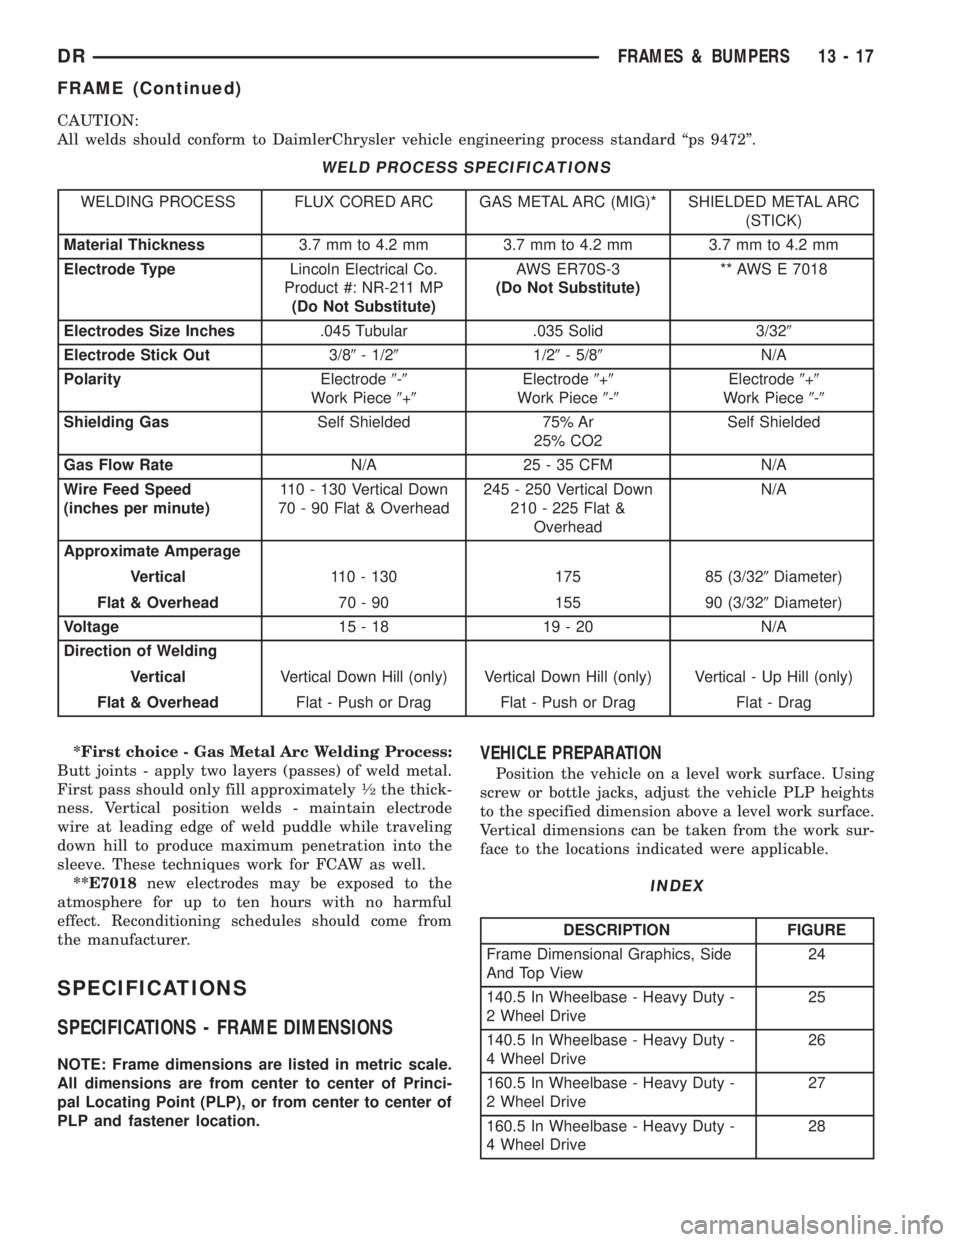
All welds should conform to DaimlerChrysler vehicle engineering process standard ªps 9472º.
WELD PROCESS SPECIFICATIONS
WELDING PROCESS FLUX CORED ARC GAS METAL ARC (MIG)* SHIELDED METAL ARC
(STICK)
Material Thickness3.7 mm to 4.2 mm 3.7 mm to 4.2 mm 3.7 mm to 4.2 mm
Electrode TypeLincoln Electrical Co.
Product #: NR-211 MP
(Do Not Substitute)AWS ER70S-3
(Do Not Substitute)** AWS E 7018
Electrodes Size Inches.045 Tubular .035 Solid 3/329
Electrode Stick Out3/89- 1/291/29- 5/89N/A
PolarityElectrode9-9
Work Piece9+9Electrode9+9
Work Piece9-9Electrode9+9
Work Piece9-9
Shielding GasSelf Shielded 75% Ar
25% CO2Self Shielded
Gas Flow RateN/A 25 - 35 CFM N/A
Wire Feed Speed
(inches per minute)110 - 130 Vertical Down
70 - 90 Flat & Overhead245 - 250 Vertical Down
210 - 225 Flat &
OverheadN/A
Approximate Amperage
Vertical110 - 130 175 85 (3/329Diameter)
Flat & Overhead70 - 90 155 90 (3/329Diameter)
Voltage15-18 19-20 N/A
Direction of Welding
VerticalVertical Down Hill (only) Vertical Down Hill (only) Vertical - Up Hill (only)
Flat & OverheadFlat - Push or Drag Flat - Push or Drag Flat - Drag
*First choice - Gas Metal Arc Welding Process:
Butt joints - apply two layers (passes) of weld metal.
First pass should only fill approximately
1¤2the thick-
ness. Vertical position welds - maintain electrode
wire at leading edge of weld puddle while traveling
down hill to produce maximum penetration into the
sleeve. These techniques work for FCAW as well.
**E7018new electrodes may be exposed to the
atmosphere for up to ten hours with no harmful
effect. Reconditioning schedules should come from
the manufacturer.
SPECIFICATIONS
SPECIFICATIONS - FRAME DIMENSIONS
NOTE: Frame dimensions are listed in metric scale.
All dimensions are from center to center of Princi-
pal Locating Point (PLP), or from center to center of
PLP and fastener location.
VEHICLE PREPARATION
Position the vehicle on a level work surface. Using
screw or bottle jacks, adjust the vehicle PLP heights
to the specified dimension above a level work surface.
Vertical dimensions can be taken from the work sur-
face to the locations indicated were applicable.
INDEX
DESCRIPTION FIGURE
Frame Dimensional Graphics, Side
And Top View24
140.5 In Wheelbase - Heavy Duty -
2 Wheel Drive25
140.5 In Wheelbase - Heavy Duty -
4 Wheel Drive26
160.5 In Wheelbase - Heavy Duty -
2 Wheel Drive27
160.5 In Wheelbase - Heavy Duty -
4 Wheel Drive28
DRFRAMES & BUMPERS 13 - 17
FRAME (Continued)
Page 1730 of 2895
INSTALLATION
(1) Install fuel injector(s) into fuel rail assembly
and install retaining clip(s).
(2) If same injector(s) is being reinstalled, install
new o-ring(s).
(3) Apply a small amount of clean engine oil to
each injector o-ring. This will aid in installation.
(4) Install fuel rail. Refer to Fuel Rail Installation.
(5) Start engine and check for fuel leaks.
FUEL PUMP RELAY
DESCRIPTION
The 5±pin, 12±volt, fuel pump relay is located in
the Power Distribution Center (PDC). Refer to the
label on the PDC cover for relay location.
OPERATION
The Powertrain Control Module (PCM) energizes
the electric fuel pump through the fuel pump relay.
The fuel pump relay is energized by first applying
battery voltage to it when the ignition key is turned
ON, and then applying a ground signal to the relay
from the PCM.
Whenever the ignition key is turned ON, the elec-
tric fuel pump will operate. But, the PCM will shut-
down the ground circuit to the fuel pump relay in
approximately 1±3 seconds unless the engine is oper-
ating or the starter motor is engaged.
REMOVAL
The fuel pump relay is located in the Power Distri-
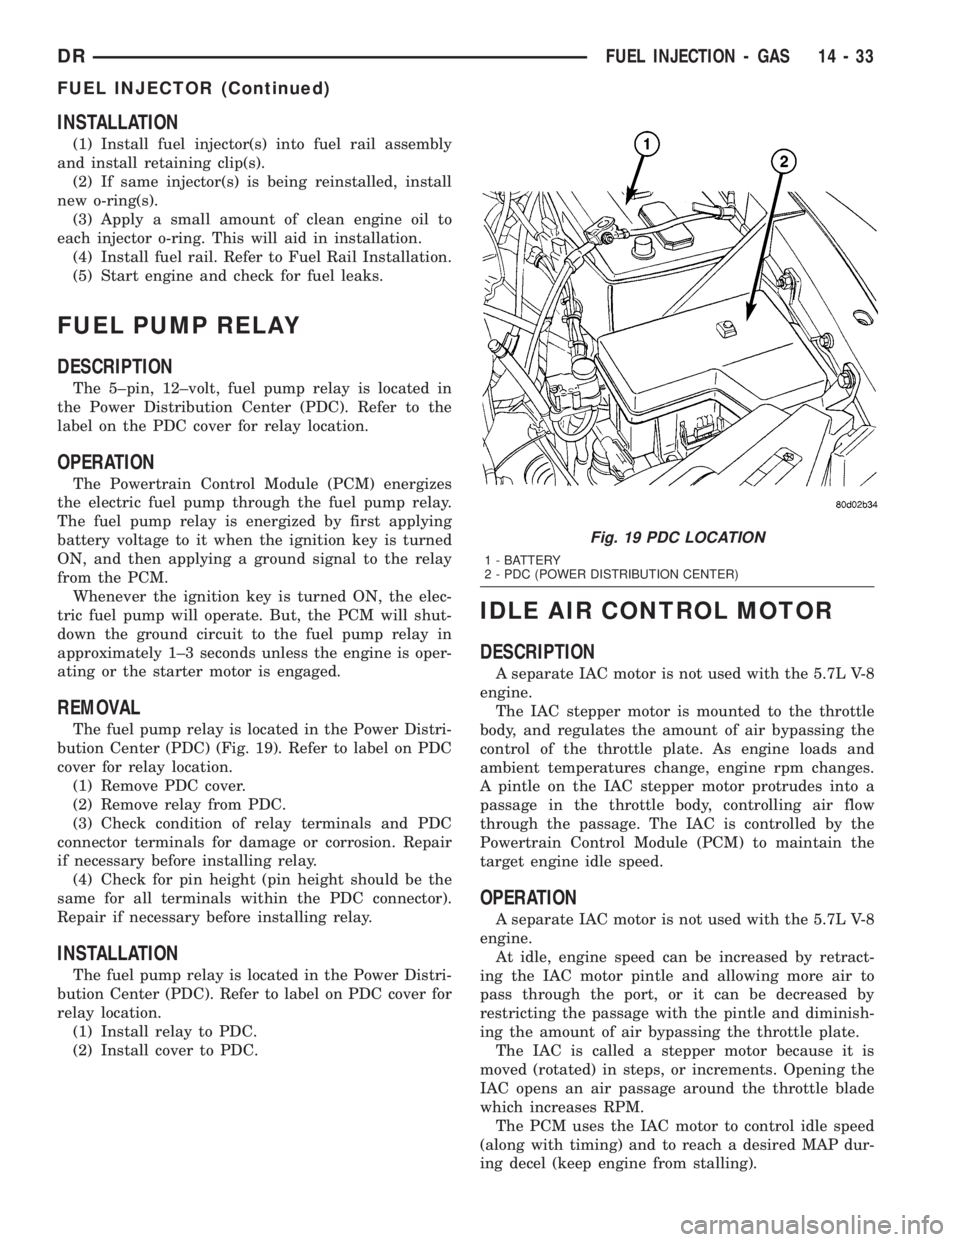
bution Center (PDC) (Fig. 19). Refer to label on PDC
cover for relay location.
(1) Remove PDC cover.
(2) Remove relay from PDC.
(3) Check condition of relay terminals and PDC
connector terminals for damage or corrosion. Repair
if necessary before installing relay.
(4) Check for pin height (pin height should be the
same for all terminals within the PDC connector).
Repair if necessary before installing relay.
INSTALLATION
The fuel pump relay is located in the Power Distri-
bution Center (PDC). Refer to label on PDC cover for
relay location.
(1) Install relay to PDC.
(2) Install cover to PDC.
IDLE AIR CONTROL MOTOR
DESCRIPTION
A separate IAC motor is not used with the 5.7L V-8
engine.
The IAC stepper motor is mounted to the throttle
body, and regulates the amount of air bypassing the
control of the throttle plate. As engine loads and
ambient temperatures change, engine rpm changes.
A pintle on the IAC stepper motor protrudes into a
passage in the throttle body, controlling air flow
through the passage. The IAC is controlled by the
Powertrain Control Module (PCM) to maintain the
target engine idle speed.
OPERATION
A separate IAC motor is not used with the 5.7L V-8
engine.
At idle, engine speed can be increased by retract-
ing the IAC motor pintle and allowing more air to
pass through the port, or it can be decreased by
restricting the passage with the pintle and diminish-
ing the amount of air bypassing the throttle plate.
The IAC is called a stepper motor because it is
moved (rotated) in steps, or increments. Opening the
IAC opens an air passage around the throttle blade
which increases RPM.
The PCM uses the IAC motor to control idle speed
(along with timing) and to reach a desired MAP dur-
ing decel (keep engine from stalling).
Fig. 19 PDC LOCATION
1 - BATTERY
2 - PDC (POWER DISTRIBUTION CENTER)
DRFUEL INJECTION - GAS 14 - 33
FUEL INJECTOR (Continued)
Page 1761 of 2895
heater. The heater can be check at room tempera-
ture. Operating range is 0.3 Ð 0.45 Ohms.
(3) Replace heater if resistance is not within oper-
ating range.
(4) If heater is within operating range, replace
heater thermostat.
REMOVAL
REMOVAL/INSTALLATION
The fuel heater/element/sensor assembly is located
inside of the fuel filter housing. Refer to Fuel Filter/
Water Separator Removal/Installation for procedures.
FUEL HEATER RELAY
DESCRIPTION
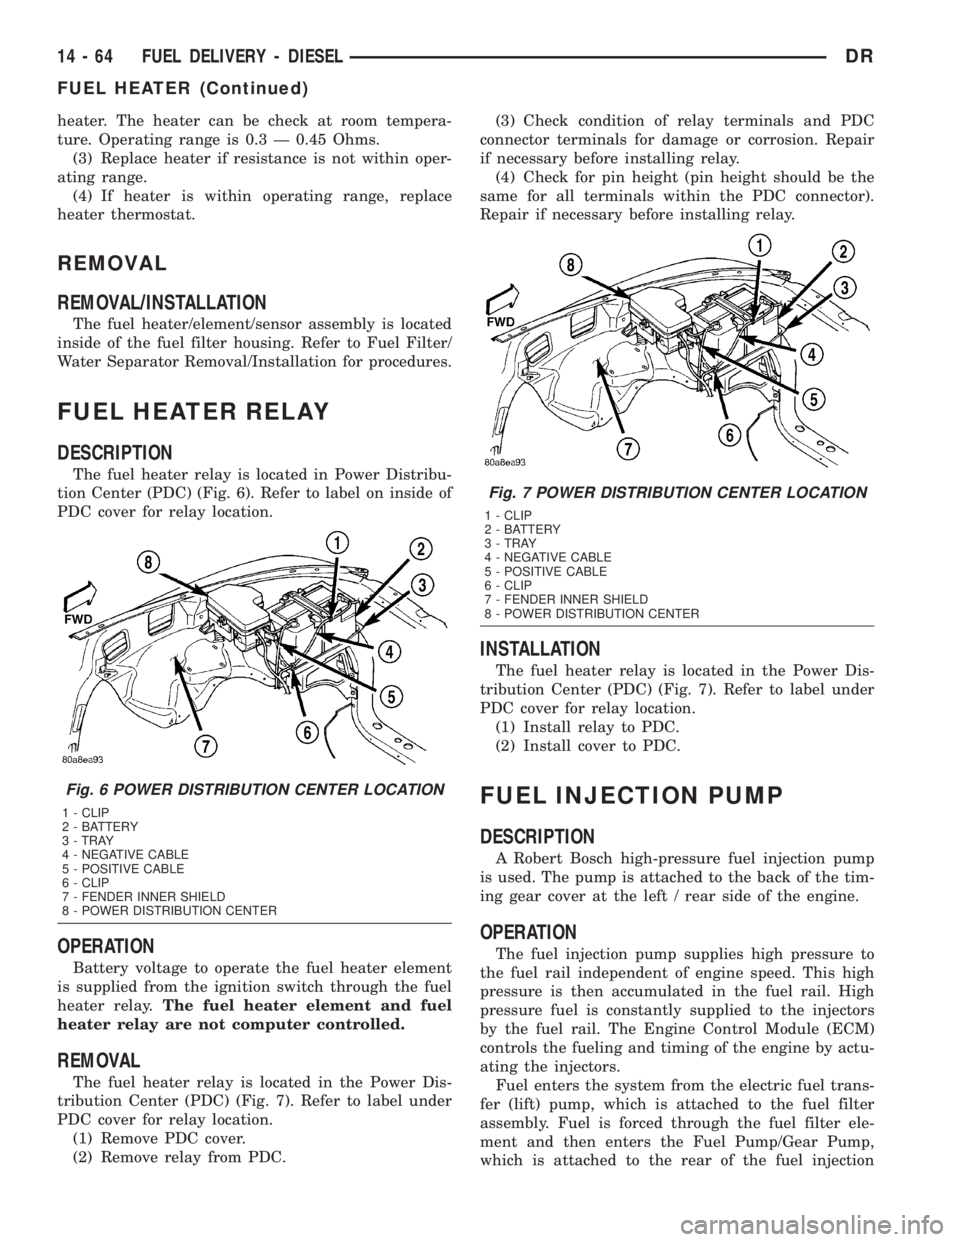
The fuel heater relay is located in Power Distribu-
tion Center (PDC) (Fig. 6). Refer to label on inside of
PDC cover for relay location.
OPERATION
Battery voltage to operate the fuel heater element
is supplied from the ignition switch through the fuel
heater relay.The fuel heater element and fuel
heater relay are not computer controlled.
REMOVAL
The fuel heater relay is located in the Power Dis-
tribution Center (PDC) (Fig. 7). Refer to label under
PDC cover for relay location.
(1) Remove PDC cover.
(2) Remove relay from PDC.(3) Check condition of relay terminals and PDC
connector terminals for damage or corrosion. Repair
if necessary before installing relay.
(4) Check for pin height (pin height should be the
same for all terminals within the PDC connector).
Repair if necessary before installing relay.
INSTALLATION
The fuel heater relay is located in the Power Dis-
tribution Center (PDC) (Fig. 7). Refer to label under
PDC cover for relay location.
(1) Install relay to PDC.
(2) Install cover to PDC.
FUEL INJECTION PUMP
DESCRIPTION
A Robert Bosch high-pressure fuel injection pump
is used. The pump is attached to the back of the tim-
ing gear cover at the left / rear side of the engine.
OPERATION
The fuel injection pump supplies high pressure to
the fuel rail independent of engine speed. This high
pressure is then accumulated in the fuel rail. High
pressure fuel is constantly supplied to the injectors
by the fuel rail. The Engine Control Module (ECM)
controls the fueling and timing of the engine by actu-
ating the injectors.
Fuel enters the system from the electric fuel trans-
fer (lift) pump, which is attached to the fuel filter
assembly. Fuel is forced through the fuel filter ele-
ment and then enters the Fuel Pump/Gear Pump,
which is attached to the rear of the fuel injection
Fig. 6 POWER DISTRIBUTION CENTER LOCATION
1 - CLIP
2 - BATTERY
3 - TRAY
4 - NEGATIVE CABLE
5 - POSITIVE CABLE
6 - CLIP
7 - FENDER INNER SHIELD
8 - POWER DISTRIBUTION CENTER
Fig. 7 POWER DISTRIBUTION CENTER LOCATION
1 - CLIP
2 - BATTERY
3 - TRAY
4 - NEGATIVE CABLE
5 - POSITIVE CABLE
6 - CLIP
7 - FENDER INNER SHIELD
8 - POWER DISTRIBUTION CENTER
14 - 64 FUEL DELIVERY - DIESELDR
FUEL HEATER (Continued)
Page 1848 of 2895
(12) Remove reverse idler shaft support segment
by sliding it straight out of housing.
(13) Support geartrain and rear housing on Fix-
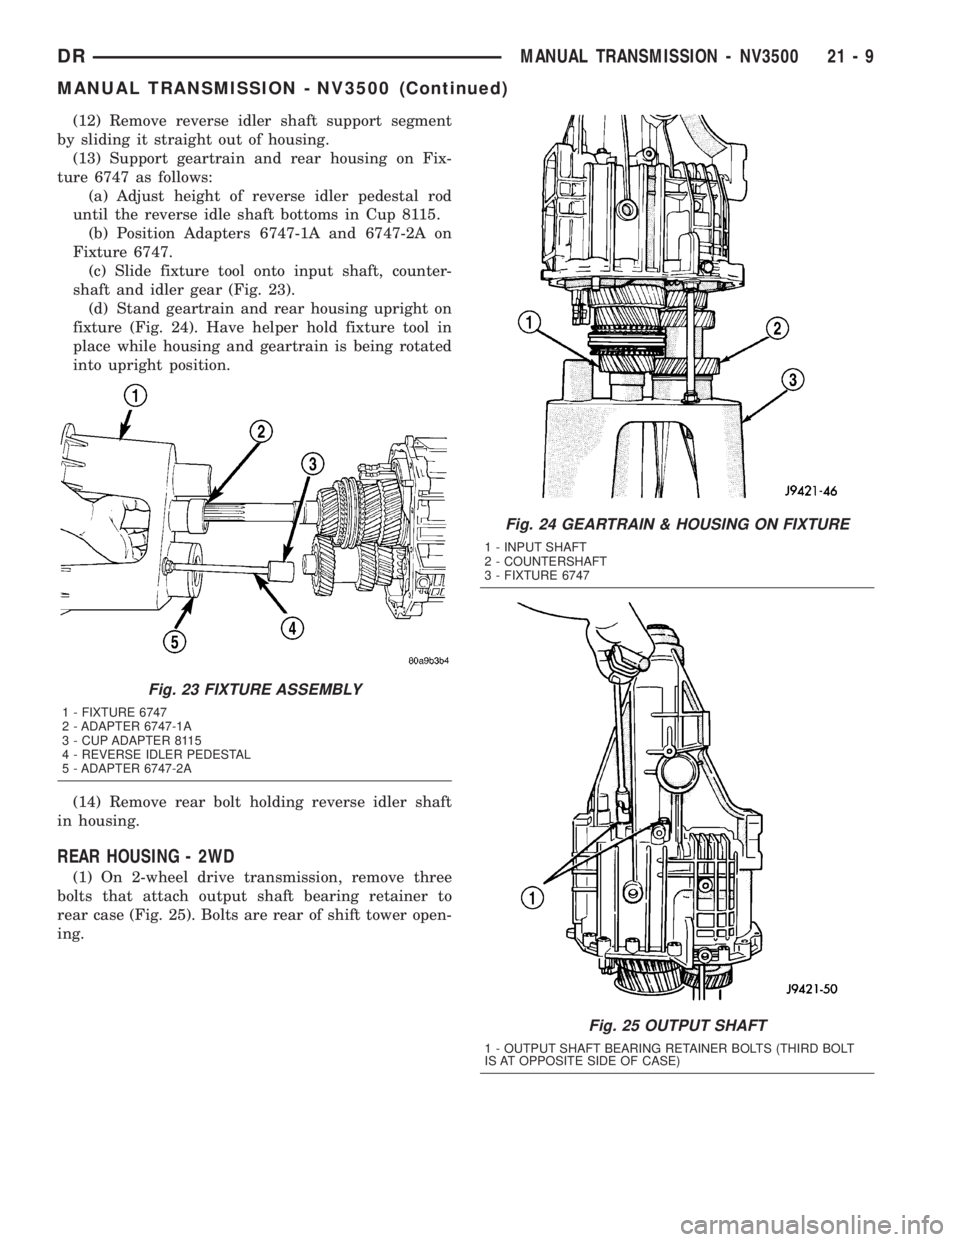
ture 6747 as follows:
(a) Adjust height of reverse idler pedestal rod
until the reverse idle shaft bottoms in Cup 8115.
(b) Position Adapters 6747-1A and 6747-2A on
Fixture 6747.
(c) Slide fixture tool onto input shaft, counter-
shaft and idler gear (Fig. 23).
(d) Stand geartrain and rear housing upright on
fixture (Fig. 24). Have helper hold fixture tool in
place while housing and geartrain is being rotated
into upright position.
(14) Remove rear bolt holding reverse idler shaft
in housing.
REAR HOUSING - 2WD
(1) On 2-wheel drive transmission, remove three
bolts that attach output shaft bearing retainer to
rear case (Fig. 25). Bolts are rear of shift tower open-
ing.
Fig. 23 FIXTURE ASSEMBLY
1 - FIXTURE 6747
2 - ADAPTER 6747-1A
3 - CUP ADAPTER 8115
4 - REVERSE IDLER PEDESTAL
5 - ADAPTER 6747-2A
Fig. 24 GEARTRAIN & HOUSING ON FIXTURE
1 - INPUT SHAFT
2 - COUNTERSHAFT
3 - FIXTURE 6747
Fig. 25 OUTPUT SHAFT
1 - OUTPUT SHAFT BEARING RETAINER BOLTS (THIRD BOLT
IS AT OPPOSITE SIDE OF CASE)
DRMANUAL TRANSMISSION - NV3500 21 - 9
MANUAL TRANSMISSION - NV3500 (Continued)
Page 1866 of 2895
GEARTRAIN ASSEMBLY
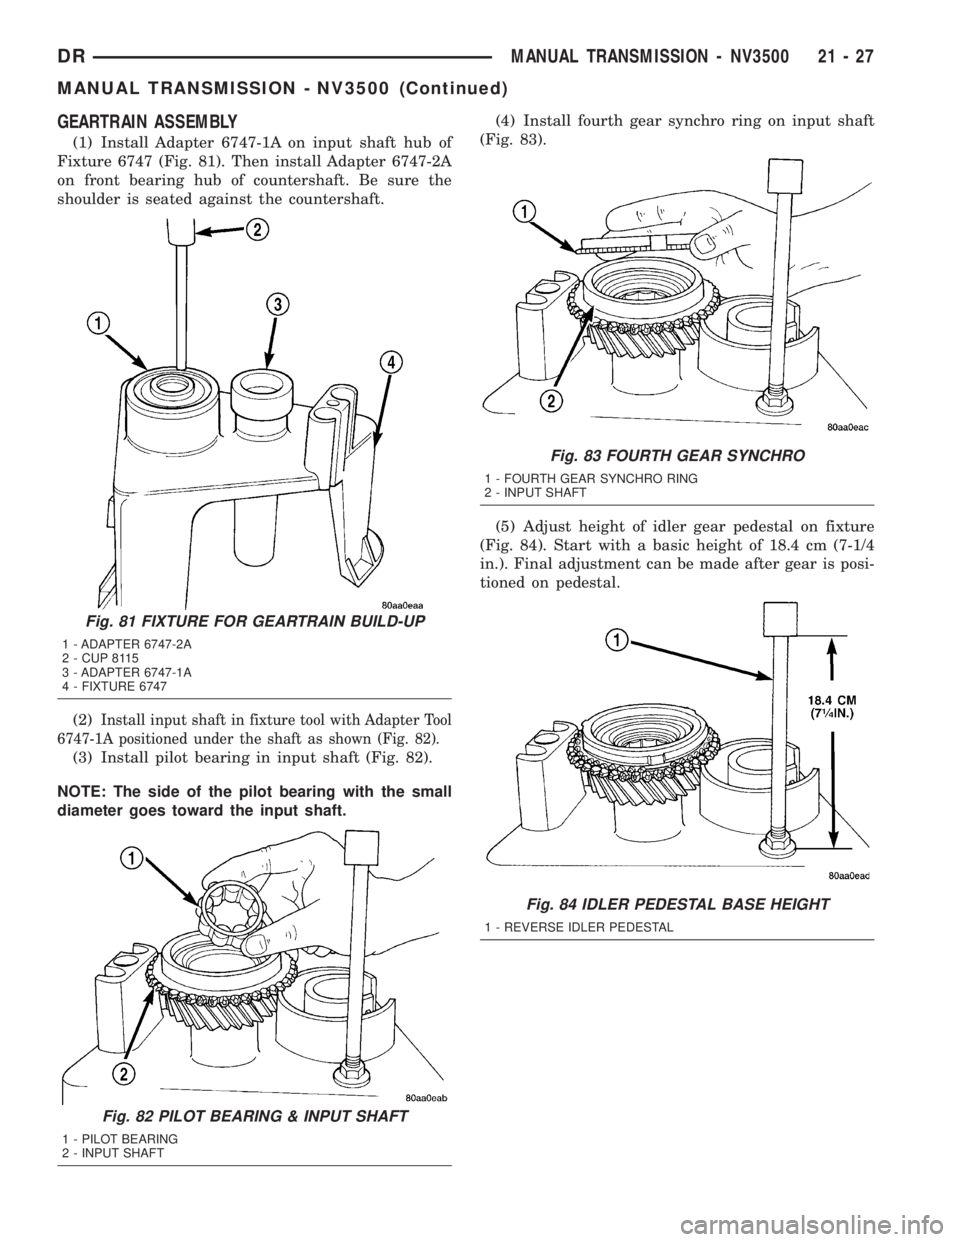
(1) Install Adapter 6747-1A on input shaft hub of
Fixture 6747 (Fig. 81). Then install Adapter 6747-2A
on front bearing hub of countershaft. Be sure the
shoulder is seated against the countershaft.
(2)
Install input shaft in fixture tool with Adapter Tool
6747-1A positioned under the shaft as shown (Fig. 82).
(3) Install pilot bearing in input shaft (Fig. 82).
NOTE: The side of the pilot bearing with the small
diameter goes toward the input shaft.(4) Install fourth gear synchro ring on input shaft
(Fig. 83).
(5) Adjust height of idler gear pedestal on fixture
(Fig. 84). Start with a basic height of 18.4 cm (7-1/4
in.). Final adjustment can be made after gear is posi-
tioned on pedestal.
Fig. 81 FIXTURE FOR GEARTRAIN BUILD-UP
1 - ADAPTER 6747-2A
2 - CUP 8115
3 - ADAPTER 6747-1A
4 - FIXTURE 6747
Fig. 82 PILOT BEARING & INPUT SHAFT
1 - PILOT BEARING
2 - INPUT SHAFT
Fig. 83 FOURTH GEAR SYNCHRO
1 - FOURTH GEAR SYNCHRO RING
2 - INPUT SHAFT
Fig. 84 IDLER PEDESTAL BASE HEIGHT
1 - REVERSE IDLER PEDESTAL
DRMANUAL TRANSMISSION - NV3500 21 - 27
MANUAL TRANSMISSION - NV3500 (Continued)
Page 1867 of 2895
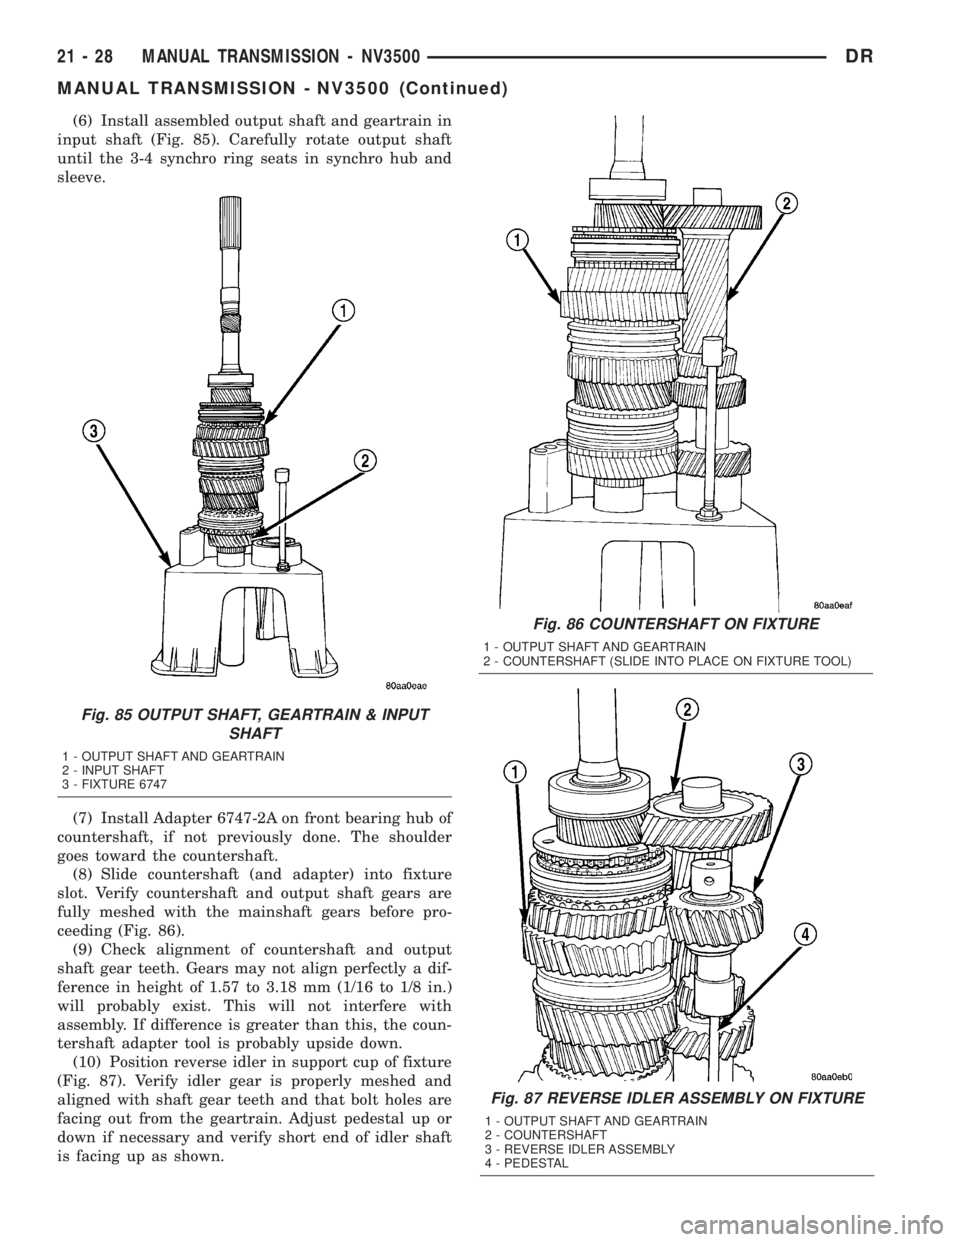
(6) Install assembled output shaft and geartrain in
input shaft (Fig. 85). Carefully rotate output shaft
until the 3-4 synchro ring seats in synchro hub and
sleeve.
(7) Install Adapter 6747-2A on front bearing hub of
countershaft, if not previously done. The shoulder
goes toward the countershaft.
(8) Slide countershaft (and adapter) into fixture
slot. Verify countershaft and output shaft gears are
fully meshed with the mainshaft gears before pro-
ceeding (Fig. 86).
(9) Check alignment of countershaft and output
shaft gear teeth. Gears may not align perfectly a dif-
ference in height of 1.57 to 3.18 mm (1/16 to 1/8 in.)
will probably exist. This will not interfere with
assembly. If difference is greater than this, the coun-
tershaft adapter tool is probably upside down.
(10) Position reverse idler in support cup of fixture
(Fig. 87). Verify idler gear is properly meshed and
aligned with shaft gear teeth and that bolt holes are
facing out from the geartrain. Adjust pedestal up or
down if necessary and verify short end of idler shaft
is facing up as shown.
Fig. 86 COUNTERSHAFT ON FIXTURE
1 - OUTPUT SHAFT AND GEARTRAIN
2 - COUNTERSHAFT (SLIDE INTO PLACE ON FIXTURE TOOL)
Fig. 87 REVERSE IDLER ASSEMBLY ON FIXTURE
1 - OUTPUT SHAFT AND GEARTRAIN
2 - COUNTERSHAFT
3 - REVERSE IDLER ASSEMBLY
4 - PEDESTAL
Fig. 85 OUTPUT SHAFT, GEARTRAIN & INPUT
SHAFT
1 - OUTPUT SHAFT AND GEARTRAIN
2 - INPUT SHAFT
3 - FIXTURE 6747
21 - 28 MANUAL TRANSMISSION - NV3500DR
MANUAL TRANSMISSION - NV3500 (Continued)
Page 1958 of 2895
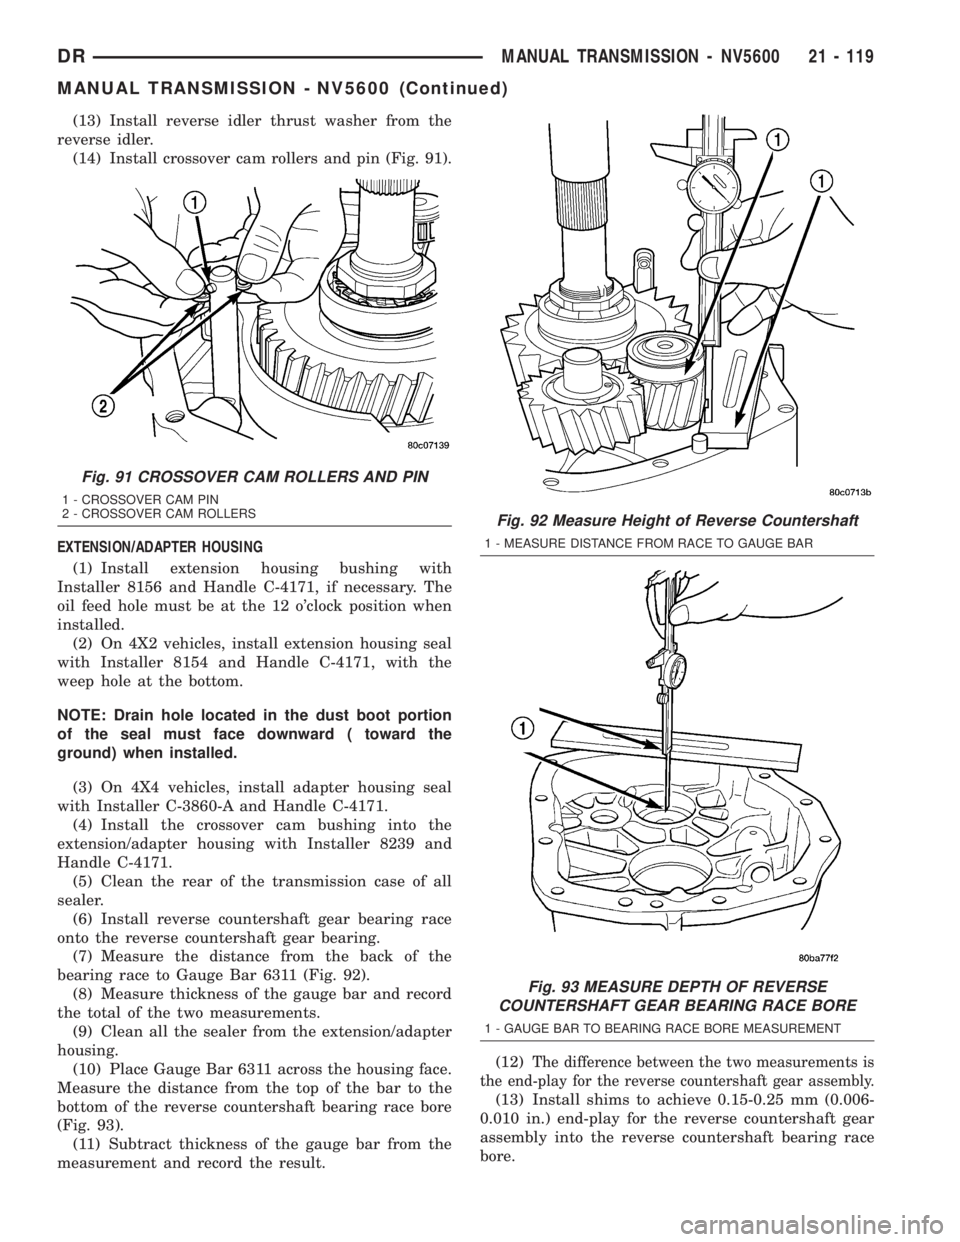
(13) Install reverse idler thrust washer from the
reverse idler.
(14) Install crossover cam rollers and pin (Fig. 91).
EXTENSION/ADAPTER HOUSING
(1) Install extension housing bushing with
Installer 8156 and Handle C-4171, if necessary. The
oil feed hole must be at the 12 o'clock position when
installed.
(2) On 4X2 vehicles, install extension housing seal
with Installer 8154 and Handle C-4171, with the
weep hole at the bottom.
NOTE: Drain hole located in the dust boot portion
of the seal must face downward ( toward the
ground) when installed.
(3) On 4X4 vehicles, install adapter housing seal
with Installer C-3860-A and Handle C-4171.
(4) Install the crossover cam bushing into the
extension/adapter housing with Installer 8239 and
Handle C-4171.
(5) Clean the rear of the transmission case of all
sealer.
(6) Install reverse countershaft gear bearing race
onto the reverse countershaft gear bearing.
(7) Measure the distance from the back of the
bearing race to Gauge Bar 6311 (Fig. 92).
(8) Measure thickness of the gauge bar and record
the total of the two measurements.
(9) Clean all the sealer from the extension/adapter
housing.
(10) Place Gauge Bar 6311 across the housing face.
Measure the distance from the top of the bar to the
bottom of the reverse countershaft bearing race bore
(Fig. 93).
(11) Subtract thickness of the gauge bar from the
measurement and record the result.(12)
The difference between the two measurements is
the end-play for the reverse countershaft gear assembly.
(13) Install shims to achieve 0.15-0.25 mm (0.006-
0.010 in.) end-play for the reverse countershaft gear
assembly into the reverse countershaft bearing race
bore.
Fig. 91 CROSSOVER CAM ROLLERS AND PIN
1 - CROSSOVER CAM PIN
2 - CROSSOVER CAM ROLLERS
Fig. 92 Measure Height of Reverse Countershaft
1 - MEASURE DISTANCE FROM RACE TO GAUGE BAR
Fig. 93 MEASURE DEPTH OF REVERSE
COUNTERSHAFT GEAR BEARING RACE BORE
1 - GAUGE BAR TO BEARING RACE BORE MEASUREMENT
DRMANUAL TRANSMISSION - NV5600 21 - 119
MANUAL TRANSMISSION - NV5600 (Continued)
Page 2663 of 2895
WINDSHIELD
WARNING
WINDSHIELD SAFETY PRECAUTIONS
WARNING: DO NOT OPERATE THE VEHICLE
WITHIN 24 HOURS OF WINDSHIELD INSTALLATION.
IT TAKES AT LEAST 24 HOURS FOR URETHANE
ADHESIVE TO CURE. IF IT IS NOT CURED, THE
WINDSHIELD MAY NOT PERFORM PROPERLY IN
AN ACCIDENT.
²URETHANE ADHESIVES ARE APPLIED AS A
SYSTEM. USE GLASS CLEANER, GLASS PREP
SOLVENT, GLASS PRIMER, PVC (VINYL) PRIMER
AND PINCH WELD (FENCE) PRIMER PROVIDED BY
THE ADHESIVE MANUFACTURER. IF NOT, STRUC-
TURAL INTEGRITY COULD BE COMPROMISED.
²DAIMLERCHRYSLER DOES NOT RECOMMEND
GLASS ADHESIVE BY BRAND. TECHNICIANS
SHOULD REVIEW PRODUCT LABELS AND TECHNI-
CAL DATA SHEETS, AND USE ONLY ADHESIVES
THAT THEIR MANUFACTURES WARRANT WILL
RESTORE A VEHICLE TO THE REQUIREMENTS OF
FMVSS 212. TECHNICIANS SHOULD ALSO INSURE
THAT PRIMERS AND CLEANERS ARE COMPATIBLE
WITH THE PARTICULAR ADHESIVE USED.
²BE SURE TO REFER TO THE URETHANE MAN-
UFACTURER'S DIRECTIONS FOR CURING TIME
SPECIFICATIONS, AND DO NOT USE ADHESIVE
AFTER ITS EXPIRATION DATE.
²VAPORS THAT ARE EMITTED FROM THE URE-
THANE ADHESIVE OR PRIMER COULD CAUSE
PERSONAL INJURY. USE THEM IN A WELL-VENTI-
LATED AREA.
²SKIN CONTACT WITH URETHANE ADHESIVE
SHOULD BE AVOIDED. PERSONAL INJURY MAY
RESULT.
²ALWAYS WEAR EYE AND HAND PROTECTION
WHEN WORKING WITH GLASS.
CAUTION: Protect all painted and trimmed surfaces
from coming in contact with urethane or primers.
Be careful not to damage painted surfaces when
removing moldings or cutting urethane around
windshield.
REMOVAL
(1) Remove inside rear view mirror. (Refer to 23 -
BODY/INTERIOR/REAR VIEW MIRROR - REMOV-
AL).
(2) Remove cowl grill. (Refer to 23 - BODY/EXTE-
RIOR/COWL GRILLE - REMOVAL).
(3) Remove the a-pillar weatherstrip retainer.
(Refer to 23 - BODY/WEATHERSTRIP/SEALS/A-
PILLAR WEATHERSTRIP RETAINER - REMOVAL)
(4) Remove the a-pillar trim panels. (Refer to 23 -
BODY/INTERIOR/A-PILLAR TRIM - REMOVAL)
(5) Remove the headliner and from the inside of
the vehicle, cut the upper urethane bonding from
around windshield upper edge using a suitable sharp
cold knife (C-4849). A pneumatic cutting device can
be used but is not recommended. (Refer to 23 -
BODY/INTERIOR/HEADLINER - REMOVAL)
(6) From the outside of the vehicle, cut urethane
bonding from the remaining sides of the windshield
using a suitable sharp cold knife (C-4849). A pneu-
matic cutting device can be used but is not recom-
mended.
(7) Separate windshield from vehicle.
INSTALLATION
WARNING: Allow the urethane at least 24 hours to
cure before returning the vehicle to use.
CAUTION: Roll down the left and right front door
glass and open the rear glass slider (if available)
before installing windshield to avoid pressurizing
the passenger compartment if a door is slammed
before urethane is cured. Water leaks can result.
The windshield fence should be cleaned of most of
its old urethane bonding material. A small amount of
old urethane, approximately 1-2 mm in height,
should remain on the fence. Do not grind off or com-
pletely remove all old urethane from the fence, the
paint finish and bonding strength will be adversely
affected.
(1) Place replacement windshield into windshield
opening and position glass in the center of the open-
ing against the support spacers. Mark the outside
surface of the glass at the support spacers with a
grease pencil or pieces of masking tape and ink pen
to use as a reference for installation. Remove replace-
ment windshield from windshield opening (Fig. 5).
(2) Position the windshield inside up on a suitable
work surface with two padded, wood 10 cm by 10 cm
by 50 cm (4 in. by 4 in. by 20 in.) blocks, placed par-
allel 75 cm (2.5 ft.) apart (Fig. 6).
(3) Clean inside of windshield with MOPAR Glass
Cleaner and lint-free cloth.
23 - 88 STATIONARY GLASSDR