4WD DODGE RAM 2003 Service Repair Manual
[x] Cancel search | Manufacturer: DODGE, Model Year: 2003, Model line: RAM, Model: DODGE RAM 2003Pages: 2895, PDF Size: 83.15 MB
Page 28 of 2895
TOWING
STANDARD PROCEDURE - TOWING
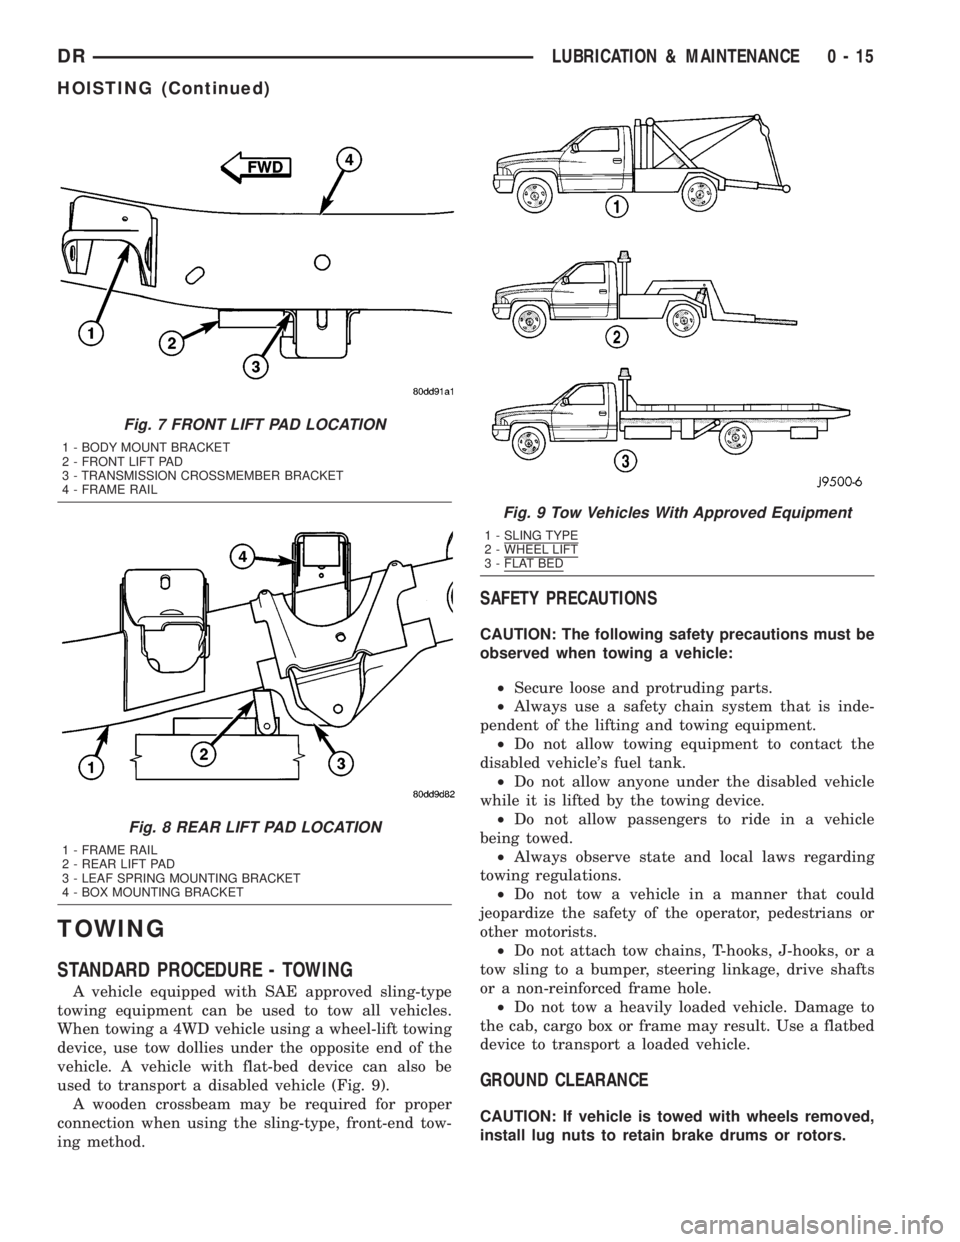
A vehicle equipped with SAE approved sling-type
towing equipment can be used to tow all vehicles.
When towing a 4WD vehicle using a wheel-lift towing
device, use tow dollies under the opposite end of the
vehicle. A vehicle with flat-bed device can also be
used to transport a disabled vehicle (Fig. 9).
A wooden crossbeam may be required for proper
connection when using the sling-type, front-end tow-
ing method.
SAFETY PRECAUTIONS
CAUTION: The following safety precautions must be
observed when towing a vehicle:
²Secure loose and protruding parts.
²Always use a safety chain system that is inde-
pendent of the lifting and towing equipment.
²Do not allow towing equipment to contact the
disabled vehicle's fuel tank.
²Do not allow anyone under the disabled vehicle
while it is lifted by the towing device.
²Do not allow passengers to ride in a vehicle
being towed.
²Always observe state and local laws regarding
towing regulations.
²Do not tow a vehicle in a manner that could
jeopardize the safety of the operator, pedestrians or
other motorists.
²Do not attach tow chains, T-hooks, J-hooks, or a
tow sling to a bumper, steering linkage, drive shafts
or a non-reinforced frame hole.
²Do not tow a heavily loaded vehicle. Damage to
the cab, cargo box or frame may result. Use a flatbed
device to transport a loaded vehicle.
GROUND CLEARANCE
CAUTION: If vehicle is towed with wheels removed,
install lug nuts to retain brake drums or rotors.
Fig. 7 FRONT LIFT PAD LOCATION
1 - BODY MOUNT BRACKET
2 - FRONT LIFT PAD
3 - TRANSMISSION CROSSMEMBER BRACKET
4 - FRAME RAIL
Fig. 8 REAR LIFT PAD LOCATION
1 - FRAME RAIL
2 - REAR LIFT PAD
3 - LEAF SPRING MOUNTING BRACKET
4 - BOX MOUNTING BRACKET
Fig. 9 Tow Vehicles With Approved Equipment
1 - SLING TYPE2 - WHEEL LIFT3 - FLAT BED
DRLUBRICATION & MAINTENANCE 0 - 15
HOISTING (Continued)
Page 29 of 2895
A towed vehicle should be raised until lifted wheels
are a minimum 100 mm (4 in) from the ground. Be
sure there is adequate ground clearance at the oppo-
site end of the vehicle, especially when towing over
rough terrain or steep rises in the road. If necessary,
remove the wheels from the lifted end of the vehicle
and lower the vehicle closer to the ground, to
increase the ground clearance at the opposite end of
the vehicle. Install lug nuts on wheel attaching studs
to retain brake drums or rotors.
RAMP ANGLE
If a vehicle with flat-bed towing equipment is used,
the approach ramp angle should not exceed 15
degrees.
TOWING WHEN KEYS ARE NOT AVAILABLE
When the vehicle is locked and keys are not avail-
able, use a flat bed hauler. A Wheel-lift or Sling-type
device can be used on 4WD vehicles providedall the
wheels are lifted off the ground using tow dol-
lies.
FOUR-WHEEL-DRIVE VEHICLE TOWING
Chrysler Corporation recommends that a vehicle be
transported on a flat-bed device. A Wheel-lift or
Sling-type device can be used providedall the
wheels are lifted off the ground using tow dol-
lies.
WARNING: WHEN TOWING A DISABLED VEHICLE
AND THE DRIVE WHEELS ARE SECURED IN A
WHEEL LIFT OR TOW DOLLIES, ENSURE THE
TRANSMISSION IS IN THE PARK POSITION (AUTO-
MATIC TRANSMISSION) OR A FORWARD DRIVE
GEAR (MANUAL TRANSMISSION).
CAUTION: Many vehicles are equipped with air
dams, spoilers, and/or ground effect panels. To
avoid component damage, a wheel-lift towing vehi-
cle or a flat-bed hauling vehicle is recommended.
0 - 16 LUBRICATION & MAINTENANCEDR
TOWING (Continued)
Page 30 of 2895
SUSPENSION
TABLE OF CONTENTS
page page
WHEEL ALIGNMENT......................1
FRONT - INDEPENDENT FRONT SUSPENSION..8FRONT - LINK/COIL......................28
REAR.................................38
WHEEL ALIGNMENT
TABLE OF CONTENTS
page page
WHEEL ALIGNMENT
DESCRIPTION..........................1
OPERATION............................2
DIAGNOSIS AND TESTING - PRE-ALIGNMENT
INSPECTION..........................2
STANDARD PROCEDURE
STANDARD PROCEDURE - HEIGHT
MEASUREMENT - 4WD (LD)..............3
STANDARD PROCEDURE - HEIGHT
ADJUSTMENT - 4WD (LD)................3
STANDARD PROCEDURE - CAMBER AND
CASTER ADJUSTMENT..................4STANDARD PROCEDURE - TOE
ADJUSTMENT.........................4
STANDARD PROCEDURE - CAMBER,
CASTER AND TOE ADJUSTMENT..........4
STANDARD PROCEDURE - ALIGNMENT
LINK/COIL SUSPENSION.................5
SPECIFICATIONS
ALIGNMENT..........................6
SPECIAL TOOLS
WHEEL ALIGNMENT....................7
WHEEL ALIGNMENT
DESCRIPTION
NOTE: Suspension components with rubber/ure-
thane bushings should be tightened with the vehi-
cle at normal ride height. It is important to have the
springs supporting the weight of the vehicle when
the fasteners are torqued. If springs are not at their
normal ride position, vehicle ride comfort could be
affected and premature bushing wear may occur.
Wheel alignment involves the correct positioning of
the wheels in relation to the vehicle. The positioning
is accomplished through suspension and steering
linkage adjustments. An alignment is considered
essential for efficient steering, good directional stabil-
ity and to minimize tire wear. The most important
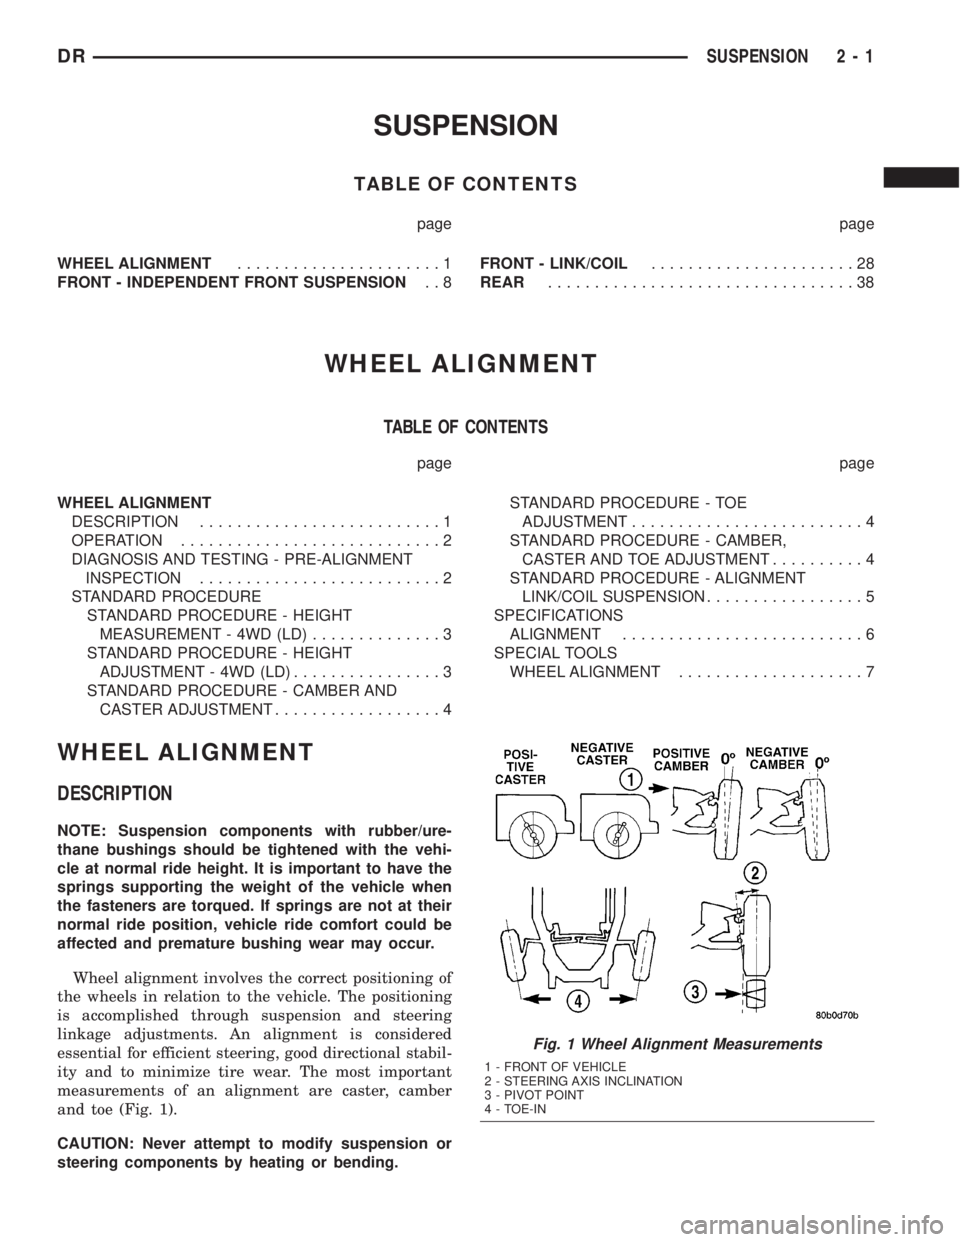
measurements of an alignment are caster, camber
and toe (Fig. 1).
CAUTION: Never attempt to modify suspension or
steering components by heating or bending.
Fig. 1 Wheel Alignment Measurements
1 - FRONT OF VEHICLE
2 - STEERING AXIS INCLINATION
3 - PIVOT POINT
4 - TOE-IN
DRSUSPENSION 2 - 1
Page 32 of 2895
CONDITION POSSIBLE CAUSES CORRECTION
EXCESSIVE STEERING
EFFORT1. Loose or worn steering gear. 1. Replace steering gear.
2. Column coupler binding. 2. Replace coupler.
3. Tire pressure. 3. Adjust tire pressure.
4. Alignment. 4. Align vehicle to specifications.
VEHICLE PULLS TO ONE
SIDE1. Tire pressure. 1. Adjust tire pressure.
2. Tire. 2. Criss-Cross Front Tires.
3. Alignment. 3. Align vehicle to specifications.
4. Loose or worn steering or
suspension components.4. Tighten or replace components as
necessary.
5. Radial tire lead. 5. Rotate or replace tire as necessary.
6. Brake pull. 6. Repair brake as necessary.
7. Weak or broken spring. 7. Replace spring.
8. Ride height (LD) 4WD only. 8. Measure and adjust ride height. (LD
only)
STANDARD PROCEDURE
STANDARD PROCEDURE - HEIGHT
MEASUREMENT - 4WD (LD)
The vehicle suspension height MUST be measured
and adjusted before performing wheel alignment pro-
cedure. Also when front suspension components have
been replaced. This measure must be performed with
the vehicle supporting it's own weight and taken on
both sides of the vehicle.
(1) Inspect tires and set to correct pressure.
(2) Jounce the front of the vehicle.
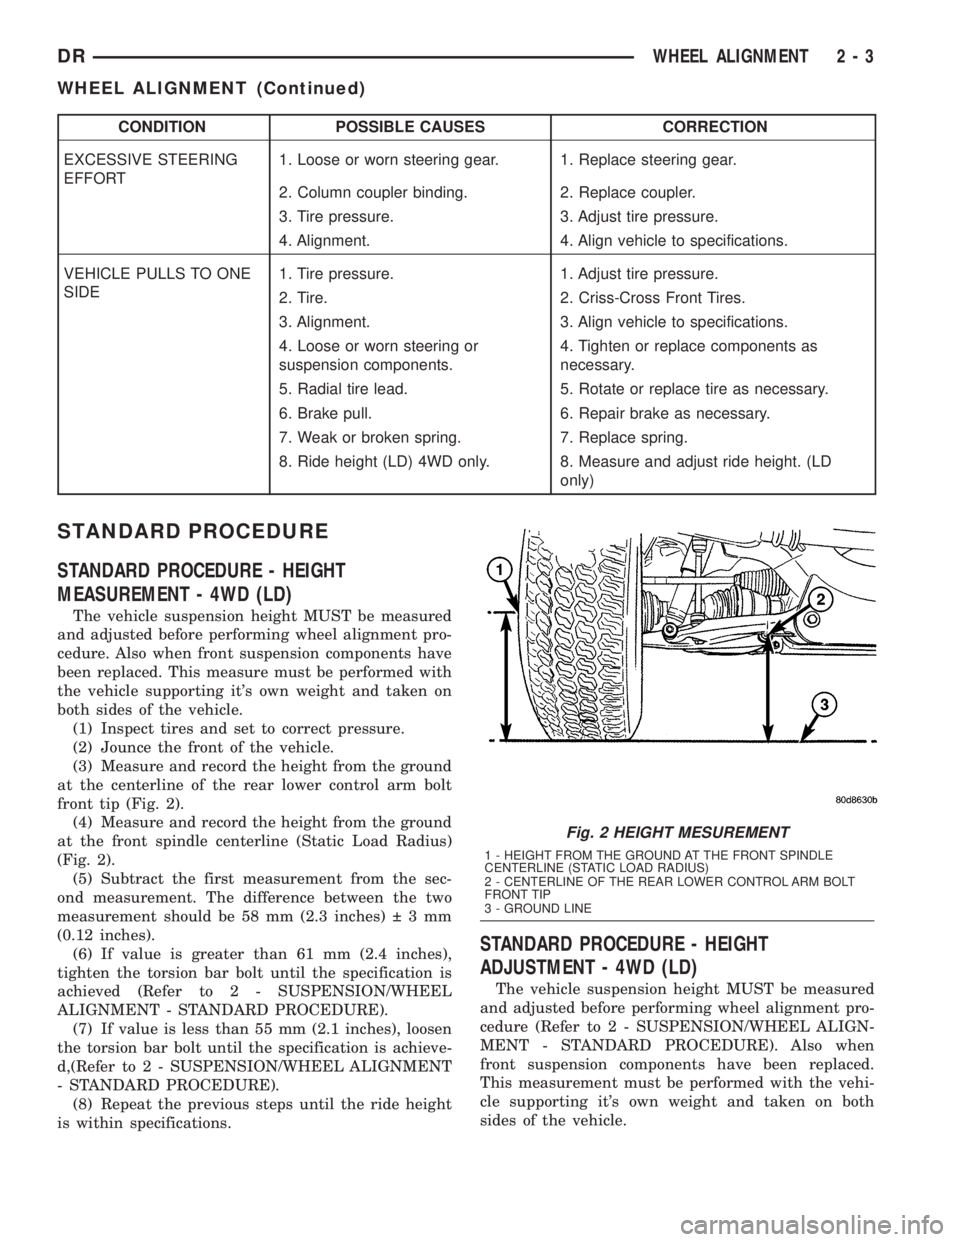
(3) Measure and record the height from the ground
at the centerline of the rear lower control arm bolt
front tip (Fig. 2).
(4) Measure and record the height from the ground
at the front spindle centerline (Static Load Radius)
(Fig. 2).
(5) Subtract the first measurement from the sec-
ond measurement. The difference between the two
measurement should be 58 mm (2.3 inches) 3mm
(0.12 inches).
(6) If value is greater than 61 mm (2.4 inches),
tighten the torsion bar bolt until the specification is
achieved (Refer to 2 - SUSPENSION/WHEEL
ALIGNMENT - STANDARD PROCEDURE).
(7) If value is less than 55 mm (2.1 inches), loosen
the torsion bar bolt until the specification is achieve-
d,(Refer to 2 - SUSPENSION/WHEEL ALIGNMENT
- STANDARD PROCEDURE).
(8) Repeat the previous steps until the ride height
is within specifications.
STANDARD PROCEDURE - HEIGHT
ADJUSTMENT - 4WD (LD)
The vehicle suspension height MUST be measured
and adjusted before performing wheel alignment pro-
cedure (Refer to 2 - SUSPENSION/WHEEL ALIGN-
MENT - STANDARD PROCEDURE). Also when
front suspension components have been replaced.
This measurement must be performed with the vehi-
cle supporting it's own weight and taken on both
sides of the vehicle.
Fig. 2 HEIGHT MESUREMENT
1 - HEIGHT FROM THE GROUND AT THE FRONT SPINDLE
CENTERLINE (STATIC LOAD RADIUS)
2 - CENTERLINE OF THE REAR LOWER CONTROL ARM BOLT
FRONT TIP
3 - GROUND LINE
DRWHEEL ALIGNMENT 2 - 3
WHEEL ALIGNMENT (Continued)
Page 37 of 2895
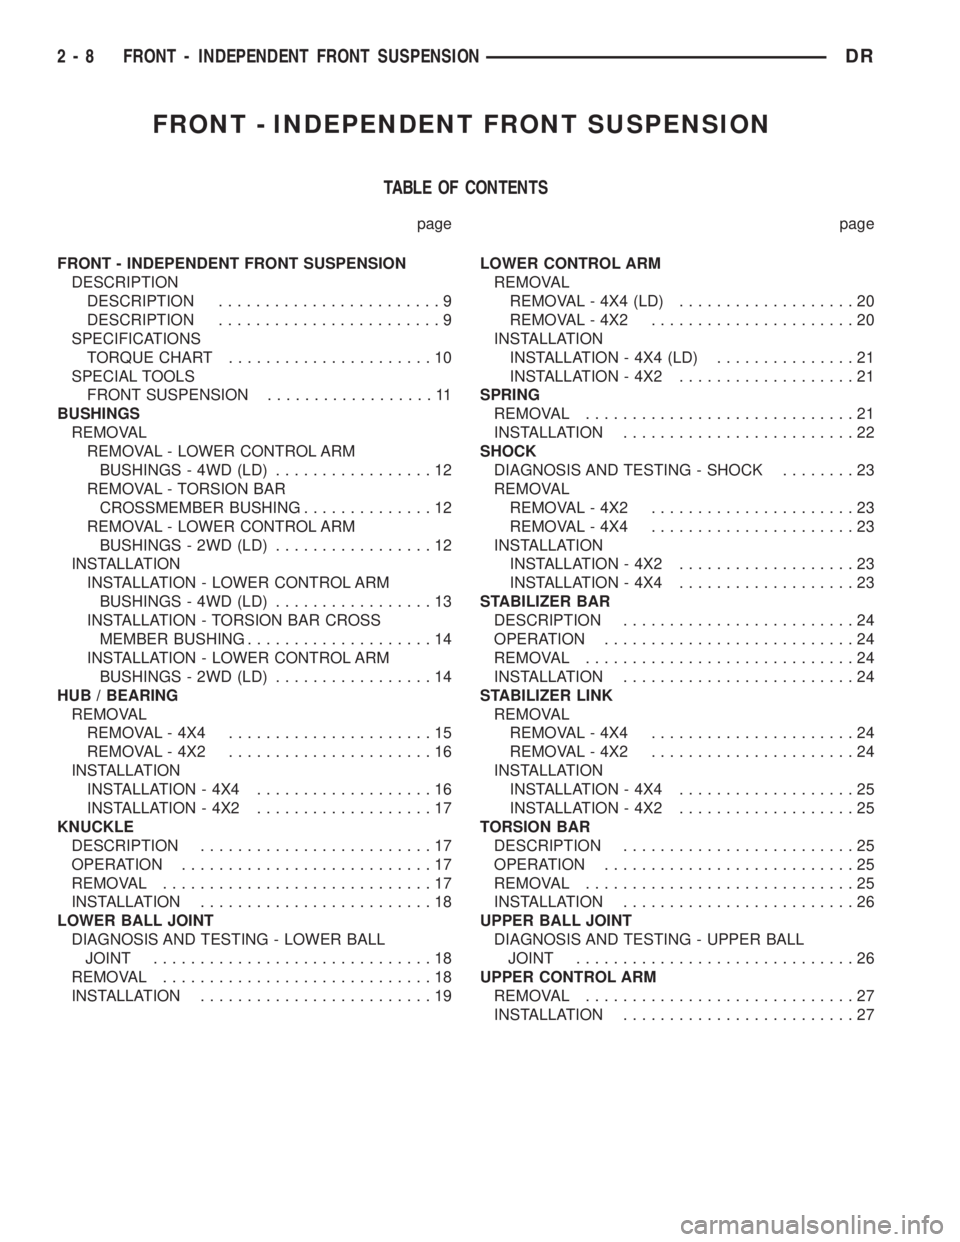
FRONT - INDEPENDENT FRONT SUSPENSION
TABLE OF CONTENTS
page page
FRONT - INDEPENDENT FRONT SUSPENSION
DESCRIPTION
DESCRIPTION........................9
DESCRIPTION........................9
SPECIFICATIONS
TORQUE CHART......................10
SPECIAL TOOLS
FRONT SUSPENSION..................11
BUSHINGS
REMOVAL
REMOVAL - LOWER CONTROL ARM
BUSHINGS - 4WD (LD).................12
REMOVAL - TORSION BAR
CROSSMEMBER BUSHING..............12
REMOVAL - LOWER CONTROL ARM
BUSHINGS - 2WD (LD).................12
INSTALLATION
INSTALLATION - LOWER CONTROL ARM
BUSHINGS - 4WD (LD).................13
INSTALLATION - TORSION BAR CROSS
MEMBER BUSHING....................14
INSTALLATION - LOWER CONTROL ARM
BUSHINGS - 2WD (LD).................14
HUB / BEARING
REMOVAL
REMOVAL - 4X4......................15
REMOVAL - 4X2......................16
INSTALLATION
INSTALLATION - 4X4...................16
INSTALLATION - 4X2...................17
KNUCKLE
DESCRIPTION.........................17
OPERATION...........................17
REMOVAL.............................17
INSTALLATION.........................18
LOWER BALL JOINT
DIAGNOSIS AND TESTING - LOWER BALL
JOINT..............................18
REMOVAL.............................18
INSTALLATION.........................19LOWER CONTROL ARM
REMOVAL
REMOVAL - 4X4 (LD)...................20
REMOVAL - 4X2......................20
INSTALLATION
INSTALLATION - 4X4 (LD)...............21
INSTALLATION - 4X2...................21
SPRING
REMOVAL.............................21
INSTALLATION.........................22
SHOCK
DIAGNOSIS AND TESTING - SHOCK........23
REMOVAL
REMOVAL - 4X2......................23
REMOVAL - 4X4......................23
INSTALLATION
INSTALLATION - 4X2...................23
INSTALLATION - 4X4...................23
STABILIZER BAR
DESCRIPTION.........................24
OPERATION...........................24
REMOVAL.............................24
INSTALLATION.........................24
STABILIZER LINK
REMOVAL
REMOVAL - 4X4......................24
REMOVAL - 4X2......................24
INSTALLATION
INSTALLATION - 4X4...................25
INSTALLATION - 4X2...................25
TORSION BAR
DESCRIPTION.........................25
OPERATION...........................25
REMOVAL.............................25
INSTALLATION.........................26
UPPER BALL JOINT
DIAGNOSIS AND TESTING - UPPER BALL
JOINT..............................26
UPPER CONTROL ARM
REMOVAL.............................27
INSTALLATION.........................27
2 - 8 FRONT - INDEPENDENT FRONT SUSPENSIONDR
Page 40 of 2895
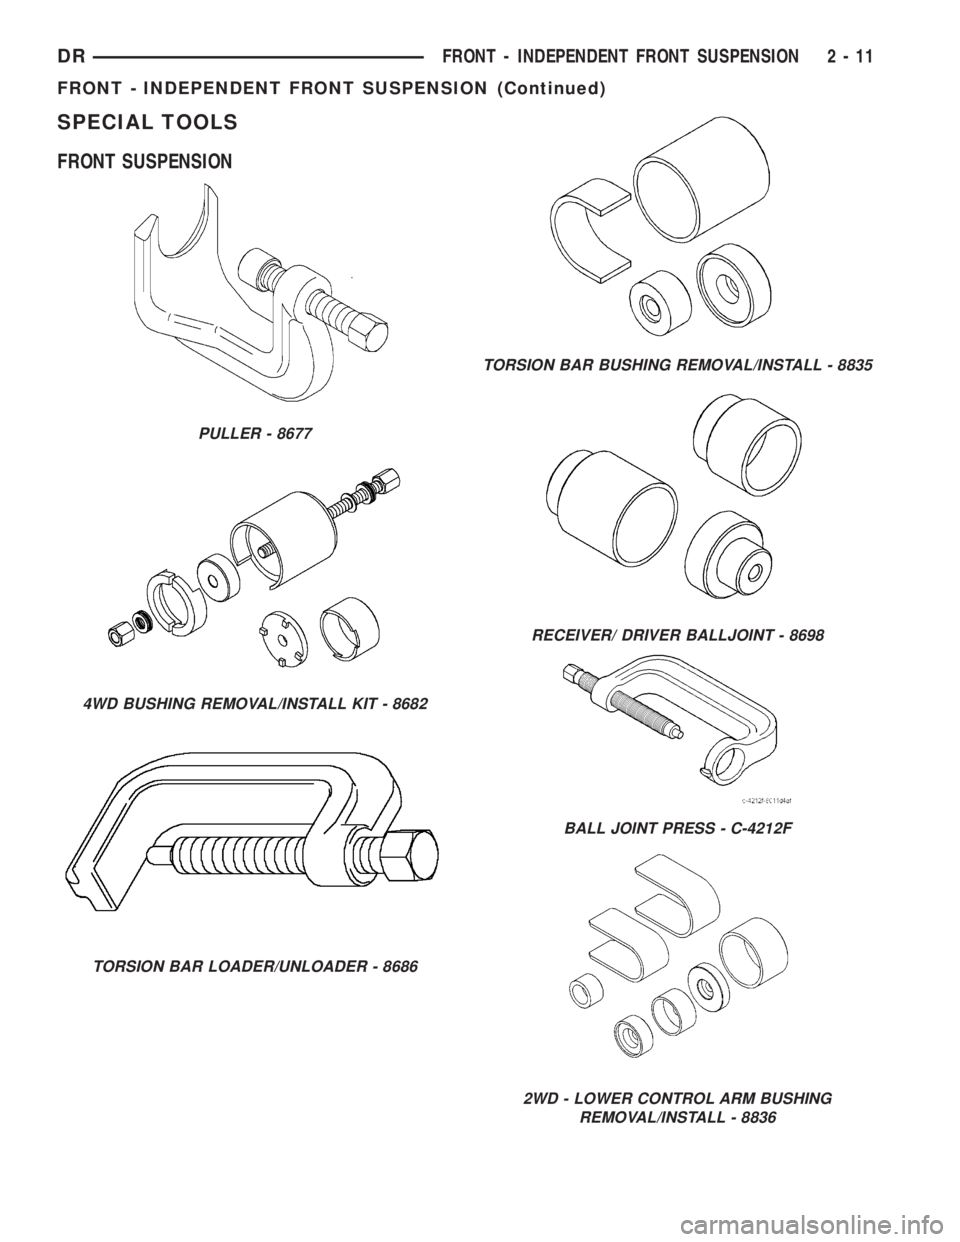
SPECIAL TOOLS
FRONT SUSPENSION
PULLER - 8677
4WD BUSHING REMOVAL/INSTALL KIT - 8682
TORSION BAR LOADER/UNLOADER - 8686
TORSION BAR BUSHING REMOVAL/INSTALL - 8835
RECEIVER/ DRIVER BALLJOINT - 8698
BALL JOINT PRESS - C-4212F
2WD - LOWER CONTROL ARM BUSHING
REMOVAL/INSTALL - 8836
DRFRONT - INDEPENDENT FRONT SUSPENSION 2 - 11
FRONT - INDEPENDENT FRONT SUSPENSION (Continued)
Page 41 of 2895
BUSHINGS
REMOVAL
REMOVAL - LOWER CONTROL ARM
BUSHINGS - 4WD (LD)
(1) Remove the lower control arm (Refer to 2 -
SUSPENSION/FRONT/LOWER CONTROL ARM -
REMOVAL).
(2) Secure the control arm in a vise.
NOTE: Extreme pressure lubrication must be used
on the threaded portions of the tool. This will
increase the longevity of the tool and insure proper
operation during the removal and installation pro-
cess.
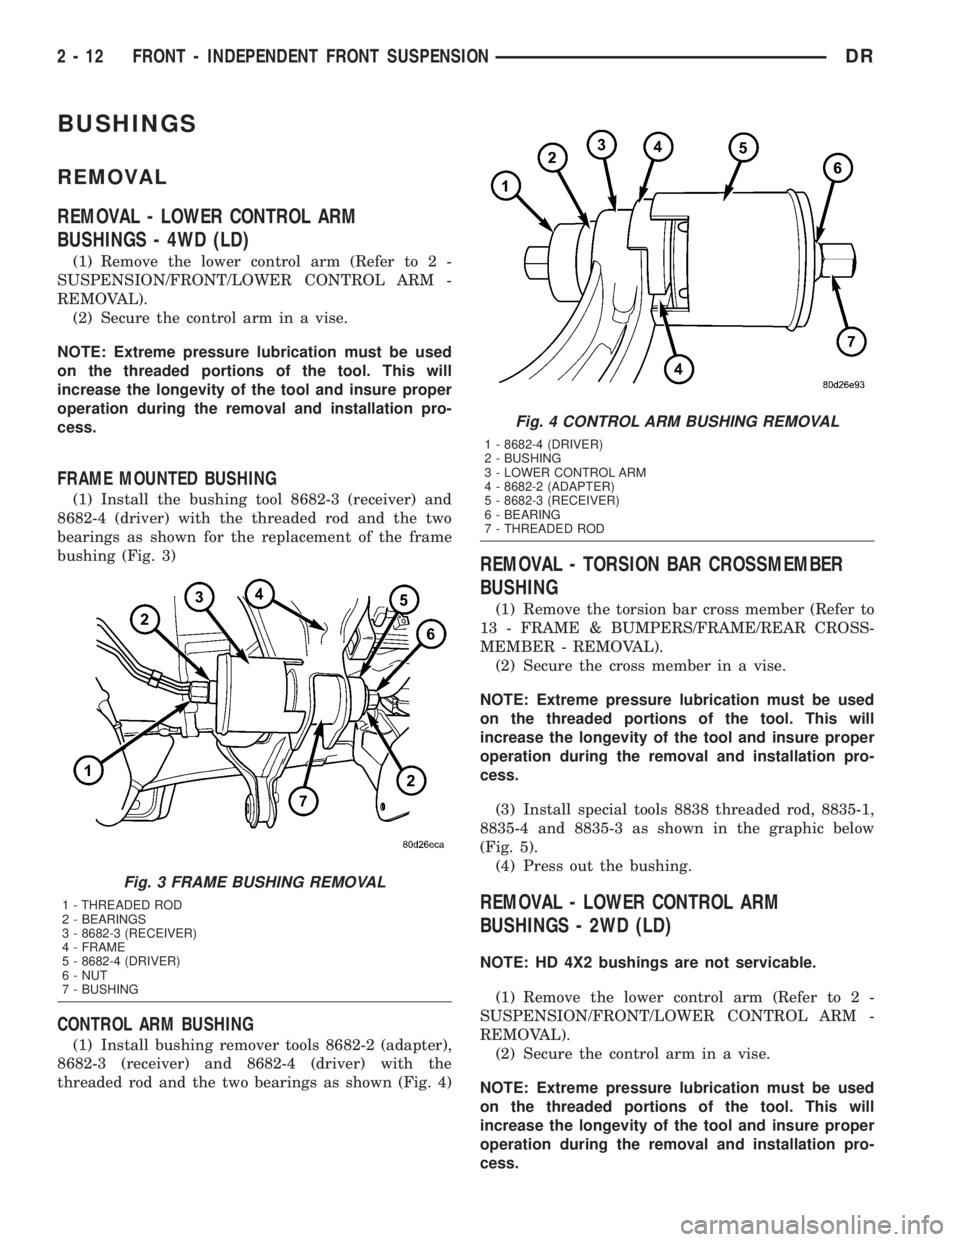
FRAME MOUNTED BUSHING
(1) Install the bushing tool 8682-3 (receiver) and
8682-4 (driver) with the threaded rod and the two
bearings as shown for the replacement of the frame
bushing (Fig. 3)
CONTROL ARM BUSHING
(1) Install bushing remover tools 8682-2 (adapter),
8682-3 (receiver) and 8682-4 (driver) with the
threaded rod and the two bearings as shown (Fig. 4)
REMOVAL - TORSION BAR CROSSMEMBER
BUSHING
(1) Remove the torsion bar cross member (Refer to
13 - FRAME & BUMPERS/FRAME/REAR CROSS-
MEMBER - REMOVAL).
(2) Secure the cross member in a vise.
NOTE: Extreme pressure lubrication must be used
on the threaded portions of the tool. This will
increase the longevity of the tool and insure proper
operation during the removal and installation pro-
cess.
(3) Install special tools 8838 threaded rod, 8835-1,
8835-4 and 8835-3 as shown in the graphic below
(Fig. 5).
(4) Press out the bushing.
REMOVAL - LOWER CONTROL ARM
BUSHINGS - 2WD (LD)
NOTE: HD 4X2 bushings are not servicable.
(1) Remove the lower control arm (Refer to 2 -
SUSPENSION/FRONT/LOWER CONTROL ARM -
REMOVAL).
(2) Secure the control arm in a vise.
NOTE: Extreme pressure lubrication must be used
on the threaded portions of the tool. This will
increase the longevity of the tool and insure proper
operation during the removal and installation pro-
cess.
Fig. 3 FRAME BUSHING REMOVAL
1 - THREADED ROD
2 - BEARINGS
3 - 8682-3 (RECEIVER)
4 - FRAME
5 - 8682-4 (DRIVER)
6 - NUT
7 - BUSHING
Fig. 4 CONTROL ARM BUSHING REMOVAL
1 - 8682-4 (DRIVER)
2 - BUSHING
3 - LOWER CONTROL ARM
4 - 8682-2 (ADAPTER)
5 - 8682-3 (RECEIVER)
6 - BEARING
7 - THREADED ROD
2 - 12 FRONT - INDEPENDENT FRONT SUSPENSIONDR
Page 42 of 2895
LARGE BUSHING
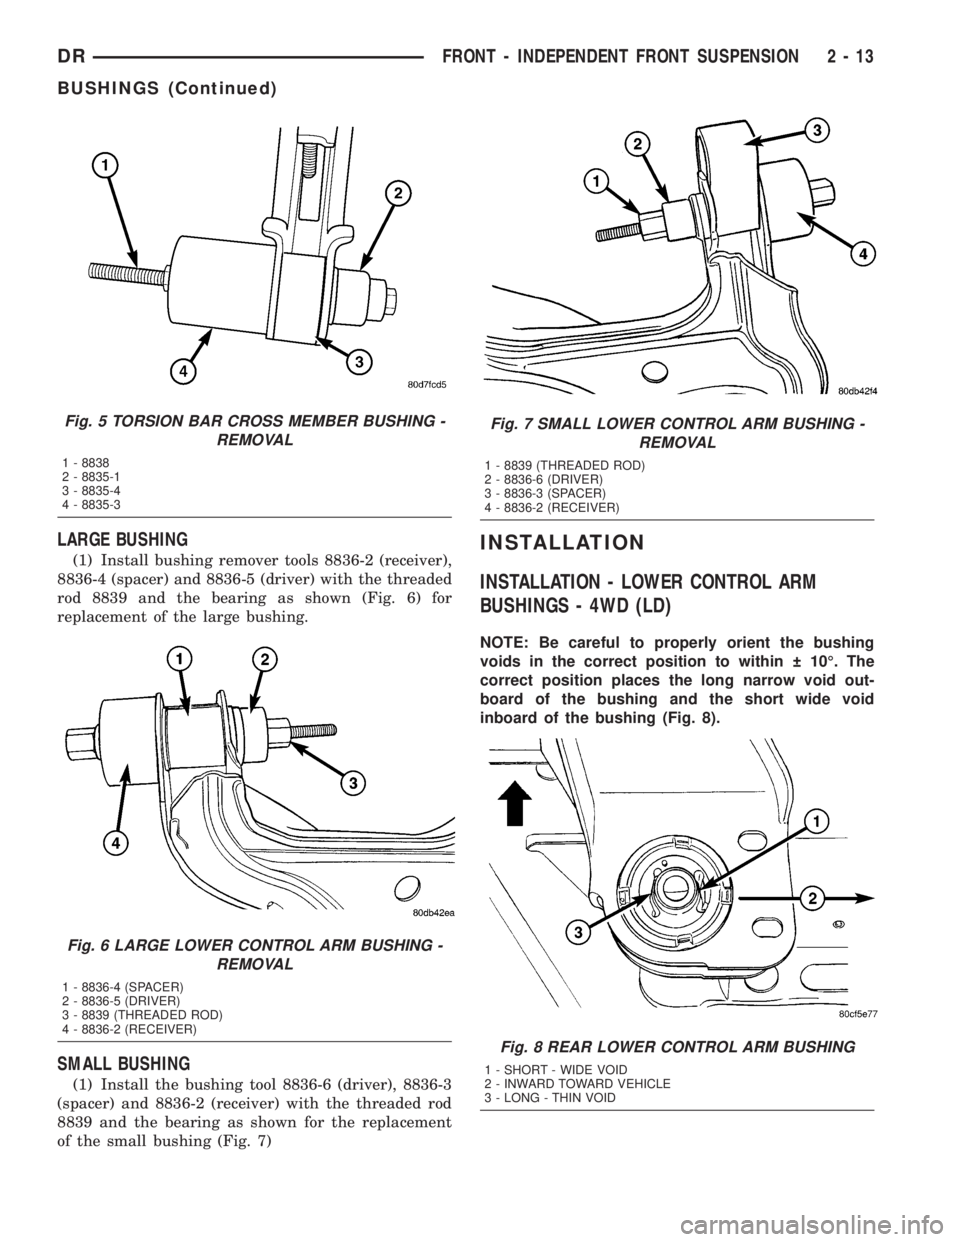
(1) Install bushing remover tools 8836-2 (receiver),
8836-4 (spacer) and 8836-5 (driver) with the threaded
rod 8839 and the bearing as shown (Fig. 6) for
replacement of the large bushing.
SMALL BUSHING
(1) Install the bushing tool 8836-6 (driver), 8836-3
(spacer) and 8836-2 (receiver) with the threaded rod
8839 and the bearing as shown for the replacement
of the small bushing (Fig. 7)
INSTALLATION
INSTALLATION - LOWER CONTROL ARM
BUSHINGS - 4WD (LD)
NOTE: Be careful to properly orient the bushing
voids in the correct position to within 10É. The
correct position places the long narrow void out-
board of the bushing and the short wide void
inboard of the bushing (Fig. 8).
Fig. 5 TORSION BAR CROSS MEMBER BUSHING -
REMOVAL
1 - 8838
2 - 8835-1
3 - 8835-4
4 - 8835-3
Fig. 6 LARGE LOWER CONTROL ARM BUSHING -
REMOVAL
1 - 8836-4 (SPACER)
2 - 8836-5 (DRIVER)
3 - 8839 (THREADED ROD)
4 - 8836-2 (RECEIVER)
Fig. 7 SMALL LOWER CONTROL ARM BUSHING -
REMOVAL
1 - 8839 (THREADED ROD)
2 - 8836-6 (DRIVER)
3 - 8836-3 (SPACER)
4 - 8836-2 (RECEIVER)
Fig. 8 REAR LOWER CONTROL ARM BUSHING
1 - SHORT - WIDE VOID
2 - INWARD TOWARD VEHICLE
3 - LONG - THIN VOID
DRFRONT - INDEPENDENT FRONT SUSPENSION 2 - 13
BUSHINGS (Continued)
Page 335 of 2895
OPERATION
The wax pellet is located in a sealed container at
the spring end of the thermostat. When heated, the
pellet expands, overcoming closing spring tension
and water pump pressure to force the valve to open.
DIAGNOSIS AND TESTINGÐTHERMOSTAT
ON-BOARD DIAGNOSTICS
Allgasoline powered modelsare equipped with
On-Board Diagnostics for certain cooling system com-
ponents. Refer to On-Board Diagnostics (OBD) in the
Diagnosis section of this group for additional infor-
mation. If the powertrain control module (PCM)
detects low engine coolant temperature, it will record
a Diagnostic Trouble Code (DTC) in the PCM mem-
ory. Do not change a thermostat for lack of heat as
indicated by the instrument panel gauge or by poor
heater performance unless a DTC is present. Refer to
the Diagnosis section of this group for other probable
causes.
The DTC can also be accessed through the
DRBIIItscan tool. Refer to the appropriate Power-
train Diagnostic Procedures information for diagnos-
tic information and operation of the DRBIIItscan
tool.
REMOVAL
WARNING: DO NOT LOOSEN THE RADIATOR
DRAINCOCK WITH THE COOLING SYSTEM HOT
AND PRESSURIZED. SERIOUS BURNS FROM THE
COOLANT CAN OCCUR.
Do not waste reusable coolant. If the solution is
clean, drain the coolant into a clean container for
reuse.
If the thermostat is being replaced, be sure that
the replacement is the specified thermostat for the
vehicle model and engine type.
Factory installed thermostat housings on 5.9L
engine is installed on a gasket with an anti-stick
coating. This will aid in gasket removal and clean-up.
(1) Disconnect the negative battery cable.
(2) Drain the cooling system until the coolant level
is below the thermostat (Refer to 7 - COOLING -
STANDARD PROCEDURE).
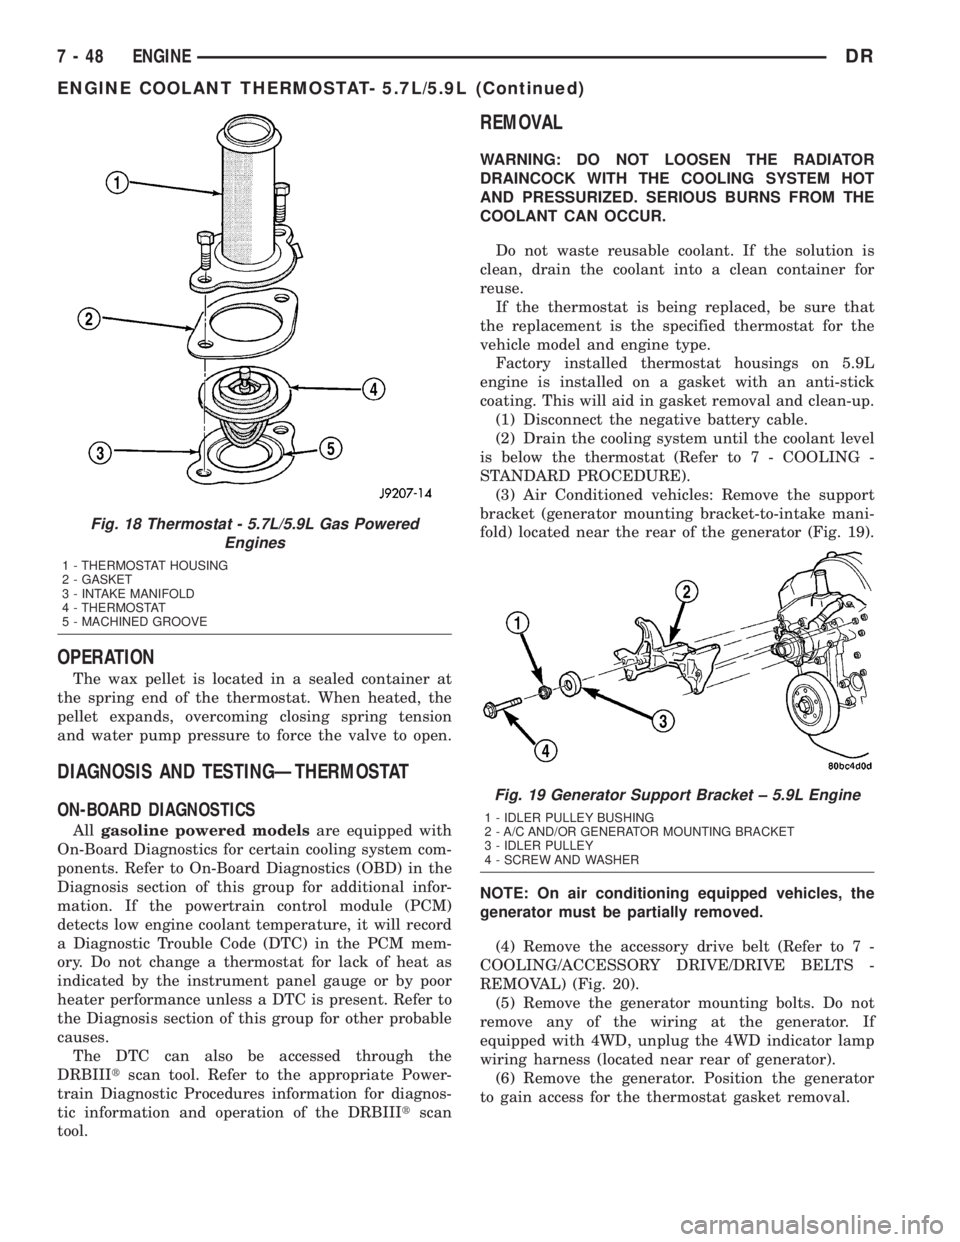
(3) Air Conditioned vehicles: Remove the support
bracket (generator mounting bracket-to-intake mani-
fold) located near the rear of the generator (Fig. 19).
NOTE: On air conditioning equipped vehicles, the
generator must be partially removed.
(4) Remove the accessory drive belt (Refer to 7 -
COOLING/ACCESSORY DRIVE/DRIVE BELTS -
REMOVAL) (Fig. 20).
(5) Remove the generator mounting bolts. Do not
remove any of the wiring at the generator. If
equipped with 4WD, unplug the 4WD indicator lamp
wiring harness (located near rear of generator).
(6) Remove the generator. Position the generator
to gain access for the thermostat gasket removal.
Fig. 18 Thermostat - 5.7L/5.9L Gas Powered
Engines
1 - THERMOSTAT HOUSING
2 - GASKET
3 - INTAKE MANIFOLD
4 - THERMOSTAT
5 - MACHINED GROOVE
Fig. 19 Generator Support Bracket ± 5.9L Engine
1 - IDLER PULLEY BUSHING
2 - A/C AND/OR GENERATOR MOUNTING BRACKET
3 - IDLER PULLEY
4 - SCREW AND WASHER
7 - 48 ENGINEDR
ENGINE COOLANT THERMOSTAT- 5.7L/5.9L (Continued)
Page 392 of 2895
OPERATION
OPERATION - PCM
The PCM operates the fuel system. The PCM is a
pre-programmed, triple microprocessor digital com-
puter. It regulates ignition timing, air-fuel ratio,
emission control devices, charging system, certain
transmission features, speed control, air conditioning
compressor clutch engagement and idle speed. The
PCM can adapt its programming to meet changing
operating conditions.
The PCM receives input signals from various
switches and sensors. Based on these inputs, the
PCM regulates various engine and vehicle operations
through different system components. These compo-
nents are referred to as Powertrain Control Module
(PCM) Outputs. The sensors and switches that pro-
vide inputs to the PCM are considered Powertrain
Control Module (PCM) Inputs.
The PCM adjusts ignition timing based upon
inputs it receives from sensors that react to: engine
rpm, manifold absolute pressure, engine coolant tem-
perature, throttle position, transmission gear selec-
tion (automatic transmission), vehicle speed, power
steering pump pressure, and the brake switch.
The PCM adjusts idle speed based on inputs it
receives from sensors that react to: throttle position,
vehicle speed, transmission gear selection, engine
coolant temperature and from inputs it receives from
the air conditioning clutch switch and brake switch.
Based on inputs that it receives, the PCM adjusts
ignition coil dwell. The PCM also adjusts the gener-
ator charge rate through control of the generator
field and provides speed control operation.
NOTE: PCM Inputs:
²ABS module (if equipped)
²A/C request (if equipped with factory A/C)
²A/C select (if equipped with factory A/C)
²A/C pressure transducer
²Auto shutdown (ASD) sense
²Battery temperature sensor
²Battery voltage
²Brake switch
²J1850 bus (+) circuits
²J1850 bus (-) circuits
²Camshaft position sensor signal
²Crankshaft position sensor
²Data link connection for DRB scan tool
²EATX module (if equipped)
²Engine coolant temperature sensor
²Fuel level (through J1850 circuitry)
²Generator (battery voltage) output
²Ignition circuit sense (ignition switch in on/off/
crank/run position)²Intake manifold air temperature sensor
²Knock sensors (2 on 3.7L engine)
²Leak detection pump (switch) sense (if equipped)
²Manifold absolute pressure (MAP) sensor
²Oil pressure
²Oxygen sensors
²Park/neutral switch (auto. trans. only)
²Power ground
²Power steering pressure switch (if equipped)
²Sensor return
²Signal ground
²Speed control multiplexed single wire input
²Throttle position sensor
²Transfer case switch (4WD range position)
²Vehicle speed signal
NOTE: PCM Outputs:
²A/C clutch relay
²Auto shutdown (ASD) relay
²J1850 bus (+/-) circuits for: speedometer, voltme-
ter, fuel gauge, oil pressure gauge/lamp, engine temp.
gauge and speed control warn. lamp
²Data link connection for DRB scan tool
²EGR valve control solenoid (if equipped)
²EVAP canister purge solenoid
²Five volt sensor supply (primary)
²Five volt sensor supply (secondary)
²Fuel injectors
²Fuel pump relay
²Generator field driver (-)
²Generator field driver (+)
²Idle air control (IAC) motor
²Ignition coil(s)
²Leak detection pump (if equipped)
²Malfunction indicator lamp (Check engine lamp).
Driven through J1850 circuits.
²Oxygen sensor heater relays
²Oxygen sensors (pulse width modulated)
²Radiator cooling fan relay (pulse width modu-
lated)
²Speed control vacuum solenoid
²Speed control vent solenoid
²Tachometer (if equipped). Driven through J1850
circuits.
²Transmission convertor clutch circuit. Driven
through J1850 circuits.
OPERATION - 5 VOLT SUPPLIES
Primary 5±volt supply:
²supplies the required 5 volt power source to the
Crankshaft Position (CKP) sensor.
²supplies the required 5 volt power source to the
Camshaft Position (CMP) sensor.
²supplies a reference voltage for the Manifold
Absolute Pressure (MAP) sensor.
DRELECTRONIC CONTROL MODULES 8E - 11
POWERTRAIN CONTROL MODULE (Continued)