seats DODGE RAM SRT-10 2006 Service Owner's Guide
[x] Cancel search | Manufacturer: DODGE, Model Year: 2006, Model line: RAM SRT-10, Model: DODGE RAM SRT-10 2006Pages: 5267, PDF Size: 68.7 MB
Page 2020 of 5267
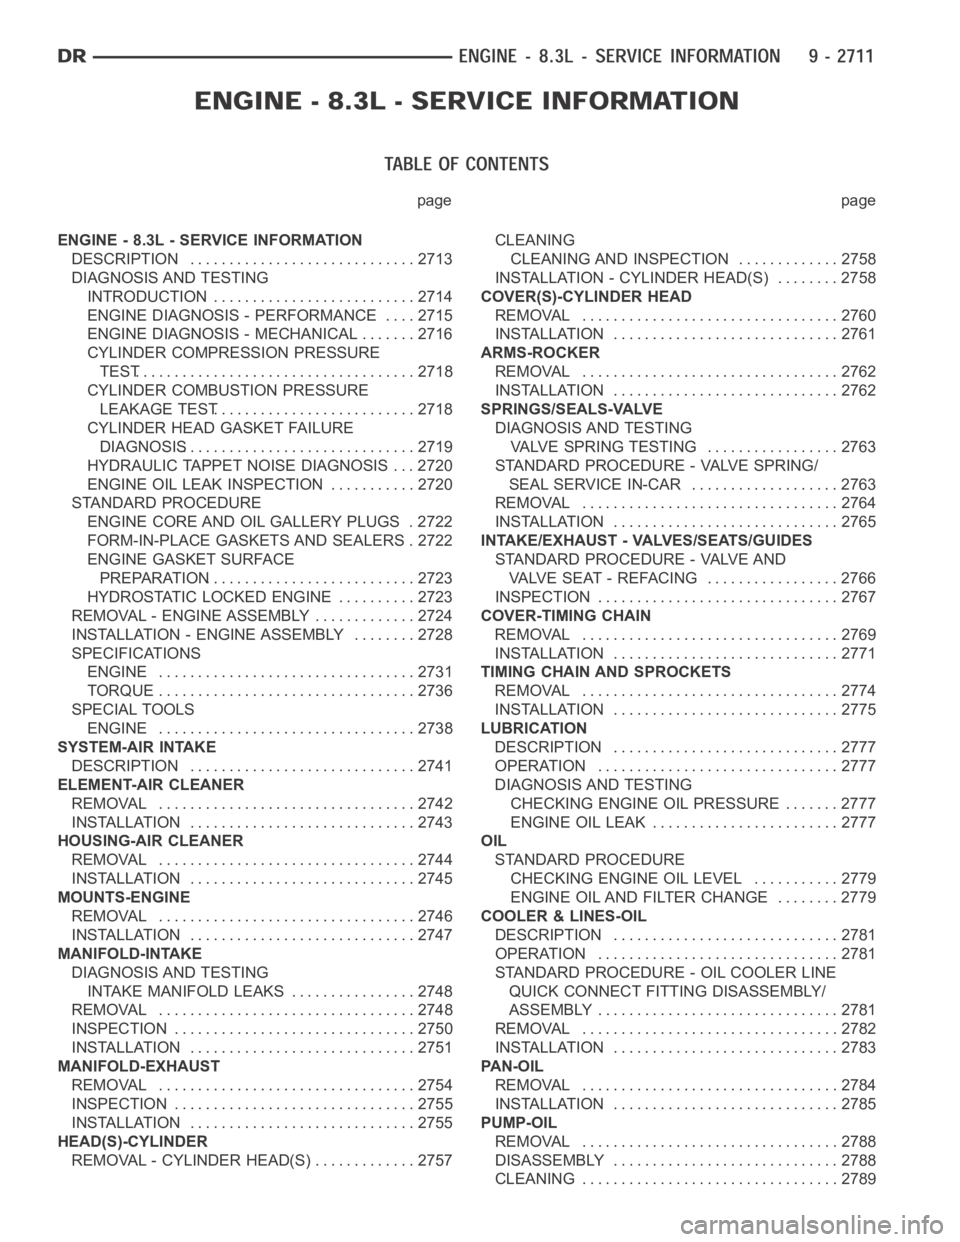
page page
ENGINE - 8.3L - SERVICE INFORMATION
DESCRIPTION ............................. 2713
DIAGNOSIS AND TESTING
INTRODUCTION . ......................... 2714
ENGINE DIAGNOSIS - PERFORMANCE .... 2715
ENGINE DIAGNOSIS - MECHANICAL ....... 2716
CYLINDER COMPRESSION PRESSURE
TEST.................................... 2718
CYLINDER COMBUSTION PRESSURE
LEAKAGE TEST.......................... 2718
CYLINDER HEAD GASKET FAILURE
DIAGNOSIS.............................. 2719
HYDRAULIC TAPPET NOISE DIAGNOSIS . . . 2720
ENGINE OIL LEAK INSPECTION ........... 2720
STANDARD PROCEDURE
ENGINE CORE AND OIL GALLERY PLUGS . 2722
FORM-IN-PLACE GASKETS AND SEALERS . 2722
ENGINE GASKET SURFACE
PREPARATION........................... 2723
HYDROSTATIC LOCKED ENGINE .......... 2723
REMOVAL - ENGINE ASSEMBLY . . ........... 2724
INSTALLATION - ENGINE ASSEMBLY ........ 2728
SPECIFICATIONS
ENGINE ................................. 2731
TORQUE ................................. 2736
SPECIAL TOOLS
ENGINE ................................. 2738
SYSTEM-AIR INTAKE
DESCRIPTION ............................. 2741
ELEMENT-AIR CLEANER
REMOVAL ................................. 2742
INSTALLATION ............................. 2743
HOUSING-AIR CLEANER
REMOVAL ................................. 2744
INSTALLATION ............................. 2745
MOUNTS-ENGINE
REMOVAL ................................. 2746
INSTALLATION ............................. 2747
MANIFOLD-INTAKE
DIAGNOSIS AND TESTING
INTAKE MANIFOLD LEAKS ................ 2748
REMOVAL ................................. 2748
INSPECTION ............................... 2750
INSTALLATION ............................. 2751
MANIFOLD-EXHAUST
REMOVAL ................................. 2754
INSPECTION ............................... 2755
INSTALLATION ............................. 2755
HEAD(S)-CYLINDER
REMOVAL - CYLINDER HEAD(S) ............. 2757CLEANING
CLEANING AND INSPECTION............. 2758
INSTALLATION - CYLINDER HEAD(S) ........ 2758
COVER(S)-CYLINDER HEAD
REMOVAL ................................. 2760
INSTALLATION ............................. 2761
ARMS-ROCKER
REMOVAL ................................. 2762
INSTALLATION ............................. 2762
SPRINGS/SEALS-VALVE
DIAGNOSIS AND TESTING
VALVE SPRING TESTING ................. 2763
STANDARD PROCEDURE - VALVE SPRING/
SEAL SERVICE IN-CAR ................... 2763
REMOVAL ................................. 2764
INSTALLATION ............................. 2765
INTAKE/EXHAUST - VALVES/SEATS/GUIDES
STANDARD PROCEDURE - VALVE AND
VALVE SEAT - REFACING ................. 2766
INSPECTION............................... 2767
COVER-TIMING CHAIN
REMOVAL ................................. 2769
INSTALLATION ............................. 2771
TIMING CHAIN AND SPROCKETS
REMOVAL ................................. 2774
INSTALLATION ............................. 2775
LUBRICATION
DESCRIPTION ............................. 2777
OPERATION ............................... 2777
DIAGNOSIS AND TESTING
CHECKING ENGINE OIL PRESSURE ....... 2777
ENGINE OIL LEAK ........................ 2777
OIL
STANDARD PROCEDURE
CHECKING ENGINE OIL LEVEL........... 2779
ENGINE OILAND FILTER CHANGE ........ 2779
COOLER & LINES-OIL
DESCRIPTION ............................. 2781
OPERATION ............................... 2781
STANDARD PROCEDURE - OIL COOLER LINE
QUICK CONNECT FITTING DISASSEMBLY/
ASSEMBLY............................... 2781
REMOVAL ................................. 2782
INSTALLATION ............................. 2783
PAN-OIL
REMOVAL ................................. 2784
INSTALLATION ............................. 2785
PUMP-OIL
REMOVAL ................................. 2788
DISASSEMBLY . ............................ 2788
CLEANING ................................. 2789
Page 2025 of 5267
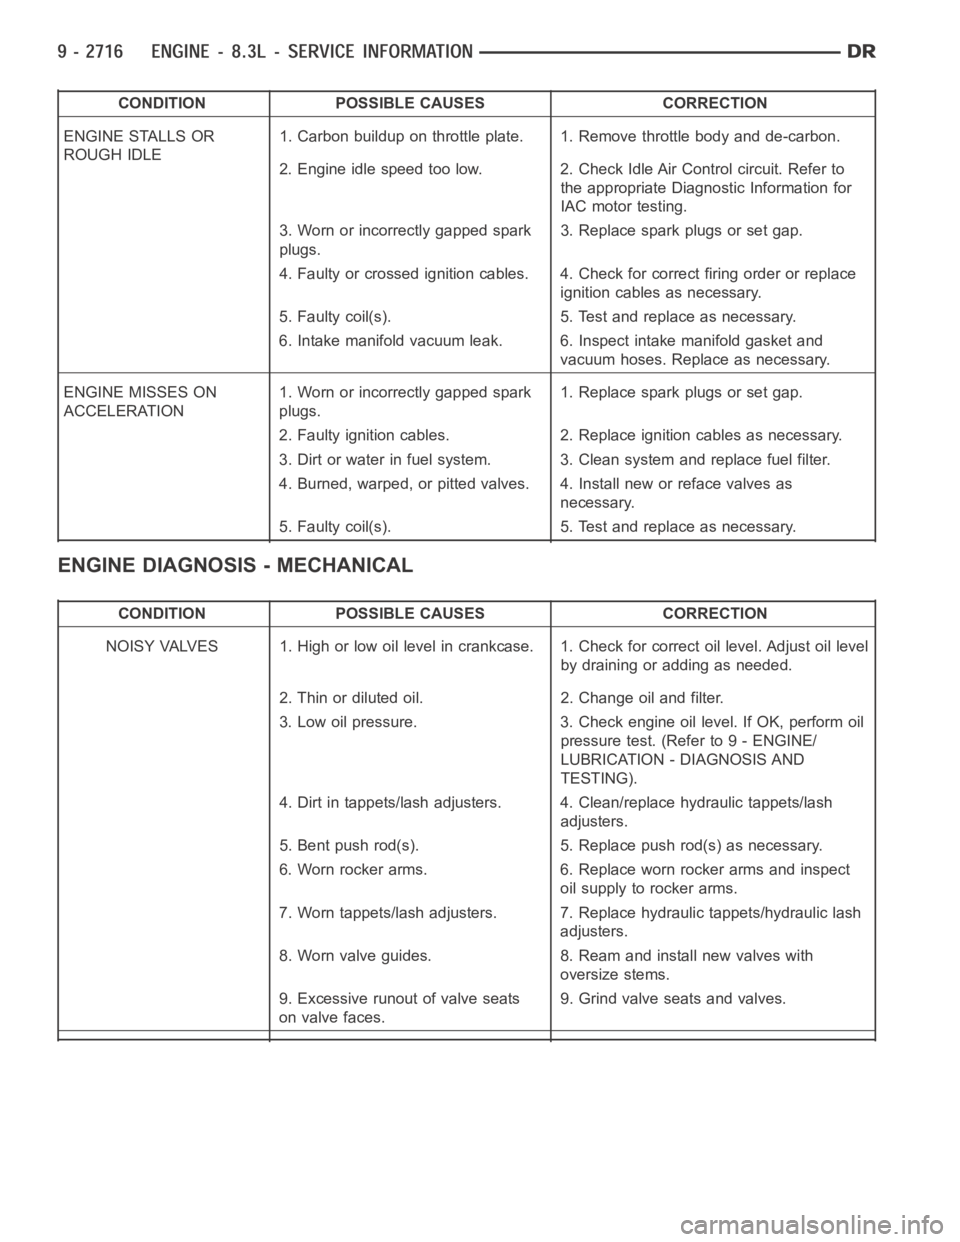
CONDITION POSSIBLE CAUSES CORRECTION
ENGINE STALLS OR
ROUGH IDLE1. Carbon buildup on throttle plate. 1. Remove throttle body and de-carbon.
2. Engine idle speed too low. 2. Check Idle Air Control circuit. Refer to
the appropriate Diagnostic Information for
IAC motor testing.
3. Worn or incorrectly gapped spark
plugs.3. Replace spark plugs or set gap.
4. Faulty or crossed ignition cables. 4. Check for correct firing order or replace
ignition cables as necessary.
5. Faulty coil(s). 5. Test and replace as necessary.
6. Intake manifold vacuum leak. 6. Inspect intake manifold gasket and
vacuum hoses. Replace as necessary.
ENGINE MISSES ON
ACCELERATION1. Worn or incorrectly gapped spark
plugs.1. Replace spark plugs or set gap.
2. Faulty ignition cables. 2. Replace ignition cables as necessary.
3. Dirt or water in fuel system. 3. Clean system and replace fuel filter.
4. Burned, warped, or pitted valves. 4. Install new or reface valves as
necessary.
5. Faulty coil(s). 5. Test and replace as necessary.
ENGINE DIAGNOSIS - MECHANICAL
CONDITION POSSIBLE CAUSES CORRECTION
NOISY VALVES 1. High or low oil level incrankcase. 1. Check for correct oil level. Adjust oil level
by draining or adding as needed.
2. Thin or diluted oil. 2. Change oil and filter.
3. Low oil pressure. 3. Check engine oil level. If OK, perform oil
pressure test. (Refer to 9 - ENGINE/
LUBRICATION - DIAGNOSIS AND
TESTING).
4. Dirt in tappets/lash adjusters. 4. Clean/replace hydraulic tappets/lash
adjusters.
5. Bent push rod(s). 5. Replace push rod(s) as necessary.
6. Worn rocker arms. 6. Replace worn rocker arms and inspect
oil supply to rocker arms.
7. Worn tappets/lash adjusters. 7. Replace hydraulic tappets/hydrauliclash
adjusters.
8. Worn valve guides. 8. Ream and install new valves with
oversize stems.
9. Excessive runout of valve seats
on valve faces.9. Grind valve seats and valves.
Page 2074 of 5267
INSTALLATION
NOTE: Before replacing parts, inspect all related
valvetrain components for damage to prevent
engine misfire.
NOTE: Black valve seals are intake. Brown valve
seals are exhaust.
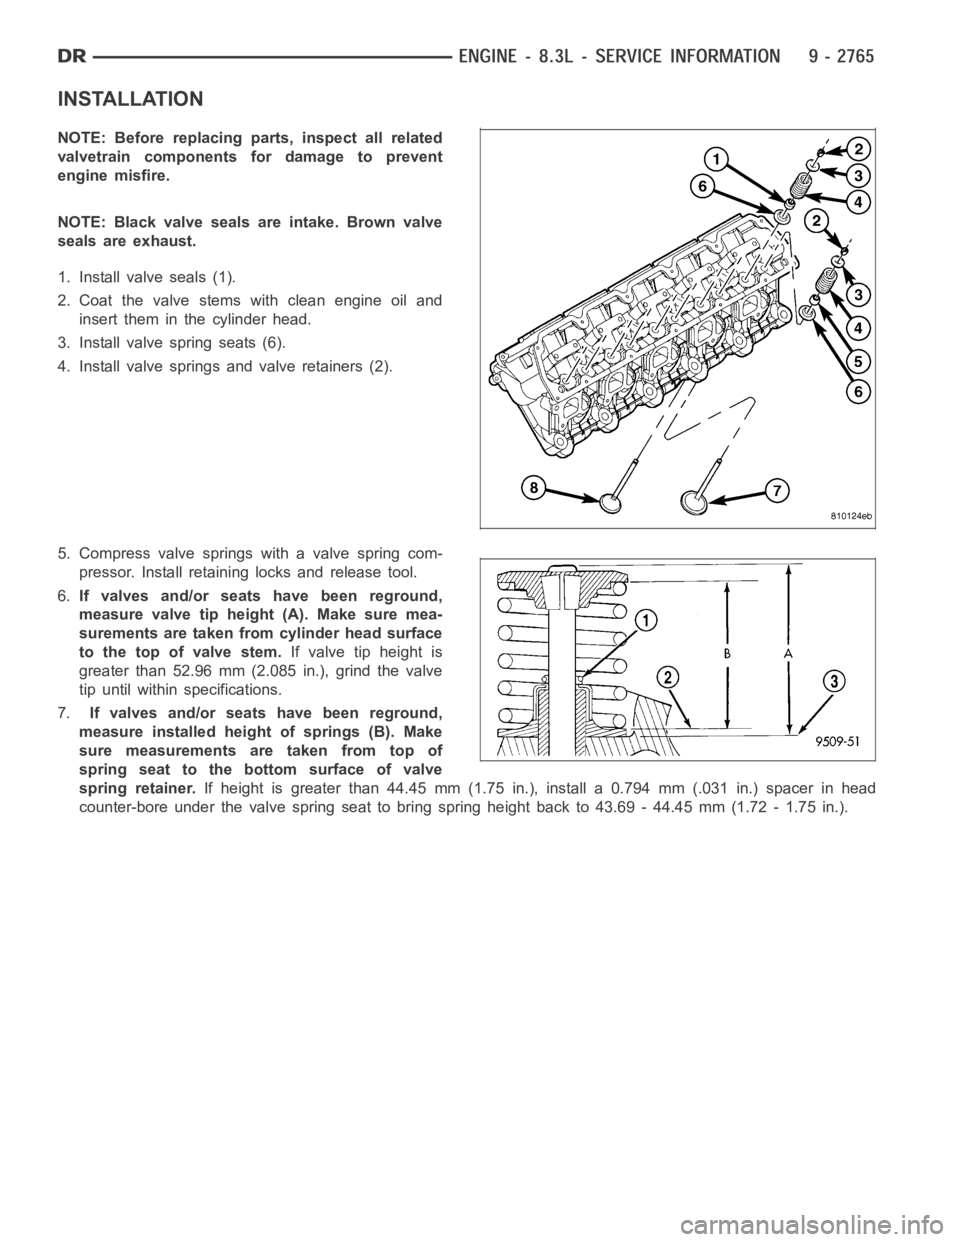
1. Install valve seals (1).
2. Coat the valve stems with clean engine oil and
insert them in the cylinder head.
3. Install valve spring seats (6).
4. Install valve springs and valve retainers (2).
5. Compress valve springs with a valve spring com-
pressor. Install retaining locks and release tool.
6.If valves and/or seats have been reground,
measure valve tip height (A). Make sure mea-
surements are taken from cylinder head surface
to the top of valve stem.If valve tip height is
greater than 52.96 mm (2.085 in.), grind the valve
tip until within specifications.
7.If valves and/or seats have been reground,
measure installed height of springs (B). Make
sure measurements are taken from top of
spring seat to the bottom surface of valve
spring retainer.If height is greater than 44.45 mm (1.75 in.), install a 0.794 mm (.031 in.) spacer in head
counter-bore under the valve spring seat to bring spring height back to 43.69 - 44.45 mm (1.72 - 1.75 in.).
Page 2075 of 5267

INTAKE/EXHAUST - VALVES/SEATS/GUIDES
STANDARD PROCEDURE - VALVE AND VALVE SEAT - REFACING
The intake and exhaust valves have a 44.5° - 45° face
angle (1). The valve seats (2) have a 44.5° - 45° face
angle.
Inspect the remaining margin after the valves are
refaced. (Refer to 9 - ENGINE - SPECIFICATIONS).
VALVE SEATS
CAUTION: Do not un-shroud valves during valve
seat refacing.
1. When refacing valve seats, it is important that the
correct size valve guide pilot be used for reseating
stones. A true and complete surface must be
obtained.
2. Measure the concentricity of valve seat using a dial
indicator. Total runout should not exceed 0.051 mm
(0.002 in.) total indicator reading.
3. Inspect the valve seat with Prussian blue to deter-
mine where the valve contacts the seat. To do this,
coat valve seatLIGHTLYwith Prussian blue then
set valve in place. Rotate the valve with light pres-
sure. If the blue is transferred to the center of valve
face, contact is satisfactory. If the blue is trans-
ferred to top edge of valve face, lower valve seat with a 30° stone. If the blue is transferred to the bottom edge
of valve face raise valve seat with a 75° stone.
NOTE: Valve seats which are worn or burned can be reworked, provided that correct angle and seat width
are maintained. Otherwise cylinder head must be replaced.
4. When seat is properly positioned the width of both seats should be 1.02 - 1.52 mm (0.040 - 0.060 in.).
Page 2076 of 5267
INSPECTION
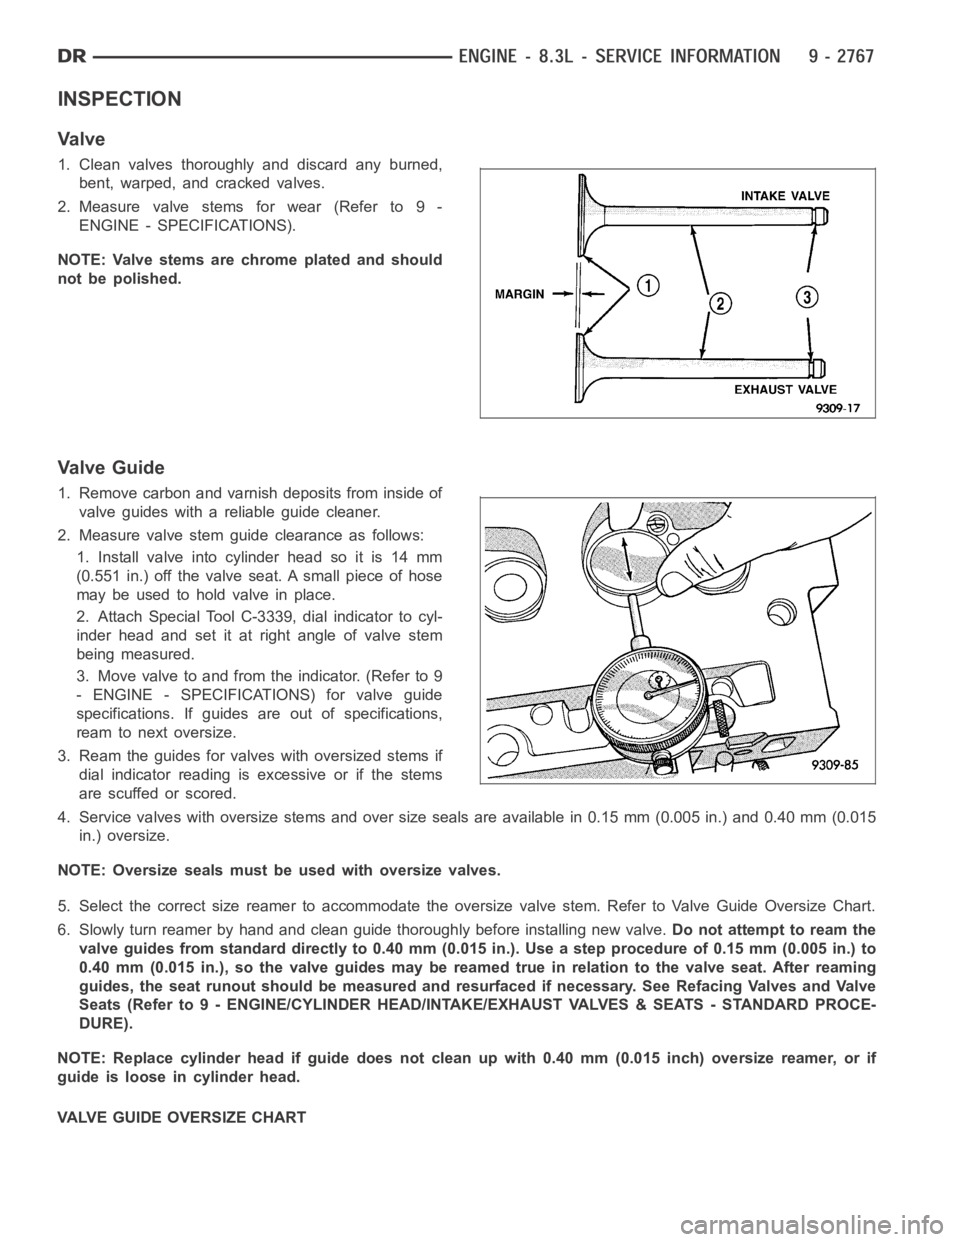
Va l v e
1. Clean valves thoroughly and discard any burned,
bent, warped, and cracked valves.
2. Measure valve stems for wear (Refer to 9 -
ENGINE - SPECIFICATIONS).
NOTE: Valve stems are chrome plated and should
not be polished.
Valve Guide
1. Remove carbon and varnish deposits from inside of
valve guides with a reliable guide cleaner.
2. Measure valve stem guide clearance as follows:
1. Install valve into cylinder head so it is 14 mm
(0.551 in.) off the valve seat. A small piece of hose
maybeusedtoholdvalveinplace.
2. Attach Special Tool C-3339, dial indicator to cyl-
inder head and set it at right angle of valve stem
being measured.
3. Move valve to and from the indicator. (Refer to 9
- ENGINE - SPECIFICATIONS) for valve guide
specifications. If guides are out of specifications,
ream to next oversize.
3. Ream the guides for valves with oversized stems if
dial indicator reading is excessive or if the stems
are scuffed or scored.
4. Service valves with oversize stems and over size seals are available in 0.15 mm (0.005 in.) and 0.40 mm (0.015
in.) oversize.
NOTE: Oversize seals must be used with oversize valves.
5. Select the correct size reamer to accommodate the oversize valve stem. Refer to Valve Guide Oversize Chart.
6. Slowly turn reamer by hand and clean guide thoroughly before installingnew valve.Do not attempt to ream the
valve guides from standard directly to 0.40 mm (0.015 in.). Use a step procedure of 0.15 mm (0.005 in.) to
0.40 mm (0.015 in.), so the valve guides may be reamed true in relation to thevalve seat. After reaming
guides, the seat runout should be measured and resurfaced if necessary. See Refacing Valves and Valve
Seats (Refer to 9 - ENGINE/CYLINDER HEAD/INTAKE/EXHAUST VALVES & SEATS - STANDARD PROCE-
DURE).
NOTE: Replace cylinder head if guide does not clean up with 0.40 mm (0.015 inch) oversize reamer, or if
guide is loose in cylinder head.
VALVE GUIDE OVERSIZE CHART
Page 2147 of 5267
8.3L ENGINE
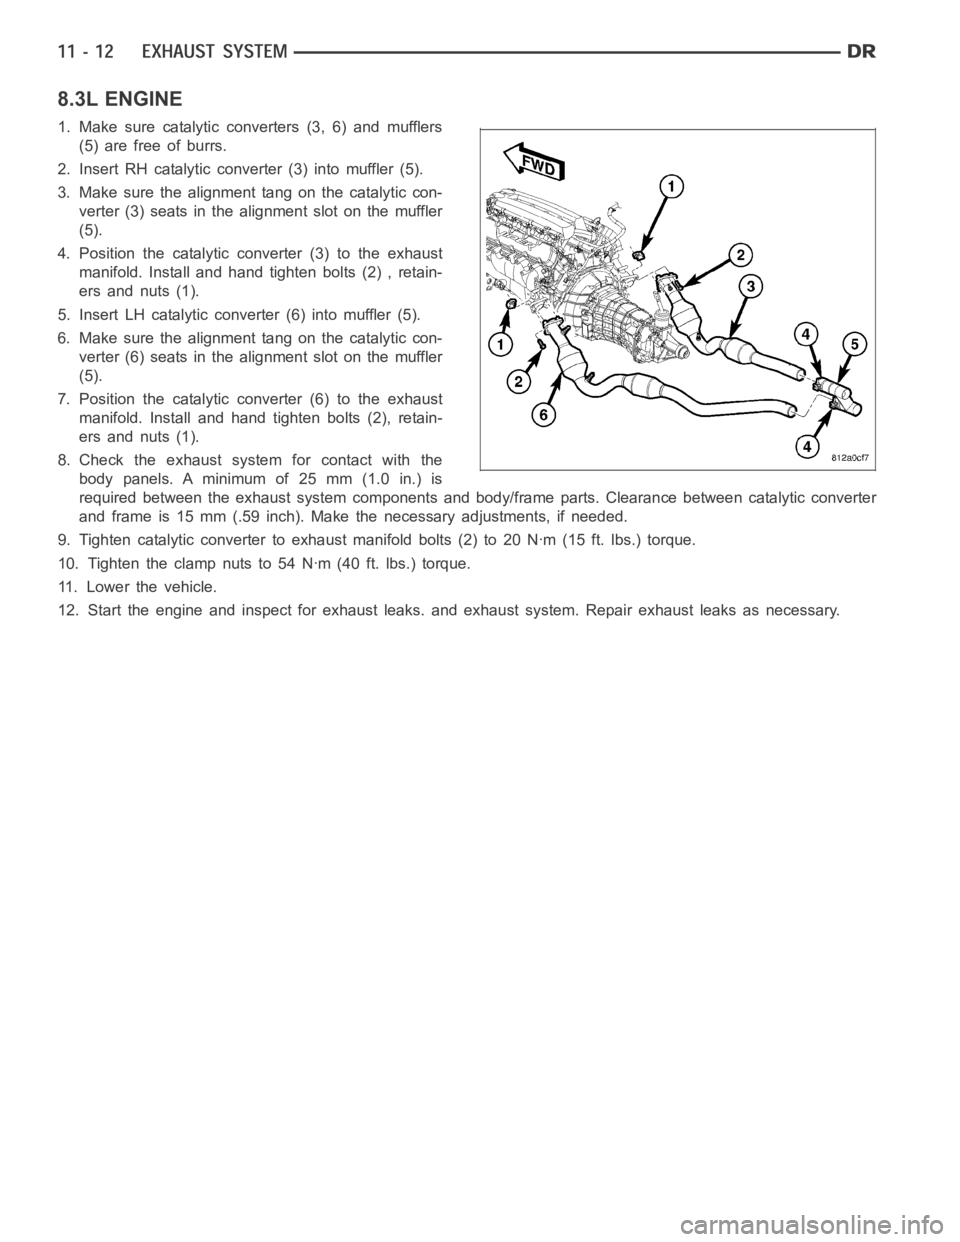
1. Make sure catalytic converters (3, 6) and mufflers
(5) are free of burrs.
2. Insert RH catalytic converter (3) into muffler (5).
3. Make sure the alignment tang on the catalytic con-
verter (3) seats in the alignment slot on the muffler
(5).
4. Position the catalytic converter (3) to the exhaust
manifold. Install and hand tighten bolts (2) , retain-
ers and nuts (1).
5. Insert LH catalytic converter (6) into muffler (5).
6. Make sure the alignment tang on the catalytic con-
verter (6) seats in the alignment slot on the muffler
(5).
7. Position the catalytic converter (6) to the exhaust
manifold. Install and hand tighten bolts (2), retain-
ers and nuts (1).
8. Check the exhaust system for contact with the
body panels. A minimum of 25 mm (1.0 in.) is
required between the exhaust system components and body/frame parts. Clearance between catalytic converter
and frame is 15 mm (.59 inch). Make the necessary adjustments, if needed.
9. Tighten catalytic converter to exhaust manifold bolts (2) to 20 Nꞏm (15 ft. lbs.) torque.
10. Tighten the clamp nuts to 54 Nꞏm (40 ft. lbs.) torque.
11. Lower the vehicle.
12. Start the engine and inspect for exhaust leaks. and exhaust system. Repair exhaust leaks as necessary.
Page 2458 of 5267

7. Install pitman shaft protective seal protector 8993
(2)overtheshaft.
8. Install the pitman shaft into the steering gear until it
fully seats into the bearing.
9. Install the new cover bolts and tighten to 68 Nꞏm
(50 ft. lbs.).
10. Install the pitman arm (Refer to 19 - STEERING/
LINKAGE/PITMAN ARM - INSTALLATION).
DIESEL
NOTE: Generous amounts of the high temperature
grease from the seal kit should be applied to areas
between the pitman shaft bearing and oil seals
and also between the dust seals and snap ring.
1. Coat the oil seal and washer withhigh temp
grease.
NOTE: Install the oil seal with the lip facing
inward. Flat side of the oil seal should be against
the washer.
2. Install the oil seal with pitman shaft seal installer
8989 driver (2) and C-4171 handle (1).
3. Install backup washer.
4. Install the retainer ring with snap ring pliers.
5. Coat the dust seal withhigh temp grease.
6. Install the dust seal with pitman shaft seal installer 8989 driver (2) andC-4171handle(1).
7. Install pitman shaft protective seal protector 8993
(2)overtheshaft(1).
8. Install the pitman shaft into the steering gear until it
fully seats into the bearing.
9. Install the new cover bolts and tighten to 68 Nꞏm
(50 ft. lbs.).
10. Install the steering gear (Refer to 19 - STEER-
ING/GEAR - INSTALLATION).
11. Install the pitman arm (Refer to 19 - STEERING/
LINKAGE/PITMAN ARM - INSTALLATION).
12. Perform a wheel alignment (Refer to 2 - SUS-
PENSION/WHEEL ALIGNMENT - STANDARD
PROCEDURE).
Page 2463 of 5267

7. Install the input shaft seal protector 8986 (2).
8. Coat the new seal inhigh temp greaseand Install
the new oil seal using the input shaft seal installer
tool 8987 driver (2) and C-4171 handle (3).
NOTE: Drive the oil seal into the housing until the
outer edge does not quite clear the snap ring
groove.
9. Insert the snap ring into the housing. Using the
input shaft seal installer 8987 driver (2) and C-4171
handle (3) push the snap ring and oil seal together
until the snap ring seats in the groove.
NOTE: Generous amounts of the high temperature
grease from the seal kit should be applied to areas
between the pitman shaft bearing and oil seals
and also between the dust seals and snap ring.
10. Install the new dust seal usinghigh temp grease, special tool C-4171 (handle) (3) and 8987 (driver) (2).
11. Check to make sure the gear is centered in the
middle tooth (1) before installing the pitman shaft.
12. Install the pitman shaft into the steering gear (Refer to 19 - STEERING/GEAR/PITMAN SHAFT - INSTALLA-
TION).
13. Perform over-center meshload adjustment (Refer to 19 - STEERING/GEAR- ADJUSTMENTS).
14. Install the steering gear to the vehicle (Refer to 19 - STEERING/GEAR - INSTALLATION).
15. Perform a wheel alignment (Refer to2 - SUSPENSION/WHEEL ALIGNMENT - STANDARD PROCEDURE).
Page 2465 of 5267
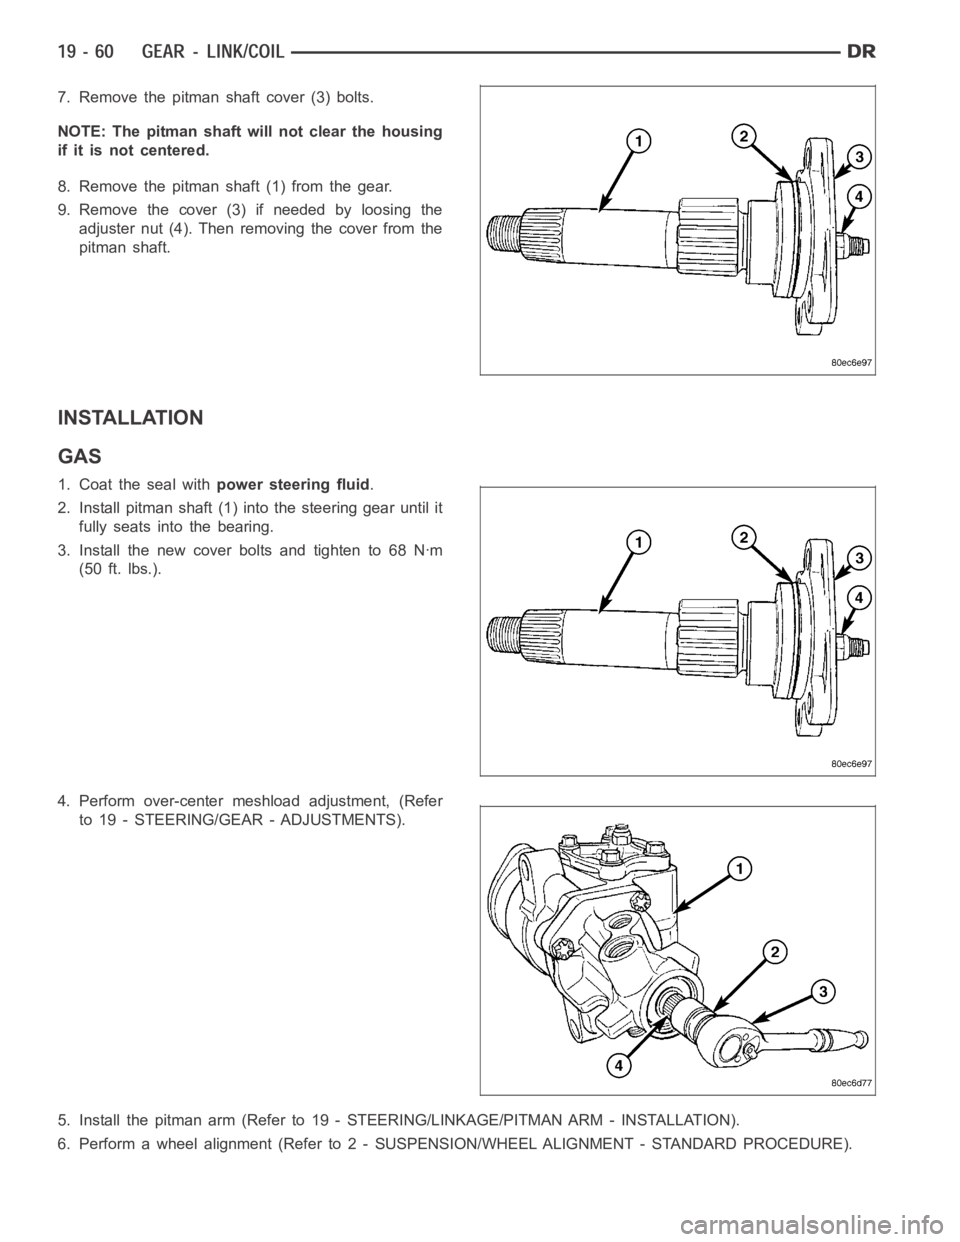
7. Remove the pitman shaft cover (3) bolts.
NOTE: The pitman shaft will not clear the housing
if it is not centered.
8. Remove the pitman shaft (1) from the gear.
9. Remove the cover (3) if needed by loosing the
adjuster nut (4). Then removing the cover from the
pitman shaft.
INSTALLATION
GAS
1. Coat the seal withpower steering fluid.
2. Install pitman shaft (1) into the steering gear until it
fully seats into the bearing.
3. Install the new cover bolts and tighten to 68 Nꞏm
(50 ft. lbs.).
4. Perform over-center meshload adjustment, (Refer
to 19 - STEERING/GEAR - ADJUSTMENTS).
5. Install the pitman arm (Refer to 19 - STEERING/LINKAGE/PITMAN ARM - INSTALLATION).
6. Perform a wheel alignment (Refer to 2- SUSPENSION/WHEEL ALIGNMENT - STANDARD PROCEDURE).
Page 2466 of 5267
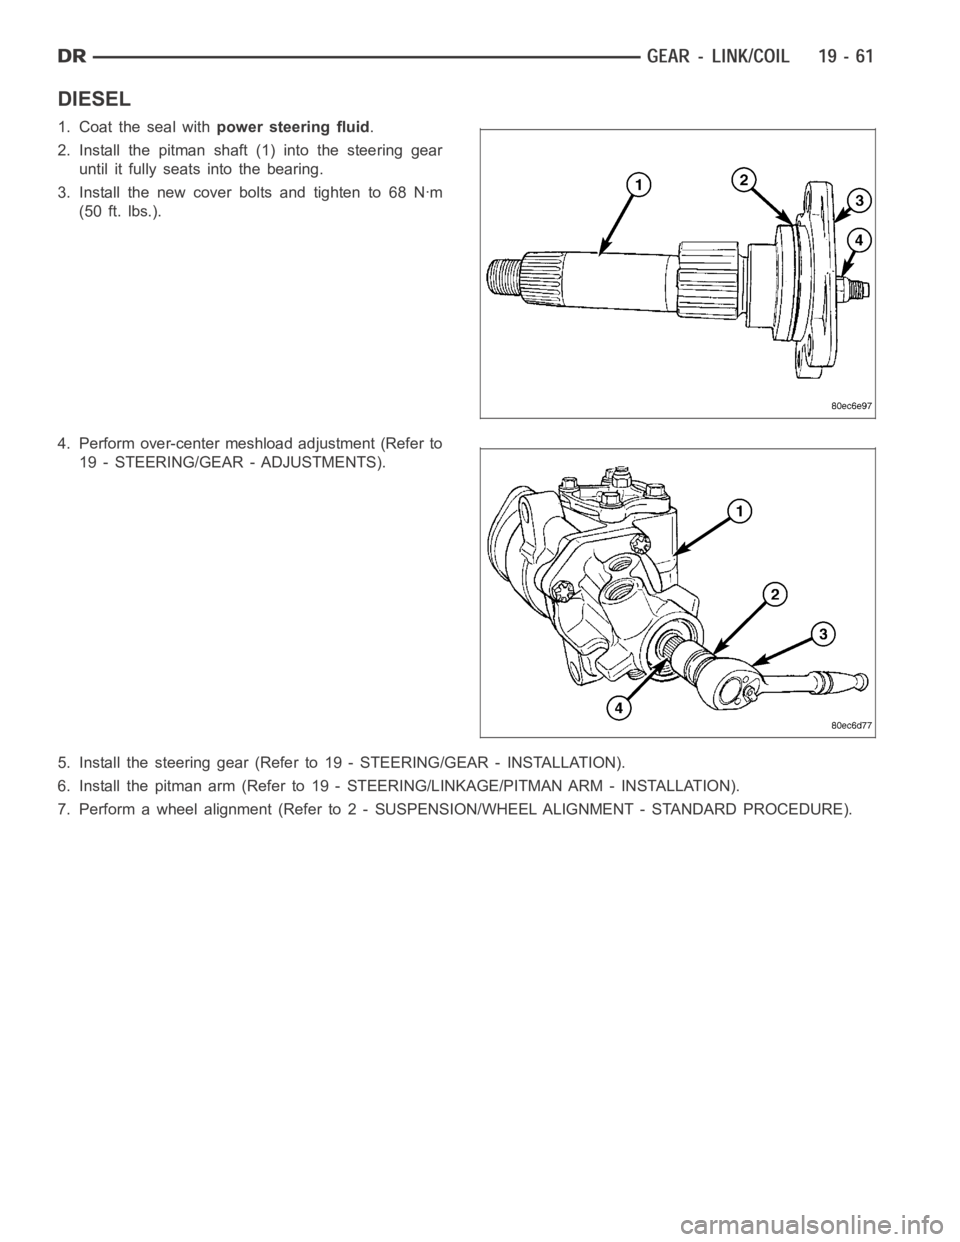
DIESEL
1. Coat the seal withpower steering fluid.
2. Install the pitman shaft (1) into the steering gear
until it fully seats into the bearing.
3. Install the new cover bolts and tighten to 68 Nꞏm
(50 ft. lbs.).
4. Perform over-center meshload adjustment (Refer to
19 - STEERING/GEAR - ADJUSTMENTS).
5. Install the steering gear (Refer to 19 - STEERING/GEAR - INSTALLATION).
6. Install the pitman arm (Refer to 19 - STEERING/LINKAGE/PITMAN ARM - INSTALLATION).
7. Perform a wheel alignment (Refer to 2- SUSPENSION/WHEEL ALIGNMENT - STANDARD PROCEDURE).