warning light DODGE SPRINTER 2005 1.G Owner's Guide
[x] Cancel search | Manufacturer: DODGE, Model Year: 2005, Model line: SPRINTER, Model: DODGE SPRINTER 2005 1.GPages: 288, PDF Size: 27.89 MB
Page 234 of 288

234 MAINTAINING YOUR VEHICLECorrosion protection, such as anticorrosion wax
should be applied to the engine compartment after
every engine cleaning. Before applying, all control
linkage bushings and joints should be lubricated. The
poly-V-belt and all pulleys should be protected from
any wax.Vehicle WashingDo not use hot water or wash your vehicle in direct
sunlight. Use only a mild car wash detergent.
Thoroughly spray the vehicle with a diffused jet of
water. Direct only a very weak spray towards the
ventilation intake. Use plenty of water and rinse the
sponge and chamois frequently.
Rinse with clear water and thoroughly wipe dry with a
chamois. Do not allow cleaning agents to dry on the
finish.
Due to the width of the vehicle, prior to running the
vehicle through an automatic car wash, fold back the
outside mirrors to prevent them from getting
damaged.
In the winter, thoroughly remove all traces of road salt
as soon as possible. When washing the underbody, do not forget to clean
the inner sides of the wheels.
Ornamental MoldingsFor regular cleaning and care of very dirty chrome-
plated parts, use a chrome cleaner.Headlamps, Taillamps, Identification Lamps, Turn
Signal LensesUse a mild car wash detergent with plenty of water.
To prevent scratches, never apply strong force and use
only a soft, non-scratchy cloth when cleaning the
lenses. Do not attempt to wipe dirty lenses with a dry
cloth or sponge.
WARNING!
Dirty or iced-up steps and entrances create a risk
of slipping or falling.
Keep steps, entrances and footwear free from dirt
(e.g. mud, clay, snow and ice).
Page 236 of 288

236 MAINTAINING YOUR VEHICLEWiper BladeClean the wiper blade rubber with a clean cloth and
detergent solution.
Light Alloy WheelsA wheel care product should be used for regular
cleaning of the light alloy wheels.
If possible, clean wheels once a week, using a soft
bristle brush and a strong spray of water.
Follow instructions on container.
NOTE: Use only acid-free cleaning materials. The acid
could lead to corrosion.Instrument ClusterUse a gentle dishwashing detergent or mild detergent
for delicate fabrics as a washing solution. Wipe with a
cloth moistened in lukewarm solution. Do not use
scouring agents.Steering Wheel and Gear Selector LeverWipe with a damp cloth and dry thoroughly or clean
with a leather care product.
WARNING!
For safety reasons, remove key from ignition lock
before cleaning the windshield, otherwise the
wiper motor can suddenly turn on and cause in-
jury.
Dirty or iced-up steps create a risk of slipping or
falling. Do not use the step in the front bumper
when it is icy or dirty.
WARNING!
For safety reasons, remove key from ignition lock
before cleaning the wiper blade, otherwise the
wiper motor can suddenly turn on and cause se-
vere personal injuries and death.
Page 237 of 288

MAINTAINING YOUR VEHICLE 237
7
Cup HolderUse a gentle dishwashing detergent or mild detergent
for delicate fabrics as a washing solution. Wipe with a
cloth moistened in lukewarm solution. Do not use
scouring agents.Seat BeltsThe webbing must not be treated with chemical
cleaning agents. Use only clear, lukewarm water and
soap. Do not dry the webbing at temperatures above
176
°F (+80
°C) or in direct sunlight.
Headliner and Shelf Below Rear WindowClean with soft bristle brush, or use a dry-shampoo
cleaner in case of excessive dirt.
UpholsteryUsing aftermarket seat covers or wearing clothing that
have the tendency to give off coloring (e.g. when wet
etc.) may cause the upholstery to become permanently
discolored. By lining the seats with a proper
intermediate cover, contact discoloration will be
prevented.
Leather Upholstery
Wipe leather upholstery with a damp cloth and dry
thoroughly or clean with a leather care product.
Exercise particular care when cleaning perforated
leather as its underside should not become wet.
Cloth Upholstery
Clean with soft bristle brush, or use a dry-shampoo
cleaner in case of excessive dirt.
Tex Upholstery
Pour an interior care product onto soft lint-free cloth
and apply with light pressure.Hard Plastic Trim ItemsPour an interior care product onto soft lint-free cloth
and apply with light pressure.
WARNING!
Do not bleach or dye seat belts as this may severe-
ly weaken them. Due to this treatment they may
not be able to provide adequate protection. For ex-
ample, in a crash the belts can be torn.
Page 241 of 288

MAINTAINING YOUR VEHICLE 241
7
No. Rated Circuit
1. 10A Parking lamp right, taillamp right
2. 10A High beam head lamp,right
3. 10A High beam head lamp, left, high beam indicator lamp
4. 10A Backup lamp
5. 10A Brake lamp
6. 20A Windshield wiper motor
7. 15A Horn, heated rear window, air recirculation switch,
optional equipment relay (terminal 15)
8. 20A Interior lighting, cigarette lighter, radio (terminal 30)
9. 15A Clock, hazard warning lamps, parking lamps 10. 10A Instrument lighting, license plate lamp
daytime driving lamps
11. 10A Side lamp, left; taillamp, left
12. 10A Low beam headlamp, right
13. 10A Low beam headlamp, left
14. 15A Fog lamp
15. 10A Radio (terminal 15)
16. 25A Engine control unit
17. 15A Engine control unit
18. 15A Ignition (terminal 15)
19. 15A Not in use
20. 15A Heater controls (terminal 30)
21. 30A Heater blower (terminal 30)
Page 245 of 288

MAINTAINING YOUR VEHICLE 245
7
BULB REPLACEMENTSwitch the lights off to prevent short circuits.
Only touch new bulbs with a clean, lint-free cloth. Do
not touch bulbs with wet or greasy fingers.
Only fit 12 volt bulbs of the same type as before and
with the correct wattage rating.
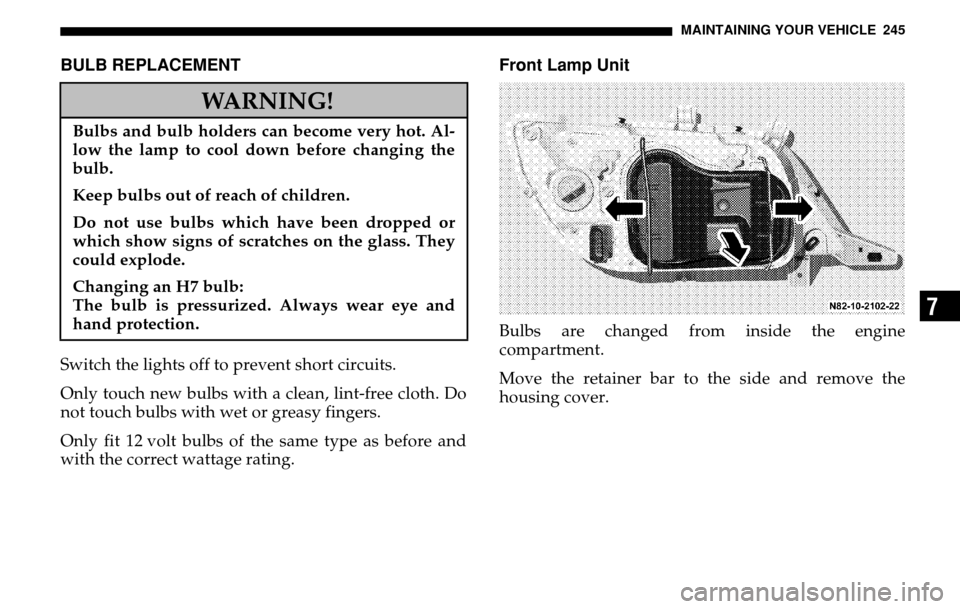
Front Lamp UnitBulbs are changed from inside the engine
compartment.
Move the retainer bar to the side and remove the
housing cover.
WARNING!
Bulbs and bulb holders can become very hot. Al-
low the lamp to cool down before changing the
bulb.
Keep bulbs out of reach of children.
Do not use bulbs which have been dropped or
which show signs of scratches on the glass. They
could explode.
Changing an H7 bulb:
The bulb is pressurized. Always wear eye and
hand protection.
Page 268 of 288

268 MAINTENANCE SCHEDULES
M A I
N T
E
N A
N
C E
S
C
H
E
D
U L
E
S8
SCOPE OF WORK FOR MAINTENANCE SERVICE
Oil ServiceOil change
Engine:
Oil change and filter replacement
Check fluid levels of the following system, refill as
necessary.
If fluid is lost, trace and eliminate cause – as a separate
order.
Power-assisted steering
Lubrication work:
Trailer tow hitch (original equipment)
Maintenance
ASSYST maintenance computer reset Function check
Signalling system,
warning and indicator lamps
Headlamps, exterior lighting
Windscreen wipers,
windscreen washer system
Check for leaks and damage.
Check for abrasion points and ensure that
lines are correctly routed!
All assemblies:
Engine, transmission, transfer case, front axle, rear
axle, steering, power steering pump
All lines and hoses, sensor cables
Rubber boots on front axle drive shafts,
rubber boots on front axle suspension ball joints, shock
absorbers
Page 283 of 288

INDEX 283
10
Acceleration Skid Control Warning Lamp . 143, 166
Additional Brake Lamp . . . . . . . . . . . . . . . . . . . . . 252
Anti-Lock Brake System (ABS) Indicator Lamp. 161
Battery Charge Indicator Lamp . . . . . . . . . . . . . . 104
Brake Lamp . . . . . . . . . . . . . . . . . . . . . . . . . . . . . . . 157
Brake System . . . . . . . . . . . . . . . . . . . . . . . . . . . . . . 164
Coolant Level Indicator Lamp . . . . . . . . . . . . . . . 106
Electronic Brake Force Distribution . . . . . . . . . . . 157
Engine Control Unit Indicator Lamp . . . . . . . . . . 107
Engine Oil Level . . . . . . . . . . . . . . . . . . . . . . . . . . . 115
Engine Oil Level Indicator Lamp . . . . . . . . . . . . . 105
Exit Lamps . . . . . . . . . . . . . . . . . . . . . . . . . . . . . . . . 256
Indicator Lamps . . . . . . . . . . . . . . . . . . . . . . . . . . . . 91
License Plate Lamp . . . . . . . . . . . . . . . . . . . . . . . . . 252
Reading Lamp . . . . . . . . . . . . . . . . . . . . . . . . . . . . . 255
Reserve Fuel Indicator Lamp . . . . . . . . . . . . . . . . 103
Seat Belt Warning Lamp . . . . . . . . . . . . . . . . . . . . . 44
Side-Marker Lamp . . . . . . . . . . . . . . . . . . . . . . . . . 253
SRS Malfunction Indicator Lamp . . . . . . . . . . . . . . 49
Taillamp . . . . . . . . . . . . . . . . . . . . . . . . . . . . . . . . . . 250
Water in Fuel Indicator Lamp . . . . . . . . . . . . . . . . 104 Lifting Points . . . . . . . . . . . . . . . . . . . . . . . . . . . . . . . . 203
Lighter, Cigar . . . . . . . . . . . . . . . . . . . . . . . . . . . . . . . . . 82
Lighting, Interior . . . . . . . . . . . . . . . . . . . . . . . . . . . . . . 69
Loading . . . . . . . . . . . . . . . . . . . . . . . . . . . . . . . . . . . . . 150
Lock, Ignition . . . . . . . . . . . . . . . . . . . . . . . . . . . . . . . . . 13
Locking, Central . . . . . . . . . . . . . . . . . . . . . . . . . . . . . . . 15
Lumbar Support . . . . . . . . . . . . . . . . . . . . . . . . . . . . . . . 61
MMaintenance Computer . . . . . . . . . . . . . . . . . . . . . . . 110
Maintenance Intervals . . . . . . . . . . . . . . . . . . . . . . . . . 265
Maintenance Schedules
Additional Maintenance Work After ... Years . . 270
Brake Fluid . . . . . . . . . . . . . . . . . . . . . . . . . . . . . . . . 267
Coolant . . . . . . . . . . . . . . . . . . . . . . . . . . . . . . . . . . . 267
Dust Filter for Heating/Ventilation Replacement . .
267
Engine Oil Change and Filter Replacement . . . . 267
Introduction . . . . . . . . . . . . . . . . . . . . . . . . . . . . . . . 264
Oil Service . . . . . . . . . . . . . . . . . . . . . . . . . . . . . . . . 268
Once a Year . . . . . . . . . . . . . . . . . . . . . . . . . . . . . . . 267
Regular Check-Ups . . . . . . . . . . . . . . . . . . . . . . . . . 266
Scope of Work for Maintenance service . . . . . . . 268