DODGE STRATUS COUPE 2005 2.G Owners Manual
Manufacturer: DODGE, Model Year: 2005, Model line: STRATUS COUPE, Model: DODGE STRATUS COUPE 2005 2.GPages: 396
Page 281 of 396
connection. You wouldn't be able to start your vehicle,
and the bad ground could damage the electrical systems.
CAUTION!
Check the other vehicle. It must have a 12-volt
battery. If the other system isn't 12-volts, both sys-
tems can be damaged.
3. You could be injured if the vehicles move. Set the
parking brake firmly on each vehicle. Put an automatic
transaxle in ªPº (PARK) or a manual transaxle in ªNº
(Neutral). Turn the ignition key to the ªLOCKº position.
WARNING!
Turn the ignition key to the ªLOCKº position on
both vehicles.
Use care to make sure that the cables or your clothes
are never caught by the fan or drive belt. Personal
injury could result.
NOTE: Turn off all lights, heater and other electrical
loads. This will avoid sparks and help save both batter-
ies.
4. Make sure battery electrolyte is at the proper level.
(See ªBatteryº on page 325.)
WARNING!
If electrolyte fluid is not visible, or appears to be
frozen, do not attempt jump starting.
The battery might rupture or explode if the tempera-
ture is below the freezing point or if it is not filled to
the proper level.
EMERGENCIES 281
8
Page 282 of 396
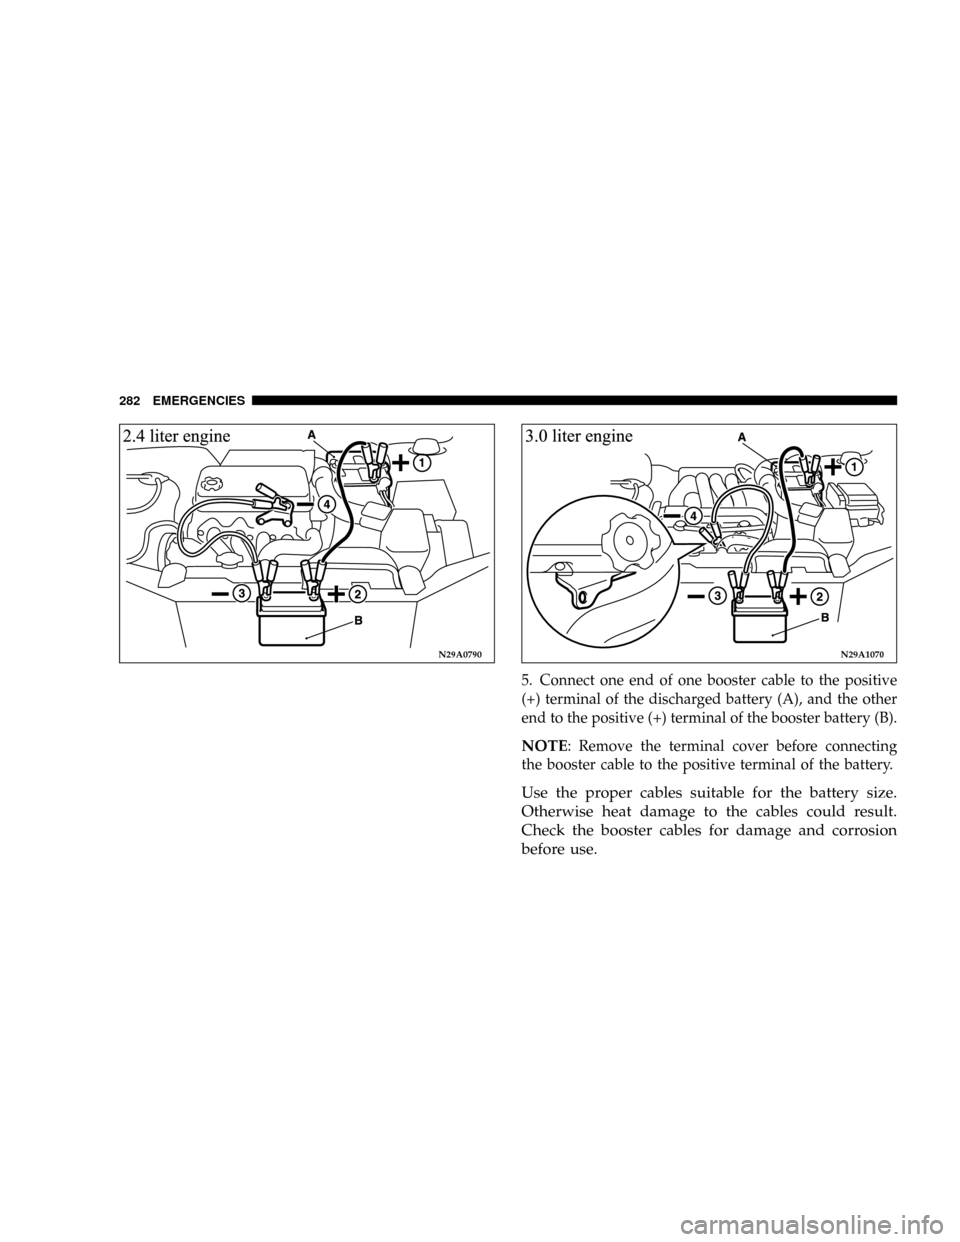
5. Connect one end of one booster cable to the positive
(+) terminal of the discharged battery (A), and the other
end to the positive (+) terminal of the booster battery (B).
NOTE: Remove the terminal cover before connecting
the booster cable to the positive terminal of the battery.
Use the proper cables suitable for the battery size.
Otherwise heat damage to the cables could result.
Check the booster cables for damage and corrosion
before use.
N29A0790N29A1070
282 EMERGENCIES
Page 283 of 396
6. Connect one end of the other jumper cable to the
negative (-) terminal of the booster battery (B), and the
other end to the engine block of the vehicle with the
discharged battery (A) at the point farthest from the
battery.WARNING!
²Be sure to observe the connecting sequence of¬
!!®!¯.
²Make sure that the connection¯is made to the
engine properly. If the connection is directly made
to the negative side of the battery, the flammable
gases generated from the battery might catch fire
and explode.
²When connecting the booster cable, do not con-
nect the positive (+) cable to the negative (-)
terminal. Otherwise sparks might cause explosion
of the battery.
²Use care not to have the booster cable caught in
the cooling fan or other rotating parts in the
engine compartment.
7. Start the engine in the vehicle which has the booster
battery, let the engine idle a few minutes, then start the
engine in the vehicle with the discharged battery.
8. After the engine is started, disconnect the cables in the
reverse order.
EMERGENCIES 283
8
Page 284 of 396
WARNING!
²Charging the battery installed in the vehicle
might cause the battery to catch fire and explode.
Or, damage to the vehicle could result. If it has to
be charged in that condition for unavoidable
reasons, disconnect the vehicle side negative lead.
²Keep sparks, cigarettes and flames away from the
battery because the battery may produce an explosion.
²Use adequate ventilation when charging or using
the battery in an enclosed space.
²Remove all the caps before charging the battery.
²Electrolyte (battery acid) is corrosive diluted sulfuric
acid. If electrolyte comes in contact with your hands,
eyes, clothes, or the painted surface of your vehicle,
thoroughly flush with water. If electrolyte gets in
your eyes, flush them thoroughly with water imme-
diately, and get prompt medical attention.
WARNING!
²Always wear protective clothing and goggles
when working near the battery.
²Keep the battery out of the reach of children.
If your vehicle has anti-lock brakes
If the vehicle is driven without sufficient battery charge,
after the engine has been started by using booster cables,
the engine may misfire. This can cause the anti-lock
braking system warning light to blink on and off. This is
a result of insufficient battery voltage; it is not a malfunc-
tion of the brake system. If this happens, fully charge the
battery before driving.
TOWING
When towing your vehicle, all state and local regulations for
towing must be followed. Incorrect towing equipment could
damage your vehicle. When towing is required, contact a
professional towing service and make sure that flat bed type,
dolly type or wheel lift type towing equipment is used. Do
not attempt to be towed by another vehicle with a rope using
the tie-down hooks.
284 EMERGENCIES
Page 285 of 396
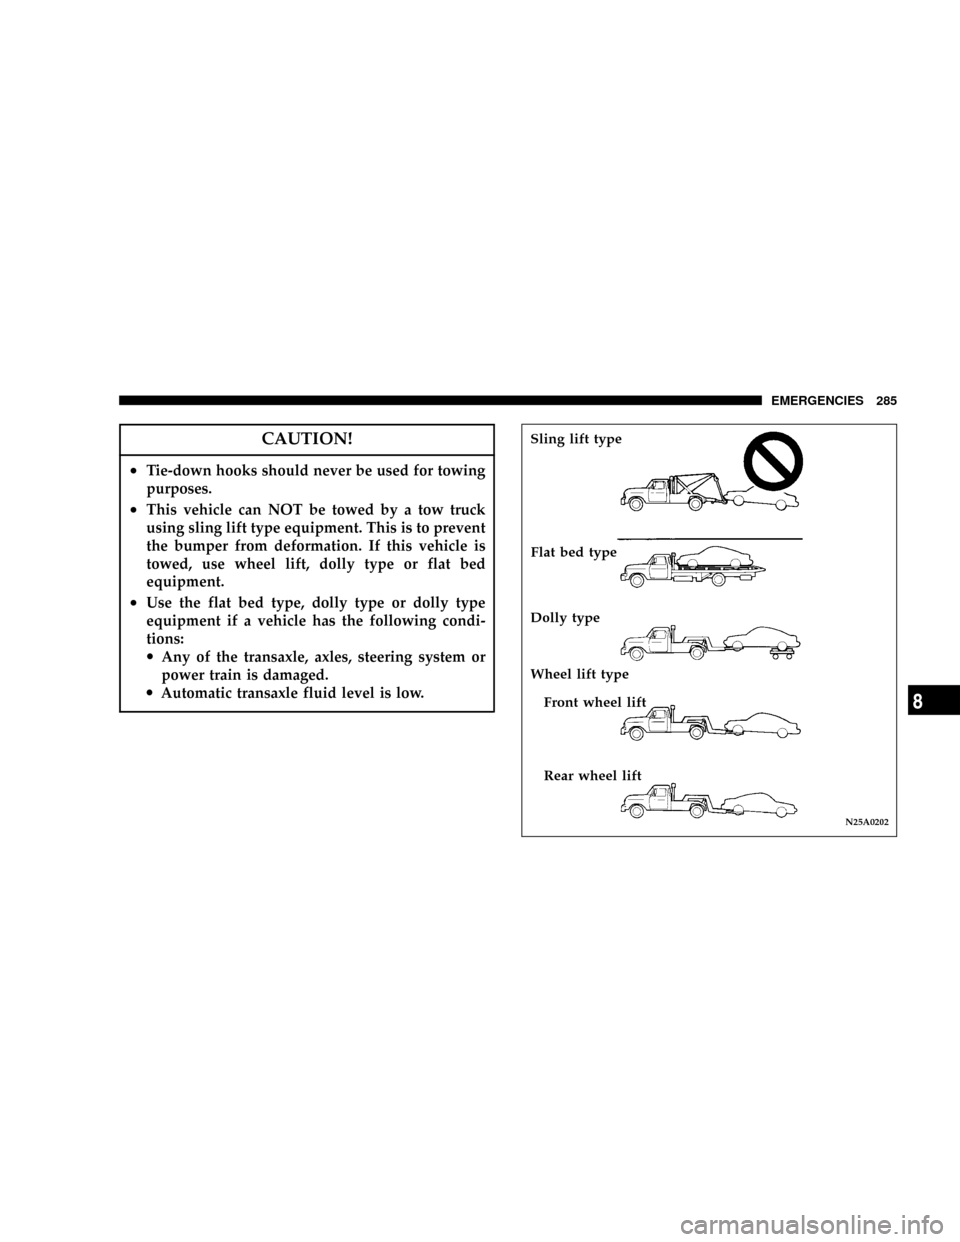
CAUTION!
²Tie-down hooks should never be used for towing
purposes.
²This vehicle can NOT be towed by a tow truck
using sling lift type equipment. This is to prevent
the bumper from deformation. If this vehicle is
towed, use wheel lift, dolly type or flat bed
equipment.
²Use the flat bed type, dolly type or dolly type
equipment if a vehicle has the following condi-
tions:
·Any of the transaxle, axles, steering system or
power train is damaged.
·Automatic transaxle fluid level is low.
N25A0202
Sling lift type
Flat bed type
Dolly type
Wheel lift type
Front wheel lift
Rear wheel lift
EMERGENCIES 285
8
Page 286 of 396
CAUTION!
²Towing should only be done by a professional
tow service particularly if it will involve towing
on winding roads, hills or heavy traffic. If you
have any doubts, use a professional tow service.
TowingÐfront wheel lift
Place the gearshift lever (manual transaxle) to Neutral or
the selector lever (automatic transaxle) in the ªNº (NEU-
TRAL) position. Release the parking brake.
TowingÐrear wheel lift
Turn the ignition key to the ªACCº position and secure
the steering wheel in a straight-ahead position with a
rope or similar device. Never place the ignition key in the
ªLOCKº position. This will result in damage to the
steering lock mechanism.
If you have to tow an automatic transaxle model with the rear
wheels raised (with the front wheels on the ground):
Observe the following restricted towing speeds and distances.
·Speed: 30 mph (50 km/h)
·Distance: 18 miles (30 km)
CAUTION!
Never tow an automatic transaxle model with the
rear wheels raised (with the front wheels on the
ground) when the automatic transaxle fluid level is
low. This may cause serious and expensive damage
to the transaxle.
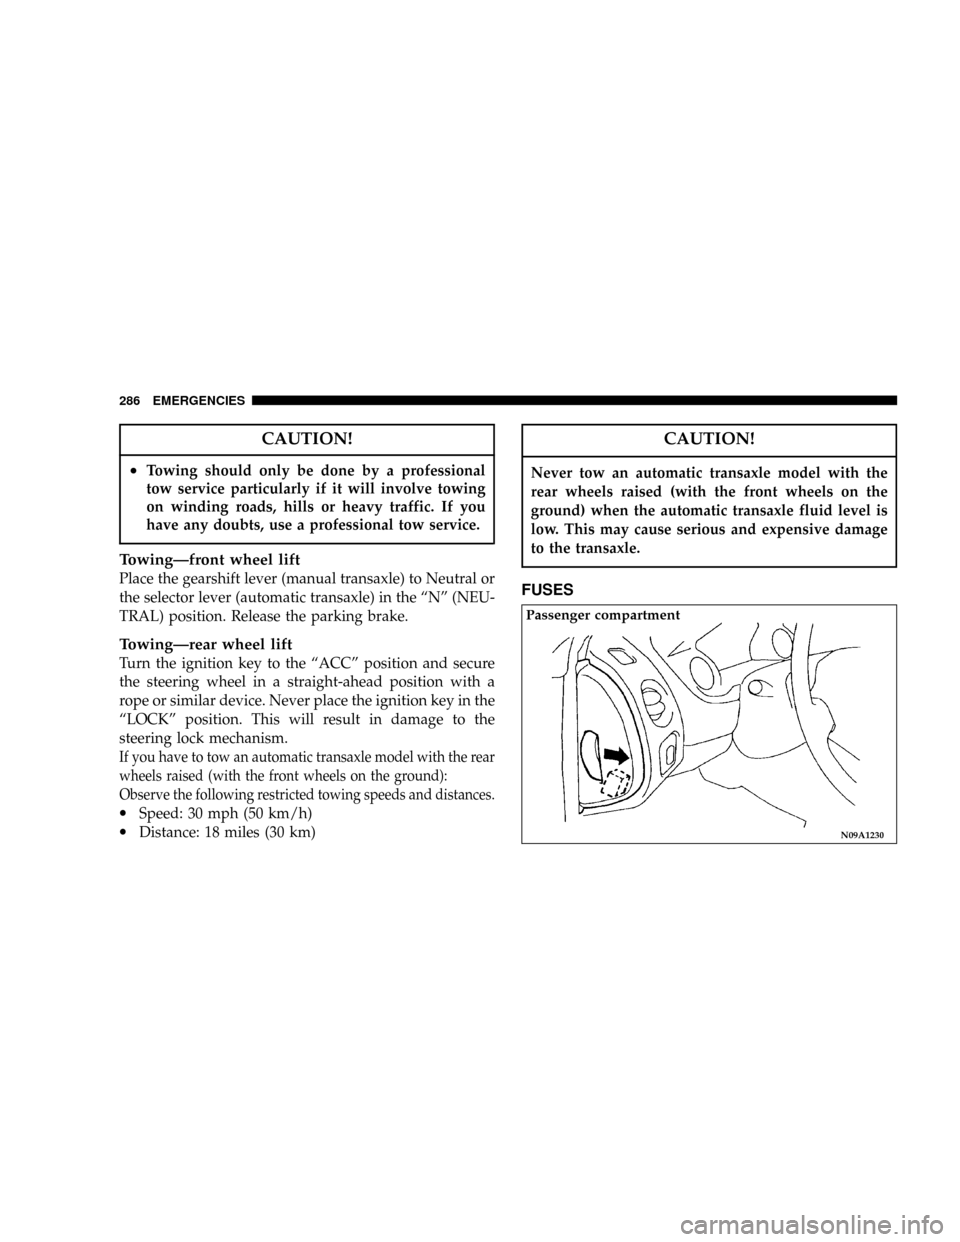
FUSES
N09A1230
Passenger compartment
286 EMERGENCIES
Page 287 of 396
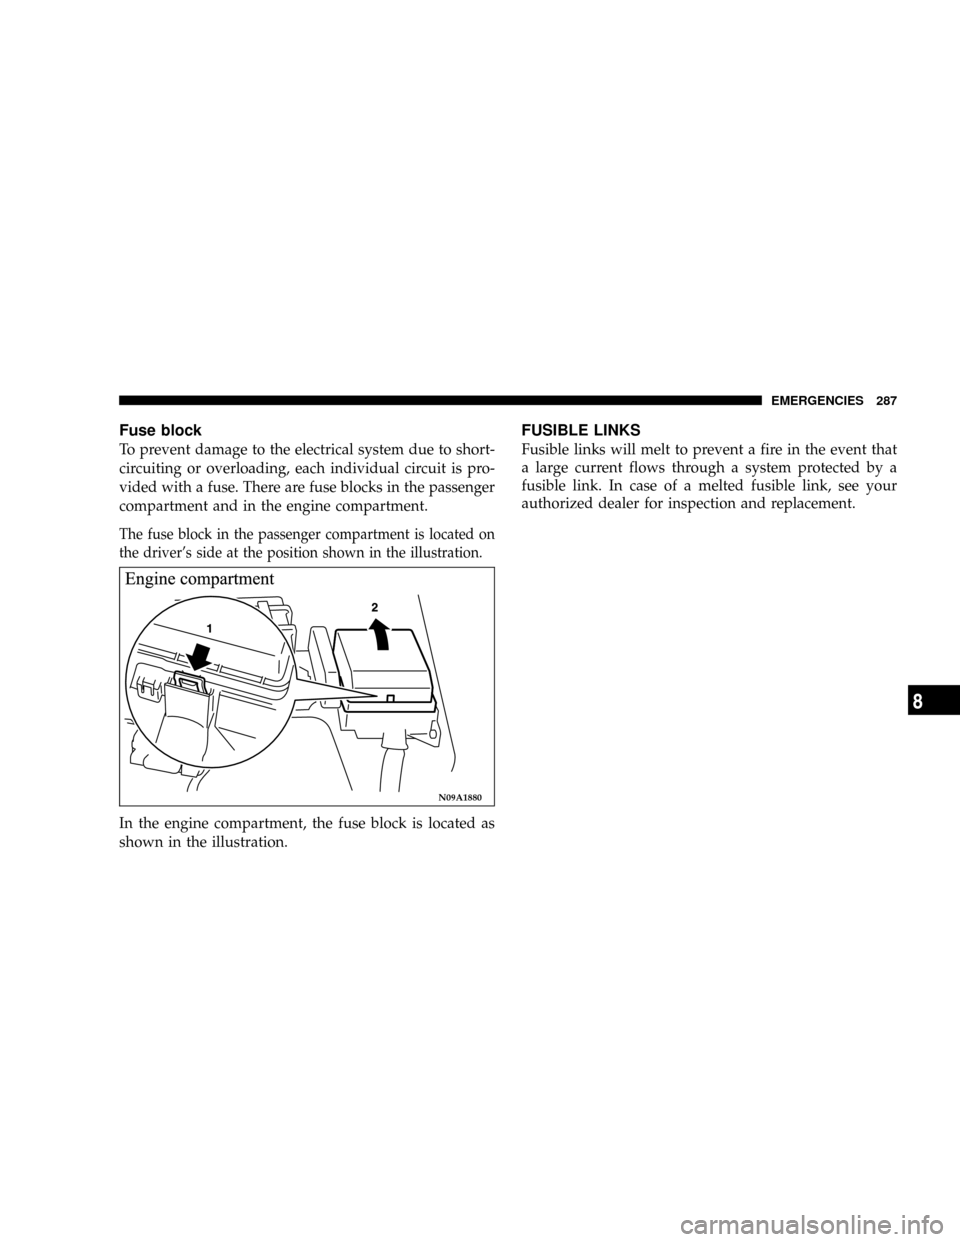
Fuse block
To prevent damage to the electrical system due to short-
circuiting or overloading, each individual circuit is pro-
vided with a fuse. There are fuse blocks in the passenger
compartment and in the engine compartment.
The fuse block in the passenger compartment is located on
the driver's side at the position shown in the illustration.
In the engine compartment, the fuse block is located as
shown in the illustration.
FUSIBLE LINKS
Fusible links will melt to prevent a fire in the event that
a large current flows through a system protected by a
fusible link. In case of a melted fusible link, see your
authorized dealer for inspection and replacement.
N09A1880
EMERGENCIES 287
8
Page 288 of 396
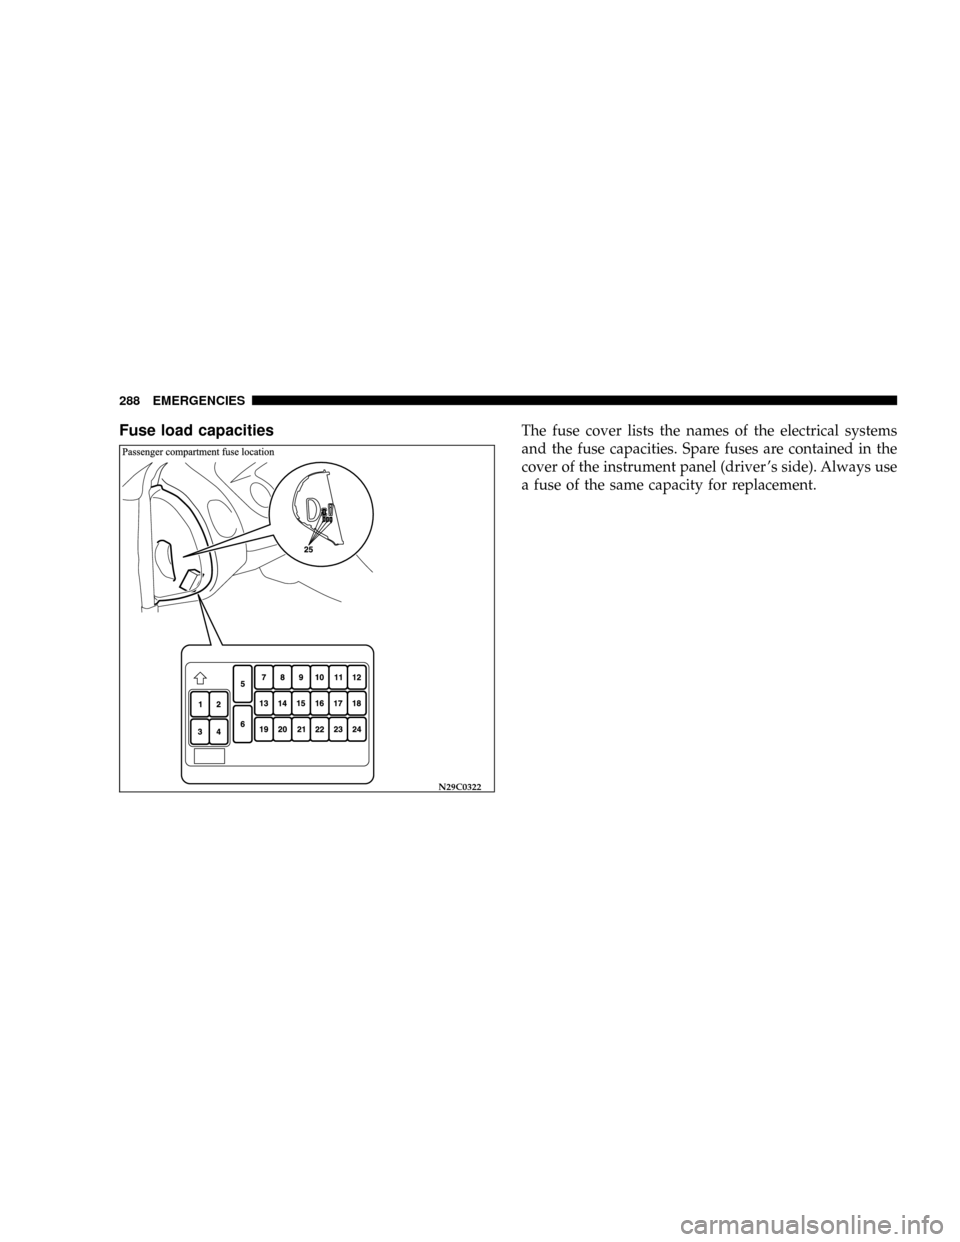
Fuse load capacitiesThe fuse cover lists the names of the electrical systems
and the fuse capacities. Spare fuses are contained in the
cover of the instrument panel (driver 's side). Always use
a fuse of the same capacity for replacement.
N29C0322
288 EMERGENCIES
Page 289 of 396
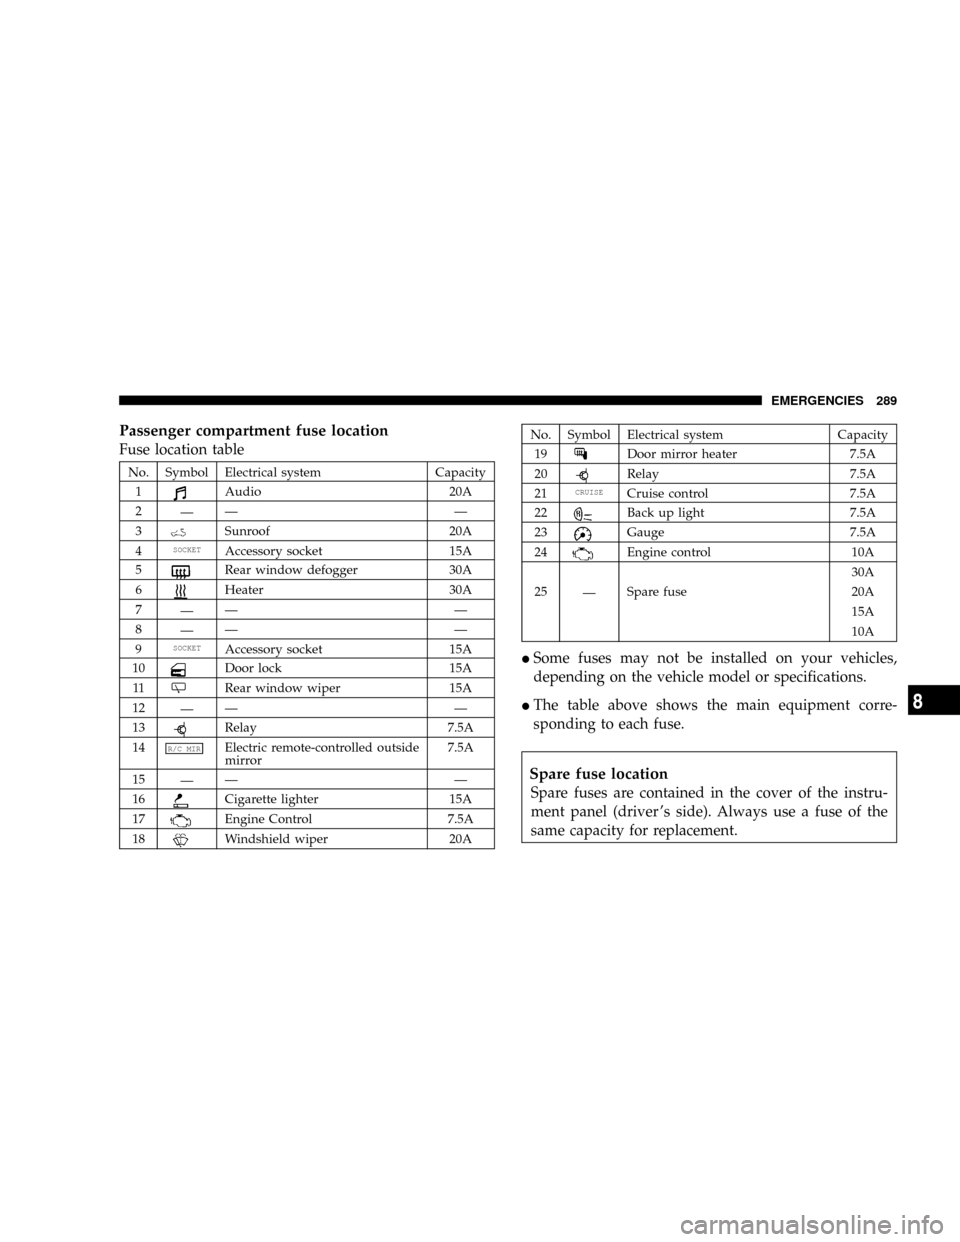
Passenger compartment fuse location
Fuse location table
No. Symbol Electrical system Capacity
1
Audio 20A
2
ÐÐÐ
3
Sunroof 20A
4
SOCKETAccessory socket 15A
5
Rear window defogger 30A
6
Heater 30A
7
ÐÐÐ
8
ÐÐÐ
9
SOCKETAccessory socket 15A
10
Door lock 15A
11
Rear window wiper 15A
12
ÐÐÐ
13
Relay 7.5A
14
R/C MIRElectric remote-controlled outside
mirror7.5A
15
ÐÐÐ
16
Cigarette lighter 15A
17
Engine Control 7.5A
18
Windshield wiper 20A
No. Symbol Electrical system Capacity
19
Door mirror heater 7.5A
20
Relay 7.5A
21
CRUISECruise control 7.5A
22
Back up light 7.5A
23
Gauge 7.5A
24
Engine control 10A
30A
25
ÐSpare fuse 20A
15A
10A
ISome fuses may not be installed on your vehicles,
depending on the vehicle model or specifications.
IThe table above shows the main equipment corre-
sponding to each fuse.
Spare fuse location
Spare fuses are contained in the cover of the instru-
ment panel (driver 's side). Always use a fuse of the
same capacity for replacement.
EMERGENCIES 289
8
Page 290 of 396
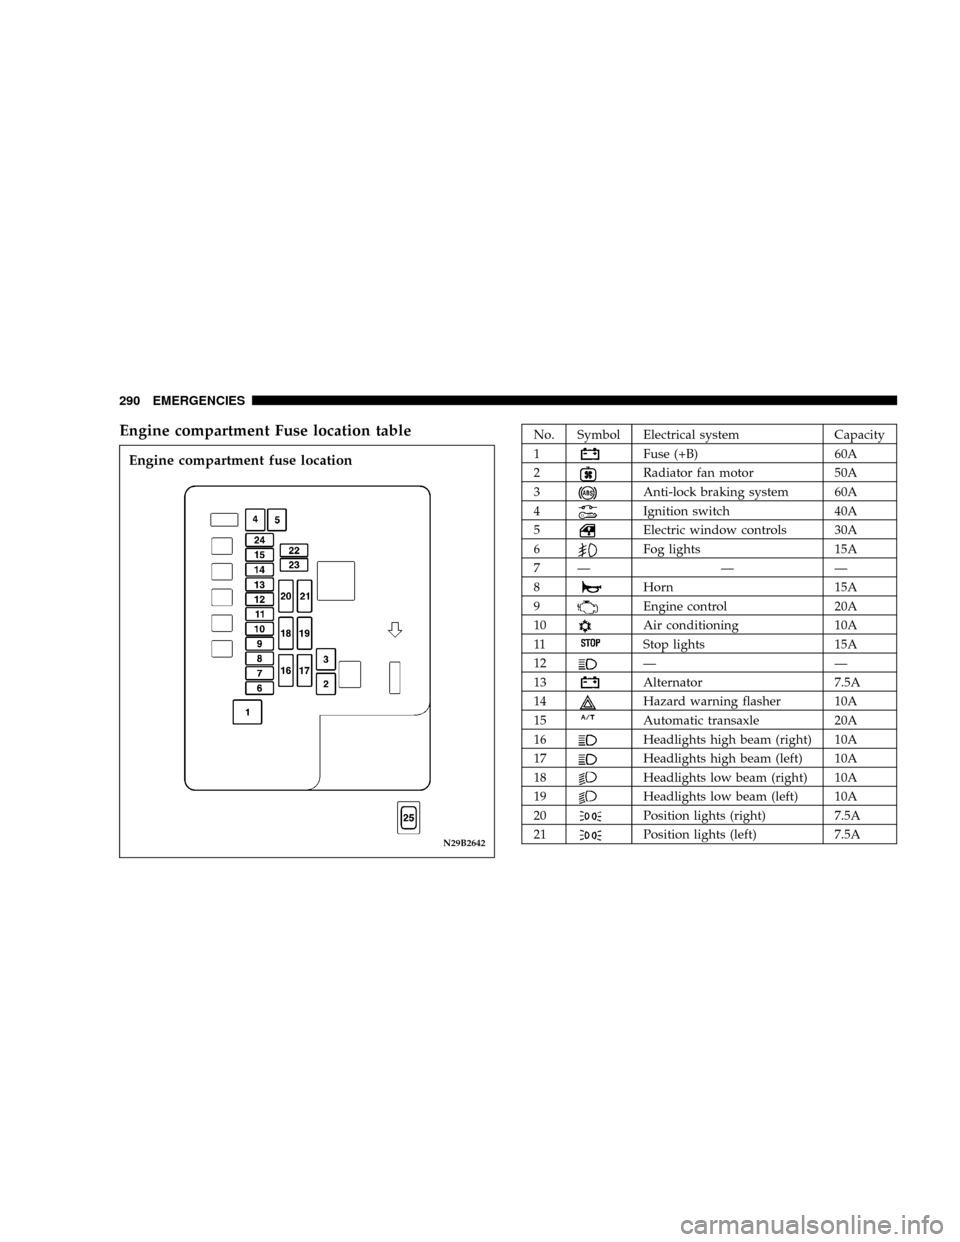
Engine compartment Fuse location tableNo. Symbol Electrical system Capacity
1
Fuse (+B) 60A
2
Radiator fan motor 50A
3
Anti-lock braking system 60A
4
Ignition switch 40A
5
Electric window controls 30A
6
Fog lights 15A
7Ð Ð Ð
8
Horn 15A
9
Engine control 20A
10
Air conditioning 10A
11
Stop lights 15A
12
ÐÐ
13
Alternator 7.5A
14
Hazard warning flasher 10A
15
Automatic transaxle 20A
16
Headlights high beam (right) 10A
17
Headlights high beam (left) 10A
18
Headlights low beam (right) 10A
19
Headlights low beam (left) 10A
20
Position lights (right) 7.5A
21
Position lights (left) 7.5AN29B2642
Engine compartment fuse location
290 EMERGENCIES