tire pressure FIAT 124 SPIDER 2017 2.G User Guide
[x] Cancel search | Manufacturer: FIAT, Model Year: 2017, Model line: 124 SPIDER, Model: FIAT 124 SPIDER 2017 2.GPages: 300, PDF Size: 121.24 MB
Page 183 of 300
Note:
Remove snow before driving. Snow
left on the windshield is dangerous as
it could obstruct vision.
Drive slowly. Braking performance
can be adversely affected if snow or
ice adheres to the brake components.
If this situation occurs, drive the vehicle
slowly, releasing the accelerator pedal
and lightly applying the brakes several
times until the brake performance
returns to normal.
Do not open or close the soft top when
the temperature is 41 °F (5 °C) or less.
The material of the soft top could be
damaged by freezing.
Do not apply excessive force to a
window scraper when removing ice or
frozen snow on the mirror glass and
windshield.
Never use warm or hot water for
removing snow or ice from windows
and mirrors as it could result in the
glass cracking.
Snow Tires
If your vehicle is equipped with the tire
pressure monitoring system (vehicle
with run-flat tires), the system may not
function correctly when using tires with
steel wire reinforcement in the
sidewalls. Use Snow Tires on all Four Wheels
:
Do not exceed the maximum
permissible speed for your snow tires or
legal speed limits.
When snow tires are used, select the
specified size and pressure.
Tire Chains
Check local regulations before using tire
chains.
If your vehicle is equipped with the
TPMS system, the system may not
function correctly when using tire
chains.
Install the chains on the rear tires only.
Do not use chains on the front tires.
Note:
Chains may affect handling.
Do not go faster than 30 mph
(50 km/h) or the chain manufacturer's
recommended limit, whichever is lower.
Drive carefully and avoid bumps,
holes, and sharp turns.
Avoid locked-wheel braking.
Do not use chains on roads that are
free of snow or ice. The tires and
chains could be damaged.
Chains may scratch or chip
aluminium wheels.
Warning!
Using tires of different size and type (M+S,
Snow) between front and rear axles can
cause unpredictable handling. You could
lose control and have a collision.
Caution!
To avoid damage to your vehicle or tires,
observe the following precautions:
Because of restricted traction device
clearance between tires and other
suspension components, it is important
that only traction devices in good condition
are used. Broken devices can cause
serious damage. Stop the vehicle
immediately if noise occurs that could
indicate device breakage. Remove the
damaged parts of the device before further
use.
Install device as tightly as possible and
then retighten after driving about ½ mile
(0.8 km).
Do not exceed 30 mph (48 km/h).
Drive cautiously and avoid severe turns
and large bumps, especially with a loaded
vehicle.
Do not drive for a prolonged period on
dry pavement.
181
Page 209 of 300
5. Insert the jack lever and attach the
lug wrench to tire jack.
Warning!
Being under a jacked-up vehicle is
dangerous. The vehicle could slip off the
jack and fall on you. You could be crushed.
Never get any part of your body under a
vehicle that is on a jack. If you need to get
under a raised vehicle, take it to a service
center where it can be raised on a lift.
6. Turn the jack handle clockwise and
raise the vehicle high enough so that
the tire is raised off the ground and can
be removed. Before removing the lug
nuts, make sure your vehicle is firmly in
position and that it cannot slip or move.
Warning!
Raising the vehicle higher than necessary
can make the vehicle less stable. It could
slip off the jack and hurt someone near it.
Raise the vehicle only enough to remove
the tire.
7. Remove the wheel nuts by turning
them counterclockwise; then remove
the wheel.Locking Lug Nuts — If Equipped
If your vehicle has optional antitheft
wheel lug nuts, one on each wheel will
lock the tires and you must use a
special key to unlock them. This key will
attach to the lug wrench.
Register them with the lock
manufacturer by filling out the card
provided in the glove compartment and
mailing it in the accompanying
envelope. If you lose this key, contact
an Authorized Dealer or use the lock
manufacturer's order form, which is
with the registration card.
Accessory wheel locks cannot be used
on steel wheels. This includes situations
when the spare tire is installed. If the
spare tire is installed, one of the original
lug nuts (which should still be in the
vehicle) must be installed in place of the
wheel lock.
To Remove An Antitheft Lug Nut
Proceed as follows:
1. Obtain the special key for the
antitheft lug nut.
2. Place the special key on top of the
antitheft lug nut, and be sure to hold
the key square to it. If you hold the key
at an angle, you may damage both key
and nut. Do not use a power impact
wrench.
3. Place the lug wrench on top of the
key and apply pressure. Turn the
wrench counterclockwise.
08020301-121-001-high.jpgFront Jacking Location
08020301-ALL-006-high.jpgJack With Lug Wrench Attached
207
Page 210 of 300
To Install The Antitheft Lug Nut
Proceed as follows:
1. Place the special key on top of the
nut, and be sure to hold the key square
to it. If you hold the key at an angle, you
may damage both key and nut. Do not
use a power impact wrench.
2. Place the lug wrench on top of the
special key, apply pressure, and turn it
clockwise.
Mounting The Tire
Proceed as follows:
1. Remove dirt and grime from the
mounting surfaces of the wheel and
hub, including the hub bolts, with a
cloth.
2. Mount the tire and install the wheel
nuts with the beveled edge inward;
tighten them by hand.
Caution!
Be sure to mount the spare tire with the
valve stem facing outward. The vehicle
could be damaged if the spare tire is
mounted incorrectly.
3. Turn the lug wrench
counterclockwise and lower the vehicle.
Use the lug wrench to tighten the nuts
in the order shown.
Warning!
To avoid the risk of forcing the vehicle off
the jack, do not tighten the wheel nuts fully
until the vehicle has been lowered. Failure
to follow this warning may result in serious
injury.
4. Remove the tire blocks and store
the tools and jack.
5. Check the inflation pressure.
If in doubt about the correct tightness,
have them checked with a torque
wrench by your Authorized Dealership
or Service Station.
With TPMS
Do not push the tire pressure monitoring
system set switch after installing the
spare tire. The switch is only to be
pushed after installing the repaired flat
tire or installing a replacement tire.
Note:To prevent the jack and tool from
rattling, store them properly.
Warning!
A loose tire or jack thrown forward in a
collision or hard stop could endanger the
occupants of the vehicle. Always stow the
jack parts and the spare tire in the places
provided. Have the deflated (flat) tire
repaired or replaced immediately.08020303-XX4-001Clean Mounting Surface
08020303-122-001Lug Nut Tightening Order
208
IN CASE OF EMERGENCY
Page 212 of 300
Tire Service Usage
Precautions
The tire sealant cannot be reused. If the
sealant has been used, or is expired,
purchase new tire sealant at an
Authorized Dealer.
Note:The tire service kit cannot be
used in the following cases. Consult an
Authorized Dealer if any of these
conditions exist:
The period of effective use for the
tire sealant has expired (the period of
effectiveness is indicated on the bottle
label)
The tear or puncture in the tire
exceeds about 0.16 in (4 mm)
The damage has occurred to an
area of the tire other than the tread
The vehicle has been driven with
nearly no air remaining in the tire
The tire has come off the wheel rim
Damage to the wheel rim has
occurred
The tire has two or more punctures
Sealing A Tire With Tire
Service
Warning!
Do not attempt to seal a tire on the side
of the vehicle closest to traffic. Pull far
enough off the road to avoid the danger of
being hit when using the Tire Service Kit.
Do not use Tire Service Kit or drive the
vehicle under the following circumstances:
If the puncture in the tire tread is
approximately 1/4 inch (6 mm) or larger.
If the tire has any sidewall damage.
If the tire has any damage from driving
with extremely low tire pressure.
If the tire has any damage from driving
on a flat tire.
If the wheel has any damage.
If you are unsure of the condition of the
tire or the wheel.
Keep Tire Service Kit away from open
flames or heat source.
A loose Tire Service Kit thrown forward
in a collision or hard stop could endanger
the occupants of the vehicle. Always stow
the Tire Service Kit in the place provided.
Failure to follow these warnings can result
in injuries that are serious or fatal to you,
your passengers, and others around you.
Take care not to allow the contents of
Tire Service Kit to come in contact with
hair, eyes, or clothing. Tire Service Kit
sealant is harmful if inhaled, swallowed, or
absorbed through the skin. It causes skin,
eye, and respiratory irritation. Flush
immediately with plenty of water if there is
any contact with eyes or skin. Change
clothing as soon as possible, if there is any
contact with clothing.
Tire Service Kit Sealant solution contains
latex. In case of an allergic reaction or rash,
consult a physician immediately. Keep Tire
Service Kit out of reach of children. If
swallowed, rinse mouth immediately with
plenty of water and drink plenty of water.
Do not induce vomiting! Consult a
physician immediately.
210
IN CASE OF EMERGENCY
Page 214 of 300
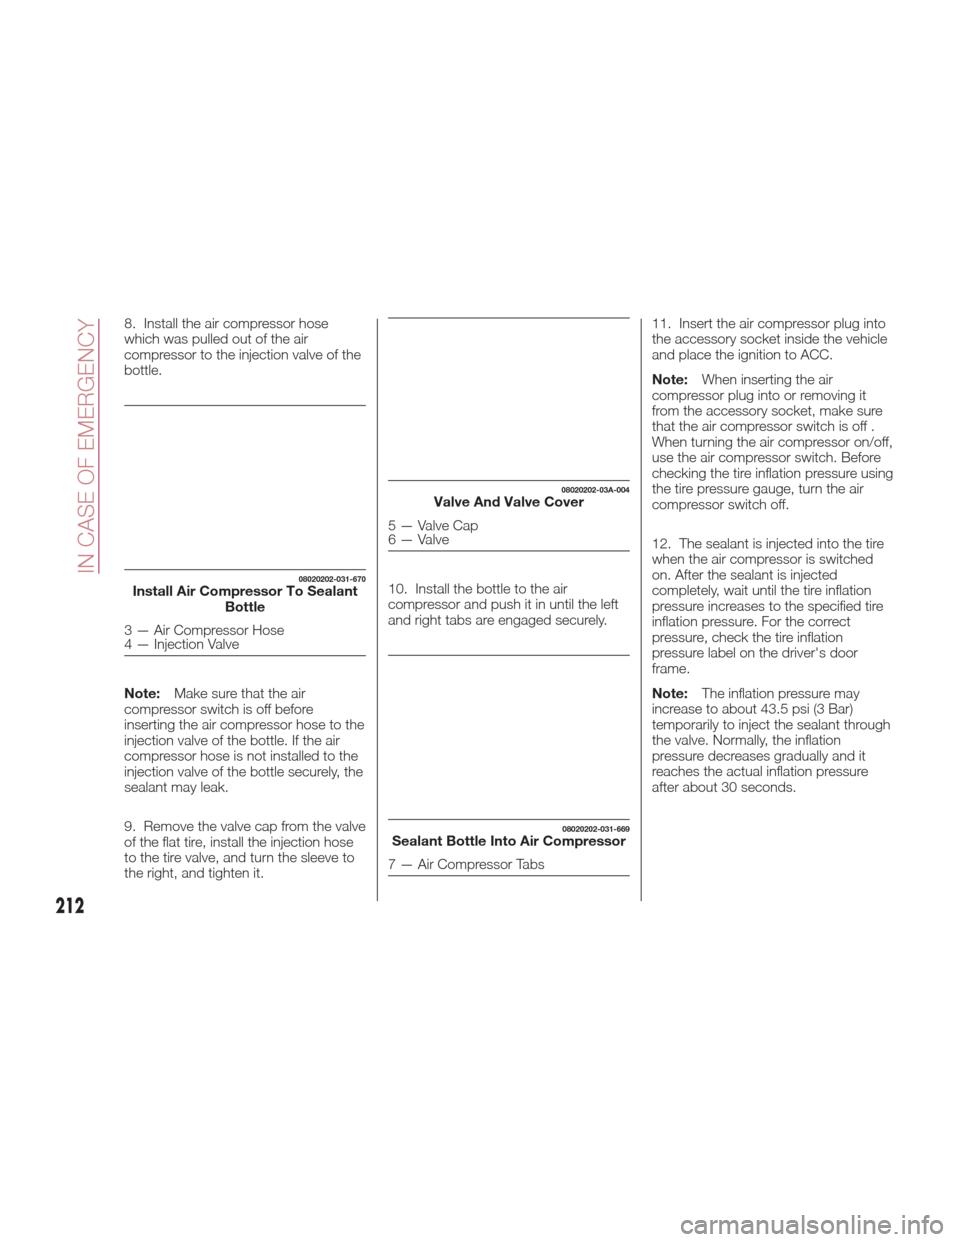
8. Install the air compressor hose
which was pulled out of the air
compressor to the injection valve of the
bottle.
Note:Make sure that the air
compressor switch is off before
inserting the air compressor hose to the
injection valve of the bottle. If the air
compressor hose is not installed to the
injection valve of the bottle securely, the
sealant may leak.
9. Remove the valve cap from the valve
of the flat tire, install the injection hose
to the tire valve, and turn the sleeve to
the right, and tighten it. 10. Install the bottle to the air
compressor and push it in until the left
and right tabs are engaged securely.11. Insert the air compressor plug into
the accessory socket inside the vehicle
and place the ignition to ACC.
Note:
When inserting the air
compressor plug into or removing it
from the accessory socket, make sure
that the air compressor switch is off .
When turning the air compressor on/off,
use the air compressor switch. Before
checking the tire inflation pressure using
the tire pressure gauge, turn the air
compressor switch off.
12. The sealant is injected into the tire
when the air compressor is switched
on. After the sealant is injected
completely, wait until the tire inflation
pressure increases to the specified tire
inflation pressure. For the correct
pressure, check the tire inflation
pressure label on the driver's door
frame.
Note: The inflation pressure may
increase to about 43.5 psi (3 Bar)
temporarily to inject the sealant through
the valve. Normally, the inflation
pressure decreases gradually and it
reaches the actual inflation pressure
after about 30 seconds.
08020202-031-670Install Air Compressor To Sealant Bottle
3 — Air Compressor Hose
4 — Injection Valve
08020202-03A-004Valve And Valve Cover
5 — Valve Cap
6 — Valve
08020202-031-669Sealant Bottle Into Air Compressor
7 — Air Compressor Tabs
212
IN CASE OF EMERGENCY
Page 215 of 300
Warning!
Never use the air compressor above
43.5 psi (3 Bar). Using the air compressor
at an inflation pressure above 3 Bar
(43.5 psi) continuously is dangerous. If the
air compressor overheats, hot air will be
exhausted and you could get burned.
Caution!
If the tire inflation pressure does not
increase, repair of the tire is not possible. If
the tire does not reach the specified tire
inflation pressure within 10 minutes, it may
have received extensive damage. In this
case, the repair using the tire service kit
was not successful.
Do not operate the air compressor for a
continuous 10 minutes or longer because
using it for long periods could cause a
malfunction.
13. Adhere the speed restriction sticker
to an area where it can be viewed easily
by the driver.
Warning!
Do not adhere the speed restriction sticker
to the padded area on the steering wheel.
Adhering the speed restriction sticker to
the padded area on the steering wheel is
dangerous because the air bag may not
operate (deploy) normally resulting in
serious injury. In addition, do not adhere
the sticker to areas where warning lights or
the speedometer cannot be viewed.
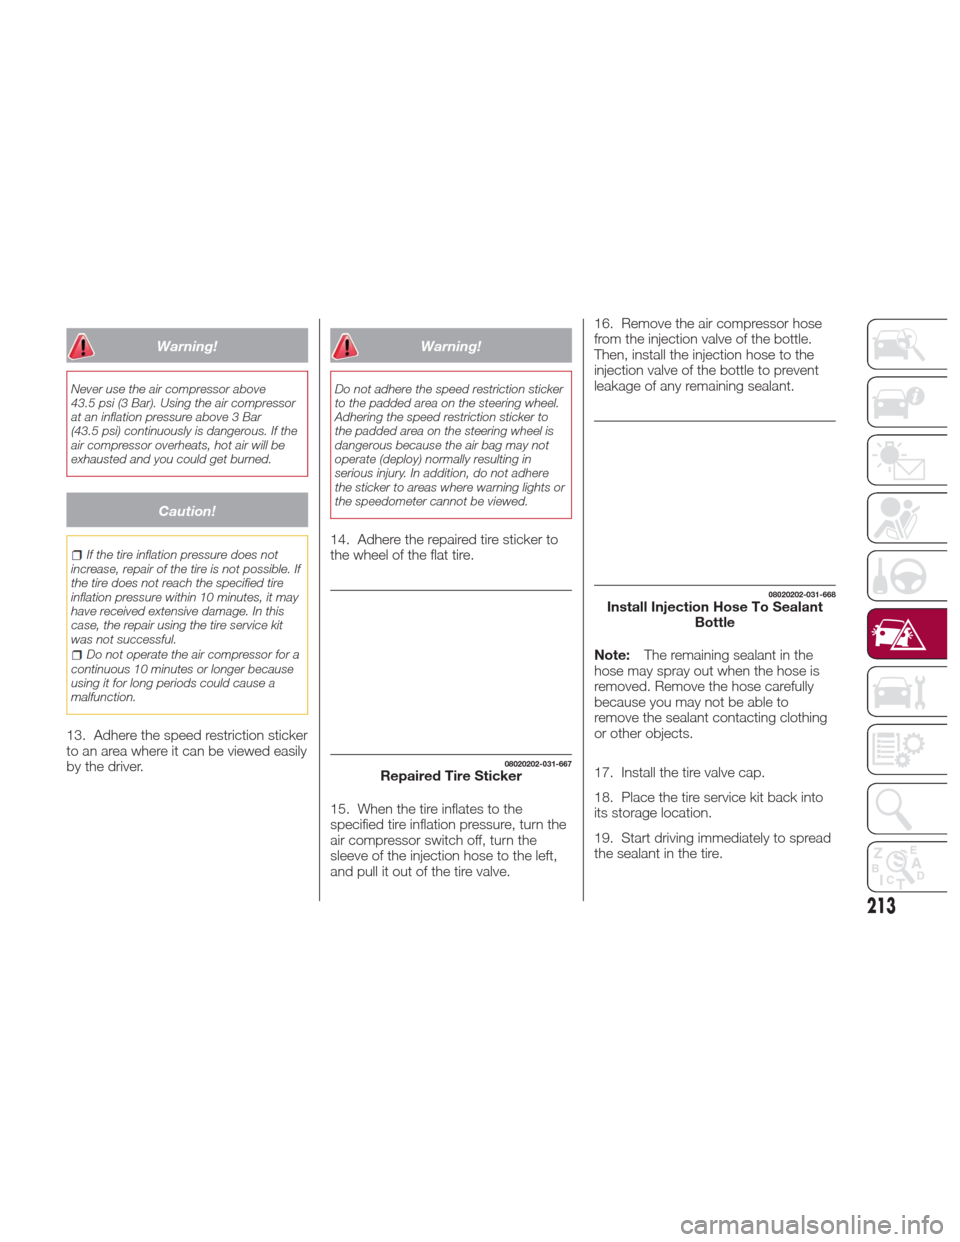
14. Adhere the repaired tire sticker to
the wheel of the flat tire.
15. When the tire inflates to the
specified tire inflation pressure, turn the
air compressor switch off, turn the
sleeve of the injection hose to the left,
and pull it out of the tire valve. 16. Remove the air compressor hose
from the injection valve of the bottle.
Then, install the injection hose to the
injection valve of the bottle to prevent
leakage of any remaining sealant.
Note:
The remaining sealant in the
hose may spray out when the hose is
removed. Remove the hose carefully
because you may not be able to
remove the sealant contacting clothing
or other objects.
17. Install the tire valve cap.
18. Place the tire service kit back into
its storage location.
19. Start driving immediately to spread
the sealant in the tire.
08020202-031-667Repaired Tire Sticker
08020202-031-668Install Injection Hose To Sealant Bottle
213
Page 216 of 300
Note:Carefully drive the vehicle at a
speed of 50 mph (80 km/h) or less. If
the vehicle is driven at a speed of
50 mph (80 km/h) or more, the vehicle
may vibrate.
Note: With TPMS system: if the tire is
not properly inflated, the
warning
light will illuminate.
After driving the vehicle for about
10 minutes or 3 miles (5 km), connect
the air compressor to the tire using
Step 9 of the procedure, and check the
tire inflation pressure using the tire
pressure gauge on the air compressor.
If the tire inflation pressure is lower than
the specified tire inflation pressure, turn
the air compressor on and wait until it
reaches the specified tire inflation
pressure.
the tire service kit is completed
successfully if the tire inflation pressure
does not decrease. Carefully drive the
vehicle to the nearest Authorized Dealer
immediately and have the flat tire
replaced. Replacement with a new tire
is recommended. If the tire is to be
repaired or reused, consult an
Authorized Dealer.
Note:
If an emergency flat tire repair has
been performed using the tire service
kit, FCA recommends that the tire be
replaced with a new one as soon as possible. If the tire is to be repaired or
reused, contact an Authorized Dealer.
The wheel can be reused if the
sealant adhering to it is removed.
However, replace the valve with a new
one.
Sealing A Tire With Tire
Service
Warning!
Do not attempt to seal a tire on the side
of the vehicle closest to traffic. Pull far
enough off the road to avoid the danger of
being hit when using the Tire Service Kit.
Do not use Tire Service Kit or drive the
vehicle under the following circumstances:
If the puncture in the tire tread is
approximately 1/4 inch (6 mm) or larger.
If the tire has any sidewall damage.
If the tire has any damage from driving
with extremely low tire pressure.
If the tire has any damage from driving
on a flat tire.
If the wheel has any damage.
If you are unsure of the condition of the
tire or the wheel.
Keep Tire Service Kit away from open
flames or heat source.
A loose Tire Service Kit thrown forward
in a collision or hard stop could endanger
the occupants of the vehicle. Always stow
the Tire Service Kit in the place provided.
Failure to follow these warnings can result
in injuries that are serious or fatal to you,
your passengers, and others around you.
Take care not to allow the contents of
Tire Service Kit to come in contact with
hair, eyes, or clothing. Tire Service Kit
sealant is harmful if inhaled, swallowed, or
absorbed through the skin. It causes skin,
eye, and respiratory irritation. Flush
immediately with plenty of water if there is
any contact with eyes or skin. Change
clothing as soon as possible, if there is any
contact with clothing.
Tire Service Kit Sealant solution contains
latex. In case of an allergic reaction or rash,
consult a physician immediately. Keep Tire
Service Kit out of reach of children. If
swallowed, rinse mouth immediately with
plenty of water and drink plenty of water.
Do not induce vomiting! Consult a
physician immediately.
214
IN CASE OF EMERGENCY
Page 219 of 300
13. Reinsert the valve core into the
valve and turn it clockwise to install.
Note:
The tire sealant cannot be reused.
If the tire sealant kit has been used, or
is expired, purchase new one at an
Authorized Dealer.
Do not throw away the empty tire
sealant bottle after use. Return the
empty tire sealant bottle to an
Authorized Dealer when replacing the
tire. The empty tire sealant bottle will
need to be used to extract and dispose
of the used sealant from the tire.
14. Install the injection hose to the tab
of the bottle to prevent leakage of any
remaining sealant.
15. Adhere the speed restriction sticker
to an area where it can be viewed easily
by the driver.
Warning!
Do not adhere the speed restriction sticker
to the padded area on the steering wheel.
Adhering the speed restriction sticker to
the padded area on the steering wheel is
dangerous because the air bag may not
operate (deploy) normally resulting in
serious injury. In addition, do not adhere
the sticker to areas where warning lights or
the speedometer cannot be viewed.
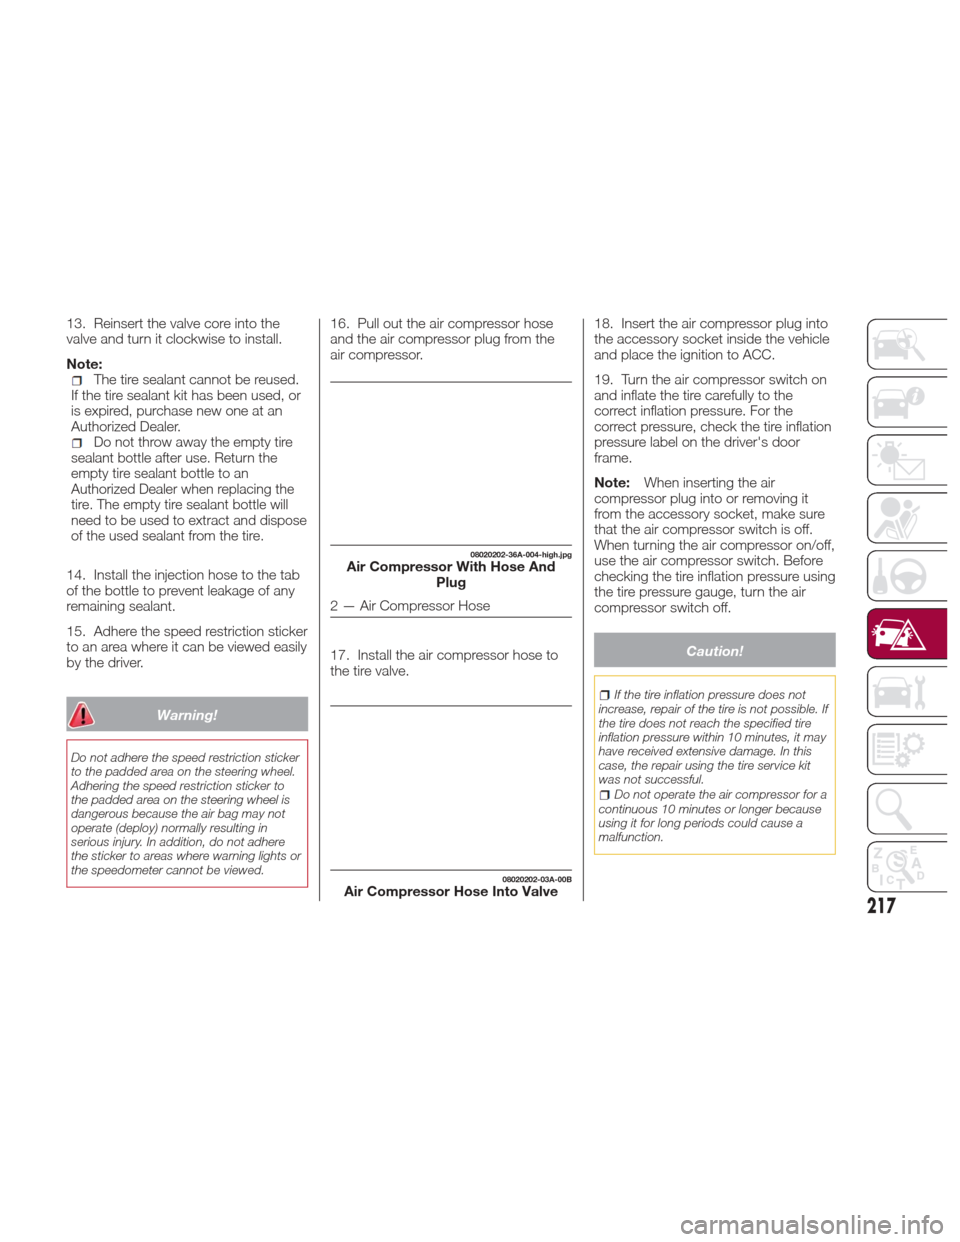
16. Pull out the air compressor hose
and the air compressor plug from the
air compressor.
17. Install the air compressor hose to
the tire valve. 18. Insert the air compressor plug into
the accessory socket inside the vehicle
and place the ignition to ACC.
19. Turn the air compressor switch on
and inflate the tire carefully to the
correct inflation pressure. For the
correct pressure, check the tire inflation
pressure label on the driver's door
frame.
Note:
When inserting the air
compressor plug into or removing it
from the accessory socket, make sure
that the air compressor switch is off.
When turning the air compressor on/off,
use the air compressor switch. Before
checking the tire inflation pressure using
the tire pressure gauge, turn the air
compressor switch off.
Caution!
If the tire inflation pressure does not
increase, repair of the tire is not possible. If
the tire does not reach the specified tire
inflation pressure within 10 minutes, it may
have received extensive damage. In this
case, the repair using the tire service kit
was not successful.
Do not operate the air compressor for a
continuous 10 minutes or longer because
using it for long periods could cause a
malfunction.
08020202-36A-004-high.jpgAir Compressor With Hose And Plug
2 — Air Compressor Hose
08020202-03A-00BAir Compressor Hose Into Valve
217
Page 220 of 300
Note:If the tire has been over
inflated, loosen the screw cap on the air
compressor and bleed some of the air
out.
20. When the tire inflates to the
specified tire inflation pressure, turn the
air compressor switch off, turn the
sleeve of the air compressor hose to
the left, and pull it out of the tire valve.
21. Install the tire valve cap.
22. Place the tire service kit back into
its storage location.
23. Start driving immediately to spread
the sealant in the tire.
Note:
Carefully drive the vehicle at a
speed of 50 mph (80 km/h) or less. If
the vehicle is driven at a speed of
50 mph (80 km/h) or more, the vehicle
may vibrate.
With TPMS system: if the tire is not
properly inflated, thewarning light
will illuminate.
After driving the vehicle for about
10 minutes or three miles (5 km),
connect the air compressor to the tire
using Step 9 of the procedure, and
check the tire inflation pressure using
the tire pressure gauge on the air
compressor. If the tire inflation pressure
is lower than the specified tire inflation
pressure, turn the air compressor on and wait until it reaches the specified
tire inflation pressure;
The emergency flat tire repair is
completed successfully if the tire
inflation pressure does not decrease.
Carefully drive the vehicle to the
nearest Authorized Dealer and have
the flat tire replaced. Replacement with
a new tire is recommended. If the tire is
to be repaired or reused, contact a
Authorized Dealer.
If an emergency flat tire repair has
been performed using the tire service
kit, FCA recommends that the tire be
replaced with a new one as soon as
possible. If the tire is to be repaired or
reused, contact an Authorized Dealer.
The tire can be reused if the sealant
adhering to it is removed. However,
replace the valve with a new one.
Replacing The Bottle
Note: The tire sealant has a period of
effective use. Check the period of
effective use indicated on the bottle
label and do not use it if it has expired.
Have the tire sealant replaced at an
Authorized Dealer before the period of
effective use has expired.
Inspect the tire service kit at regular
intervals as well as the operation of the
tire compressor.
JUMP STARTING
Preparations For Jump
Starting
If the battery is discharged, a jump
starting can be performed using the
battery and the cables of another
vehicle, or using a booster battery.
Jump-starting is dangerous if done
incorrectly, so follow the procedure in
this section carefully. If you feel unsure
about jump-starting, it is strongly
recommend that you have a competent
service technician do the work.
Note: When a booster battery is being
used, comply with the utilization and
precaution instructions specified by the
manufacturer.
218
IN CASE OF EMERGENCY
Page 227 of 300
INTRODUCTION
Be extremely careful and prevent injury
to yourself and others or damage to
your vehicle when using this Owner’s
Manual for inspection and maintenance.
If you are unsure about any procedure it
describes, we strongly urge you to have
a reliable and qualified service shop
perform the work, preferably at your
Authorized Dealer.
Factory-trained FCA technicians and
genuine FCA parts are best for your
vehicle. Without this expertise and the
parts that have been designed and
made especially for your vehicle,
inadequate, incomplete, and insufficient
servicing may result in problems. This
could lead to vehicle damage or an
accident and injuries.
For expert advice and quality service,
contact your Authorized Dealer.
To continue New Vehicle Limited
Warranty eligibility and to protect your
investment, it is your responsibility to
properly maintain your vehicle
according to factory recommended
schedules outlined in this Owner’s
Manual. As part of this you must keep
your maintenance records, receipts,
repair orders and any other documents
as evidence this maintenance was
performed. You must present these
documents, should any New Vehicle
Limited Warranty coverage
disagreement occur. Failure to do so
can result in your New Vehicle LimitedWarranty being voided either in whole
or in part.
This evidence may consist of the
following:
The FCA Scheduled Maintenance
Record, refer to the Warranty Booklet,
must be completely filled out showing
mileage, repair order number, date for
each service, and signed by a qualified
automotive service technician who
service vehicles.
Original copies of repair orders or
other receipts that include the mileage
and date the vehicle was serviced.
Each receipt should be signed by a
qualified automotive service technician.
For self maintenance, a statement
that you completed the maintenance
yourself, displaying mileage and the
date the work was performed. Also,
receipts for the replacement parts (fluid,
filters, etc.) indicating the date and
mileage must accompany this
statement.
Note:
If you elect to perform maintenance
yourself or have your vehicle serviced at
a location other than an Authorized
Dealer, FCA requires that all fluids, parts
and materials must meet FCA
standards for durability and
performance as described in this
Owner’s Manual. Claims against the warranty resulting
from lack of maintenance, as opposed
to defective materials or authorized FCA
workmanship, will not be honored.
Any auto repair shop using parts
equivalent to your vehicle's original
equipment may perform maintenance.
But we recommend that it always be
done by an Authorized Dealer using
genuine FCA parts. Selecting
“Maintenance Monitor” enables the
system to notify you of your vehicle's
approaching inspection/servicing
period.
Owner Maintenance
Precautions
The owner or a qualified service
technician should make these vehicle
inspections at the indicated intervals to
ensure safe and dependable operation.
Bring any problem to the attention of an
Authorized Dealer or qualified service
technician as soon as possible.
When refueling perform inspection
of:
Brake and clutch fluid level
Engine coolant level
Engine oil level
Washer fluid level
At least monthly perform inspection
of:
Tire inflation pressures
225