air condition FIAT 124 SPIDER 2017 2.G Owner's Manual
[x] Cancel search | Manufacturer: FIAT, Model Year: 2017, Model line: 124 SPIDER, Model: FIAT 124 SPIDER 2017 2.GPages: 300, PDF Size: 121.24 MB
Page 148 of 300
EVENT DATA
RECORDER (EDR)
This vehicle is equipped with an event
data recorder (EDR).
The main purpose of an EDR is to
record, in certain crash or near
crash-like situations, such as an air bag
deployment or hitting a road obstacle,
data that will assist in understanding
how a vehicle’s systems performed.
The EDR is designed to record data
related to vehicle dynamics and safety
systems for a short period of time,
typically 30 seconds or less.
The EDR in this vehicle is designed to
record such data as:
How various systems in your vehicle
were operating.
Whether or not the driver and
passenger safety belts were
buckled/fastened.
How far (if at all) the driver was
pushing the accelerator and/or brake
pedal.
How fast the vehicle was traveling.
This data can help provide a better
understanding of the circumstances in
which crashes and injuries occur. Note:
EDR data are recorded by your
vehicle only if a non-trivial crash or near
crash-like situation occurs; no data are
recorded by the EDR under normal
driving conditions and no personal
data (e.g., name, gender, age, and
crash location) are recorded. However,
other parties, such as law
enforcement, could combine the EDR
data with the type of personally
identifying data routinely acquired
during a crash investigation.
To read data recorded by an EDR,
special equipment is required, and
access to the vehicle or the EDR is
needed. In addition to the vehicle
manufacturer, other parties, such as
law enforcement, that have the special
equipment, can read the information if
they have access to the vehicle or the
EDR.
FCA will not disclose any of the data
recorded in an EDR to a third party
unless:
A written agreement from the
vehicle owner or the lessee is
obtained.
Officially requested by the police or
other law enforcement authorities.
Used as a defense for FCA in a law
suit, claim, or arbitration.
Ordered by a judge or court. However, if necessary, FCA will:
Use the data for research on FCA
vehicle performance, including safety.
Disclose the data or the
summarized data to a third party for
research purposes without disclosing
vehicle or owner identification
information.
Recording Of Vehicle Data
This vehicle is equipped with a
computer which records the following
main vehicle data related to vehicle
controls, operation, and other driving
conditions.
Recorded Data
Vehicle conditions such as engine
speed and vehicle speed.
Driving operation conditions such
as accelerator and brake pedals, and
information related to the
environmental circumstances while the
vehicle is driven.
Malfunction diagnosis information
from each on-vehicle computer.
Information related to controls of
other on-vehicle computers.
The recorded data may vary depending
on the vehicle grade and optional
equipment. Voice and images are not
recorded.
146
SAFETY
Page 164 of 300
RADAR SENSORS —
IF EQUIPPED
Rear Radar Sensors
The following systems use the rear
radar sensors:
Blind Spot Monitoring System (BSM)
Rear Cross Traffic Alert (RCTA)
The radar sensors function by detecting
the radio waves reflected off of a vehicle
approaching from the rear or an
obstruction sent from the radar sensor.
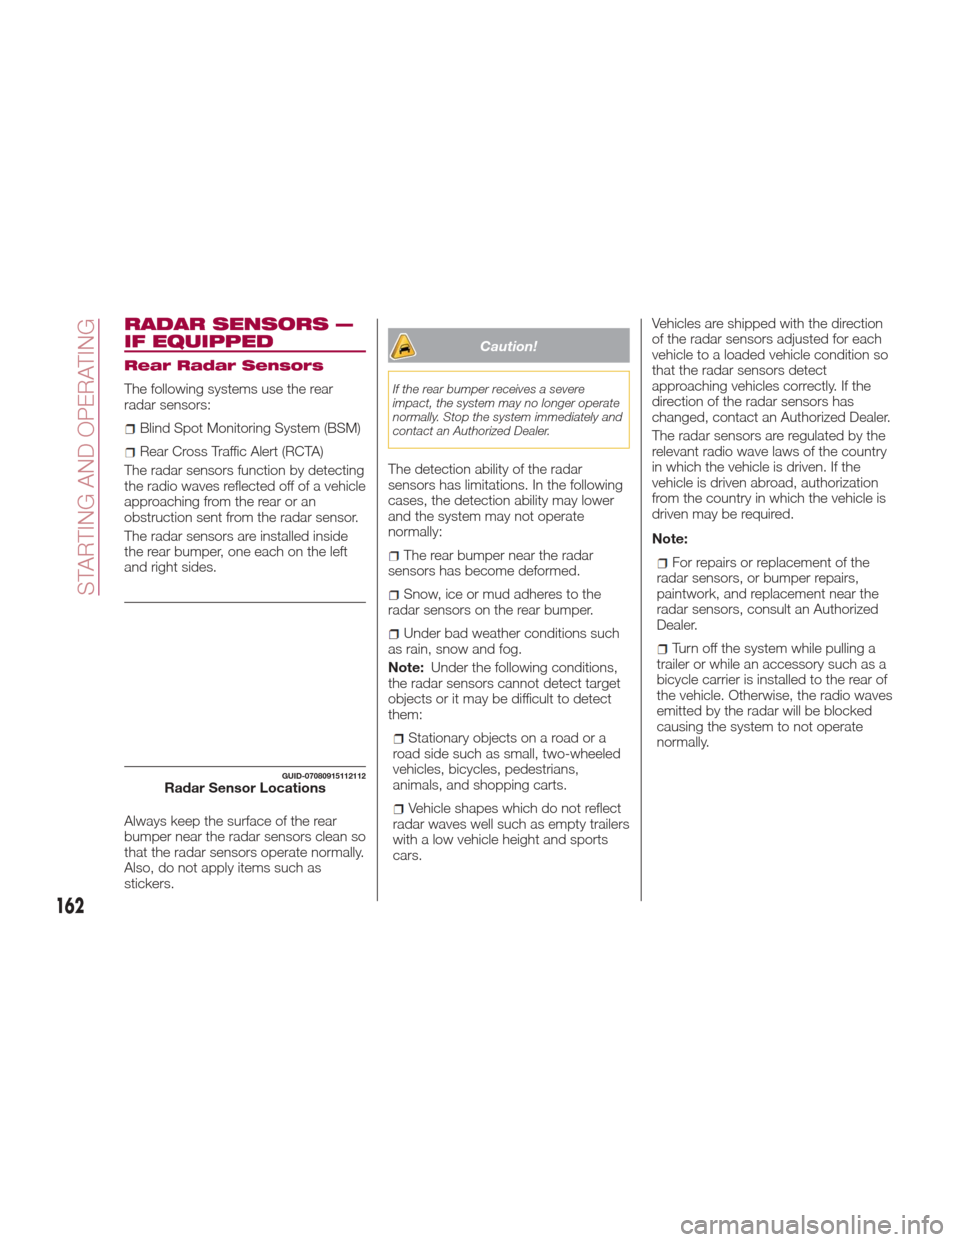
The radar sensors are installed inside
the rear bumper, one each on the left
and right sides.
Always keep the surface of the rear
bumper near the radar sensors clean so
that the radar sensors operate normally.
Also, do not apply items such as
stickers.
Caution!
If the rear bumper receives a severe
impact, the system may no longer operate
normally. Stop the system immediately and
contact an Authorized Dealer.
The detection ability of the radar
sensors has limitations. In the following
cases, the detection ability may lower
and the system may not operate
normally:
The rear bumper near the radar
sensors has become deformed.
Snow, ice or mud adheres to the
radar sensors on the rear bumper.
Under bad weather conditions such
as rain, snow and fog.
Note: Under the following conditions,
the radar sensors cannot detect target
objects or it may be difficult to detect
them:
Stationary objects on a road or a
road side such as small, two-wheeled
vehicles, bicycles, pedestrians,
animals, and shopping carts.
Vehicle shapes which do not reflect
radar waves well such as empty trailers
with a low vehicle height and sports
cars. Vehicles are shipped with the direction
of the radar sensors adjusted for each
vehicle to a loaded vehicle condition so
that the radar sensors detect
approaching vehicles correctly. If the
direction of the radar sensors has
changed, contact an Authorized Dealer.
The radar sensors are regulated by the
relevant radio wave laws of the country
in which the vehicle is driven. If the
vehicle is driven abroad, authorization
from the country in which the vehicle is
driven may be required.
Note:
For repairs or replacement of the
radar sensors, or bumper repairs,
paintwork, and replacement near the
radar sensors, consult an Authorized
Dealer.
Turn off the system while pulling a
trailer or while an accessory such as a
bicycle carrier is installed to the rear of
the vehicle. Otherwise, the radio waves
emitted by the radar will be blocked
causing the system to not operate
normally.
GUID-07080915112112Radar Sensor Locations
162
STARTING AND OPERATING
Page 165 of 300
REAR PARK ASSIST
— IF EQUIPPED
Rear Park Assist
Warning!
Do not rely completely on the parking
sensor system and be sure to confirm the
safety around your vehicle visually when
driving. This system can assist the driver in
operating the vehicle in the forward and
backward directions while parking. The
detection ranges of the sensors are limited,
therefore, driving the vehicle while relying
only on the system may cause an accident.
Always confirm the safety around your
vehicle visually when driving.
Parking and other potentially dangerous
manoeuvres are, however, always the
driver’s responsibility. When performing
these operations, always make sure that
there are no other people (especially
children) or animals on the route you want
to drive into. The parking sensors are an
aid for the driver, but the driver must
never allow their attention to lapse during
potentially dangerous manoeuvres, even
those executed at low speeds.
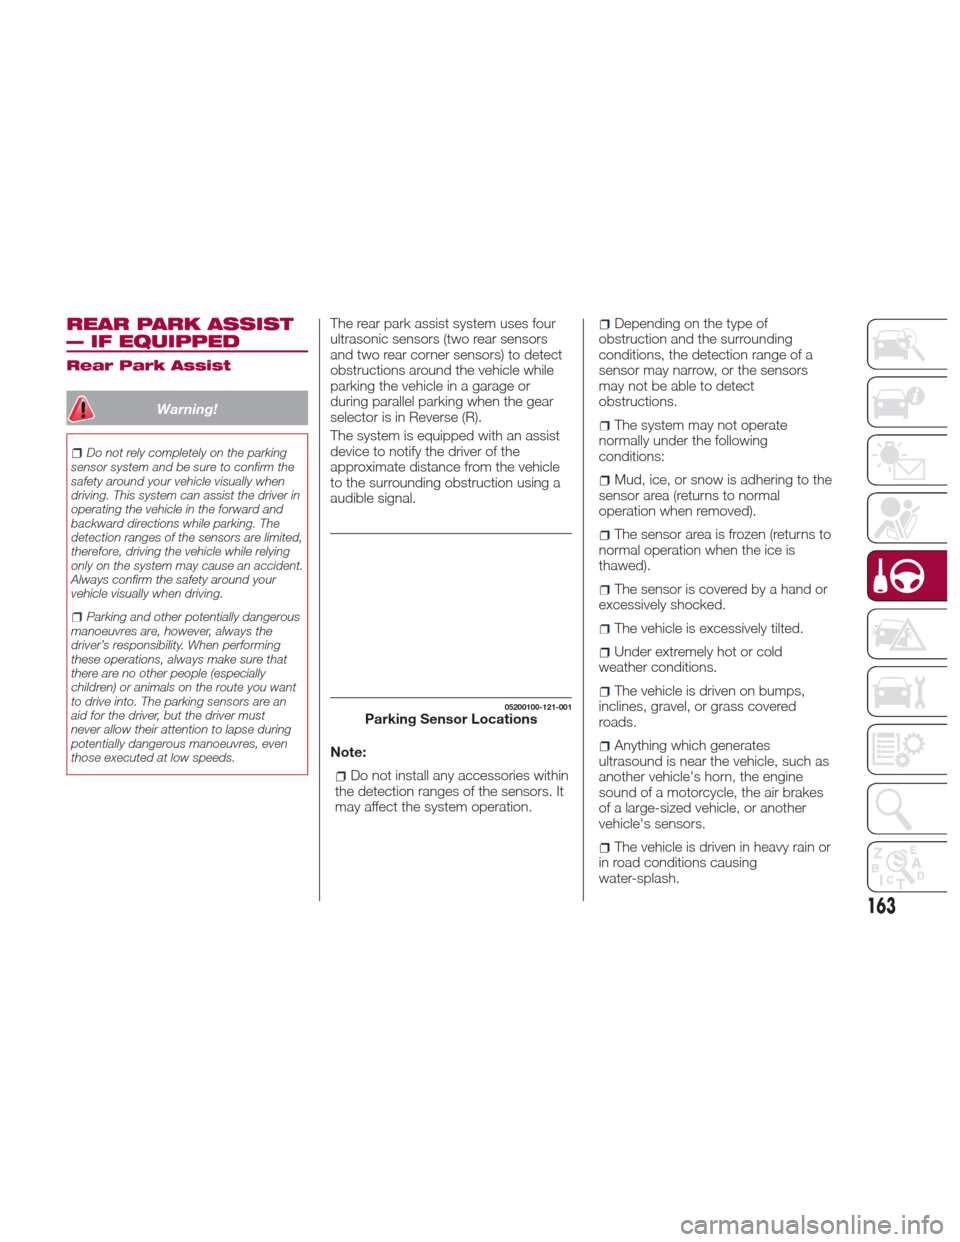
The rear park assist system uses four
ultrasonic sensors (two rear sensors
and two rear corner sensors) to detect
obstructions around the vehicle while
parking the vehicle in a garage or
during parallel parking when the gear
selector is in Reverse (R).
The system is equipped with an assist
device to notify the driver of the
approximate distance from the vehicle
to the surrounding obstruction using a
audible signal.
Note:
Do not install any accessories within
the detection ranges of the sensors. It
may affect the system operation.
Depending on the type of
obstruction and the surrounding
conditions, the detection range of a
sensor may narrow, or the sensors
may not be able to detect
obstructions.
The system may not operate
normally under the following
conditions:
Mud, ice, or snow is adhering to the
sensor area (returns to normal
operation when removed).
The sensor area is frozen (returns to
normal operation when the ice is
thawed).
The sensor is covered by a hand or
excessively shocked.
The vehicle is excessively tilted.
Under extremely hot or cold
weather conditions.
The vehicle is driven on bumps,
inclines, gravel, or grass covered
roads.
Anything which generates
ultrasound is near the vehicle, such as
another vehicle's horn, the engine
sound of a motorcycle, the air brakes
of a large-sized vehicle, or another
vehicle's sensors.
The vehicle is driven in heavy rain or
in road conditions causing
water-splash.
05200100-121-001Parking Sensor Locations
163
Page 177 of 300
Carbon Monoxide
Warnings
Warning!
Carbon monoxide (CO) in exhaust gases is
deadly. Follow the precautions below to
prevent carbon monoxide poisoning:
Do not inhale exhaust gases. They
contain carbon monoxide, a colorless and
odorless gas, which can kill. Never run the
engine in a closed area, such as a garage,
and never sit in a parked vehicle with the
engine running for an extended period. If
the vehicle is stopped in an open area with
the engine running for more than a short
period, adjust the ventilation system to
force fresh, outside air into the vehicle.
Guard against carbon monoxide with
proper maintenance. Have the exhaust
system inspected every time the vehicle is
raised. Have any abnormal conditions
repaired promptly. Until repaired, drive with
all side windows fully open.
Refueling Procedure
Fuel Filler Door
Note: Always use only a designated
FCA fuel filler cap or an approved
equivalent, available at your Authorized
Dealer. The wrong cap can result in a
serious malfunction of the fuel and
emission control systems.
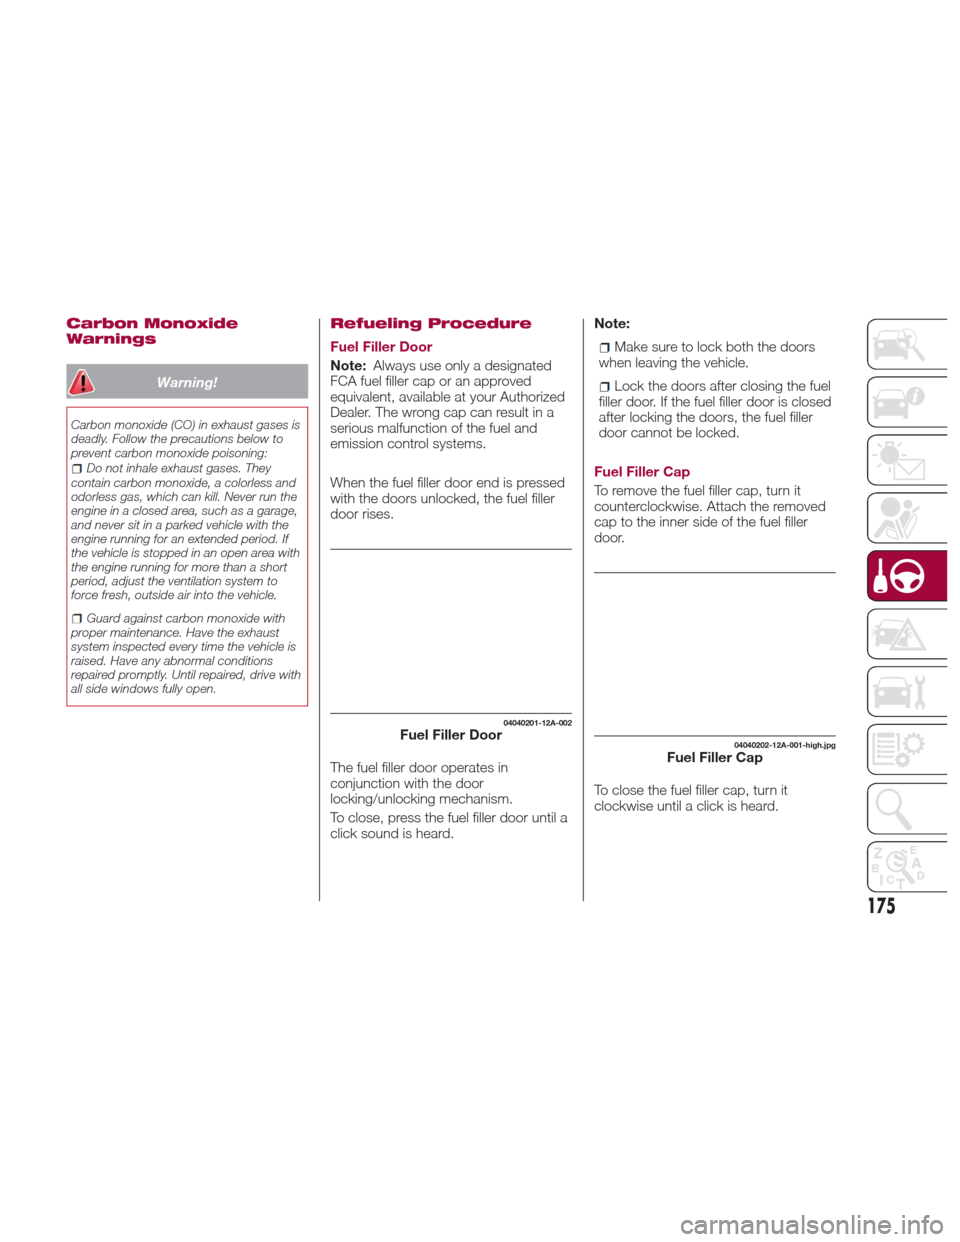
When the fuel filler door end is pressed
with the doors unlocked, the fuel filler
door rises.
The fuel filler door operates in
conjunction with the door
locking/unlocking mechanism.
To close, press the fuel filler door until a
click sound is heard. Note:Make sure to lock both the doors
when leaving the vehicle.
Lock the doors after closing the fuel
filler door. If the fuel filler door is closed
after locking the doors, the fuel filler
door cannot be locked.
Fuel Filler Cap
To remove the fuel filler cap, turn it
counterclockwise. Attach the removed
cap to the inner side of the fuel filler
door.
To close the fuel filler cap, turn it
clockwise until a click is heard.
04040201-12A-002Fuel Filler Door04040202-12A-001-high.jpgFuel Filler Cap
175
Page 181 of 300
Follow the maintenance schedule
and contact your Authorized Dealer.
Use the air conditioner only when
necessary.
Slow down on rough roads.
Keep the tires properly inflated.
Do not carry unnecessary weight.
Do not rest your foot on the brake
pedal while driving.
Keep the wheels in correct
alignment.
Keep windows closed at high
speeds.
Slow down when driving in
crosswinds and headwinds.
Hazardous Driving
When driving on ice or in water, snow,
mud, sand, or similar hazards:
Be cautious and allow extra distance
for braking.
Avoid sudden braking and sudden
maneuvering.
Do not pump the brakes. Continue to
press down on the brake pedal.
If you get stuck, select a lower gear
and accelerate slowly. Do not spin the
rear wheels.
For more traction in starting on
slippery surfaces such as ice or packed
snow, use sand, rock salt, chains,
carpeting, or other nonslip material
under the rear wheels.
Note: Usesnowchainsonlyonthe
rear wheels.
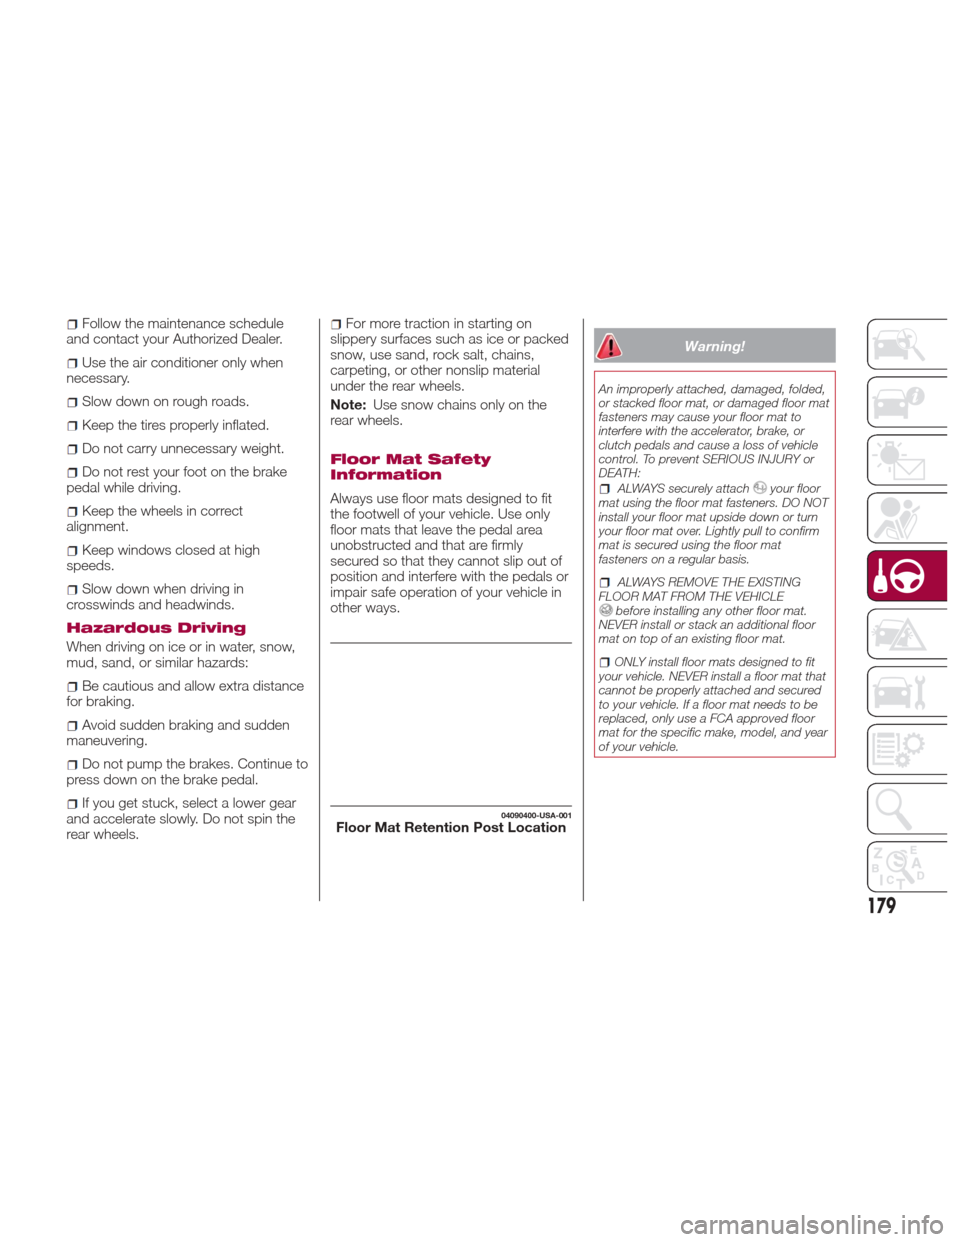
Floor Mat Safety
Information
Always use floor mats designed to fit
the footwell of your vehicle. Use only
floor mats that leave the pedal area
unobstructed and that are firmly
secured so that they cannot slip out of
position and interfere with the pedals or
impair safe operation of your vehicle in
other ways.
Warning!
An improperly attached, damaged, folded,
or stacked floor mat, or damaged floor mat
fasteners may cause your floor mat to
interfere with the accelerator, brake, or
clutch pedals and cause a loss of vehicle
control. To prevent SERIOUS INJURY or
DEATH:
ALWAYS securely attachyour floor
mat using the floor mat fasteners. DO NOT
install your floor mat upside down or turn
your floor mat over. Lightly pull to confirm
mat is secured using the floor mat
fasteners on a regular basis.
ALWAYS REMOVE THE EXISTING
FLOOR MAT FROM THE VEHICLE
before installing any other floor mat.
NEVER install or stack an additional floor
mat on top of an existing floor mat.
ONLY install floor mats designed to fit
your vehicle. NEVER install a floor mat that
cannot be properly attached and secured
to your vehicle. If a floor mat needs to be
replaced, only use a FCA approved floor
mat for the specific make, model, and year
of your vehicle.
04090400-USA-001Floor Mat Retention Post Location
179
Page 201 of 300
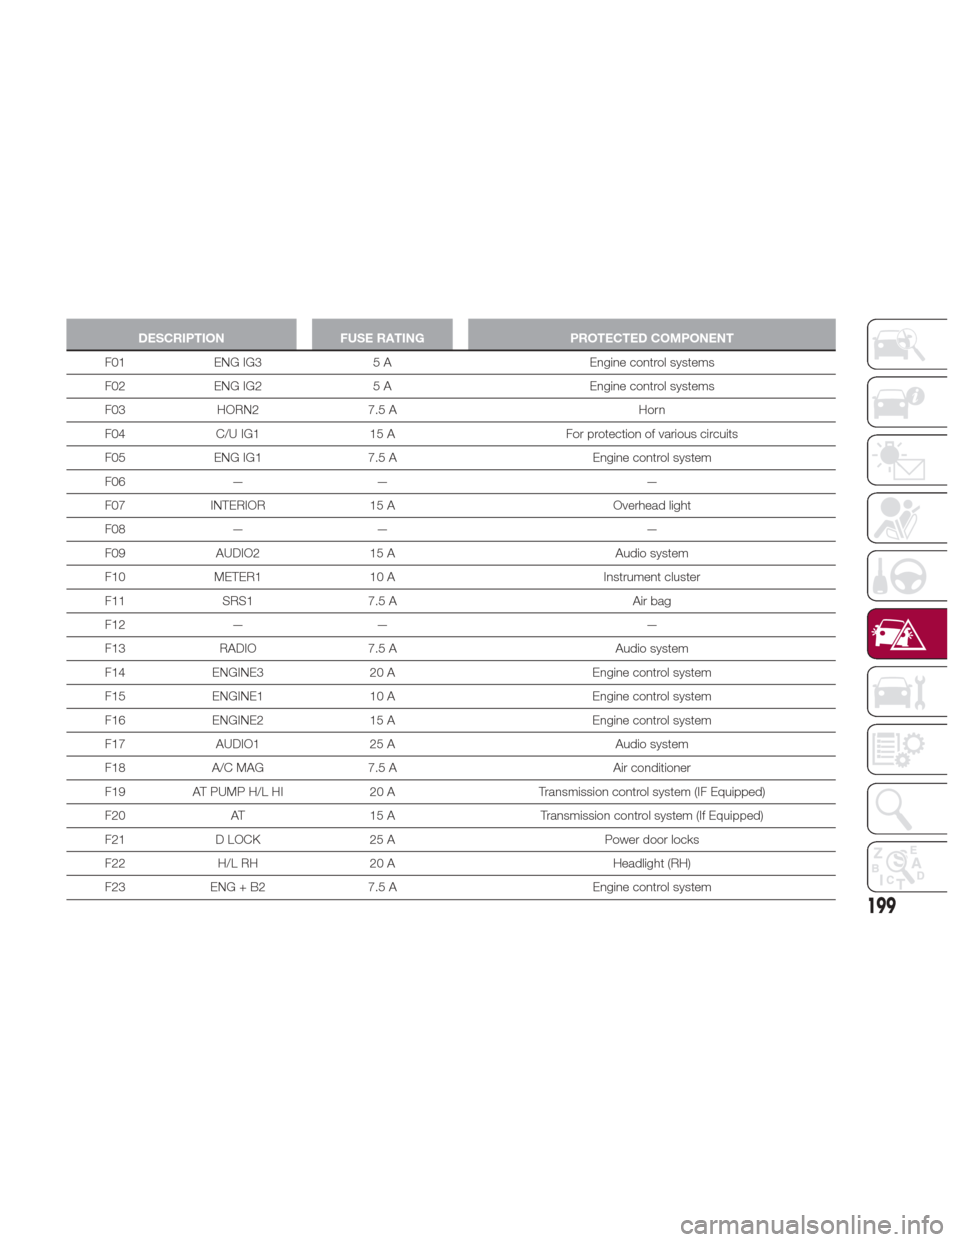
DESCRIPTIONFUSE RATING PROTECTED COMPONENT
F01 ENG IG3 5 A Engine control systems
F02
ENG IG2 5 A Engine control systems
F03 HORN2 7.5 A Horn
F04 C/U IG1 15 A For protection of various circuits
F05 ENG IG1 7.5 A Engine control system
F06 — — —
F07 INTERIOR 15 A Overhead light
F08 — — —
F09 AUDIO2 15 A Audio system
F10 METER1 10 A Instrument cluster
F11 SRS1 7.5 A Air bag
F12 — — —
F13 RADIO 7.5 A Audio system
F14 ENGINE3 20 A Engine control system
F15 ENGINE1 10 A Engine control system
F16 ENGINE2 15 A Engine control system
F17 AUDIO1 25 A Audio system
F18 A/C MAG 7.5 A Air conditioner
F19 AT PUMP H/L HI 20 ATransmission control system (IF Equipped)
F20 AT 15 A Transmission control system (If Equipped)
F21 D LOCK 25 A Power door locks
F22 H/L RH 20 A Headlight (RH)
F23 ENG + B2 7.5 A Engine control system
199
Page 203 of 300

DESCRIPTIONFUSE RATING PROTECTED COMPONENT
F47 DEFOG 30 A Rear window defogger
F48
IG2 30 A For protection of various circuits
F49 — — —
F50 HEATER 40 A Air conditioner
F51 — — —
F52 — — —
201
Page 207 of 300
To Secure The Jack
Proceed as follows:
1. Insert the wing bolt into the jack with
the jack screw pointing back, and turn
the wing bolt clockwise to temporarily
tighten it.
2. Turn the jack screw clockwise.
3. Turn the wing bolt completely to
secure the jack.
4. Insert the cover tabs and install the
cover.
Warning!
A loose tire or jack thrown forward in a
collision or hard stop could endanger the
occupants of the vehicle. Always stow the
jack parts and the spare tire in the places
provided. Have the deflated (flat) tire
repaired or replaced immediately.
Maintenance
Always keep the jack clean.
Make sure the moving parts are kept
free from dirt or rust.
Make sure the screw thread is
adequately lubricated. Conditions Of Non-Use
Temperatures below -40°F (−40°C)
On sandy or muddy ground
On uneven ground
On steep roads
In extreme weather conditions
In direct contact with the engine or
for repairs under the vehicle
On boats
Changing Procedure
Note: Make sure the jack is well
lubricated before using it.
Warning!
Do not attempt to change a tire on the side
of the vehicle close to moving traffic, pull
far enough off the road to avoid being hit
when operating the jack or changing the
wheel.
Proceed as follows:
1. Stop the vehicle in a position that
does not cause any danger to traffic
and lets you change the tire in safety, as
far as possible from the edge of the
driving lane. The ground must be flat
and sufficiently compact. 2. Turn on the hazard warning lights
and engage the parking brake.
3. For vehicles with automatic
transmission, place the gear selector in
Park (P). For vehicles with manual
transmission, place gear selector in
Reverse (R) and turn off the engine.
4. Stop the engine. The motor must be
kept off as long as the vehicle is lifted
off the ground.
5. Remove the jack and tools.
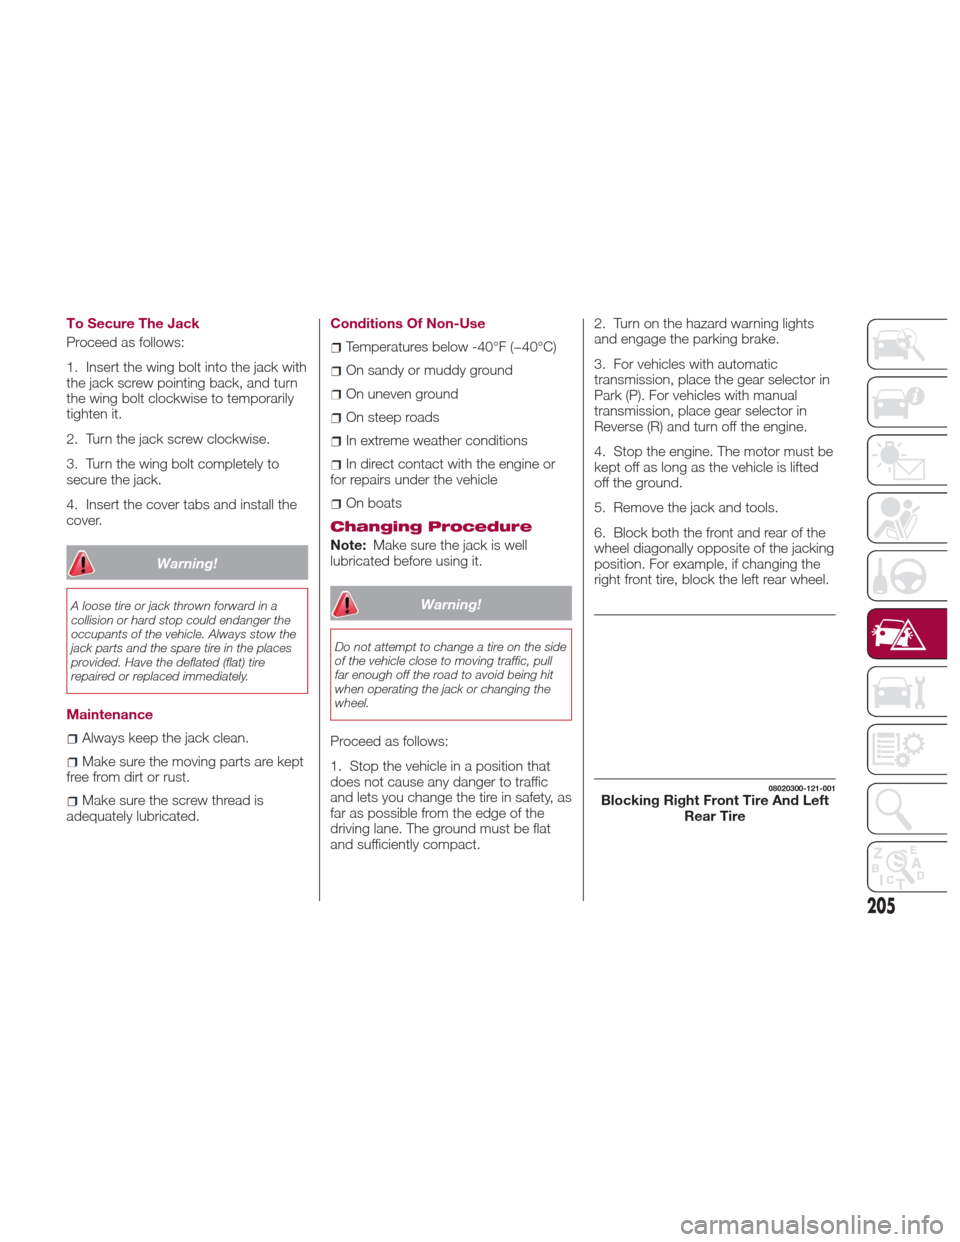
6. Block both the front and rear of the
wheel diagonally opposite of the jacking
position. For example, if changing the
right front tire, block the left rear wheel.
08020300-121-001Blocking Right Front Tire And Left
Rear Tire
205
Page 212 of 300
Tire Service Usage
Precautions
The tire sealant cannot be reused. If the
sealant has been used, or is expired,
purchase new tire sealant at an
Authorized Dealer.
Note:The tire service kit cannot be
used in the following cases. Consult an
Authorized Dealer if any of these
conditions exist:
The period of effective use for the
tire sealant has expired (the period of
effectiveness is indicated on the bottle
label)
The tear or puncture in the tire
exceeds about 0.16 in (4 mm)
The damage has occurred to an
area of the tire other than the tread
The vehicle has been driven with
nearly no air remaining in the tire
The tire has come off the wheel rim
Damage to the wheel rim has
occurred
The tire has two or more punctures
Sealing A Tire With Tire
Service
Warning!
Do not attempt to seal a tire on the side
of the vehicle closest to traffic. Pull far
enough off the road to avoid the danger of
being hit when using the Tire Service Kit.
Do not use Tire Service Kit or drive the
vehicle under the following circumstances:
If the puncture in the tire tread is
approximately 1/4 inch (6 mm) or larger.
If the tire has any sidewall damage.
If the tire has any damage from driving
with extremely low tire pressure.
If the tire has any damage from driving
on a flat tire.
If the wheel has any damage.
If you are unsure of the condition of the
tire or the wheel.
Keep Tire Service Kit away from open
flames or heat source.
A loose Tire Service Kit thrown forward
in a collision or hard stop could endanger
the occupants of the vehicle. Always stow
the Tire Service Kit in the place provided.
Failure to follow these warnings can result
in injuries that are serious or fatal to you,
your passengers, and others around you.
Take care not to allow the contents of
Tire Service Kit to come in contact with
hair, eyes, or clothing. Tire Service Kit
sealant is harmful if inhaled, swallowed, or
absorbed through the skin. It causes skin,
eye, and respiratory irritation. Flush
immediately with plenty of water if there is
any contact with eyes or skin. Change
clothing as soon as possible, if there is any
contact with clothing.
Tire Service Kit Sealant solution contains
latex. In case of an allergic reaction or rash,
consult a physician immediately. Keep Tire
Service Kit out of reach of children. If
swallowed, rinse mouth immediately with
plenty of water and drink plenty of water.
Do not induce vomiting! Consult a
physician immediately.
210
IN CASE OF EMERGENCY
Page 213 of 300
U.S.A. And CANADA Markets:
Proceed as follows:
1. Pull over to a safe location and turn
on the vehicle’s hazard warning lights.
2. Verify that the valve stem (on the
wheel with the deflated tire) is in a
position that is near to the ground. This
will allow the tire service kit hoses to
reach the valve stem and keep the tire
service kit flat on the ground. This will
provide the best positioning of the kit
when injecting the sealant into the
deflated tire and running the air pump.
Move the vehicle as necessary to place
the valve stem in this position before
proceeding.
3. Shift the gear selector to Reverse (R)
for a manual transmission, and shift the
gear selector to Park (P) for an
automatic transmission.
4. Apply the parking brake with the
brake pedal depressed and turn off the
engine.
5. Unload passengers and cargo and
remove the tire service kit.6. Shake the sealant bottle to mix the
contents. Then extend the injection
hose.Note:Do not shake the bottle
excessively. Otherwise, the sealant
could spray out of the injection hose,
and if the sealant contacts clothing or
other objects, you may not be able to
remove it.
The sealant hardens easily and
injecting it will be difficult under cold
weather conditions (32 °F (0 °C) or
below). Warm the sealant inside the
vehicle to facilitate injection.
7. Pull out the air compressor hose
and the air compressor plug from the
air compressor.
08020202-121-003Tire Service Kit Location
08020202-03A-666Sealant Bottle With Injection Hose
1 — Injection Hose
08020202-36A-004-high.jpgAir compressor With Hose And Plug
2 — Air Compressor Hose
211