Fig 38 FIAT 500 2020 Owner handbook (in English)
[x] Cancel search | Manufacturer: FIAT, Model Year: 2020, Model line: 500, Model: FIAT 500 2020Pages: 228, PDF Size: 6.01 MB
Page 21 of 228
Deactivation
The function is deactivated by turning
the headlights or the side lights on,
or by pulling the left lever towards the
steering wheel (unstable position)
for more than 2 seconds, or by turning
the ignition device to MAR.
AUTO FUNCTION
(for versions/markets, where provided)
Function activation
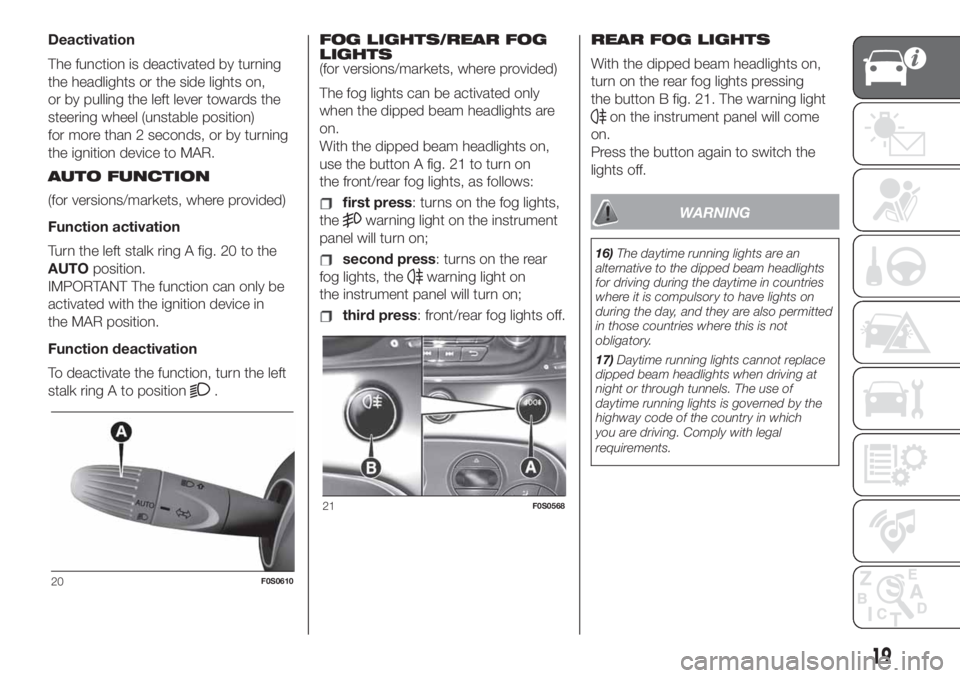
Turn the left stalk ring A fig. 20 to the
AUTOposition.
IMPORTANT The function can only be
activated with the ignition device in
the MAR position.
Function deactivation
To deactivate the function, turn the left
stalk ring A to position
.FOG LIGHTS/REAR FOG
LIGHTS
(for versions/markets, where provided)
The fog lights can be activated only
when the dipped beam headlights are
on.
With the dipped beam headlights on,
use the button A fig. 21 to turn on
the front/rear fog lights, as follows:
first press: turns on the fog lights,
the
warning light on the instrument
panel will turn on;
second press: turns on the rear
fog lights, the
warning light on
the instrument panel will turn on;
third press: front/rear fog lights off.REAR FOG LIGHTS
With the dipped beam headlights on,
turn on the rear fog lights pressing
the button B fig. 21. The warning light
on the instrument panel will come
on.
Press the button again to switch the
lights off.
WARNING
16)The daytime running lights are an
alternative to the dipped beam headlights
for driving during the daytime in countries
where it is compulsory to have lights on
during the day, and they are also permitted
in those countries where this is not
obligatory.
17)Daytime running lights cannot replace
dipped beam headlights when driving at
night or through tunnels. The use of
daytime running lights is governed by the
highway code of the country in which
you are driving. Comply with legal
requirements.
20F0S0610
21F0S0568
19
Page 22 of 228
INTERIOR LIGHTS
FRONT CEILING LIGHT
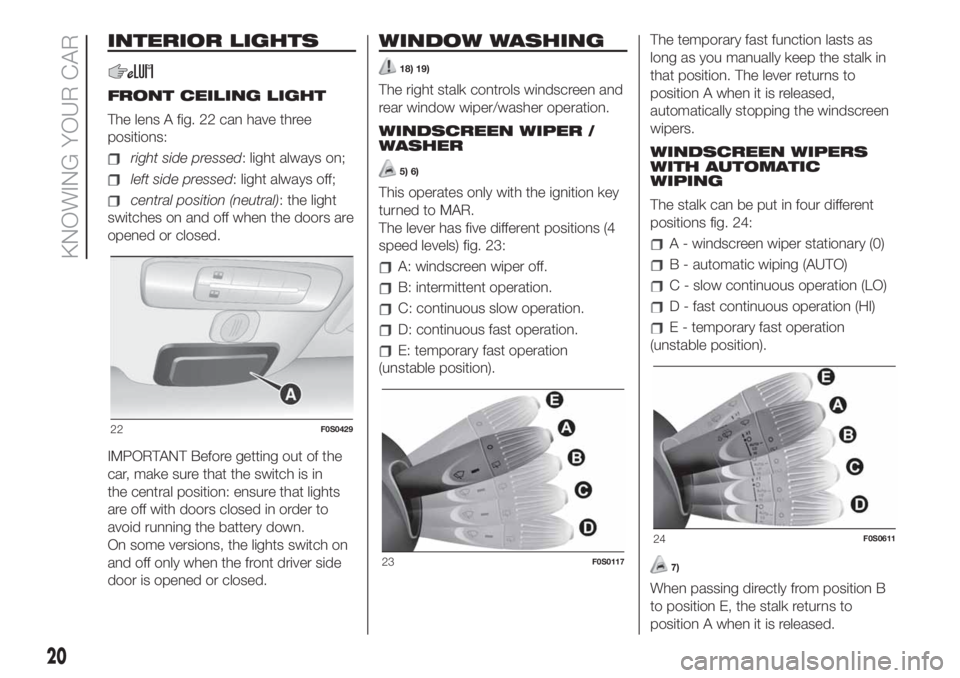
The lens A fig. 22 can have three
positions:
right side pressed: light always on;
left side pressed: light always off;
central position (neutral): the light
switches on and off when the doors are
opened or closed.
IMPORTANT Before getting out of the
car, make sure that the switch is in
the central position: ensure that lights
are off with doors closed in order to
avoid running the battery down.
On some versions, the lights switch on
and off only when the front driver side
door is opened or closed.
WINDOW WASHING
18) 19)
The right stalk controls windscreen and
rear window wiper/washer operation.
WINDSCREEN WIPER /
WASHER
5) 6)
This operates only with the ignition key
turned to MAR.
The lever has five different positions (4
speed levels) fig. 23:
A: windscreen wiper off.
B: intermittent operation.
C: continuous slow operation.
D: continuous fast operation.
E: temporary fast operation
(unstable position).The temporary fast function lasts as
long as you manually keep the stalk in
that position. The lever returns to
position A when it is released,
automatically stopping the windscreen
wipers.
WINDSCREEN WIPERS
WITH AUTOMATIC
WIPING
The stalk can be put in four different
positions fig. 24:
A - windscreen wiper stationary (0)
B - automatic wiping (AUTO)
C - slow continuous operation (LO)
D - fast continuous operation (HI)
E - temporary fast operation
(unstable position).
7)
When passing directly from position B
to position E, the stalk returns to
position A when it is released.
22F0S0429
23F0S0117
24F0S0611
20
KNOWING YOUR CAR
Page 23 of 228
“Smart washing” function
Pull the stalk towards the steering
wheel (unstable position) to operate the
windscreen washer.
Keep the lever pulled to activate both
the windscreen washer jet and the
windscreen wiper with a single
movement; the latter turns on
automatically if you keep the lever
pulled for more than half a second.
The operation of the windscreen wiper
terminates several strokes after the
stalk is released; a final cleaning stroke
several seconds later completes the
wiping operation.
REAR WINDOW WIPER /
WASHER
8)
This operates only with the ignition key
turned to MAR.
Rear Window Wiper
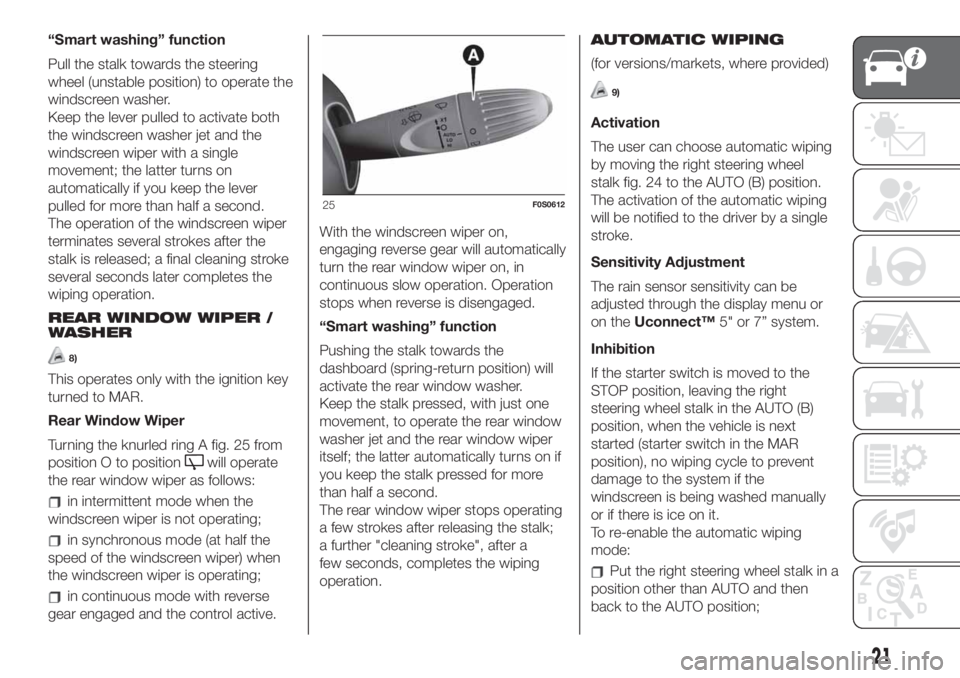
Turning the knurled ring A fig. 25 from
position O to position
will operate
the rear window wiper as follows:
in intermittent mode when the
windscreen wiper is not operating;
in synchronous mode (at half the
speed of the windscreen wiper) when
the windscreen wiper is operating;
in continuous mode with reverse
gear engaged and the control active.With the windscreen wiper on,
engaging reverse gear will automatically
turn the rear window wiper on, in
continuous slow operation. Operation
stops when reverse is disengaged.
“Smart washing” function
Pushing the stalk towards the
dashboard (spring-return position) will
activate the rear window washer.
Keep the stalk pressed, with just one
movement, to operate the rear window
washer jet and the rear window wiper
itself; the latter automatically turns on if
you keep the stalk pressed for more
than half a second.
The rear window wiper stops operating
a few strokes after releasing the stalk;
a further "cleaning stroke", after a
few seconds, completes the wiping
operation.AUTOMATIC WIPING
(for versions/markets, where provided)
9)
Activation
The user can choose automatic wiping
by moving the right steering wheel
stalk fig. 24 to the AUTO (B) position.
The activation of the automatic wiping
will be notified to the driver by a single
stroke.
Sensitivity Adjustment
The rain sensor sensitivity can be
adjusted through the display menu or
on theUconnect™5" or 7” system.
Inhibition
If the starter switch is moved to the
STOP position, leaving the right
steering wheel stalk in the AUTO (B)
position, when the vehicle is next
started (starter switch in the MAR
position), no wiping cycle to prevent
damage to the system if the
windscreen is being washed manually
or if there is ice on it.
To re-enable the automatic wiping
mode:
Put the right steering wheel stalk in a
position other than AUTO and then
back to the AUTO position;
25F0S0612
21
Page 26 of 228
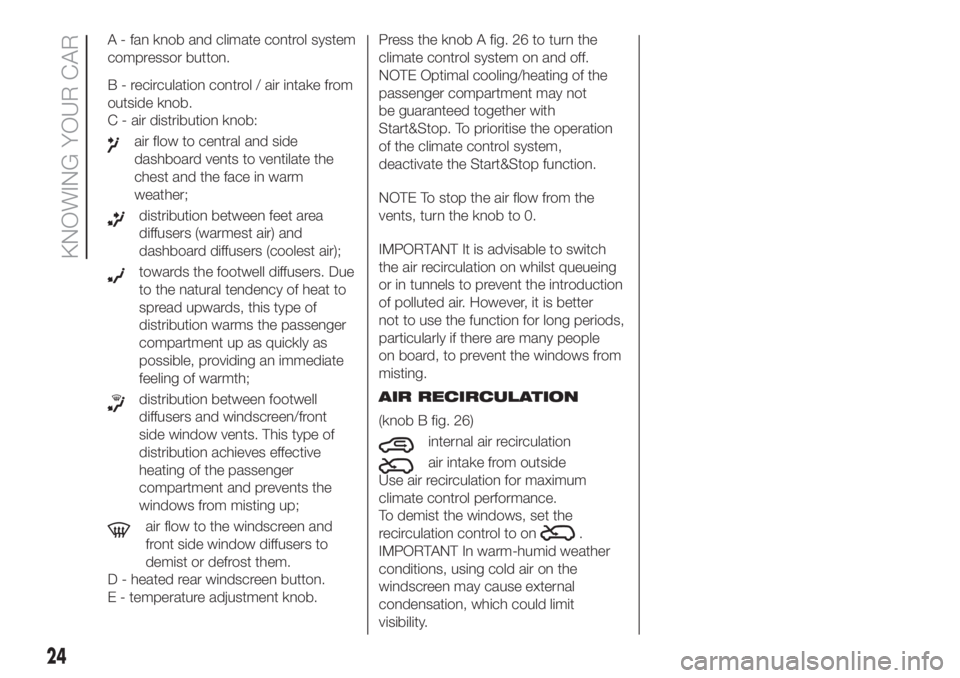
A - fan knob and climate control system
compressor button.
B - recirculation control / air intake from
outside knob.
C - air distribution knob:
air flow to central and side
dashboard vents to ventilate the
chest and the face in warm
weather;
distribution between feet area
diffusers (warmest air) and
dashboard diffusers (coolest air);
towards the footwell diffusers. Due
to the natural tendency of heat to
spread upwards, this type of
distribution warms the passenger
compartment up as quickly as
possible, providing an immediate
feeling of warmth;
distribution between footwell
diffusers and windscreen/front
side window vents. This type of
distribution achieves effective
heating of the passenger
compartment and prevents the
windows from misting up;
air flow to the windscreen and
front side window diffusers to
demist or defrost them.
D - heated rear windscreen button.
E - temperature adjustment knob.Press the knob A fig. 26 to turn the
climate control system on and off.
NOTE Optimal cooling/heating of the
passenger compartment may not
be guaranteed together with
Start&Stop. To prioritise the operation
of the climate control system,
deactivate the Start&Stop function.
NOTE To stop the air flow from the
vents, turn the knob to 0.
IMPORTANT It is advisable to switch
the air recirculation on whilst queueing
or in tunnels to prevent the introduction
of polluted air. However, it is better
not to use the function for long periods,
particularly if there are many people
on board, to prevent the windows from
misting.
AIR RECIRCULATION
(knob B fig. 26)
internal air recirculation
air intake from outside
Use air recirculation for maximum
climate control performance.
To demist the windows, set the
recirculation control to on
.
IMPORTANT In warm-humid weather
conditions, using cold air on the
windscreen may cause external
condensation, which could limit
visibility.
24
KNOWING YOUR CAR
Page 29 of 228
WARNING
10)Never use R12 or R134a coolant,
which is not compatible with climate
control system components.
ELECTRIC WINDOWS
20) 21)
These operate when the ignition key is
turned to MAR and for about two
minutes after turning the key to STOP
or removing it.
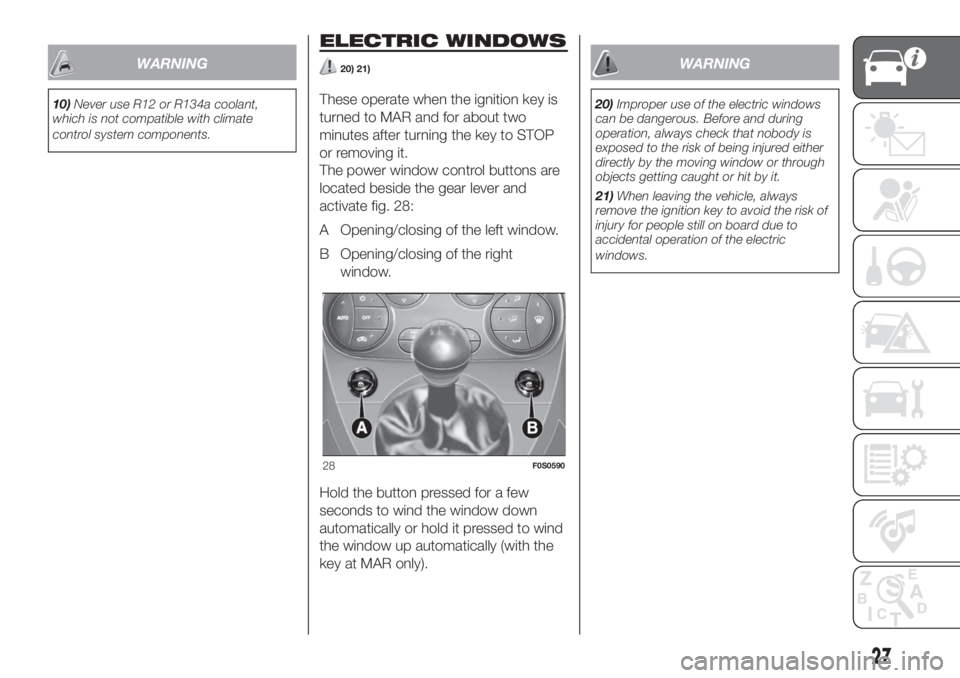
The power window control buttons are
located beside the gear lever and
activate fig. 28:
A Opening/closing of the left window.
B Opening/closing of the right
window.
Hold the button pressed for a few
seconds to wind the window down
automatically or hold it pressed to wind
the window up automatically (with the
key at MAR only).
WARNING
20)Improper use of the electric windows
can be dangerous. Before and during
operation, always check that nobody is
exposed to the risk of being injured either
directly by the moving window or through
objects getting caught or hit by it.
21)When leaving the vehicle, always
remove the ignition key to avoid the risk of
injury for people still on board due to
accidental operation of the electric
windows.
28F0S0590
27
Page 30 of 228
ROOF
FIXED GLASS SUNROOF
(for versions/markets, where provided)
The roof comprises a wide fixed glass
panel and a manually-operated sun
blind. The blind can be used in the "all
closed" or "all open" positions.
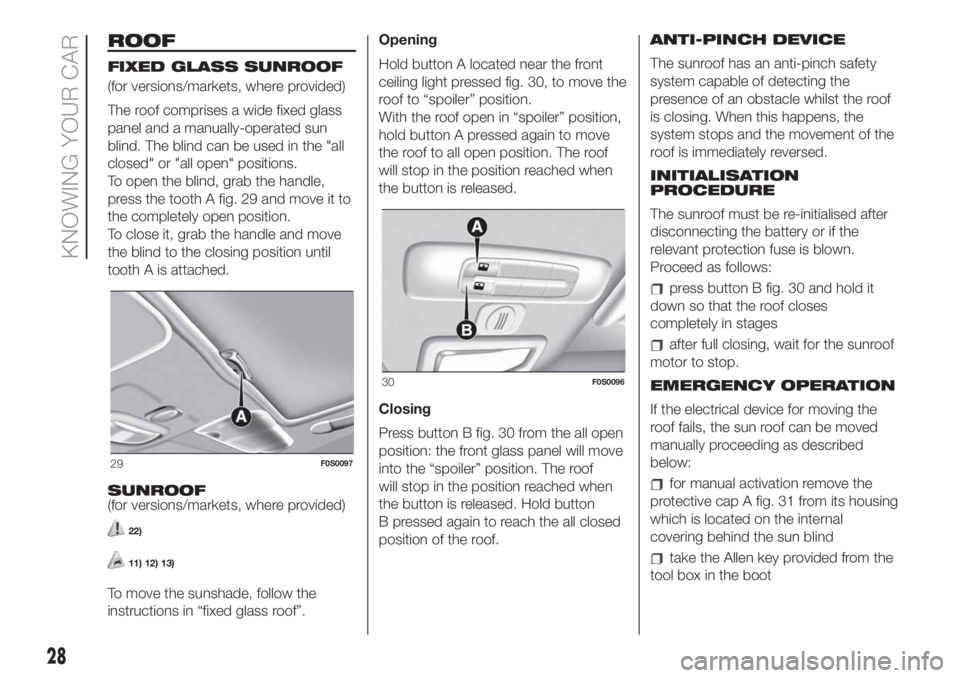
To open the blind, grab the handle,
press the tooth A fig. 29 and move it to
the completely open position.
To close it, grab the handle and move
the blind to the closing position until
tooth A is attached.
SUNROOF
(for versions/markets, where provided)
22)
11) 12) 13)
To move the sunshade, follow the
instructions in “fixed glass roof”.Opening
Hold button A located near the front
ceiling light pressed fig. 30, to move the
roof to “spoiler” position.
With the roof open in “spoiler” position,
hold button A pressed again to move
the roof to all open position. The roof
will stop in the position reached when
the button is released.
Closing
Press button B fig. 30 from the all open
position: the front glass panel will move
into the “spoiler” position. The roof
will stop in the position reached when
the button is released. Hold button
B pressed again to reach the all closed
position of the roof.ANTI-PINCH DEVICE
The sunroof has an anti-pinch safety
system capable of detecting the
presence of an obstacle whilst the roof
is closing. When this happens, the
system stops and the movement of the
roof is immediately reversed.
INITIALISATION
PROCEDURE
The sunroof must be re-initialised after
disconnecting the battery or if the
relevant protection fuse is blown.
Proceed as follows:
press button B fig. 30 and hold it
down so that the roof closes
completely in stages
after full closing, wait for the sunroof
motor to stop.
EMERGENCY OPERATION
If the electrical device for moving the
roof fails, the sun roof can be moved
manually proceeding as described
below:
for manual activation remove the
protective cap A fig. 31 from its housing
which is located on the internal
covering behind the sun blind
take the Allen key provided from the
tool box in the boot
29F0S0097
30F0S0096
28
KNOWING YOUR CAR
Page 31 of 228
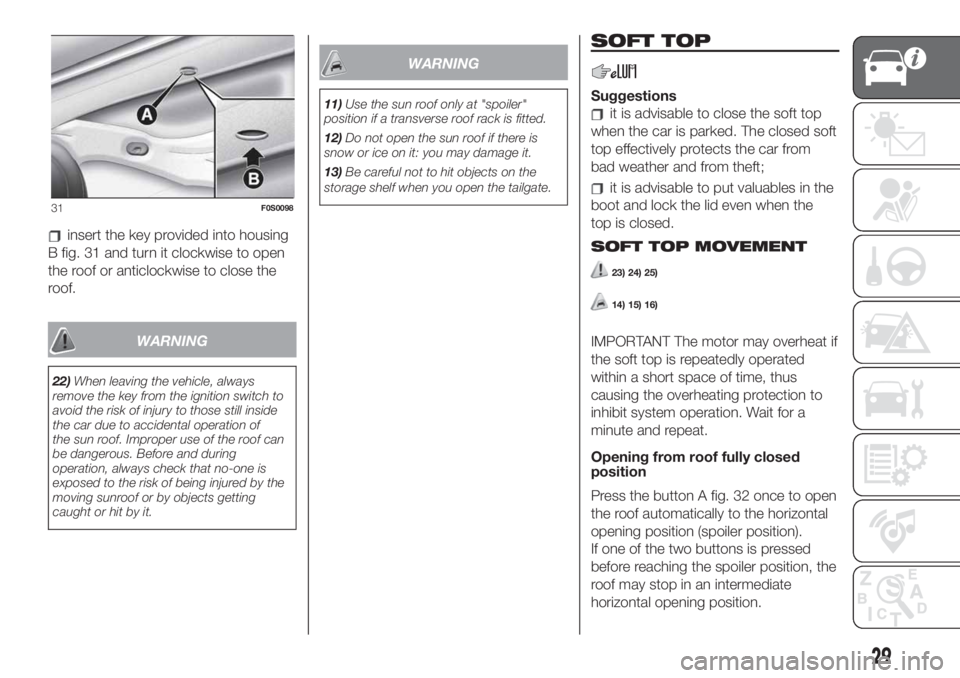
insert the key provided into housing
B fig. 31 and turn it clockwise to open
the roof or anticlockwise to close the
roof.
WARNING
22)When leaving the vehicle, always
remove the key from the ignition switch to
avoid the risk of injury to those still inside
the car due to accidental operation of
the sun roof. Improper use of the roof can
be dangerous. Before and during
operation, always check that no-one is
exposed to the risk of being injured by the
moving sunroof or by objects getting
caught or hit by it.
WARNING
11)Use the sun roof only at "spoiler"
position if a transverse roof rack is fitted.
12)Do not open the sun roof if there is
snow or ice on it: you may damage it.
13)Be careful not to hit objects on the
storage shelf when you open the tailgate.
SOFT TOP
Suggestions
it is advisable to close the soft top
when the car is parked. The closed soft
top effectively protects the car from
bad weather and from theft;
it is advisable to put valuables in the
boot and lock the lid even when the
top is closed.
SOFT TOP MOVEMENT
23) 24) 25)
14) 15) 16)
IMPORTANT The motor may overheat if
the soft top is repeatedly operated
within a short space of time, thus
causing the overheating protection to
inhibit system operation. Wait for a
minute and repeat.
Opening from roof fully closed
position
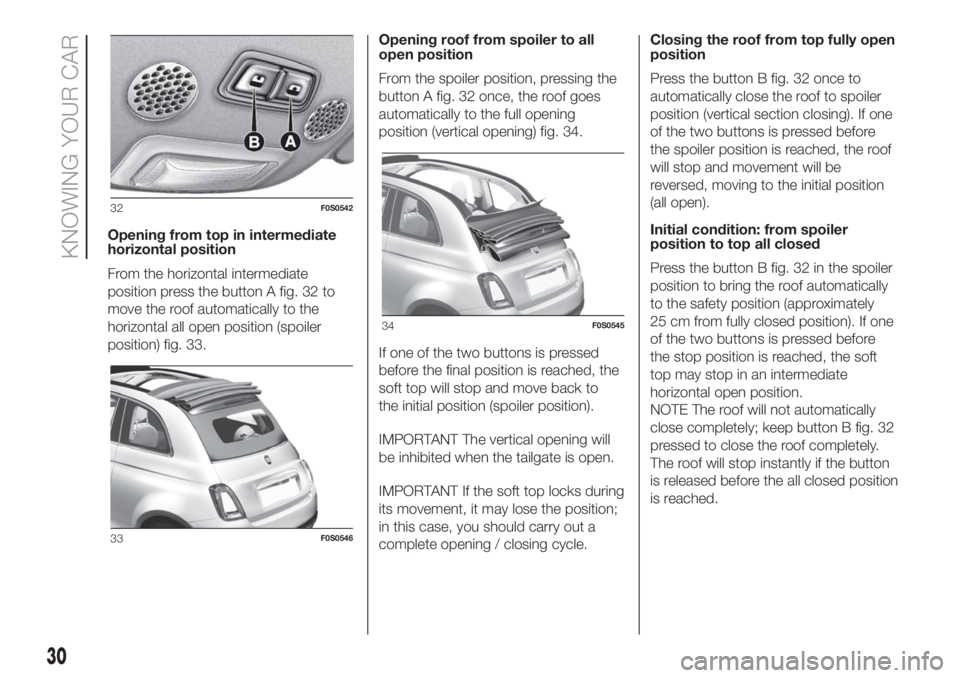
Press the button A fig. 32 once to open
the roof automatically to the horizontal
opening position (spoiler position).
If one of the two buttons is pressed
before reaching the spoiler position, the
roof may stop in an intermediate
horizontal opening position.
31F0S0098
29
Page 32 of 228
Opening from top in intermediate
horizontal position
From the horizontal intermediate
position press the button A fig. 32 to
move the roof automatically to the
horizontal all open position (spoiler
position) fig. 33.Opening roof from spoiler to all
open position
From the spoiler position, pressing the
button A fig. 32 once, the roof goes
automatically to the full opening
position (vertical opening) fig. 34.
If one of the two buttons is pressed
before the final position is reached, the
soft top will stop and move back to
the initial position (spoiler position).
IMPORTANT The vertical opening will
be inhibited when the tailgate is open.
IMPORTANT If the soft top locks during
its movement, it may lose the position;
in this case, you should carry out a
complete opening / closing cycle.Closing the roof from top fully open
position
Press the button B fig. 32 once to
automatically close the roof to spoiler
position (vertical section closing). If one
of the two buttons is pressed before
the spoiler position is reached, the roof
will stop and movement will be
reversed, moving to the initial position
(all open).
Initial condition: from spoiler
position to top all closed
Press the button B fig. 32 in the spoiler
position to bring the roof automatically
to the safety position (approximately
25 cm from fully closed position). If one
of the two buttons is pressed before
the stop position is reached, the soft
top may stop in an intermediate
horizontal open position.
NOTE The roof will not automatically
close completely; keep button B fig. 32
pressed to close the roof completely.
The roof will stop instantly if the button
is released before the all closed position
is reached.
32F0S0542
33F0S0546
34F0S0545
30
KNOWING YOUR CAR
Page 33 of 228
Initial condition: from intermediate
position to top all closed
Press the button B fig. 32 in the
horizontal intermediate position to bring
the roof automatically to the safety
position (approximately 25 cm from
horizontal all closed position).
Keep the button B fig. 32 pressed to
close the roof completely.
The roof will stop instantly if the button
is released before the all closed position
is reached.
IMPORTANT NOTES
The horizontal and vertical parts of
the soft top can be operated at any
speed lower than 100 and 80 km/h
respectively.
The top can be operated at any
temperature in the range from -18 to
+80 °C.
It is recommended to have the
engine running always when opening or
closing the soft top.
If required, remove the battery with
open or closed soft top, but NOT when
the soft top is moving.
Do not fix luggage transport devices
to the soft top and do not travel with
objects resting on the open top.
The activation of the heated rear
windscreen, upon request by the user,
is carried out only if the soft top is
completely closed. If the soft top is
closed incorrectly, the heated rear
window will not function and the
corresponding warning light will not turn
on.
When the soft top is opened using
the relevant control, if the heated rear
windscreen had been engaged it is
automatically deactivated and the
warning light switches off
Do not remove ice from the soft top
with a sharp item.
To prevent damage, do not use
scrapers or sprays to remove ice from
the heated rear window.
Do not put objects on the soft top:
they could fall if the it is operated,
causing damage and injury.
It is advisable to cover the soft top
with a protective sheet if the car is
left parked in the open for a long time.
Do not keep the soft top folded for a
long time: this could cause folds and
creases in the fabric.
Before moving the soft top, check
that there is enough room to carry
out the operation and that there are no
obstacles or people close to its moving
parts.
The cooled air flow into the
passenger compartment may decrease
if the automatic climate control system
is on and the top is not completely
closed.
With the soft top open and the car
travelling, the voice recognition system
may not recognise voice commands
because of the background noise: with
the soft top closed and at a high speed,
the voice function for number dialling
may not be recognised.
INITIALISATION
PROCEDURE
The soft top must be re-initialised after
disconnecting the battery or if the
relevant protection fuse is blown.
Proceed as follows:
before carrying out any other
operation, make sure the engine is on
during the whole initialisation
procedure;
keep the opening button pressed
until the soft top is completely open;
when the soft top is completely
open, keep the button pressed for at
least 2 seconds;
keep the closing button pressed
until the soft top is completely closed;
when the soft top is completely
closed, keep the button pressed for at
least 2 seconds.
31
Page 34 of 228
When the procedure is terminated, the
soft top will automatically carry out a
complete opening and closing cycle (up
to 25 cm from the completely closed
position) to inform the driver that
correct operation has been restored.
WIND STOP
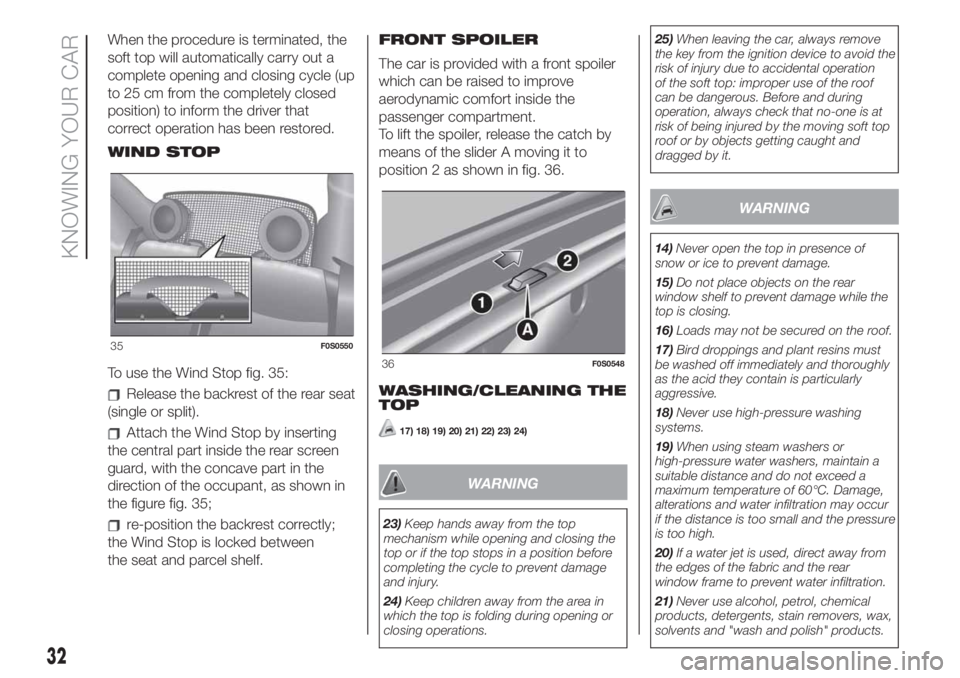
To use the Wind Stop fig. 35:
Release the backrest of the rear seat
(single or split).
Attach the Wind Stop by inserting
the central part inside the rear screen
guard, with the concave part in the
direction of the occupant, as shown in
the figure fig. 35;
re-position the backrest correctly;
the Wind Stop is locked between
the seat and parcel shelf.FRONT SPOILER
The car is provided with a front spoiler
which can be raised to improve
aerodynamic comfort inside the
passenger compartment.
To lift the spoiler, release the catch by
means of the slider A moving it to
position 2 as shown in fig. 36.
WASHING/CLEANING THE
TOP
17) 18) 19) 20) 21) 22) 23) 24)
WARNING
23)Keep hands away from the top
mechanism while opening and closing the
top or if the top stops in a position before
completing the cycle to prevent damage
and injury.
24)Keep children away from the area in
which the top is folding during opening or
closing operations.25)When leaving the car, always remove
the key from the ignition device to avoid the
risk of injury due to accidental operation
of the soft top: improper use of the roof
can be dangerous. Before and during
operation, always check that no-one is at
risk of being injured by the moving soft top
roof or by objects getting caught and
dragged by it.
WARNING
14)Never open the top in presence of
snow or ice to prevent damage.
15)Do not place objects on the rear
window shelf to prevent damage while the
top is closing.
16)Loads may not be secured on the roof.
17)Bird droppings and plant resins must
be washed off immediately and thoroughly
as the acid they contain is particularly
aggressive.
18)Never use high-pressure washing
systems.
19)When using steam washers or
high-pressure water washers, maintain a
suitable distance and do not exceed a
maximum temperature of 60°C. Damage,
alterations and water infiltration may occur
if the distance is too small and the pressure
is too high.
20)If a water jet is used, direct away from
the edges of the fabric and the rear
window frame to prevent water infiltration.
21)Never use alcohol, petrol, chemical
products, detergents, stain removers, wax,
solvents and "wash and polish" products.
35F0S0550
36F0S0548
32
KNOWING YOUR CAR