lock FIAT 500 2020 Owner handbook (in English)
[x] Cancel search | Manufacturer: FIAT, Model Year: 2020, Model line: 500, Model: FIAT 500 2020Pages: 228, PDF Size: 6.01 MB
Page 35 of 228
22)Rinse immediately to remove soap to
prevent stains and halos. Repeat the
operation if needed.
23)Rinse immediately, and repeat this
operation if necessary. If you choose to
waterproof the soft top, strictly follow the
instructions on the package of the
waterproofing product you have selected in
order to obtain optimal results.
24)The rubber seals on the soft top must
be cleaned exclusively with water. If you
notice that this trim is dry or is sticking,
apply talcum powder or products
specifically for rubber trim (silicone spray).LUGGAGE
COMPARTMENT
26) 27) 28)
ELECTRIC HANDLE
(SOFT TOUCH)
The tailgate can be opened at any time
if the doors are unlocked.
To open it, enable the handle, opening
one of the front doors or unlocking
the doors with the remote control or
using the key without remote control.
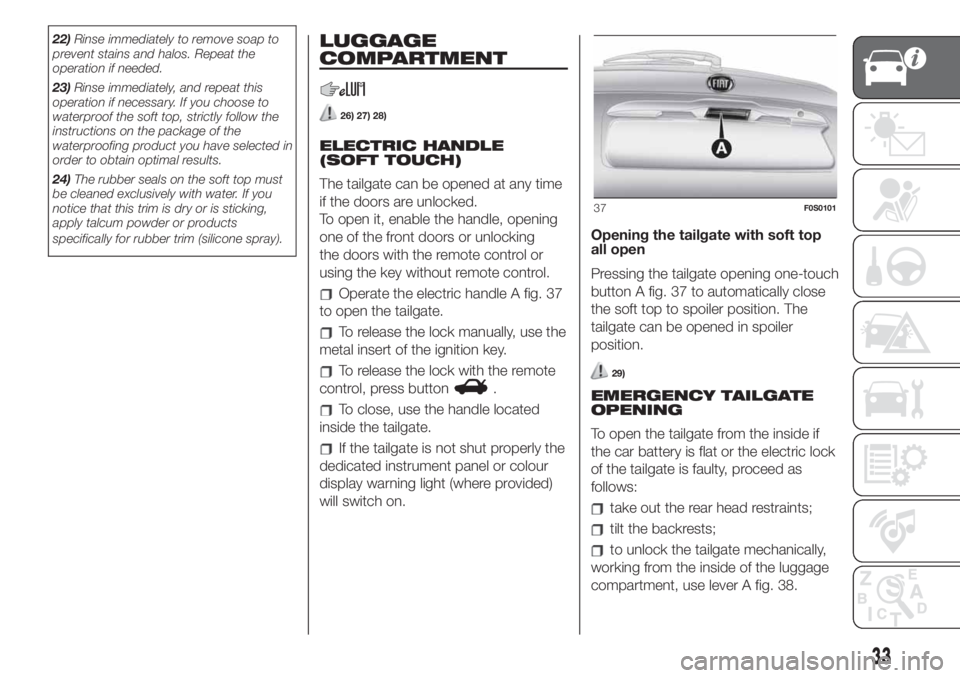
Operate the electric handle A fig. 37
to open the tailgate.
To release the lock manually, use the
metal insert of the ignition key.
To release the lock with the remote
control, press button
.
To close, use the handle located
inside the tailgate.
If the tailgate is not shut properly the
dedicated instrument panel or colour
display warning light (where provided)
will switch on.Opening the tailgate with soft top
all open
Pressing the tailgate opening one-touch
button A fig. 37 to automatically close
the soft top to spoiler position. The
tailgate can be opened in spoiler
position.
29)
EMERGENCY TAILGATE
OPENING
To open the tailgate from the inside if
the car battery is flat or the electric lock
of the tailgate is faulty, proceed as
follows:
take out the rear head restraints;
tilt the backrests;
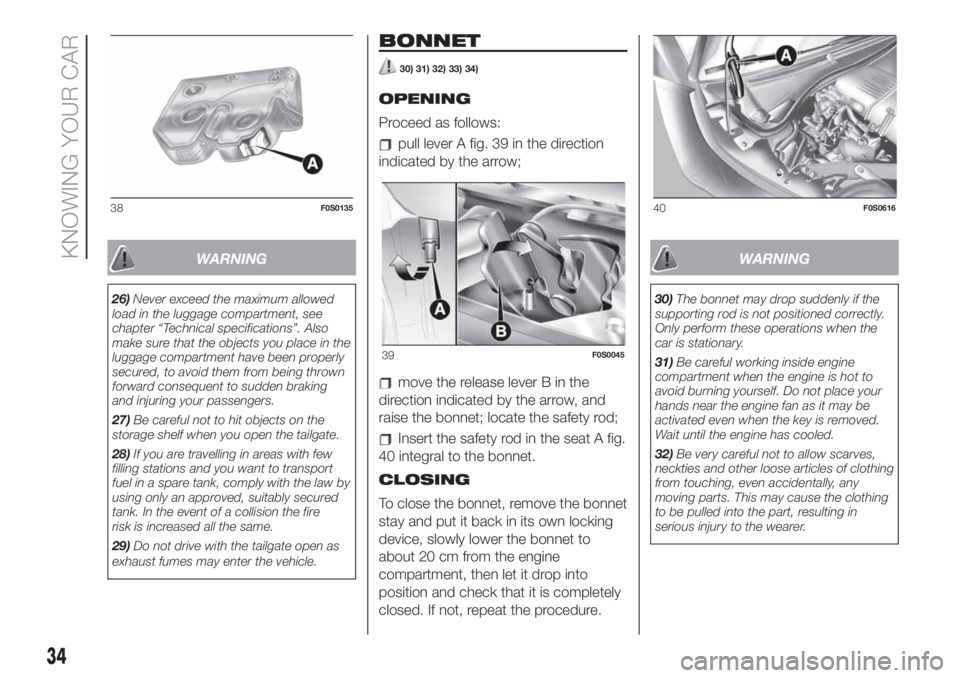
to unlock the tailgate mechanically,
working from the inside of the luggage
compartment, use lever A fig. 38.
37F0S0101
33
Page 36 of 228
WARNING
26)Never exceed the maximum allowed
load in the luggage compartment, see
chapter “Technical specifications”. Also
make sure that the objects you place in the
luggage compartment have been properly
secured, to avoid them from being thrown
forward consequent to sudden braking
and injuring your passengers.
27)Be careful not to hit objects on the
storage shelf when you open the tailgate.
28)If you are travelling in areas with few
filling stations and you want to transport
fuel in a spare tank, comply with the law by
using only an approved, suitably secured
tank. In the event of a collision the fire
risk is increased all the same.
29)Do not drive with the tailgate open as
exhaust fumes may enter the vehicle.
BONNET
30) 31) 32) 33) 34)
OPENING
Proceed as follows:
pull lever A fig. 39 in the direction
indicated by the arrow;
move the release lever B in the
direction indicated by the arrow, and
raise the bonnet; locate the safety rod;
Insert the safety rod in the seat A fig.
40 integral to the bonnet.
CLOSING
To close the bonnet, remove the bonnet
stay and put it back in its own locking
device, slowly lower the bonnet to
about 20 cm from the engine
compartment, then let it drop into
position and check that it is completely
closed. If not, repeat the procedure.
WARNING
30)The bonnet may drop suddenly if the
supporting rod is not positioned correctly.
Only perform these operations when the
car is stationary.
31)Be careful working inside engine
compartment when the engine is hot to
avoid burning yourself. Do not place your
hands near the engine fan as it may be
activated even when the key is removed.
Wait until the engine has cooled.
32)Be very careful not to allow scarves,
neckties and other loose articles of clothing
from touching, even accidentally, any
moving parts. This may cause the clothing
to be pulled into the part, resulting in
serious injury to the wearer.
38F0S0135
39F0S0045
40F0S0616
34
KNOWING YOUR CAR
Page 37 of 228
33)For safety reasons, the bonnet must
always be properly closed while the car is
travelling. Make sure that the bonnet is
properly closed and that the lock is
engaged. If you notice when driving that
the bonnet has not been properly locked,
stop immediately and close the bonnet
correctly.
34)Use both hands to lift the bonnet.
Before lifting, check that the windscreen
wiper arms are not raised from the
windscreen, that the vehicle is stationary
and that the handbrake is engaged.VERSION WITH LPG
SYSTEM
25)
INTRODUCTION
The "LPG" version of the car features
two fuel systems, one for petrol and
one for LPG. Like the petrol system, the
LPG system is timed, sequential
multipoint type with special injectors.
PASSIVE SAFETY / ACTIVE SAFETY
35) 36)
26) 27)
Passive safety
The car has the same passive safety
specifications as other versions. In
particular, the tank mountings (located
in the spare wheel housing) have been
designed to exceed the Fiat safety
standards for impact tests.
Active safety
The car has the same active safety
specifications as other versions.Although the LPG system has
numerous safety features, it is advisable
to proceed as follows every time the
car is not in use for a long period or
moved in an emergency as a result of a
fault or accident:
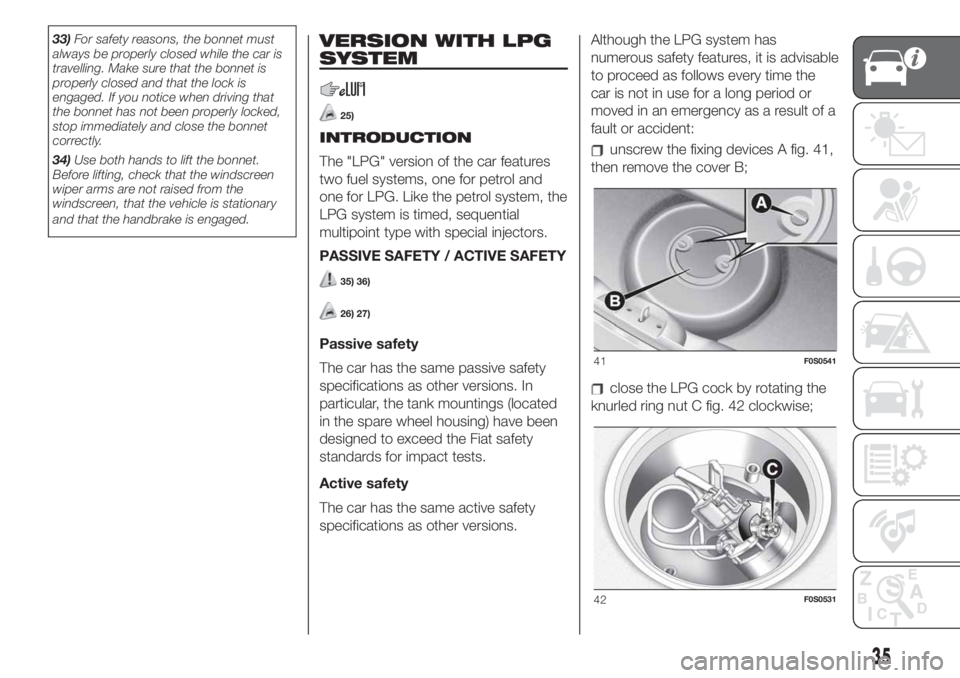
unscrew the fixing devices A fig. 41,
then remove the cover B;
close the LPG cock by rotating the
knurled ring nut C fig. 42 clockwise;
41F0S0541
42F0S0531
35
Page 40 of 228
WARNING
25)The system operates at temperatures
ranging between −20°C and 100°C.
26)The car is equipped with a gaseous
LPG injection system designed specifically
for it: it is therefore absolutely forbidden
to alter the configuration of the system or
its components. The use of other
components or materials could cause
malfunctions and lead to a reduction in
safety; therefore, in the case of problems,
contact a Fiat Dealership. To prevent
damage to the gas system parts when
towing or raising the vehicle, follow the
instructions in the "Towing the vehicle"
paragraph of the Owner Handbook.
27)When painting in an oven, the LPG
tank must be removed from the car and
later refitted by a Fiat Dealership. Although
the LPG system has numerous safety
features, it is advisable to proceed
as follows every time the vehicle is not in
use for a long period or moved in an
emergency as a result of a breakdown or
accident: unscrew the fastening devices A
fig. 41, then remove the cover B. Close
the LPG cock rotating the ring nut C
clockwise fig. 42; refit the cover and tighten
the fixing devices.28)Periodically (at least once every six
months), it is advisable to let the LPG in the
tank run out and, at the next refuelling,
check that it does not exceed the
maximum capacity of 30.5 litres (reserve
included) (with a tolerance of 2 litres
excess) (see instructions in the "Capacities"
paragraph). If the level is above 30.5 litres
(reserve included) contact a Fiat Dealership
immediately.
29)In particular usage conditions, such as
starting and operation at low ambient
temperature or LPG supply with low
propane content, the system may switch
temporarily to petrol operation, without
a visual indication of switching on the
selector. If the level of LPG in the tank is
low or there is a request for high
performance (e.g. overtaking, car fully
laden, steep hills): the system can
automatically switch to petrol operation to
guarantee the required engine
performance; in this event, the performed
switching is shown by the orange (petrol)
LED lit and the green (LPG) LED off on the
switch. When the above conditions stop,
the system automatically restores the LPG
operation; the orange (petrol) LED turns
off and the green (LPG) LED is lit on the
switch. To achieve the automatic switching
described above, make sure that there is
always enough fuel in the petrol tank.
30)It is strictly forbidden to use any
additive in the LPG.
38
KNOWING YOUR CAR
Page 45 of 228
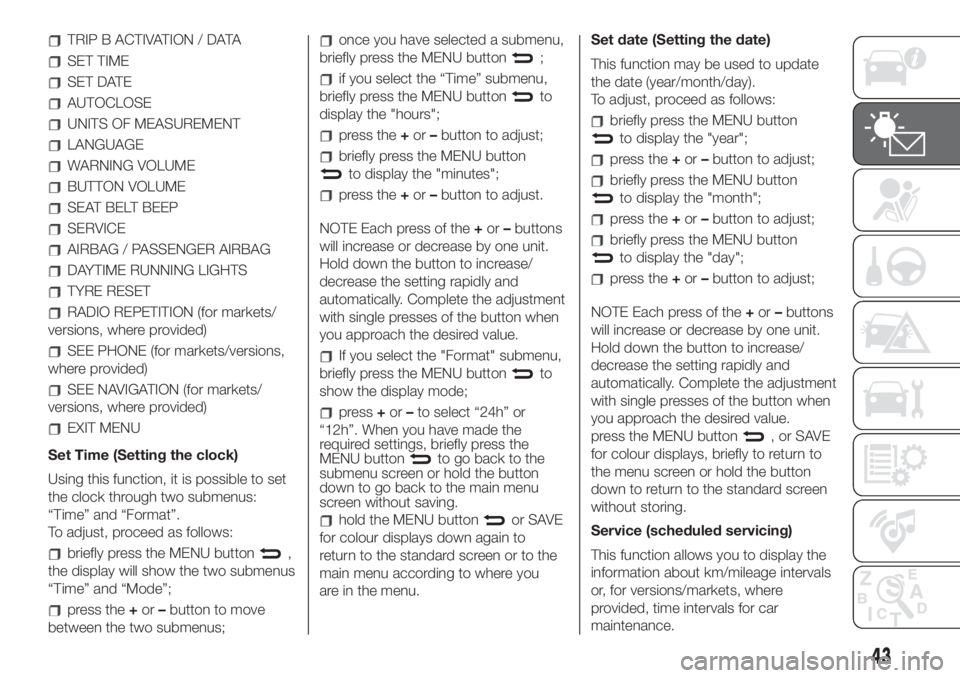
TRIP B ACTIVATION / DATA
SET TIME
SET DATE
AUTOCLOSE
UNITS OF MEASUREMENT
LANGUAGE
WARNING VOLUME
BUTTON VOLUME
SEAT BELT BEEP
SERVICE
AIRBAG / PASSENGER AIRBAG
DAYTIME RUNNING LIGHTS
TYRE RESET
RADIO REPETITION (for markets/
versions, where provided)
SEE PHONE (for markets/versions,
where provided)
SEE NAVIGATION (for markets/
versions, where provided)
EXIT MENU
Set Time (Setting the clock)
Using this function, it is possible to set
the clock through two submenus:
“Time” and “Format”.
To adjust, proceed as follows:
briefly press the MENU button,
the display will show the two submenus
“Time” and “Mode”;
press the+or–button to move
between the two submenus;
once you have selected a submenu,
briefly press the MENU button
;
if you select the “Time” submenu,
briefly press the MENU button
to
display the "hours";
press the+or–button to adjust;
briefly press the MENU button
to display the "minutes";
press the+or–button to adjust.
NOTE Each press of the+or–buttons
will increase or decrease by one unit.
Hold down the button to increase/
decrease the setting rapidly and
automatically. Complete the adjustment
with single presses of the button when
you approach the desired value.
If you select the "Format" submenu,
briefly press the MENU button
to
show the display mode;
press+or–to select “24h” or
“12h”. When you have made the
required settings, briefly press the
MENU button
to go back to the
submenu screen or hold the button
down to go back to the main menu
screen without saving.
hold the MENU buttonor SAVE
for colour displays down again to
return to the standard screen or to the
main menu according to where you
are in the menu.Set date (Setting the date)
This function may be used to update
the date (year/month/day).
To adjust, proceed as follows:
briefly press the MENU button
to display the "year";
press the+or–button to adjust;
briefly press the MENU button
to display the "month";
press the+or–button to adjust;
briefly press the MENU button
to display the "day";
press the+or–button to adjust;
NOTE Each press of the+or–buttons
will increase or decrease by one unit.
Hold down the button to increase/
decrease the setting rapidly and
automatically. Complete the adjustment
with single presses of the button when
you approach the desired value.
press the MENU button
,orSAVE
for colour displays, briefly to return to
the menu screen or hold the button
down to return to the standard screen
without storing.
Service (scheduled servicing)
This function allows you to display the
information about km/mileage intervals
or, for versions/markets, where
provided, time intervals for car
maintenance.
43
Page 49 of 228
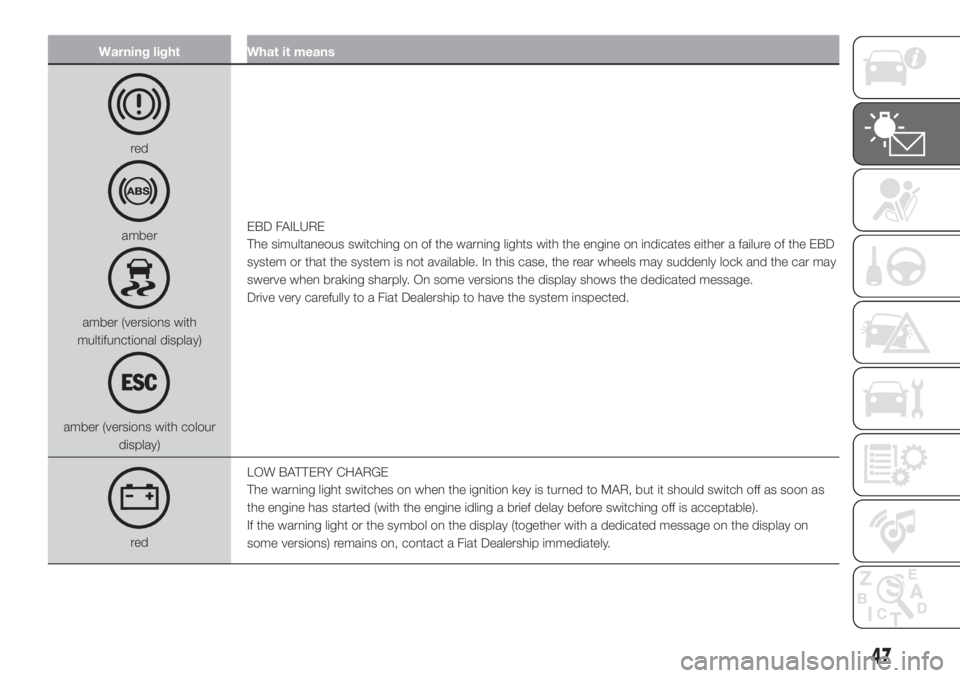
Warning light What it means
red
amber
amber (versions with
multifunctional display)
amber (versions with colour
display)EBD FAILURE
The simultaneous switching on of the warning lights with the engine on indicates either a failure of the EBD
system or that the system is not available. In this case, the rear wheels may suddenly lock and the car may
swerve when braking sharply. On some versions the display shows the dedicated message.
Drive very carefully to a Fiat Dealership to have the system inspected.
redLOW BATTERY CHARGE
The warning light switches on when the ignition key is turned to MAR, but it should switch off as soon as
the engine has started (with the engine idling a brief delay before switching off is acceptable).
If the warning light or the symbol on the display (together with a dedicated message on the display on
some versions) remains on, contact a Fiat Dealership immediately.
47
Page 70 of 228
ACTIVE SAFETY
SYSTEMS
The vehicle has the following active
safety systems:
ABS (Anti-lock Braking System);
EBD (Electronic Brake force
Distribution);
MSR (Motor Schleppmoment
Regelung);
ESC (Electronic Stability Control);
HH (Hill Holder);
ASR (Antislip Regulation);
HBA (Hydraulic Brake Assist);
For the operation of the systems, see
the following description.
ABS (Anti-lock Braking
System)
This system, which is an integral part of
the braking system, prevents one or
more wheels from locking and slipping
in any road surface condition,
irrespective of the intensity of the
braking action, ensuring that the car
can be controlled even during
emergency braking thus optimising
stopping distances.
The system intervenes during braking
when the wheels are about to lock,
typically in emergency braking or
low-grip conditions, when locking may
be more frequent.The system also improves control and
stability of the car when braking on a
surface where the grip of the left and
right wheels varies, or on corners.
System intervention
A slight pulsing of the brake pedal and
noise indicates the intervention of the
ABS: this is completely normal when
the system intervenes.
49) 50) 51) 52) 53) 54) 55) 56) 57)
EBD (Electronic
Brakeforce Distribution)
SYSTEM
This system (which cannot be
deactivated) recognises emergency
braking conditions according to the
speed of operation of the brake pedal
and provides an additional hydraulic
braking pressure to support that
provided by the driver. This allows
faster and more powerful operation of
the braking system.MSR (Motor
Schleppmoment
Regelung) SYSTEM
The MSR system is an integral part of
the ABS, that intervenes, if there is a
sudden change to a lower gear,
restoring torque to the engine, thereby
preventing excessive drive at the drive
wheels which, especially in poor grip
conditions, could lead to a loss in
stability of the vehicle.
ESC (Electronic Stability
Control) SYSTEM
This is an electronic system that
controls vehicle stability in the event of
tyre grip loss, helping maintain
directional control.
The system is capable of recognising
potentially dangerous situations in
terms of the stability and intervenes
automatically on the brakes in a
differentiated manner for the four
wheels in order to provide a stabilising
torque.
The ESC system switches on
automatically when the engine is
started and cannot be switched off.
System intervention
This is indicated by the flashing of the
warning light
on the instrument
panel, to inform the driver that the car is
in critical stability and grip conditions.
68
SAFETY
Page 76 of 228
SEAT BELTS
All vehicle seats are equipped with seat
belts with three anchor points and a
retractor.
The reel mechanism operates locking
the belt in the event of sharp braking or
strong deceleration due to an impact.
This allows the belt strap to slide freely
and to adapt to the body of the
occupant. In the event of an accident,
the belt will lock reducing the risk of
impact inside the passenger
compartment and of being projected
outside the car.
The driver is responsible for respecting,
and ensuring that all the other
occupants of the vehicle also respect,
the local laws in force in relation to
the use of the seat belts.
Always fasten the seat belts before
setting off.
USING THE SEAT BELTS
The belt should be worn keeping the
torso straight and rested against the
backrest.
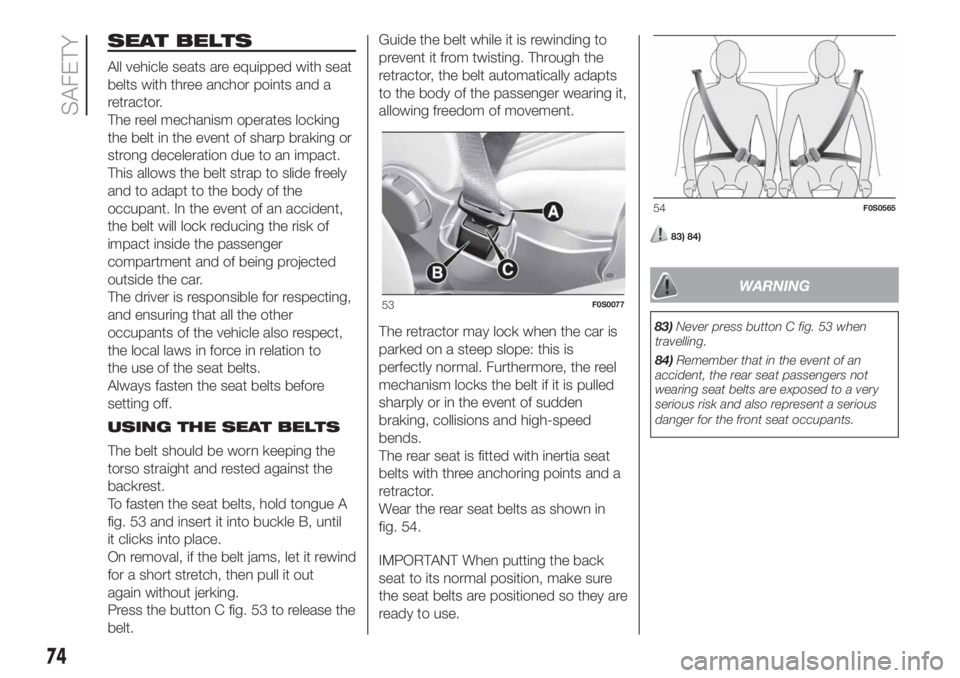
To fasten the seat belts, hold tongue A
fig. 53 and insert it into buckle B, until
it clicks into place.
On removal, if the belt jams, let it rewind
for a short stretch, then pull it out
again without jerking.
Press the button C fig. 53 to release the
belt.Guide the belt while it is rewinding to
prevent it from twisting. Through the
retractor, the belt automatically adapts
to the body of the passenger wearing it,
allowing freedom of movement.
The retractor may lock when the car is
parked on a steep slope: this is
perfectly normal. Furthermore, the reel
mechanism locks the belt if it is pulled
sharply or in the event of sudden
braking, collisions and high-speed
bends.
The rear seat is fitted with inertia seat
belts with three anchoring points and a
retractor.
Wear the rear seat belts as shown in
fig. 54.
IMPORTANT When putting the back
seat to its normal position, make sure
the seat belts are positioned so they are
ready to use.
83) 84)
WARNING
83)Never press button C fig. 53 when
travelling.
84)Remember that in the event of an
accident, the rear seat passengers not
wearing seat belts are exposed to a very
serious risk and also represent a serious
danger for the front seat occupants.
53F0S0077
54F0S0565
74
SAFETY
Page 100 of 228
39)Never, under any circumstances, jump
start the engine by pushing, towing or
coasting downhill. This could cause fuel to
flow into the catalytic converter and
damage it beyond repair.
40)A quick burst on the accelerator before
stopping the engine serves no practical
purpose; it wastes fuel and is especially
damaging to turbocharged engines.PARKING THE
VEHICLE
When parking and leaving the car,
proceed as follows:
engage a gear (1stgear if facing
uphill or reverse if facing downhill) and
leave the wheels turned;
stop the engine and engage the
handbrake;
always remove the ignition key.
Block the wheels with a wedge or a
stone if the car is parked on a steep
slope.
Do not leave the ignition key on MAR to
avoid draining the battery. Always
remove the key when you leave the car.
Versions with Dualogic
transmission
To park safely it is essential to engage
1
stgear or reverse (R), with your foot on
the brake pedal and, if there is a
gradient, to operate the handbrake.
Before releasing the brake pedal, wait
until P appears on the display.
IMPORTANT NEVER leave the car with
the gearbox in neutral (or, on versions
equipped with automatic transmission,
before placing the gear lever at P).HANDBRAKE
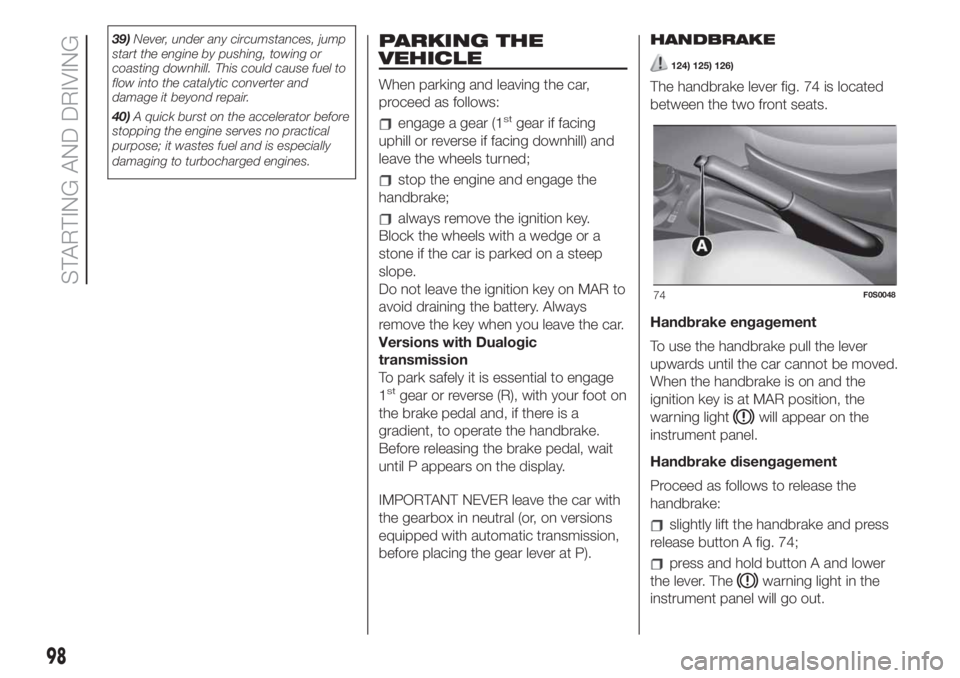
124) 125) 126)
The handbrake lever fig. 74 is located
between the two front seats.
Handbrake engagement
To use the handbrake pull the lever
upwards until the car cannot be moved.
When the handbrake is on and the
ignition key is at MAR position, the
warning light
will appear on the
instrument panel.
Handbrake disengagement
Proceed as follows to release the
handbrake:
slightly lift the handbrake and press
release button A fig. 74;
press and hold button A and lower
the lever. The
warning light in the
instrument panel will go out.
74F0S0048
98
STARTING AND DRIVING
Page 101 of 228
Press the brake pedal when carrying
out this operation to prevent the car
from moving accidentally.
WARNING
124)The car should be braked after a few
clicks of the lever, if it is not, contact a
Fiat Dealership to have it adjusted.
125)Never leave children in the
unattended car. Always remove the ignition
key when leaving the car and take it out
with you.
126)In the case of parking manoeuvres on
roads on a gradient, the front wheels
must be steered towards the pavement
(when parking downhill), or in the opposite
direction if the vehicle is parked uphill.
Block the wheels with a wedge or a stone if
the car is parked on a steep slope.
MANUAL
TRANSMISSION
(for versions/markets, where provided)
127)
41)
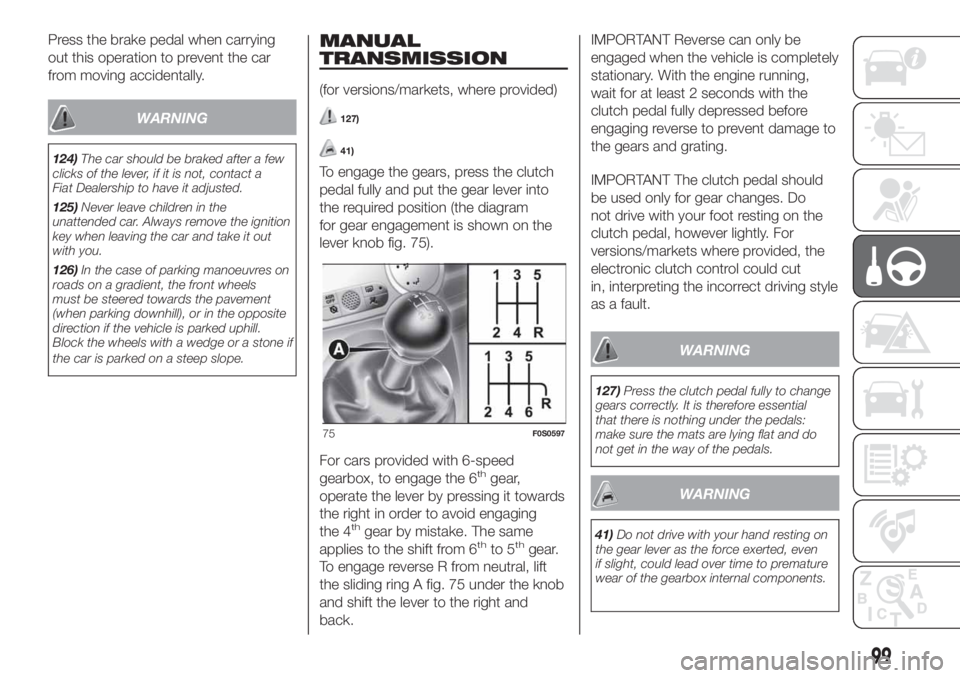
To engage the gears, press the clutch
pedal fully and put the gear lever into
the required position (the diagram
for gear engagement is shown on the
lever knob fig. 75).
For cars provided with 6-speed
gearbox, to engage the 6
thgear,
operate the lever by pressing it towards
the right in order to avoid engaging
the 4
thgear by mistake. The same
applies to the shift from 6thto 5thgear.
To engage reverse R from neutral, lift
the sliding ring A fig. 75 under the knob
and shift the lever to the right and
back.IMPORTANT Reverse can only be
engaged when the vehicle is completely
stationary. With the engine running,
wait for at least 2 seconds with the
clutch pedal fully depressed before
engaging reverse to prevent damage to
the gears and grating.
IMPORTANT The clutch pedal should
be used only for gear changes. Do
not drive with your foot resting on the
clutch pedal, however lightly. For
versions/markets where provided, the
electronic clutch control could cut
in, interpreting the incorrect driving style
as a fault.
WARNING
127)Press the clutch pedal fully to change
gears correctly. It is therefore essential
that there is nothing under the pedals:
make sure the mats are lying flat and do
not get in the way of the pedals.
WARNING
41)Do not drive with your hand resting on
the gear lever as the force exerted, even
if slight, could lead over time to premature
wear of the gearbox internal components.
75F0S0597
99