lock FIAT 500 2020 Owner handbook (in English)
[x] Cancel search | Manufacturer: FIAT, Model Year: 2020, Model line: 500, Model: FIAT 500 2020Pages: 228, PDF Size: 6.01 MB
Page 139 of 228
WARNING
170)Before towing, turn the key to MAR
and then to STOP without extracting it.
If the key is removed, the steering lock will
come on automatically and it will be
impossible to steer the wheels.
171)Before tightening the ring clean the
threaded housing thoroughly. Make sure
that the ring is fully fastened in the housing
before towing the car.
172)The (front/rear) tow hook must be
used exclusively for roadside assistance
operations. You are allowed to tow the
vehicle for short distances using an
appropriate device in accordance with the
highway code (a rigid bar), to move the
vehicle on the road in readiness for towing
or transport via a tow truck. The tow hook
MUST NOT be used to tow vehicles off
the road or where there are obstacles
and/or for towing operations using cables
or other non-rigid devices. In compliance
with the above conditions, towing must
take place with the two vehicles (one
towing, the other towed) aligned as much
as possible along the same centre line.173)Whilst towing, remember that as the
assistance of the brake servo and the
electric power assisted steering is
not available, greater force needs to be
exerted on the brake pedal and more effort
is required on the steering wheel. Do not
use flexible cables when towing and avoid
jerky movements. Make sure not to
damage parts in contact with the car while
towing. When towing the vehicle, you
must comply with all specific traffic
regulations and adopt an appropriate
driving behaviour. Do not start the engine
while towing the vehicle.
137
Page 143 of 228
Thousands of miles 9 18 27 36 45 54 63 72 81 90
Thousands of kilometres 15 30 45 60 75 90 105 120 135 150
Years12345678910
Check operation of the windscreen wiper/washer system
and adjust jets, if necessary●●●●●
Check cleanliness of bonnet and luggage compartment
locks, cleanliness and lubrication of linkage●●●●●
Check soft top operation while closing and opening; check
of seals and lubrication of canvas sliding side guide (only
cabrio versions)●●●●●
Check handbrake lever travel and adjust, if necessary●●●●●
Visually inspect condition and wear of front/rear disc brake
pads (for versions/markets, where provided) and operation
of pad wear indicator●●●●●●●●●●
Visually inspect condition and wear of the rear drum brake
lining●●●●●●●●●●
Visually inspect condition of the accessory drive belt(s) (5)●
Inspect and if necessary adjust tensioning of accessory
drive belt(s) (for versions without automatic tensioner only)●●
Visually inspect conditions of toothed timing drive belt (0.9
TwinAir versions excluded) (5)●
(5) The maximum mileage is 120,000 km. Regardless of the mileage, the belt must be replaced every 6 years. If the vehicle is used in heavy conditions (dusty areas,
especially severe weather conditions, very low or very high temperatures for extended periods, urban driving, long periods of idling), the maximum mileage is
60,000 km. The belt must be replaced every 4 years regardless of the mileage.
141
Page 146 of 228
REGULAR CHECKS
Every 1,000 km or before long
journeys, check and, if necessary, top
up:
engine coolant level;
brake fluid level;
windscreen washer fluid level;
tyre inflation pressure and condition;
operation of lighting system
(headlights, direction indicators, hazard
warning lights, etc.);
operation of windscreen washer/
wiper system and positioning/wear of
rear window wiper blades.
Every 3,000 km check and top up if
required: engine oil level.
You are advised to use PETRONAS
LUBRICANTS products, which have
been designed and produced
specifically for Fiat cars (see table
“Capacities” in the “Technical
specifications” section).DEMANDING USE OF THE
CAR
If the vehicle is mainly used in one of
the following particularly harsh
conditions:
towing a trailer or caravan;
dusty roads;
short, repeated journeys (less than
7-8 Km) at sub-zero outdoor
temperatures;
engine often idling or driving long
distances at low speeds or long periods
of inactivity;
perform the following inspections more
frequently than shown on the
Scheduled Servicing Plan:
check front disc brake pad condition
and wear;
check cleanliness of bonnet and
luggage compartment locks,
cleanliness and lubrication of linkage;
visually inspect conditions of:
engine, gearbox, transmission, pipes
and hoses (exhaust/fuel system/brakes)
and rubber elements (gaiters/sleeves/
bushes, etc.);
check battery charge and battery
fluid level (electrolyte);
visually inspect conditions of the
accessory drive belts;
check and, if necessary, change
engine oil and replace oil filter;
check and, if necessary, replace
pollen filter;
check and, if necessary, replace air
cleaner.
144
SERVICING AND CARE
Page 149 of 228
ENGINE OIL
Check the oil level a few minutes (about
5) after the engine has stopped, with
the vehicle parked on level ground.
NOTE The dipstick is integrated in the
engine oil cap on 0.9 TwinAir 85 HP
versions.
For 1.2 8V versions:pull out the
engine oil dipstick B, clean it with a
cloth that does not leave any trace and
reinsert it..
For 0.9 TwinAir 85 HP version:The
engine oil dipstick A is integral with plug
A. Loosen the plug, clean the dipstick
with a cloth that does not leave traces,
reinsert the dipstick and re-tighten
the plug.
Extract the engine oil dipstick again and
check that the level is between the
MIN and MAX marks on the dipstick.
If the oil level is near or under the MIN
line, add oil through the filler A until
it reaches the MAX line.
The range between the MIN. and MAX.
marks corresponds to about 1 litre of
oil.
The oil level must never exceed the
MAX mark.
Engine oil consumption
The maximum engine oil consumption
is usually 400 grams every 1000 km.When the car is new, the engine needs
to be run in; therefore the engine oil
consumption can only be considered
stabilised after the first 5000 - 6000
km.
IMPORTANT The oil consumption
depends on driving style and the
conditions under which the car is used.
IMPORTANT After adding or changing
the oil, let the engine turn over for a few
seconds and wait a few minutes after
turning it off before you check the level.
61)
3)
ENGINE COOLING
SYSTEM FLUID
The coolant level must be checked
when the engine is cold and must
range between the MIN and MAX
marks on the reservoir.
If the level is too low, undo the reservoir
plug C (see previous pages) and add
the fluid as described in the chapter
"Technical Specifications".
176)
62)
WINDSCREEN/REAR
WINDOW WASHER FLUID
Check fluid level through the reservoir.
If the level is too low, lift the plug D (see
previous pages) and add the fluid as
described in the chapter "Technical
Specifications".
After topping up, close cap D, making
sure it is correctly locked.
177)
BRAKE FLUID
Check that the fluid is at the maximum
level (the fluid level in the reservoir
must not exceed the MAX mark).
If the fluid level in the tank is too low,
undo reservoir cap E (see previous
pages) and add the fluid as described
in the "Technical Specifications"
section.
NOTE Carefully clean the plug of the
reservoir E and the surrounding surface.
Take great care to ensure that
impurities do not enter the reservoir
when the cap is opened.
Always use a funnel with a built-in filter
with a mesh of 0.12 mm or less.
147
Page 152 of 228
WARNING
64)Incorrect installation of electric and
electronic devices may cause severe
damage to your car. After purchasing your
vehicle, if you wish to install any
accessories (anti-theft, etc.), go to a Fiat
Dealership, which will suggest the most
suitable devices and advise you whether a
higher capacity battery needs to be
installed.
WARNING
5)Batteries contain substances which are
very dangerous for the environment. It is
advisable to contact a Fiat Dealership
for battery replacement.
BRAKES
Depending on the version/market, the
vehicle may be equipped with
mechanical wear detectors for the
brake pads: one for each wheel
assembly.
When the brake linings are close to
wearing out, pressing the brake pedal
will generate a slight squeal: this lasts
for about 100 km (the mileage varies
with the driving style and route).
In this case, it is still possible to
continue driving, with caution.
However, contact a Fiat Dealership as
soon as possible to have the worn
brake pads changed.
REPLACING THE
WINDSCREEN/REAR
WINDOW WIPER
BLADES
WIPER BLADES
Replace the blades if the rubber edge is
deformed or worn. In any case, it is
advisable to replace them
approximately once a year.
185) 186)
RAISING THE
WINDSCREEN WIPER
BLADES
Lift the windscreen wiper arm and
position the blade so that it forms a 90°
angle with the arm.
REPLACING THE
WINDSCREEN WIPER
BLADES
Proceed as follows:
raise the wiper arm A fig. 133 and
position the blade so that it forms
an angle of 90° with the arm;
press the button A and extract the
blade C from the arm B;
insert the new blade making sure it
is locked into place.
150
SERVICING AND CARE
Page 153 of 228
REPLACING THE REAR
WINDOW WIPER BLADE
Proceed as follows:
raise cover A fig. 134 and remove
the arm from the car undoing the nut B
that fastens it to the pivot pin;
correctly position the new arm and
tighten the nut fully;
lower the cover.WINDSCREEN WASHER
NOZZLES
If there is no jet, first check that there is
fluid in the reservoir (see the "Checking
fluid levels" paragraph in this chapter).
Then check that the nozzle holes are
not clogged; use a needle to unblock
them if necessary.
The screen washer jets can be oriented
by adjusting the nozzle angles.
The jets should be directed at about
1/3 of the height from the top edge of
the windscreen fig. 135.
IMPORTANT In versions with a sun
roof, make sure that the sun roof is
closed before operating the front jets.REAR WINDOW WASHER
NOZZLE
The rear window washer jets are fixed.
The nozzle holder is on the rear window
fig. 136.
WARNING
185)Driving with worn windscreen wiper
blades is a serious hazard, because
visibility is reduced in bad weather
conditions.
186)If the window needs to be cleaned,
make sure the device is deactivated or the
key is on STOP.
133F0S0137
134F0S0109
135F0S0110
136F0S0111
151
Page 158 of 228
IDENTIFICATION
DATA
It is advisable to take note of the
identification codes. The following
identification codes are printed and
shown on the plates:
VIN plate.
Chassis marking.
Bodywork paint identification plate
(where provided).
Engine marking.
VEHICLE IDENTIFICATION
NUMBER (VIN) PLATE
It is applied to the left side of the rear
floor in the luggage compartment
or, depending on the version, on the
passenger-side rear pillar. It shows the
following information fig. 137:
AName of Manufacturer.
BType-approval number.
CVehicle type identification code.DChassis manufacture progressive
number.
EMaximum authorised weight of
vehicle fully laden.
FMaximum authorised weight of
vehicle when fully laden plus trailer.
GMaximum admitted weight on first
(front) axle.
HMaximum authorised weight on
second axle (rear).
IEngine type.
LBodywork version code.
MSpare part number.
NFiat colour code (where provided).
BODYWORK PAINT
IDENTIFICATION PLATE
(where provided)
Depending on the version, the plate
may be applied to the external tailgate
pillar (left side) and contains the
following informationfig. 138:
APaint manufacturer.BColour name.
CFiat colour code.
DRespray and touch up code.
Alternatively, depending on the version,
the Fiat Colour Code may be integrated
in the type-approval data summary
plate (field N fig. 137).
CHASSIS MARKING
It is applied on the right side of the rear
floor in the boot and shows the
following fig. 139:
type of vehicle;
chassis serial number.
ENGINE MARKING
It is stamped on the cylinder block and
includes the type and the engine serial
number.
137F0S0668
138F0S0113
139F0S0114
156
TECHNICAL DATA
Page 167 of 228
REFUELLING
1.2 8V 69 HP / 1.2
8V 69 HP LPG0.9 TwinAir 85 HP(°)Prescribed fuels and original lubricants
Fuel tank (petrol - litres):
35 / 30.5(***)35
Unleaded petrol with RON no lower than 95
(EN228 specifications)
including a reserve of (litres): 5.0 5.0
Engine cooling system:
4.85 / 5.2
(**)5.3Mixture of distilled water and PARAFLUUP
liquid at 50%(*)
Engine sump (litres):- 2.8 SELENIA DIGITEK P.E.
2.5 -SELENIA K P.E. (1.2 8V 69 HP version) /
SELENIA MULTIPOWER GAS 5W-40 (1.2
8V 69 HP LPG)
Engine sump and filter (litres):- 3.2 SELENIA DIGITEK P.E.
2.8 -SELENIA K P.E. (1.2 8V 69 HP version) /
SELENIA MULTIPOWER GAS 5W-40 (1.2
8V 69 HP LPG)
Gearbox/differential casing (litres): 1.65 1.65 TUTELA TRANSMISSION GEARFORCE
(°) For versions/markets, where provided
(***) LPG versions (including reserve). The figure already takes into account the 80% tank filling limit and the residual fluid required for priming and the maximum
permitted capacity. In addition, after different refuelling processes, this figure may vary due to differences between the network pump supply pressures, pumps
having different supply/locking features, tank not completely run out of fuel. (**) LPG versions (*) When the vehicle is used in particularly harsh weather conditions, we recommend using a 60-40 mixture of PARAFLUUPand demineralised water.
165
Page 176 of 228
TIPS, CONTROLS
AND GENERAL
INFORMATION
Road safety
Learn how to use the various system
functions before setting off.
Read the instructions for the system
carefully before setting off.
Reception conditions
Reception conditions change
constantly while driving. Reception may
be interfered with by the presence of
mountains, buildings or bridges,
especially when you are far away from
the broadcaster.
IMPORTANT The volume may be
increased when receiving traffic
bulletins.
Care and maintenance
Observe the following precautions to
ensure the system is fully operational:
the display is sensitive to scratching,
liquids and detergents. Avoid hitting
the display with pointed or hard objects
that could damage its surface. Do not
press on the display when cleaning it.
never use alcohol, petrols and
derivatives to clean the display lens.
Prevent any liquid from entering the
system: this could damage it beyond
repair.Anti-theft protection
The system is equipped with an
anti-theft protection system based on
the exchange of information with the
electronic control unit (Body Computer)
on the vehicle.
This guarantees maximum safety and
prevents the secret code from being
entered after the power supply has
been disconnected.
If the check has a positive outcome, the
system will start to operate, whereas if
the comparison codes are not the
same or if the electronic control unit
(Body Computer) is replaced, the
system will ask the user to enter the
secret code according to the procedure
described in the paragraph below.
Entering the secret code
When the system is switched on, if the
code is requested, the display will
show “Please enter Anti-Theft Code”
followed by the screen showing a
keypad to enter the secret code.
The secret code is made up of four
digits from 0 to 9.
If an incorrect code is entered, the
system displays “Incorrect Code” to
notify the user of the need to enter the
correct code.After the 3 available attempts to enter
the code, the system displays
“Incorrect Code. Radio locked. Wait for
30 minutes”. After the text has
disappeared it is possible to start the
code entering procedure again.
Vehicle radio passport
This document certifies ownership of
the system. The vehicle radio passport
shows the system model, serial number
and secret code.
WARNING Keep the vehicle radio
passport in a safe place so that you
can give the information to the relevant
authorities if the system is stolen.
In case of loss of the car radio
passport, contact the Fiat Dealership,
taking an ID document and the car
ownership documents.
Important notes
In the event of an anomaly, the system
should only be checked and repaired at
a Fiat Dealership.
If the temperature is particularly low, the
display may take a while to reach
optimum brightness.
If the car is stopped for a while and the
external temperature is very high, the
system may go into “thermal
protection” mode, suspending
operation until the temperature in the
passenger compartment returns to
acceptable levels.
174
MULTIMEDIA
Page 179 of 228
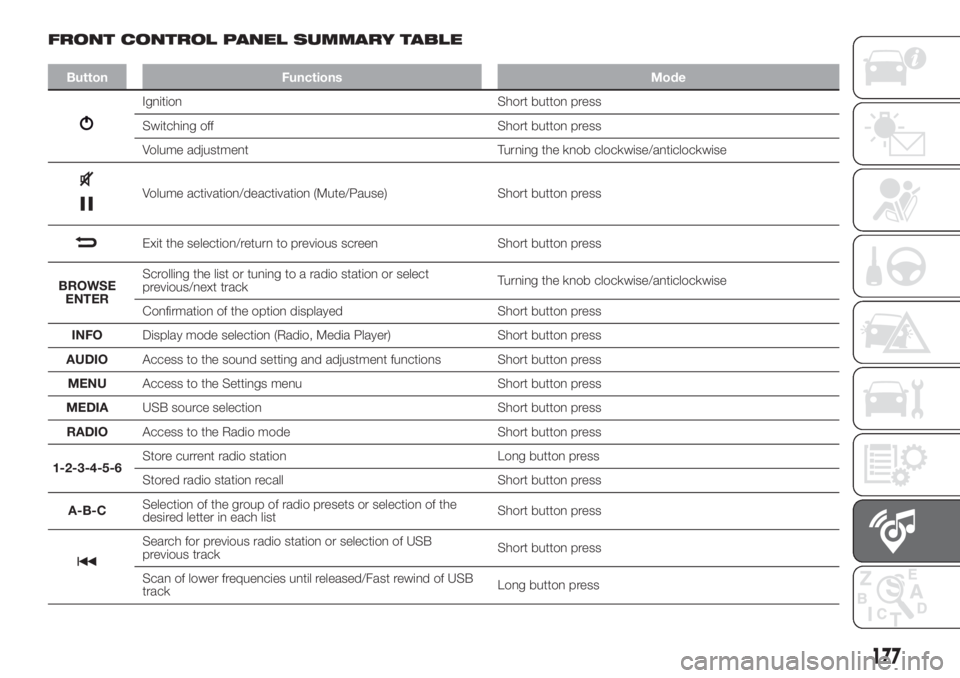
FRONT CONTROL PANEL SUMMARY TABLE
Button Functions Mode
Ignition Short button press
Switching off Short button press
Volume adjustment Turning the knob clockwise/anticlockwise
Volume activation/deactivation (Mute/Pause) Short button press
Exit the selection/return to previous screen Short button press
BROWSE
ENTERScrolling the list or tuning to a radio station or select
previous/next trackTurning the knob clockwise/anticlockwise
Confirmation of the option displayed Short button press
INFODisplay mode selection (Radio, Media Player) Short button press
AUDIOAccess to the sound setting and adjustment functions Short button press
MENUAccess to the Settings menu Short button press
MEDIAUSB source selection Short button press
RADIOAccess to the Radio mode Short button press
1-2-3-4-5-6Store current radio station Long button press
Stored radio station recall Short button press
A-B-CSelection of the group of radio presets or selection of the
desired letter in each listShort button press
Search for previous radio station or selection of USB
previous trackShort button press
Scan of lower frequencies until released/Fast rewind of USB
trackLong button press
177