steering FIAT 500 ABARTH 2013 2.G Owner's Manual
[x] Cancel search | Manufacturer: FIAT, Model Year: 2013, Model line: 500 ABARTH, Model: FIAT 500 ABARTH 2013 2.GPages: 84, PDF Size: 4.63 MB
Page 39 of 84
Pair Your Mobile Phone
• Press the VR steering wheel button and say “Settings” then, at the end of the
BLUE&ME™ message say “Pairing”.
• The system will show the phone pairing PIN number on the EVIC display. For the
next two steps, consult your mobile phone owner’s manual about Bluetooth®
pairing procedures for your phone.
• On your mobile phone, search for devices equipped with Bluetooth® wireless
technology (the setting on your mobile phone might be called Discover or New
Device). In this list you will find BLUE&ME™ (name identifying the BLUE&ME™
system on your car): select it.
• When prompted by the mobile phone, enter the PIN number shown on the instru-
ment panel display using your mobile phone keypad. If pairing is successful, the
system will say “Connecting” and at the end the display will show as confirmation
message, the ID of the paired mobile phone.
• It is essential to wait until you see this confirmation message on the display.
Pressing the PHONE/MENU button on the steering wheel or the MUTE/ESC but-
ton before the message is displayed may cancel the pairing process. If the pairing
process fails, an error message will be displayed: in this event repeat the pairing
procedure.
• At first pairing, BLUE&ME™ will say “Welcome” immediately after connecting.
This message will no longer be heard when your phone automatically connects to
the BLUE&ME™ system on future ignition cycles.
• BLUE&ME™ will ask if you would like to copy your paired phone phonebook to
BLUE&ME™. It is recommended to copy it. To start copying the phonebook say
“Yes”, otherwise say “No”.
• For certain mobile phones the phonebook is not copied automatically, in this case
you must transfer the phonebook contacts using your mobile phone keypad.
If BLUE&ME™ asks you to do this, then perform this procedure following the in-
structions specific to your mobile phone and press the PHONE/MENU button on
the steering wheel when you have finished.
Making a Phone Call
• Assume that “John Smith” is one of the contacts stored in your phonebook.
• To call John Smith, proceed as follows:
•Press the steering wheel button PHONE/MENU and pronounce “Call John Smith”.
• If the name is recognized, the system will display the recognized contact’s infor-
mation on the display screen.
• If there is just one phone number for John Smith in your phonebook, the system
will ask if you would like to call John Smith. To start the call say “Yes”, otherwise
say “No”.
• If John Smith has several phone numbers, the system will ask which phone num-
ber you would like to call (e.g.: “Call John Smith (at) Work or (at) Home?”). An-
swer with the type of required phone number (e.g.: “(at) Home”).
ELECTRONICS
37
Page 40 of 84
• If John Smith has several phone numbers but the “location” (i.e.: the type of
phone number like work, home, etc.) is missing, the system will display the se-
lected contact and a list of related phone numbers on the instrument cluster dis-
play. The hands-free phone system will ask if you would like to call the phone
number displayed. To respond with yes, say “Yes”, otherwise say “No”. If this is
the correct contact but the wrong number, say “Forward” or “Backward” to navi-
gate to the phone number you’d like to call. To call the displayed phone number,
pronounce “Call”. You can also scroll through the phone number list manually by
pressing the buttons on the back of the steering wheel until you find the required
number. Then, press the PRESET UP/OK button on the rear of the steering
wheel to start the call.
• To end the phone call, press the PHONE HANG UP button on the steering wheel.
Media Player
• With the BLUE&ME™ media player you can play, via the car sound system, the
digital audio files stored on a USB device by simply connecting it to the USB port
located in the glove box of the car.
• The MEDIA PLAYER menu enables the following:
– Display tracks stored on your USB stick/iPod®.
– Play audio files stored on your USB stick/iPod®.
How To Connect The USB Stick/iPod® To BLUE&ME™
• To connect your USB stick/iPod® to BLUE&ME™, proceed as follows:
• Copy tracks on your USB stick/iPod® (BLUE&ME™ recognizes .wma, .mp3 and
.wav, .aac formats for audio files and .wpl and .m3u for playlists).
• USB devices without USB wire: just connect the USB stick/iPod® (directly or by
an extension lead) to the USB port on the car.
• USB stick/iPod® with USB wire: use the wire to connect the USB stick/iPod® to
the USB port on the car.
• Turn the ignition key to ON. BLUE&ME™ will start automatically to play your digi-
tal tracks selecting them from the library built at the moment the USB stick/iPod®
is connected.
• If AUTOPLAY is set to “ON”, BLUE&ME™ will start playback automatically.
• Refer to the iPod®/USB/MP3 CONTROL section in this manual and the
BLUE&ME™ User's Manual on the DVD for more details.
WARNING!
Driving while distracted can result in loss of vehicle control, accident and injury. It
is strongly recommended that you use extreme caution when using any device or
feature that may take your focus off the road or your hands off the steering wheel.
Your primary responsibility is the safe operation of your vehicle.
ELECTRONICS
38
Page 43 of 84
TRIP BUTTON
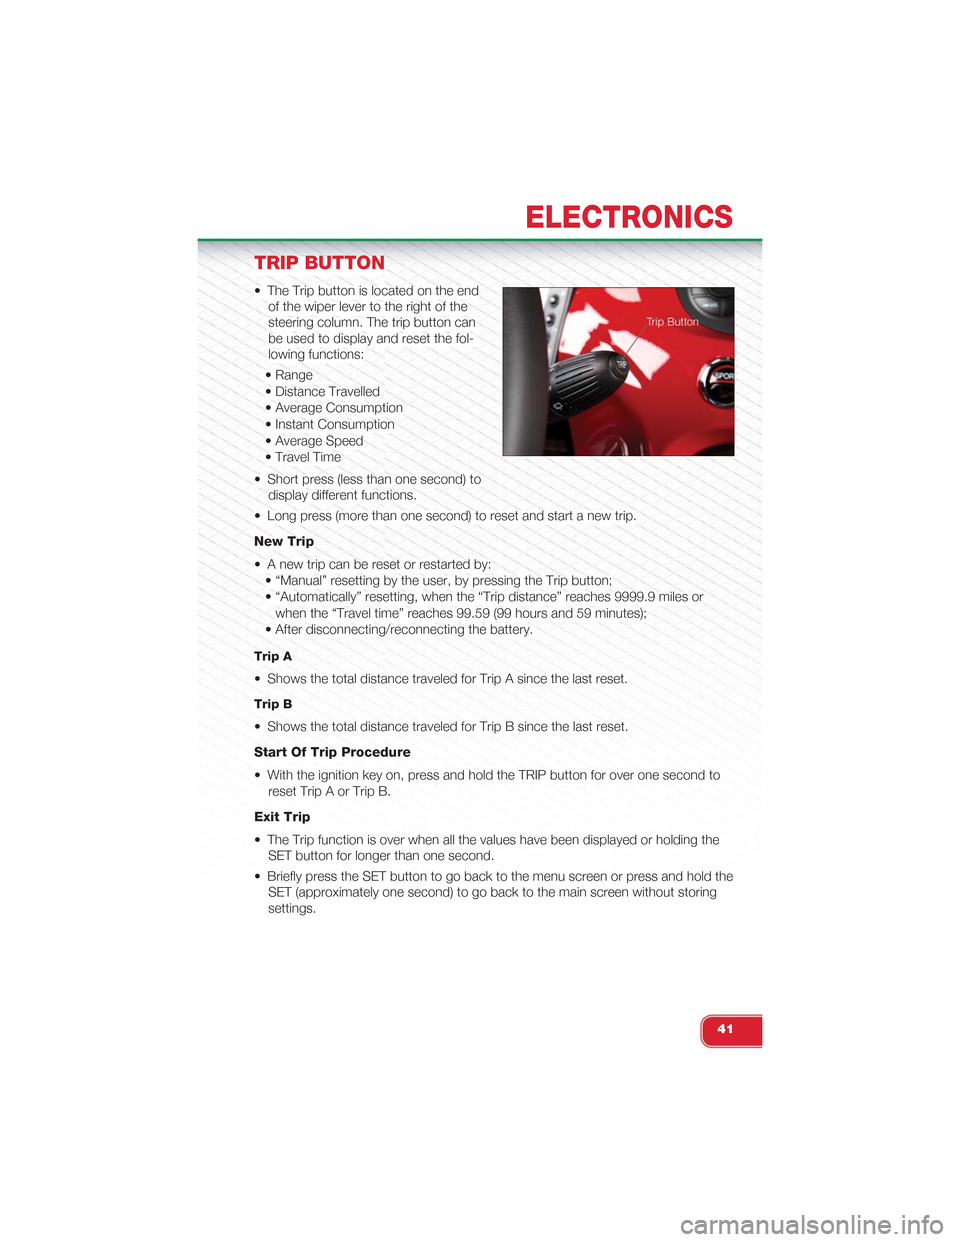
• The Trip button is located on the end
of the wiper lever to the right of the
steering column. The trip button can
be used to display and reset the fol-
lowing functions:
• Range
• Distance Travelled
• Average Consumption
• Instant Consumption
• Average Speed
• Travel Time
• Short press (less than one second) to
display different functions.
• Long press (more than one second) to reset and start a new trip.
New Trip
• A new trip can be reset or restarted by:
• “Manual” resetting by the user, by pressing the Trip button;
• “Automatically” resetting, when the “Trip distance” reaches 9999.9 miles or
when the “Travel time” reaches 99.59 (99 hours and 59 minutes);
• After disconnecting/reconnecting the battery.
Trip A
• Shows the total distance traveled for Trip A since the last reset.
Trip B
• Shows the total distance traveled for Trip B since the last reset.
Start Of Trip Procedure
• With the ignition key on, press and hold the TRIP button for over one second to
reset Trip A or Trip B.
Exit Trip
• The Trip function is over when all the values have been displayed or holding the
SET button for longer than one second.
• Briefly press the SET button to go back to the menu screen or press and hold the
SET (approximately one second) to go back to the main screen without storing
settings.
ELECTRONICS
41
Page 46 of 84
24-HOUR ROADSIDE ASSISTANCE
• If your Abarth requires jump start assistance, out of gas/fuel delivery, tire service,
lockout service or towing due to a defect covered under the Basic Limited War-
ranty, dial toll-free 1-888-242-6342. See your Warranty booklet for further details.
• Provide your name, vehicle identification number and license plate number.
• Provide your location, including telephone number, from which you are calling.
• Briefly describe the nature of the problem and answer a few simple questions.
• You will be given the name of the service provider and an estimated time of ar-
rival. If you feel you are in an “unsafe situation”, please let us know. With your
consent, we will contact local police or safety authorities.
INSTRUMENT CLUSTER WARNING LIGHTS
- Generic Warning Light
• The Generic Warning Light will illuminate if any of the following conditions occur:
Oil Change Request, Engine Oil Pressure Sensor Failure, After Run Cooling
Pump, External Light Failure, Fuel Cut-Off Intervention, Fuel Cut-Off Not Available,
Parking Sensor Failure.
- Power Steering System Warning
• If the “POWER STEERING SYSTEM OVER TEMP” message and icon are dis-
played in the Electronic Vehicle Information Center (EVIC) display, it indicates that
extreme steering maneuvers have occurred, which caused an over temperature
condition in the power steering system. You will lose power steering assistance
momentarily until the over temperature condition no longer exists. Once driving
conditions are safe, pull over and let the vehicle idle. After approximately five min-
utes, the system will cool and return to normal operation.
- Engine Temperature Warning Light
• This light warns of an overheated engine condition.
• If the light turns on or flashes continuously while driving, safely pull over and stop
the vehicle. If the A/C system is on, turn it off. Also, shift the transmission into
NEUTRAL and idle the vehicle. If the temperature reading does not return to nor-
mal, turn the engine off immediately.
• We recommend that you do not operate the vehicle or engine damage will occur.
Have the vehicle serviced immediately.
WARNING!
A hot engine cooling system is dangerous. You or others could be badly burned
by steam or boiling coolant. You may want to call an authorized studio for service
if your vehicle overheats.
WHAT TO DO IN EMERGENCIES
44
Page 47 of 84
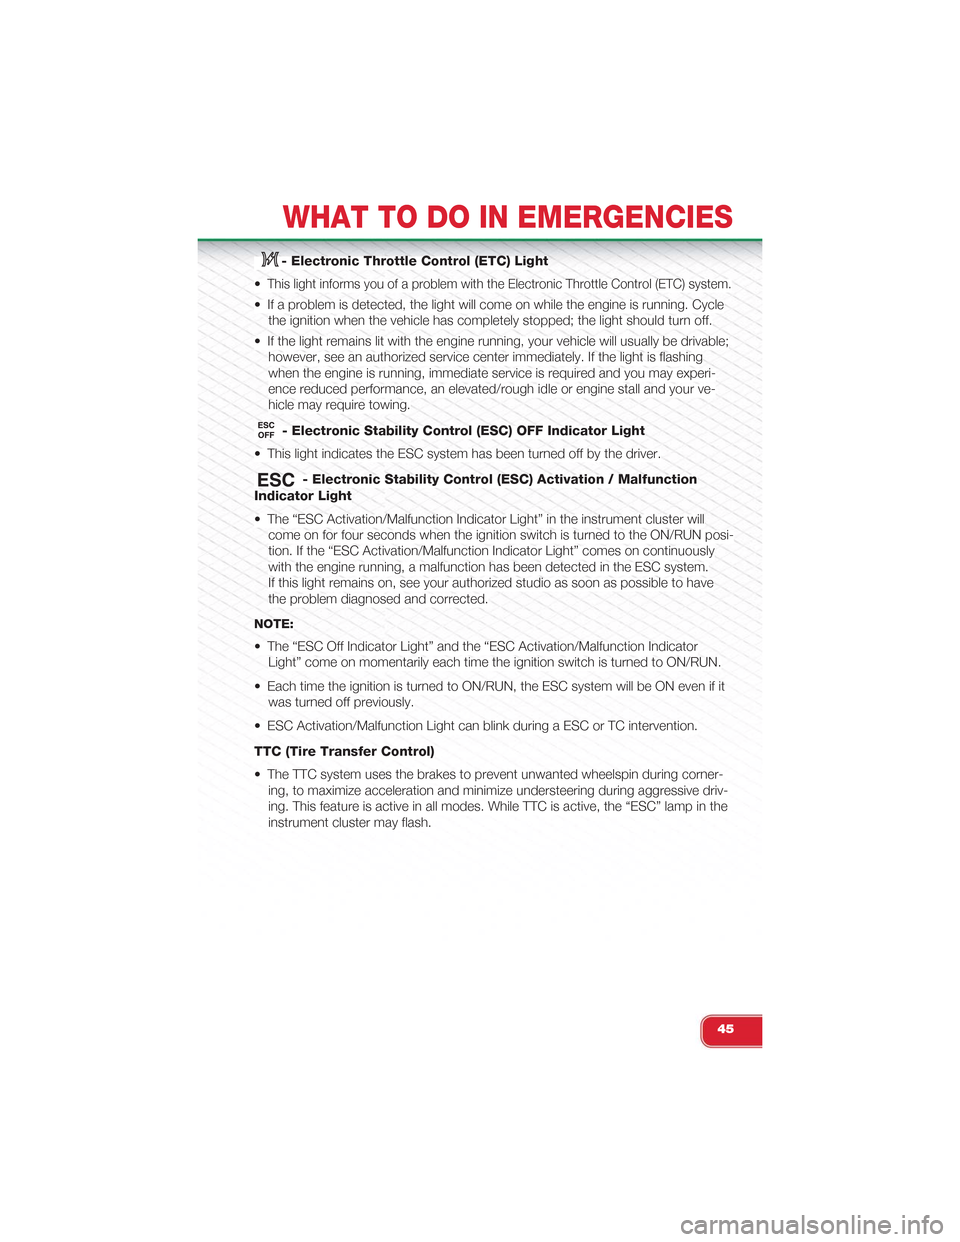
- Electronic Throttle Control (ETC) Light
•This light informs you of a problem with the Electronic Throttle Control (ETC) system.
• If a problem is detected, the light will come on while the engine is running. Cycle
the ignition when the vehicle has completely stopped; the light should turn off.
• If the light remains lit with the engine running, your vehicle will usually be drivable;
however, see an authorized service center immediately. If the light is flashing
when the engine is running, immediate service is required and you may experi-
ence reduced performance, an elevated/rough idle or engine stall and your ve-
hicle may require towing.
- Electronic Stability Control (ESC) OFF Indicator Light
• This light indicates the ESC system has been turned off by the driver.
- Electronic Stability Control (ESC) Activation / Malfunction
Indicator Light
• The “ESC Activation/Malfunction Indicator Light” in the instrument cluster will
come on for four seconds when the ignition switch is turned to the ON/RUN posi-
tion. If the “ESC Activation/Malfunction Indicator Light” comes on continuously
with the engine running, a malfunction has been detected in the ESC system.
If this light remains on, see your authorized studio as soon as possible to have
the problem diagnosed and corrected.
NOTE:
• The “ESC Off Indicator Light” and the “ESC Activation/Malfunction Indicator
Light” come on momentarily each time the ignition switch is turned to ON/RUN.
• Each time the ignition is turned to ON/RUN, the ESC system will be ON even if it
was turned off previously.
• ESC Activation/Malfunction Light can blink during a ESC or TC intervention.
TTC (Tire Transfer Control)
• The TTC system uses the brakes to prevent unwanted wheelspin during corner-
ing, to maximize acceleration and minimize understeering during aggressive driv-
ing. This feature is active in all modes. While TTC is active, the “ESC” lamp in the
instrument cluster may flash.
WHAT TO DO IN EMERGENCIES
45
Page 59 of 84
TOWING A DISABLED VEHICLE
With Ignition Key
Manual Transmission
• Vehicle can be flat towed (all four wheels on the ground) with the transmission in
NEUTRAL.
• Vehicle can be towed with the front wheels elevated.
• Vehicle can be towed on a flatbed truck (all wheels off the ground).
NOTE:If it is necessary to use the accessories while being towed (wipers, defrosters, etc.), the keymust be in the ON/RUN position. Make certain the transmission remains in NEUTRAL.
Without The Ignition Key
• Special care must be taken when the vehicle is towed with the ignition in the
OFF/LOCK position. A dolly should be used under the front wheels if the rear
wheels are raised. Proper towing equipment is necessary to prevent damage to
the vehicle.
CAUTION!
• Failure to follow these towing methods can cause severe transmission dam-
age. Such damage is not covered by the New Vehicle Limited Warranty.
• If the vehicle being towed requires steering, the ignition switch must be in the
ON/RUN position.
• Do not attempt to use sling-type equipment when towing. When securing
the vehicle to a flatbed truck, do not attach to front or rear suspension com-
ponents. Damage to your vehicle may result from improper towing.
ENHANCED ACCIDENT RESPONSE SYSTEM
• In the event of an impact causing air bag deployment, if the communication net-
work remains intact, and the power remains intact, depending on the nature of
the event the Occupant Restraint Controller (ORC) will determine whether to have
the Enhanced Accident Response System perform the following functions:
• Cut off fuel to the engine.
• Flash hazard lights as long as the battery has power or until the ignition key is
turned off.
• Turn on the interior lights, which remain on as long as the battery has power or
until the ignition key is removed.
• Unlock the doors automatically.
WHAT TO DO IN EMERGENCIES
57
Page 61 of 84
FREEING A STUCK VEHICLE
• If your vehicle becomes stuck in mud, sand or snow, it can often be moved by a
rocking motion. Turn your steering wheel right and left to clear the area around
the front wheels. Then shift back and forth between 1st gear and REVERSE. Us-
ing minimal accelerator pedal pressure to maintain the rocking motion, without
spinning the wheels, is most effective.
NOTE:If your vehicle is equipped with Traction Control or Electronic Stability Control (ESC), turnthe system OFF before attempting to “rock” the vehicle.
CAUTION!
• Racing the engine or spinning the wheels may lead to transmission overheat-
ing and failure. Allow the engine to idle with the shift lever in NEUTRAL for at
least one minute after every five rocking-motion cycles. This will minimize
overheating and reduce the risk of transmission failure during prolonged ef-
forts to free a stuck vehicle.
• When “rocking” a stuck vehicle by moving between 1st and REVERSE, do
not spin the wheels faster than 15 mph (24 km/h), or drivetrain damage may
result.
• Revving the engine or spinning the wheels too fast may lead to transmission
overheating and failure. It can also damage the tires. Do not spin the wheels
above 30 mph (48 km/h) while in gear (no transmission shifting occurring).
WARNING!
Fast spinning tires can be dangerous. Forces generated by excessive wheel
speeds may cause tire damage or failure. A tire could explode and injure some-
one. Do not spin your vehicle's wheels faster than 30 mph (48 km/h) when you
are stuck. Do not let anyone near a spinning wheel, no matter what the speed.
WHAT TO DO IN EMERGENCIES
59
Page 71 of 84
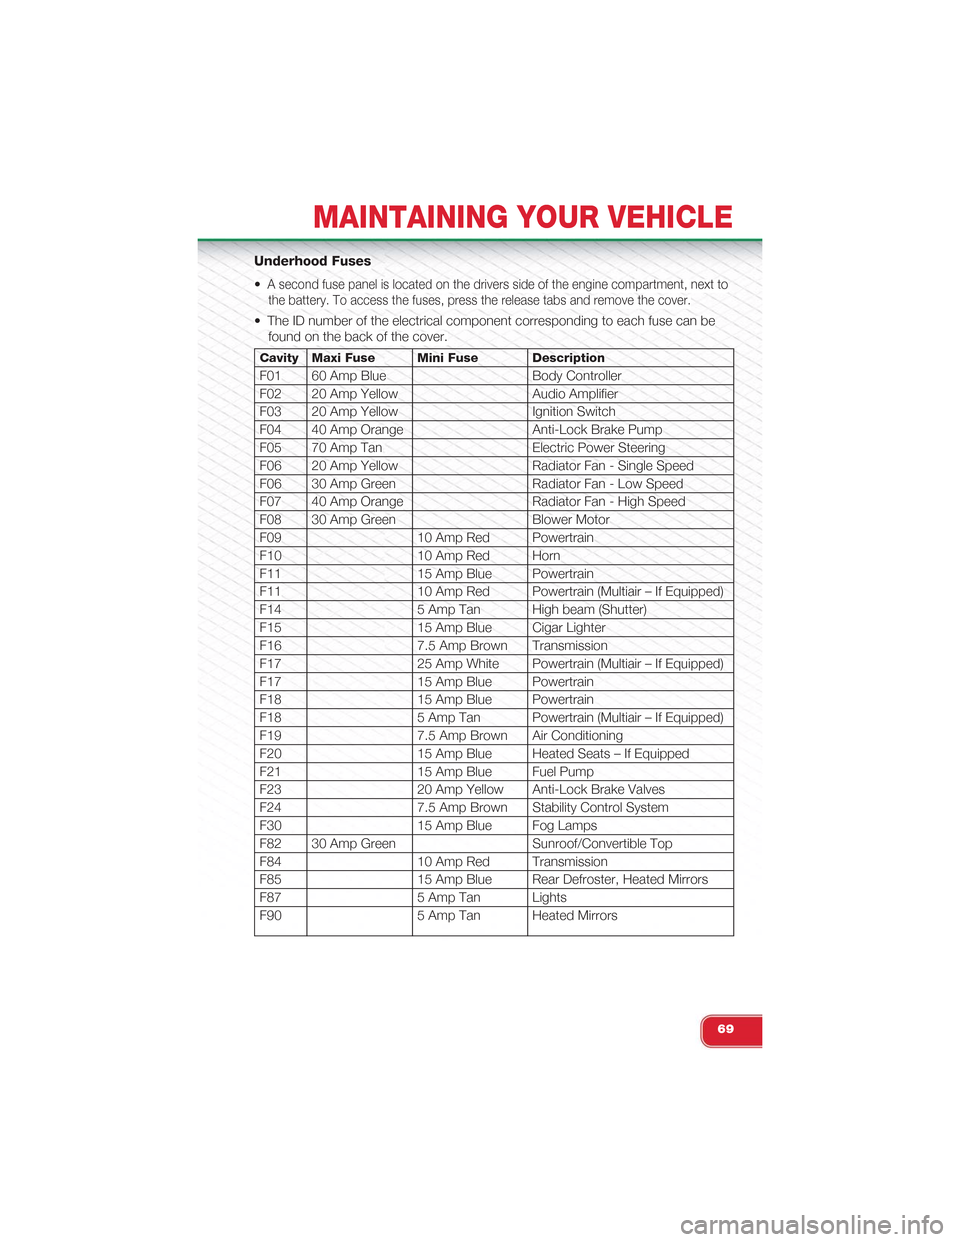
Underhood Fuses
•A second fuse panel is located on the drivers side of the engine compartment, next to
the battery. To access the fuses, press the release tabs and remove the cover.
• The ID number of the electrical component corresponding to each fuse can be
found on the back of the cover.
Cavity Maxi Fuse Mini Fuse Description
F01 60 Amp Blue Body Controller
F02 20 Amp Yellow Audio Amplifier
F03 20 Amp Yellow Ignition Switch
F04 40 Amp Orange Anti-Lock Brake Pump
F05 70 Amp Tan Electric Power Steering
F06 20 Amp Yellow Radiator Fan - Single Speed
F06 30 Amp Green Radiator Fan - Low Speed
F07 40 Amp Orange Radiator Fan - High Speed
F08 30 Amp Green Blower Motor
F09 10 Amp Red Powertrain
F10 10 Amp Red Horn
F11 15 Amp Blue Powertrain
F11 10 Amp Red Powertrain (Multiair – If Equipped)
F14 5 Amp Tan High beam (Shutter)
F15 15 Amp Blue Cigar Lighter
F16 7.5 Amp Brown Transmission
F17 25 Amp White Powertrain (Multiair – If Equipped)
F17 15 Amp Blue Powertrain
F18 15 Amp Blue Powertrain
F18 5 Amp Tan Powertrain (Multiair – If Equipped)
F19 7.5 Amp Brown Air Conditioning
F20 15 Amp Blue Heated Seats – If Equipped
F21 15 Amp Blue Fuel Pump
F23 20 Amp Yellow Anti-Lock Brake Valves
F24 7.5 Amp Brown Stability Control System
F30 15 Amp Blue Fog Lamps
F82 30 Amp Green Sunroof/Convertible Top
F84 10 Amp Red Transmission
F85 15 Amp Blue Rear Defroster, Heated Mirrors
F87 5 Amp Tan Lights
F90 5 Amp Tan Heated Mirrors
MAINTAINING YOUR VEHICLE
69
Page 72 of 84
TIRE PRESSURES
• Check the inflation pressure of each tire, at least monthly and inflate to the rec-
ommended pressure for your vehicle.
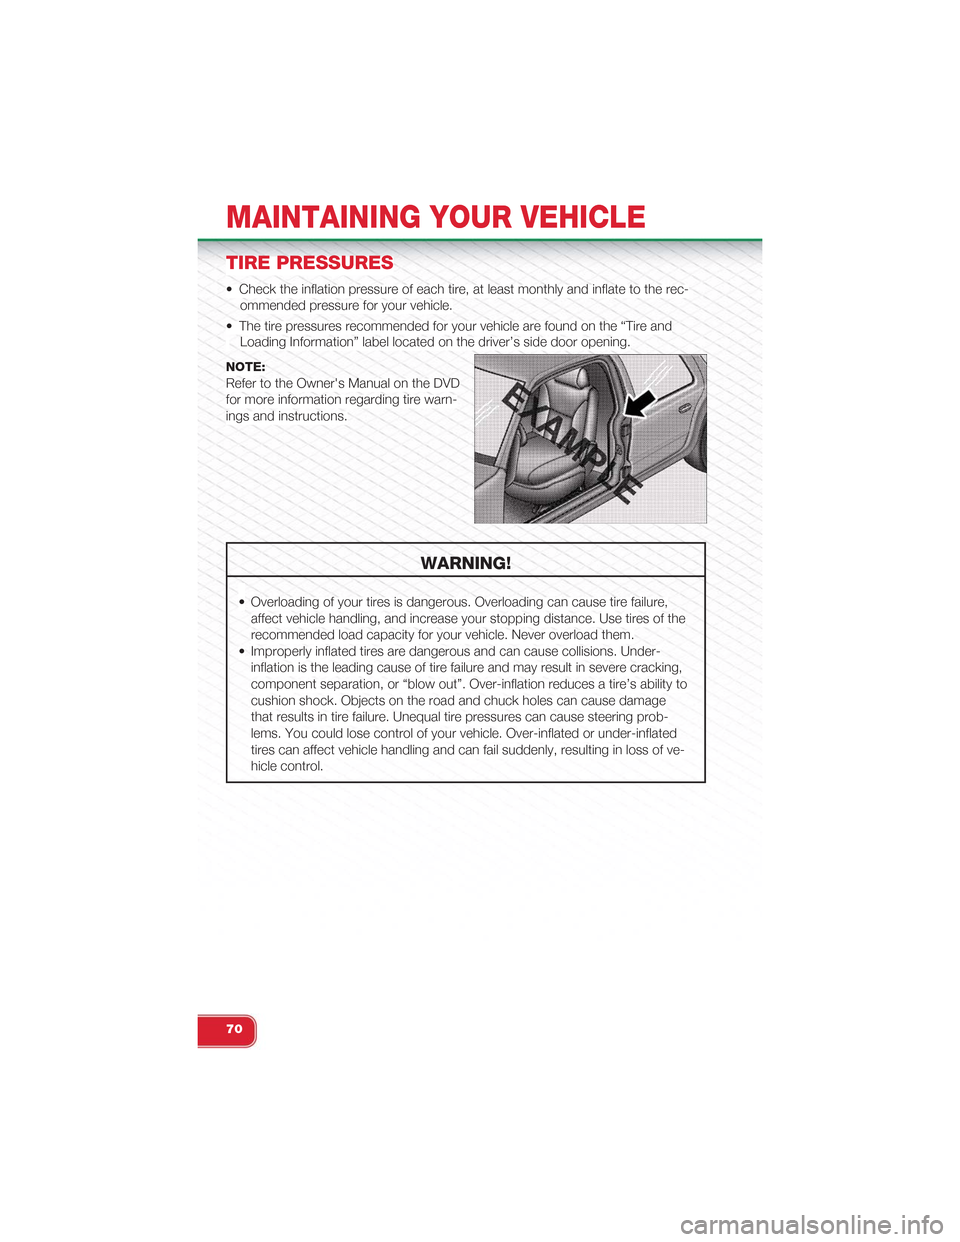
• The tire pressures recommended for your vehicle are found on the “Tire and
Loading Information” label located on the driver’s side door opening.
NOTE:
Refer to the Owner's Manual on the DVD
for more information regarding tire warn-
ings and instructions.
WARNING!
• Overloading of your tires is dangerous. Overloading can cause tire failure,
affect vehicle handling, and increase your stopping distance. Use tires of the
recommended load capacity for your vehicle. Never overload them.
• Improperly inflated tires are dangerous and can cause collisions. Under-
inflation is the leading cause of tire failure and may result in severe cracking,
component separation, or “blow out”. Over-inflation reduces a tire’s ability to
cushion shock. Objects on the road and chuck holes can cause damage
that results in tire failure. Unequal tire pressures can cause steering prob-
lems. You could lose control of your vehicle. Over-inflated or under-inflated
tires can affect vehicle handling and can fail suddenly, resulting in loss of ve-
hicle control.
MAINTAINING YOUR VEHICLE
70
Page 80 of 84
Rear Seat, Folding. . . . . . . . . . . . .15Reclining Front Seats. . . . . . . . . . .14Recreational Towing. . . . . . . . . . . .43Remote Keyless Entry (RKE)Power Convertible Top Function . . .8Replacement Bulbs. . . . . . . . . . . .72Reporting Safety Defects. . . . . . . . .74Restraints, Child. . . . . . . . . . . . . .12
Schedule, Maintenance. . . . . . . . . .64Seat Belts. . . . . . . . . . . . . . . . .10SeatsAdjustment. . . . . . . . . . . . . .14Rear Folding. . . . . . . . . . . . . .15Security Against Theft. . . . . . . . . . .9Setting the Clock. . . . . . . . . . . . .33Signals, Turn. . . . . . . . . . . . . . . .18Spark Plugs. . . . . . . . . . . . . . . .63Speed ControlAccel/Decel. . . . . . . . . . . . . .21Cancel. . . . . . . . . . . . . . . . .21Distance Setting (ACC Only) .. . . .21Speed Control (Cruise Control). . . . . .21StartingCold Weather. . . . . . . . . . . . .29SteeringTilt Column. . . . . . . . . . . . . .16
Steering Wheel Audio Controls. . . . . .34Store Radio Presets. . . . . . . . . . . .33Stuck, Freeing. . . . . . . . . . . . . . .59
Theft System Arming. . . . . . . . . . . .9Theft System Disarming . .. . . . . . . .9Tilt Steering Column . .. . . . . . . . . .16TIREFIT. . . . . . . . . . . . . . . . . . .49TiresAir Pressure. . . . . . . . . . . . . .70Pressure Warning Light. . . . . . .46Towing24-Hour Towing Assistance. . . . .44Disabled Vehicle. . . . . . . . . . .57Recreational. . . . . . . . . . . . . .43Towing Vehicle Behind a Motorhome . .43TransmissionFluid. . . . . . . . . . . . . . . . . .63Turn Signals. . . . . . . . . . . . . . . .18
USB Port . . . . .. . . . . . . . . . . . .39
WasherRear. . . . . . . . . . . . . . . . . .20Wheel and Wheel Trim Care. . . . . . .71Wind Buffeting. . . . . . . . . . . . . . .29Wiper, Rear .. . . . . . . . . . . . . . .20
INDEX
78