buttons FIAT 500 ABARTH 2013 2.G User Guide
[x] Cancel search | Manufacturer: FIAT, Model Year: 2013, Model line: 500 ABARTH, Model: FIAT 500 ABARTH 2013 2.GPages: 84, PDF Size: 4.63 MB
Page 26 of 84
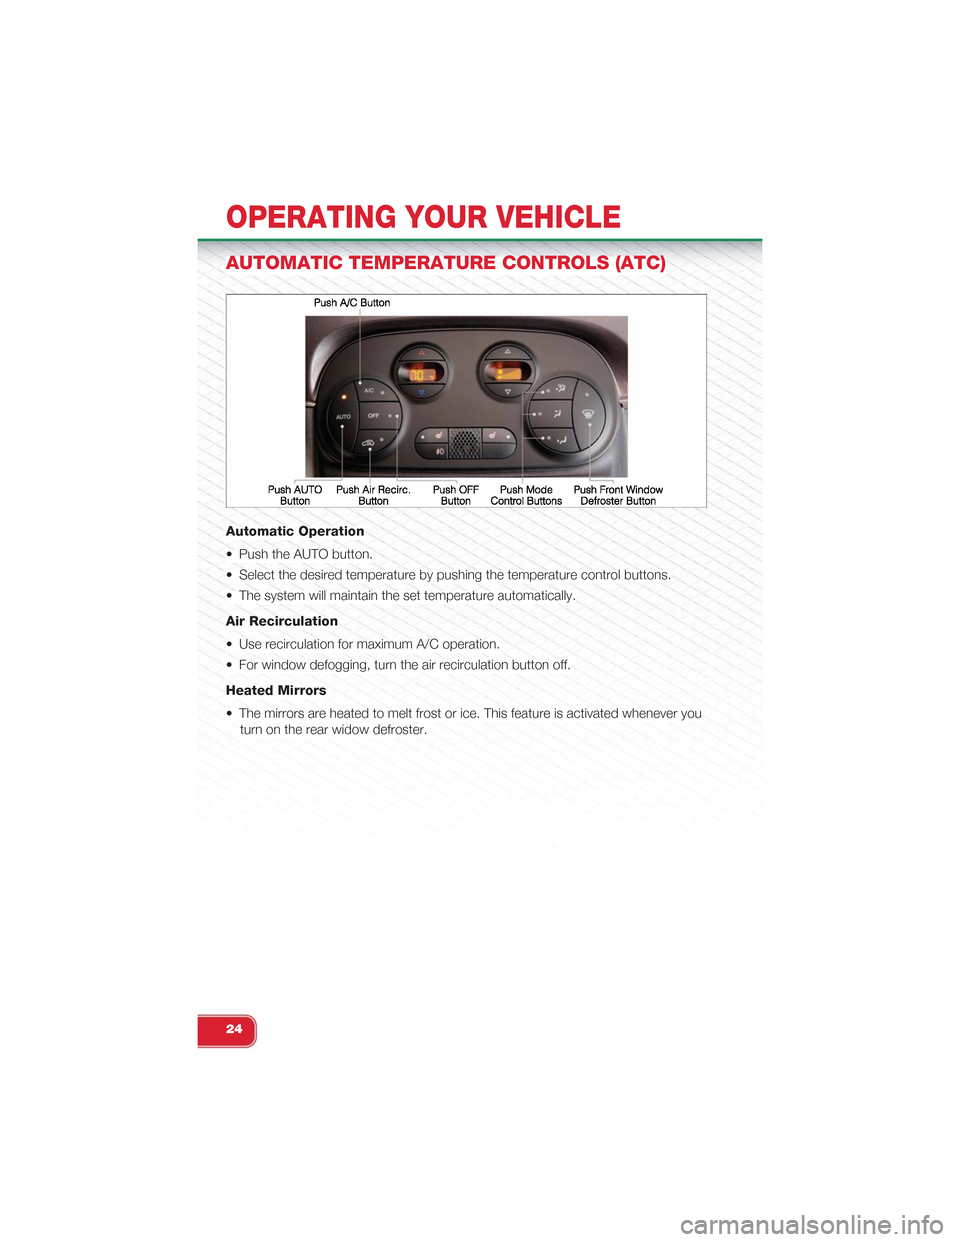
AUTOMATIC TEMPERATURE CONTROLS (ATC)
Automatic Operation
• Push the AUTO button.
• Select the desired temperature by pushing the temperature control buttons.
• The system will maintain the set temperature automatically.
Air Recirculation
• Use recirculation for maximum A/C operation.
• For window defogging, turn the air recirculation button off.
Heated Mirrors
• The mirrors are heated to melt frost or ice. This feature is activated whenever you
turn on the rear widow defroster.
OPERATING YOUR VEHICLE
24
Page 29 of 84
POWER CONVERTIBLE TOP
On vehicles equipped with a power convertible top, the power convertible top
switch is located on the overhead console. The switch contains two buttons. The
passenger side button, is used to open the power top, and the driver side button, is
used to close the power top.
NOTE:
• The power top buttons will operate when the ignition switch is turned to the
ACC/ON/RUN position.
• The power top can be remotely operated with the key fob. Refer to “Opening
Power Top Remote Function” in “Things To Know Before Starting” in the Owner’s
Manual on the DVD for more information.
Lowering The Power Top
Auto Open
Push the top open button approximately one second for the three-quarter open/
spoiler position. Push the top open button for approximately one second a second
time to fully open the convertible top.
Manual Open
For manual open, push and hold the open button until desired roof position or until
spoiler position.
NOTE:
Vertical movement only operates in auto open/close mode.
Raising The Power Top
Auto Close
From the convertible top fully open position, push the top close button for approxi-
mately one second for the three-quarter open/spoiler position. Push the top close
button for approximately one second a second time for the one-quarter open posi-
tion. Push and hold close button to fully close convertible top.
Manual Close
For manual close, push and hold the close button until desired position until one-
quarter open position. Push and hold again for full close position.
NOTE:
Rail lubrication is recommended every 2000 cycles, or if scratching noises due to
dust are present. Refer to “Fluids, Lubes, and Genuine Part” in “Maintaining Your
Vehicle” in the Owner’s Manual on the DVD for information.
OPERATING YOUR VEHICLE
27
Page 34 of 84
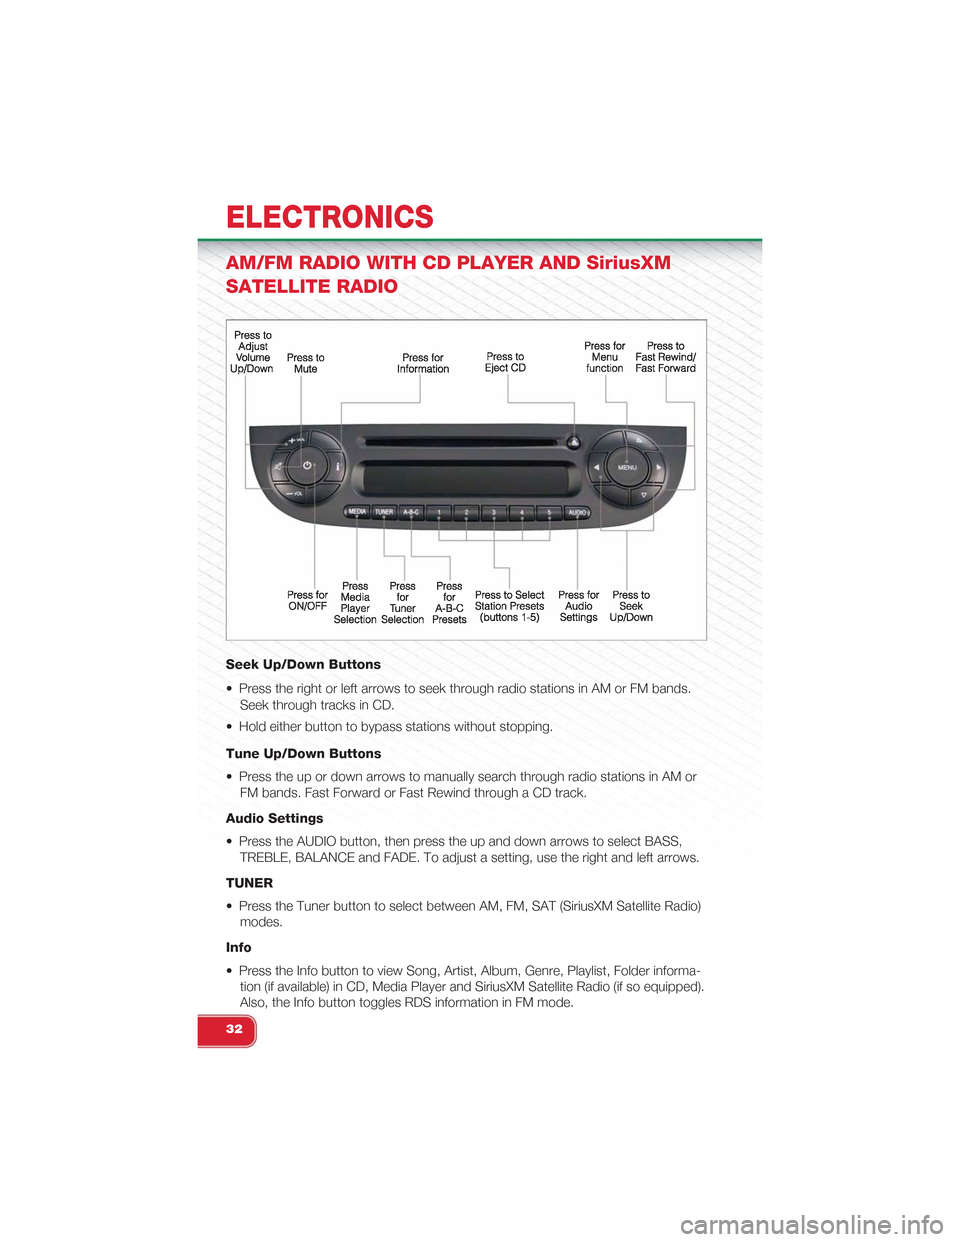
AM/FM RADIO WITH CD PLAYER AND SiriusXM
SATELLITE RADIO
Seek Up/Down Buttons
• Press the right or left arrows to seek through radio stations in AM or FM bands.
Seek through tracks in CD.
• Hold either button to bypass stations without stopping.
Tune Up/Down Buttons
• Press the up or down arrows to manually search through radio stations in AM or
FM bands. Fast Forward or Fast Rewind through a CD track.
Audio Settings
• Press the AUDIO button, then press the up and down arrows to select BASS,
TREBLE, BALANCE and FADE. To adjust a setting, use the right and left arrows.
TUNER
• Press the Tuner button to select between AM, FM, SAT (SiriusXM Satellite Radio)
modes.
Info
• Press the Info button to view Song, Artist, Album, Genre, Playlist, Folder informa-
tion (if available) in CD, Media Player and SiriusXM Satellite Radio (if so equipped).
Also, the Info button toggles RDS information in FM mode.
ELECTRONICS
32
Page 35 of 84
MENU
• Press the MENU button and one of the following options will appear on the Radio
display. Use the up and down arrows to scroll through the options; use the left
and right arrows to change a selection setting.
• Speech Volume • SiriusXM Telephone Number
• Aux Audio Offset • System Reset
• Radio Off • On Volume Limit
• Sat ID
Clock Setting
• The time is set using the Electronic Vehicle Information Center (EVIC) Display.
• With the Date and Time shown in the EVIC display, press the SET button to enter
the menu mode.
• Press the plus or minus buttons until "Set Time" is displayed and press the SET
button again.
• Press the SET button; “hours” will flash on the display.
• Press the plus or minus buttons to adjust the hours.
• When setting the hour is complete, briefly press the SET button and “minutes” will
flash in the display. Press the plus or minus buttons to adjust the minutes.
• When setting the time is complete, press and hold the SET button.
Station Presets
• To store a tuned station, find the station to store by either pressing the right and
left arrow (Seek) buttons or by pressing up or down arrow (Manual Tune) buttons.
• Once the station is found, press and hold one of the PRESET buttons, until you
hear a confirmation beep (Preset Saved will be shown in the radio display). A total
of 15 FM, 10 AM and 15 SiriusXM Satellite Radio stations can be preset by
pressing the A-B-C button.
A-B-C Button
• Press the A-B-C button to choose between the presets stored in the AM, FM or
SAT modes. The mode (AM, FM, SAT), station preset (A, B, C) and preset button
number (P 1-5) will be displayed in the middle of the radio display.
ELECTRONICS
33
Page 37 of 84
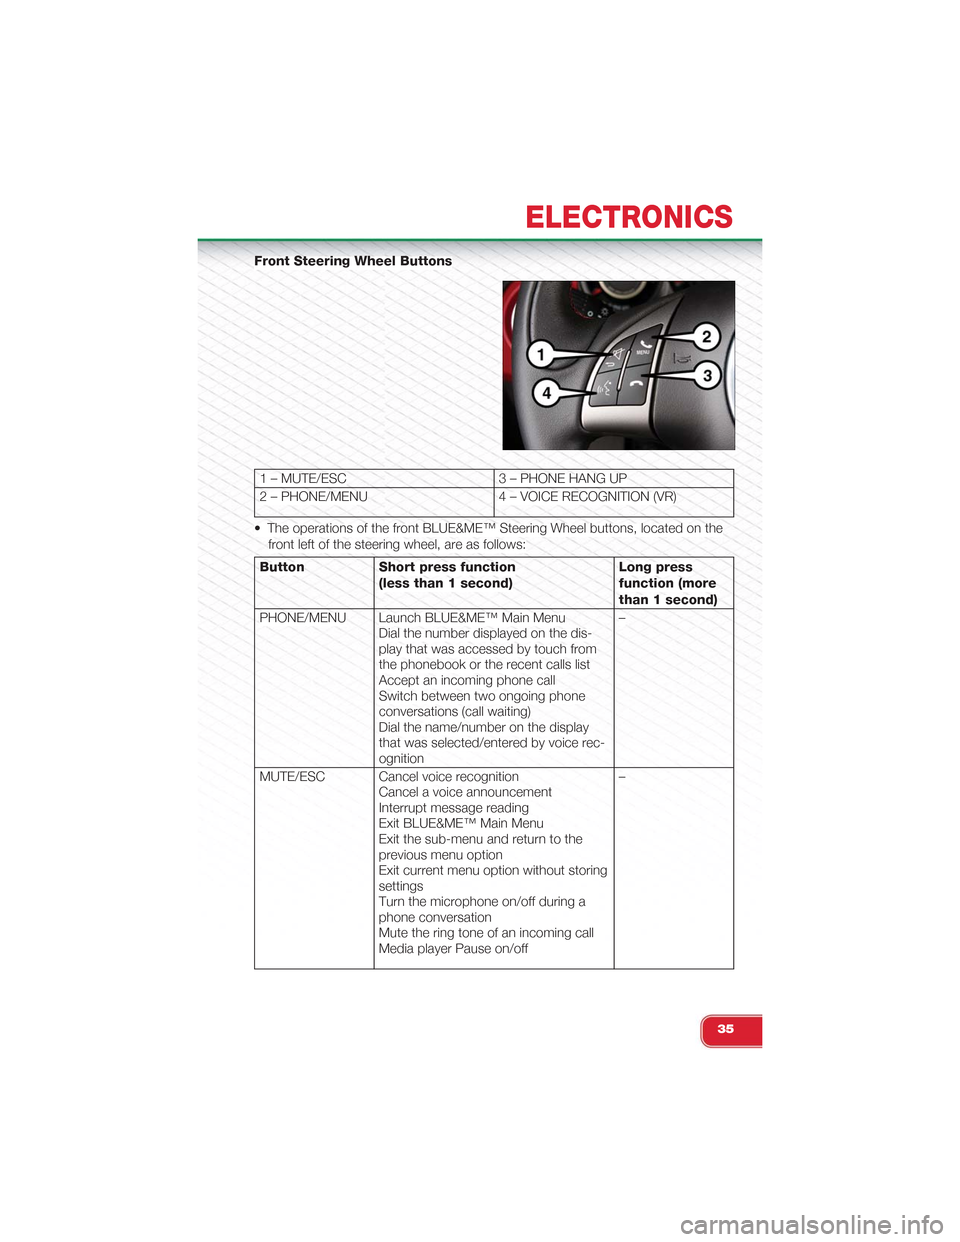
Front Steering Wheel Buttons
1 – MUTE/ESC 3 – PHONE HANG UP
2 – PHONE/MENU 4 – VOICE RECOGNITION (VR)
• The operations of the front BLUE&ME™ Steering Wheel buttons, located on the
front left of the steering wheel, are as follows:
Button Short press function
(less than 1 second)
Long press
function (more
than 1 second)
PHONE/MENU Launch BLUE&ME™ Main MenuDial the number displayed on the dis-play that was accessed by touch fromthe phonebook or the recent calls listAccept an incoming phone callSwitch between two ongoing phoneconversations (call waiting)Dial the name/number on the displaythat was selected/entered by voice rec-ognition
–
MUTE/ESC Cancel voice recognitionCancel a voice announcementInterrupt message readingExit BLUE&ME™ Main MenuExit the sub-menu and return to theprevious menu optionExit current menu option without storingsettingsTurn the microphone on/off during aphone conversationMute the ring tone of an incoming callMedia player Pause on/off
–
ELECTRONICS
35
Page 40 of 84
• If John Smith has several phone numbers but the “location” (i.e.: the type of
phone number like work, home, etc.) is missing, the system will display the se-
lected contact and a list of related phone numbers on the instrument cluster dis-
play. The hands-free phone system will ask if you would like to call the phone
number displayed. To respond with yes, say “Yes”, otherwise say “No”. If this is
the correct contact but the wrong number, say “Forward” or “Backward” to navi-
gate to the phone number you’d like to call. To call the displayed phone number,
pronounce “Call”. You can also scroll through the phone number list manually by
pressing the buttons on the back of the steering wheel until you find the required
number. Then, press the PRESET UP/OK button on the rear of the steering
wheel to start the call.
• To end the phone call, press the PHONE HANG UP button on the steering wheel.
Media Player
• With the BLUE&ME™ media player you can play, via the car sound system, the
digital audio files stored on a USB device by simply connecting it to the USB port
located in the glove box of the car.
• The MEDIA PLAYER menu enables the following:
– Display tracks stored on your USB stick/iPod®.
– Play audio files stored on your USB stick/iPod®.
How To Connect The USB Stick/iPod® To BLUE&ME™
• To connect your USB stick/iPod® to BLUE&ME™, proceed as follows:
• Copy tracks on your USB stick/iPod® (BLUE&ME™ recognizes .wma, .mp3 and
.wav, .aac formats for audio files and .wpl and .m3u for playlists).
• USB devices without USB wire: just connect the USB stick/iPod® (directly or by
an extension lead) to the USB port on the car.
• USB stick/iPod® with USB wire: use the wire to connect the USB stick/iPod® to
the USB port on the car.
• Turn the ignition key to ON. BLUE&ME™ will start automatically to play your digi-
tal tracks selecting them from the library built at the moment the USB stick/iPod®
is connected.
• If AUTOPLAY is set to “ON”, BLUE&ME™ will start playback automatically.
• Refer to the iPod®/USB/MP3 CONTROL section in this manual and the
BLUE&ME™ User's Manual on the DVD for more details.
WARNING!
Driving while distracted can result in loss of vehicle control, accident and injury. It
is strongly recommended that you use extreme caution when using any device or
feature that may take your focus off the road or your hands off the steering wheel.
Your primary responsibility is the safe operation of your vehicle.
ELECTRONICS
38
Page 41 of 84
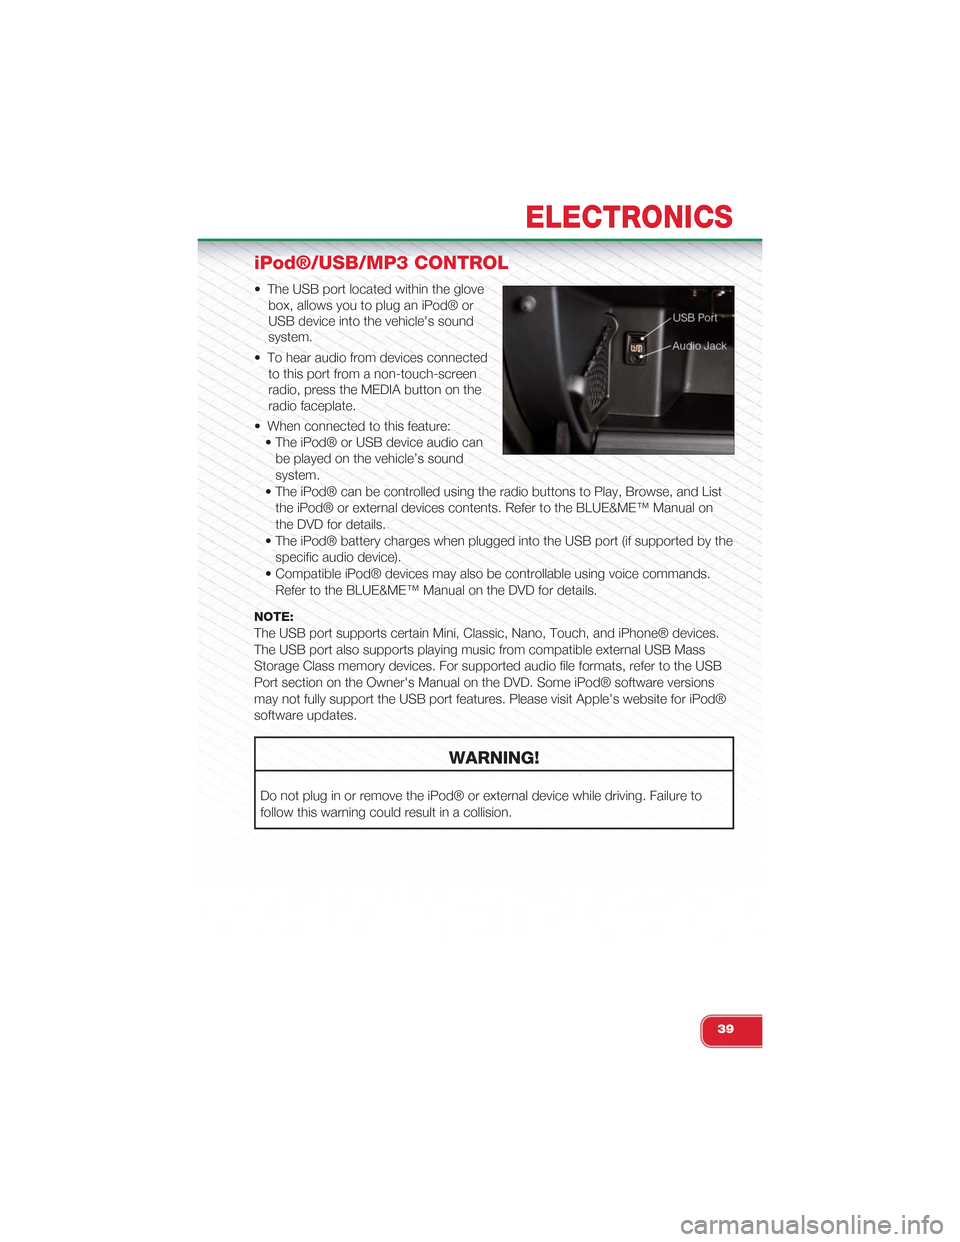
iPod®/USB/MP3 CONTROL
• The USB port located within the glove
box, allows you to plug an iPod® or
USB device into the vehicle's sound
system.
• To hear audio from devices connected
to this port from a non-touch-screen
radio, press the MEDIA button on the
radio faceplate.
• When connected to this feature:
• The iPod® or USB device audio can
be played on the vehicle’s sound
system.
• The iPod® can be controlled using the radio buttons to Play, Browse, and List
the iPod® or external devices contents. Refer to the BLUE&ME™ Manual on
the DVD for details.
• The iPod® battery charges when plugged into the USB port (if supported by the
specific audio device).
• Compatible iPod® devices may also be controllable using voice commands.
Refer to the BLUE&ME™ Manual on the DVD for details.
NOTE:
The USB port supports certain Mini, Classic, Nano, Touch, and iPhone® devices.
The USB port also supports playing music from compatible external USB Mass
Storage Class memory devices. For supported audio file formats, refer to the USB
Port section on the Owner's Manual on the DVD. Some iPod® software versions
may not fully support the USB port features. Please visit Apple’s website for iPod®
software updates.
WARNING!
Do not plug in or remove the iPod® or external device while driving. Failure to
follow this warning could result in a collision.
ELECTRONICS
39
Page 42 of 84
ELECTRONIC VEHICLE INFORMATION
CENTER (EVIC)
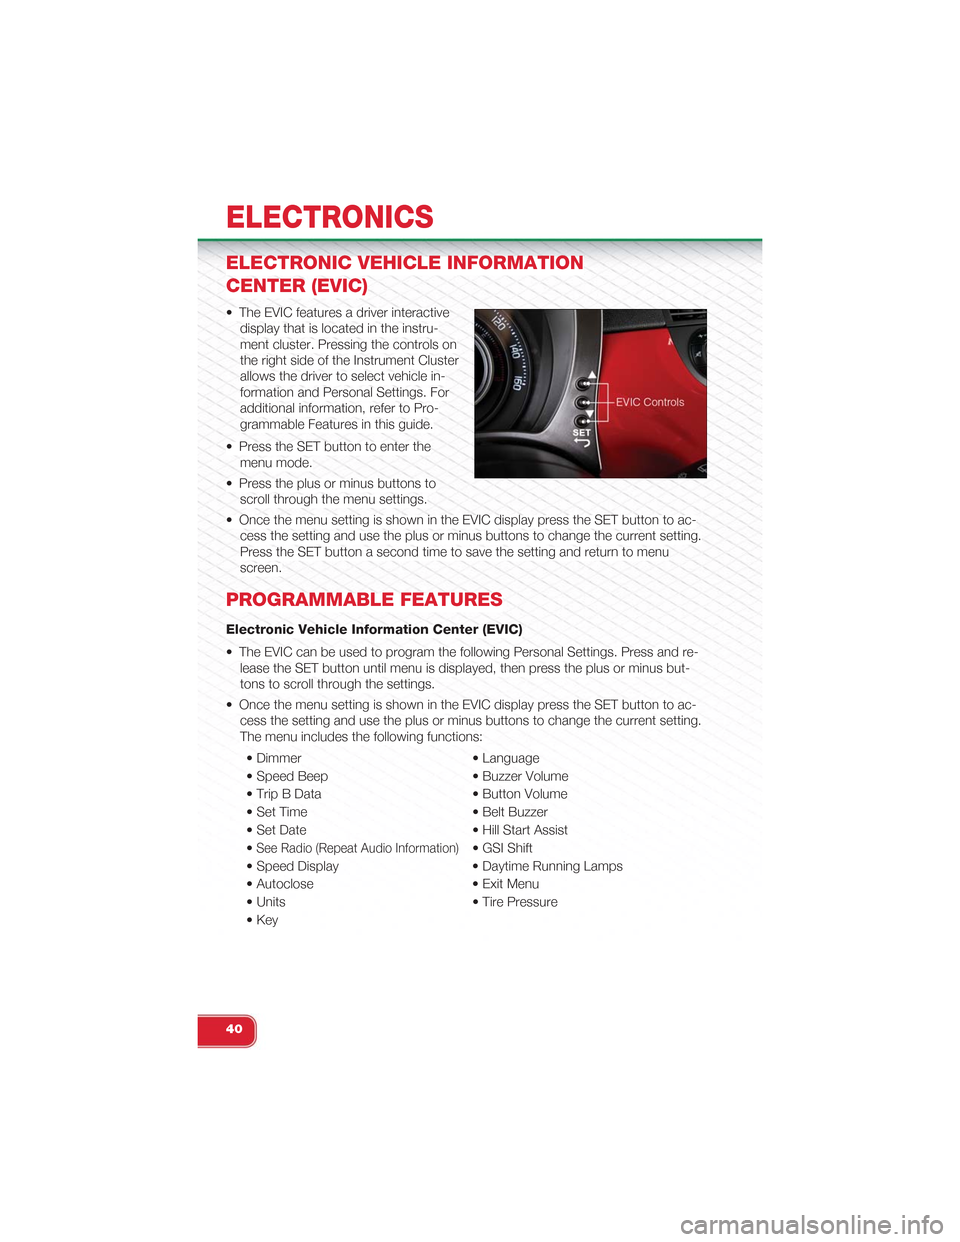
• The EVIC features a driver interactive
display that is located in the instru-
ment cluster. Pressing the controls on
the right side of the Instrument Cluster
allows the driver to select vehicle in-
formation and Personal Settings. For
additional information, refer to Pro-
grammable Features in this guide.
• Press the SET button to enter the
menu mode.
• Press the plus or minus buttons to
scroll through the menu settings.
• Once the menu setting is shown in the EVIC display press the SET button to ac-
cess the setting and use the plus or minus buttons to change the current setting.
Press the SET button a second time to save the setting and return to menu
screen.
PROGRAMMABLE FEATURES
Electronic Vehicle Information Center (EVIC)
• The EVIC can be used to program the following Personal Settings. Press and re-
lease the SET button until menu is displayed, then press the plus or minus but-
tons to scroll through the settings.
• Once the menu setting is shown in the EVIC display press the SET button to ac-
cess the setting and use the plus or minus buttons to change the current setting.
The menu includes the following functions:
• Dimmer • Language
• Speed Beep • Buzzer Volume
• Trip B Data • Button Volume
• Set Time • Belt Buzzer
• Set Date • Hill Start Assist
•See Radio (Repeat Audio Information)• GSI Shift
• Speed Display • Daytime Running Lamps
• Autoclose • Exit Menu
• Units • Tire Pressure
• Key
ELECTRONICS
40