FIAT 500E 2016 2.G Service Manual
Manufacturer: FIAT, Model Year: 2016, Model line: 500E, Model: FIAT 500E 2016 2.GPages: 132, PDF Size: 4.59 MB
Page 41 of 132
EXTENDING YOUR DRIVING RANGE PER CHARGE
•A little knowledge will go a long way to extend your driving range on the 500e.First
and foremost understand that the drive system and cabin temperature management
features use the most energy from the high voltage battery.Reducing energy draw
from these features are the easiest and most effective way to extend driving range.
•Just like a conventional vehicle, 500e likes to keep things smooth and steady for most
efficient operation.When driving, avoid aggressive driving styles and high speeds for
extended times.When practical, choose surface streets over the highway, work to
maintain a steady speed to extend range.
•The 500e uses high voltage components to heat and cool the cabin, so a little aware-
ness can go a long way to extend range.When using automatic climate control, con-
sider setting temperatures a few degrees higher or lower during hot and cold days.If
your 500e has been soaking in hot or cold temperatures for an extended period, it is
recommended that the car be preconditioned via the Uconnect Access smartphone
app while still plugged into a charging source.This will allow 500e to use external
power to establish a comfortable cabin temperature before the drive, and allow the
battery to maintain the temperature using significantly less energy during the drive.
Additional Tips:
•Keep tires properly inflated
•Avoid carrying nonessential cargo
•Be mindful of adding external accessories that may increase aerodynamic drag
•Perform all scheduled maintenance at recommended intervals
Driving Behavior Gauge
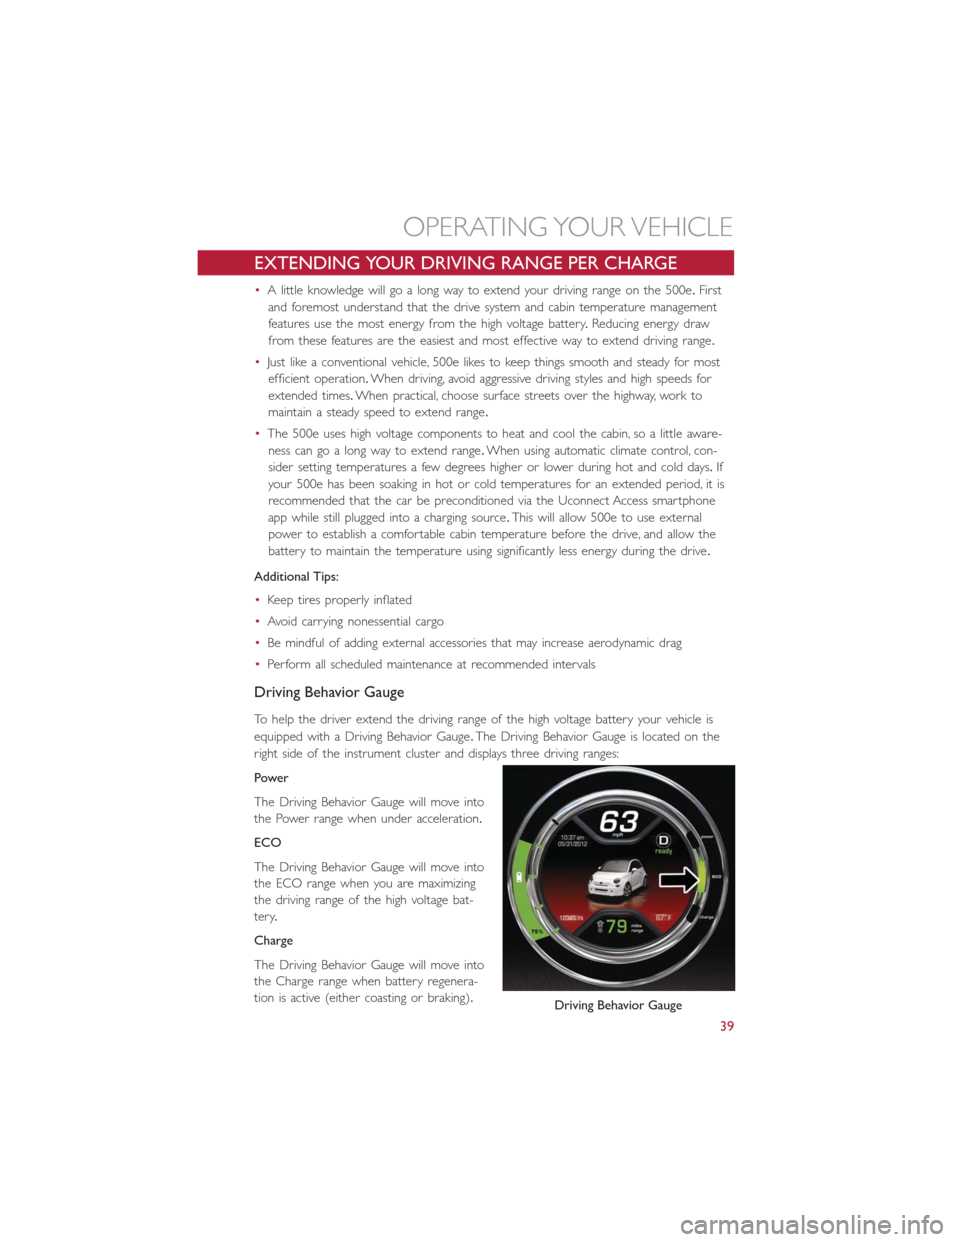
To help the driver extend the driving range of the high voltage battery your vehicle is
equipped with a Driving Behavior Gauge.The Driving Behavior Gauge is located on the
right side of the instrument cluster and displays three driving ranges:
Power
The Driving Behavior Gauge will move into
the Power range when under acceleration.
ECO
The Driving Behavior Gauge will move into
the ECO range when you are maximizing
the driving range of the high voltage bat-
tery.
Charge
The Driving Behavior Gauge will move into
the Charge range when battery regenera-
tion is active (either coasting or braking).
Driving Behavior Gauge
OPERATING YOUR VEHICLE
39
Page 42 of 132
LIGHTS
MULTIFUNCTION LEVER
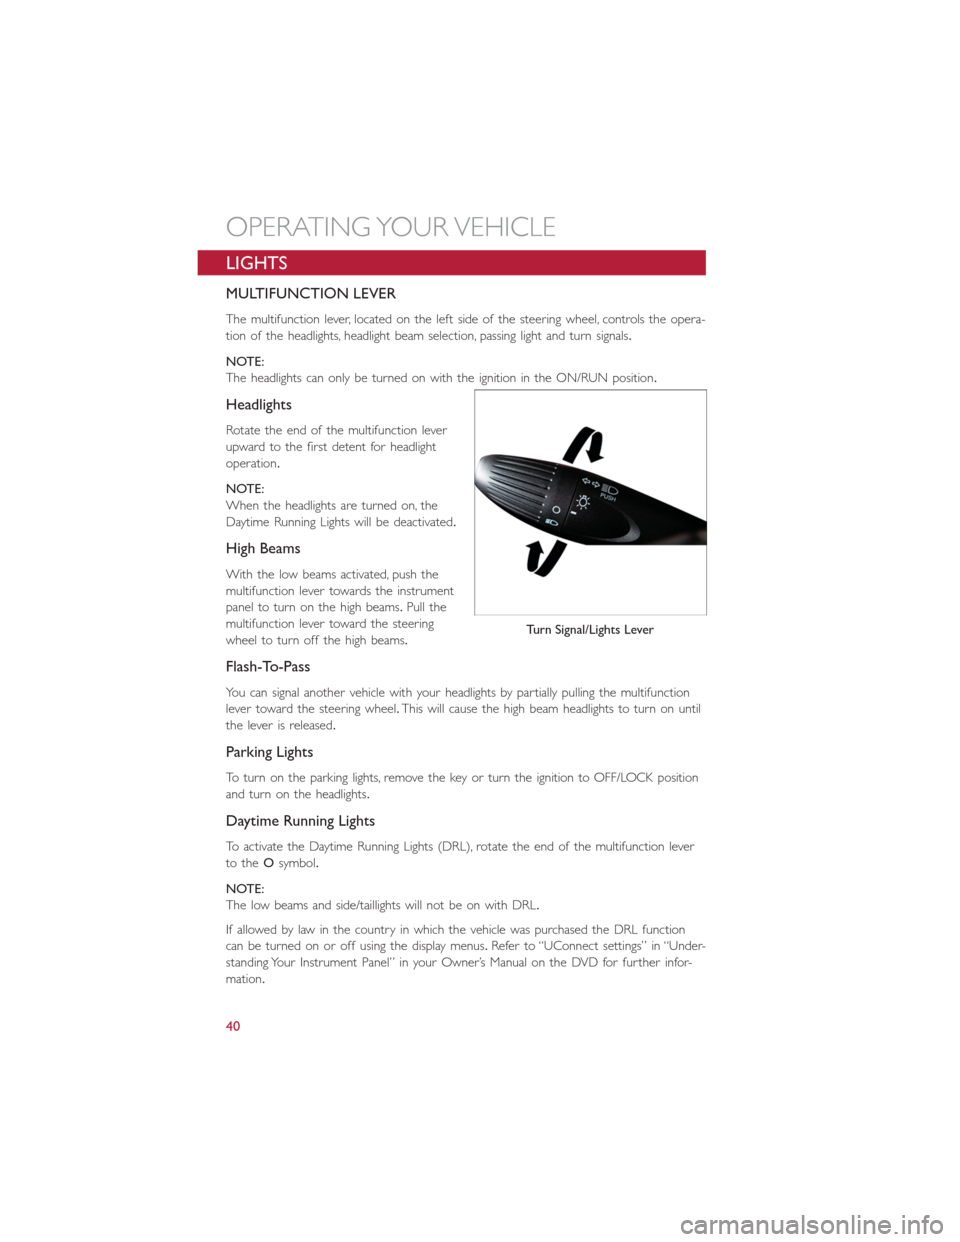
The multifunction lever, located on the left side of the steering wheel, controls the opera-
tion of the headlights, headlight beam selection, passing light and turn signals.
NOTE:
The headlights can only be turned on with the ignition in the ON/RUN position.
Headlights
Rotate the end of the multifunction lever
upward to the first detent for headlight
operation.
NOTE:
When the headlights are turned on, the
Daytime Running Lights will be deactivated.
High Beams
With the low beams activated, push the
multifunction lever towards the instrument
panel to turn on the high beams.Pull the
multifunction lever toward the steering
wheel to turn off the high beams.
Flash-To-Pass
You can signal another vehicle with your headlights by partially pulling the multifunction
lever toward the steering wheel.This will cause the high beam headlights to turn on until
the lever is released.
Parking Lights
To turn on the parking lights, remove the key or turn the ignition to OFF/LOCK position
and turn on the headlights.
Daytime Running Lights
To activate the Daytime Running Lights (DRL), rotate the end of the multifunction lever
to theOsymbol.
NOTE:
The low beams and side/taillights will not be on with DRL.
If allowed by law in the country in which the vehicle was purchased the DRL function
can be turned on or off using the display menus.Refer to “UConnect settings” in “Under-
standing Your Instrument Panel” in your Owner’s Manual on the DVD for further infor-
mation.
Turn Signal/Lights Lever
OPERATING YOUR VEHICLE
40
Page 43 of 132
Turn Signals
Push the multifunction lever upward to signal a right turn or downward to signal a left
turn.The corresponding indicator in the instrument cluster will blink to indicate the op-
eration of the turn signal.
NOTE:
The indicators will automatically turn off when the turn has been completed and the
steering wheel is returned to a straight position.
Lane Change Assist
Tap the lever up or down once, without moving beyond the detent, and the turn signal
(right or left) will flash three times then automatically turn off.
Follow Me Home/Headlight Delay
When this feature is selected the driver can choose to have the headlights remain on for
a preset period of time.
Activation
Remove the key or turn the ignition to the OFF/LOCK position, and pull the multifunc-
tion lever toward the steering wheel, within two minutes.Each time the lever is pulled,
the activation of the lights will be extended by 30 seconds.The activation of the lights
can be extended to a maximum of 210 seconds.
Deactivation
Pull the multifunction lever toward the steering wheel and hold it for more than two
seconds.
Interior Lights
The interior light switches are located in the overhead console.The interior lights can be
set to three different positions (Off/Left Position, Center Position, On/Right Position).
Using the switch on the left overhead, push the switch to the right from its center posi-
tion and the lights are always on.Push the switch to the left from its center position and
the lights are always off.Leave the switch in the center position, and the lights are turned
on and off when the doors are opened or closed.The switch on the right side of the
overhead console controls the map or reading function of the lights.Push the switch to
the right to turn on the right light and push the switch to the left to turn on the left
light.
CAUTION!
Before getting out of the vehicle be sure that the switch is in the center position or
that the lights are off to avoid draining the battery.
OPERATING YOUR VEHICLE
41
Page 44 of 132
Interior Light Timing (Center Position)
There are four different modes of operation that can be activated in this position:
•When one door is opened a three minute timer is activated.
•When the key is removed from the ignition (within two minutes of the ignition being
turned off ), a 10 second timer is activated.
•When the doors are unlocked with the Key Fob a 10 second timer is activated.
•When the doors are locked with the Key Fob the lights will turn off.
Interior Light Timing (On/Right Position)
•When all doors are closed a 15 minute timer is activated.
NOTE:
The timer is deactivated when the key is moved into the ON/RUN position.
Fog Lights — If Equipped
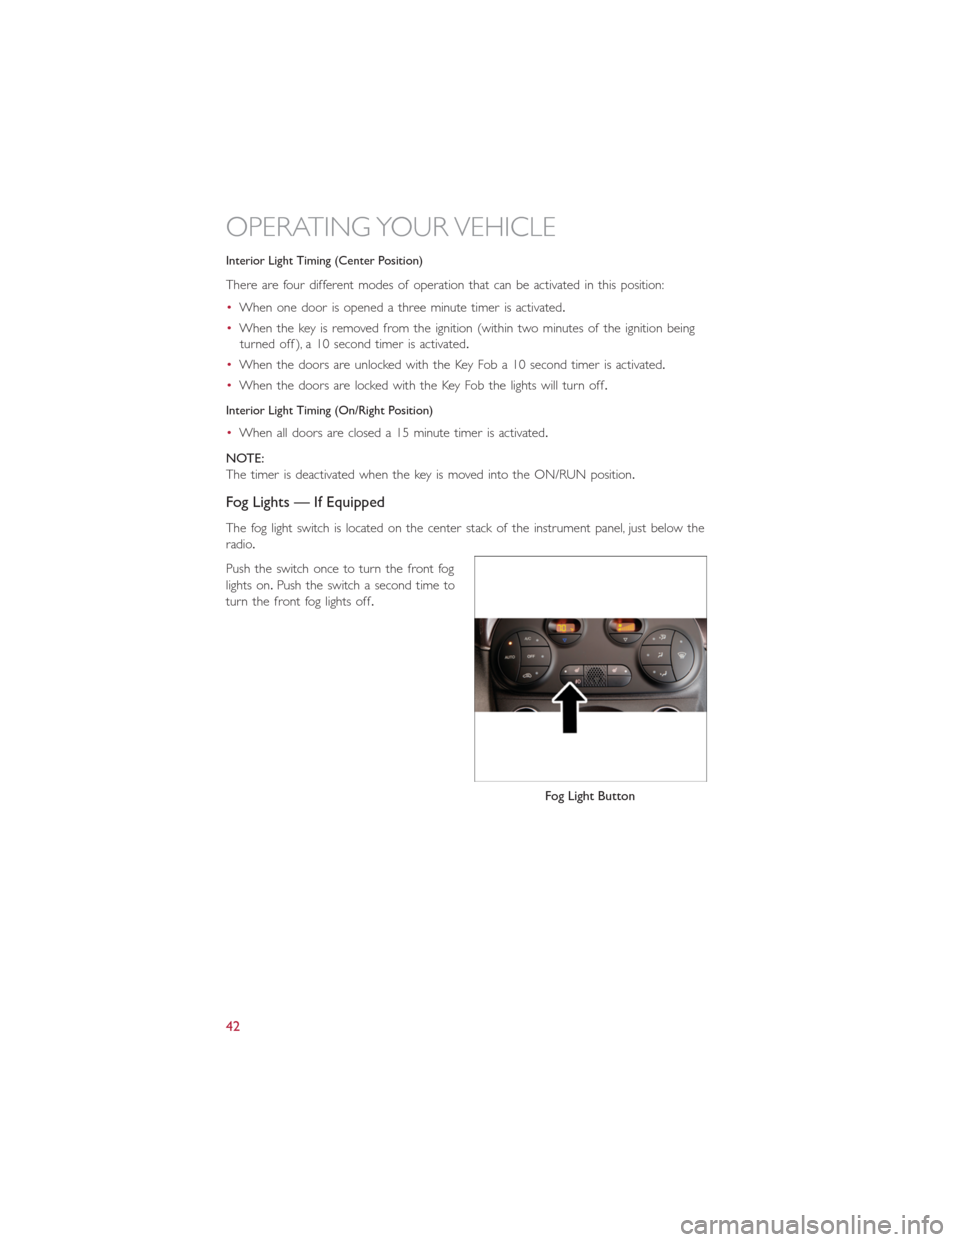
The fog light switch is located on the center stack of the instrument panel, just below the
radio.
Push the switch once to turn the front fog
lights on.Push the switch a second time to
turn the front fog lights off.
Fog Light Button
OPERATING YOUR VEHICLE
42
Page 45 of 132
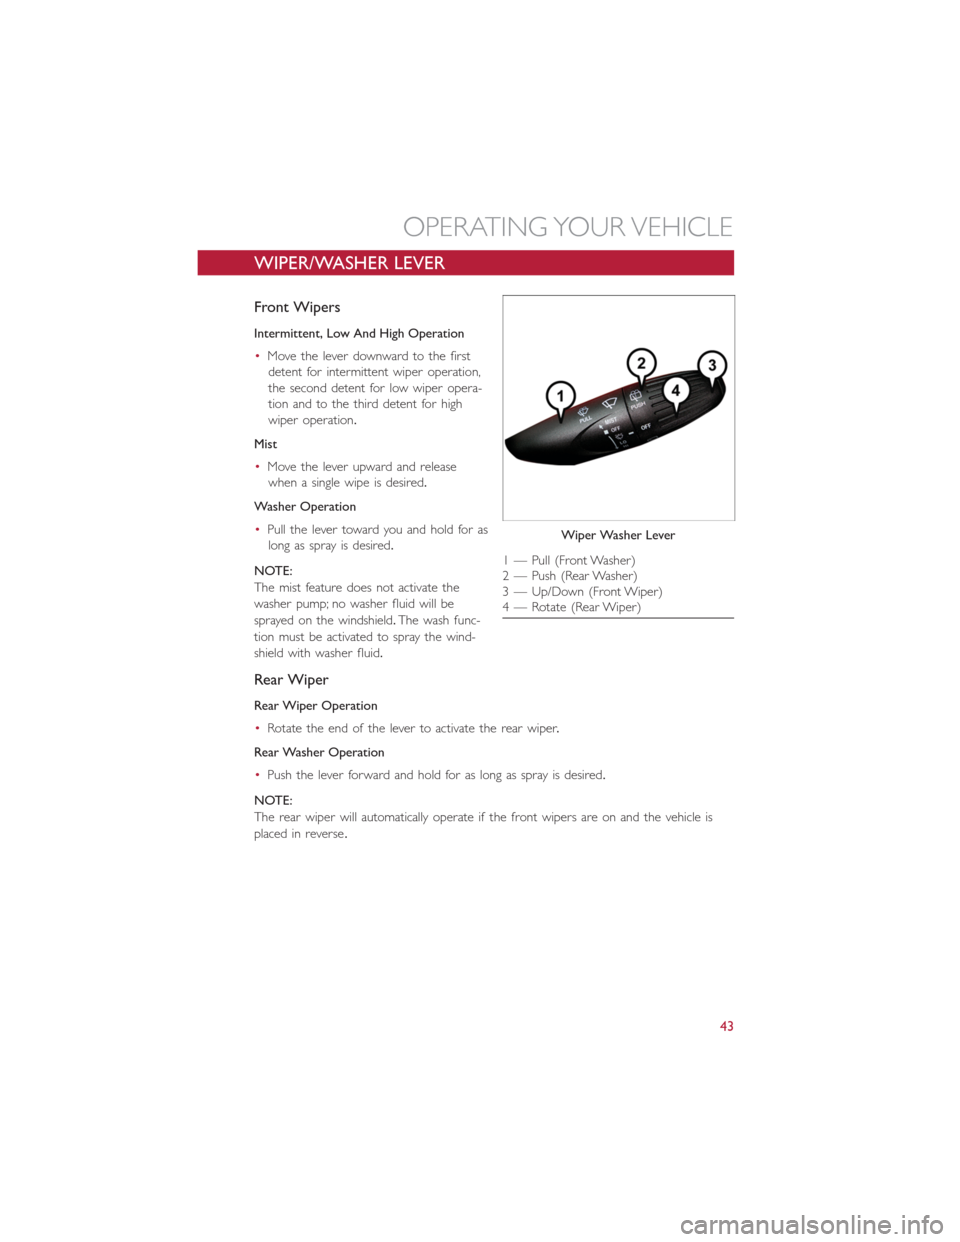
WIPER/WASHER LEVER
Front Wipers
Intermittent, Low And High Operation
•Move the lever downward to the first
detent for intermittent wiper operation,
the second detent for low wiper opera-
tion and to the third detent for high
wiper operation.
Mist
•Move the lever upward and release
when a single wipe is desired.
Washer Operation
•Pull the lever toward you and hold for as
long as spray is desired.
NOTE:
The mist feature does not activate the
washer pump; no washer fluid will be
sprayed on the windshield.The wash func-
tion must be activated to spray the wind-
shield with washer fluid.
Rear Wiper
Rear Wiper Operation
•Rotate the end of the lever to activate the rear wiper.
Rear Washer Operation
•Push the lever forward and hold for as long as spray is desired.
NOTE:
The rear wiper will automatically operate if the front wipers are on and the vehicle is
placed in reverse.
Wiper Washer Lever
1 — Pull (Front Washer)
2 — Push (Rear Washer)
3 — Up/Down (Front Wiper)
4 — Rotate (Rear Wiper)
OPERATING YOUR VEHICLE
43
Page 46 of 132
ELECTRONIC SPEED CONTROL
When engaged, the Electronic Speed Control takes over accelerator operations at speeds
greater than 25 mph (40 km/h).
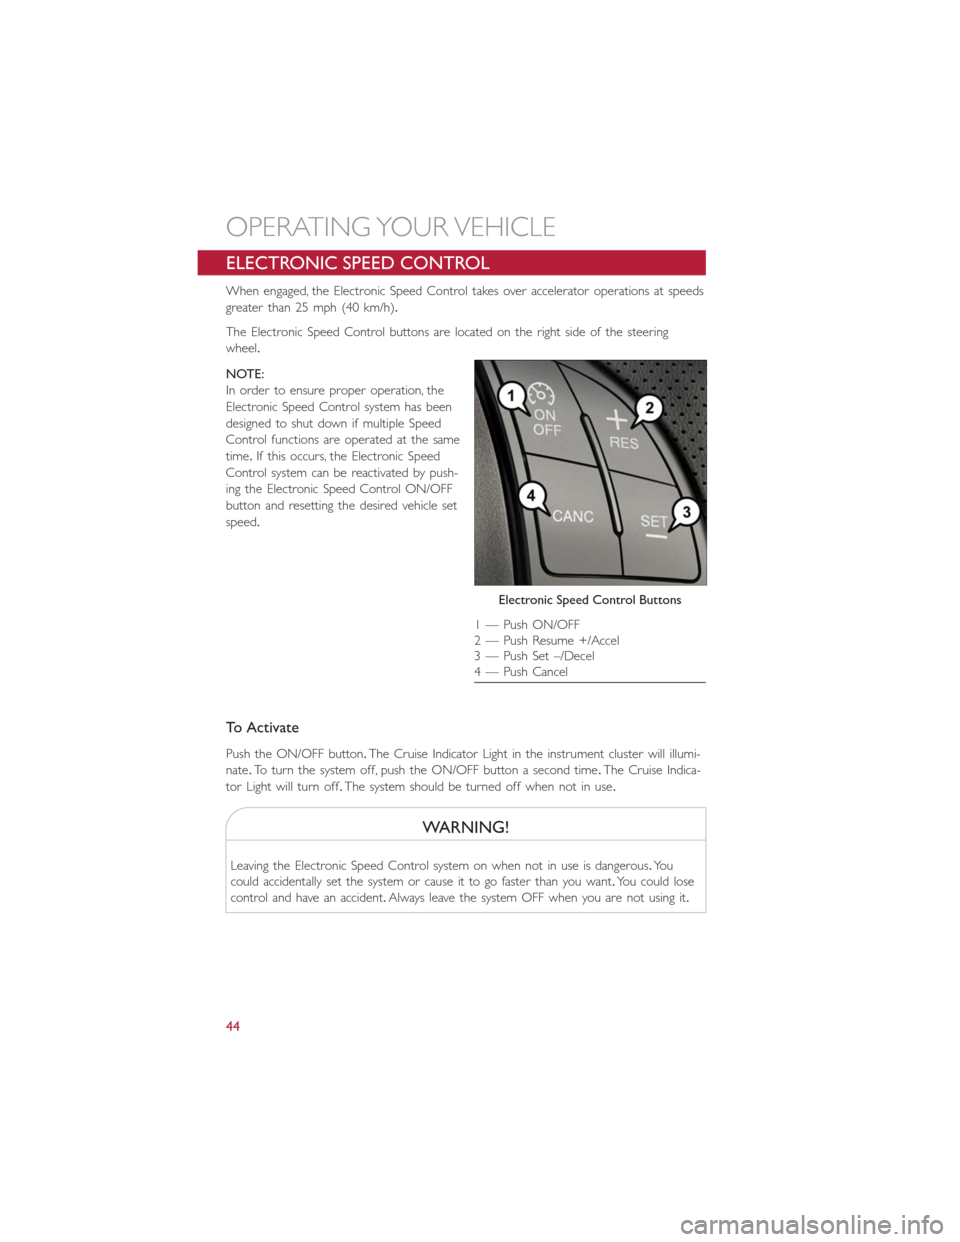
The Electronic Speed Control buttons are located on the right side of the steering
wheel.
NOTE:
In order to ensure proper operation, the
Electronic Speed Control system has been
designed to shut down if multiple Speed
Control functions are operated at the same
time.If this occurs, the Electronic Speed
Control system can be reactivated by push-
ing the Electronic Speed Control ON/OFF
button and resetting the desired vehicle set
speed.
To Activate
Push the ON/OFF button.The Cruise Indicator Light in the instrument cluster will illumi-
nate.To turn the system off, push the ON/OFF button a second time.The Cruise Indica-
tor Light will turn off.The system should be turned off when not in use.
WARNING!
Leaving the Electronic Speed Control system on when not in use is dangerous.Yo u
could accidentally set the system or cause it to go faster than you want.You could lose
control and have an accident.Always leave the system OFF when you are not using it.
Electronic Speed Control Buttons
1 — Push ON/OFF
2 — Push Resume +/Accel
3 — Push Set –/Decel
4 — Push Cancel
OPERATING YOUR VEHICLE
44
Page 47 of 132
To Set A Desired Speed
Turn the Electronic Speed Control ON.When the vehicle has reached the desired speed,
push the SET (-) button and release.Release the accelerator and the vehicle will operate
at the selected speed.
NOTE:
The vehicle should be traveling at a steady speed and on level ground before pushing the
SET (-) button.
To Deactivate
A soft tap on the brake pedal, pushing the CANC button, or normal brake pressure
while slowing the vehicle will deactivate Electronic Speed Control without erasing the set
speed memory.Pushing the ON/OFF button or turning the ignition switch OFF erases
the set speed in memory.
To Resume Speed
To resume a previously set speed, push the RES (+) button and release.Resume can be
used at any speed above 20 mph (32 km/h).
To Vary The Speed Setting
To Increase Speed
When the Electronic Speed Control is set, you can increase speed by pushing the
RES (+) button.
The drivers preferred units can be selected through the instrument panel settings if
equipped.Refer to “Understanding Your Instrument Panel” in the Owner’s Manual on the
DVD for more information.The speed increment shown is dependent on the selected
speed unit of U.S.(mph) or Metric (km/h):
U.S. Speed (mph)
•Pushing the RES (+) button once will result in a 1 mph increase in set speed.Each
subsequent tap of the button results in an increase of 1 mph.
•If the button is continually pushed, the set speed will continue to increase until the
button is released, then the new set speed will be established.
Metric Speed (km/h)
•Pushing the RES (+) button once will result in a 1 km/h increase in set speed.Each
subsequent tap of the button results in an increase of 1 km/h.
•If the button is continually pushed, the set speed will continue to increase until the
button is released, then the new set speed will be established.
To Decrease Speed
When the Electronic Speed Control is set, you can decrease speed by pushing the
SET (-) button.
OPERATING YOUR VEHICLE
45
Page 48 of 132
The drivers preferred units can be selected through the instrument panel settings if
equipped.Refer to “Understanding Your Instrument Panel” in the Owner’s Manual on the
DVD for more information.The speed decrement shown is dependant on the selected
speed unit of U.S.(mph) or Metric (km/h):
U.S. Speed (mph)
•Pushing the SET (-) button once will result in a 1 mph decrease in set speed.Each
subsequent tap of the button results in a decrease of 1 mph.
•If the button is continually pushed, the set speed will continue to decrease until the
button is released, then the new set speed will be established.
Metric Speed (km/h)
•Pushing the SET (-) button once will result in a 1 km/h decrease in set speed.Each
subsequent tap of the button results in a decrease of 1 km/h.
•If the button is continually pushed, the set speed will continue to decrease until the
button is released, then the new set speed will be established.
To Accelerate For Passing
Press the accelerator as you would normally.When the pedal is released, the vehicle will
return to the set speed.
Using Electronic Speed Control On Hills
NOTE:
The Electronic Speed Control system maintains speed up and down hills.A slight speed
change on moderate hills is normal.
On steep hills, a greater speed loss or gain may occur so it may be preferable to drive
without Electronic Speed Control.
WARNING!
Electronic Speed Control can be dangerous where the system cannot maintain a con-
stant speed.Your vehicle could go too fast for the conditions, and you could lose con-
trol and have an accident.Do not use Electronic Speed Control in heavy traffic or on
roads that are winding, icy, snow-covered or slippery.
OPERATING YOUR VEHICLE
46
Page 49 of 132
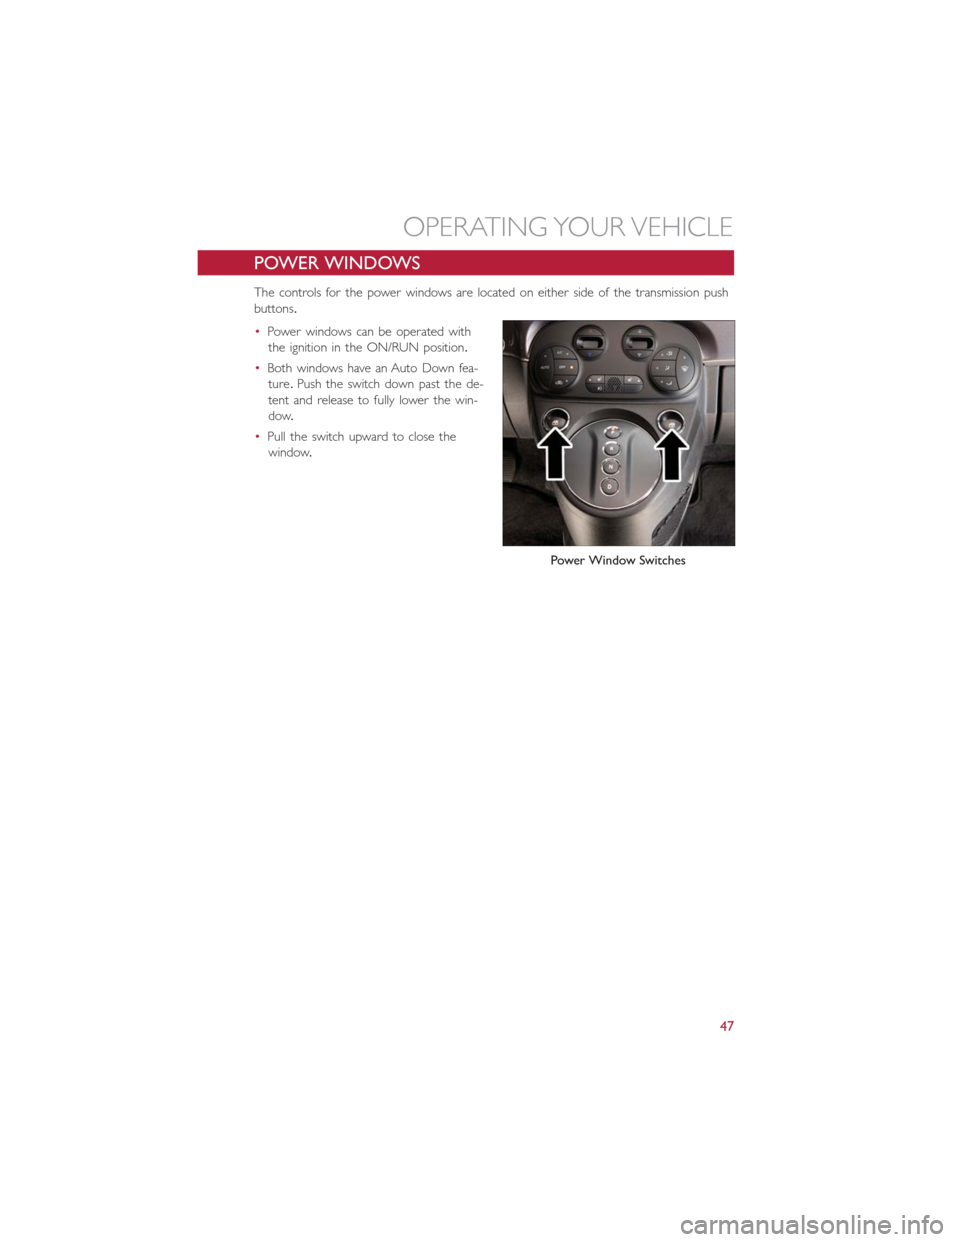
POWER WINDOWS
The controls for the power windows are located on either side of the transmission push
buttons.
•Power windows can be operated with
the ignition in the ON/RUN position.
•Both windows have an Auto Down fea-
ture.Push the switch down past the de-
tent and release to fully lower the win-
dow.
•Pull the switch upward to close the
window.
Power Window Switches
OPERATING YOUR VEHICLE
47
Page 50 of 132
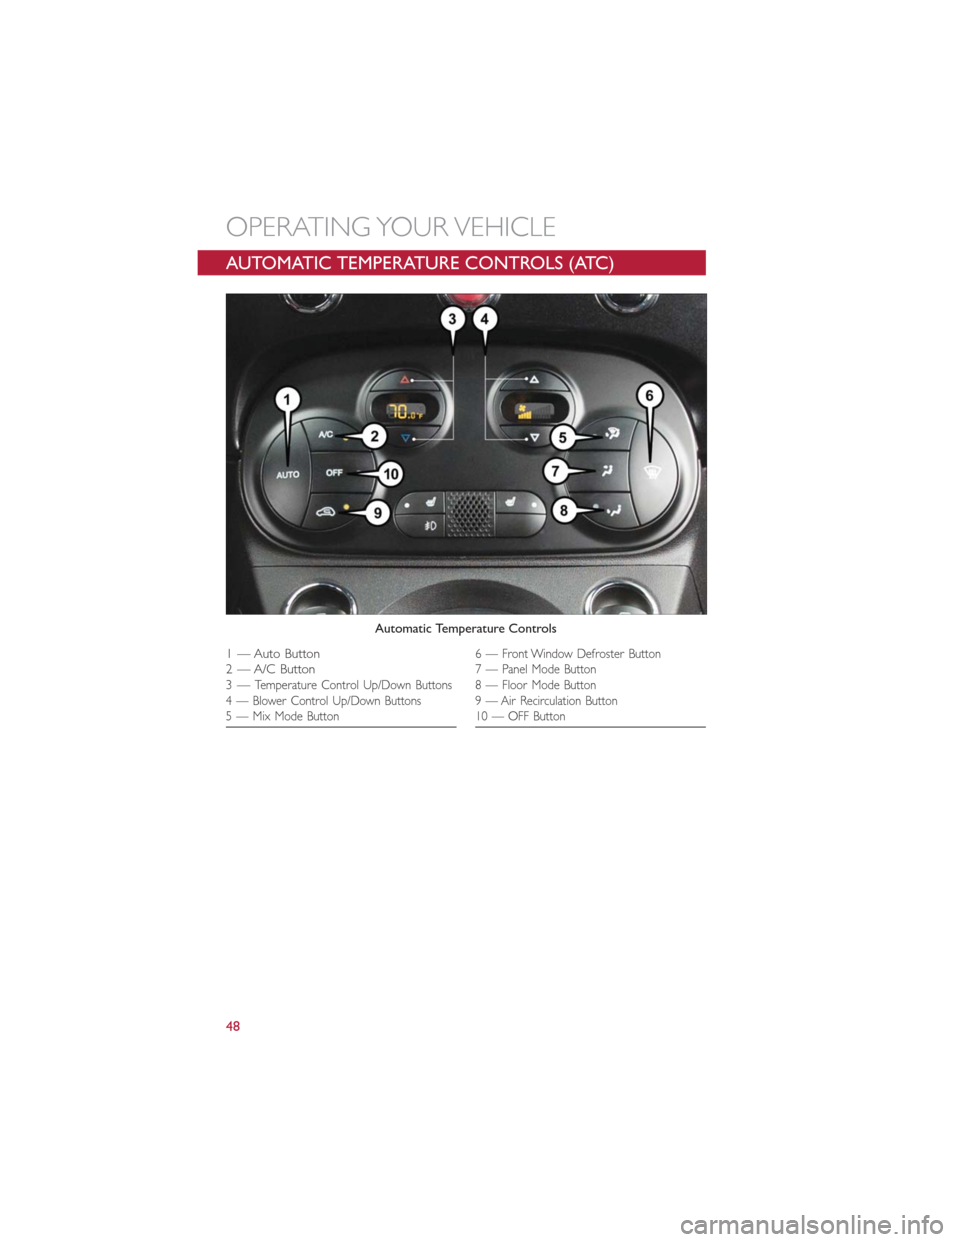
AUTOMATIC TEMPERATURE CONTROLS (ATC)
Automatic Temperature Controls
1 — Auto Button
2 — A/C Button
3—
Temperature Control Up/Down Buttons
4 — Blower Control Up/Down Buttons
5 — Mix Mode Button
6 — Front Window Defroster Button
7 — Panel Mode Button
8 — Floor Mode Button
9 — Air Recirculation Button
10 — OFF Button
OPERATING YOUR VEHICLE
48