buttons FIAT 500E 2016 2.G User Guide
[x] Cancel search | Manufacturer: FIAT, Model Year: 2016, Model line: 500E, Model: FIAT 500E 2016 2.GPages: 132, PDF Size: 4.59 MB
Page 9 of 132
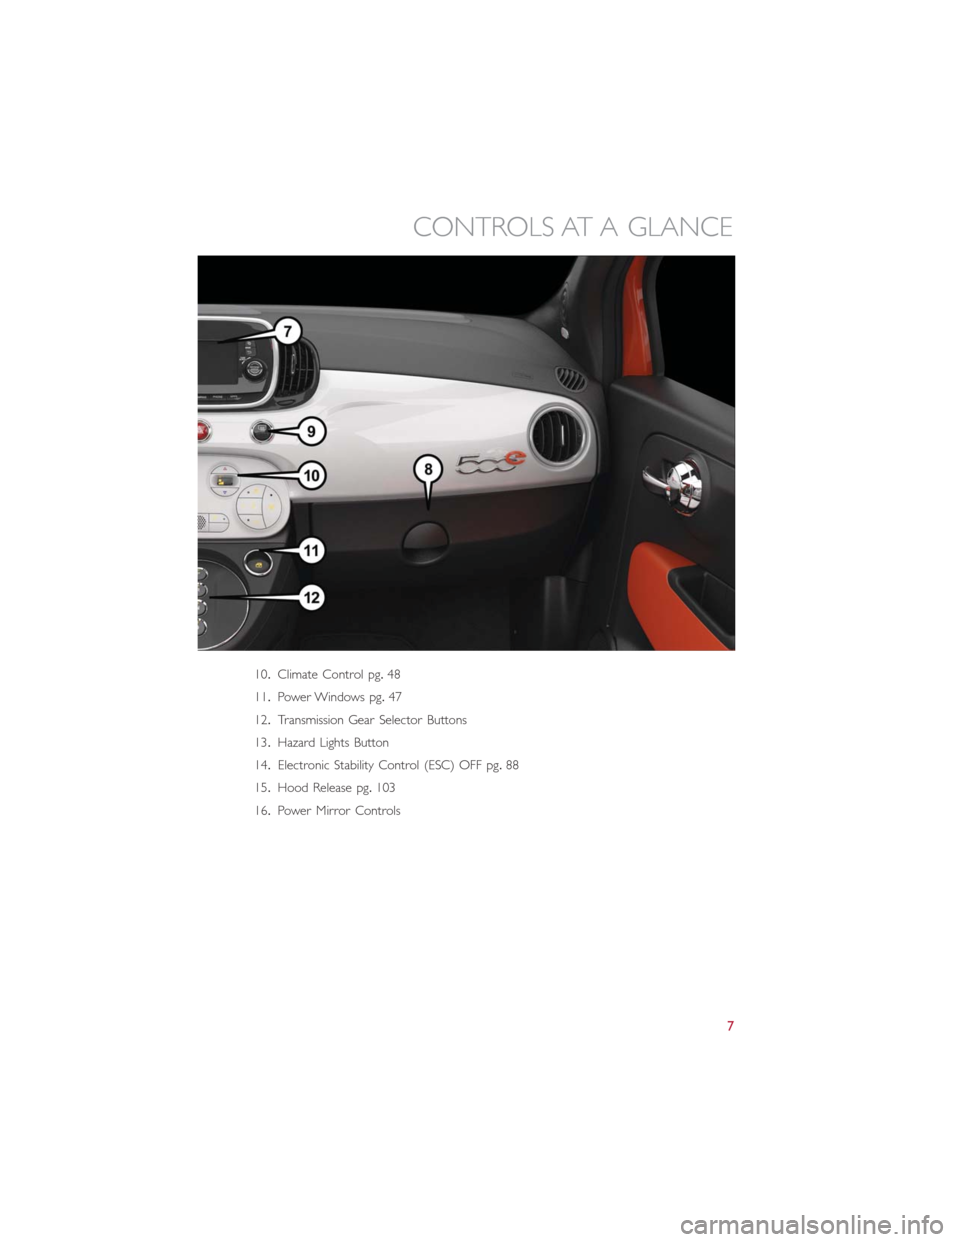
10.Climate Control pg.48
11.Power Windows pg.47
12.Transmission Gear Selector Buttons
13.Hazard Lights Button
14.Electronic Stability Control (ESC) OFF pg.88
15.Hood Release pg.103
16.Power Mirror Controls
CONTROLS AT A GLANCE
7
Page 21 of 132
STARTING YOUR 500e
•Before starting your vehicle, adjust your seat, adjust both inside and outside mirrors,
and fasten your seat belts.
WARNING!
•Never leave children alone in a vehicle, or with access to an unlocked vehicle.
•Allowing children to be in a vehicle unattended is dangerous for a number of rea-
sons.A child or others could be seriously or fatally injured.Children should be
warned not to touch the parking brake, brake pedal or the transmission gear se-
lector buttons.
•Do not leave the key fob in or near the vehicle (or in a location accessible to chil-
dren).A child could operate power windows, other controls, or move the vehicle.
NOTE:
Make sure the EVSE is not plugged into the vehicle.
•Turn the key to the START position while your vehicle is in PARK.When the ignition
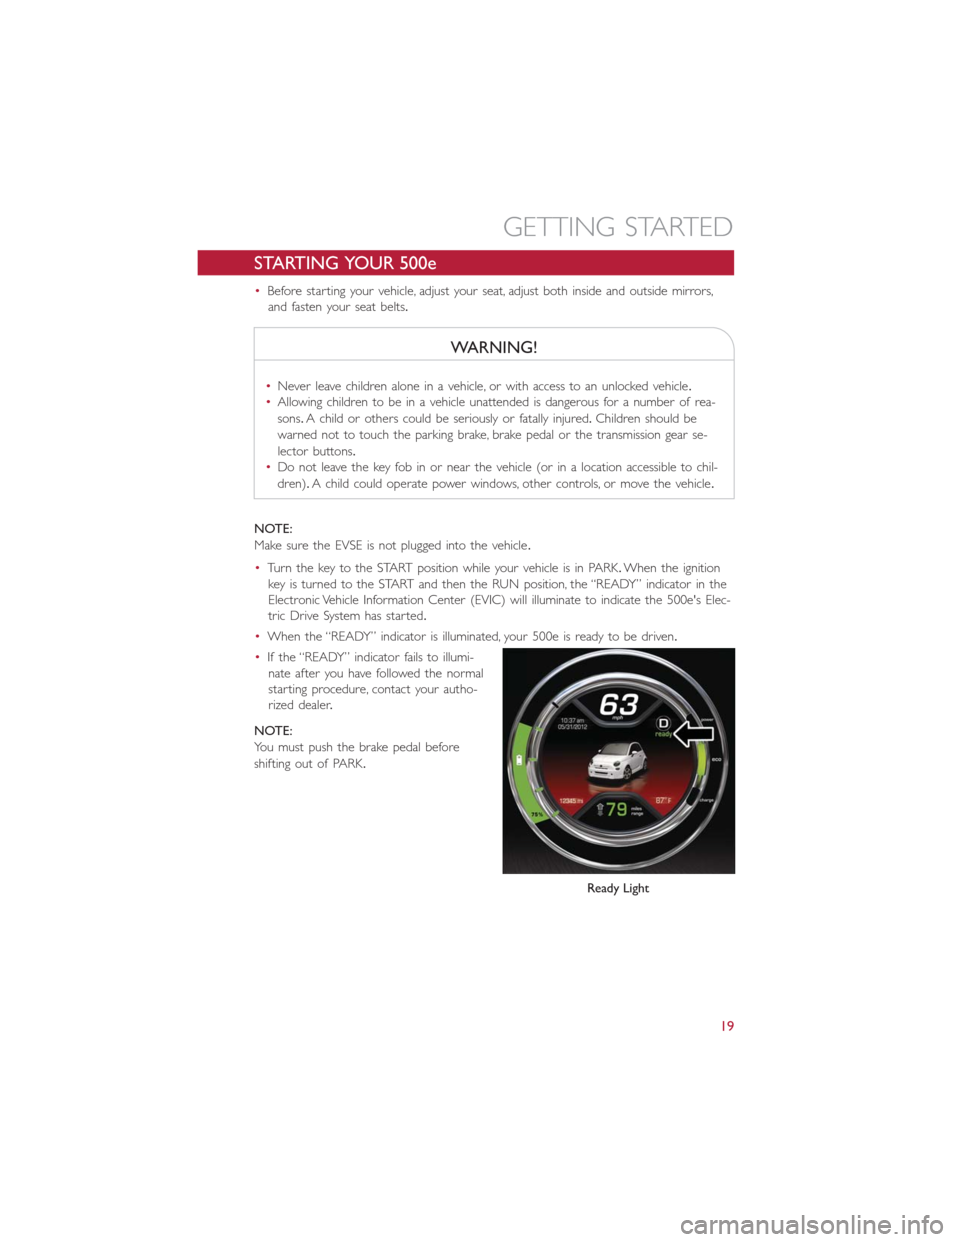
key is turned to the START and then the RUN position, the “READY” indicator in the
Electronic Vehicle Information Center (EVIC) will illuminate to indicate the 500e's Elec-
tric Drive System has started.
•When the “READY” indicator is illuminated, your 500e is ready to be driven.
•If the “READY” indicator fails to illumi-
nate after you have followed the normal
starting procedure, contact your autho-
rized dealer.
NOTE:
You must push the brake pedal before
shifting out of PARK.
Ready Light
GETTING STARTED
19
Page 46 of 132
ELECTRONIC SPEED CONTROL
When engaged, the Electronic Speed Control takes over accelerator operations at speeds
greater than 25 mph (40 km/h).
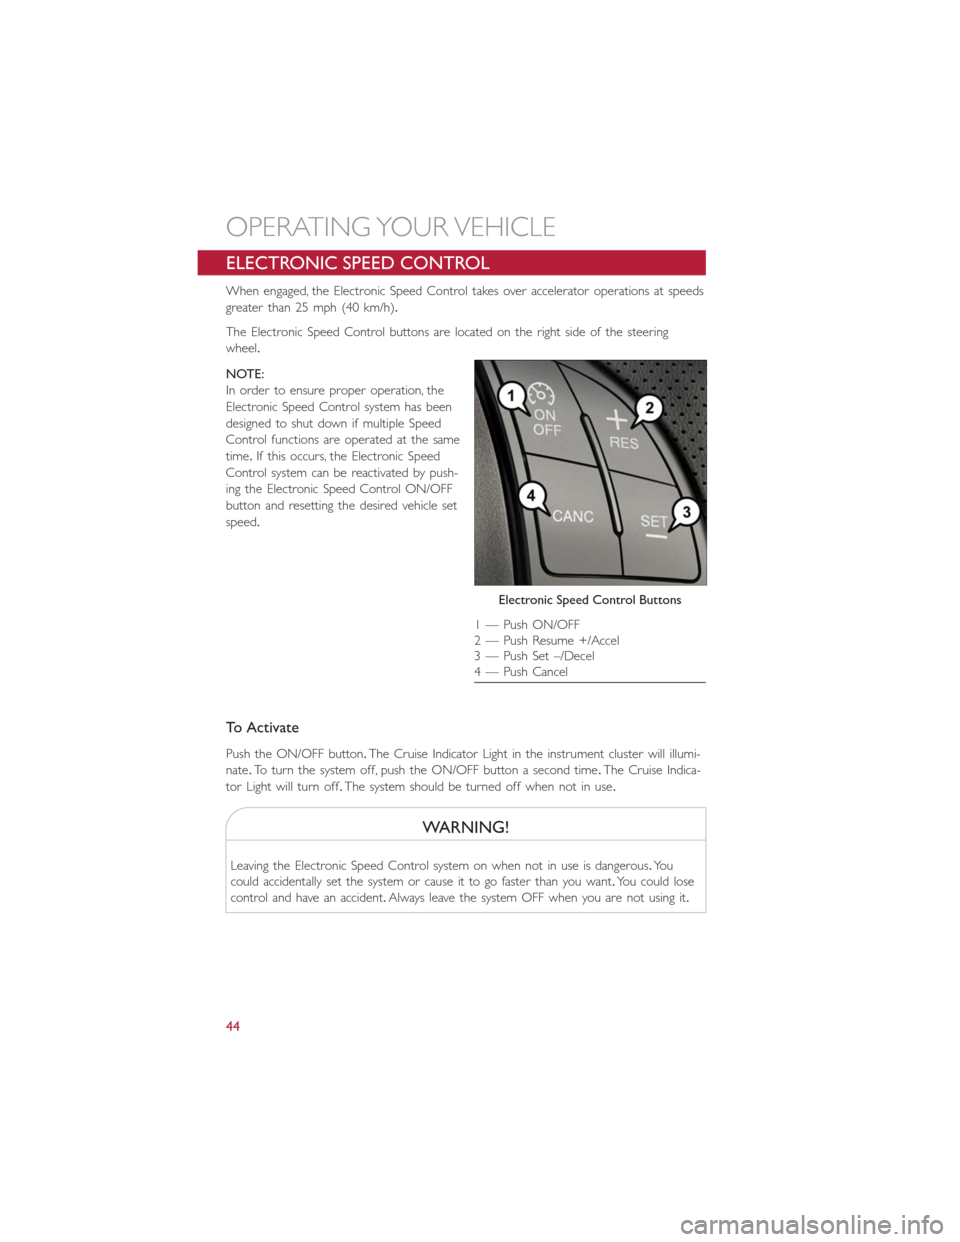
The Electronic Speed Control buttons are located on the right side of the steering
wheel.
NOTE:
In order to ensure proper operation, the
Electronic Speed Control system has been
designed to shut down if multiple Speed
Control functions are operated at the same
time.If this occurs, the Electronic Speed
Control system can be reactivated by push-
ing the Electronic Speed Control ON/OFF
button and resetting the desired vehicle set
speed.
To Activate
Push the ON/OFF button.The Cruise Indicator Light in the instrument cluster will illumi-
nate.To turn the system off, push the ON/OFF button a second time.The Cruise Indica-
tor Light will turn off.The system should be turned off when not in use.
WARNING!
Leaving the Electronic Speed Control system on when not in use is dangerous.Yo u
could accidentally set the system or cause it to go faster than you want.You could lose
control and have an accident.Always leave the system OFF when you are not using it.
Electronic Speed Control Buttons
1 — Push ON/OFF
2 — Push Resume +/Accel
3 — Push Set –/Decel
4 — Push Cancel
OPERATING YOUR VEHICLE
44
Page 49 of 132
POWER WINDOWS
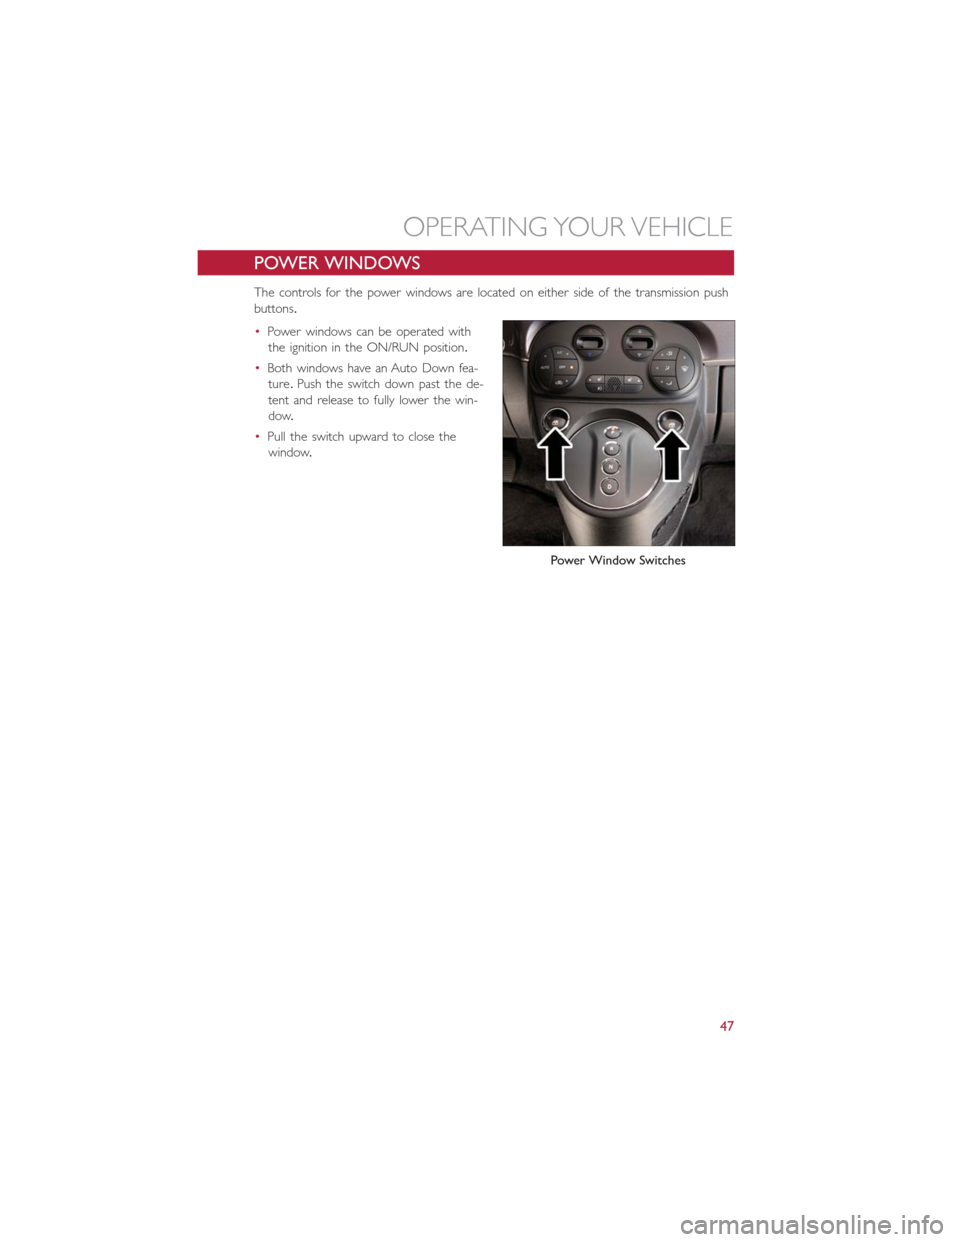
The controls for the power windows are located on either side of the transmission push
buttons.
•Power windows can be operated with
the ignition in the ON/RUN position.
•Both windows have an Auto Down fea-
ture.Push the switch down past the de-
tent and release to fully lower the win-
dow.
•Pull the switch upward to close the
window.
Power Window Switches
OPERATING YOUR VEHICLE
47
Page 50 of 132
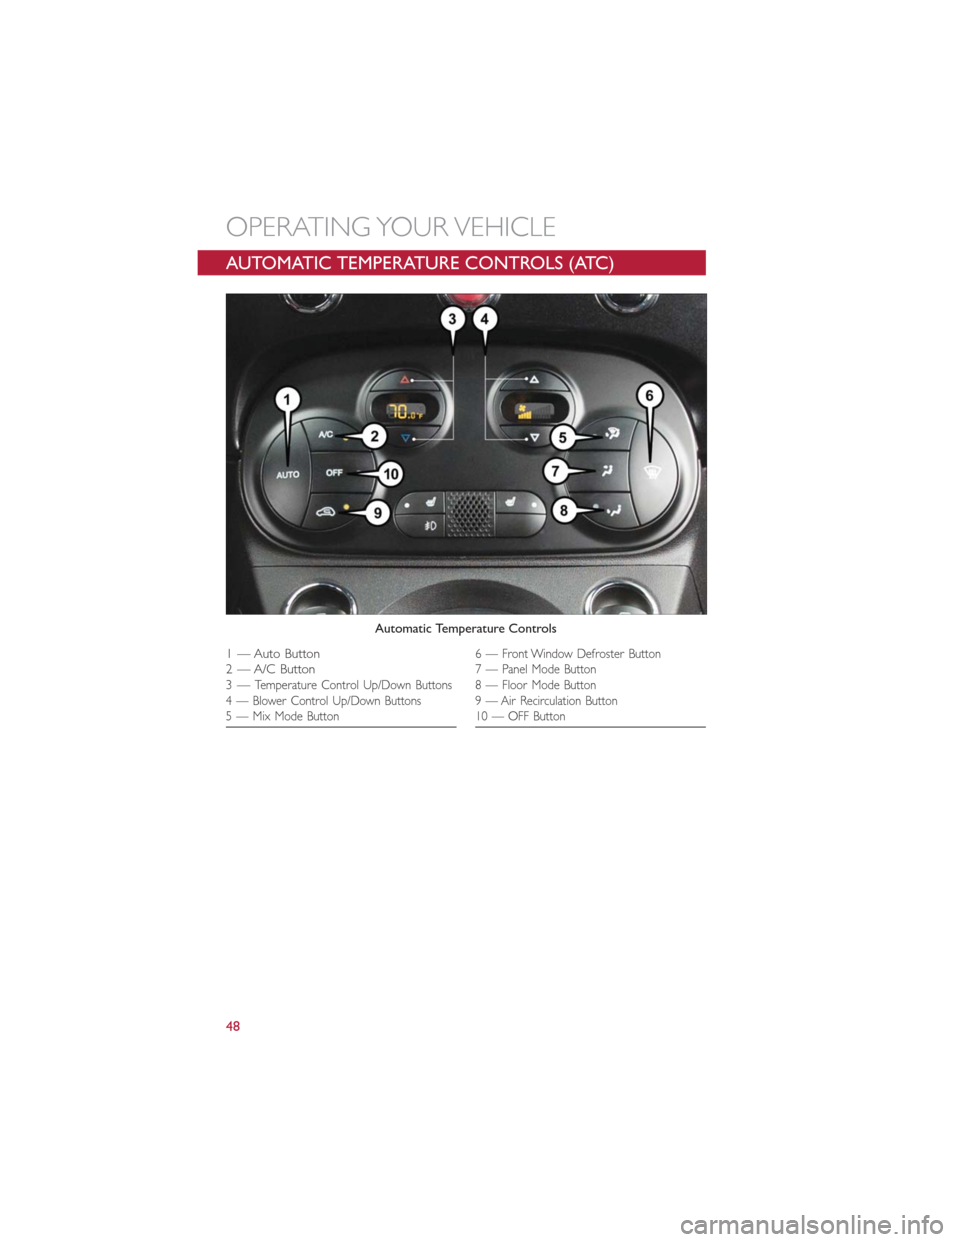
AUTOMATIC TEMPERATURE CONTROLS (ATC)
Automatic Temperature Controls
1 — Auto Button
2 — A/C Button
3—
Temperature Control Up/Down Buttons
4 — Blower Control Up/Down Buttons
5 — Mix Mode Button
6 — Front Window Defroster Button
7 — Panel Mode Button
8 — Floor Mode Button
9 — Air Recirculation Button
10 — OFF Button
OPERATING YOUR VEHICLE
48
Page 51 of 132
Automatic Operation
1.Push the AUTO button.
2.Select the desired temperature by pushing the temperature control buttons.
NOTE:
The system will maintain the set temperature automatically.
Air Recirculation
•Use recirculation for maximum A/C operation.
•For window defogging, turn the air recirculation button off.
Heated Mirrors
The mirrors are heated to melt frost or ice.This feature is activated when you turn on the
rear window defroster, which is located in the center of the instrument panel, below the radio.
REAR PARK ASSIST
If an object is detected behind the rear bumper while the vehicle is in REVERSE, a chime
will sound.The chime rate will change depending on the distance of the object, getting
faster as the object gets closer to the bumper.The chime will become continuous when
the distance between the vehicle and the obstacle is less than 12 inches (30 cm).
OPERATING YOUR VEHICLE
49
Page 58 of 132
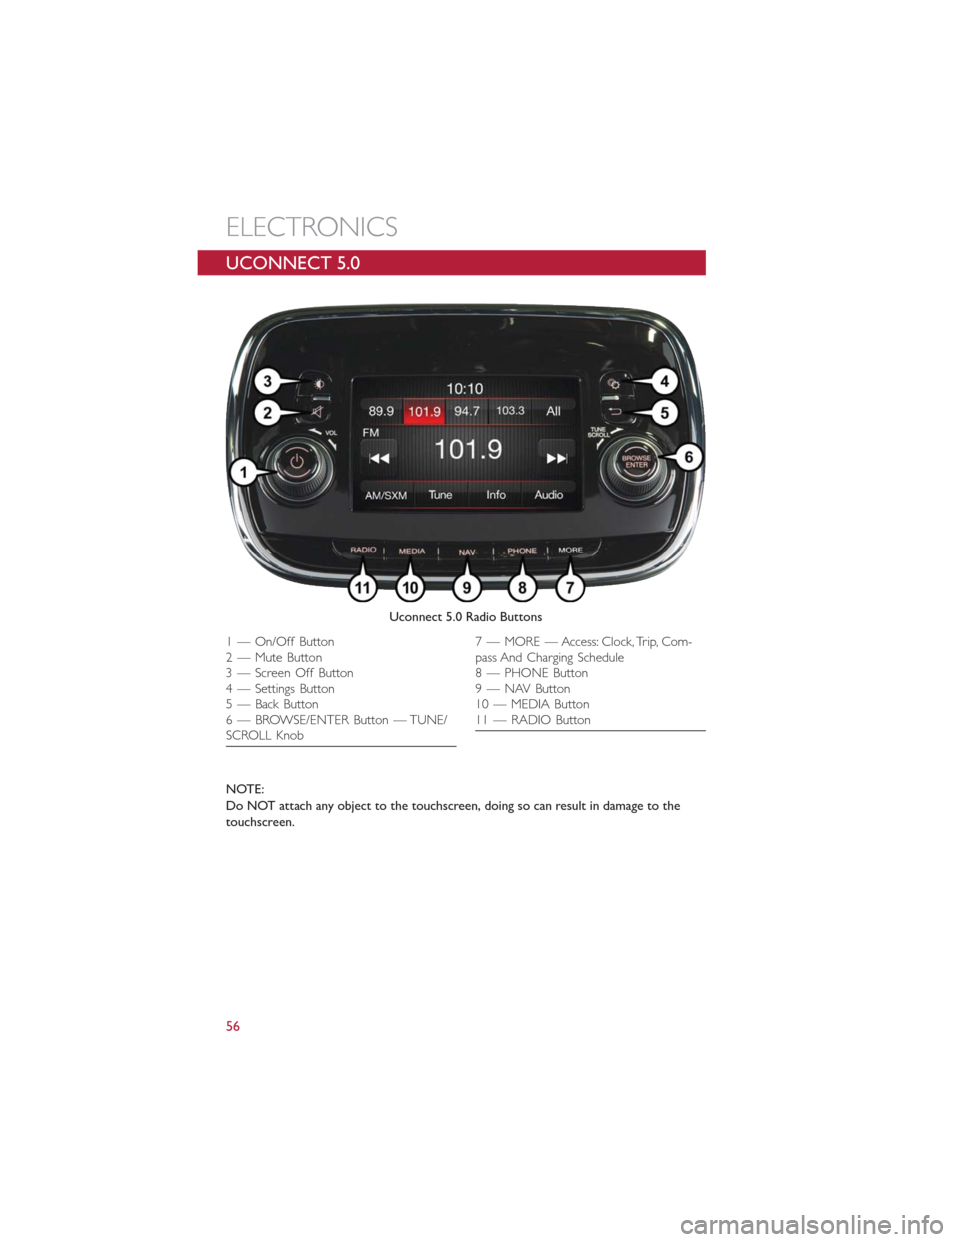
UCONNECT 5.0
NOTE:
Do NOT attach any object to the touchscreen, doing so can result in damage to the
touchscreen.
Uconnect 5.0 Radio Buttons
1 — On/Off Button
2 — Mute Button
3 — Screen Off Button
4 — Settings Button
5 — Back Button
6 — BROWSE/ENTER Button — TUNE/
SCROLL Knob7 — MORE — Access: Clock, Trip, Com-
pass And Charging Schedule
8 — PHONE Button
9 — NAV Button
10 — MEDIA Button
11 — RADIO Button
ELECTRONICS
56
Page 59 of 132
Clock Setting
To start the clock setting procedure:
1.Push the Settings button on the faceplate and then press the “Clock and Date” button
on the touchscreen.
2.Press the “Set Time” button on the touchscreen.
3.Press the “Up” or “Down” arrows to adjust the hours or minutes, then select the
“AM” or “PM” button on the touchscreen.You can also select 12hr or 24hr format by
pressing the desired button on the touchscreen.
4.Once the time is set press the “Done” button on the touchscreen to exit the time
screen.
NOTE:
In the Clock Setting Menu you can also select Display Clock.Display Clock turns the
clock display in the status bar on or off.
Equalizer, Balance And Fade
1.Push the Settings button on the faceplate.
2.Scroll down and press the “Audio” button on the touchscreen to open the Audio
menu.
3.The Audio Menu shows the following options for you to customize your audio set-
tings.
Equalizer
Press the “Equalizer” button on the touchscreen to adjust the Bass, Mid and Treble.Use
the “+” or “-” button on the touchscreen to adjust the equalizer to your desired settings.
Balance/Fade
Press the “Balance/Fade” button on the touchscreen to adjust the sound from the speak-
ers.Use the arrow buttons on the touchscreen to adjust the sound level from the front
and rear or right and left side speakers.Press the Center “C” button on the touchscreen
to reset the balance and fade to the factory setting.
Speed Adjusted Volume
Press the “Speed Adjusted Volume” button on the touchscreen to select between OFF, 1,
2or3.This will decrease the radio volume relative to a decrease in vehicle speed.
Surround Sound
Press the “Surround Sound” button on the touchscreen, select On or Off followed by
pressing the back arrow button on the touchscreen.When this feature is activated, it pro-
vides simulated surround sound mode.
ELECTRONICS
57
Page 60 of 132
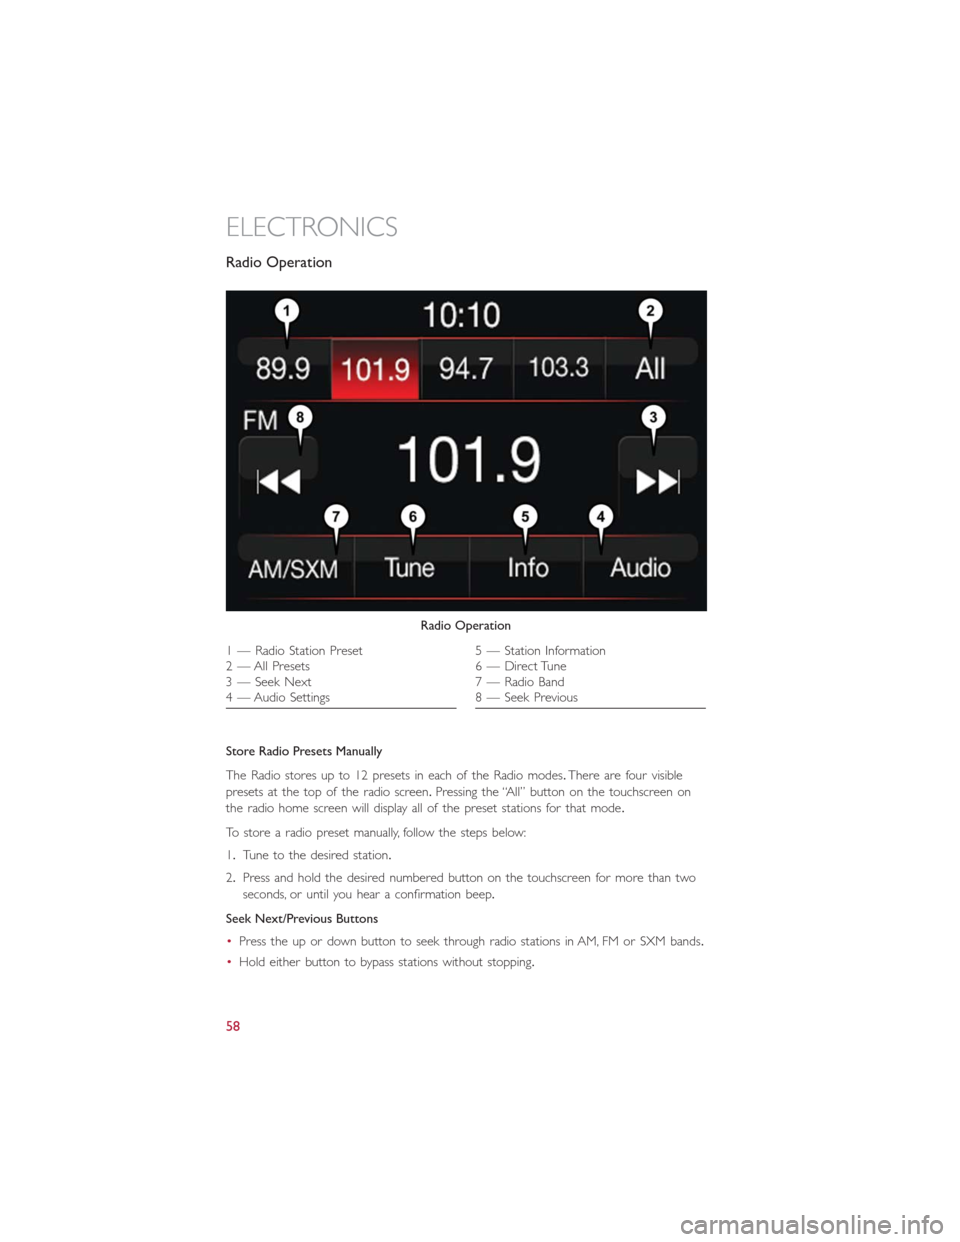
Radio Operation
Store Radio Presets Manually
The Radio stores up to 12 presets in each of the Radio modes.There are four visible
presets at the top of the radio screen.Pressing the “All” button on the touchscreen on
the radio home screen will display all of the preset stations for that mode.
To store a radio preset manually, follow the steps below:
1.Tune to the desired station.
2.Press and hold the desired numbered button on the touchscreen for more than two
seconds, or until you hear a confirmation beep.
Seek Next/Previous Buttons
•Press the up or down button to seek through radio stations in AM, FM or SXM bands.
•Hold either button to bypass stations without stopping.
Radio Operation
1 — Radio Station Preset
2 — All Presets
3 — Seek Next
4 — Audio Settings5 — Station Information
6 — Direct Tune
7 — Radio Band
8 — Seek Previous
ELECTRONICS
58
Page 62 of 132
PRE-DEFINED VOICE TEXT REPLY RESPONSES
Ye s.Stuck in Traffic.See you later.
No.Start without me.I’ll be Late.
Okay.Where are you?
I will be
late.
Call me.Are you there yet?
I’ll call you later.I need directions.
See you in
minutes.
I’m on my way.
Can’t talk right now.
I’m lost.Thanks.
NOTE:
Voice texting reply and voice texting features require a compatible mobile device enabled
with Bluetooth Message Access Profile (MAP).iPhone and some other smartphones do
not currently support Bluetooth MAP.Visit UconnectPhone.com for system and device
compatibility.
Want to dictate a personal message? You must first register with Uconnect Access (U.S.
residents only) to take advantage of a new, cloud-based Voice Texting service, an enhance-
ment to Voice Text Reply.
USB/AUX CONTROL
To select a specific audio source, push the
MEDIA button on the faceplate.To allow
music to play from your portable device
through the vehicle’s speakers, press the
“Source” button then select one of the
following modes:
USB/iPod
•USB/iPod Mode is entered by either in-
serting a USB Jump Drive or iPod cable
into the USB port or by pushing the
MEDIA button on the faceplate located
left of the display.
Audio Jack (AUX)
•The AUX allows a portable device, such
as an MP3 player or an iPod, to be
plugged into the radio and utilize the vehicle’s audio system, using a 3.5 mm audio
cable, to amplify the source and play through the vehicle speakers.
•The functions of the portable device are controlled using the device buttons, not the
buttons on the radio.The volume may be controlled using the radio or portable
device.
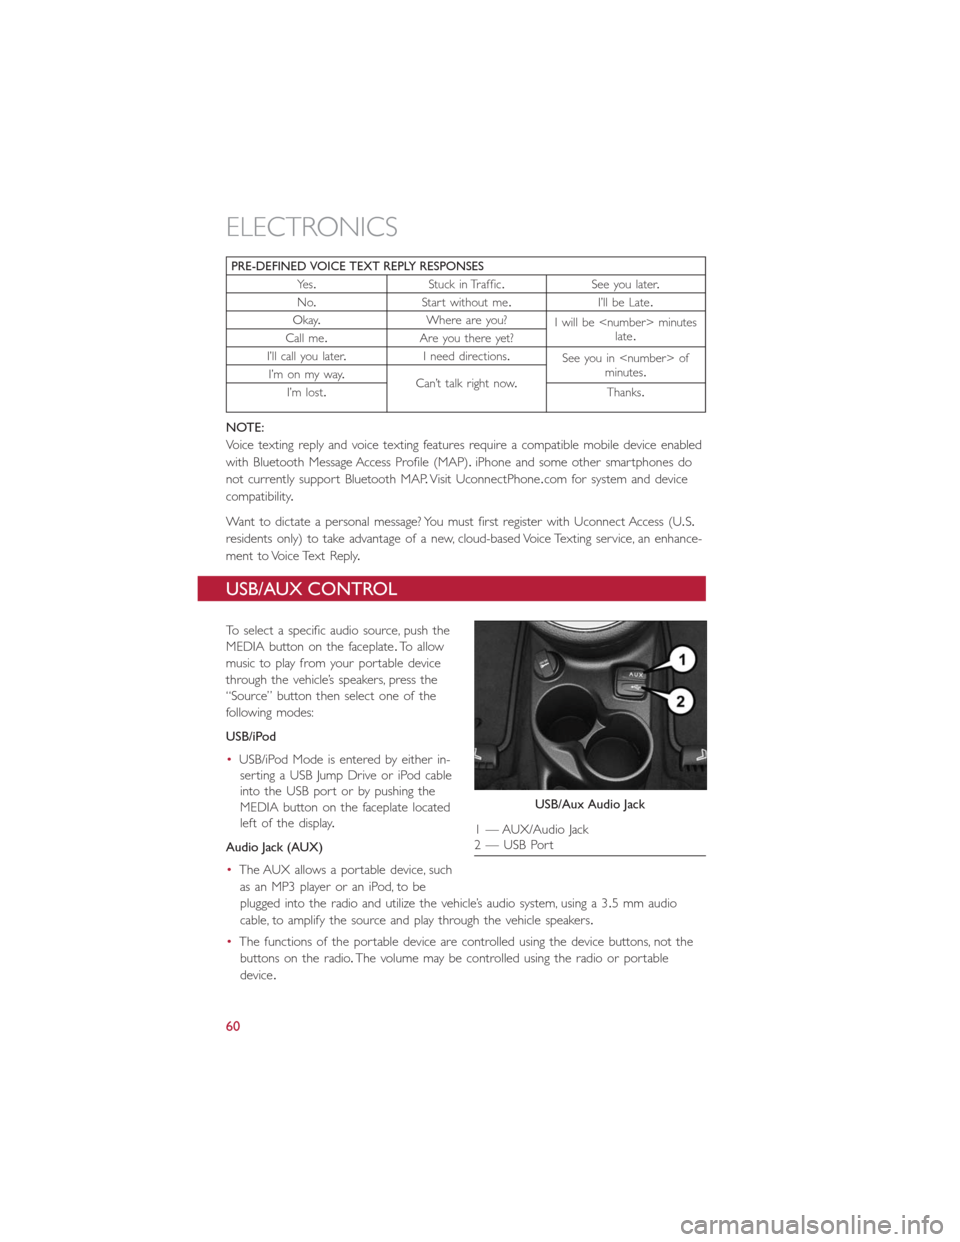
USB/Aux Audio Jack
1 — AUX/Audio Jack
2 — USB Port
ELECTRONICS
60