key FIAT 500L 2014 2.G User Guide
[x] Cancel search | Manufacturer: FIAT, Model Year: 2014, Model line: 500L, Model: FIAT 500L 2014 2.GPages: 116, PDF Size: 4.53 MB
Page 1 of 116
Download a free
Vehicle Information App
by visiting your application store, Keyword (My FIAT), or
scanning the Microsoft Tag. To put Microsoft Tags to work
for you, use your mobile phone’s browser or App store
to download a Microsoft Tag reader, like the free one at
www.gettag.mobi. Then follow the directions to scan the code.
Download a FREE electronic copy
of the Owner’s Manual or Warranty Booklet by visiting
the Owners tab at:
www.fiatusa.com (U.S.)
14BF-926-AA
Fourth Edition REV 2 User Guide
2 014 USER GUIDE
1752732_14d_500L_UG_REV2_041514.indd 14/15/14 8:51 AM
Page 3 of 116
INTRODUCTION/WELCOME
WELCOME FROM FIAT...............2
CONTROLS AT A GLANCE
DRIVER COCKPIT..................4
INSTRUMENT CLUSTER...............6
GETTING STARTED
KEY FOB.......................8
VEHICLE SECURITY ALARM............8
POWER DOOR LOCKS...............9
SEAT BELT......................10
SUPPLEMENTAL RESTRAINT SYSTEM (SRS) —
AIR BAGS......................11
CHILD RESTRAINTS................12
FRONT SEATS....................16
REAR SEATS.....................17
HEATED SEATS...................18
TILT/TELESCOPING STEERING COLUMN...18
OPERATING YOUR VEHICLE
ENGINE BREAK-IN RECOMMENDATIONS...19
TURN SIGNAL/LIGHTS/HIGH BEAM LEVER...19
WIPER/WASHER LEVER..............21
SPEED CONTROL..................22
MANUAL CLIMATE CONTROLS.........24
AUTOMATIC TEMPERATURE CONTROLS
(ATC).........................25
REAR PARK ASSIST.................26
POWER SUNROOF.................26
WIND BUFFETING.................27
EURO TWIN CLUTCH SIX-SPEED
TRANSMISSION...................27
ADDING FUEL...................30
ELECTRONIC STABILITY CONTROL (ESC)...31
ELECTRONICSYOUR VEHICLE'S SOUND SYSTEM.......32
IDENTIFYING YOUR RADIO............34
Uconnect® 5.0...................35
Uconnect® 6.5N..................45
STEERING WHEEL AUDIO CONTROLS.....62
ELECTRONIC VEHICLE INFORMATION
CENTER (EVIC)...................62
PROGRAMMABLE FEATURES...........63UNIVERSAL GARAGE DOOR OPENER
(HomeLink®)....................64
POWER INVERTER.................66
POWER OUTLETS.................67
UTILITYTRAILER TOWING.................68
RECREATIONAL TOWING (BEHIND
MOTORHOME, ETC.)...............68
WHAT TO DO IN EMERGENCIES24-HOUR ROADSIDE ASSISTANCE........69
INSTRUMENT CLUSTER WARNING LIGHTS..69
IF YOUR ENGINE OVERHEATS..........74
JACKING AND TIRE CHANGING.........75
TIREFIT KIT......................81
JUMP-STARTING PROCEDURE..........86
SHIFT LEVER OVERRIDE..............89
TOWING A DISABLED VEHICLE.........90
FREEING A STUCK VEHICLE............91
EVENT DATA RECORDER (EDR).........92
CAP-LESS FUEL FILL FUNNEL...........92
MAINTAINING YOUR VEHICLEOPENING THE HOOD..............93
ENGINE COMPARTMENT.............94
FLUIDS AND CAPACITIES.............95
MAINTENANCE SCHEDULE...........96
FUSES........................100
TIRE PRESSURES.................103
WHEEL AND WHEEL TRIM CARE.......104
EXTERIOR BULBS.................104
CONSUMER ASSISTANCEFIAT CUSTOMER CENTER............105
FIAT CANADA CUSTOMER CENTER......105
ASSISTANCE FOR THE HEARING IMPAIRED...105
PUBLICATIONS ORDERING...........105
REPORTING SAFETY DEFECTS IN THE
UNITED STATES..................106
MOPAR ACCESSORIESAUTHENTIC ACCESSORIES BY MOPAR®...107
FAQ ’sFREQUENTLY ASKED QUESTIONS.......108
INDEX......................109
TABLE OF CONTENTS
1
Page 10 of 116
KEY FOB
Locking And Unlocking The Doors
And Liftgate
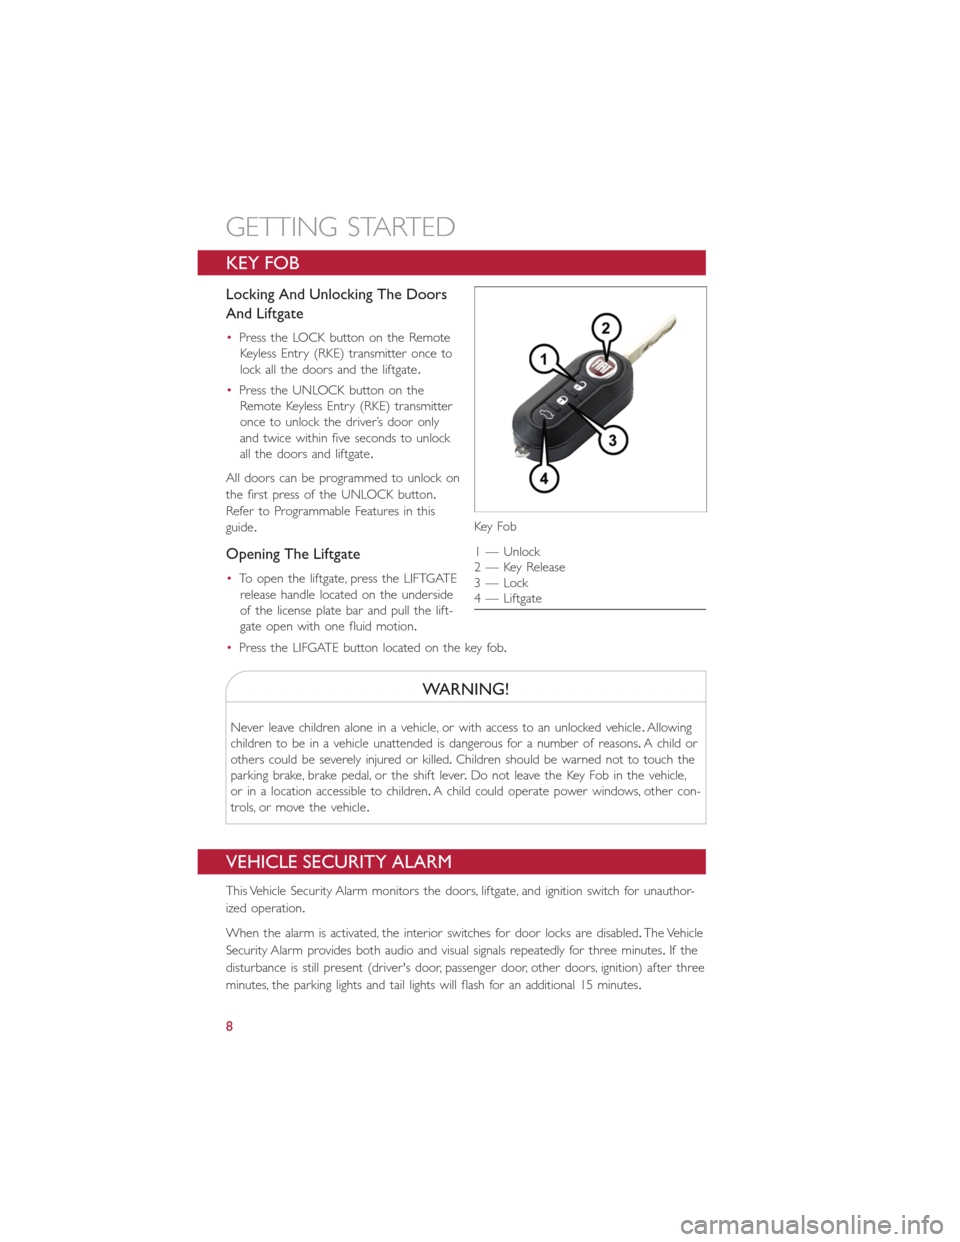
•Press the LOCK button on the Remote
Keyless Entry (RKE) transmitter once to
lock all the doors and the liftgate.
•Press the UNLOCK button on the
Remote Keyless Entry (RKE) transmitter
once to unlock the driver’s door only
and twice within five seconds to unlock
all the doors and liftgate.
All doors can be programmed to unlock on
the first press of the UNLOCK button.
Refer to Programmable Features in this
guide.
Opening The Liftgate
•To open the liftgate, press the LIFTGATE
release handle located on the underside
of the license plate bar and pull the lift-
gate open with one fluid motion.
•Press the LIFGATE button located on the key fob.
WARNING!
Never leave children alone in a vehicle, or with access to an unlocked vehicle.Allowing
children to be in a vehicle unattended is dangerous for a number of reasons.A child or
others could be severely injured or killed.Children should be warned not to touch the
parking brake, brake pedal, or the shift lever.Do not leave the Key Fob in the vehicle,
or in a location accessible to children.A child could operate power windows, other con-
trols, or move the vehicle.
VEHICLE SECURITY ALARM
This Vehicle Security Alarm monitors the doors, liftgate, and ignition switch for unauthor-
ized operation.
When the alarm is activated, the interior switches for door locks are disabled.The Vehicle
Security Alarm provides both audio and visual signals repeatedly for three minutes.If the
disturbance is still present (driver's door, passenger door, other doors, ignition) after three
minutes, the parking lights and tail lights will flash for an additional 15 minutes.
Key Fo b
1 — Unlock
2 — Key Release
3 — Lock
4 — Liftgate
GETTING STARTED
8
Page 11 of 116
To Arm:
•Press the Key Fob LOCK button.
To Disarm The System:
•Push the Key Fob UNLOCK button or cycle the ignition to the ON/RUN position.
The Vehicle Security Alarm is designed to protect your vehicle; however, you can create
conditions where the Vehicle Security Alarm will give you a false alarm.If one of the pre-
viously described arming sequences has occurred, the Vehicle Security Alarm will arm re-
gardless of whether you are in the vehicle or not.If you remain in the vehicle and open
a door, the alarm will sound.If this occurs, disarm the Vehicle Security Alarm.
If the Vehicle Security Alarm is armed and the battery becomes disconnected the Vehicle
Security Alarm will remain armed when the battery is reconnected.The exterior lights
will flash, and the horn will sound.If this occurs, disarm the Vehicle Security Alarm.
POWER DOOR LOCKS
•Press the central LOCK/UNLOCK button located on the instrument panel, in the
switch bank below the radio.The button has an LED that indicates whether the doors
are locked or unlocked.
•LED ON:doors locked.Pressing the central LOCK/UNLOCK button once will unlock
all doors.The LED will switch off once the doors are unlocked.
•LED OFF:doors unlocked.Pressing the central LOCK/UNLOCK button once will lock
all doors.The LED will switch on once the doors are locked.
•Once the doors have been locked with the RKE transmitter, it will no longer be pos-
sible to unlock them by pressing central LOCK/UNLOCK button.
NOTE:
With central locking active (LED ON), opening one of the front doors, it is possible to
perform a central unlocking (LED OFF).With central locking active (LED ON), in order
to open one of the rear passenger doors, it is necessary pulling the internal door handle
twice.With one of the rear door open (LED OFF), the unlocking is performed only for
that door, not for all the vehicle.
•To unlock the front doors, pull the inside door handle to the first detent.If the rear
doors are locked, you must pull the door handle once to unlock the door and pull the
door handle a second time to open the door.
CAUTION!
An unlocked vehicle is an invitation to thieves.Always remove the key from the ignition
and lock all of the doors when leaving the vehicle unattended.
GETTING STARTED
9
Page 12 of 116
WARNING!
•Do not leave children or animals inside parked vehicles in hot weather.Interior
heat build-up may cause serious injury or death.
•For personal security and safety in the event of an collision, lock the vehicle doors
as you drive as well as when you park and leave the vehicle.
•Before exiting a vehicle, always turn the vehicle OFF, apply the parking brake, shift
the Euro Twin Clutch transmission into PARK or the manual transmission into
REVERSE, and remove the Key Fob from the ignition.When leaving the vehicle,
always lock your vehicle.
•Never leave children alone in a vehicle, or with access to an unlocked vehicle.
•Allowing children to be in a vehicle unattended is dangerous for a number of rea-
sons.A child or others could be seriously or fatally injured.Children should be
warned not to touch the parking brake, brake pedal or the shift lever.
•Do not leave the Key Fob in or near the vehicle, or in a location accessible to
child.A child could operate power windows, other controls, or move the vehicle.
Doors Lock With One Or More Doors Open
•It is possible locking the vehicle through the RKE, internal button or external key pawl,
also if one or more doors are open.At lock command request, LED is switched ON.
At closing of the last door, the vehicle maintains the central locking status if key is not
inserted in Ignition Device, otherwise the vehicle will be unlocked and the LED will be
switched OFF.
NOTE:
If the key is not inserted in the ignition switch, but is inside the vehicle, the system does
not recognize the presence of the key and after the closing of last door, the vehicle re-
mains locked.
SEAT BELT
Be sure everyone in your vehicle is in a seat and using a seat belt properly.
•Position the lap belt across your thighs, below your abdomen.To remove slack in the
lap portion, pull up a bit on the shoulder belt.To loosen the lap belt if it is too tight,
tilt the latch plate and pull on the lap belt.A snug belt reduces the risk of sliding
under the belt in a collision.
•Position the shoulder belt on your chest so that it is comfortable and not resting on
your neck.The retractor will withdraw any slack in the belt.
A shoulder belt placed behind you will not protect you from injury during a collision.
You are more likely to hit your head in a collision if you do not wear your shoulder belt.
The lap and shoulder belt are meant to be used together.
A belt that is too loose will not protect you properly.In a sudden stop you could move
too far forward, increasing the possibility of injury.Wear your seat belt snugly.
GETTING STARTED
10
Page 22 of 116
High Beams
•Pull the lever rearward to activate the high beams.
•A high beam symbol will illuminate in the cluster to indicate the high beams are on.
NOTE:
For safe driving, turn off the high beams when oncoming traffic is present to prevent
headlight glare and as a courtesy to other motorists.
Flash To Pass
•Pull the lever toward you to activate the high beams.The high beams will remain on
until the lever is released.
Headlight Delay (Follow Me Home)
•Within two minutes of the ignition switch being turned to the OFF/LOCK position or
the ignition key being removed from the ignition, pull the turn signal lever toward the
steering wheel.
•Each movement of the lever toward the steering wheel will increase the illumination
period by 30 seconds, up to a maximum of 210 seconds.
•To deactivate, pull the multifunction lever toward the steering wheel and hold it for
more than two seconds.
NOTE:
Activation of Follow Me Home is only enabled once per key cycle and the steps outlined
above must be repeated each time you want to activate it.
Fog Lights
•Push the fog light button, located on the center stack of the instrument panel just be-
low the radio, once to turn on the fog lights.
•Push the button a second time to turn the fog lights off.
OPERATING YOUR VEHICLE
20
Page 29 of 116
WARNING!
•Do not let children play with the sunroof, or leave children unattended in the ve-
hicle, and do not leave the key in or near the vehicle (or in a location accessible
to children).Occupants, particularly unattended children, can become entrapped by
the power sunroof while operating the power sunroof switch.Such entrapment
may result in serious injury or death.
•In a collision, there is a greater risk of being thrown from a vehicle with an open
sunroof.You could also be seriously injured or killed.Always fasten your seat belt
properly and make sure all passengers are properly secured.
•Do not allow small children to operate the sunroof.Never allow your fingers,
other body parts, or any object to project through the sunroof opening.Injury
may result.
WIND BUFFETING
Wind buffeting can be described as a helicopter-type percussion sound.If buffeting
occurs with the rear windows open, adjust the front and rear windows together.
If buffeting occurs with the sunroof open, adjust the sunroof opening, or adjust any
window.This will minimize buffeting.
EURO TWIN CLUTCH SIX-SPEED TRANSMISSION
•This vehicle may be equipped with a fuel efficient Euro Twin Clutch Six Speed Trans-
mission.This transmission offers a sportier driving experience with faster AutoStick®
shifting.
•During low-speed driving conditions in first gear, vehicle momentum changes may feel
exaggerated in response to changes in accelerator pedal position.This behavior is nor-
mal and is similar to vehicles equipped with a manual transmission.
NOTE:
•Very aggressive driving may result in some clutch odor similar to a manual transmission.
An active warning message will display in the Instrument Cluster if cool down actions
are needed.
•The first few shifts on a new vehicle may be somewhat abrupt.This is a normal condi-
tion, and precision shifts will develop within a few hundred miles (kilometers).
•
At low speeds you may hear mechanical noises similar to a manual transmission as the
transmission changes gears.These noises are normal and will not damage the transmission.
•Before and after the engine is started, you may hear a hydraulic pump for a short
period of time.This noise is normal and will not damage the transmission.
OPERATING YOUR VEHICLE
27
Page 37 of 116
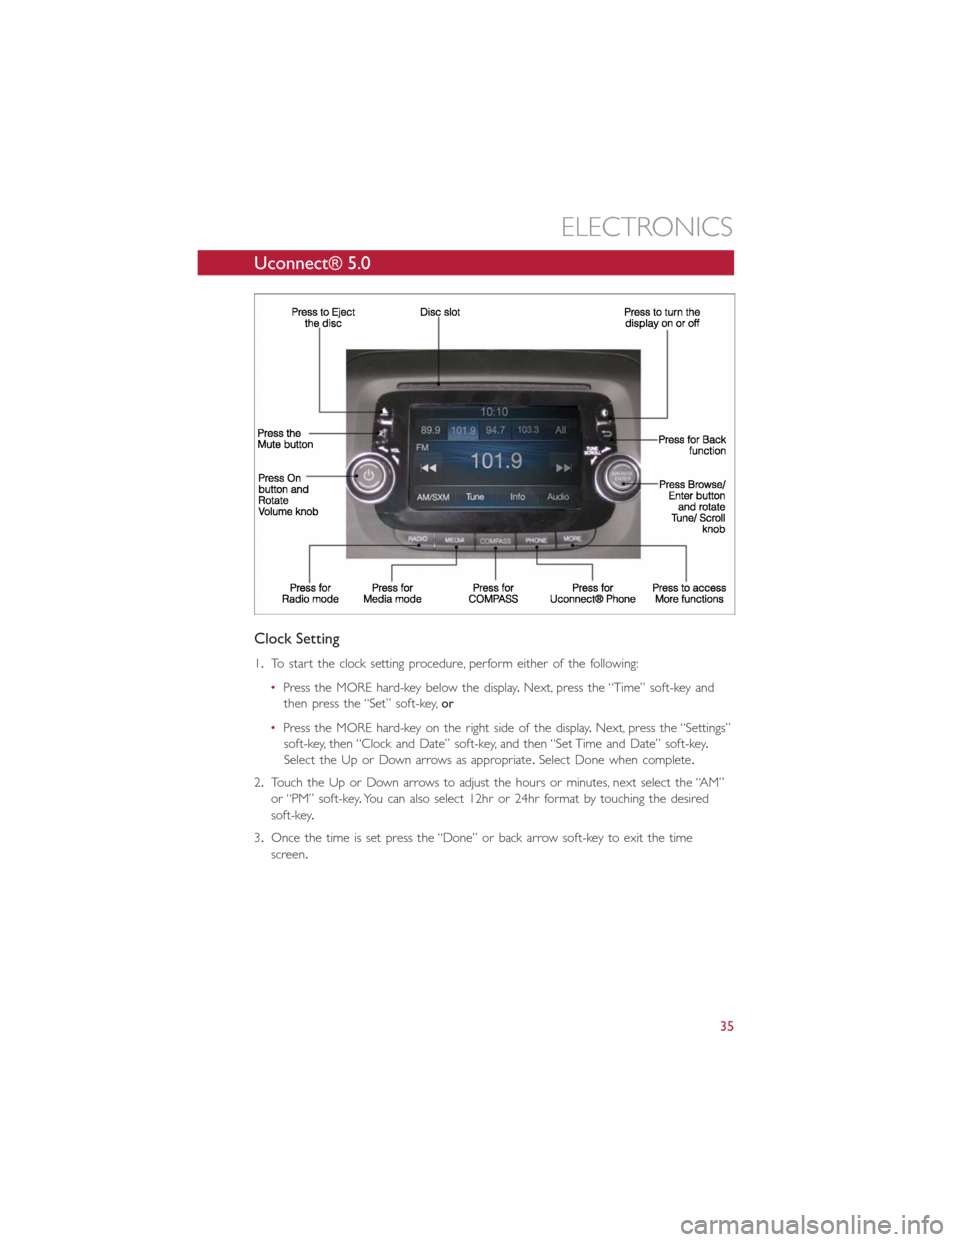
Uconnect® 5.0
Clock Setting
1.To start the clock setting procedure, perform either of the following:
•Press the MORE hard-key below the display.Next, press the “Time” soft-key and
then press the “Set” soft-key,or
•Press the MORE hard-key on the right side of the display.Next, press the “Settings”
soft-key, then “Clock and Date” soft-key, and then “Set Time and Date” soft-key.
Select the Up or Down arrows as appropriate.Select Done when complete.
2.Touch the Up or Down arrows to adjust the hours or minutes, next select the “AM”
or “PM” soft-key.You can also select 12hr or 24hr format by touching the desired
soft-key.
3.Once the time is set press the “Done” or back arrow soft-key to exit the time
screen.
ELECTRONICS
35
Page 38 of 116
Equalizer, Balance And Fade
1.Press the MORE hard-key below the display then press the “Setting” soft-key.
2.Scroll down and press the “Audio” soft-key to open the Audio menu.
3.
The Audio Menu shows the following options for you to customize your audio settings.
Equalizer
•Touch the “Equalizer” soft-key to adjust the Bass, Mid and Treble.Use the “+” or “-”
soft-key to adjust the equalizer to your desired settings.
Balance/Fade
•
Touch the “Balance/Fade” soft-key to adjust the sound from the speakers.Use the arrow
soft-keys to adjust the sound level from the front and rear or right and left side speakers.
Touch the Center “C” soft-key to reset the balance and fade to the factory setting.
Speed Adjusted Volume — If Equipped
•Touch the “Speed Adjusted Volume” soft-key to select between OFF, 1, 2 or 3.This will
decrease the radio volume relative to a decrease in vehicle speed.
Loudness
•Touch the “Loudness” soft-key to select the Loudness feature.When this feature is
activated it improves sound quality at lower volumes.
Surround Sound — If Equipped
•
Touch the “Surround Sound” soft-key, select On or Off followed by pressing the back arrow
soft-key.When this feature is activated, it provides simulated surround sound mode.
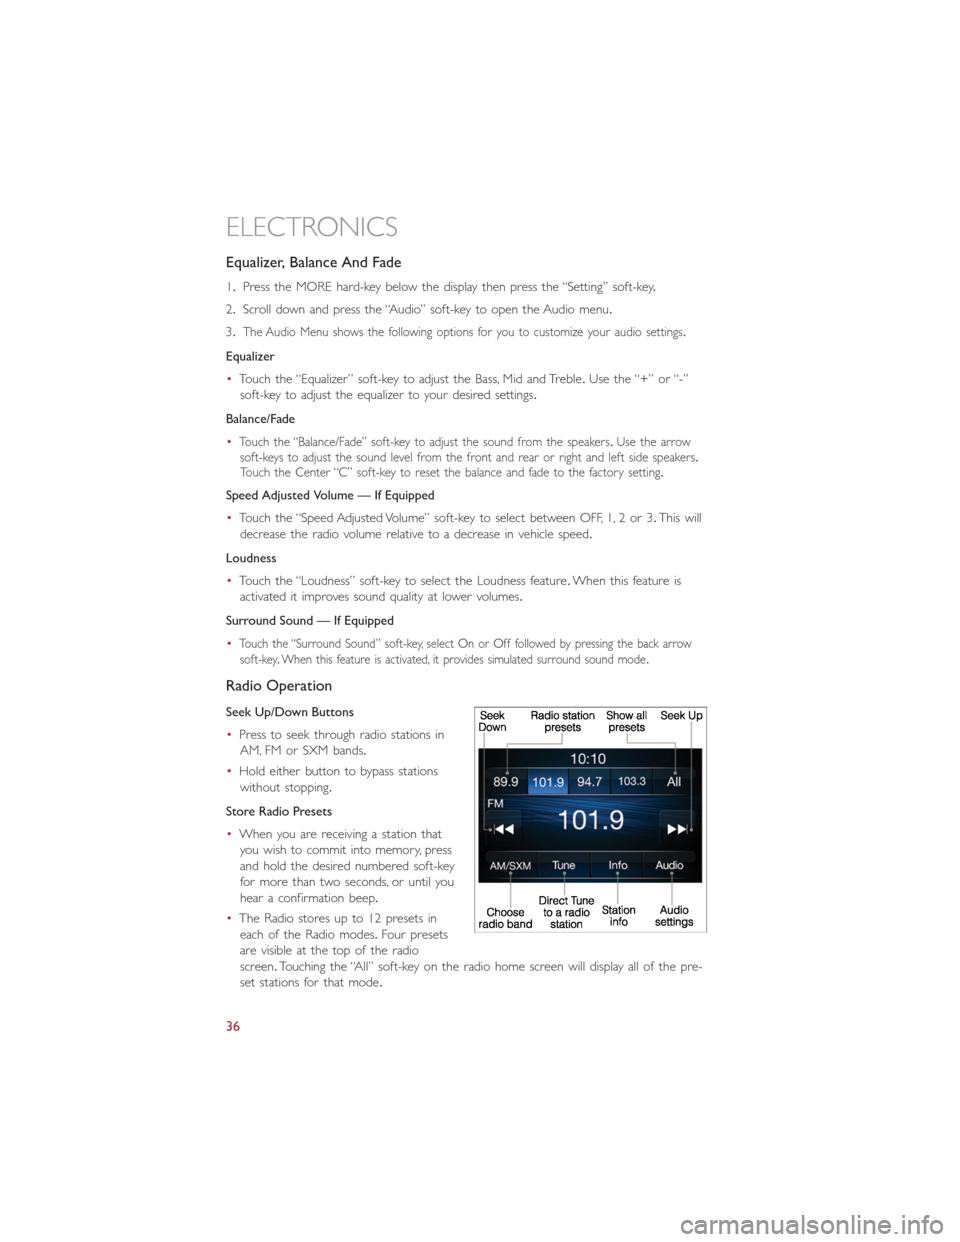
Radio Operation
Seek Up/Down Buttons
•Press to seek through radio stations in
AM, FM or SXM bands.
•Hold either button to bypass stations
without stopping.
Store Radio Presets
•When you are receiving a station that
you wish to commit into memory, press
and hold the desired numbered soft-key
for more than two seconds, or until you
hear a confirmation beep.
•The Radio stores up to 12 presets in
each of the Radio modes.Four presets
are visible at the top of the radio
screen.Touching the “All” soft-key on the radio home screen will display all of the pre-
set stations for that mode.
ELECTRONICS
36
Page 39 of 116
SiriusXM Premier Over 160 Channels
Get every channel available on your satellite radio, and enjoy all you want, all in one place.
Hear commercial-free music plus sports, news, talk and entertainment.Get all the pre-
mium programming, including Howard Stern, every NFL game, Oprah Radio®, every
MLB® and NHL® game, every NASCAR® race and more.And get 20+ Xtra channels,
including SiriusXM Latino, a selection of channels dedicated to Spanish language program-
ming.
•To access SiriusXM Satellite Radio, press the RADIO hard-key and then the “SXM”
soft-key.
SiriusXM services require subscriptions, sold separately after the 12-month trial included
with the new vehicle purchase.If you decide to continue your service at the end of your
trial subscription, the plan you choose will automatically renew and bill at then-current
rates until you call SiriusXM at 1-866-635-2349 for U.S. residents and 1-888-539-7474
for Canadian residents to cancel. See SiriusXM Customer Agreement for complete
terms at www.siriusxm.com.All fees and programming subject to change.Our satellite
service is available only to those at least 18 and older in the 48 contiguous USA and
D.C.Our Sirius satellite service is also available in PR (with coverage limitations).Our
Internet radio service is available throughout our satellite service area and in AK and HI.
© 2014 Sirius XM Radio Inc.Sirius, XM and all related marks and logos are trademarks
of Sirius XM Radio Inc.
Disc Operation — If Equipped
Your vehicle may have a remote CD player located in the lower center console storage
bin.
•CD/Disc Mode is entered by either inserting a CD/Disc or by touching the MEDIA
button located below the display.Once in Media Mode, select Disc.
•Gently insert one CD into the CD player with the CD label facing as indicated on the
illustration located on the Disc player.
Seek Up/Down Buttons
•Press to seek through Disc tracks.
•Hold either button to bypass tracks without stopping.
Browse
•Touch the “Browse” soft-key to scroll through and select a desired track on the Disc.
Touch the “Exit” soft-key if you wish to cancel the browse function.
ELECTRONICS
37