steering FIAT 500L 2015 2.G Owner's Manual
[x] Cancel search | Manufacturer: FIAT, Model Year: 2015, Model line: 500L, Model: FIAT 500L 2015 2.GPages: 148, PDF Size: 3.77 MB
Page 51 of 148
Get Started
1.VisitUconnectPhone.comto check mobile device and feature compatibility and to
find phone pairing instructions.
2.Reduce background noise.Wind and passenger conversations are examples of noise
that may impact recognition.
3.Speak clearly at a normal pace and volume while facing straight ahead.The micro-
phone is positioned on the rearview mirror and aimed at the driver.
4.Each time you give a Voice Command, you must first press either the VR or Phone
button, wait untilafterthe beep, then say your Voice Command.
5.You can interrupt the help message or system prompts by pressing the VR or Phone
button and saying a Voice Command from current category.
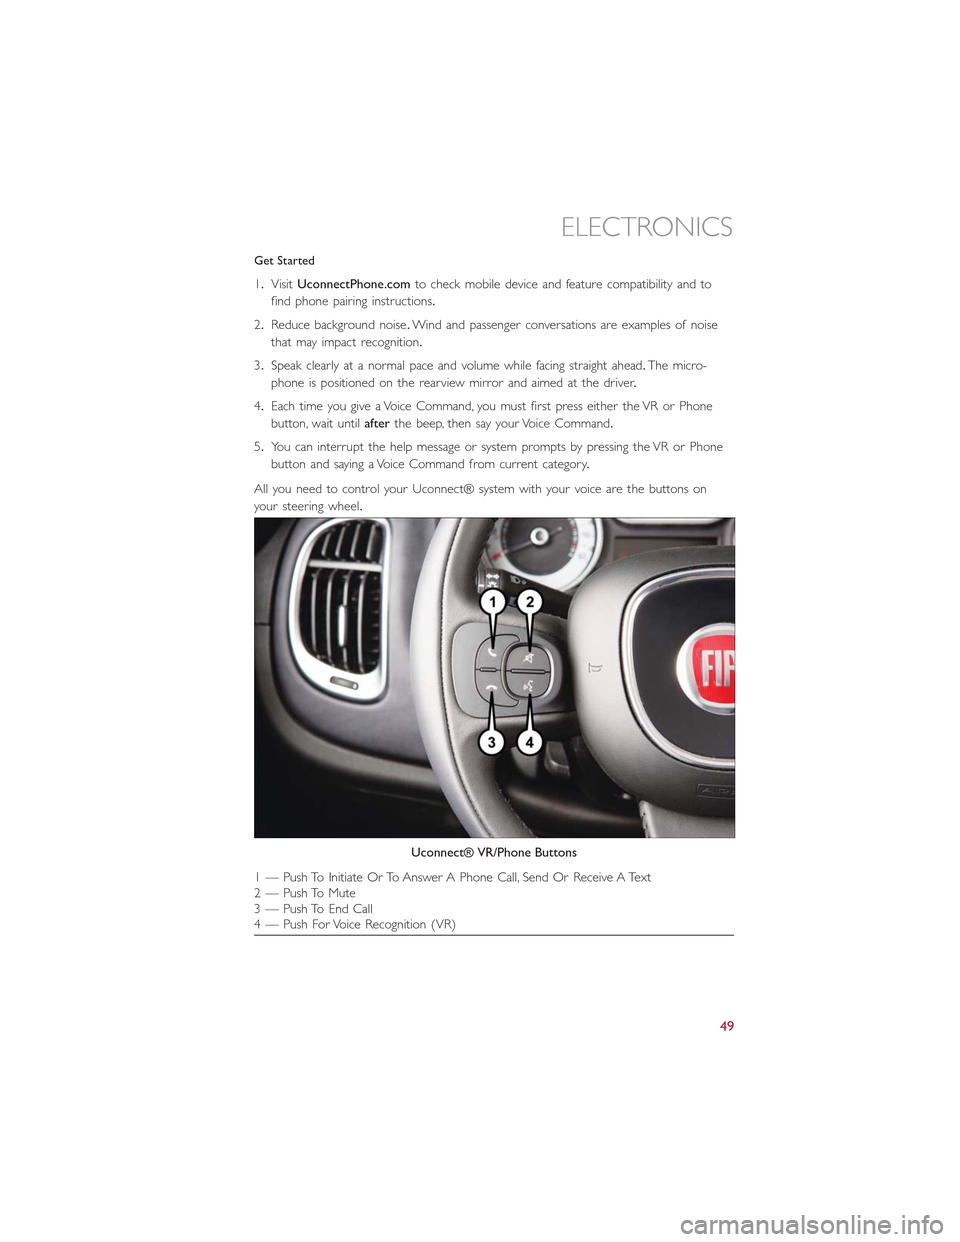
All you need to control your Uconnect® system with your voice are the buttons on
your steering wheel.
Uconnect® VR/Phone Buttons
1 — Push To Initiate Or To Answer A Phone Call, Send Or Receive A Text2 — Push To Mute3 — Push To End Call4 — Push For Voice Recognition (VR)
ELECTRONICS
49
Page 63 of 148
USB Port
Connect your iPod® or compatible device using a USB cable into the USB Port.USB
Memory sticks with audio files can also be used.Then, audio from the device can be
played on the vehicles sound system while providing metadata (artist, track title, album,
etc.) information on the radio display.
When connected, the iPod®/compatible USB device can be controlled using the radio or
Steering Wheel Audio Controls to play, skip to the next or previous track, browse, and list
the contents.
The iPod® battery charges when plugged into the USB port (if supported by the specific
device).
•To route the USB/iPod® cable out of the center console, use the access cut out.
NOTE:
•When connecting your iPod® device for the first time, the system may take several
minutes to read your music, depending on the number of files.For example, the sys-
tem will take approximately five minutes for every 1,000 songs loaded on the device.
Also during the reading process, the Shuffle and Browse functions will be disabled.This
process ensures the full use of your iPod® features and only happens the first time it
is connected.After the first time, the reading process of your iPod® will take consider-
ably less time unless changes are made or new songs are added to the play list.
•The USB port supports certain Mini, Classic, Nano, Touch, and iPhone® devices.The
USB port also supports playing music from compatible external USB Mass Storage
Class memory devices.Some iPod® software versions may not fully support the USB
port features.Please visit Apple’s website for iPod® software updates.
ELECTRONICS
61
Page 69 of 148
Get Started
1.VisitUconnectPhone.comto check mobile device and feature compatibility and to
find phone pairing instructions.
2.Reduce background noise.Wind and passenger conversations are examples of noise
that may impact recognition.
3.Speak clearly at a normal pace and volume while facing straight ahead.The micro-
phone is positioned on the rearview mirror and aimed at the driver.
4.Each time you give a Voice Command, you must first press either the VR or Phone
button, wait untilafterthe beep, then say your Voice Command.
5.You can interrupt the help message or system prompts by pressing the VR or Phone
button and saying a Voice Command from current category.
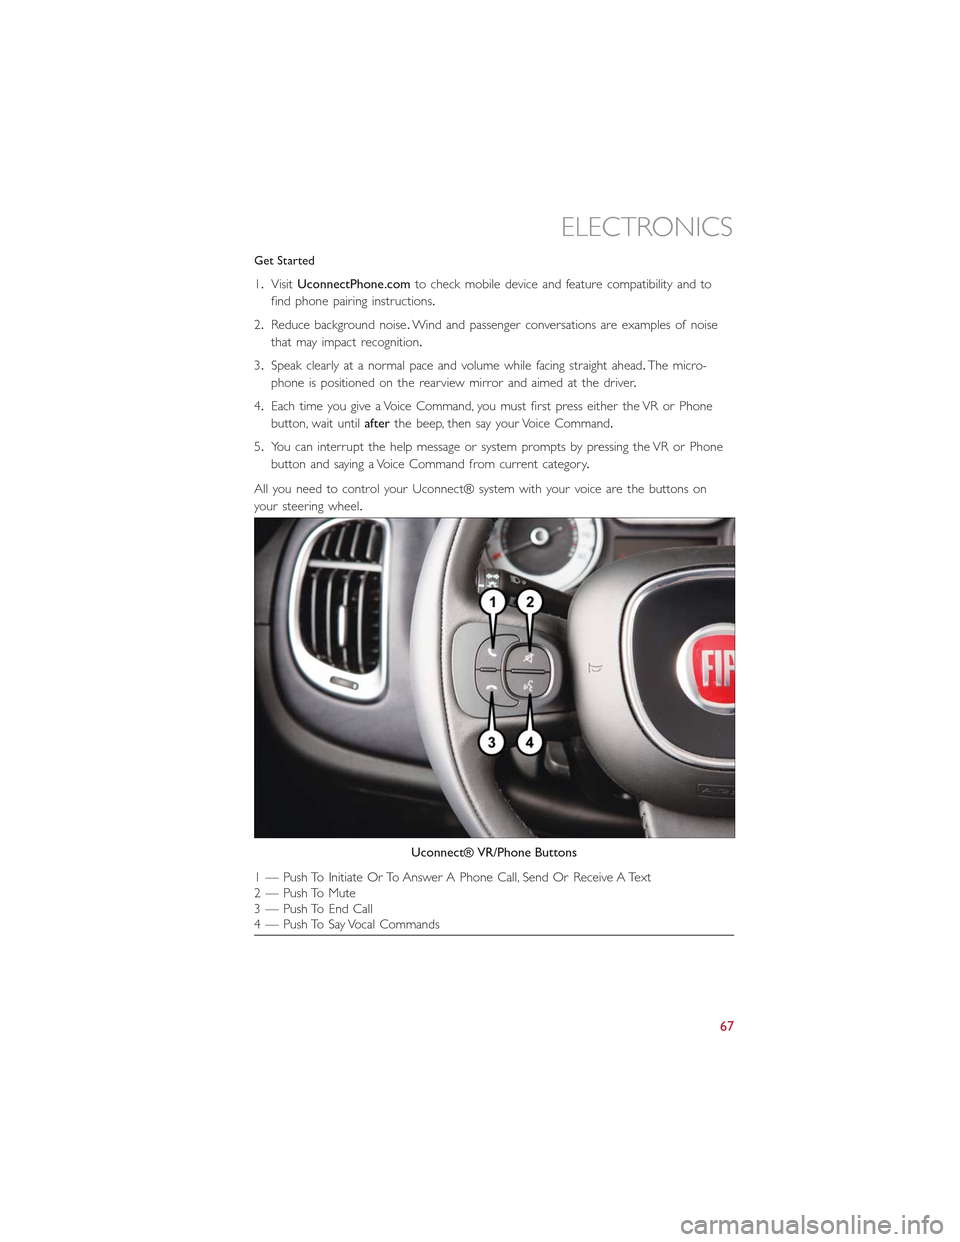
All you need to control your Uconnect® system with your voice are the buttons on
your steering wheel.
Uconnect® VR/Phone Buttons
1 — Push To Initiate Or To Answer A Phone Call, Send Or Receive A Text2 — Push To Mute3 — Push To End Call4 — Push To Say Vocal Commands
ELECTRONICS
67
Page 77 of 148
The Uconnect® Phone feature enables you to place and receive hands-free mobile
phone calls.Drivers can also place mobile phone calls using their voice or by using the
buttons on the touchscreen (see Voice Command section).
The hands-free calling feature is made possible through Bluetooth® technology — the
global standard that enables different electronic devices to connect to each other wire-
lessly.
If the Uconnect® Phone Buttonexists on your steering wheel, you then have the
Uconnect® Phone features.
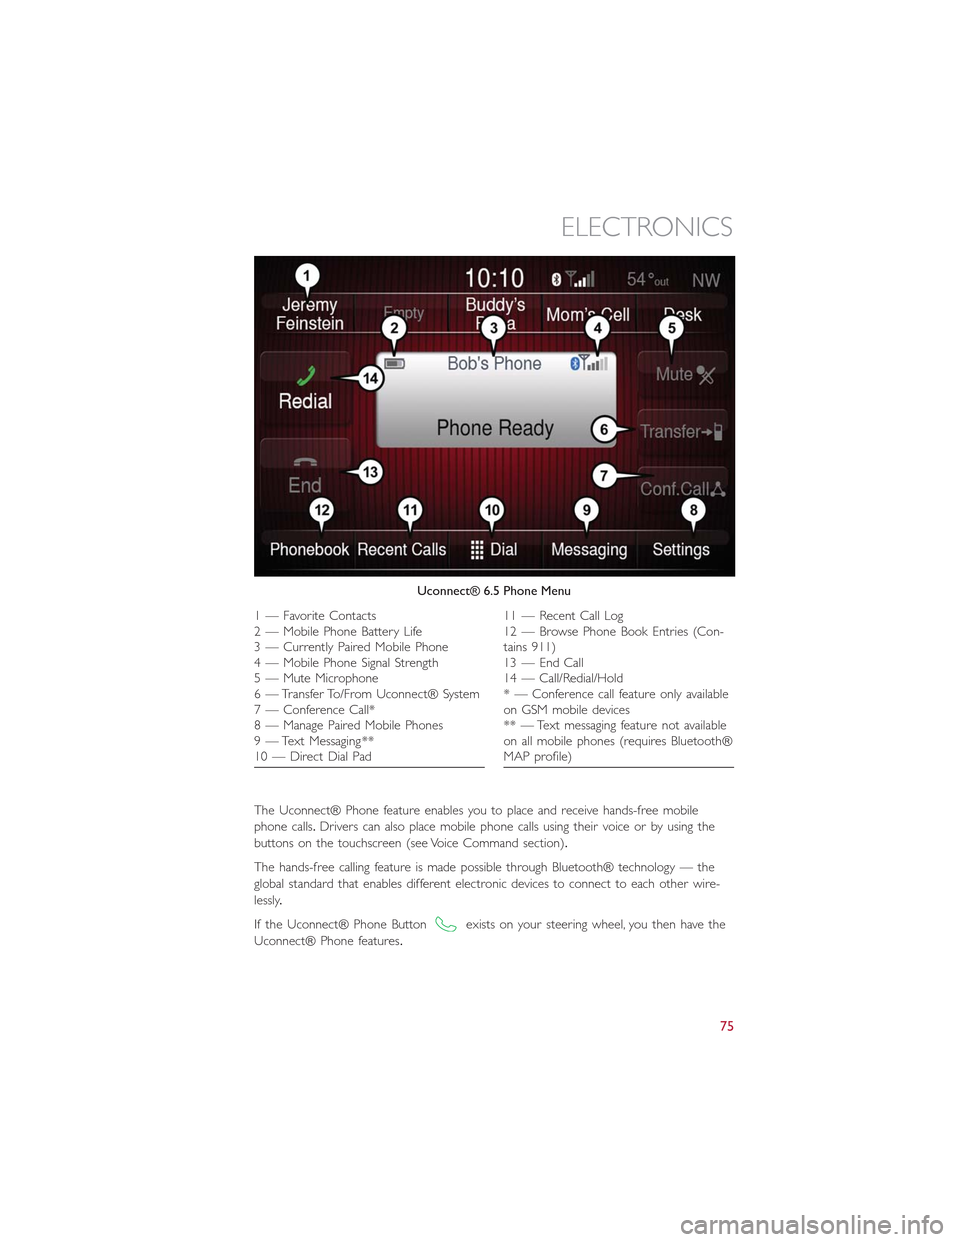
Uconnect® 6.5 Phone Menu
1—FavoriteContacts2 — Mobile Phone Battery Life3 — Currently Paired Mobile Phone4 — Mobile Phone Signal Strength5 — Mute Microphone6 — Transfer To/From Uconnect® System7 — Conference Call*8 — Manage Paired Mobile Phones9 — Text Messaging **10 — Direct Dial Pad
11 — Recent Call Log12 — Browse Phone Book Entries (Con-tains 911)13 — End Call14 — Call/Redial/Hold* — Conference call feature only availableon GSM mobile devices** — Text messaging feature not availableon all mobile phones (requires Bluetooth®MAP profile)
ELECTRONICS
75
Page 81 of 148
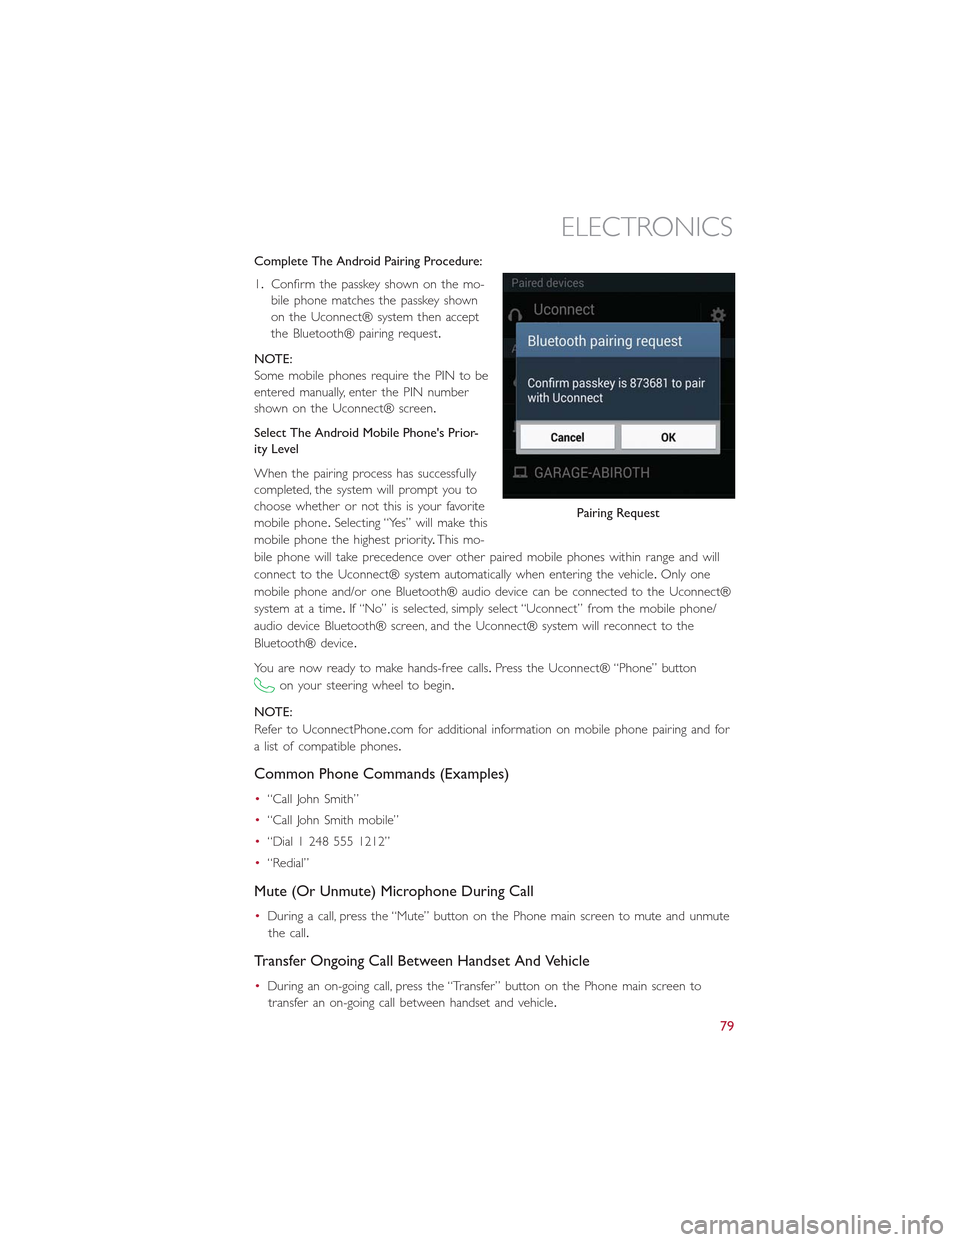
Complete The Android Pairing Procedure:
1.Confirm the passkey shown on the mo-
bile phone matches the passkey shown
on the Uconnect® system then accept
the Bluetooth® pairing request.
NOTE:
Some mobile phones require the PIN to be
entered manually, enter the PIN number
shown on the Uconnect® screen.
Select The Android Mobile Phone's Prior-
ity Level
When the pairing process has successfully
completed, the system will prompt you to
choose whether or not this is your favorite
mobile phone.Selecting “Yes” will make this
mobile phone the highest priority.This mo-
bile phone will take precedence over other paired mobile phones within range and will
connect to the Uconnect® system automatically when entering the vehicle.Only one
mobile phone and/or one Bluetooth® audio device can be connected to the Uconnect®
system at a time.If “No” is selected, simply select “Uconnect” from the mobile phone/
audio device Bluetooth® screen, and the Uconnect® system will reconnect to the
Bluetooth® device.
You are now ready to make hands-free calls.Press the Uconnect® “Phone” button
on your steering wheel to begin.
NOTE:
Refer to UconnectPhone.com for additional information on mobile phone pairing and for
a list of compatible phones.
Common Phone Commands (Examples)
•“Call John Smith”
•“Call John Smith mobile”
•“Dial 1 248 555 1212”
•“Redial”
Mute (Or Unmute) Microphone During Call
•During a call, press the “Mute” button on the Phone main screen to mute and unmute
the call.
Transfer Ongoing Call Between Handset And Vehicle
•During an on-going call, press the “Transfer” button on the Phone main screen to
transfer an on-going call between handset and vehicle.
Pairing Request
ELECTRONICS
79
Page 82 of 148
Phonebook
The Uconnect® system will automatically sync your phonebook from your paired phone,
if this feature is supported by your phone.Phonebook contacts are updated each time
that the phone is connected.If your phone book entries do not appear, check the set-
tings on your phone.Some phones require you to enable this feature manually.
•Your phonebook can be browsed on the Uconnect® system touchscreen, but editing
can only be done on your phone.To browse, press the “Phone” button on the touch-
screen, then the “Phonebook” button on the touchscreen.
Favorite phonebook entries can be saved as Favorites for quicker access.Favorites are
shown at the top of the main phone screen.
Voice Command Tips
•Speaking complete names (i.e; Call John Doe vs.Call John) will result in greater system
accuracy.
•You can “link” commands together for faster results.Say “Call John Doe, mobile,” for
example.
•If you are listening to available voice command options, you do not have to listen to
the entire list.When you hear the command that you need, push thebutton
on the steering wheel, wait for the beep and say your command.
Changing The Volume
•Start a dialogue by pushing the Phone button, then say a command for example
- "Help."
•Use the radio VOLUME/MUTE rotary knob to adjust the volume to a comfortable
level while the Uconnect® system is speaking.Please note the volume setting for
Uconnect® is different than the audio system.
NOTE:
To access help, push the Uconnect® Phone buttonon the steering wheel and say
"help." Press the display or press either the Phoneor VRbutton and say
"cancel" to cancel the help session.
Incoming Text Messages
After pairing your Uconnect® system with a Bluetooth® enabled mobile device with the
Message Access Profile (MAP), the Uconnect® system can announce a new incoming text
message and read it to you over the vehicle’s audio system.
NOTE:
Only incoming text messages received during the current ignition cycle can be viewed/
read.
To enable incoming text messaging:
iPhone®
1.Press the settings button on the mobile phone.
ELECTRONICS
80
Page 86 of 148
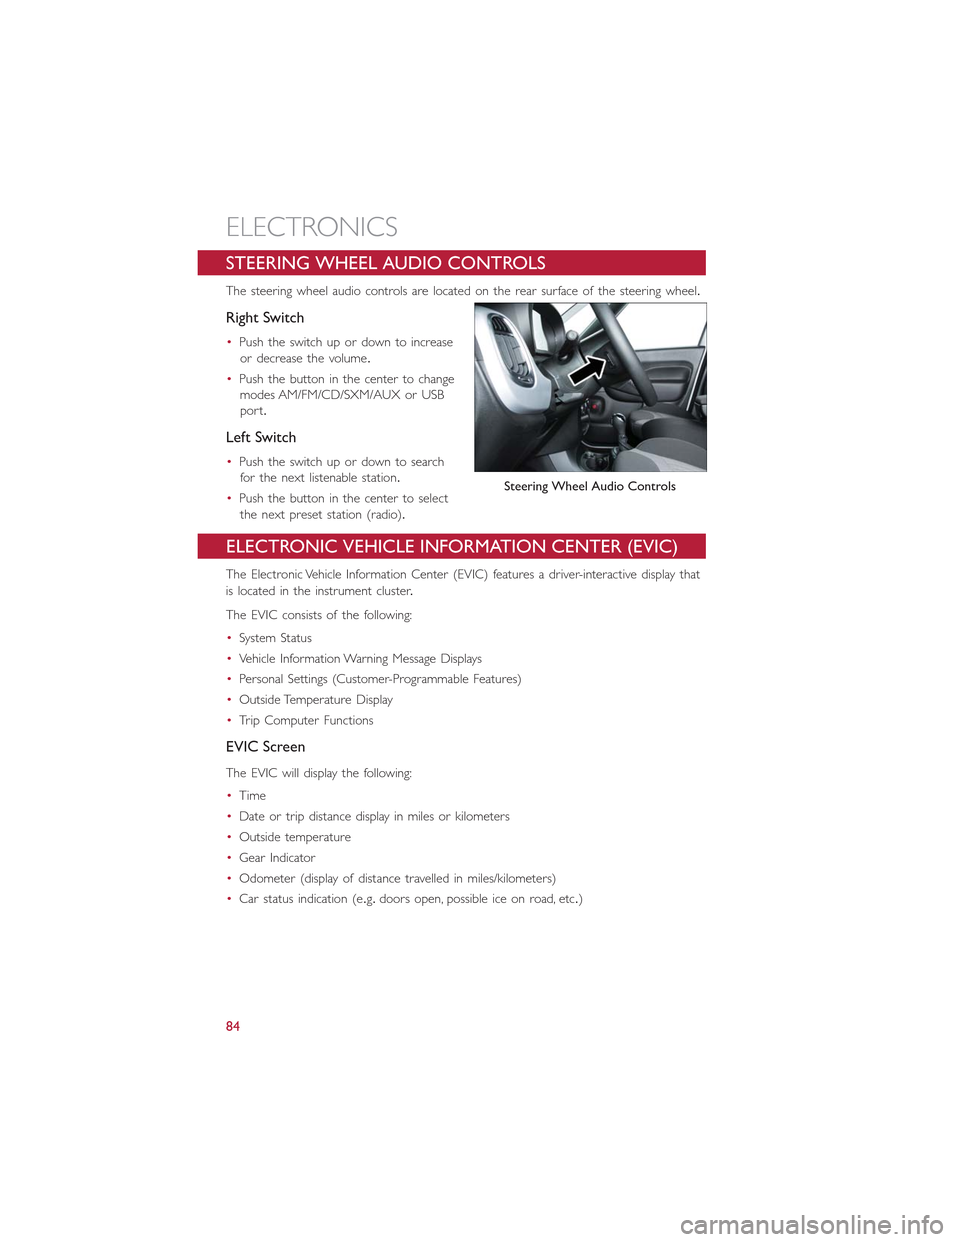
STEERING WHEEL AUDIO CONTROLS
The steering wheel audio controls are located on the rear surface of the steering wheel.
Right Switch
•Push the switch up or down to increase
or decrease the volume.
•Push the button in the center to change
modes AM/FM/CD/SXM/AUX or USB
port.
Left Switch
•Push the switch up or down to search
for the next listenable station.
•Push the button in the center to select
the next preset station (radio).
ELECTRONIC VEHICLE INFORMATION CENTER (EVIC)
The Electronic Vehicle Information Center (EVIC) features a driver-interactive display that
is located in the instrument cluster.
The EVIC consists of the following:
•System Status
•Vehicle Information Warning Message Displays
•Personal Settings (Customer-Programmable Features)
•Outside Temperature Display
•Trip Computer Functions
EVIC Screen
The EVIC will display the following:
•Time
•Date or trip distance display in miles or kilometers
•Outside temperature
•Gear Indicator
•Odometer (display of distance travelled in miles/kilometers)
•Car status indication (e.g.doors open, possible ice on road, etc.)
Steering Wheel Audio Controls
ELECTRONICS
84
Page 99 of 148
Vehicle Security Light
This light will flash rapidly for approximately 15 seconds when the vehicle security alarm
is arming.The light will flash at a slower speed continuously after the alarm is set.The
security light will also come on for about three seconds when the ignition is first turned
on.
Front Fog Light Indicator
This indicator will illuminate when the front fog lights are on.
- Electronic Speed Control SET Indicator
This indicator will illuminate when the cruising speed has been set.
- Electronic Stability Control (ESC) OFF Indicator Light
This light indicates the ESC system has been turned off by the driver.
Partial Off
This mode is entered by momentarily pressing the ESC Off switch.This mode is intended
for times when a more spirited driving experience is desired.It is also intended for driv-
ing in deep snow, sand or gravel conditions, when more wheel spin than ESC would nor-
mally allow is required to gain traction.To turn ESC on again, momentarily press the
switch again.This will restore the normal ESC On mode of operation.
Full Off
This mode is intended for off-highway or off-road use only and should not be used on
public roadways.In this mode, all TCS and ESC stability features are turned OFF, except
for the limited slip feature described in the TCS section.To enter the “Full Off ” mode,
depress and hold the ESC OFF switch for five seconds.After five seconds, the ESC OFF
Indicator Light will illuminate, and the “ESC OFF” message will display in the EVIC.To turn
ESC ON again, momentarily press the ESC OFF switch.
- Park/Headlight ON Indicator
This indicator will illuminate when the park lights or headlights are turned on.
- Power Steering System Warning
This light is used to manage the electrical warning of the EPS (Electric Power Steering
System).When the ignition is turned to the ON/RUN position, the warning light will illu-
minate momentarily.If the warning light stays on, cycle the ignition to the OFF position
and back to ON/RUN.If the warning light stays on, contact your authorized dealer.
If the warning light switches on while driving, you may not have steering assistance.Al-
though it will still be possible to steer the car, the effort needed to operate the steering
wheel could be increased: contact an authorized dealer as soon as possible.
- Defroster Indicator
Indicates that defroster is on.
WHAT TO DO IN EMERGENCIES
97
Page 120 of 148
Automatic Transmission
•Vehicle can be towed with the front wheels elevated.
•Vehicle can be towed on a flatbed truck (all wheels off the ground).
If the ignition key is unavailable, or the battery is discharged, refer to “Shift Lever Over-
ride” in this section for instructions on shifting the transmission out of PARK in order to
move the vehicle.
CAUTION!
•DO NOT
flat tow any vehicle equipped with a conventional automatic transmission.Damage
to the drivetrain will result.If these vehicles require towing, make sure all drive
wheels are OFF the ground.
•Towing this vehicle in violation of the above requirements can cause severe trans-
mission damage.Damage from improper towing is not covered under the New
Vehicle Limited Warranty.
FREEING A STUCK VEHICLE
If your vehicle becomes stuck in mud, sand or snow, it can often be moved by a rocking
motion.Turn your steering wheel right and left to clear the area around the front
wheels.Then shift back and forth between DRIVE/2nd gear and REVERSE.Using minimal
accelerator pedal pressure to maintain the rocking motion, without spinning the wheels, is
most effective.
NOTE:
If your vehicle is equipped with Traction Control or Electronic Stability Control (ESC),
turn the system OFF before attempting to “rock” the vehicle.
WHAT TO DO IN EMERGENCIES
118
Page 132 of 148
FUSES
Underhood Fuses
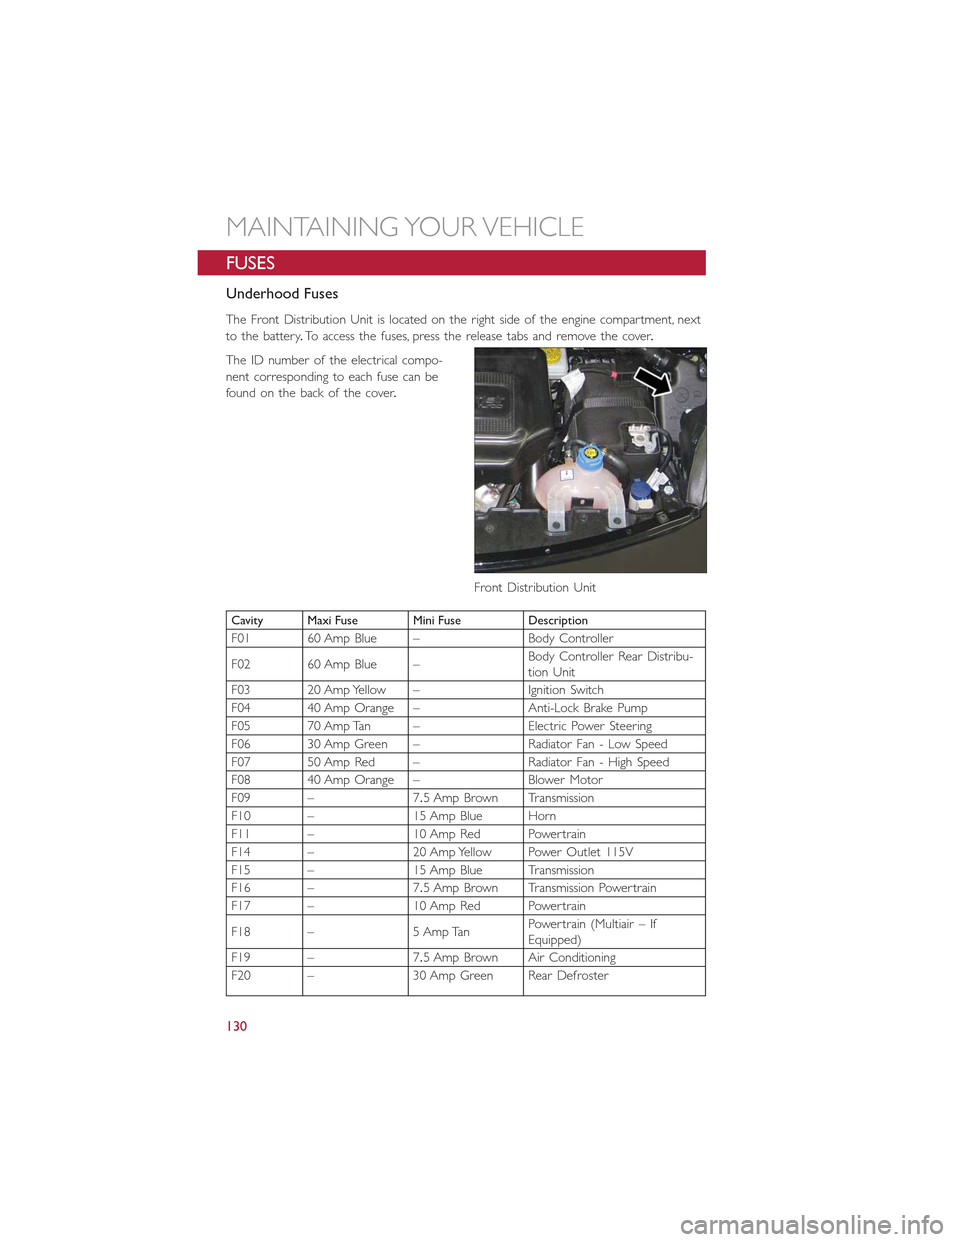
The Front Distribution Unit is located on the right side of the engine compartment, next
to the battery.To access the fuses, press the release tabs and remove the cover.
The ID number of the electrical compo-
nent corresponding to each fuse can be
found on the back of the cover.
Cavity Maxi Fuse Mini Fuse Description
F01 60 Amp Blue – Body Controller
F02 60 Amp Blue –Body Controller Rear Distribu-tion Unit
F03 20 Amp Yellow – Ignition Switch
F04 40 Amp Orange – Anti-Lock Brake Pump
F05 70 Amp Tan – Electric Power Steering
F06 30 Amp Green – Radiator Fan - Low Speed
F07 50 Amp Red – Radiator Fan - High Speed
F08 40 Amp Orange – Blower Motor
F09 – 7.5 Amp Brown Transmission
F10 – 15 Amp Blue Horn
F11 – 10 Amp Red Powertrain
F14 – 20 Amp Yellow Power Outlet 115V
F15 – 15 Amp Blue Transmission
F16 – 7.5 Amp Brown Transmission Powertrain
F17 – 10 Amp Red Powertrain
F18 – 5 Amp TanPowertrain (Multiair – IfEquipped)
F19 – 7.5 Amp Brown Air Conditioning
F20 – 30 Amp Green Rear Defroster
Front Distribution Unit
MAINTAINING YOUR VEHICLE
130