dashboard FIAT 500L LIVING 2014 2.G Owners Manual
[x] Cancel search | Manufacturer: FIAT, Model Year: 2014, Model line: 500L LIVING, Model: FIAT 500L LIVING 2014 2.GPages: 420, PDF Size: 9.77 MB
Page 7 of 420
GETTING TO KNOW YOUR CAR
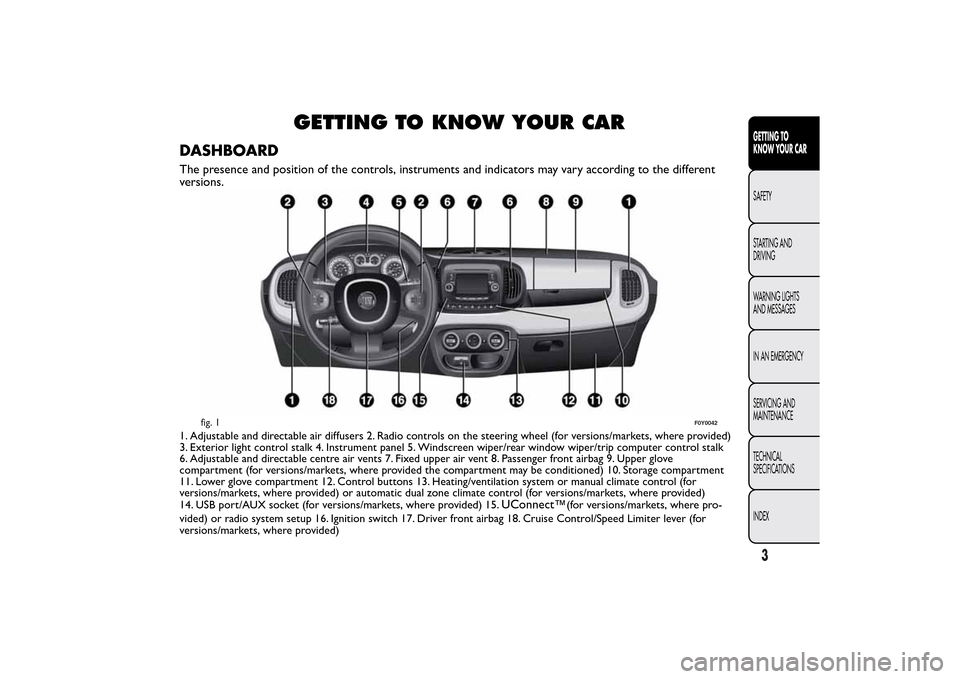
DASHBOARDThe presence and position of the controls, instruments and indicators may vary according to the different
versions.1. Adjustable and directable air diffusers 2. Radio controls on the steering wheel (for versions/markets, where provided)
3. Exterior light control stalk 4. Instrument panel 5. Windscreen wiper/rear window wiper/trip computer control stalk
6. Adjustable and directable centre air vents 7. Fixed upper air vent 8. Passenger front airbag 9. Upper glove
compartment (for versions/markets, where provided the compartment may be conditioned) 10. Storage compartment
11. Lower glove compartment 12. Control buttons 13. Heating/ventilation system or manual climate control (for
versions/markets, where provided) or automatic dual zone climate control (for versions/markets, where provided)
14. USB port/AUX socket (for versions/markets, where provided) 15.
UConnect
vided) or radio system setup 16. Ignition switch 17. Driver front airbag 18. Cruise Control/Speed Limiter lever (for
versions/markets, where provided)
fig. 1
F0Y0042
3GETTING TO
KNOW YOUR CARSAFETY
STARTING AND
DRIVING
WARNING LIGHTS
AND MESSAGES
IN AN EMERGENCY
SERVICING AND
MAINTENANCE
TECHNICAL
SPECIFICATIONS
INDEX
™ (for versions/markets, where pro-
Page 50 of 420
INTERNAL AIR RECIRCULATION
Press button B (
) so that the LED on the
button switches on. It is advisable to switch internal
air recirculation on while standing in traffic or in
tunnels to prevent the introduction of polluted air.
Do not use the function for a long time, particularly
if there are many passengers on board, to prevent
the windows from misting up.
IMPORTANT Internal air recirculation makes it
possible to reach the required heating or cooling
conditions more quickly depending on the mode
selected. Do not use the internal air recirculation
function on rainy/cold days as it would considerably
increase the possibility of the windows misting.AIR DISTRIBUTION SELECTION
Turn knob E to manually select one of the five
possible air distribution settings in the passenger
compartment:
Air flow to the windscreen, front side window
and front/rear footwell diffusers.Air flow to the front/rear footwell diffusers. This
air distribution allows the passenger
compartment to be heated quickly.Air flow distributed between central and side
dashboard vents and front/rear footwell vents.Air flow to central/side dashboard vents
(passenger’s body).Air flow to windscreen and side windows.
46GETTING TO
KNOW YOUR CAR
SAFETY
STARTING AND
DRIVING
WARNING LIGHTS
AND MESSAGES
IN AN EMERGENCY
SERVICING AND
MAINTENANCE
TECHNICAL
SPECIFICATIONS
INDEX
Page 54 of 420
INTERNAL AIR RECIRCULATION
Press button B (
) so that the LED on the
button switches on. It is advisable to switch internal
air recirculation on while standing in traffic or in
tunnels to prevent the introduction of polluted air.
Do not use the function for a long time, particularly
if there are many passengers on board, to prevent
the windows from misting up.
IMPORTANT Internal air recirculation makes it
possible to reach the required heating or cooling
conditions more quickly depending on the mode
selected. Do not use the internal air recirculation
function on rainy/cold days as it would considerably
increase the possibility of the windows misting.AIR DISTRIBUTION SELECTION
Turn knob F to manually select one of the five
possible air distribution settings in the passenger
compartment:
Air flow to the windscreen, front side window
and front/rear footwell diffusers.Air flow to the front/rear footwell diffusers. This
air distribution allows the passenger
compartment to be heated quickly.Air flow distributed between central and side
dashboard diffusers and front/rear footwell
diffusers.Air flow to central/side dashboard vents
(passenger’s body).Air flow to windscreen and side windows.
Selecting the footwell/windscreen or only windscreen
distribution activates the climate control system
compressor (LED on A/C button on) and the air
recirculation is set to "outside air" (LED on button B
off ). This logic guarantees optimum visibility at the
windows. The user can always set air recirculation
and climate control system compressor.
50GETTING TO
KNOW YOUR CAR
SAFETY
STARTING AND
DRIVING
WARNING LIGHTS
AND MESSAGES
IN AN EMERGENCY
SERVICING AND
MAINTENANCE
TECHNICAL
SPECIFICATIONS
INDEX
Page 55 of 420
START&STOP
Manual climate control system
If the Start&Stop function is activated (engine off
when the car speed is zero), the system keeps the air
flow selected by the user.
In these conditions, the passenger compartment
cooling and heating cannot be guaranteed, as the
compressor stops with the engine coolant pump.
The Start&Stop function can be deactivated, to
enhance the operation of the climate control system,
by pressing the dedicated button on the dashboard.
ADDITIONAL ELECTRIC HEATER
(for versions/markets, where provided)
The additional electric heater ensures more rapid
passenger compartment heating.
It activates in cold weather conditions, if the
following conditions are verified:
❒outside temperature low;
❒engine coolant temperature low;
❒engine on;
❒fan speed set at least to 1
stspeed;
❒knob A turned completely clockwise to red
section.The heater is switched off when at least one of the
conditions above is no longer verified.
NoteThe power of the electric heater is modulated
according to the battery voltage.
SYSTEM MAINTENANCE
In winter, the climate control system must be turned
on at least once a month for about 10 minutes.
Have the system inspected at a Fiat Dealership
before the summer.
The system uses R134a coolant which
does not pollute the environment in the
event of accidental leakage. Under no
circumstances use R12 fluid, which is
incompatible with the components of the system.
51GETTING TO
KNOW YOUR CARSAFETY
STARTING AND
DRIVING
WARNING LIGHTS
AND MESSAGES
IN AN EMERGENCY
SERVICING AND
MAINTENANCE
TECHNICAL
SPECIFICATIONS
INDEX
Page 59 of 420
ADJUSTING THE AIR TEMPERATURE
Turn the A or L knob clockwise or anticlockwise to
adjust the air temperature in the front left (knob
A) or right (knob L) zone of the passenger
compartment.
The set temperatures are shown on the displays.
Press the MONO button to align the air
temperature between the two zones.
Turn the L knob to return to the separate
management of air temperatures in the two zones.
Turning the knobs completely in one direction or the
other activates the "HI" (maximum heating) or
"LO" (maximum cooling) functions respectively.
To deactivate these functions, turn the temperature
knob to the desired temperature.
AIR DISTRIBUTION SELECTION
By pressing buttons H (
/
/
), it is possible to
set one of the 7 possible air distributions manually:
Air flow to the windscreen and front side
window diffusers to demist/defrost them.Air flow at central and side dashboard vents to
ventilate the chest and the face during the hot
season.Air flow to the front and rear footwell diffusers.
This air distribution setting heats the passenger
compartment most quickly, giving a prompt
sensation of warmth.
Air flow distributed between footwell
diffusers (hotter air) and central and side
dashboard vents (cooler air). This distribution
setting is useful in spring and autumn on
sunny days.Air flow distributed between footwell
diffusers and windscreen and front side
window defrosting/demisting diffusers. This
distribution setting allows the passenger
compartment to be warmed effectively and
prevents the windows from misting.Air flow distribution between windscreen
demisting/defrosting diffusers and side and
central dashboard vents. This allows air to be
sent to the windscreen in conditions of
strong sunlight.
Air flow distribution to all diffusers on
the car.
NoteAir always flows from the side dashboard
diffusers: it is, however, possible to interrupt the air
flow by operating the wheel located near the
corresponding vents.
In AUTO mode, the climate control system
automatically manages air distribution (the LEDs on
buttons H are off ).
When set manually, the air distribution is indicated
by the LEDs on the selected buttons switching on.
55GETTING TO
KNOW YOUR CARSAFETY
STARTING AND
DRIVING
WARNING LIGHTS
AND MESSAGES
IN AN EMERGENCY
SERVICING AND
MAINTENANCE
TECHNICAL
SPECIFICATIONS
INDEX
Page 65 of 420
When a low air flow is selected, the climate control
system control unit always activates the Start&Stop
function.
The climate control system control unit attempts to
manage the "discomfort" caused by the engine
stopping (deactivation of compressor and engine
coolant pump) as best it can but the operation of the
climate control system can be enhanced through
the deactivation of the Start&Stop function by
pressing the
button on the dashboard control trim
(see contents of "Start&Stop system" paragraph in
this chapter).
NoteIn particularly severe climate conditions it is
recommended to limit the use of the Start&Stop
function to prevent the compressor from
continuously switching on and off, with consequent
rapid misting of the windows and accumulation of
humidity with unpleasant smells in the passenger
compartment.
NoteWhen the Start&Stop function is on (engine
off and vehicle speed zero), the automatic
recirculation management is turned off always taking
air in from outside, to reduce the probability of
window misting up (as the compressor is off ).ADDITIONAL HEATER
(for versions/markets, where provided)
This allows the passenger compartment to be heated
more quickly in cold weather conditions.
The heater switches off automatically when the
required comfort conditions are achieved.
The additional heater activates automatically
depending on the environmental conditions and with
engine started.
IMPORTANT The heater only operates if the outside
temperature and engine coolant temperature are
low. The heater will not activate if the battery
voltage is too low.
61GETTING TO
KNOW YOUR CARSAFETY
STARTING AND
DRIVING
WARNING LIGHTS
AND MESSAGES
IN AN EMERGENCY
SERVICING AND
MAINTENANCE
TECHNICAL
SPECIFICATIONS
INDEX
Page 66 of 420
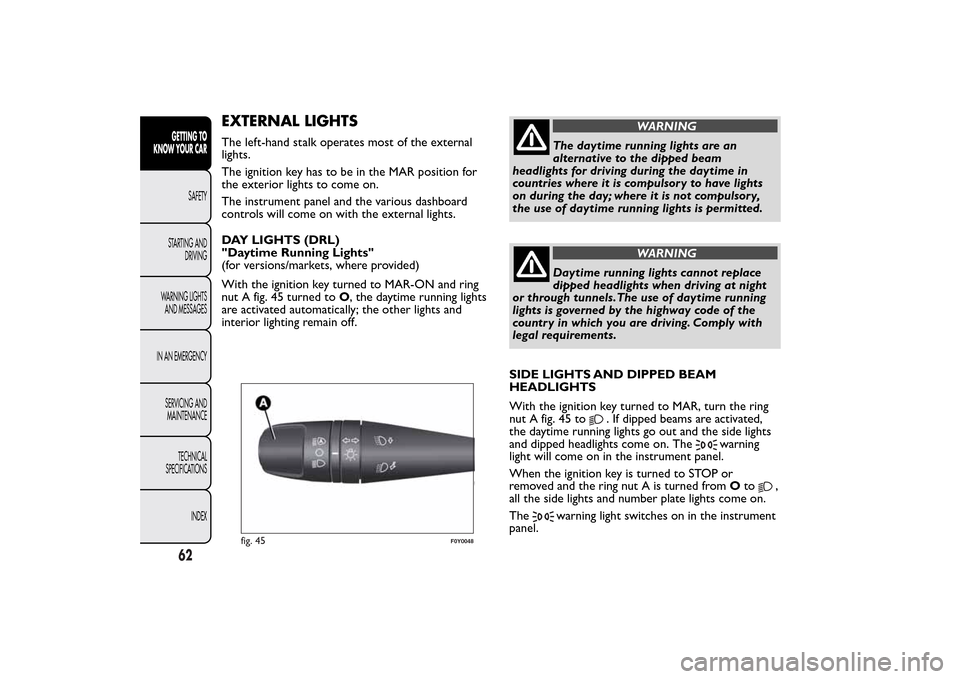
EXTERNAL LIGHTSThe left-hand stalk operates most of the external
lights.
The ignition key has to be in the MAR position for
the exterior lights to come on.
The instrument panel and the various dashboard
controls will come on with the external lights.
DAY LIGHTS (DRL)
"Daytime Running Lights"
(for versions/markets, where provided)
With the ignition key turned to MAR-ON and ring
nut A fig. 45 turned toO, the daytime running lights
are activated automatically; the other lights and
interior lighting remain off.
WARNING
The daytime running lights are an
alternative to the dipped beam
headlights for driving during the daytime in
countries where it is compulsory to have lights
on during the day; where it is not compulsory,
the use of daytime running lights is permitted.
WARNING
Daytime running lights cannot replace
dipped headlights when driving at night
or through tunnels.The use of daytime running
lights is governed by the highway code of the
country in which you are driving. Comply with
legal requirements.
SIDE LIGHTS AND DIPPED BEAM
HEADLIGHTS
With the ignition key turned to MAR, turn the ring
nut A fig. 45 to
. If dipped beams are activated,
the daytime running lights go out and the side lights
and dipped headlights come on. The
warning
light will come on in the instrument panel.
When the ignition key is turned to STOP or
removed and the ring nut A is turned fromOto
,
all the side lights and number plate lights come on.
The
warning light switches on in the instrument
panel.
fig. 45
F0Y0048
62GETTING TO
KNOW YOUR CAR
SAFETY
STARTING AND
DRIVING
WARNING LIGHTS
AND MESSAGES
IN AN EMERGENCY
SERVICING AND
MAINTENANCE
TECHNICAL
SPECIFICATIONS
INDEX
Page 72 of 420
REAR WINDOW WASHER/ WIPER
It can be operated only with the ignition key turned
to MAR.
Activation
Turn the ring nut B fig. 46 from
to
to operate
the rear window wiper as follows:
❒in intermittent mode when the windscreen wiper
is not operating;
❒in synchronous mode (at half the speed of the
windscreen wiper) when the windscreen wiper
is operating;
❒in continuous mode with reverse engaged.
With the windscreen wiper on and reverse gear
engaged, rear window wiping will be continuous in
the same way.
Pushing the stalk towards the dashboard (unstable
position) the rear window washer jet will activate.
Keep the stalk pushed for more than half a second to
activate the rear window wiper as well. Releasing
the stalk will activate the smart washing function, as
described for the windscreen wiper.
Deactivation
The function stops when the stalk is released.
Do not use the rear window wiper to
removelayersofsnoworice.In
such conditions, the wiper may be
subjected to excessive stress and the motor
protection, which prevents operation for a few
seconds, may intervene. If operation is not
restored, contact a Fiat Dealership.
68GETTING TO
KNOW YOUR CAR
SAFETY
STARTING AND
DRIVING
WARNING LIGHTS
AND MESSAGES
IN AN EMERGENCY
SERVICING AND
MAINTENANCE
TECHNICAL
SPECIFICATIONS
INDEX
Page 96 of 420
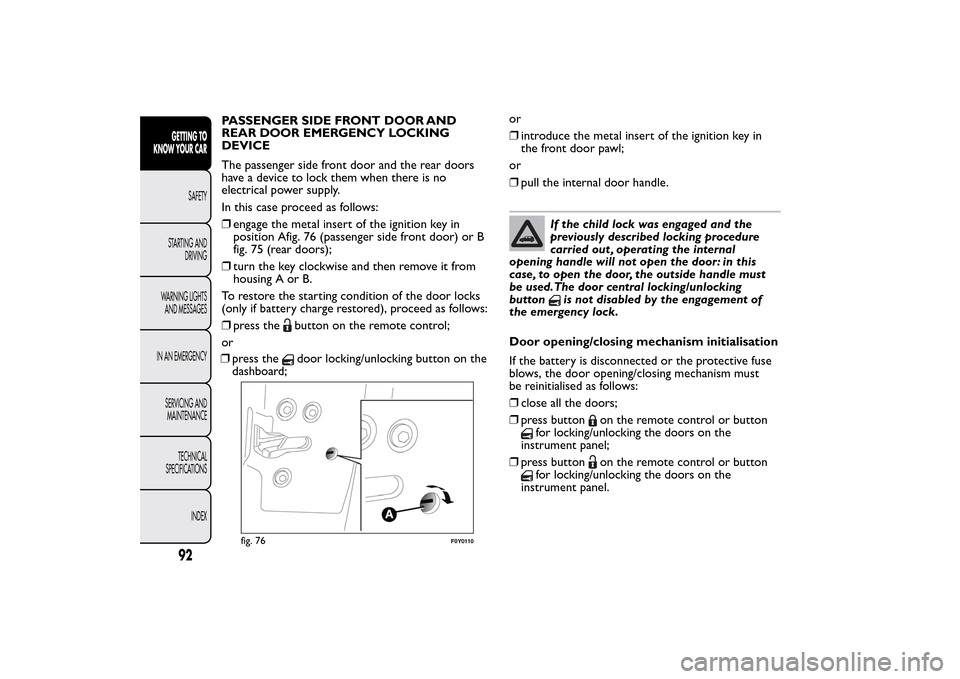
PASSENGER SIDE FRONT DOOR AND
REAR DOOR EMERGENCY LOCKING
DEVICE
The passenger side front door and the rear doors
have a device to lock them when there is no
electrical power supply.
In this case proceed as follows:
❒engage the metal insert of the ignition key in
position Afig. 76 (passenger side front door) or B
fig. 75 (rear doors);
❒turn the key clockwise and then remove it from
housing A or B.
To restore the starting condition of the door locks
(only if battery charge restored), proceed as follows:
❒press the
button on the remote control;
or
❒press thedoor locking/unlocking button on the
dashboard;or
❒introduce the metal insert of the ignition key in
the front door pawl;
or
❒pull the internal door handle.
If the child lock was engaged and the
previously described locking procedure
carried out , operating the internal
opening handle will not open the door: in this
case, to open the door, the outside handle must
be used.The door central locking/unlocking
button
is not disabled by the engagement of
the emergency lock.
Door opening/closing mechanism initialisation
If the battery is disconnected or the protective fuse
blows, the door opening/closing mechanism must
be reinitialised as follows:
❒close all the doors;
❒press button
on the remote control or button
for locking/unlocking the doors on the
instrument panel;
❒press button
on the remote control or button
for locking/unlocking the doors on the
instrument panel.
fig. 76
F0Y0110
92GETTING TO
KNOW YOUR CAR
SAFETY
STARTING AND
DRIVING
WARNING LIGHTS
AND MESSAGES
IN AN EMERGENCY
SERVICING AND
MAINTENANCE
TECHNICAL
SPECIFICATIONS
INDEX
Page 121 of 420
START&STOP SYSTEMINTRODUCTION
The Start&Stop system automatically stops the
engine each time the car is stationary and starts it
again when the driver wants to move off.
In this way, the efficiency of the car is increased, by
reducing consumption, emissions of harmful gases
and noise pollution.
OPERATING MODES
Engine stopping mode
With the car stopped, the engine stops with gearbox
in neutral and clutch pedal released.
NoteThe engine can only be stopped automatically
after exceeding a speed of about 10 km/h, to prevent
the engine from being repeatedly stopped when
driving at walking pace.
The
symbol appears on the display when the
engine stops.
Restarting the engine
Press the clutch pedal to restart the engine.MANUAL SYSTEM ACTIVATION/
DEACTIVATION
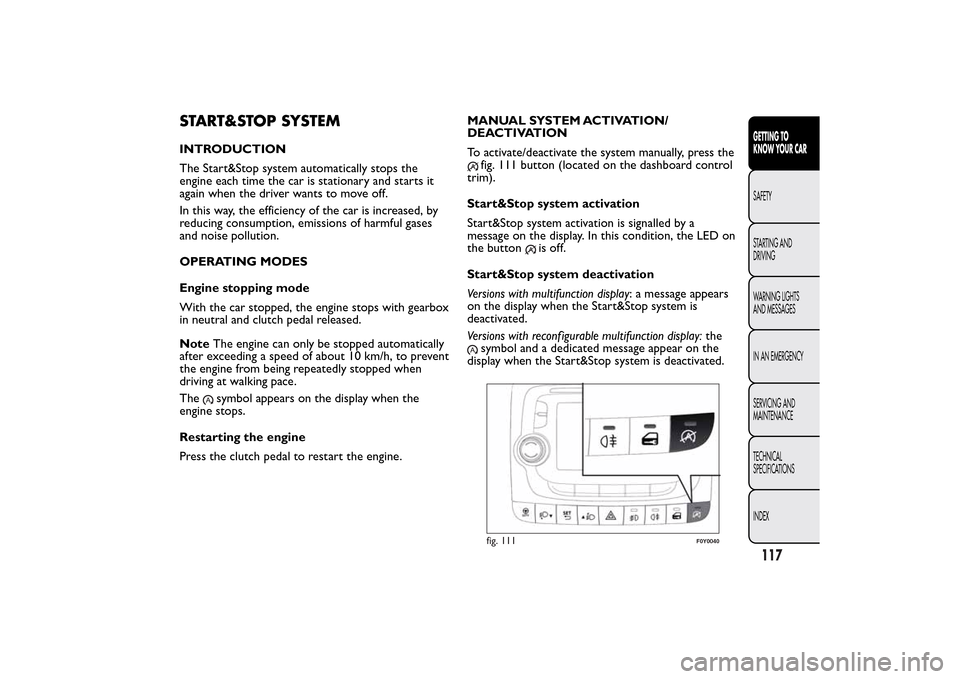
To activate/deactivate the system manually, press the
fig. 111 button (located on the dashboard control
trim).
Start&Stop system activation
Start&Stop system activation is signalled by a
message on the display. In this condition, the LED on
the button
is off.
Start&Stop system deactivation
Versions with multifunction display: a message appears
on the display when the Start&Stop system is
deactivated.
Versions with reconf igurable multifunction display:the
symbol and a dedicated message appear on the
display when the Start&Stop system is deactivated.fig. 111
F0Y0040
117GETTING TO
KNOW YOUR CARSAFETY
STARTING AND
DRIVING
WARNING LIGHTS
AND MESSAGES
IN AN EMERGENCY
SERVICING AND
MAINTENANCE
TECHNICAL
SPECIFICATIONS
INDEX