tyre pressure FIAT 500L LIVING 2014 2.G Owners Manual
[x] Cancel search | Manufacturer: FIAT, Model Year: 2014, Model line: 500L LIVING, Model: FIAT 500L LIVING 2014 2.GPages: 420, PDF Size: 9.77 MB
Page 25 of 420
Note“Trip B” may be disabled (see “Activating Trip
B”). “Range” and “Instantaneous fuel consumption"
parameters cannot be reset.
VALUES DISPLAYED
Outside temperature (for versions/markets, where
provided)
Indicates the temperature outside the passenger
compartment.
Range
This indicates the approximate distance which can be
travelled with the amount of fuel present in the
tank.“----”will appear on the display in the
following cases:
❒range value lower than 50 km (or 30 mi)
❒car parked with engine running for a long period.
IMPORTANT The range value variation can be
affected by several factors: driving style, type of route
(motorway, urban, mountain roads, etc.), conditions
of use (load, tyre pressures, etc.). Trip planning
must therefore take the above into account.
Distance travelled
Shows the distance covered since the start of the
new journey.Average consumption
Shows the approximate average fuel consumption
since the start of the new journey.
Instantaneous consumption
This value shows the fuel consumption. The value is
constantly updated. The display will show “----”
if the car is parked with the engine running.
Average speed
This shows the car average speed as a function of the
overall time elapsed since the start of the new
mission.
Tr i p t i me
Shows the time elapsed since the start of a new
journey.
IMPORTANT If there is no information, the Trip
computer displays "----"inplaceofthevalue.
When normal operating condition is restored,
calculation of different units will restart regularly. No
values displayed before the failure will be reset nor
will a new mission be started.
21GETTING TO
KNOW YOUR CARSAFETY
STARTING AND
DRIVING
WARNING LIGHTS
AND MESSAGES
IN AN EMERGENCY
SERVICING AND
MAINTENANCE
TECHNICAL
SPECIFICATIONS
INDEX
Page 116 of 420
ESC SYSTEM
(Electronic Stability Control)This is an electronic system that controls car stability
in the event of tyre grip loss, helping maintain
directional control.
The system is capable of recognising potentially
dangerous situations in terms of the stability and
intervenes automatically on the brakes in a
differentiated manner for the four wheels in order to
provide a stabilising torque.
The ESC system also includes the following
subsystems:
❒Hill Holder
❒ASR
❒HBA
❒DST
❒ERM
SYSTEM INTERVENTION
It is signalled by the flashing of theESCwarning light
on the instrument panel, to inform the driver that
the car is in critical stability and grip conditions.
SYSTEM ACTIVATION
The ESC system switches on automatically when the
engine is started and cannot be switched off.HILL HOLDER SYSTEM
This system is an integral part of the ESC system and
facilitates starting on slopes.
It is activated automatically in the following instances:
❒uphill: car stationary on a road with a gradient
higher than 5%, engine running, brake pressed and
gearbox in neutral or gear (other than reverse)
engaged;
❒downhill: car stationary on a road with a gradient
higher than 5%, engine running, brake pressed and
reverse gear engaged.
When setting off, the ESC system control unit
maintains braking pressure on the wheels until the
torque required for starting is reach or, in any case,
for a maximum of 2 seconds so that the right foot
can be moved easily from the brake pedal to the
accelerator pedal.
When 2 seconds have elapsed, without any
departure having taken place, the system is
automatically deactivated, gradually releasing the
braking pressure. During this release stage, a typical
mechanical brake release noise can be heard,
indicating that the car is about to move.
IMPORTANT The Hill Holder system is not a parking
brake; therefore, never leave the vehicle without
having engaged the handbrake, turned the engine off
and engaged the 1
stgear, so that the vehicle is parked
in safe conditions (for further information read
paragraph "When parked" in the chapter "Starting
and driving").
112GETTING TO
KNOW YOUR CAR
SAFETY
STARTING AND
DRIVING
WARNING LIGHTS
AND MESSAGES
IN AN EMERGENCY
SERVICING AND
MAINTENANCE
TECHNICAL
SPECIFICATIONS
INDEX
Page 118 of 420
WARNING
Do not take unnecessary risks, even if
your vehicle is fitted with the ESC and
ASR systems.Your driving style must always be
suited to the road conditions, visibility and
traffic .The driver is always responsible for road
safety.
HBA SYSTEM
(Hydraulic Brake Assist)
The HBA system is designed to improve the car's
braking capacity during emergency braking. The
system detects an emergency braking by monitoring
the speed and strength with which the brake pedal
is pressed, thereby applying the optimal brake
pressure.
This can reduce the stopping distance, the HBA
system therefore completes the ABS.
Max. assistance from the HBA system is obtained
pressing the brake pedal very quickly. In addition, the
brake pedal should be pressed continuously during
braking, avoiding intermittent presses, to obtain
benefits from the system.
Do not reduce pressure on the brake pedal until
braking is not necessary anymore.
The HBA system is deactivated when the brake pedal
is released.
WARNING
The HBA system cannot increase tyre
grip on the road over the limits imposed
by laws of physics: always drive carefully
according to the conditions of the road surface.
WARNING
The HBA system cannot prevent
accidents, including those due
to excessive speed on bends, travelling on
low-grip surfaces or aquaplaning.
WARNING
The HBA system is an aid for the driver,
who must always pay full attention
while driving.The responsibility always rests
with the driver.The features of the HBA system
must never be tested in imprudent or dangerous
ways, with the possibility of putting the safety
of the driver, occupants or other road users
at risk.
114GETTING TO
KNOW YOUR CAR
SAFETY
STARTING AND
DRIVING
WARNING LIGHTS
AND MESSAGES
IN AN EMERGENCY
SERVICING AND
MAINTENANCE
TECHNICAL
SPECIFICATIONS
INDEX
Page 177 of 420
To engage 6
th
gear (for versions/markets where
provided), push firmly to the right when operating
the lever in order to avoid selecting 4
th
gear by
mistake. The same applies to the shift from 6
th
to 5
th
gear.
IMPORTANT Reverse can only be engaged when the
car is completely stationary. With the engine
running, wait for at least 2 seconds with the clutch
pedal fully pressed before engaging reverse to
prevent damage to the gears and grating.
IMPORTANT The clutch pedal should be used only
for gear changes. Do not drive with your foot resting
on the clutch pedal, however lightly. For versions/
markets where provided, the electronic clutch
control could cut in, interpreting the incorrect
driving style as a fault.
WARNING
Depress the clutch pedal fully to change
gear correctly. It is therefore essential
that there is nothing under the pedals: make
sure the mats are lying flat and do not get
in the way of the pedals.Do not drive with your hand resting on
the gear lever as the force exerted, even if
slight , could lead over time to premature
wear of the gearbox internal components.
SAVING FUELHere are some suggestions which can help you to
save fuel and lower harmful emissions.
GENERAL CONSIDERATIONS
Car maintenance
Have checks and adjustments carried out in
accordance with the “Scheduled Servicing Plan”.
Ty r e s
Check the tyre pressures at least once every 4
weeks: if the pressure is too low, consumption levels
increase as resistance to rolling is higher.
Unnecessary loads
Do not travel with an overloaded boot. The weight
of the car and its arrangement greatly affect fuel
consumption and stability.
Roof rack/ski rack
Remove the roof rack or ski rack from the roof if not
in use. These accessories lower aerodynamic
penetration and adversely affect consumption levels.
When transporting particularly large objects, use a
trailer if possible.
173GETTING TO KNOW
YOUR CAR
SAFETYSTARTING AND
DRIVINGWARNING LIGHTS
AND MESSAGES
IN AN EMERGENCY
SERVICING AND
MAINTENANCE
TECHNICAL
SPECIFICATIONS
INDEX
Page 184 of 420
SNOW TYRESUse snow tyres of the same size as the normal tyres
provided with the car.
A Fiat Dealership will be happy to provide advice
concerning the most suitable type of tyre for the
customer's requirements.
For the type of tyre to be used, inflation pressures
and the specifications of snow tyres, follow the
instructions given in paragraph "Wheels" in section
"Technical specifications".
The winter performance of these tyres is
considerably reduced when the tread thickness is less
than 4 mm. Replace them in this case.
Due to the specific characteristics of snow tyres, in
normal weather conditions or on long motorway
journeys, the performance of these tyres is lower
than that of standard tyres.
Their usage should therefore be restricted in
accordance with their type-approval; always comply
with specific local regulations relating to the use
of snow tyres.
All four tyres should be the same (brand and track)
to ensure greater safety when driving and braking
and better driveability. Remember that you should
not change the rotation direction of the tyres.
WARNING
The maximum speed for snow tyres
marked "Q" is 160 km/h, while it is 190
km/h for "T" tyres and 210 km/h for "H" tyres.
The highway code speed limits must however
always be complied with.
180GETTING TO KNOW
YOUR CAR
SAFETYSTARTING AND
DRIVINGWARNING LIGHTS
AND MESSAGES
IN AN EMERGENCY
SERVICING AND
MAINTENANCE
TECHNICAL
SPECIFICATIONS
INDEX
Page 185 of 420
SNOW CHAINSThe use of snow chains should be in compliance with
local regulations.
Snow chains may be fitted to the tyres of the front
wheels (drive wheels) only.
Check the tension of the snow chains after the first
few metres have been driven.
17" tyres cannot be fitted with chains. For other
tyres (15" and 16") fit only reduced size snow chains
with a maximum projection of 9 mm beyond the
tyre profile.
IMPORTANT Snow chains cannot be fitted to the
space-saver wheel (for versions/markets, where
provided). If a front tyre is punctured, replace a rear
wheel with the space-saver wheel and move the
rear wheel to the front axle. In this way, with two
normal drive wheels at the front, snow chains can be
fitted.
Keep your speed down when snow chains
are fitted; do not exceed 50 km/h. Avoid
potholes, steps and pavements and avoid
driving for long distances on roads not covered
with snow to prevent damaging the car and
the roadbed.
STORING THE CARIf the car is to be left inactive for longer than a
month, the following precautions should be followed:
❒park the car in covered, dry and if possible
well-ventilated premises and slightly open
the windows;
❒engage a gear and check that the handbrake is not
engaged;
❒disconnect the negative battery terminal (for
versions with Start&Stop system refer to the
paragraph "Start&Stop system" in the chapter
"Knowing your car"); If the battery is not
disconnected the from the electrical system, check
its charge every thirty days;
❒clean and protect the painted parts using
protective wax;
❒clean and protect the shiny metal parts using
special compounds available commercially;
❒sprinkle talcum powder on the rubber windscreen
and rear window wiper blades and lift them off the
glass;
❒cover the car with a cloth or perforated plastic
sheet. Do not use sheets of non-perforated plastic
as they do not allow moisture on the car body
to evaporate;
❒inflate tyres to +0.5 bar above the standard
specified pressure and check it at intervals;
❒do not drain the engine cooling system.
181GETTING TO KNOW
YOUR CAR
SAFETYSTARTING AND
DRIVINGWARNING LIGHTS
AND MESSAGES
IN AN EMERGENCY
SERVICING AND
MAINTENANCE
TECHNICAL
SPECIFICATIONS
INDEX
Page 202 of 420
WARNING
Alert other drivers that the car is
stationary in compliance with local
regulations: hazard warning lights, warning
triangle, etc . Any passengers on board should
leave the car, especially if it is heavily laden.
Passengers should stay away from on-coming
traffic while the wheel is being changed. If you
are on a slope or uneven surface, place the
wedge provided under the wheel (see the
instructions on the next pages).
WARNING
The vehicle's driving characteristics will
be modified with the space-saver wheel
fitted. Avoid sudden starting or stopping, sharp
or fast turns.The overall duration of the
space-saver spare wheel is of about 3000 km,
after which the relevant tyre must be replaced
with another one of the same type. Never
install a standard tyre on a rim that is designed
for use with a space-saver wheel. Have the
wheel repaired and refitted as soon as possible.
Two or more space-saver wheels should never
be used together. Do not grease the threads
of wheel studs before fitting them: they might
slip out .
WARNING
The jack shall only be used for raising
the car model it has been supplied with.
Never use the jack for other purposes, such as
raising other car models. Never use the jack for
repair operations under the vehicle. Incorrectly
positioning the jack may cause the vehicle to
fall. Do not use the jack for loads higher than
the one shown on its label.The space-saver
wheel cannot be fitted with snow chains. If a
front (drive) tyre is punctured and chains are
needed, use a standard wheel from the rear
axle and install the space-saver wheel on the
rear axle. In this way, with two normal drive
wheels at the front axle, it is possible to use
snow chains.
WARNING
Incorrectly fitting the wheel cap may
cause it to fall off when the vehicle is in
motion. Never tamper with the inflating valve.
Never introduce tools of any kind between
rim and tyre. Check tyre and space-saver wheel
pressures regularly, complying with the values
given in the "Technical specifications" chapter.
198GETTING TO KNOW
YOUR CAR
SAFETY
STARTING AND
DRIVING
WARNING LIGHTS
AND MESSAGES
IN AN
EMERGENCY
SERVICING AND
MAINTENANCE
TECHNICAL
SPECIFICATIONS
INDEX
Page 207 of 420
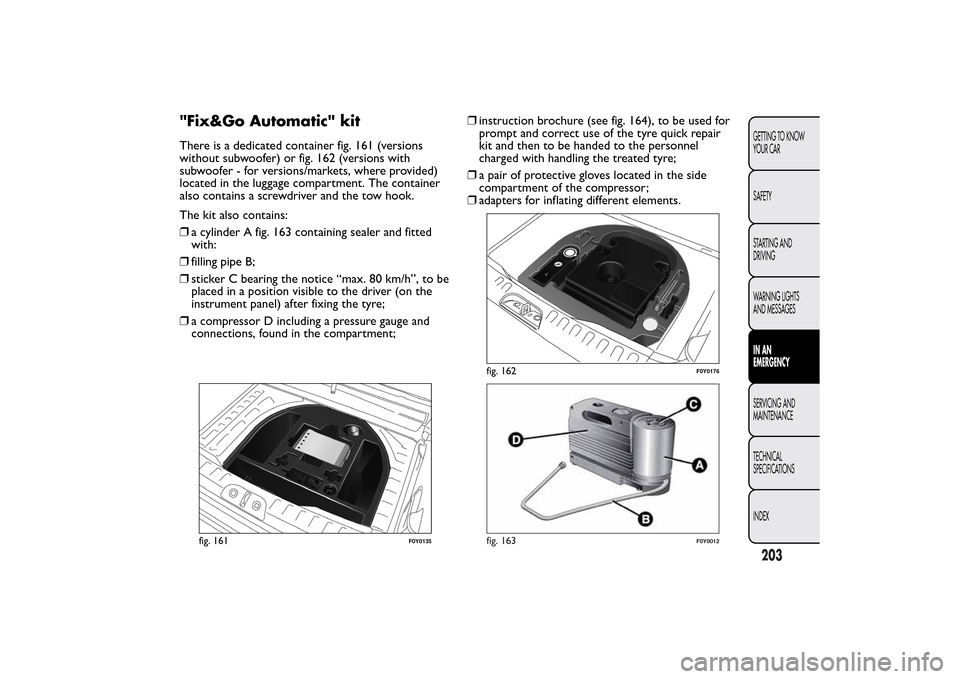
"Fix&Go Automatic" kitThere is a dedicated container fig. 161 (versions
without subwoofer) or fig. 162 (versions with
subwoofer - for versions/markets, where provided)
located in the luggage compartment. The container
also contains a screwdriver and the tow hook.
The kit also contains:
❒a cylinder A fig. 163 containing sealer and fitted
with:
❒filling pipe B;
❒sticker C bearing the notice “max. 80 km/h”, to be
placed in a position visible to the driver (on the
instrument panel) after fixing the tyre;
❒a compressor D including a pressure gauge and
connections, found in the compartment;❒instruction brochure (see fig. 164), to be used for
prompt and correct use of the tyre quick repair
kit and then to be handed to the personnel
charged with handling the treated tyre;
❒a pair of protective gloves located in the side
compartment of the compressor;
❒adapters for inflating different elements.
fig. 161
F0Y0135
fig. 162
F0Y0176
fig. 163
F0Y0012
203GETTING TO KNOW
YOUR CAR
SAFETY
STARTING AND
DRIVING
WARNING LIGHTS
AND MESSAGESIN AN
EMERGENCYSERVICING AND
MAINTENANCE
TECHNICAL
SPECIFICATIONS
INDEX
Page 209 of 420
WARNING
The cylinder contains ethyl glycol.
Contains latex: may cause an allergic
reaction. Harmful if swallowed. Eye irritant .
May cause irritation if inhaled or on contact .
Avoid contact with eyes, skin and clothes. In the
event of contact , wash immediately with plenty
of water. If ingested, do not induce vomiting.
Rinse out your mouth, drink large quantities of
water and seek immediate medical attention.
Keep away from children.The product must not
be used by asthmatics. Do not inhale the
vapours during insertion and suction. Call a
doctor immediately if allergic reactions are
noted. Store the canister in its proper
compartment , away from sources of heat .The
sealant fluid has an expiry date. Replace the
bottle containing out-of-date sealant fluid.Dispose of the bottle and the sealant
liquid properly. Have the sealing fluid and
the cylinder disposed of in compliance
with national and local regulations.
INFLATING PROCEDURE
WARNING
Put on the protective gloves provided
together with quick tyre repair kit .Proceed as follows:
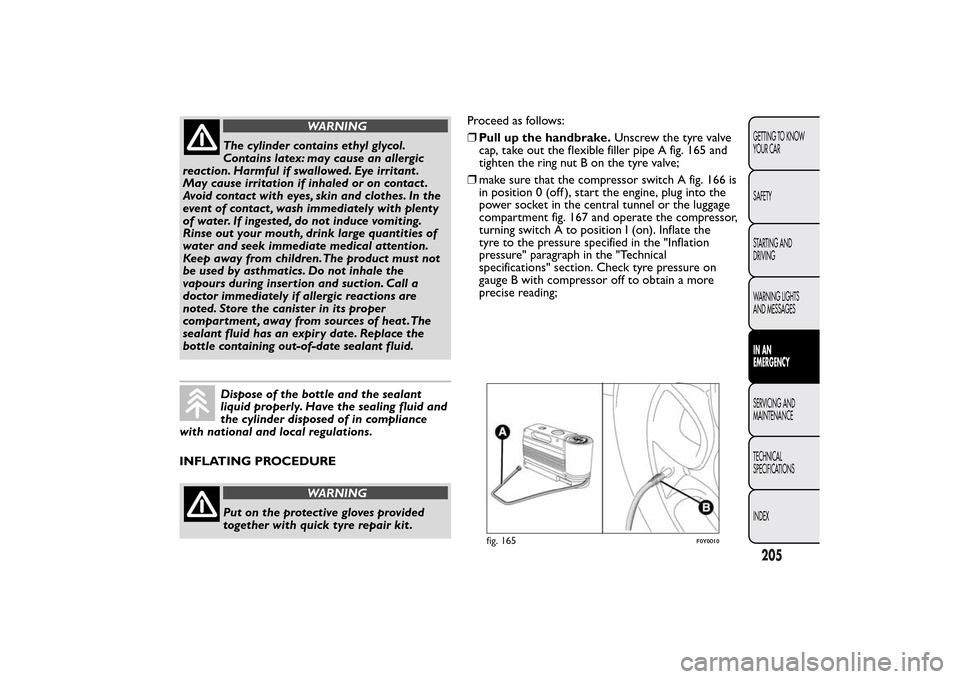
❒Pull up the handbrake.Unscrew the tyre valve
cap, take out the flexible filler pipe A fig. 165 and
tighten the ring nut B on the tyre valve;
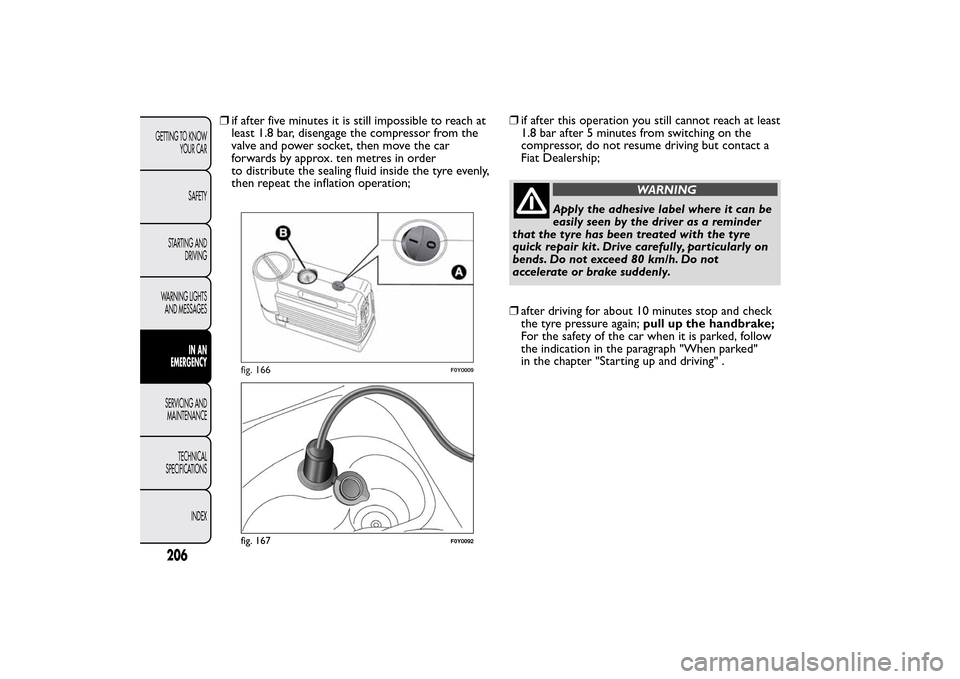
❒make sure that the compressor switch A fig. 166 is
in position 0 (off ), start the engine, plug into the
power socket in the central tunnel or the luggage
compartment fig. 167 and operate the compressor,
turning switch A to position I (on). Inflate the
tyre to the pressure specified in the "Inflation
pressure" paragraph in the "Technical
specifications" section. Check tyre pressure on
gauge B with compressor off to obtain a more
precise reading;
fig. 165
F0Y0010
205GETTING TO KNOW
YOUR CAR
SAFETY
STARTING AND
DRIVING
WARNING LIGHTS
AND MESSAGESIN AN
EMERGENCYSERVICING AND
MAINTENANCE
TECHNICAL
SPECIFICATIONS
INDEX
Page 210 of 420
❒if after five minutes it is still impossible to reach at
least 1.8 bar, disengage the compressor from the
valve and power socket, then move the car
forwards by approx. ten metres in order
to distribute the sealing fluid inside the tyre evenly,
then repeat the inflation operation;❒if after this operation you still cannot reach at least
1.8 bar after 5 minutes from switching on the
compressor, do not resume driving but contact a
Fiat Dealership;
WARNING
Apply the adhesive label where it can be
easily seen by the driver as a reminder
that the tyre has been treated with the tyre
quick repair kit . Drive carefully, particularly on
bends. Do not exceed 80 km/h. Do not
accelerate or brake suddenly.
❒after driving for about 10 minutes stop and check
the tyre pressure again;pull up the handbrake;
For the safety of the car when it is parked, follow
the indication in the paragraph "When parked"
in the chapter "Starting up and driving" .
fig. 166
F0Y0009
fig. 167
F0Y0092
206GETTING TO KNOW
YOUR CAR
SAFETY
STARTING AND
DRIVING
WARNING LIGHTS
AND MESSAGES
IN AN
EMERGENCY
SERVICING AND
MAINTENANCE
TECHNICAL
SPECIFICATIONS
INDEX