handbrake FIAT 500L LIVING 2015 2.G User Guide
[x] Cancel search | Manufacturer: FIAT, Model Year: 2015, Model line: 500L LIVING, Model: FIAT 500L LIVING 2015 2.GPages: 224, PDF Size: 5.92 MB
Page 116 of 224

❒instruction booklet to be used for
prompt and correct use of the kit and
then to be handed to the personnel
charged with handling the treated tyre;
❒a pair of protective gloves located
in the side compartment of the
compressor;
❒adapters for inflating different
elements.
IMPORTANT The sealing fluid is
effective with external temperatures of
between –20°C and +50°C. The sealing
fluid has an expiry date.INFLATION PROCEDUREProceed as follows:
❒Pull the handbrake.Unscrew the
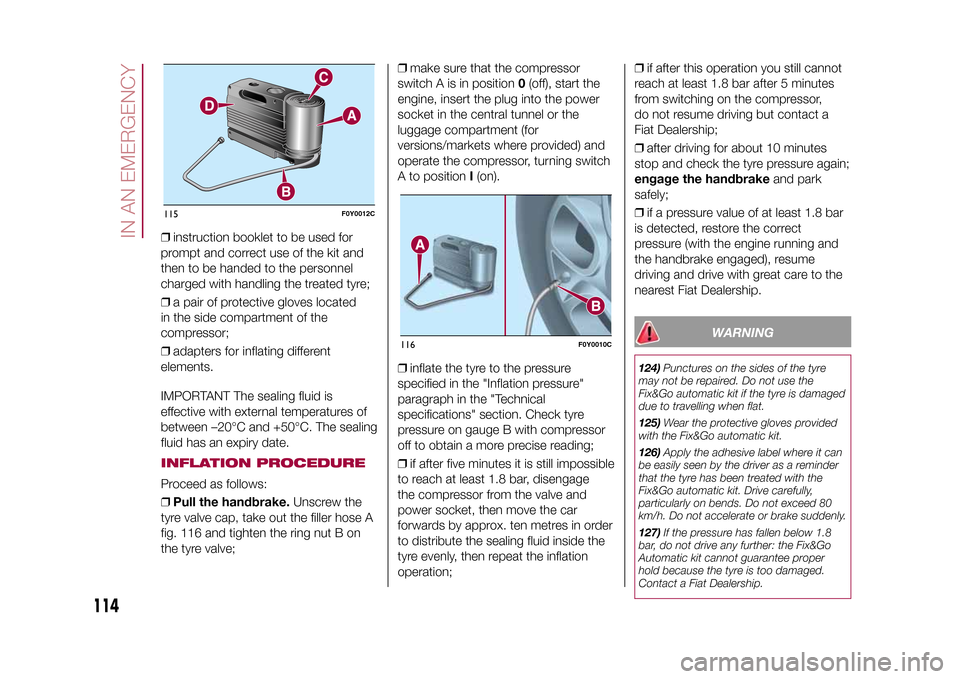
tyre valve cap, take out the filler hose A
fig. 116 and tighten the ring nut B on
the tyre valve;❒make sure that the compressor
switch A is in position0(off), start the
engine, insert the plug into the power
socket in the central tunnel or the
luggage compartment (for
versions/markets where provided) and
operate the compressor, turning switch
A to positionI(on).
❒inflate the tyre to the pressure
specified in the "Inflation pressure"
paragraph in the "Technical
specifications" section. Check tyre
pressure on gauge B with compressor
off to obtain a more precise reading;
❒if after five minutes it is still impossible
to reach at least 1.8 bar, disengage
the compressor from the valve and
power socket, then move the car
forwards by approx. ten metres in order
to distribute the sealing fluid inside the
tyre evenly, then repeat the inflation
operation;❒if after this operation you still cannot
reach at least 1.8 bar after 5 minutes
from switching on the compressor,
do not resume driving but contact a
Fiat Dealership;
❒after driving for about 10 minutes
stop and check the tyre pressure again;
engage the handbrakeand park
safely;
❒if a pressure value of at least 1.8 bar
is detected, restore the correct
pressure (with the engine running and
the handbrake engaged), resume
driving and drive with great care to the
nearest Fiat Dealership.
WARNING
124)Punctures on the sides of the tyre
may not be repaired. Do not use the
Fix&Go automatic kit if the tyre is damaged
due to travelling when flat.
125)Wear the protective gloves provided
with the Fix&Go automatic kit.
126)Apply the adhesive label where it can
be easily seen by the driver as a reminder
that the tyre has been treated with the
Fix&Go automatic kit. Drive carefully,
particularly on bends. Do not exceed 80
km/h. Do not accelerate or brake suddenly.
127)If the pressure has fallen below 1.8
bar, do not drive any further: the Fix&Go
Automatic kit cannot guarantee proper
hold because the tyre is too damaged.
Contact a Fiat Dealership.
115
F0Y0012C
116
F0Y0010C
114
IN AN EMERGENCY
9-1-2015 12:9 Pagina 114
Page 130 of 224

JUMP STARTINGIf the battery is flat, a jump starting can
be performed using the battery and
the cables of another vehicle, or using a
booster battery.IMPORTANTWhen a booster battery is used, comply
with the utilisation and precaution
instructions specified by the producer.
Do not use the booster battery or
any other source of external supply with
a voltage above 12 V: the battery, the
starter, the alternator and the electrical
system of the vehicle could be
damaged.
Do not attempt jump starting if the
battery is frozen. The battery could
break and explode!PREPARATION TO JUMP
STARTING
140) 141) 142)
68)
IMPORTANT The positive terminal (+) of
the battery is shielded by a protective
cover. Lift the cover to access the
positive terminal.
Proceed as follows:
❒engage the handbrake, move the
Dualogic gear lever to P (Park) or,
for versions with manual gearbox, to
neutral and bring the ignition key to
STOP;❒switch off all the other electrical
devices in the vehicle;
❒if another vehicle is ready for jump
starting, park the vehicle within the
reach of the cables to be used for
starting, operate the handbrake and
make sure that the ignition is
deactivated.
IMPORTANT Avoid contact between
the two vehicles since this could cause
a connection to earth and may result
in serious injury to any people nearby.
PROCEDURE FOR JUMP
STARTINGIMPORTANT If the procedure below is
carried out incorrectly, it can cause
severe injury to people or damage the
recharging system of one or both
vehicles. Carefully follow the
instructions given below.Cable connectionProceed as follows to carry out a jump
starting:
❒connect one end of the cable used
for positive (+) to the positive terminal
(+) of the vehicle with flat battery;
❒connect the other end of the cable
used for positive (+) to the positive
terminal (+) of the auxiliary battery;❒connect one end of the cable used
for negative (–) to the negative terminal
(–) of the auxiliary battery;
❒connect the other end of the cable
used for negative (–) to an engine earth
(the visible metal part of the vehicle
engine with flat battery) away from the
battery and the fuel injection system;
❒start the vehicle engine with the
auxiliary battery, let it run for a
few minutes at idling. Start the engine
of the vehicle with flat battery.
Cable disconnectionOnce the engine has been started,
remove the cables proceeding as
follows:
❒disconnect the end of the cable used
for negative (–) from the engine earth
of the vehicle with flat battery;
❒disconnect the other end of the cable
used for negative (–) from the negative
terminal (–) of the auxiliary battery;
❒disconnect the end of the cable used
for positive (+) from the positive terminal
(+) of the auxiliary battery;
❒disconnect one end of the cable
used for positive (+) from the positive
terminal (+) of the vehicle with flat
battery.
128
IN AN EMERGENCY
9-1-2015 12:9 Pagina 128
Page 137 of 224

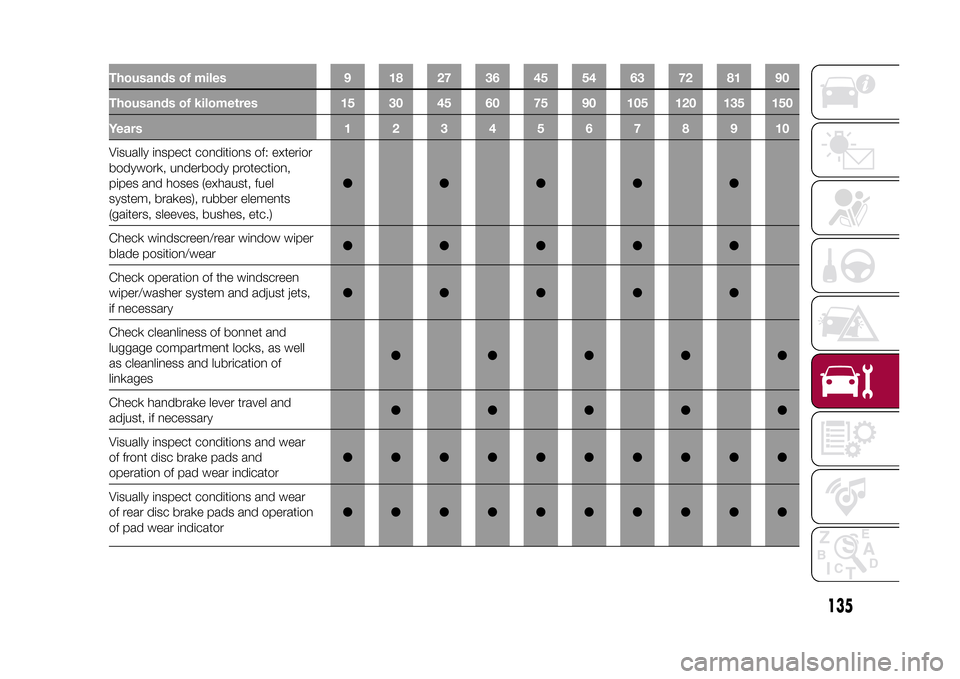
Thousands of miles 9 18 27 36 45 54 63 72 81 90
Thousands of kilometres 15 30 45 60 75 90 105 120 135 150
Years12345678910Visually inspect conditions of: exterior
bodywork, underbody protection,
pipes and hoses (exhaust, fuel
system, brakes), rubber elements
(gaiters, sleeves, bushes, etc.)●●●●●
Check windscreen/rear window wiper
blade position/wear●●●●●
Check operation of the windscreen
wiper/washer system and adjust jets,
if necessary●●●●●
Check cleanliness of bonnet and
luggage compartment locks, as well
as cleanliness and lubrication of
linkages●●●●●
Check handbrake lever travel and
adjust, if necessary●●●●●
Visually inspect conditions and wear
of front disc brake pads and
operation of pad wear indicator●●●●●●●●●●
Visually inspect conditions and wear
of rear disc brake pads and operation
of pad wear indicator●●●●●●●●●●
135
9-1-2015 12:9 Pagina 135
Page 143 of 224

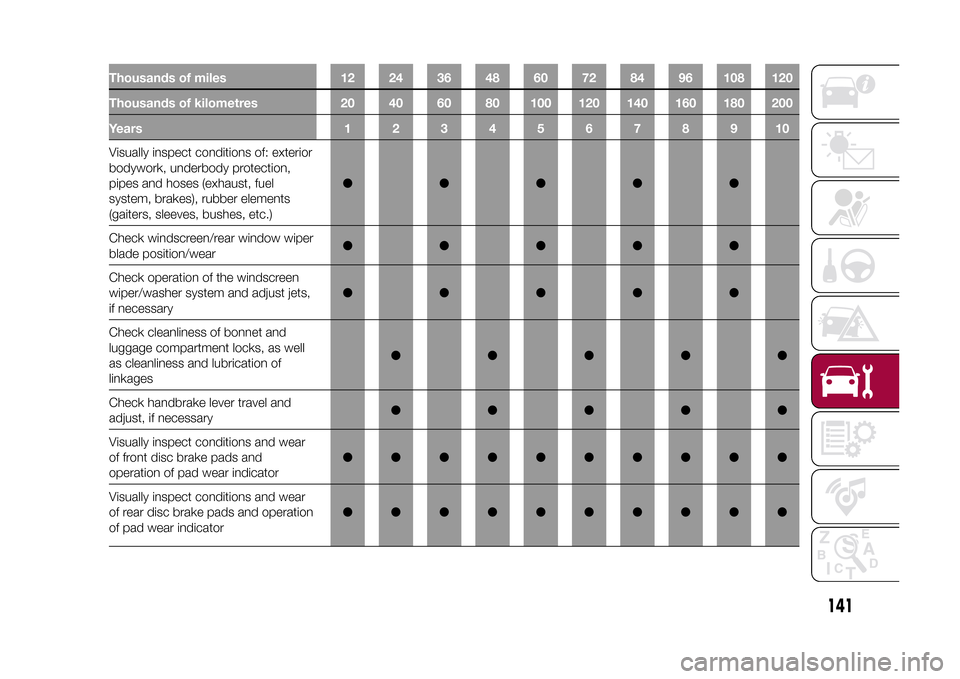
Thousands of miles 12 24 36 48 60 72 84 96 108 120
Thousands of kilometres 20 40 60 80 100 120 140 160 180 200
Years12345678910Visually inspect conditions of: exterior
bodywork, underbody protection,
pipes and hoses (exhaust, fuel
system, brakes), rubber elements
(gaiters, sleeves, bushes, etc.)●●●●●
Check windscreen/rear window wiper
blade position/wear●●●●●
Check operation of the windscreen
wiper/washer system and adjust jets,
if necessary●●●●●
Check cleanliness of bonnet and
luggage compartment locks, as well
as cleanliness and lubrication of
linkages●●●●●
Check handbrake lever travel and
adjust, if necessary●●●●●
Visually inspect conditions and wear
of front disc brake pads and
operation of pad wear indicator●●●●●●●●●●
Visually inspect conditions and wear
of rear disc brake pads and operation
of pad wear indicator●●●●●●●●●●
141
9-1-2015 12:9 Pagina 141