key FIAT 500X 2015 2.G User Guide
[x] Cancel search | Manufacturer: FIAT, Model Year: 2015, Model line: 500X, Model: FIAT 500X 2015 2.GPages: 240, PDF Size: 10.72 MB
Page 15 of 240
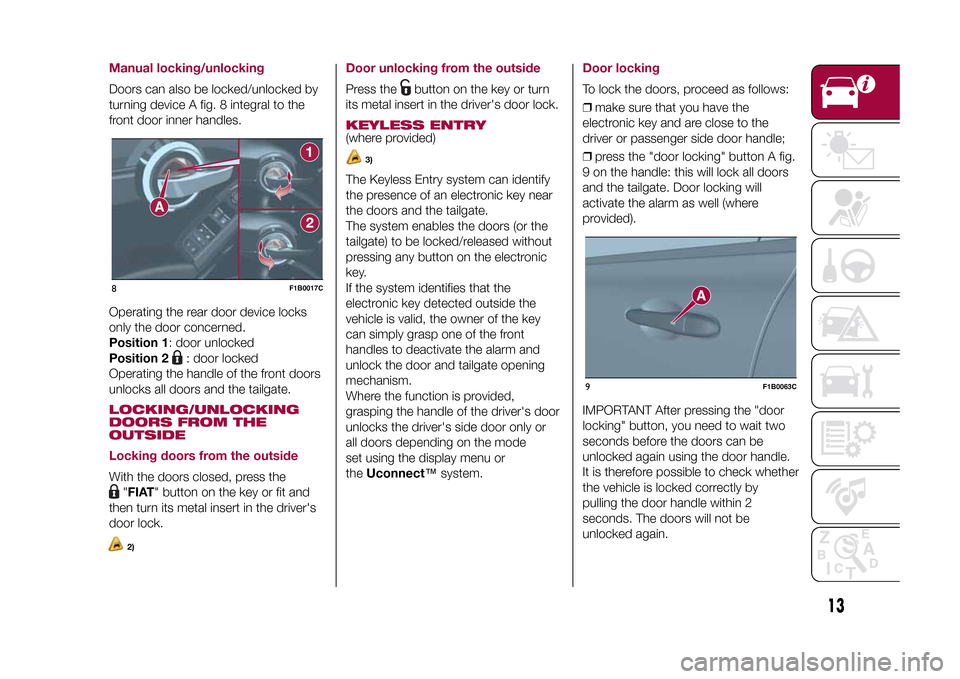
Manual locking/unlockingDoors can also be locked/unlocked by
turning device A fig. 8 integral to the
front door inner handles.
Operating the rear door device locks
only the door concerned.
Position 1: door unlocked
Position 2
: door locked
Operating the handle of the front doors
unlocks all doors and the tailgate.
LOCKING/UNLOCKING
DOORS FROM THE
OUTSIDE
Locking doors from the outsideWith the doors closed, press the
"FIAT" button on the key or fit and
then turn its metal insert in the driver's
door lock.2)
Door unlocking from the outsidePress the
button on the key or turn
its metal insert in the driver's door lock.
KEYLESS ENTRY(where provided)
3)
The Keyless Entry system can identify
the presence of an electronic key near
the doors and the tailgate.
The system enables the doors (or the
tailgate) to be locked/released without
pressing any button on the electronic
key.
If the system identifies that the
electronic key detected outside the
vehicle is valid, the owner of the key
can simply grasp one of the front
handles to deactivate the alarm and
unlock the door and tailgate opening
mechanism.
Where the function is provided,
grasping the handle of the driver's door
unlocks the driver's side door only or
all doors depending on the mode
set using the display menu or
theUconnect™system.
Door lockingTo lock the doors, proceed as follows:
❒make sure that you have the
electronic key and are close to the
driver or passenger side door handle;
❒press the "door locking" button A fig.
9 on the handle: this will lock all doors
and the tailgate. Door locking will
activate the alarm as well (where
provided).
IMPORTANT After pressing the "door
locking" button, you need to wait two
seconds before the doors can be
unlocked again using the door handle.
It is therefore possible to check whether
the vehicle is locked correctly by
pulling the door handle within 2
seconds. The doors will not be
unlocked again.
8
F1B0017C
9
F1B0063C
13
15-12-2014 8:23 Pagina 13
Page 16 of 240
Driver side door emergency
openingIf the electronic key does not work (e.g.
because its battery is flat or the vehicle
battery is flat), the emergency metal
insert inside the key can in any case be
used to operate the lock, unlocking
the driver's door.
To extract the metal insert, proceed as
follows:
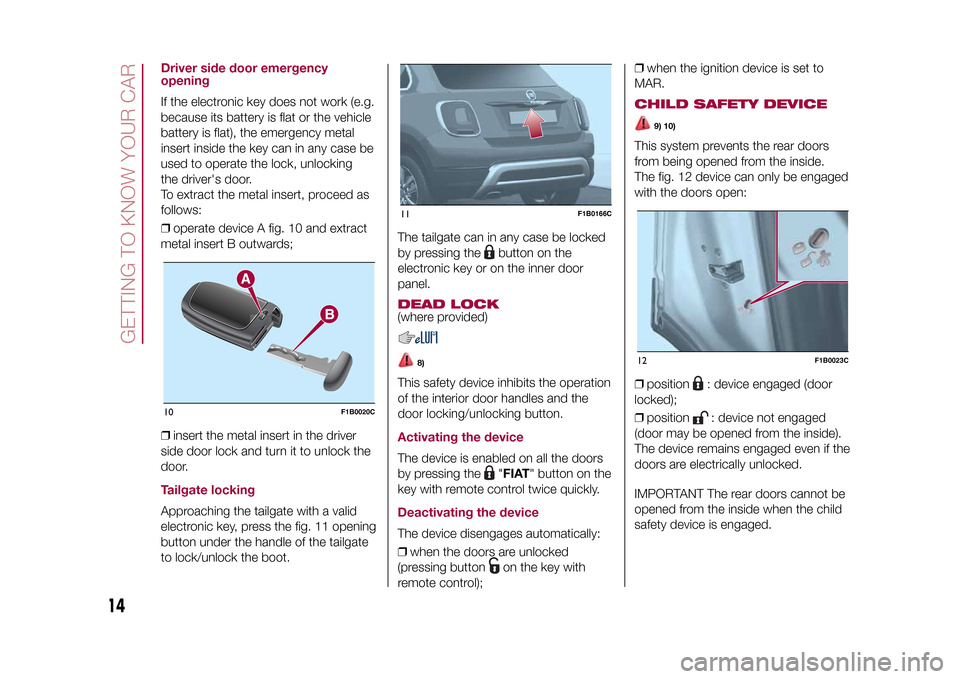
❒operate device A fig. 10 and extract
metal insert B outwards;
❒insert the metal insert in the driver
side door lock and turn it to unlock the
door.Tailgate lockingApproaching the tailgate with a valid
electronic key, press the fig. 11 opening
button under the handle of the tailgate
to lock/unlock the boot.The tailgate can in any case be locked
by pressing the
button on the
electronic key or on the inner door
panel.
DEAD LOCK(where provided)
8)
This safety device inhibits the operation
of the interior door handles and the
door locking/unlocking button.Activating the deviceThe device is enabled on all the doors
by pressing the
"FIAT" button on the
key with remote control twice quickly.
Deactivating the deviceThe device disengages automatically:
❒when the doors are unlocked
(pressing button
on the key with
remote control);❒when the ignition device is set to
MAR.
CHILD SAFETY DEVICE
9) 10)
This system prevents the rear doors
from being opened from the inside.
The fig. 12 device can only be engaged
with the doors open:
❒position
: device engaged (door
locked);
❒position: device not engaged
(door may be opened from the inside).
The device remains engaged even if the
doors are electrically unlocked.
IMPORTANT The rear doors cannot be
opened from the inside when the child
safety device is engaged.
10
F1B0020C
11
F1B0166C
12
F1B0023C
14
GETTING TO KNOW YOUR CAR
15-12-2014 8:23 Pagina 14
Page 17 of 240
WARNING
8)Once the Dead Lock system is
engaged, it is impossible to open the
doors from inside the vehicle. Before
getting out of the vehicle, please therefore
check that there is no-one left on board.
9)NEVER leave children unattended inside
the vehicle, nor leave the vehicle with the
doors unlocked in a place that children can
access easily. Children may seriously, or
even fatally, injure themselves. Also ensure
that children do not inadvertently operate
the electric parking brake, the brake pedal
or the automatic transmission lever.
10)Always use this device when carrying
children. After engaging the child lock
on both rear doors, check for proper
engagement by trying to open a rear door
with the internal handle.
WARNING
2)Make sure to take the key with you once
a door or the tailgate is locked, to prevent
locking the same key inside the vehicle.
Once it has been left inside, the key can be
collected only using the second key
supplied.3)The operation of the recognition system
depends on various factors, such as, for
example, any electromagnetic wave
interference from external sources (e.g.
mobile phones), the charge of the battery
in the electronic key and the presence
of metal objects near the key or the vehicle.
In these cases it is still possible to unlock
the doors by using the metal insert in
the electronic key (see description on the
following pages).
SEATSFRONT SEATS WITH
MANUAL ADJUSTMENT
11)4)
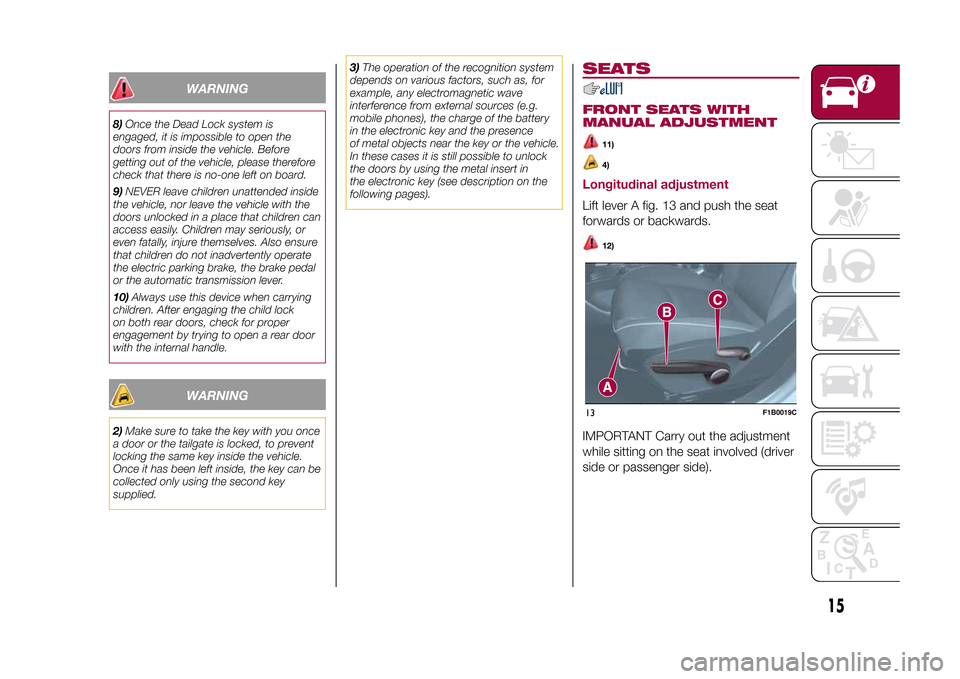
Longitudinal adjustmentLift lever A fig. 13 and push the seat
forwards or backwards.
12)
IMPORTANT Carry out the adjustment
while sitting on the seat involved (driver
side or passenger side).13
F1B0019C
15
15-12-2014 8:23 Pagina 15
Page 24 of 240
DIPPED BEAM
HEADLIGHTSTurn the light switch ring nut to
:
side lights, dipped beam headlights and
instrument panel will light up; the
warning light will come on on the
latter.
DAYTIME RUNNING
LIGHTS (DRL)"Daytime Running Lights"
18) 19)
With the ignition device turned to MAR
and the light switch ring nut turned to
positionOthe daytime running lights
are automatically activated (the other
lights and interior lighting remain off).FOG LIGHTS(where provided)
Press the
button to turn on the fog
lights with side lights and dipped beam
headlights on.
When the fog lights are on, the side
lights and number plate lights are also
on, while the daytime running lights
are off.
Press the button again or turn the
switch ring nut toOin order to switch it
off.
REAR FOG LIGHTThe button that controls switching on
and off of the rear fog light is integrated
into the light switch.
Press the
button to turn on the rear
fog light with side lights and fog lights
on.
PARKING LIGHTSThese lights can be switched on with
ignition device at STOP or with key
removed, by moving the light switch
ring nut to positionOand then to
position
, the switch will go back
to positionO.
The
warning light switches on in
the instrument panel.
HEADLIGHTS OFF TIMER
(Follow me home)
ActivationWith headlights on, bring the ignition
device to STOP.
Within 45 seconds, turn the light switch
ring nut toO: the set timing starts.DeactivationThis function is deactivated by
switching on the headlights, the side
lights or bringing the ignition device to
MAR.
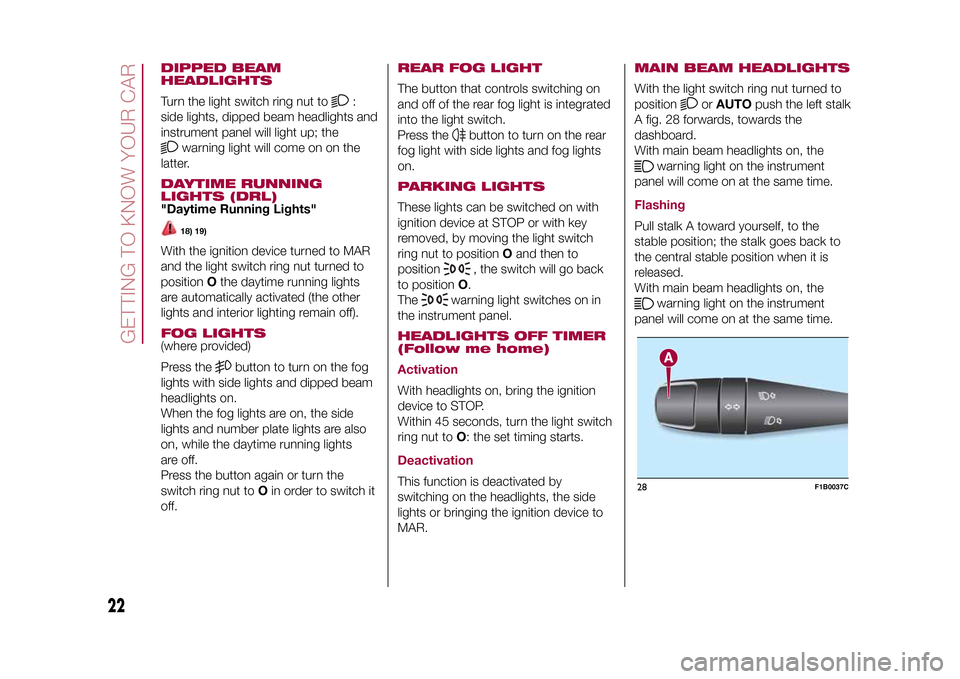
MAIN BEAM HEADLIGHTSWith the light switch ring nut turned to
position
orAUTOpush the left stalk
A fig. 28 forwards, towards the
dashboard.
With main beam headlights on, the
warning light on the instrument
panel will come on at the same time.
FlashingPull stalk A toward yourself, to the
stable position; the stalk goes back to
the central stable position when it is
released.
With main beam headlights on, the
warning light on the instrument
panel will come on at the same time.
28
F1B0037C
22
GETTING TO KNOW YOUR CAR
15-12-2014 8:23 Pagina 22
Page 28 of 240
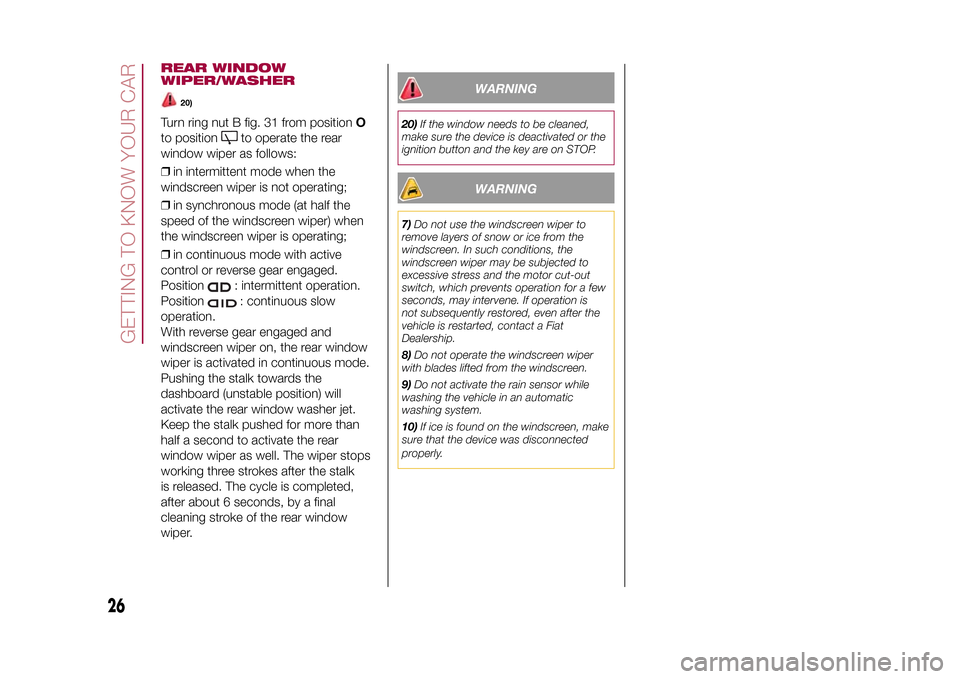
REAR WINDOW
WIPER/WASHER
20)
Turn ring nut B fig. 31 from positionO
to position
to operate the rear
window wiper as follows:
❒in intermittent mode when the
windscreen wiper is not operating;
❒in synchronous mode (at half the
speed of the windscreen wiper) when
the windscreen wiper is operating;
❒in continuous mode with active
control or reverse gear engaged.
Position: intermittent operation.
Position: continuous slow
operation.
With reverse gear engaged and
windscreen wiper on, the rear window
wiper is activated in continuous mode.
Pushing the stalk towards the
dashboard (unstable position) will
activate the rear window washer jet.
Keep the stalk pushed for more than
half a second to activate the rear
window wiper as well. The wiper stops
working three strokes after the stalk
is released. The cycle is completed,
after about 6 seconds, by a final
cleaning stroke of the rear window
wiper.
WARNING
20)If the window needs to be cleaned,
make sure the device is deactivated or the
ignition button and the key are on STOP.
WARNING
7)Do not use the windscreen wiper to
remove layers of snow or ice from the
windscreen. In such conditions, the
windscreen wiper may be subjected to
excessive stress and the motor cut-out
switch, which prevents operation for a few
seconds, may intervene. If operation is
not subsequently restored, even after the
vehicle is restarted, contact a Fiat
Dealership.
8)Do not operate the windscreen wiper
with blades lifted from the windscreen.
9)Do not activate the rain sensor while
washing the vehicle in an automatic
washing system.
10)If ice is found on the windscreen, make
sure that the device was disconnected
properly.
26
GETTING TO KNOW YOUR CAR
15-12-2014 8:23 Pagina 26
Page 33 of 240
ELECTRIC WINDOWS
21)
Electric windows operate with the
ignition device at MAR and for about 3
minutes after the ignition device
switches to STOP (or key removed).
When one of the front doors is opened
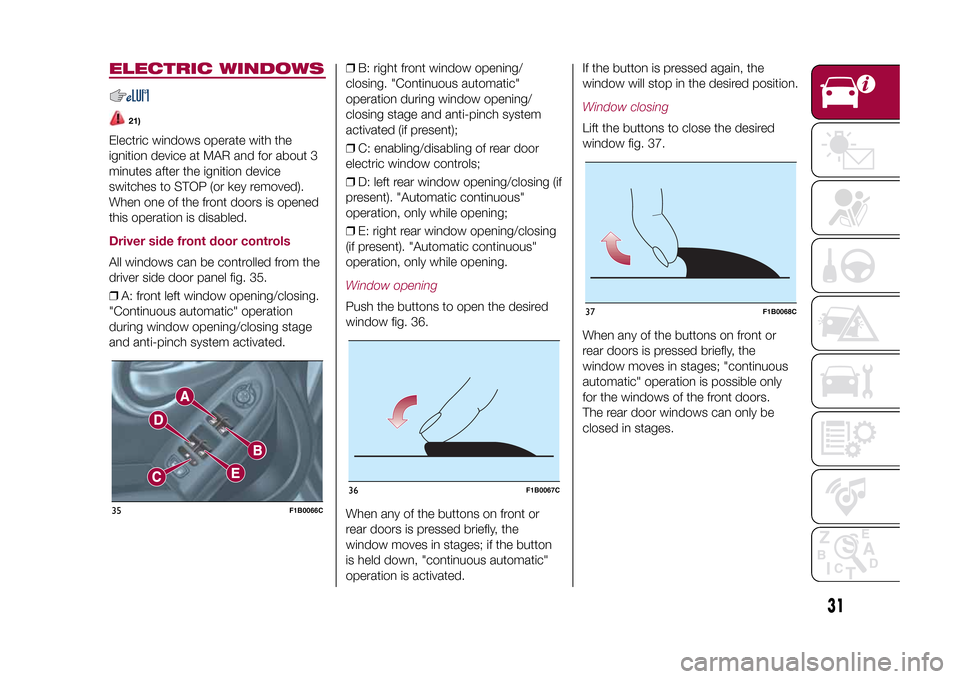
this operation is disabled.Driver side front door controlsAll windows can be controlled from the
driver side door panel fig. 35.
❒A: front left window opening/closing.
"Continuous automatic" operation
during window opening/closing stage
and anti-pinch system activated.❒B: right front window opening/
closing. "Continuous automatic"
operation during window opening/
closing stage and anti-pinch system
activated (if present);
❒C: enabling/disabling of rear door
electric window controls;
❒D: left rear window opening/closing (if
present). "Automatic continuous"
operation, only while opening;
❒E: right rear window opening/closing
(if present). "Automatic continuous"
operation, only while opening.
Window openingPush the buttons to open the desired
window fig. 36.
When any of the buttons on front or
rear doors is pressed briefly, the
window moves in stages; if the button
is held down, "continuous automatic"
operation is activated.If the button is pressed again, the
window will stop in the desired position.
Window closingLift the buttons to close the desired
window fig. 37.
When any of the buttons on front or
rear doors is pressed briefly, the
window moves in stages; "continuous
automatic" operation is possible only
for the windows of the front doors.
The rear door windows can only be
closed in stages.
35
F1B0066C
36
F1B0067C
37
F1B0068C
31
15-12-2014 8:23 Pagina 31
Page 34 of 240
Front window anti-pinch safety
device(where provided)
This safety system can recognise the
presence of any obstacle during the
window closing movement. If this
occurs, the system stops the window's
movement and reverts it, depending
on its position. The window then lowers
by about 5 cm in relation to the first
stop position. The window cannot be
operated in any way during this time.Electric window system
initialisationIf power supply is interrupted, the
electric window automatic operation
must be reinitialised.
The initialisation procedure described
below must be carried out with the
doors closed and for each door:
❒close the window by keeping the
button pressed;
❒once the window is completely
closed, keep the button pressed for at
least 3 seconds.
WARNING
21)Incorrect use of the electric windows
may be dangerous. Before and during
operation, always check that nobody
is exposed to the risk of being injured
either directly by the moving window or
through objects getting caught or by being
hit. When leaving the vehicle (equipped
with mechanical key with remote control),
always remove the key from the ignition
device to prevent accidental operation of
the electric windows from being a hazard
for those still on board.
ELECTRIC SUN
ROOF
22)
The electric sun roof comprises two
glass panels (the front one is mobile
and the rear one fixed) and is fitted with
two manually operated sun blinds.
Operation of the sun roof is only
possible with the ignition device at
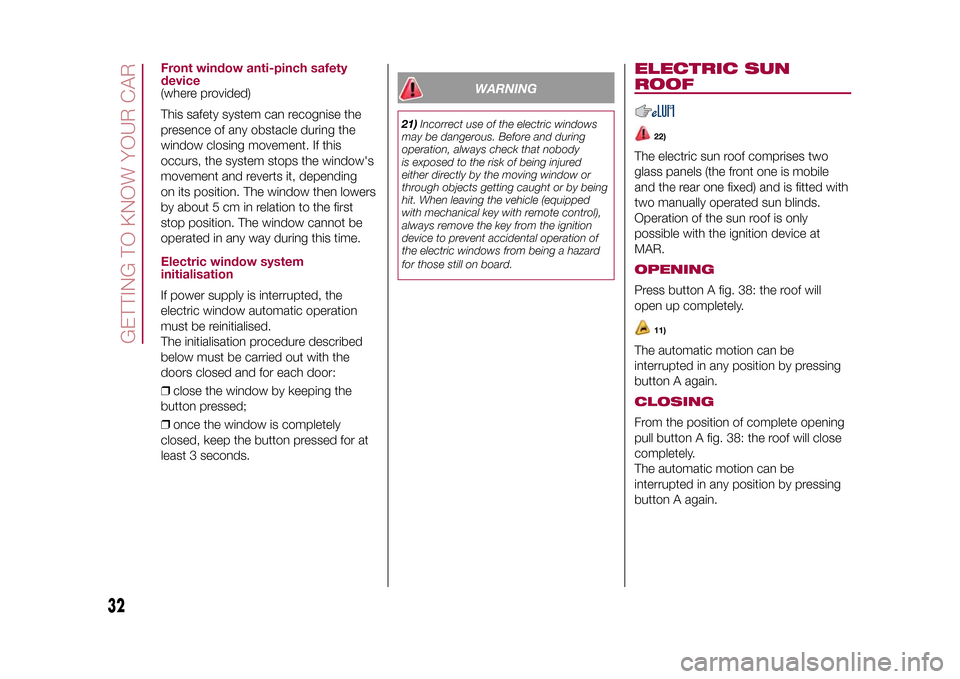
MAR.OPENINGPress button A fig. 38: the roof will
open up completely.
11)
The automatic motion can be
interrupted in any position by pressing
button A again.CLOSINGFrom the position of complete opening
pull button A fig. 38: the roof will close
completely.
The automatic motion can be
interrupted in any position by pressing
button A again.
32
GETTING TO KNOW YOUR CAR
15-12-2014 8:23 Pagina 32
Page 35 of 240
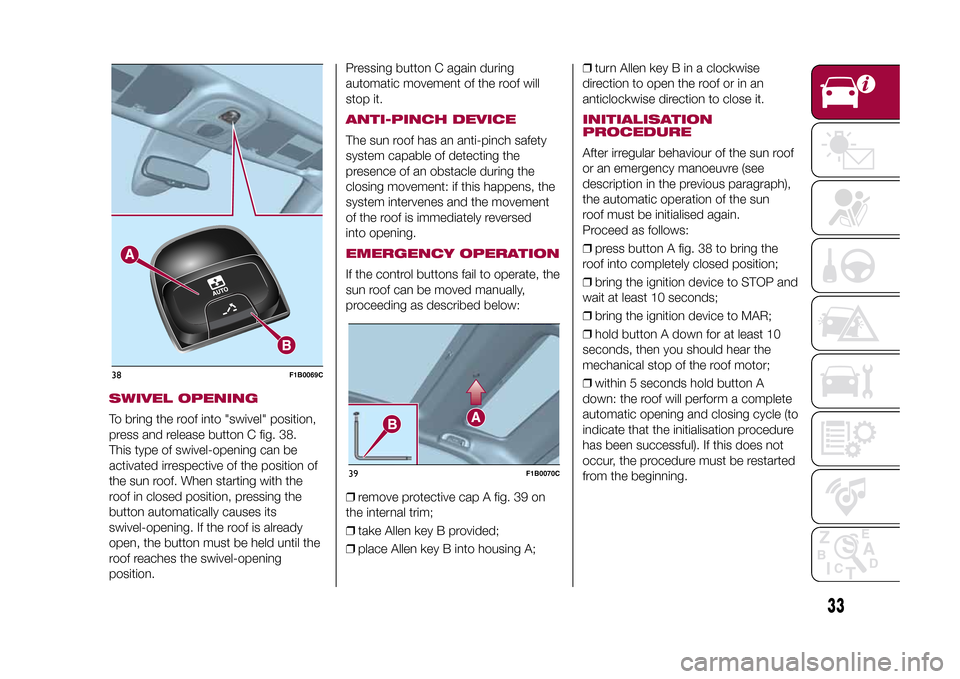
SWIVEL OPENINGTo bring the roof into "swivel" position,
press and release button C fig. 38.
This type of swivel-opening can be
activated irrespective of the position of
the sun roof. When starting with the
roof in closed position, pressing the
button automatically causes its
swivel-opening. If the roof is already
open, the button must be held until the
roof reaches the swivel-opening
position.Pressing button C again during
automatic movement of the roof will
stop it.
ANTI-PINCH DEVICEThe sun roof has an anti-pinch safety
system capable of detecting the
presence of an obstacle during the
closing movement: if this happens, the
system intervenes and the movement
of the roof is immediately reversed
into opening.EMERGENCY OPERATIONIf the control buttons fail to operate, the
sun roof can be moved manually,
proceeding as described below:
❒remove protective cap A fig. 39 on
the internal trim;
❒take Allen key B provided;
❒place Allen key B into housing A;❒turn Allen key B in a clockwise
direction to open the roof or in an
anticlockwise direction to close it.
INITIALISATION
PROCEDUREAfter irregular behaviour of the sun roof
or an emergency manoeuvre (see
description in the previous paragraph),
the automatic operation of the sun
roof must be initialised again.
Proceed as follows:
❒press button A fig. 38 to bring the
roof into completely closed position;
❒bring the ignition device to STOP and
wait at least 10 seconds;
❒bring the ignition device to MAR;
❒hold button A down for at least 10
seconds, then you should hear the
mechanical stop of the roof motor;
❒within 5 seconds hold button A
down: the roof will perform a complete
automatic opening and closing cycle (to
indicate that the initialisation procedure
has been successful). If this does not
occur, the procedure must be restarted
from the beginning.
38
F1B0069C
39
F1B0070C
33
15-12-2014 8:23 Pagina 33
Page 36 of 240
WARNING
22)When leaving the vehicle, always
remove the key (where present) from the
ignition to avoid the risk of injury due to
accidental operation of the sun roof.
Improper use of the roof can be
dangerous. Before and during operation,
always check that nobody is at risk of
being injured by the moving sun roof or by
objects getting caught or hit by it.
WARNING
11)Do not open the sun roof if a roof rack
or crossbars are fitted. Do not open the
sun roof if there is snow or ice on it: you
may damage it.
BONNETOPENINGProceed as follows:
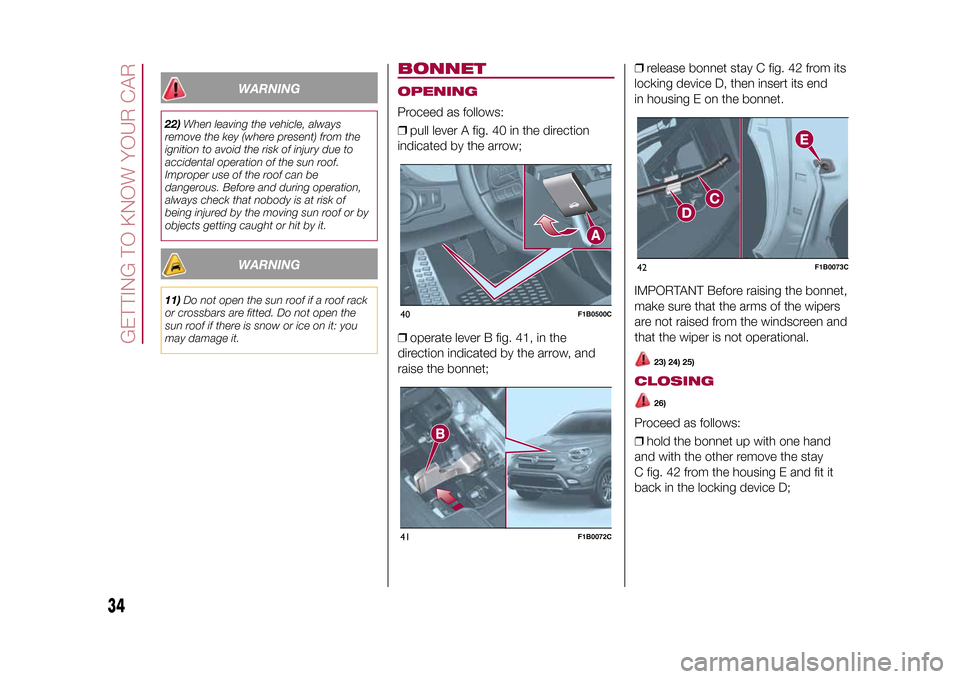
❒pull lever A fig. 40 in the direction
indicated by the arrow;
❒operate lever B fig. 41, in the
direction indicated by the arrow, and
raise the bonnet;❒release bonnet stay C fig. 42 from its
locking device D, then insert its end
in housing E on the bonnet.
IMPORTANT Before raising the bonnet,
make sure that the arms of the wipers
are not raised from the windscreen and
that the wiper is not operational.
23) 24) 25)
CLOSING
26)
Proceed as follows:
❒hold the bonnet up with one hand
and with the other remove the stay
C fig. 42 from the housing E and fit it
back in the locking device D;
40
F1B0500C
41
F1B0072C
42
F1B0073C
34
GETTING TO KNOW YOUR CAR
15-12-2014 8:23 Pagina 34
Page 38 of 240
The direction indicators will blink twice
and the internal roof light will
simultaneously come on when the boot
is opened; the roof light will
automatically switch off when the
tailgate is closed (see also "Interior
lights").
If the tailgate is left open, the roof light
will automatically switch off to preserve
the battery charge.Emergency opening from the insideProceed as follows:
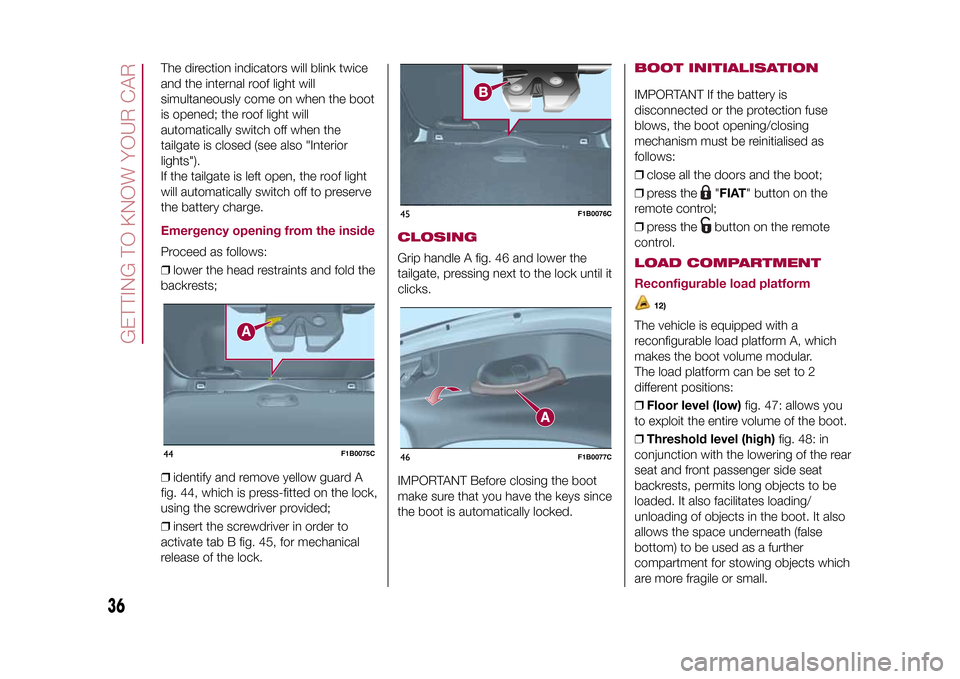
❒lower the head restraints and fold the
backrests;
❒identify and remove yellow guard A
fig. 44, which is press-fitted on the lock,
using the screwdriver provided;
❒insert the screwdriver in order to
activate tab B fig. 45, for mechanical
release of the lock.
CLOSINGGrip handle A fig. 46 and lower the
tailgate, pressing next to the lock until it
clicks.
IMPORTANT Before closing the boot
make sure that you have the keys since
the boot is automatically locked.
BOOT INITIALISATIONIMPORTANT If the battery is
disconnected or the protection fuse
blows, the boot opening/closing
mechanism must be reinitialised as
follows:
❒close all the doors and the boot;
❒press the
"FIAT" button on the
remote control;
❒press thebutton on the remote
control.
LOAD COMPARTMENT
Reconfigurable load platform
12)
The vehicle is equipped with a
reconfigurable load platform A, which
makes the boot volume modular.
The load platform can be set to 2
different positions:
❒Floor level (low)fig. 47: allows you
to exploit the entire volume of the boot.
❒Threshold level (high)fig. 48: in
conjunction with the lowering of the rear
seat and front passenger side seat
backrests, permits long objects to be
loaded. It also facilitates loading/
unloading of objects in the boot. It also
allows the space underneath (false
bottom) to be used as a further
compartment for stowing objects which
are more fragile or small.
44
F1B0075C
45
F1B0076C
46
F1B0077C
36
GETTING TO KNOW YOUR CAR
15-12-2014 8:23 Pagina 36