fog light FIAT 500X 2018 Owner handbook (in English)
[x] Cancel search | Manufacturer: FIAT, Model Year: 2018, Model line: 500X, Model: FIAT 500X 2018Pages: 276, PDF Size: 7.08 MB
Page 27 of 276
Mirrors realignment operation
In case one of the door mirrors has
been moved manually it may occur that
the mirror itself does not retain its
position in a stable way while driving.
In that case it is necessary to carry out
the following realignment operation:
manually close the mirror in parking
position, folding it from position 1 to
position 2 (see fig. 28 );
Actuate the mirrors opening control
one or two times C fig. 27 to realign the
system and bring both mirrors in the
driving position.
WARNING
17) As the driver's door mirror is curved, it
may slightly alter the perception of
distance.
EXTERIOR LIGHTS
LIGHT SWITCH
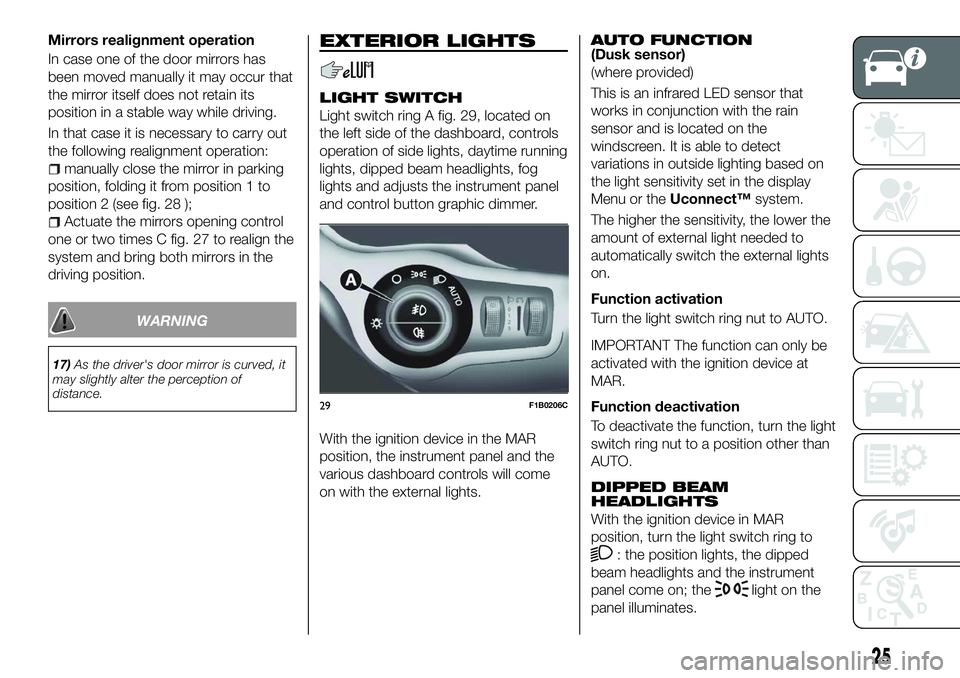
Light switch ring A fig. 29, located on
the left side of the dashboard, controls
operation of side lights, daytime running
lights, dipped beam headlights, fog
lights and adjusts the instrument panel
and control button graphic dimmer.
With the ignition device in the MAR
position, the instrument panel and the
various dashboard controls will come
on with the external lights.
AUTO FUNCTION(Dusk sensor)
(where provided)
This is an infrared LED sensor that
works in conjunction with the rain
sensor and is located on the
windscreen. It is able to detect
variations in outside lighting based on
the light sensitivity set in the display
Menu or the Uconnect™ system.
The higher the sensitivity, the lower the
amount of external light needed to
automatically switch the external lights
on.
Function activation
Turn the light switch ring nut to AUTO.
IMPORTANT The function can only be
activated with the ignition device at
MAR.
Function deactivation
To deactivate the function, turn the light
switch ring nut to a position other than
AUTO.
DIPPED BEAM
HEADLIGHTS
With the ignition device in MAR
position, turn the light switch ring to
: the position lights, the dipped
beam headlights and the instrument
panel come on; the
light on the
panel illuminates.
29F1B0206C
25
Page 28 of 276
DAYTIME RUNNING
LIGHTS (DRL)
"Daytime Running Lights"
18) 19)
With the ignition device in the MAR
position and the light ring turned to the
Oposition, the daytime running lights
are automatically activated. The other
lights and interior lighting remain off.
The daytime running lights are
temporarily deactivated when the
direction indicators are activated. When
the direction indicators are deactivated,
the daylight running lights are
reactivated.
FOG LIGHTS(where provided)
The fog light switch is integrated with
the light switch.
With the ignition device in the MAR
position and the dipped beam
headlights on, press the
button to
switch on the fog lights.
When the fog lights are on, the position
and number plates lights are on while
the daytime running lights are off.
To switch them off, press the button
again or turn the light switch ring to O.
REAR FOG LIGHT(where provided)
The button which turns the rear fog light
on and off is integrated in the light
switch.
With the ignition device in the MAR
position and the dipped beam
headlights or fog lights on, press the
button to switch on the rear fog
light.
PARKING LIGHTS
These can be turned on by turning the
light switch ring to the
position.
The
warning light switches on in
the instrument panel.
IMPORTANT NOTE Do not select this
light switch position when the car is
moving, but only to indicate that the car
is parked when prescribed by the
regulations in force in the country where
you are driving (Highway Code).
To turn the lights off, turn the light
switch ring to the Oposition
HEADLIGHTS OFF DELAY
(Follow me home)
Activation
With multifunction display and
Uconnect™Radio: turn the ignition
device to STOP. Within 2 minutes, pull
the left stalk to headlight flashing mode:
the headlight off delay is activated for
30 seconds. The function can be activated for 7 times in sequence, i.e.
up to a total of 210 seconds.
With reconfigurable multifunction
display and/orUconnect™7'': the
headlight off delay can be set (from 0,
30, 60 to 90 seconds) in the Menu.
If the headlight off delay is set to
0 seconds, it is possible to turn on the
lights for a predefined time of
30 seconds using the main beam
headlights stalk within 2 minutes after
stopping the engine. It is possible to
turn on the lights 7 times, for a
maximum of 210 seconds.
If the value set on the Menu is different
from 0, the lights can be switched of for
the predetermined time by taking the
ring from position
(with the engine
running) to position O(with the engine
off).
The function can be activated
automatically on versions with dusk
sensor: turn the ring to the AUTO
position with the engine running. The
dipped beam headlights will be turned
on if the sensor detects a low level of
light. The headlights off delay is
activated automatically when the engine
is switched off with the headlights on
for the time selected in the Menu.
26
GETTING TO KNOW YOUR CAR
Page 58 of 276
Warning lightWhat it means
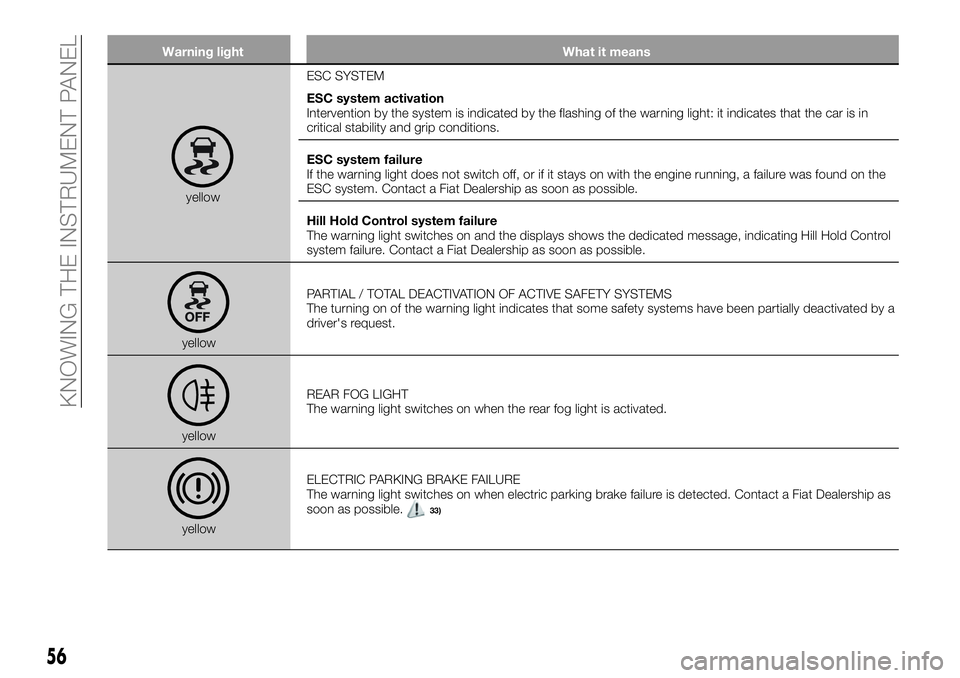
yellowESC SYSTEM
ESC system activation
Intervention by the system is indicated by the flashing of the warning light: it indicates that the car is in
critical stability and grip conditions.
ESC system failure
If the warning light does not switch off, or if it stays on with the engine running, a failure was found on the
ESC system. Contact a Fiat Dealership as soon as possible.
Hill Hold Control system failure
The warning light switches on and the displays shows the dedicated message, indicating Hill Hold Control
system failure. Contact a Fiat Dealership as soon as possible.
yellow
PARTIAL / TOTAL DEACTIVATION OF ACTIVE SAFETY SYSTEMS
The turning on of the warning light indicates that some safety systems have been partially deactivated by a
driver's request.
yellow
REAR FOG LIGHT
The warning light switches on when the rear fog light is activated.
yellowELECTRIC PARKING BRAKE FAILURE
The warning light switches on when electric parking brake failure is detected. Contact a Fiat Dealership as
soon as possible.
33)
56
KNOWING THE INSTRUMENT PANEL
Page 61 of 276
Warning lightWhat it means
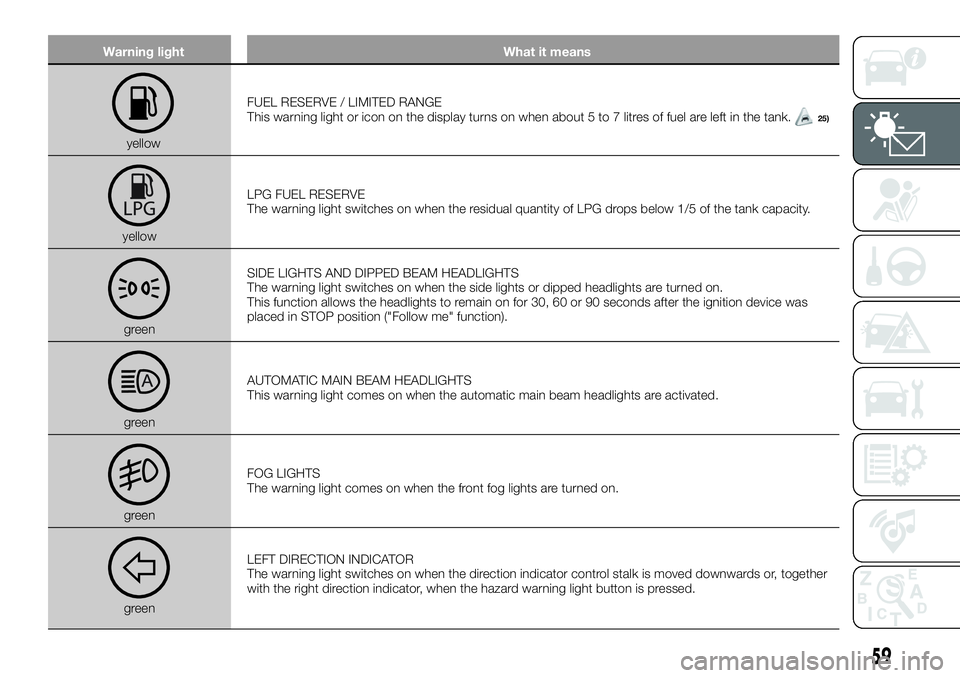
yellowFUEL RESERVE / LIMITED RANGE
This warning light or icon on the display turns on when about 5 to 7 litres of fuel are left in the tank.
25)
yellow LPG FUEL RESERVE
The warning light switches on when the residual quantity of LPG drops below 1/5 of the tank capacity.
greenSIDE LIGHTS AND DIPPED BEAM HEADLIGHTS
The warning light switches on when the side lights or dipped headlights are turned on.
This function allows the headlights to remain on for 30, 60 or 90 seconds after the ignition device was
placed in STOP position ("Follow me" function).
green
AUTOMATIC MAIN BEAM HEADLIGHTS
This warning light comes on when the automatic main beam headlights are activated.
greenFOG LIGHTS
The warning light comes on when the front fog lights are turned on.
greenLEFT DIRECTION INDICATOR
The warning light switches on when the direction indicator control stalk is moved downwards or, together
with the right direction indicator, when the hazard warning light button is pressed.
59
Page 67 of 276
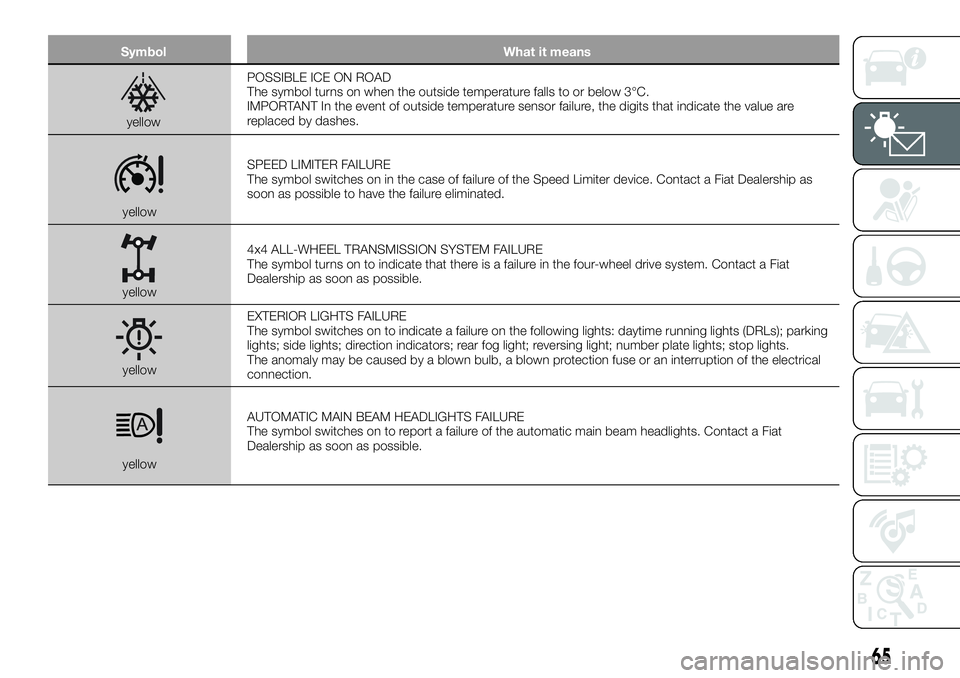
SymbolWhat it means
yellowPOSSIBLE ICE ON ROAD
The symbol turns on when the outside temperature falls to or below 3°C.
IMPORTANT In the event of outside temperature sensor failure, the digits that indicate the value are
replaced by dashes.
yellow SPEED LIMITER FAILURE
The symbol switches on in the case of failure of the Speed Limiter device. Contact a Fiat Dealership as
soon as possible to have the failure eliminated.
yellow
4x4 ALL-WHEEL TRANSMISSION SYSTEM FAILURE
The symbol turns on to indicate that there is a failure in the four-wheel drive system. Contact a Fiat
Dealership as soon as possible.
yellowEXTERIOR LIGHTS FAILURE
The symbol switches on to indicate a failure on the following lights: daytime running lights (DRLs); parking
lights; side lights; direction indicators; rear fog light; reversing light; number plate lights; stop lights.
The anomaly may be caused by a blown bulb, a blown protection fuse or an interruption of the electrical
connection.
yellow
AUTOMATIC MAIN BEAM HEADLIGHTS FAILURE
The symbol switches on to report a failure of the automatic main beam headlights. Contact a Fiat
Dealership as soon as possible.
65
Page 88 of 276
WARNING
60)The system is an aid for vehicle driving,
it DOES NOT warn the driver about
incoming vehicles outside of the detection
areas. The driver must always maintain a
sufficient level of attention to the traffic and
road conditions and for controlling the
trajectory of the vehicle.
61) The system is an aid for the driver, who
must always pay full attention while driving.
The responsibility always rests with the
driver, who must take into account the
traffic conditions in order to drive in
complete safety. The driver must always
maintain a safe distance from the vehicle in
front.
62) If the driver depresses the brake pedal
fully or carries out a fast steering during
system operation, the automatic braking
function may stop (e.g. to allow a possible
manoeuvre to avoid the obstacle).
63) The system intervenes on vehicles
travelling in the same lane. People, animals
and things (e.g. pushchairs) are not taken
into consideration.
64) If the car must be placed on a roller
bench for maintenance interventions or if it
is washed in an automatic roller washing
tunnel with an obstacle in the front part
(e.g. another car, a wall or another
obstacle), the system may detect its
presence and activate. In this case the
system must be deactivated through the
settings of the Uconnect™system.
65) If the iTPMS system signals a pressure
decrease on the tyres, it is recommended
to check the pressure on all four tyres. 66)
The iTPMS does not relieve the driver
from the obligation to check the tyre
pressure every month; it is not even to be
considered a replacing system for
maintenance or a safety system.
67) Tyre pressure must be checked with
tyres cold. Should it become necessary for
whatever reason to check pressure with
warm tyres, do not reduce pressure even
though it is higher than the prescribed
value, but repeat the check when tyres are
cold
68) The iTPMS cannot indicate sudden tyre
pressure drops (e.g. if a tyre bursts). In this
case, stop the vehicle, braking with caution
and avoiding abrupt steering.
69) The system only warns that the tyre
pressure is low: it is not able to inflate
them.
70) Insufficient tyre inflation increases fuel
consumption, reduces the tread duration
and may affect the capacity to drive safely.
IMPORTANT
32) The system may have limited or absent
operation due to weather conditions such
as: heavy rain, hail, thick fog, heavy snow.
33) The section of the bumper before the
sensor must not be covered with
adhesives, auxiliary headlights or any other
object.
34) System intervention might be
unexpected or delayed when other vehicles
transport loads projecting from the side,
above or from the rear, with respect to the
normal size of the vehicle. 35)
Operation can be adversely affected by
any structural change made to the vehicle,
such as a modification to the front
geometry, tyre change, or a heavier load
than the standard load of the vehicle.
36) Incorrect repairs made on the front part
of the vehicle (e.g. bumper, chassis) may
alter the position of the radar sensor, and
adversely affect its operation. Go to a Fiat
Dealership for any operation of this type.
37) Do not tamper with nor carry out any
intervention on the radar sensor or on the
camera on the windscreen. In the event of
a sensor failure, contact a Fiat Dealership.
38) When towing a trailer (with modules
installed after purchasing the vehicle), a
vehicle or during loading manoeuvres on a
vehicle transporter (or in vehicle for
transport), the system must be deactivated
via the Uconnect™system.
39) Do not wash with high-pressure jets in
the bumper lower area: in particular do not
operate on the system's electrical
connector.
40) Be careful in the case of repairs and
new paintings in the area around the
sensor (panel covering the sensor on the
left side of the bumper). In the event of a
frontal impact the sensor may automatically
deactivate and display a warning to indicate
that the sensor needs to be repaired. Even
without a malfunction warning, deactivate
the system operation if you think that the
position of the radar sensor has changed
(e.g. due to low-speed frontal impact as
during parking manoeuvres). In these
cases, go to a Fiat Dealership to have the
radar sensor realigned or replaced.
86
SAFETY
Page 152 of 276
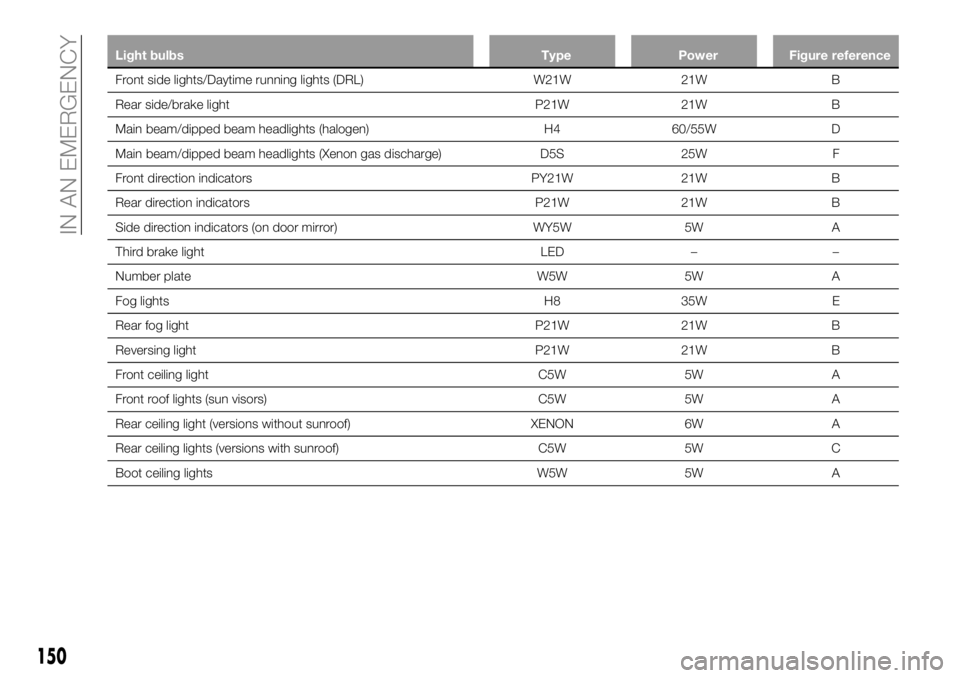
Light bulbsTypePowerFigure reference
Front side lights/Daytime running lights (DRL) W21W21W B
Rear
side/brake light P21W21W B
Main beam/dipped beam headlights (halogen) H460/55W D
Main beam/dipped beam headlights (Xenon gas discharge) D5S25W F
Front direction indicators PY21W21W B
Rear direction indicators P21W21W B
Side direction indicators (on door mirror) WY5W5WA
Third brake light LED––
Number plate W5W5WA
Fog lights H835W E
Rear fog light P21W21W B
Reversing light P21W21W B
Front ceiling light C5W5W A
Front roof lights (sun visors) C5W5W A
Rear ceiling light (versions without sunroof) XENON6WA
Rear ceiling lights (versions with sunroof) C5W5W C
Boot ceiling lights W5W5WA
150
IN AN EMERGENCY
Page 153 of 276
REPLACING AN
EXTERNAL BULB
Dipped/main beam headlights
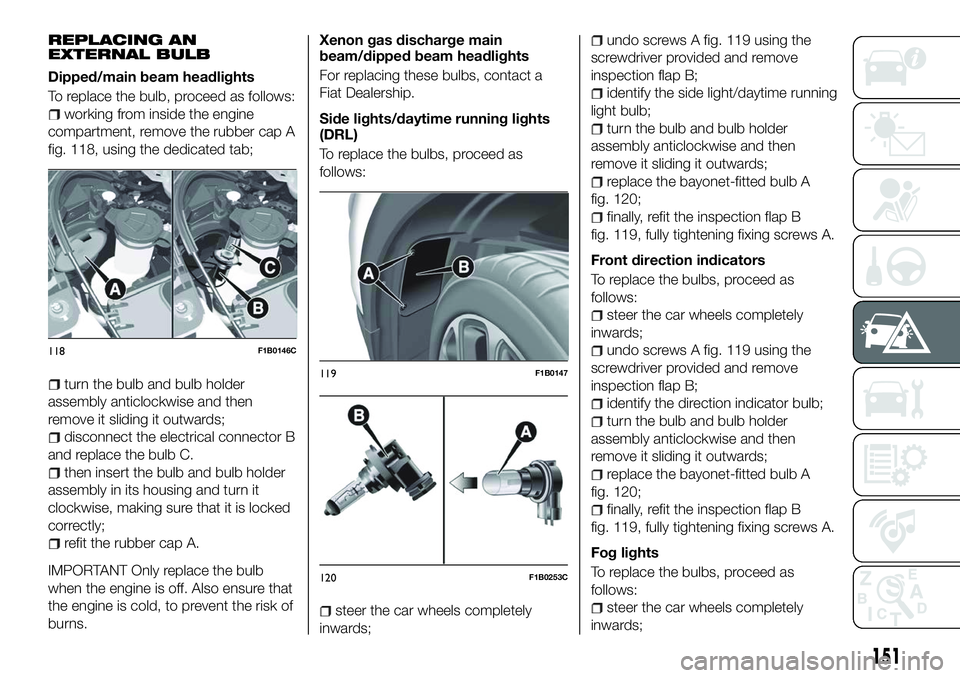
To replace the bulb, proceed as follows:
working from inside the engine
compartment, remove the rubber cap A
fig. 118, using the dedicated tab;
turn the bulb and bulb holder
assembly anticlockwise and then
remove it sliding it outwards;
disconnect the electrical connector B
and replace the bulb C.
then insert the bulb and bulb holder
assembly in its housing and turn it
clockwise, making sure that it is locked
correctly;
refit the rubber cap A.
IMPORTANT Only replace the bulb
when the engine is off. Also ensure that
the engine is cold, to prevent the risk of
burns.
Xenon gas discharge main
beam/dipped beam headlights
For replacing these bulbs, contact a
Fiat Dealership.
Side lights/daytime running lights
(DRL)
To replace the bulbs, proceed as
follows:
steer the car wheels completely
inwards;
undo screws A fig. 119 using the
screwdriver provided and remove
inspection flap B;
identify the side light/daytime running
light bulb;
turn the bulb and bulb holder
assembly anticlockwise and then
remove it sliding it outwards;
replace the bayonet-fitted bulb A
fig. 120;
finally, refit the inspection flap B
fig. 119, fully tightening fixing screws A.
Front direction indicators
To replace the bulbs, proceed as
follows:
steer the car wheels completely
inwards;
undo screws A fig. 119 using the
screwdriver provided and remove
inspection flap B;
identify the direction indicator bulb;
turn the bulb and bulb holder
assembly anticlockwise and then
remove it sliding it outwards;
replace the bayonet-fitted bulb A
fig. 120;
finally, refit the inspection flap B
fig. 119, fully tightening fixing screws A.
Fog lights
To replace the bulbs, proceed as
follows:
steer the car wheels completely
inwards;
118F1B0146C
119F1B0147
120F1B0253C
151
Page 154 of 276
undo screws A fig. 119 using the
screwdriver provided and remove
inspection flap B;
identify the fog light;
turn the bulb and bulb holder
assembly anticlockwise and then
remove it sliding it outwards;
disconnect the electrical connector;
replace the bulb-bulb holder
assembly B fig. 120;
reconnect the electrical connector to
the new bulb-bulb holder; then insert it
making sure it is locked correctly;
insert the assembly by turning it
clockwise and locking it correctly;
finally, refit the inspection flap B
fig. 119, fully tightening fixing screws A.
Side turn light
IMPORTANT The procedure is
described by way of example only. It is
advisable to contact a Fiat Dealership
for bulb replacement.
To replace the bulb, proceed as follows:
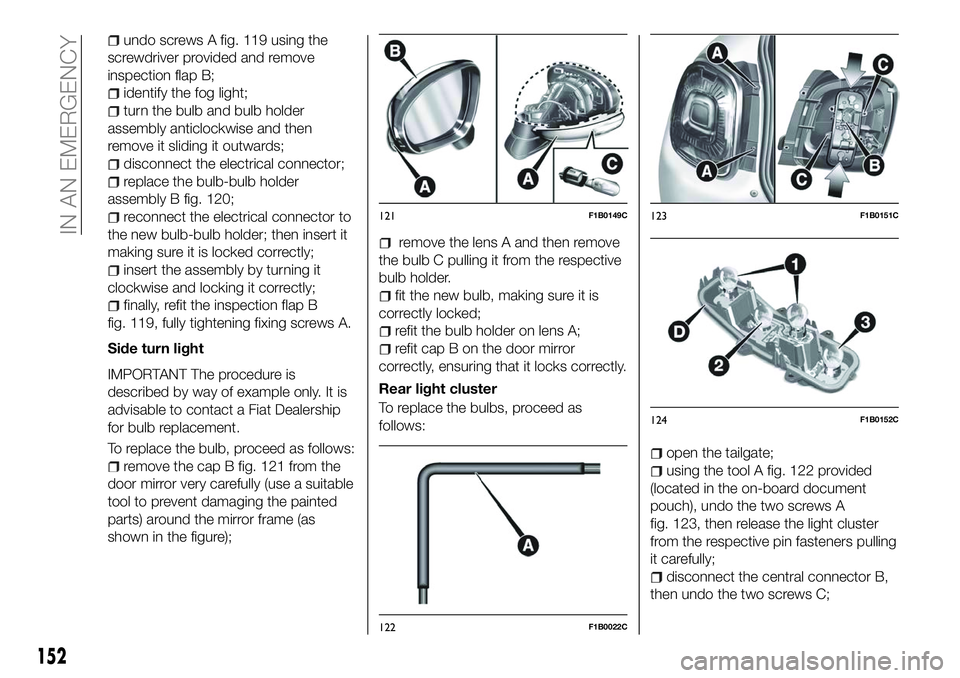
remove the cap B fig. 121 from the
door mirror very carefully (use a suitable
tool to prevent damaging the painted
parts) around the mirror frame (as
shown in the figure);
remove the lens A and then remove
the bulb C pulling it from the respective
bulb holder.
fit the new bulb, making sure it is
correctly locked;
refit the bulb holder on lens A;
refit cap B on the door mirror
correctly, ensuring that it locks correctly.
Rear light cluster
To replace the bulbs, proceed as
follows:
open the tailgate;
using the tool A fig. 122 provided
(located in the on-board document
pouch), undo the two screws A
fig. 123, then release the light cluster
from the respective pin fasteners pulling
it carefully;
disconnect the central connector B,
then undo the two screws C;
121F1B0149C
122F1B0022C
123F1B0151C
124F1B0152C
152
IN AN EMERGENCY
Page 155 of 276
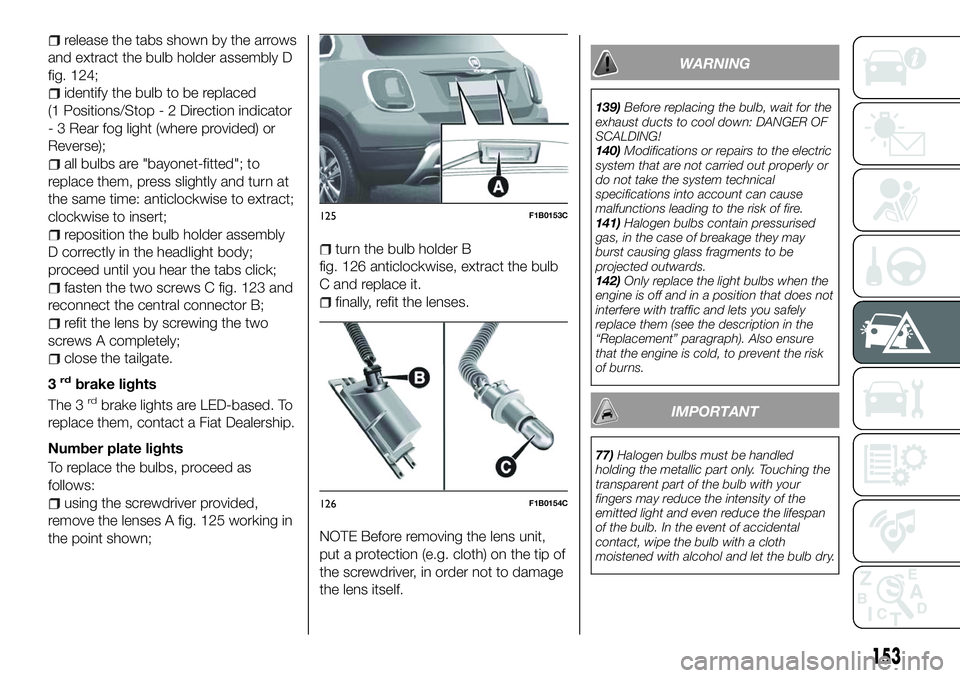
release the tabs shown by the arrows
and extract the bulb holder assembly D
fig. 124;
identify the bulb to be replaced
(1 Positions/Stop - 2 Direction indicator
- 3 Rear fog light (where provided) or
Reverse);
all bulbs are "bayonet-fitted"; to
replace them, press slightly and turn at
the same time: anticlockwise to extract;
clockwise to insert;
reposition the bulb holder assembly
D correctly in the headlight body;
proceed until you hear the tabs click;
fasten the two screws C fig. 123 and
reconnect the central connector B;
refit the lens by screwing the two
screws A completely;
close the tailgate.
3
rdbrake lights
The 3rdbrake lights are LED-based. To
replace them, contact a Fiat Dealership.
Number plate lights
To replace the bulbs, proceed as
follows:
using the screwdriver provided,
remove the lenses A fig. 125 working in
the point shown;
turn the bulb holder B
fig. 126 anticlockwise, extract the bulb
C and replace it.
finally, refit the lenses.
NOTE Before removing the lens unit,
put a protection (e.g. cloth) on the tip of
the screwdriver, in order not to damage
the lens itself.
WARNING
139) Before replacing the bulb, wait for the
exhaust ducts to cool down: DANGER OF
SCALDING!
140) Modifications or repairs to the electric
system that are not carried out properly or
do not take the system technical
specifications into account can cause
malfunctions leading to the risk of fire.
141) Halogen bulbs contain pressurised
gas, in the case of breakage they may
burst causing glass fragments to be
projected outwards.
142) Only replace the light bulbs when the
engine is off and in a position that does not
interfere with traffic and lets you safely
replace them (see the description in the
“Replacement” paragraph). Also ensure
that the engine is cold, to prevent the risk
of burns.
IMPORTANT
77) Halogen bulbs must be handled
holding the metallic part only. Touching the
transparent part of the bulb with your
fingers may reduce the intensity of the
emitted light and even reduce the lifespan
of the bulb. In the event of accidental
contact, wipe the bulb with a cloth
moistened with alcohol and let the bulb dry.
125F1B0153C
126F1B0154C
153