sensor FIAT 500X 2019 Owner handbook (in English)
[x] Cancel search | Manufacturer: FIAT, Model Year: 2019, Model line: 500X, Model: FIAT 500X 2019Pages: 284, PDF Size: 8.33 MB
Page 142 of 284
TRAFFIC SIGN
RECOGNITION
(where provided)
130) 131) 132)
64) 65) 66) 67) 68)
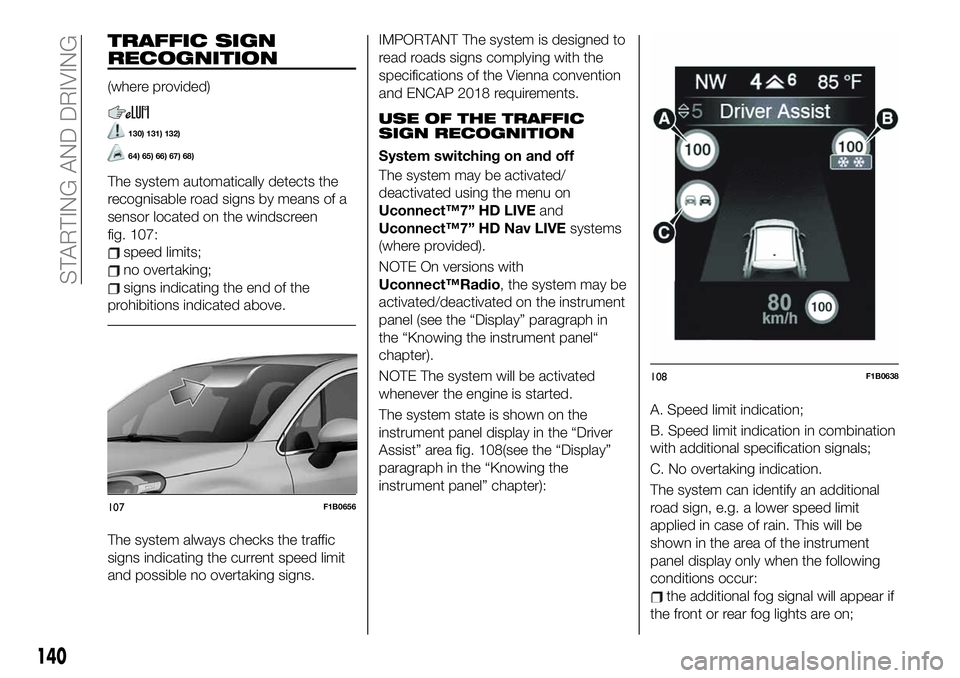
The system automatically detects the
recognisable road signs by means of a
sensor located on the windscreen
fig. 107:
speed limits;
no overtaking;
signs indicating the end of the
prohibitions indicated above.
The system always checks the traffic
signs indicating the current speed limit
and possible no overtaking signs.
IMPORTANT The system is designed to
read roads signs complying with the
specifications of the Vienna convention
and ENCAP 2018 requirements.
USE OF THE TRAFFIC
SIGN RECOGNITION
System switching on and off
The system may be activated/
deactivated using the menu on
Uconnect™7” HD LIVEand
Uconnect™7” HD Nav LIVEsystems
(where provided).
NOTE On versions with
Uconnect™Radio, the system may be
activated/deactivated on the instrument
panel (see the “Display” paragraph in
the “Knowing the instrument panel“
chapter).
NOTE The system will be activated
whenever the engine is started.
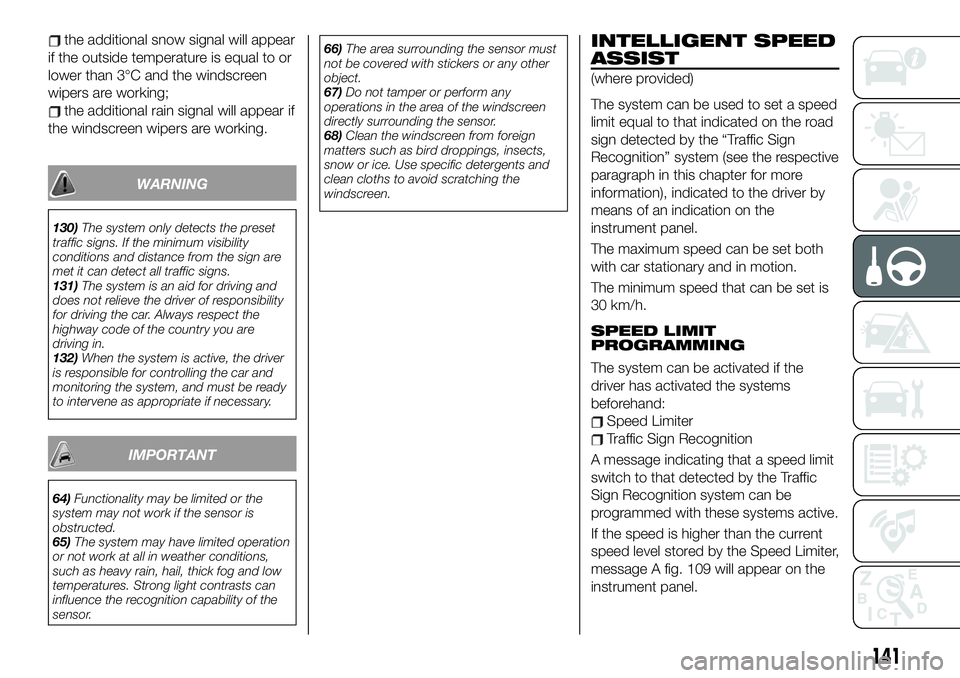
The system state is shown on the
instrument panel display in the “Driver
Assist” area fig. 108(see the “Display”
paragraph in the “Knowing the
instrument panel” chapter):A. Speed limit indication;
B. Speed limit indication in combination
with additional specification signals;
C. No overtaking indication.
The system can identify an additional
road sign, e.g. a lower speed limit
applied in case of rain. This will be
shown in the area of the instrument
panel display only when the following
conditions occur:
the additional fog signal will appear if
the front or rear fog lights are on;
107F1B0656
108F1B0638
140
STARTING AND DRIVING
Page 143 of 284
the additional snow signal will appear
if the outside temperature is equal to or
lower than 3°C and the windscreen
wipers are working;
the additional rain signal will appear if
the windscreen wipers are working.
WARNING
130)The system only detects the preset
traffic signs. If the minimum visibility
conditions and distance from the sign are
met it can detect all traffic signs.
131)The system is an aid for driving and
does not relieve the driver of responsibility
for driving the car. Always respect the
highway code of the country you are
driving in.
132)When the system is active, the driver
is responsible for controlling the car and
monitoring the system, and must be ready
to intervene as appropriate if necessary.
IMPORTANT
64)Functionality may be limited or the
system may not work if the sensor is
obstructed.
65)The system may have limited operation
or not work at all in weather conditions,
such as heavy rain, hail, thick fog and low
temperatures. Strong light contrasts can
influence the recognition capability of the
sensor.66)The area surrounding the sensor must
not be covered with stickers or any other
object.
67)Do not tamper or perform any
operations in the area of the windscreen
directly surrounding the sensor.
68)Clean the windscreen from foreign
matters such as bird droppings, insects,
snow or ice. Use specific detergents and
clean cloths to avoid scratching the
windscreen.
INTELLIGENT SPEED
ASSIST
(where provided)
The system can be used to set a speed
limit equal to that indicated on the road
sign detected by the “Traffic Sign
Recognition” system (see the respective
paragraph in this chapter for more
information), indicated to the driver by
means of an indication on the
instrument panel.
The maximum speed can be set both
with car stationary and in motion.
The minimum speed that can be set is
30 km/h.
SPEED LIMIT
PROGRAMMING
The system can be activated if the
driver has activated the systems
beforehand:
Speed Limiter
Traffic Sign Recognition
A message indicating that a speed limit
switch to that detected by the Traffic
Sign Recognition system can be
programmed with these systems active.
If the speed is higher than the current
speed level stored by the Speed Limiter,
message A fig. 109 will appear on the
instrument panel.
141
Page 146 of 284
WARNING
133)Parking and other potentially
dangerous manoeuvres are, however,
always the driver’s responsibility. While
carrying out these manoeuvres, always
make sure that no people (especially
children) or animals are in the area
concerned. The camera is an aid for the
driver, but the driver must never allow
his/her attention to lapse during potentially
dangerous manoeuvres, even those
executed at low speeds. Always keep a
slow speed, so as to promptly brake in the
case of obstacles.
IMPORTANT
69)It is vital, for correct operation, that the
camera is always kept clean and free from
any mud, dirt, snow or ice. Be careful not
to scratch or damage the camera while
cleaning it. Avoid using dry, rough or hard
cloths. The camera must be washed using
clean water, with the addition of car
shampoo if necessary. In washing stations
which use steam or high-pressure jets,
clean the camera quickly, keeping the
nozzle more than 10 cm away from the
sensors. Also, do not apply stickers to the
camera.
TOWING TRAILERS
IMPORTANT
134) 135)
For towing caravans or trailers the
vehicle must be fitted with an approved
tow hook and an adequate electrical
system. Should aftermarket installation
be requested, this must be carried out
by specialists.
Install any specific and/or additional
door mirrors as specified by the
Highway Code.
Remember that when towing a trailer,
steep hills are harder to climb, braking
distances increase and overtaking takes
longer depending on the overall weight
of the trailer. Engage a low gear when
driving downhill, rather than constantly
using the brake. The weight the trailer
exerts on the vehicle tow hook reduces
the vehicle's loading capacity by the
same amount. To make sure that the
maximum towable weight is not
exceeded (given in the vehicle
registration document) account should
be taken of the fully laden trailer,
including accessories and luggage.Do not exceed the speed limits specific
to each country you are driving in, in the
case of vehicles towing trailers. In any
case, the top speed must not exceed
100 km/h.
Any electric brake must be powered
directly by the battery through a cable
with a cross-section of no less than
2.5 mm
2. In addition to the electrical
branches, the vehicle electrical system
can only be connected to the supply
cable for an electric brake and to the
cable for an internal light for the trailer,
not exceeding 15 W. For connections,
use the preset control unit with a
battery cable with section not less than
2.5 mm
2. The use of auxiliary loads
other than external lights (e.g. electric
brake) must take place with engine
running.
INSTALLING A TOW
HOOK
The towing device should be fastened
to the body by specialised personnel
according to any additional and/or
integrative information supplied by the
Manufacturer of the device. It must also
meet current regulations with reference
to Directive 94/20/EC and subsequent
amendments.
For any version the towing device used
must be right for the towable weight of
the vehicle on which it is to be installed.
144
STARTING AND DRIVING
Page 205 of 284
BATTERY
RECHARGING
IMPORTANT
IMPORTANT The battery recharging
procedure is given as information only.
To carry out this operation contact a
Fiat Dealership.
IMPORTANT After setting the ignition
device to STOP and having closed the
driver side door, wait at least one
minute before disconnecting the
electrical supply from the battery. When
reconnecting the electrical supply to the
battery, make sure that the ignition
device is in the STOP position and the
driver side door is closed.
IMPORTANT Charging should be slow
at a low ampere rating for
approximately 24 hours. Charging for a
longer time may damage the battery.
IMPORTANT The cables of the
electrical system must be correctly
reconnected to the battery, i.e. the
positive cable (+) to the positive
terminal and the negative cable (–) to
the negative terminal. The battery
terminals are marked with the positive
(+) and negative (–) symbols, and are
shown on the battery cover. The battery
terminals must also be corrosion-freeand firmly secured to the terminals. If a
"quick-type" battery charger is used
with the battery fitted on the vehicle,
before connecting it disconnect both
cables of the battery itself. Do not use a
"quick-type" battery charger to provide
the starting voltage.
VERSIONS WITHOUT
START&STOP SYSTEM
To recharge, proceed as follows:
disconnect the terminal from the
negative battery pole;
connect the charger cables to the
battery terminals, observing the polarity;
turn on the charger;
when it is recharged, turn the
charger off before disconnecting it from
the battery;
reconnect the negative battery
terminal.
VERSIONS WITH
START&STOP SYSTEM
To recharge, proceed as follows:
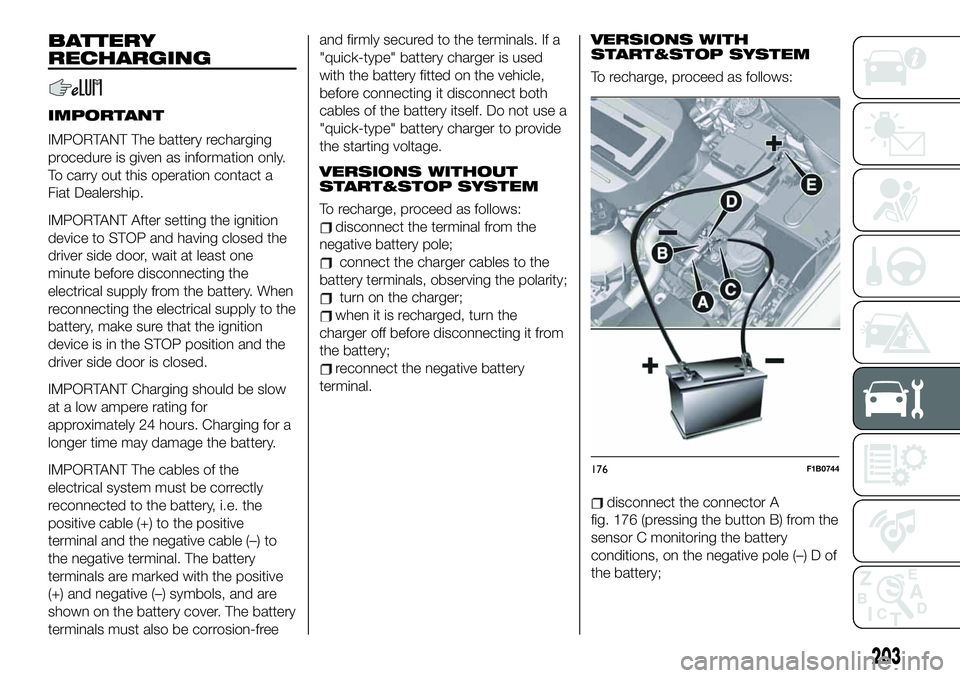
disconnect the connector A
fig. 176 (pressing the button B) from the
sensor C monitoring the battery
conditions, on the negative pole (–) D of
the battery;
176F1B0744
203
Page 206 of 284
sensor terminal D as shown;
turn on the battery charger. At the
end of the charging process, switch the
battery charger off;
after having disconnected the battery
charger, reconnect connector A to the
sensor C as shown.
SERVICING
PROCEDURES
87) 88) 89)
The following pages contain the rules
on therequiredmaintenance
envisaged by the technical personnel
who designed the vehicle.
In addition to these specific
maintenance instructions specified for
routine scheduled servicing, there are
other components which may require
intervention or replacements over the
vehicle’s life cycle.
ENGINE OIL
90)
Engine oil level check
To ensure correct engine lubrication, the
oil must always be kept at the
prescribed level (see "Engine
compartment" in this chapter).
AIR CLEANER
177)
Replacing the air cleaner
See the "Scheduled servicing plan" for
the correct servicing intervals.It is advisable to replace it with a
genuine spare part, designed especially
for this vehicle.
AIR CONDITIONING
SYSTEM MAINTENANCE
91) 92)
To ensure the best possible
performance, the air conditioning
system must be checked and undergo
maintenance at a Fiat Dealership at the
beginning of the summer.
WINDOWS
When cleaning the heated windscreen
and rear window be careful, if the
defrosting function is active, regarding
the temperature of the glass; also make
sure that children do not come into
contact with the heated surface. The
glass may be hot.
Never use an abrasive detergent to
clean the surface of the windows.
Do not use scrapers or sharp items that
might scratch the windows.
Spray the detergent on the cloth to be
used for cleaning the rear view mirror.
Do not spray the detergent directly on
the glass.
Cleaning the window with hot water
could cause the removal of any labels.
204
SERVICING AND MAINTENANCE
connect the positive cable (+) of the
battery charger to the positive battery
terminal E and the negative cable (–) to
Page 280 of 284
Fiat Code (system)............14
Fix&Go kit.................167
Fluids and lubricants..........230
Fog lights..................26
Fog lights (bulb replacement).....156
Follow Me Home.............27
Front direction indicators (bulb
replacement)..............155
Front roof light...............29
Front seat electric heating........20
Front seats (manual adjustments) . . .19
Fuel consumption............235
Fuel cut-off system...........172
Full Brake Control (system).......81
Fuse boxes................159
Fuses (replacement)...........158
GSI (Gear Shift Indicator)........48
Hazard warning lights.........152
emergency braking.........152
Head restraints...............21
Headlight alignment adjustment....28
Headlight alignment corrector.....28
Headlights (cleaning)..........209
Heavy-duty use of the car
(scheduled servicing)........191
HSA (system)................76
i-Size child restraint systems.....101
Identification data
chassis marking...........213engine marking............213
VIN plate................213
Ignition device...............12
Important information and
recommendations..........268
Intelligent Speed Assist system. . . .141
Interior lights................29
Interiors (cleaning)............210
ISOFIX child restraint system
(installation)...............98
iTPMS (indirect Tyre Pressure
Monitoring System)..........85
Jump starting..............170
Keyless Entry (system).........16
Keys
electronic key.............11
key with remote control.......11
Lane Assist system...........138
Lane Change................28
Lifting the vehicle.............207
Light bulbs
Bulbs types..............153
Light switch.................25
Main beam headlights..........27
Main menu.................49
Manual climate control system.....34
Manual gearbox.............118
Mopar Connect.............266
Number plate lights (bulb
replacement)..............157
Occupant protection systems.....87
Official type approvals.........267
Paintwork (cleaning and
maintenance).............209
Park Assist (system)...........135
Parking lights................27
Parking the vehicle...........115
PBA (system)................76
Performance (top speed)........234
Periodic checks (scheduled
servicing)................191
Pre-tensioners...............92
load limiters...............92
Prescriptions for handling the car
at the end of its life..........236
Rain sensor................31
RCP system................80
Read this carefully..............2
Rear direction indicators (bulb
replacement)..............157
Rear fog light................26
Rear fog light (bulb replacement) . . .157
Rear fog lights (changing a bulb) . . .157
Rear seats..................20
Rear view camera............143
Rear view mirrors.............23
Rear window washer
windscreen/rear window
washing fluid level..........200
Rear window wiper/washer.......32
INDEX