window FIAT BRAVO 2015 2.G Owners Manual
[x] Cancel search | Manufacturer: FIAT, Model Year: 2015, Model line: BRAVO, Model: FIAT BRAVO 2015 2.GPages: 275, PDF Size: 7.55 MB
Page 7 of 275
GETTING TO KNOW YOUR CAR
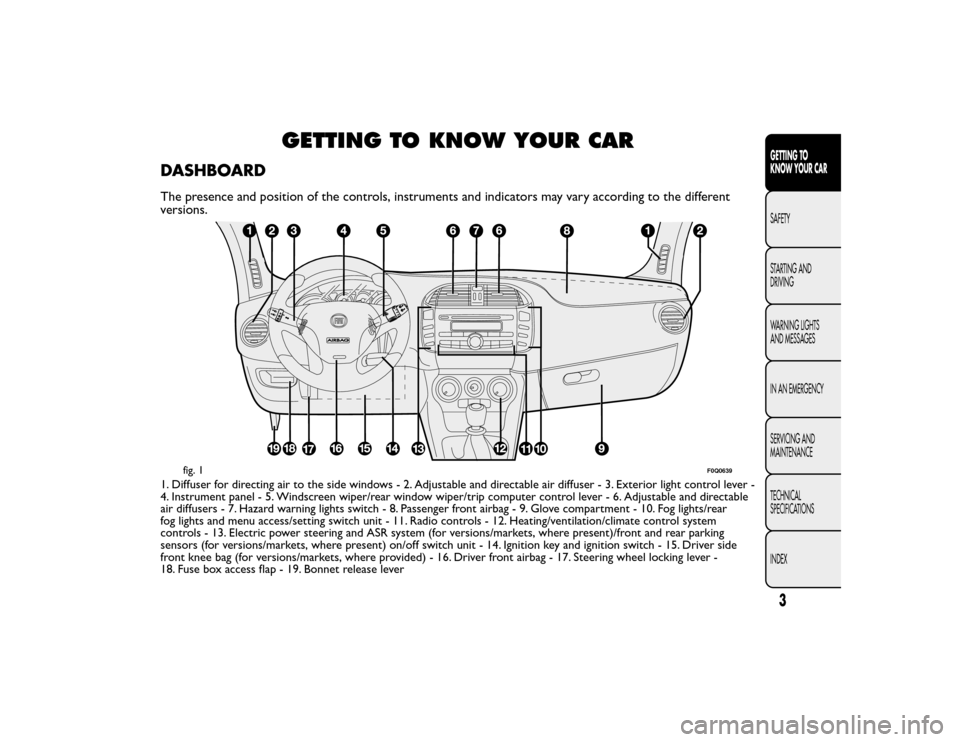
DASHBOARDThe presence and position of the controls, instruments and indicators may vary according to the different
versions.1. Diffuser for directing air to the side windows - 2. Adjustable and directable air diffuser - 3. Exterior light control lever -
4. Instrument panel - 5. Windscreen wiper/rear window wiper/trip computer control lever - 6. Adjustable and directable
air diffusers - 7. Hazard warning lights switch - 8. Passenger front airbag - 9. Glove compartment - 10. Fog lights/rear
fog lights and menu access/setting switch unit - 11. Radio controls - 12. Heating/ventilation/climate control system
controls - 13. Electric power steering and ASR system (for versions/markets, where present)/front and rear parking
sensors (for versions/markets, where present) on/off switch unit - 14. Ignition key and ignition switch - 15. Driver side
front knee bag (for versions/markets, where provided) - 16. Driver front airbag - 17. Steering wheel locking lever -
18. Fuse box access flap - 19. Bonnet release lever
fig. 1
F0Q0639
3GETTING TO
KNOW YOUR CAR
SAFETY
STARTING AND
DRIVING
WARNING LIGHTS
AND MESSAGES
IN AN EMERGENCY
SERVICING AND
MAINTENANCE
TECHNICAL
SPECIFICATIONS
INDEX
Page 13 of 275
KEY WITH REMOTE CONTROL
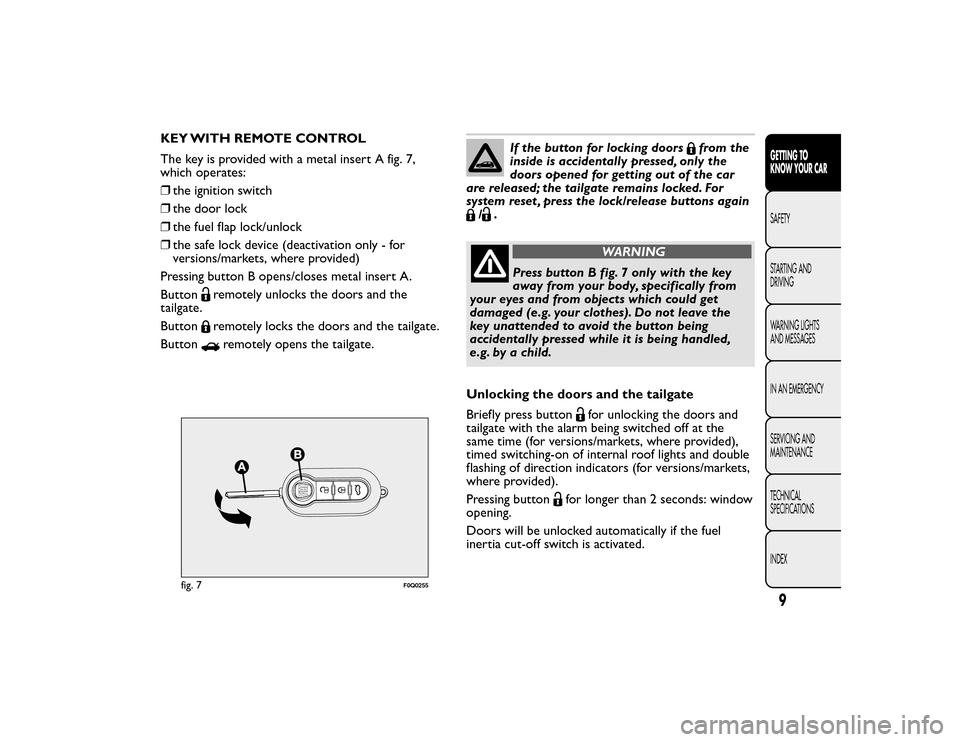
The key is provided with a metal insert A fig. 7,
which operates:
❒the ignition switch
❒ the door lock
❒ the fuel flap lock/unlock
❒ the safe lock device (deactivation only - for
versions/markets, where provided)
Pressing button B opens/closes metal insert A.
Button
remotely unlocks the doors and the
tailgate.
Buttonremotely locks the doors and the tailgate.
Buttonremotely opens the tailgate.
If the button for locking doors
from the
inside is accidentally pressed, only the
doors opened for getting out of the car
are released; the tailgate remains locked. For
system reset , press the lock/release buttons again
/
.
WARNING
Press button B fig. 7 only with the key
away from your body, specifically from
your eyes and from objects which could get
damaged (e.g. your clothes). Do not leave the
key unattended to avoid the button being
accidentally pressed while it is being handled,
e.g. by a child.
Unlocking the doors and the tailgate
Briefly press button
for unlocking the doors and
tailgate with the alarm being switched off at the
same time (for versions/markets, where provided),
timed switching-on of internal roof lights and double
flashing of direction indicators (for versions/markets,
where provided).
Pressing button
for longer than 2 seconds: window
opening.
Doors will be unlocked automatically if the fuel
inertia cut-off switch is activated.
fig. 7
F0Q0255
9GETTING TO
KNOW YOUR CAR
SAFETY
STARTING AND
DRIVING
WARNING LIGHTS
AND MESSAGES
IN AN EMERGENCY
SERVICING AND
MAINTENANCE
TECHNICAL
SPECIFICATIONS
INDEX
Page 14 of 275
Locking the doors and the tailgate
Briefly press button
for locking the doors and
tailgate with the alarm being switched on at the same
time (for versions/markets, where provided), timed
switching-off of internal roof lights and single flashing
of direction indicators.
Pressing button
for longer than 2 seconds: window
closing. When the button is pressed twice quickly,
the safe lock device is activated (for versions/
markets, where provided) (see "Safe Lock Device"
paragraph hereafter).
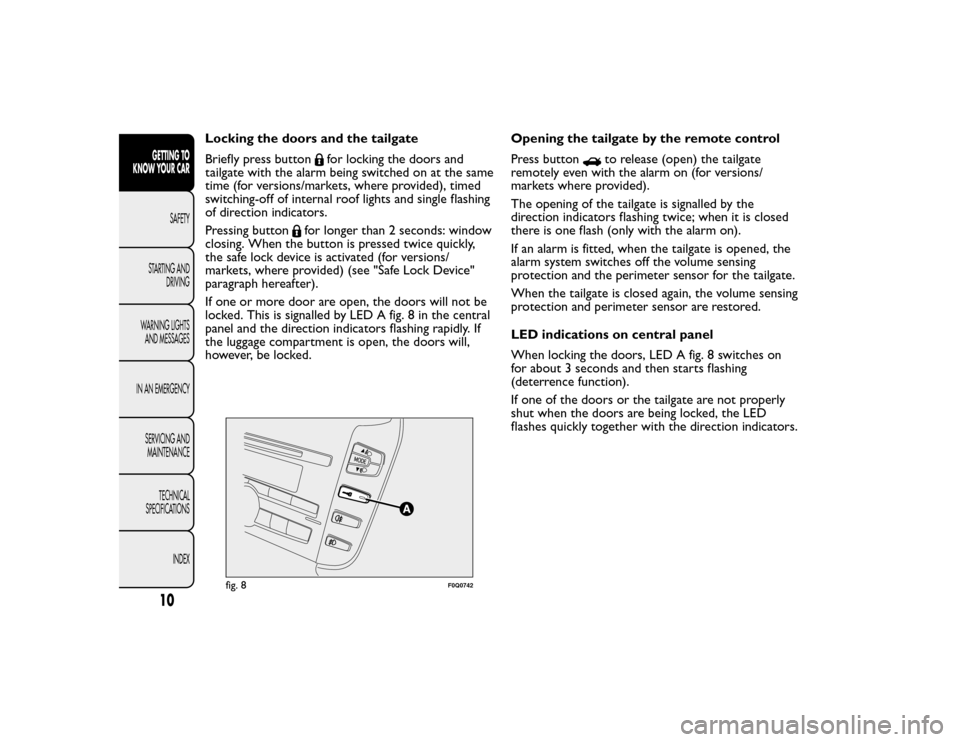
If one or more door are open, the doors will not be
locked. This is signalled by LED A fig. 8 in the central
panel and the direction indicators flashing rapidly. If
the luggage compartment is open, the doors will,
however, be locked. Opening the tailgate by the remote control
Press button
to release (open) the tailgate
remotely even with the alarm on (for versions/
markets where provided).
The opening of the tailgate is signalled by the
direction indicators flashing twice; when it is closed
there is one flash (only with the alarm on).
If an alarm is fitted, when the tailgate is opened, the
alarm system switches off the volume sensing
protection and the perimeter sensor for the tailgate.
When the tailgate is closed again, the volume sensing
protection and perimeter sensor are restored.
LED indications on central panel
When locking the doors, LED A fig. 8 switches on
for about 3 seconds and then starts flashing
(deterrence function).
If one of the doors or the tailgate are not properly
shut when the doors are being locked, the LED
flashes quickly together with the direction indicators.
fig. 8
F0Q0742
10GETTING TO
KNOW YOUR CAR
SAFETY
STARTING AND DRIVING
WARNING LIGHTS AND MESSAGES
IN AN EMERGENCY SERVICING ANDMAINTENANCE
TECHNICAL
SPECIFICATIONS
INDEX
Page 16 of 275
SAFE LOCK DEVICE
(for versions/markets, where provided)
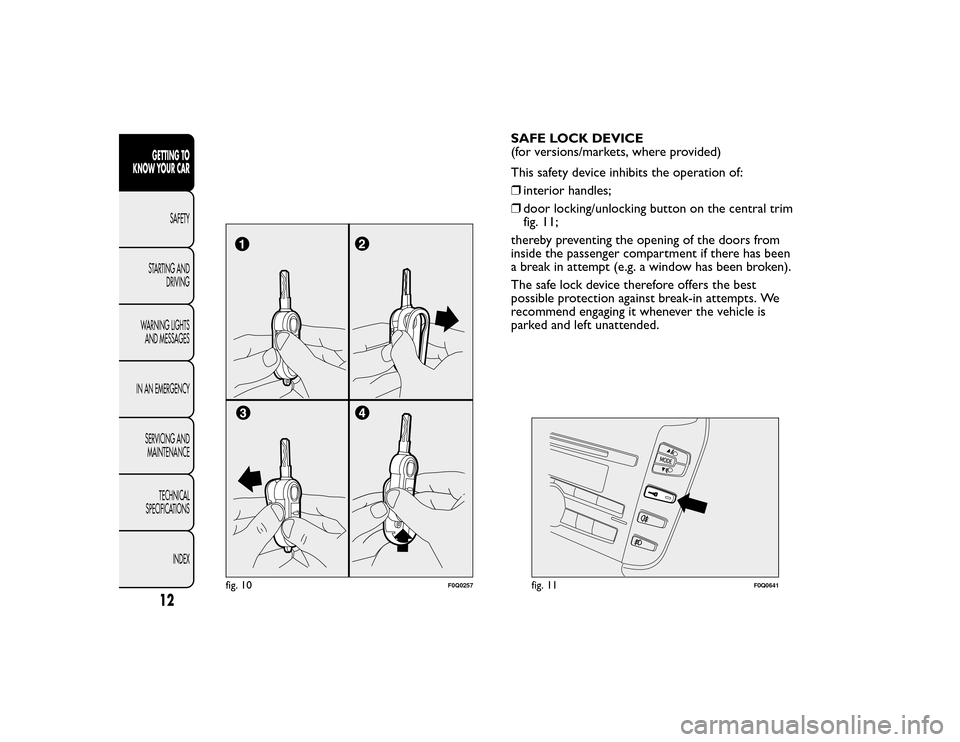
This safety device inhibits the operation of:
❒interior handles;
❒ door locking/unlocking button on the central trim
fig. 11;
thereby preventing the opening of the doors from
inside the passenger compartment if there has been
a break in attempt (e.g. a window has been broken).
The safe lock device therefore offers the best
possible protection against break-in attempts. We
recommend engaging it whenever the vehicle is
parked and left unattended.
fig. 10
F0Q0257
fig. 11
F0Q0641
12GETTING TO
KNOW YOUR CAR
SAFETY
STARTING AND DRIVING
WARNING LIGHTS AND MESSAGES
IN AN EMERGENCY SERVICING ANDMAINTENANCE
TECHNICAL
SPECIFICATIONS
INDEX
Page 19 of 275
IMPORTANT The alarm is adapted to meet
requirements in various countries.
TURNING THE ALARM OFF
Press button
on the key with remote control.
The following operations are performed (excluding
some versions for specific markets):
❒ direction indicators flash twice;
❒ there are two short acoustic signals (beeps);
❒ doors are unlocked.
IMPORTANT The alarm does not switch off when
the central opening is activated using the metal insert
in the key.
VOLUME SENSING/ANTI-LIFT
PROTECTION
To guarantee the correct operation of the protection
system it is advisable to shut all the side windows
and the sun roof (for versions/markets, where
provided).
If necessary, the function can be turned off (if, for
example, you are leaving an animal in the car) by
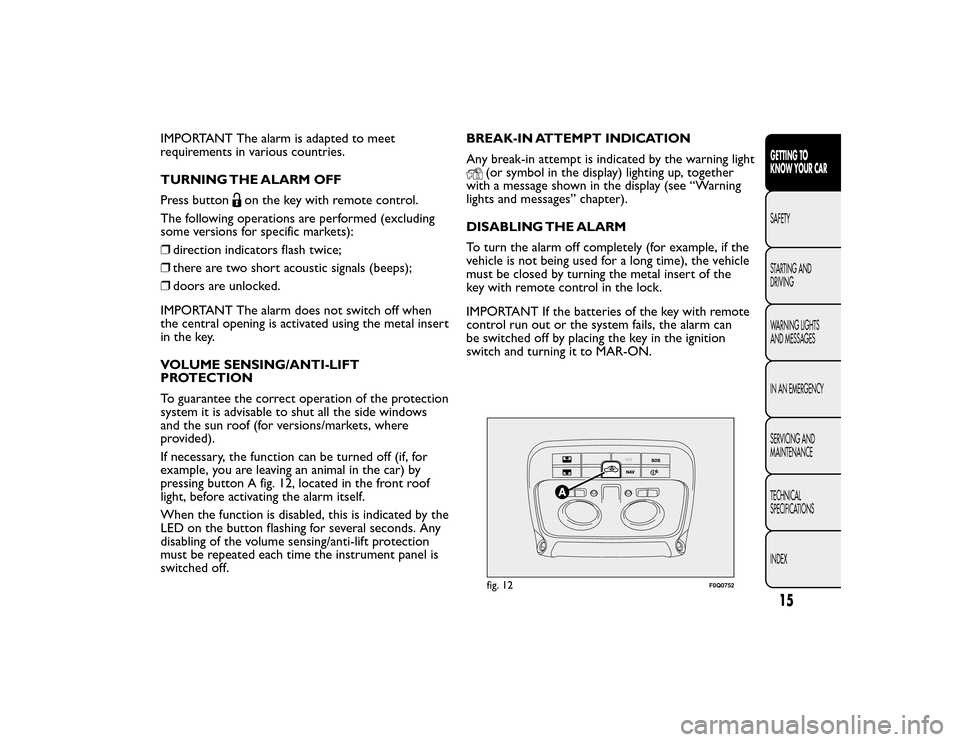
pressing button A fig. 12, located in the front roof
light, before activating the alarm itself.
When the function is disabled, this is indicated by the
LED on the button flashing for several seconds. Any
disabling of the volume sensing/anti-lift protection
must be repeated each time the instrument panel is
switched off. BREAK-IN ATTEMPT INDICATION
Any break-in attempt is indicated by the warning light
(or symbol in the display) lighting up, together
with a message shown in the display (see “Warning
lights and messages” chapter).
DISABLING THE ALARM
To turn the alarm off completely (for example, if the
vehicle is not being used for a long time), the vehicle
must be closed by turning the metal insert of the
key with remote control in the lock.
IMPORTANT If the batteries of the key with remote
control run out or the system fails, the alarm can
be switched off by placing the key in the ignition
switch and turning it to MAR-ON.fig. 12
F0Q0752
15GETTING TO
KNOW YOUR CAR
SAFETY
STARTING AND
DRIVING
WARNING LIGHTS
AND MESSAGES
IN AN EMERGENCY
SERVICING AND
MAINTENANCE
TECHNICAL
SPECIFICATIONS
INDEX
Page 40 of 275
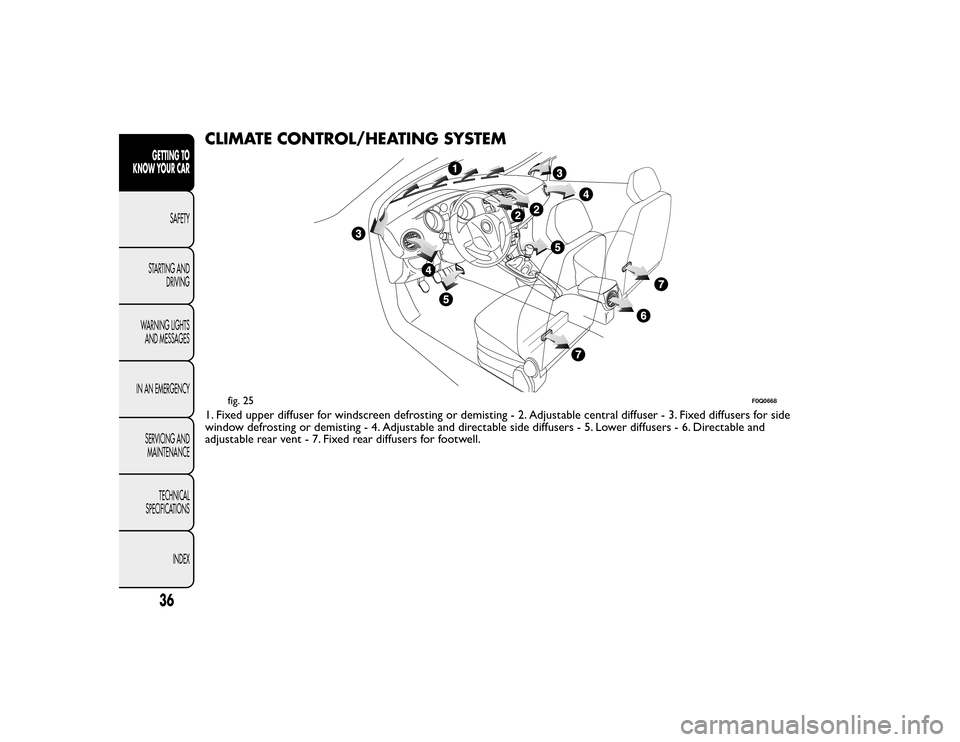
CLIMATE CONTROL/HEATING SYSTEM1. Fixed upper diffuser for windscreen defrosting or demisting - 2. Adjustable central diffuser - 3. Fixed diffusers for side
window defrosting or demisting - 4. Adjustable and directable side diffusers - 5. Lower diffusers - 6. Directable and
adjustable rear vent - 7. Fixed rear diffusers for footwell.
fig. 25
F0Q0668
36GETTING TO
KNOW YOUR CAR
SAFETY
STARTING AND DRIVING
WARNING LIGHTS AND MESSAGES
IN AN EMERGENCY SERVICING ANDMAINTENANCE
TECHNICAL
SPECIFICATIONS
INDEX
Page 41 of 275
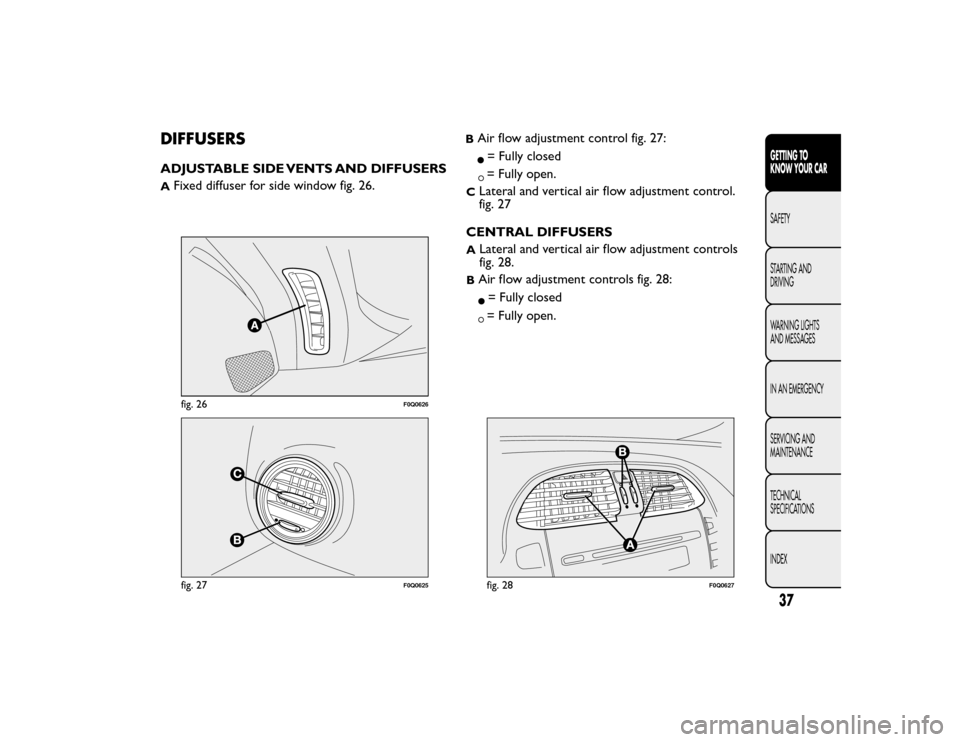
DIFFUSERSADJUSTABLE SIDE VENTS AND DIFFUSERSA
Fixed diffuser for side window fig. 26.
BAir flow adjustment control fig. 27:= Fully closed= Fully open.
C
Lateral and vertical air flow adjustment control.
fig. 27
CENTRAL DIFFUSERS
A
Lateral and vertical air flow adjustment controls
fig. 28.
BAir flow adjustment controls fig. 28:= Fully closed= Fully open.
fig. 26
F0Q0626
fig. 27
F0Q0625
fig. 28
F0Q0627
37GETTING TO
KNOW YOUR CAR
SAFETY
STARTING AND
DRIVING
WARNING LIGHTS
AND MESSAGES
IN AN EMERGENCY
SERVICING AND
MAINTENANCE
TECHNICAL
SPECIFICATIONS
INDEX
Page 44 of 275
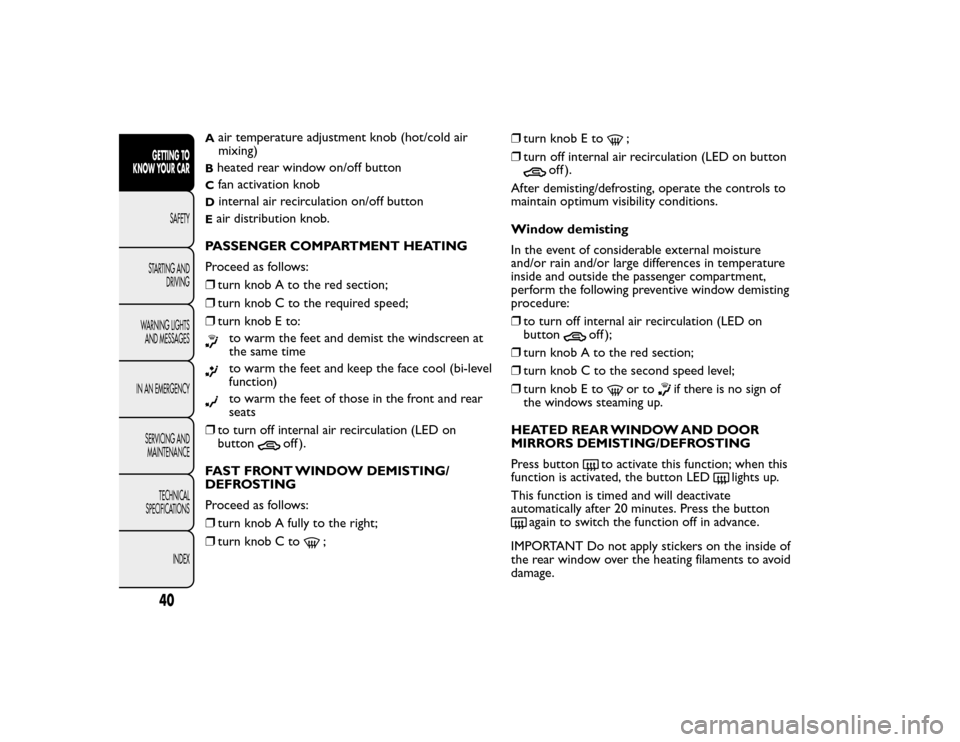
A
air temperature adjustment knob (hot/cold air
mixing)
Bheated rear window on/off buttonC
fan activation knob
D
internal air recirculation on/off button
Eair distribution knob.
PASSENGER COMPARTMENT HEATING
Proceed as follows:
❒ turn knob A to the red section;
❒ turn knob C to the required speed;
❒ turn knob E to:
to warm the feet and demist the windscreen at
the same timeto warm the feet and keep the face cool (bi-level
function)to warm the feet of those in the front and rear
seats
❒ to turn off internal air recirculation (LED on
button
off ).
FAST FRONT WINDOW DEMISTING/
DEFROSTING
Proceed as follows:
❒ turn knob A fully to the right;
❒ turn knob C to
; ❒
turn knob E to
;
❒ turn off internal air recirculation (LED on button
off ).
After demisting/defrosting, operate the controls to
maintain optimum visibility conditions.
Window demisting
In the event of considerable external moisture
and/or rain and/or large differences in temperature
inside and outside the passenger compartment,
perform the following preventive window demisting
procedure:
❒ to turn off internal air recirculation (LED on
button
off );
❒ turn knob A to the red section;
❒ turn knob C to the second speed level;
❒ turn knob E to
or to
if there is no sign of
the windows steaming up.
HEATED REAR WINDOW AND DOOR
MIRRORS DEMISTING/DEFROSTING
Press button
to activate this function; when this
function is activated, the button LED
lights up.
This function is timed and will deactivate
automatically after 20 minutes. Press the button
again to switch the function off in advance.
IMPORTANT Do not apply stickers on the inside of
the rear window over the heating filaments to avoid
damage.
40GETTING TO
KNOW YOUR CAR
SAFETY
STARTING AND DRIVING
WARNING LIGHTS AND MESSAGES
IN AN EMERGENCY SERVICING ANDMAINTENANCE
TECHNICAL
SPECIFICATIONS
INDEX
Page 45 of 275
FAN SPEED ADJUSTMENT
To ventilate the passenger compartment properly,
proceed as follows:
❒fully open the central and side air diffusers;
❒ turn knob A to the blue section;
❒ turn knob C to the required speed;
❒ turn knob E to
;
❒ turn off internal air recirculation (LED on button
off ).
INTERNAL AIR RECIRCULATION
ACTIVATION
Press button
: when the function is on, the
button LED lights up. It is advisable to switch the
internal air recirculation on while standing in queues
or in tunnels to prevent the introduction of polluted
air. However, it is better not to use the function
for long periods, particularly if there are many people
on board, to prevent the windows from misting.
IMPORTANT Internal air recirculation makes it
possible to reach the required heating or cooling
conditions more quickly depending on the mode
selected. Do not use the internal air recirculation
function on rainy/cold days as it would considerably
increase the possibility of the windows misting. ADDITIONAL HEATER
(for versions/markets, where provided)
This device warms up the passenger compartment
more quickly when it is very cold and the engine
coolant temperature is low.
The additional heater comes on automatically when
the engine is started, if knob A is turned to the
last red sector and the fan (knob C) is at least at the
first speed level.
The heater switches off automatically when the
required comfort conditions are achieved.
IMPORTANT The heater will not turn on if the
battery voltage is too low.
41GETTING TO
KNOW YOUR CAR
SAFETY
STARTING AND
DRIVING
WARNING LIGHTS
AND MESSAGES
IN AN EMERGENCY
SERVICING AND
MAINTENANCE
TECHNICAL
SPECIFICATIONS
INDEX
Page 47 of 275
A
air temperature adjustment knob (hot/cold air
mixing)
Bheated rear window on/off buttonC
fan activation knob
D
climate control system compressor on/off button
Einternal air recirculation on/off buttonFair distribution knob.
PASSENGER COMPARTMENT HEATING
Proceed as follows:
❒ turn knob A to the red section;
❒ turn knob C to the required speed;
❒ turn knob F to:
to warm the feet and demist the windscreen at
the same timeto warm the feet and keep the face cool (bi-level
function)to warm the feet of those in the front and rear
seats
❒ to turn off internal air recirculation (LED on
button
off ).
FAST FRONT WINDOW DEMISTING/
DEFROSTING
Proceed as follows:
❒ press thebutton
❒ turn knob A fully to the right;
❒ turn knob C to
; ❒
turn knob E to
;
❒ turn off internal air recirculation (LED on button
off ).
After demisting/defrosting, operate the controls to
maintain optimum visibility conditions.
Window demisting
In the event of considerable external moisture
and/or rain and/or large differences in temperature
inside and outside the passenger compartment,
perform the following preventive window demisting
procedure:
❒ press the
button
❒ turn off internal air recirculation (LED on button
off );
❒ turn knob A to the red section;
❒ turn knob C to the second speed level;
❒ turn knob F to
or to
if there is no sign of
the windows steaming up.
The climate control system is very useful for
demisting the windows more quickly: just carry out
the above procedure and activate the system by
pressing button
.
43GETTING TO
KNOW YOUR CAR
SAFETY
STARTING AND
DRIVING
WARNING LIGHTS
AND MESSAGES
IN AN EMERGENCY
SERVICING AND
MAINTENANCE
TECHNICAL
SPECIFICATIONS
INDEX