turn signal FIAT CROMA 2005 2.G Connect NavPlus Manual
[x] Cancel search | Manufacturer: FIAT, Model Year: 2005, Model line: CROMA, Model: FIAT CROMA 2005 2.GPages: 164, PDF Size: 5.39 MB
Page 24 of 164

24
CONNECT NAV+
TA - TRAFFIC INFORMATION
Certain stations in the FM band
(FM1, FM2, FM3 and FMAST) are al-
so enabled to broadcast information
about the conditions of the traffic. In
this case the displays shows the ab-
breviation “TP”.
To turn on/off the TA function (Traf-
fic Announcement) for traffic bulletins,
press briefly one of the keypad keys
16-fig. 1set near the icon key TA.
When the TA function is on, the dis-
play shows “TA” and the wording on
the icon key is darkened.
The listening conditions and infor-
mation shown on the display may be
the following:
– TA and TP: you are tuned to a sta-
tion that broadcasts traffic information
and the traffic information function is
on– TP: you are tuned to a station that
broadcasts traffic information but the
traffic information function is off
– TA: the traffic information function
is on but you are tuned to a station
that does not broadcast traffic infor-
mation
– TA and TP not shown on the dis-
play: you are tuned to a station that
does not broadcast traffic information
and the traffic information function is
off.
With the TA function on it is possi-
ble:
1) to receive traffic information al-
so if the CD/CDC/MP3 player is
working;
2) to receive traffic information at a
preset minimum level also with the ra-
dio volume down completely. Listening to stored stations
Proceed as follows:
– choose the required frequency
band (FM1, FM2, FM3, FMAST, LW,
MW or AMAST) pressing repeatedly
the “SRC” key 2-fig. 1;
– press briefly one of the station
storage keys on the keypad 16-fig. 1
numbered from “1” to “6” at the bot-
tom of the main screen.
In the FM1, FM2, FM3 and FMAST
bands, if reception is poor and the
“AF-Alt. Freq.” alternative frequency
seek function is on, a station with the
strongest signal that is broadcasting
the same programme is automatically
sought.
Page 26 of 164

26
CONNECT NAV+
– With AF OFF the radio will not
tune the strongest station automati-
cally and it will have to be found man-
ually using the tuner buttons.
To turn on/off this function, press
briefly one of the keypad keys 16-fig.
1set near the icon key AF.
When the AF function is on, the
display shows “AF” and the wording
on the icon key is darkened.
The RDS channel name (if available)
is still shown on the display.“FREQUENCY” FUNCTION
The “Frequency” function enables to
tune the required radio station by
turning knob 15-fig. 1clockwise or
counter-clockwise.
To turn the “Frequency” function on,
turn knob 15-fig. 1to select the cor-
responding icon key and then press it.
To turn this function off, press again
knob 15-fig. 1. AF - SEEKING ALTERNATIVE
FREQUENCIES
Within the RDS system the radio can
work in two different modes:
– AF ON: alternative frequency
search on;
– AF OFF: alternative frequency
search off.
When the signal of the RDS station
tuned weakens, the following two cas-
es may occur:
– With AF ON the RDS system ac-
tivates automatic tuning of the opti-
mum frequency of the station chosen,
with the stations enabled, therefore
the radio is automatically tuned to the
station with the strongest signal that
is broadcasting the same programme.
During the journey it will thus be pos-
sible to continue listening to the sta-
tion chosen without having to change
the frequency when changing area. Of
course, the station being listened to
must be receivable in the area the car
is crossing.
Page 27 of 164

27
CONNECT NAV+
During automatic storage the display
shows “Autostore”.
Stations will be stored automatically
on the preset keys from “1” to “6” of
the keypad16-fig. 1. After storage,
the radio tunes automatically to the
first station of the FMAST band, cor-
responding to the frequency stored on
the preset key “1” of the keypad 16-
fig. 1.
Every station is stored only once, ex-
cept in the case of regional pro-
grammes, which in certain cases might
be stored twice.The behaviour of the set during Au-
tostore is as follows:
– pressing one of the preset keys
from “1” to “6” the automatic storage
process is interrupted and the station
stored with that key is tuned
– changing the audio source (Radio,
CD, CD-Changer) during the auto-
matic storage process, the Autostore
function is interrupted. “Autostore” FUNCTION
(AUTOMATIC STATION
STORAGE)
After selecting the AMAST or
FMAST band, to turn on the Auto-
store function (automatic station stor-
age), select the “AUTOSTORE” icon
with the knob 15-fig. 1then press it
to confirm.
When this function is on, the radio
automatically stores the stations with
the strongest signal:
– 6 FM stations in the FMAST band
or
– 6 AM stations in the AMAST band.
Page 28 of 164

28
CONNECT NAV+
IMPORTANTIt may occur that
the Autostore function is unable to
find 6 stations with a strong signal; in
this case only the stations found are
stored.
IMPORTANTActivating the “Au-
tostore” function cancels the stations
stored previously in the FMAST or
AMAST band.“Band Scan” FUNCTION
The “Band scan” function activates
station scanning in the chosen fre-
quency band. Each station frequency
will be displayed for about 10 seconds.
To turn the “Band scan” function on,
select the “Band scan” icon with the
knob 15-fig. 1then press it to con-
firm.
During scanning, the display will
show “Band Scan”.
Scanning will be interrupted by press-
ing knob 15-fig. 1again (by taking care
to be positioned onto the “Preset
Scan” graphic key), or by selecting a
station previously memorized. “Preset Scan” FUNCTION
The “Preset scan” function activates
stored station scanning in the chosen
frequency band. Each stored station
will be played for about 10 seconds.
To turn on the “Preset scan” func-
tion, select the “Preset scan” icon with
the knob 15-fig. 1and then press it to
confirm.
During stations scan, the scanned
one is highlighted in the stored sta-
tions window and corresponding low-
bar button too. During operations the
string “Preset Scan” is displayed in the
main window.
Scanning will be interrupted by press-
ing knob 15-fig. 1again (by taking care
to be positioned onto the “Preset
Scan” graphic key), or by selecting a
station previously memorized.
Page 29 of 164

29
CONNECT NAV+
LOC/DX function
(tuner sensitivity adjustment)
With this function it is possible to
change the sensitivity of automatic ra-
dio station searching. When low sen-
sitivity “LOC” is set, only stations with
excellent reception are sought; when
high sensitivity “DX” is set, all the sta-
tions are sought. If you are in an area
with a large number of broadcasters
and you want the ones with the
strongest signal, choose low sensitivi-
ty “LOC”.
To choose between low or high
tuner sensitivity, select the “LOC/DX”
function with the knob 15-fig. 1and
then press it repeatedly. The abbre-
viation of the sensitivity chosen will be
shown on the display:
– LOC = low sensitivity;
– DX = high sensitivity.Mono/Stereo function
To pass from “Mono” to “Stereo” or
vice versa, select “Mono/Stereo” by
turning the knob 15-fig. 1and press
it to confirm. This function is only
available on FM band.
When stereo reception is on the dis-
play shows “STEREO”, when it is off
the display shows “MONO”.
When the signal of the station tuned
is weak, to improve the sound quality,
it is advisable to switch to “MONO”. “Radio setup” FUNCTION
To turn on the “Radio Setup” func-
tion, select the “Radio Setup” icon
with the knob 15-fig. 1and press it
to confirm. This function enables to
go to next window to adjust radio
settings. When in this window it is
not possible to change the audio
source. The following functions are
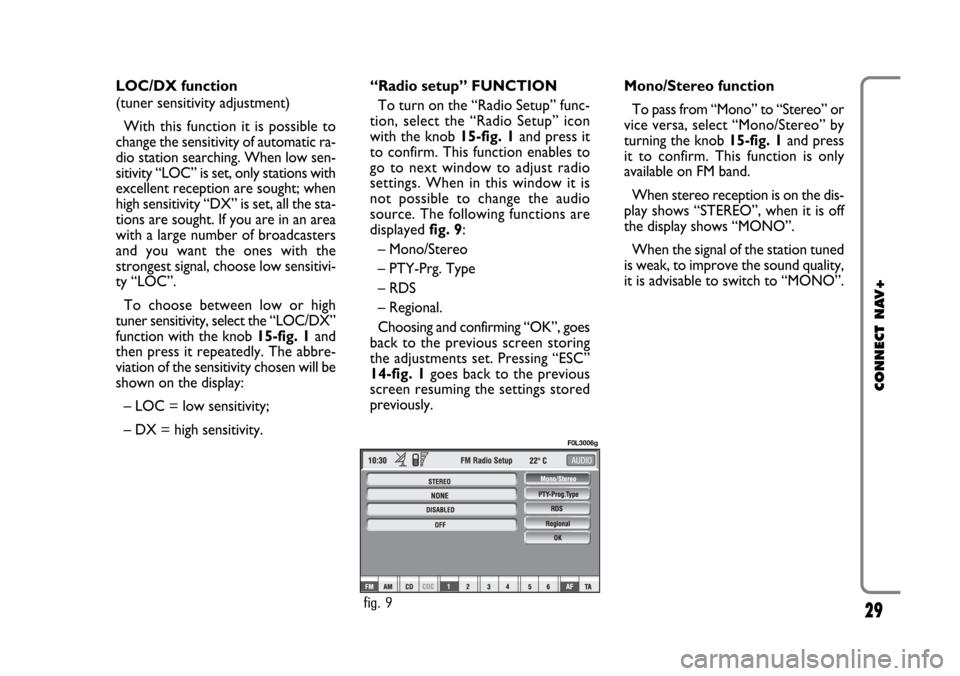
displayed fig. 9:
– Mono/Stereo
– PTY-Prg. Type
– RDS
– Regional.
Choosing and confirming “OK”, goes
back to the previous screen storing
the adjustments set. Pressing “ESC”
14-fig. 1goes back to the previous
screen resuming the settings stored
previously.
fig. 9
F0L3006g
Page 61 of 164

– DTMF setting (Dual Tone Multi
Frequency) to repeat dialling and in-
hibit the own identification number
transmission
– selection of network provider
– setting volume and tone of incom-
ing calls
– displaying the remaining credit for
a pre-paid SIM card (if provided for by
the telephone company)
– display of signal field intensity and
other status warnings with symbols
and words.PRELIMINARY
OPERATIONS
ENTERING AND EXITING
THE TELEPHONE MODE
To enter the telephone mode pro-
ceed as follows:
– turn ignition key to ON;
– short push on “TEL” button 19-fig.
1on front panel.
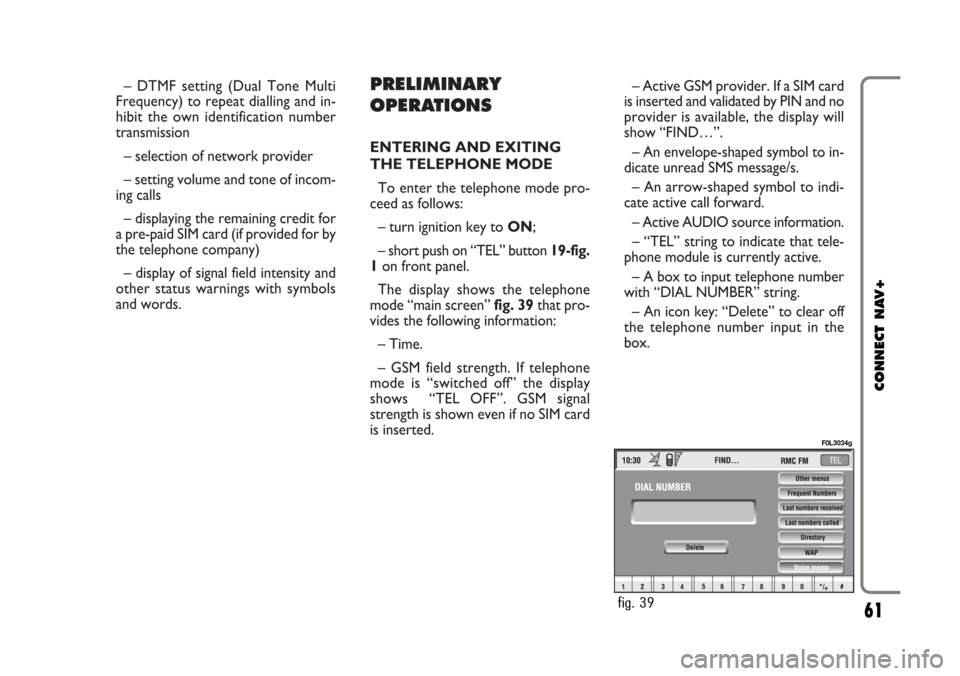
The display shows the telephone
mode “main screen” fig. 39that pro-
vides the following information:
– Time.
– GSM field strength. If telephone
mode is “switched off” the display
shows “TEL OFF”. GSM signal
strength is shown even if no SIM card
is inserted.– Active GSM provider. If a SIM card
is inserted and validated by PIN and no
provider is available, the display will
show “FIND…”.
– An envelope-shaped symbol to in-
dicate unread SMS message/s.
– An arrow-shaped symbol to indi-
cate active call forward.
– Active AUDIO source information.
– “TEL” string to indicate that tele-
phone module is currently active.
– A box to input telephone number
with “DIAL NUMBER” string.
– An icon key: “Delete” to clear off
the telephone number input in the
box.
61
CONNECT NAV+
fig. 39
F0L3034g
Page 92 of 164

GENERAL
INFORMATION
The navigator integrated in the
CONNECT Nav+ allows you to
reach the chosen destination by visu-
al and voice instructions. Use of the
navigation system is quick, convenient,
safe and above all very flexible because
it allows you to call up already pro-
grammed destinations or points of ref-
erence such as hotels, monuments,
public structures, fuel stations.
The car position is determined
through the GPS system (Global Posi-
tioning System) installed on the car.
The GPS system is fitted with an an-
tenna and a reception module inte-
grated in the telematic system. This
system configuration dynamically
processes the satellite signals, those
from the right and left odometer, the
reversing signal and the information of
the gyroscope integrated in the navi-
gation computer, integrating them with
the current position of the car to ob-
tain an “estimated car point”.The navigation system helps the dri-
ver while he/she drives by suggesting
vocally and graphically the optimum
routing to reach the preset destina-
tion.
The navigation system suggestions do
not exempt the driver from full re-
sponsibility due to his/her driving be-
haviour and to compliance with road
and other traffic regulations. The re-
sponsibility for road safety always and
in any case lies with the car driver.IMPORTANT NOTES
– GPS reception is difficult under
trees, among tall buildings, in multi-lev-
el car parks, tunnels and everywhere
reception of the satellite antenna may
be hindered.
– The GPS system needs about 15
minutes for activation if the car bat-
tery is disconnected.
– The GPS system needs a few min-
utes to determine the new position of
the car if it is turned off and the car
is moved with the system off (e.g.: on
ferryboat).
– The GPS satellite aerial must not
be covered with metal or damp ob-
jects.
The instantaneous car position is
identified in the CD-ROM and shown
on the display together with the topo-
graphic characteristics of the area
memorised on the CD-ROM. Access
to data on the CD-ROM requires a
few moments waiting for the map dis-
plays.
92
CONNECT NAV+
N N
A A
V V
I I
G G
A A
T T
O O
R R
( (
N N
A A
V V
) )
Page 96 of 164

MAIN SCREEN
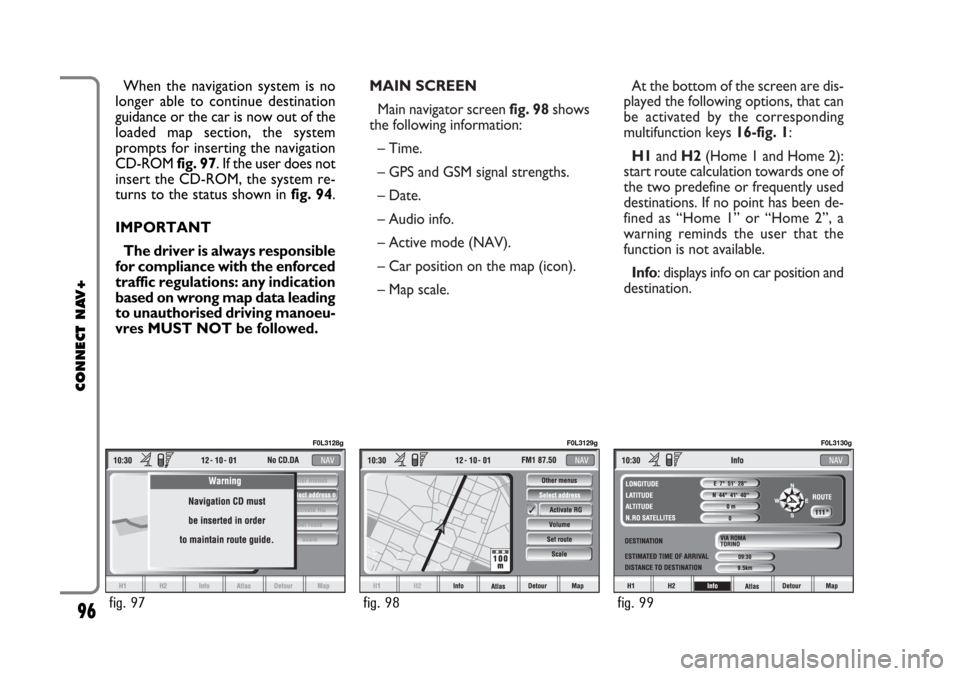
Main navigator screen fig. 98shows
the following information:
– Time.
– GPS and GSM signal strengths.
– Date.
– Audio info.
– Active mode (NAV).
– Car position on the map (icon).
– Map scale.At the bottom of the screen are dis-
played the following options, that can
be activated by the corresponding
multifunction keys 16-fig. 1:
H1and H2(Home 1 and Home 2):
start route calculation towards one of
the two predefine or frequently used
destinations. If no point has been de-
fined as “Home 1” or “Home 2”, a
warning reminds the user that the
function is not available.
Info: displays info on car position and
destination. When the navigation system is no
longer able to continue destination
guidance or the car is now out of the
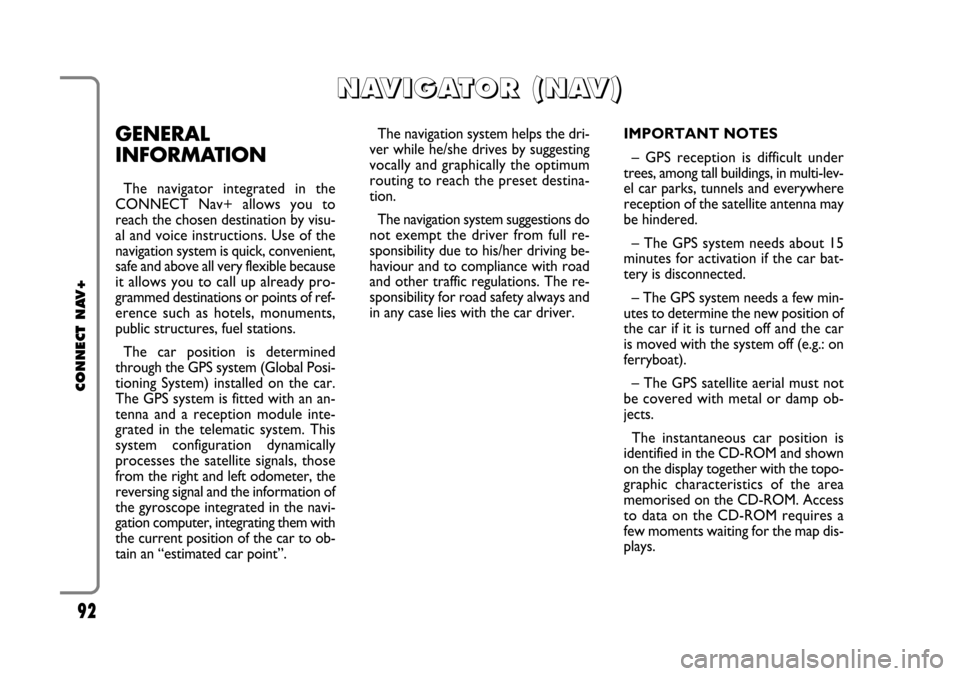
loaded map section, the system
prompts for inserting the navigation
CD-ROM fig. 97. If the user does not
insert the CD-ROM, the system re-
turns to the status shown in fig. 94.
IMPORTANT
The driver is always responsible
for compliance with the enforced
traffic regulations: any indication
based on wrong map data leading
to unauthorised driving manoeu-
vres MUST NOT be followed.
96
CONNECT NAV+
fig. 97
F0L3128g
fig. 98
F0L3129g
fig. 99
F0L3130g