warning FIAT CROMA 2005 2.G Connect NavPlus Manual
[x] Cancel search | Manufacturer: FIAT, Model Year: 2005, Model line: CROMA, Model: FIAT CROMA 2005 2.GPages: 164, PDF Size: 5.39 MB
Page 5 of 164
5
CONNECT NAV+
ADVICE
ROAD SAFETY
You are recommended to learn how
to use the different functions of the
CONNECT Nav+ and in particular of
the radio (e.g. storing stations) before
starting to drive.RECEPTION CONDITIONS
Reception conditions change con-
stantly when driving. Reception can be
disturbed by the presence of moun-
tains, buildings, bridges particularly
when far away from the broadcaster
received.
IMPORTANTWhen receiving
traffic information the volume might
be higher than normal.CARE AND MAINTENANCE
The structure of the CONNECT
Nav+ ensures long years of operation
with no need for particular mainte-
nance. In the event of a fault, contact
Fiat Dealership.
Some care must however be taken
to ensure the complete efficiency of
the CONNECT Nav+:
– the monitor is sensitive to scratch-
ing, liquid detergents and UV rays;
– liquids that penetrate inside may
damage the device irreparably.
Clean the front panel and display on-
ly using a soft, dry antistatic cloth.
Cleaning and polishing products may
damage the surface.
A A
D D
V V
I I
C C
E E
, ,
C C
O O
N N
T T
R R
O O
L L
S S
A A
N N
D D
G G
E E
N N
E E
R R
A A
L L
I I
N N
F F
O O
R R
M M
A A
T T
I I
O O
N N
Too high a volume when dri-
ving can put the driver’s life
at risk and that of other people.
Therefore the volume should always
be adjusted in such a way that it is
always possible to hear the noises of
the surrounding environment (e.g.
horns, ambulance, police sirens, etc.).
WARNING
Page 15 of 164
15
CONNECT NAV+
GENERAL
INFORMATION
IMPORTANT NOTES FOR
USE AND ROAD SAFETY
The CONNECT Nav+ with Ra-
dio/Telephone/Navigator/On-board
computer makes it possible to easily
control the main functions of the car. To avoid creating dangerous situa-
tions for yourself and others in use of
the system, please pay attention to the
following points:
– the CONNECT Nav+ must be
used keeping full control of the car;
in the case of doubt in the use of the
functions, it is necessary to stop be-
fore performing the various opera-
tions;
– use of the cell phone is prohibited
near explosive substances.
The navigation system allows you to
reach your destination, indicating each
route change stored on the navigation
CD-ROM. In fact, in calculating the
route, the system takes into account
of all the information stored concern-
ing the roads, advising the best route.
However it cannot take account of the
traffic, sudden interruptions or any
other inconvenience.In carrying out any manoeuvre it is
always necessary to follow the rules of
the road, regardless of the advice giv-
en by the navigation system. If you
leave the suggested route, the naviga-
tion system will calculate a new one
and suggest it to you.
The navigation system
helps the driver while dri-
ving by suggesting, vocally and
graphically, the best route to be fol-
lowed to reach the preset destina-
tion. The suggestions given by the
navigation system do not exempt
the driver from full responsibility
due to driving behaviour and com-
pliance with road and other traffic
regulations. The responsibility for
road safety always and anyway lies
with the car’s driver.
WARNING
Page 42 of 164
42
CONNECT NAV+
Delete
“Delete” icon enables to clear the
CD name.
To turn the function on, select
“Delete” icon rotating the knob 15-
fig. 1and pressing it.
Delete name
“Delete name” icon enables to delete
a previously stored sequence name.
To turn the function on, select
“Delete name” icon rotating the knob
15-fig. 1and pressing it.
OK
To confirm your choices, select the
“OK” icon with the knob 15-fig. 1
and press it; the name and the asso-
ciated sequence are stored.IMPORTANTIn case of buffer full,
a warning message “WARNING, CD
DIRECTORY FULL” will be displayed
to point out the problem. The user
shall have to delete some previously
stored CD names.
“AUDIO SETUP” FUNCTION
(AUDIO ADJUSTMENTS)
To access the audio setup menu
while listening to a CD, select the “Au-
dio setup” icon with the knob 15-
fig. 1and press it to confirm.
For the description of the different
functions available in the menu, see the
corresponding paragraph of the “RA-
DIO MODE” chapter.CD-CHANGER
MODE (if installed)
IMPORTANTNever use 8 cm au-
dio or MP3 CDs, even with the spe-
cial adapter, since this format damages
the system.
The CD-changer cannot play CDs in
the MP3 format.
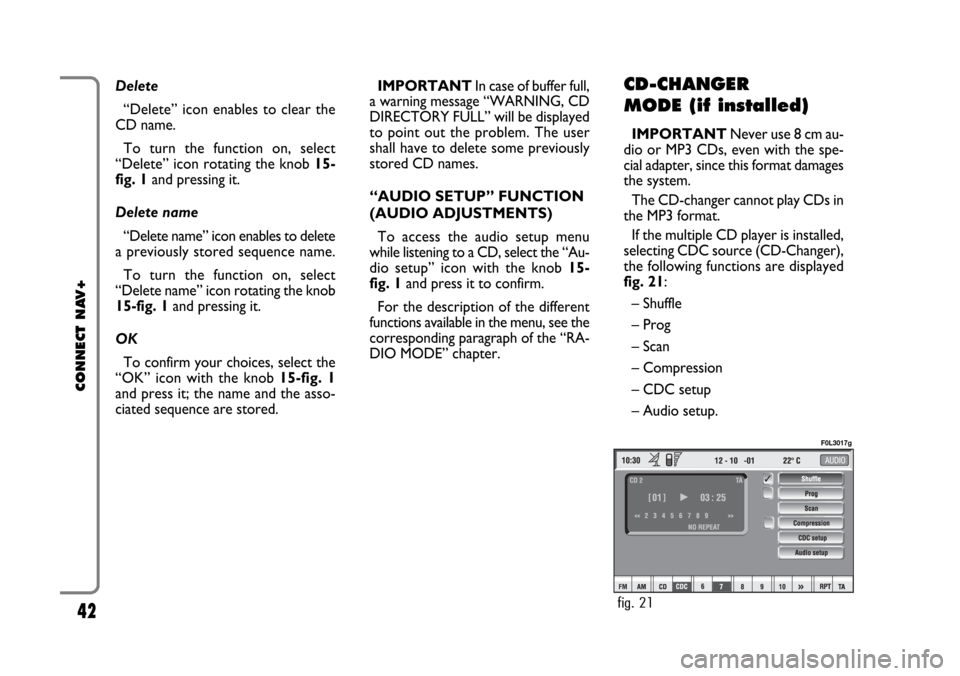
If the multiple CD player is installed,
selecting CDC source (CD-Changer),
the following functions are displayed
fig. 21:
– Shuffle
– Prog
– Scan
– Compression
– CDC setup
– Audio setup.
fig. 21
F0L3017g
Page 48 of 164
48
CONNECT NAV+
Since a full MP3 CD could hypothet-
ically include many MP3 files, a 999
music pieces limit is imposed by the
system. If the user inserts a MP3 CD
which has more than 999 tracks (files)
in it, then only the first 999 files will be
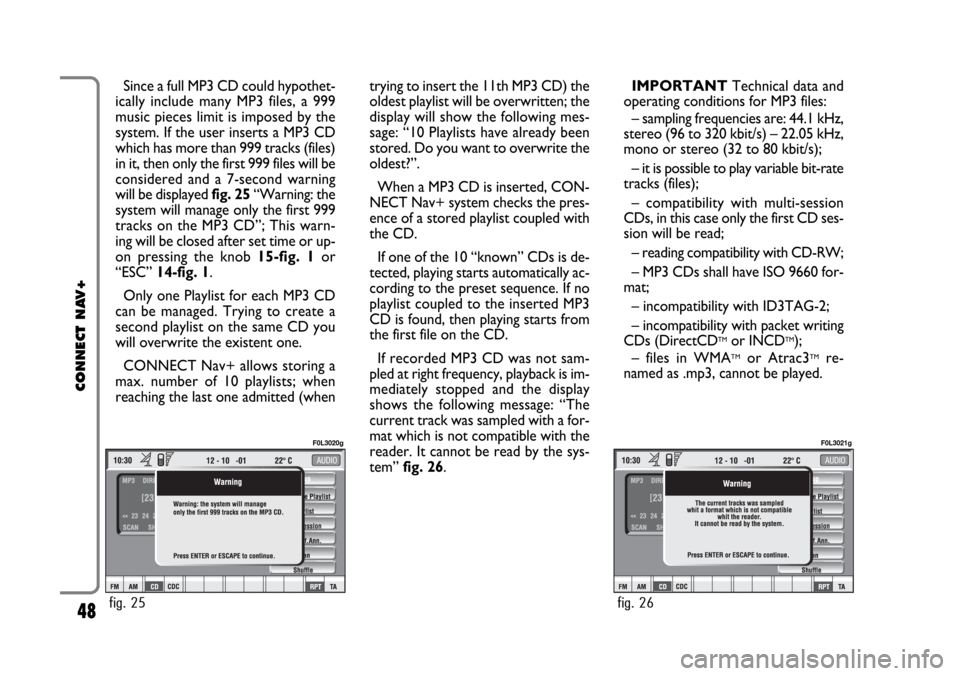
considered and a 7-second warning
will be displayed fig. 25“Warning: the
system will manage only the first 999
tracks on the MP3 CD”; This warn-
ing will be closed after set time or up-
on pressing the knob 15-fig. 1or
“ESC” 14-fig. 1.
Only one Playlist for each MP3 CD
can be managed. Trying to create a
second playlist on the same CD you
will overwrite the existent one.
CONNECT Nav+ allows storing a
max. number of 10 playlists; when
reaching the last one admitted (whentrying to insert the 11th MP3 CD) the
oldest playlist will be overwritten; the
display will show the following mes-
sage: “10 Playlists have already been
stored. Do you want to overwrite the
oldest?”.
When a MP3 CD is inserted, CON-
NECT Nav+ system checks the pres-
ence of a stored playlist coupled with
the CD.
If one of the 10 “known” CDs is de-
tected, playing starts automatically ac-
cording to the preset sequence. If no
playlist coupled to the inserted MP3
CD is found, then playing starts from
the first file on the CD.
If recorded MP3 CD was not sam-
pled at right frequency, playback is im-
mediately stopped and the display
shows the following message: “The
current track was sampled with a for-
mat which is not compatible with the
reader. It cannot be read by the sys-
tem” fig. 26.IMPORTANTTechnical data and
operating conditions for MP3 files:
– sampling frequencies are: 44.1 kHz,
stereo (96 to 320 kbit/s) – 22.05 kHz,
mono or stereo (32 to 80 kbit/s);
– it is possible to play variable bit-rate
tracks (files);
– compatibility with multi-session
CDs, in this case only the first CD ses-
sion will be read;
– reading compatibility with CD-RW;
– MP3 CDs shall have ISO 9660 for-
mat;
– incompatibility with ID3TAG-2;
– incompatibility with packet writing
CDs (DirectCD
TMor INCDTM);
– files in WMATMor Atrac3TMre-
named as .mp3, cannot be played.
fig. 25
F0L3020g
fig. 26
F0L3021g
Page 61 of 164
– DTMF setting (Dual Tone Multi
Frequency) to repeat dialling and in-
hibit the own identification number
transmission
– selection of network provider
– setting volume and tone of incom-
ing calls
– displaying the remaining credit for
a pre-paid SIM card (if provided for by
the telephone company)
– display of signal field intensity and
other status warnings with symbols
and words.PRELIMINARY
OPERATIONS
ENTERING AND EXITING
THE TELEPHONE MODE
To enter the telephone mode pro-
ceed as follows:
– turn ignition key to ON;
– short push on “TEL” button 19-fig.
1on front panel.
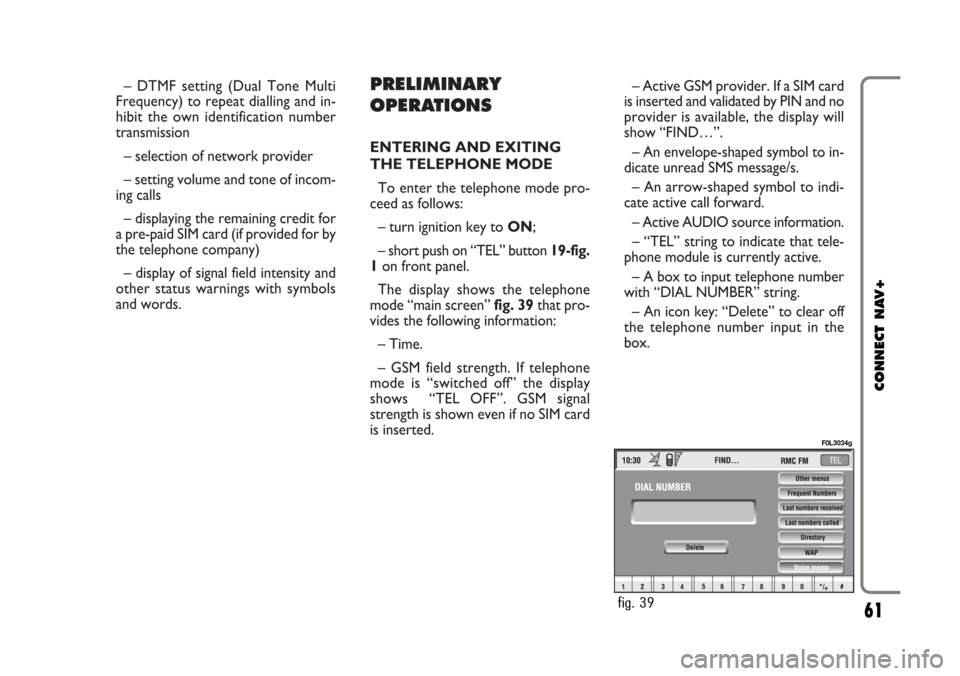
The display shows the telephone
mode “main screen” fig. 39that pro-
vides the following information:
– Time.
– GSM field strength. If telephone
mode is “switched off” the display
shows “TEL OFF”. GSM signal
strength is shown even if no SIM card
is inserted.– Active GSM provider. If a SIM card
is inserted and validated by PIN and no
provider is available, the display will
show “FIND…”.
– An envelope-shaped symbol to in-
dicate unread SMS message/s.
– An arrow-shaped symbol to indi-
cate active call forward.
– Active AUDIO source information.
– “TEL” string to indicate that tele-
phone module is currently active.
– A box to input telephone number
with “DIAL NUMBER” string.
– An icon key: “Delete” to clear off
the telephone number input in the
box.
61
CONNECT NAV+
fig. 39
F0L3034g
Page 63 of 164
Press “ESC” 14-fig. 1to return to
main telephone screen.
– A long push on “TEL” button 19-
fig. 1switches off (the display shows
an hourglass during this operation) the
telephone mode (TEL OFF). To switch
it on again, a short push on the same
button will be required.INSERTING
THE TELEPHONE CARD
If no valid SIM card is inserted when
calling the telephone function, the dis-
play shows the relevant warning mes-
sage.
The insertion of a valid SIM card
makes it possible to make the tele-
phone operational and access its func-
tions. The telephone card is to be in-
serted in the special slot 11-fig. 1:
– press button 10-fig. 1and remove
the SIM slot;
– put the SIM cards into the special
recess by following the shaping of the
seat, with the golden part facing up-
wards.
Correct card insertion is confirmed
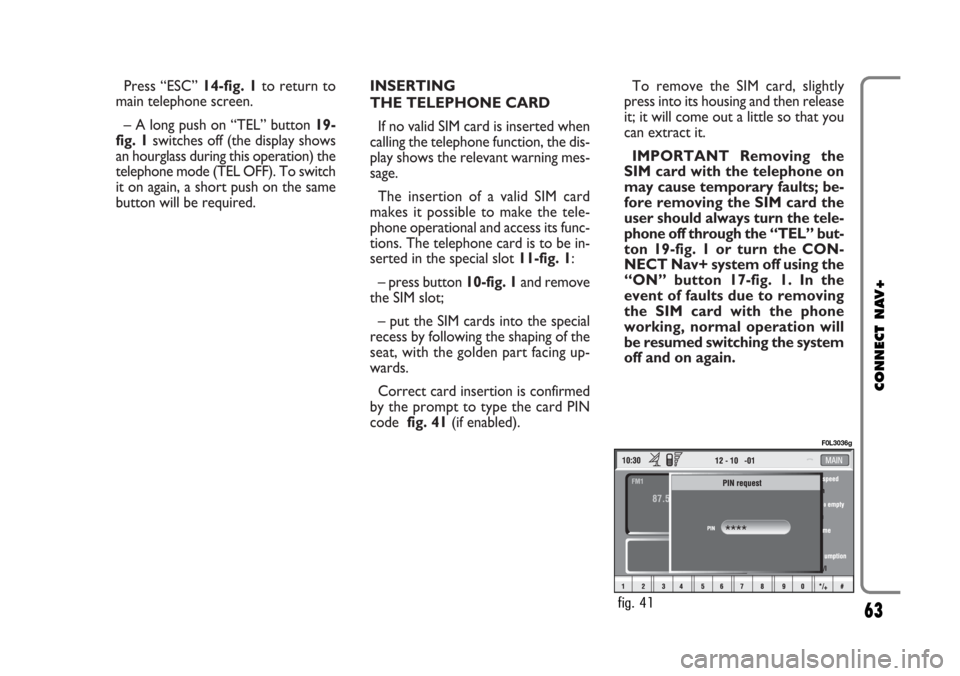
by the prompt to type the card PIN
code fig. 41(if enabled).To remove the SIM card, slightly
press into its housing and then release
it; it will come out a little so that you
can extract it.
IMPORTANT Removing the
SIM card with the telephone on
may cause temporary faults; be-
fore removing the SIM card the
user should always turn the tele-
phone off through the “TEL” but-
ton 19-fig. 1 or turn the CON-
NECT Nav+ system off using the
“ON” button 17-fig. 1. In the
event of faults due to removing
the SIM card with the phone
working, normal operation will
be resumed switching the system
off and on again.
63
CONNECT NAV+
fig. 41
F0L3036g
Page 79 of 164
“In directory” icon key
This key fig. 63 - 64, selected and
confirmed by rotating and pressing the
knob 15-fig. 1, stores current dis-
played site address in the “Site direc-
tory” (with a maximum of 10 stored
addresses), proceed as follows:
– rotate the knob15-fig. 1to se-
lect the address and then press the
knob to confirm.Storing the tenth address, the display
shows a dialog box warning the user
that the directory is full and the icon
key (“In directory”) is greyed. Further
storing requests a preventive deletion.
A mnemonic string (max. length 30
characters) can be associated to each
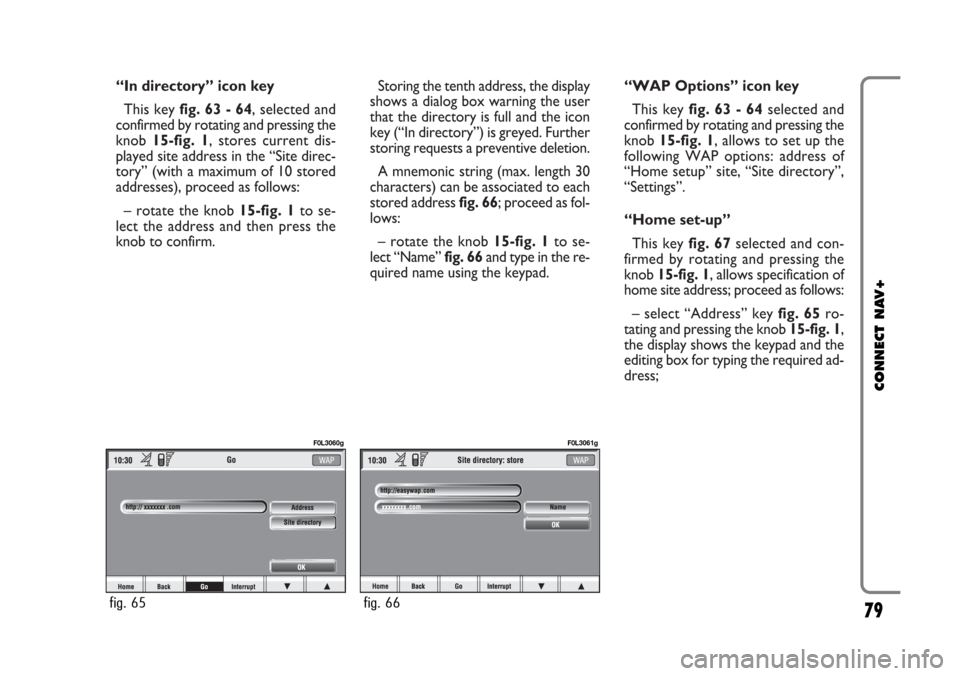
stored address fig. 66; proceed as fol-
lows:
– rotate the knob 15-fig. 1to se-
lect “Name” fig. 66and type in the re-
quired name using the keypad.“WAP Options” icon key
This key fig. 63 - 64selected and
confirmed by rotating and pressing the
knob 15-fig. 1, allows to set up the
following WAP options: address of
“Home setup” site, “Site directory”,
“Settings”.
“Home set-up”
This keyfig. 67selected and con-
firmed by rotating and pressing the
knob 15-fig. 1, allows specification of
home site address; proceed as follows:
– select “Address” key fig. 65ro-
tating and pressing the knob 15-fig. 1,
the display shows the keypad and the
editing box for typing the required ad-
dress;
79
CONNECT NAV+
fig. 65
F0L3060g
fig. 66
F0L3061g
Page 84 of 164
“Other menus” FUNCTION
Selecting and confirming “Other
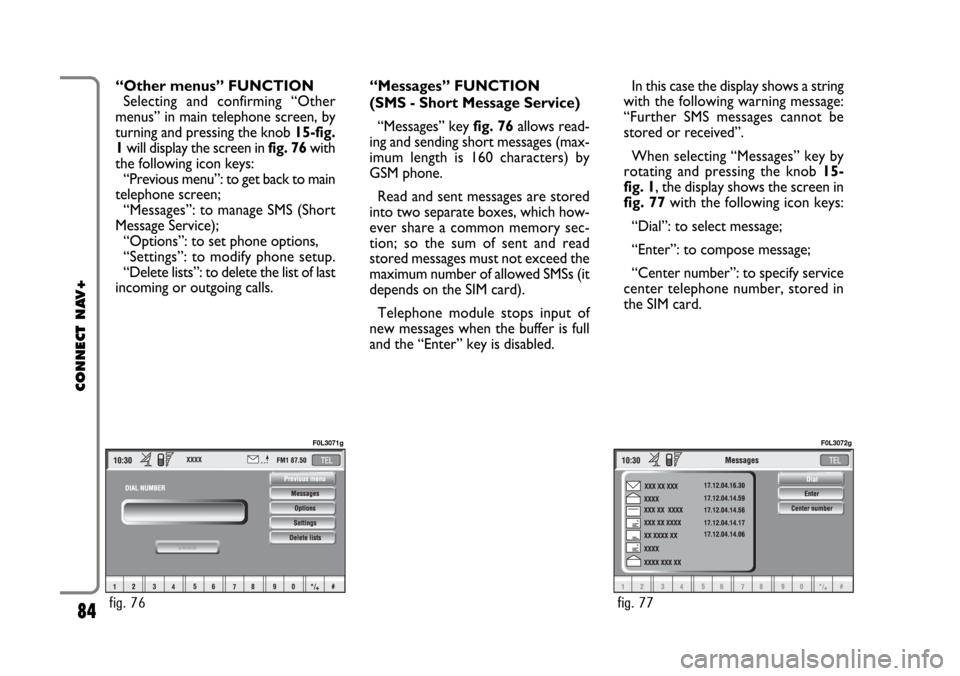
menus” in main telephone screen, by
turning and pressing the knob 15-fig.
1will display the screen in fig. 76with
the following icon keys:
“Previous menu”: to get back to main
telephone screen;
“Messages”: to manage SMS (Short
Message Service);
“Options”: to set phone options,
“Settings”: to modify phone setup.
“Delete lists”: to delete the list of last
incoming or outgoing calls.“Messages” FUNCTION
(SMS - Short Message Service)
“Messages” key fig. 76allows read-
ing and sending short messages (max-
imum length is 160 characters) by
GSM phone.
Read and sent messages are stored
into two separate boxes, which how-
ever share a common memory sec-
tion; so the sum of sent and read
stored messages must not exceed the
maximum number of allowed SMSs (it
depends on the SIM card).
Telephone module stops input of
new messages when the buffer is full
and the “Enter” key is disabled.In this case the display shows a string
with the following warning message:
“Further SMS messages cannot be
stored or received”.
When selecting “Messages” key by
rotating and pressing the knob 15-
fig. 1, the display shows the screen in
fig. 77with the following icon keys:
“Dial”: to select message;
“Enter”: to compose message;
“Center number”: to specify service
center telephone number, stored in
the SIM card.
84
CONNECT NAV+
fig. 76
F0L3071g
fig. 77
F0L3072g
Page 96 of 164
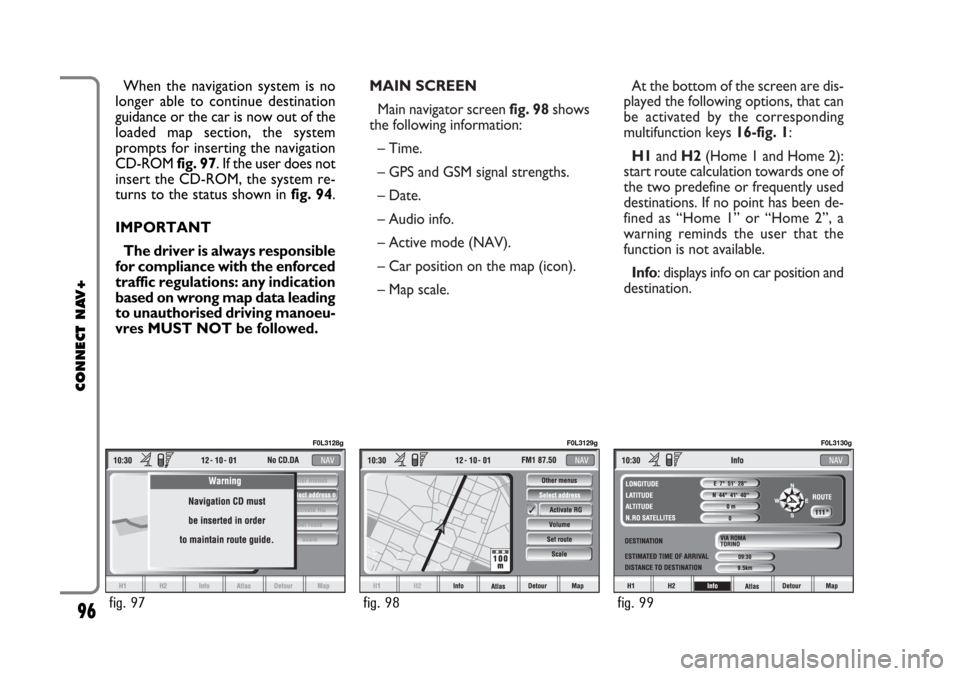
MAIN SCREEN
Main navigator screen fig. 98shows
the following information:
– Time.
– GPS and GSM signal strengths.
– Date.
– Audio info.
– Active mode (NAV).
– Car position on the map (icon).
– Map scale.At the bottom of the screen are dis-
played the following options, that can
be activated by the corresponding
multifunction keys 16-fig. 1:
H1and H2(Home 1 and Home 2):
start route calculation towards one of
the two predefine or frequently used
destinations. If no point has been de-
fined as “Home 1” or “Home 2”, a
warning reminds the user that the
function is not available.
Info: displays info on car position and
destination. When the navigation system is no
longer able to continue destination
guidance or the car is now out of the
loaded map section, the system
prompts for inserting the navigation
CD-ROM fig. 97. If the user does not
insert the CD-ROM, the system re-
turns to the status shown in fig. 94.
IMPORTANT
The driver is always responsible
for compliance with the enforced
traffic regulations: any indication
based on wrong map data leading
to unauthorised driving manoeu-
vres MUST NOT be followed.
96
CONNECT NAV+
fig. 97
F0L3128g
fig. 98
F0L3129g
fig. 99
F0L3130g
Page 102 of 164
102
CONNECT NAV+
Then, select OK using the keypad and
press the knob 15-fig. 1.
The “Voice recognition” key allows
to associate a voice sample to a des-
tination stored in the directory. Sym-
bol “√” at the left of the key shows if
a sample has already been associated.
Selecting and confirming “Voice
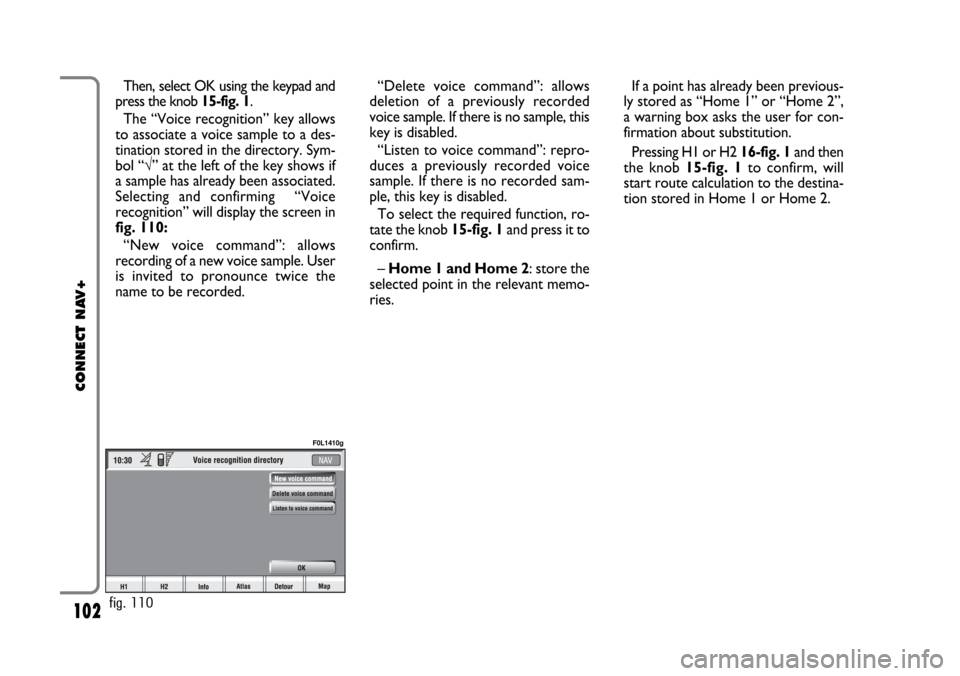
recognition” will display the screen in
fig. 110:
“New voice command”: allows
recording of a new voice sample. User
is invited to pronounce twice the
name to be recorded. “Delete voice command”: allows
deletion of a previously recorded
voice sample. If there is no sample, this
key is disabled.
“Listen to voice command”: repro-
duces a previously recorded voice
sample. If there is no recorded sam-
ple, this key is disabled.
To select the required function, ro-
tate the knob 15-fig. 1and press it to
confirm.
– Home 1 and Home 2: store the
selected point in the relevant memo-
ries.If a point has already been previous-
ly stored as “Home 1” or “Home 2”,
a warning box asks the user for con-
firmation about substitution.
Pressing H1 or H2 16-fig. 1and then
the knob 15-fig. 1to confirm, will
start route calculation to the destina-
tion stored in Home 1 or Home 2.
fig. 110
F0L1410g