bulb FIAT CROMA 2006 2.G Owners Manual
[x] Cancel search | Manufacturer: FIAT, Model Year: 2006, Model line: CROMA, Model: FIAT CROMA 2006 2.GPages: 240, PDF Size: 7.41 MB
Page 144 of 240
Warning light vturns on
together with the dedicated
message on the display to in-
dicate that the cleaning pro-
cedure cannot be performed, contact
Fiat Dealership as soon as possible.
144
IN AN
EMERGENCY
CAR
MAINTENANCE
TECHNICAL
SPECIFICATIONS
INDEX
DASHBOARD
AND CONTROLS
SAFETY
DEVICES
CORRECT USE
OF THE CAR
WARNING
LIGHTS AND
MESSAGES
GENERIC FAILURE
INDICATION
(amber)
The warning light turns on in the follow-
ing circumstances.
Engine oil pressure
sensor failure
The warning light comes on when the en-
gine oil pressure sensor is faulty. Contact
Fiat Dealership as soon as possible.
The display will show the dedicated mes-
sage.
è
EXTERNAL LIGHT
FAILURE (amber)
The warning light turns on
when one of the following lights is failing:
– side/taillights
– brake lights (third brake light excluded)
– rear fog lights
– direction indicators
– number plate lights.
The failure referring to these lights could
be: one or more blown bulbs, a blown
protection fuse or an electric connection
cut-off.
The display will show the dedicated mes-
sage.
W
REAR FOG LIGHTS
(amber)
The warning light turns on
when the rear fog lights are turned on.
4
Diesel particulate filter clogged
(Multijet versions)
The warning light turns on together with
the message on the display and the buzzer
when the diesel particulate filter is clogged
and the driving conditions do not enable
to activate automatically the reclaiming
procedure.
To enable the cleaning procedure, keep
the car running until the warning light
turns off.
Inertial fuel cut-off switch
intervened
The warning light turns on together with
the message on the display, when the in-
ertial fuel cut-off switch is triggered.
To reset the fuel cut-off switch, see para-
graph “Power and fuel cut-off switch” in
section “Dashboard and controls”.
Rain sensor failure
The warning light on the dial turns on (on
certain versions together with the mes-
sage on the display) when the rain sensor
is faulty. Contact Fiat Dealership.
Page 149 of 240

149
WARNING
LIGHTS AND
MESSAGES
CAR
MAINTENANCE
TECHNICAL
SPECIFICATIONS
INDEX
DASHBOARD
AND CONTROLS
SAFETY
DEVICES
CORRECT USE
OF THE CAR
IN AN
EMERGENCY
JUMP STARTING .................................................................... 150
BUMP STARTING .................................................................. 151
IF A TYRE IS PUNCTURED ................................................ 151
WHEN NEEDING TO CHANGE A BULB .................... 157
IF AN EXTERIOR LIGHT BURNS OUT .......................... 161
IF AN INTERIOR LIGHT BURNS OUT ........................... 166
IF A FUSE BLOWS ................................................................. 169
IF THE BATTERY IS FLAT ................................................... 180
JACKING THE CAR .............................................................. 180
TOWING THE CAR ............................................................ 181
I I
N N
A A
N N
E E
M M
E E
R R
G G
E E
N N
C C
Y Y
Page 157 of 240
157
WARNING
LIGHTS AND
MESSAGES
CAR
MAINTENANCE
TECHNICAL
SPECIFICATIONS
INDEX
DASHBOARD
AND CONTROLS
SAFETY
DEVICES
CORRECT USE
OF THE CAR
IN AN
EMERGENCY
WHEN NEEDING TO
CHANGE A BULB
GENERAL INSTRUCTIONS
❒When a light is not working, check
that the corresponding fuse is intact
before changing a bulb. For the loca-
tion of fuses, refer to the paragraph “If
a fuse blows” in this section;
❒Before changing a bulb check the con-
tacts for oxidation;
❒Burnt bulbs must be replaced by
others of the same type and power;
❒Always check the height of the head-
light beam after changing a bulb.
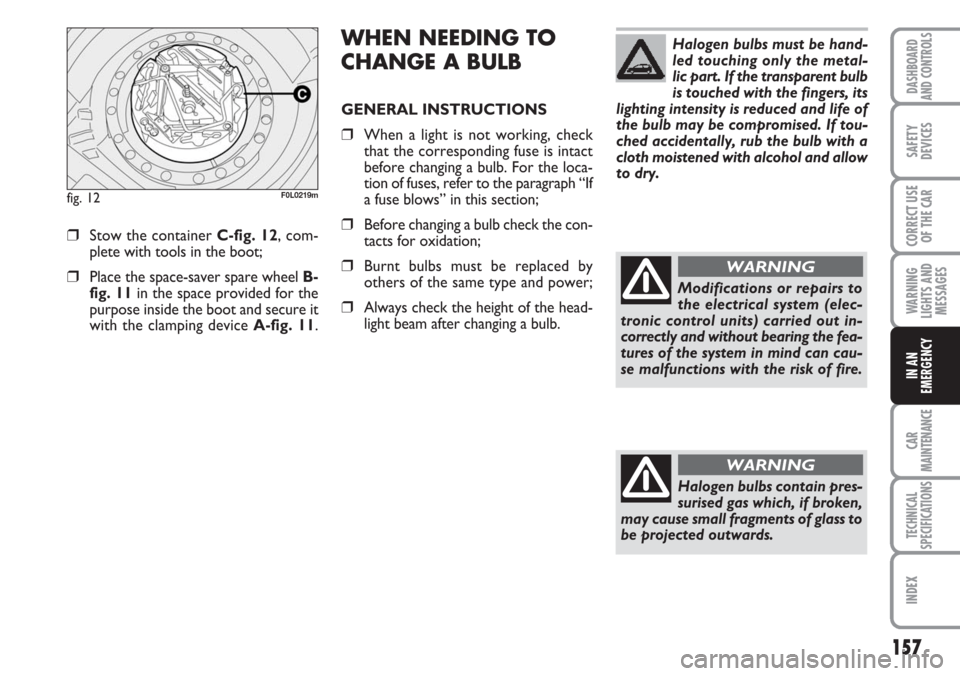
❒Stow the container C-fig. 12, com-
plete with tools in the boot;
❒Place the space-saver spare wheel B-
fig. 11in the space provided for the
purpose inside the boot and secure it
with the clamping device A-fig. 11.
fig. 12F0L0219m
Halogen bulbs must be hand-
led touching only the metal-
lic part. If the transparent bulb
is touched with the fingers, its
lighting intensity is reduced and life of
the bulb may be compromised. If tou-
ched accidentally, rub the bulb with a
cloth moistened with alcohol and allow
to dry.
Modifications or repairs to
the electrical system (elec-
tronic control units) carried out in-
correctly and without bearing the fea-
tures of the system in mind can cau-
se malfunctions with the risk of fire.
WARNING
Halogen bulbs contain pres-
surised gas which, if broken,
may cause small fragments of glass to
be projected outwards.
WARNING
Page 158 of 240
158
WARNING
LIGHTS AND
MESSAGES
CAR
MAINTENANCE
TECHNICAL
SPECIFICATIONS
INDEX
DASHBOARD
AND CONTROLS
SAFETY
DEVICES
CORRECT USE
OF THE CAR
IN AN
EMERGENCY
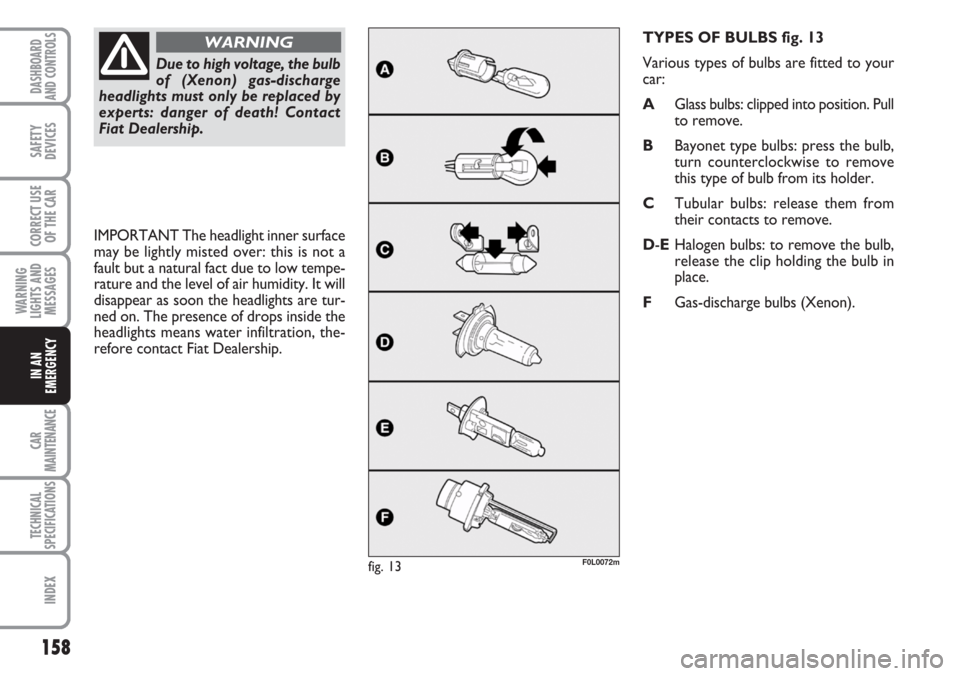
TYPES OF BULBS fig. 13
Various types of bulbs are fitted to your
car:
AGlass bulbs: clipped into position. Pull
to remove.
BBayonet type bulbs: press the bulb,
turn counterclockwise to remove
this type of bulb from its holder.
CTubular bulbs: release them from
their contacts to remove.
D-EHalogen bulbs: to remove the bulb,
release the clip holding the bulb in
place.
FGas-discharge bulbs (Xenon).
F0L0072mfig. 13
Due to high voltage, the bulb
of (Xenon) gas-discharge
headlights must only be replaced by
experts: danger of death! Contact
Fiat Dealership.
WARNING
IMPORTANT The headlight inner surface
may be lightly misted over: this is not a
fault but a natural fact due to low tempe-
rature and the level of air humidity. It will
disappear as soon the headlights are tur-
ned on. The presence of drops inside the
headlights means water infiltration, the-
refore contact Fiat Dealership.
Page 159 of 240
159
WARNING
LIGHTS AND
MESSAGES
CAR
MAINTENANCE
TECHNICAL
SPECIFICATIONS
INDEX
DASHBOARD
AND CONTROLS
SAFETY
DEVICES
CORRECT USE
OF THE CAR
IN AN
EMERGENCY
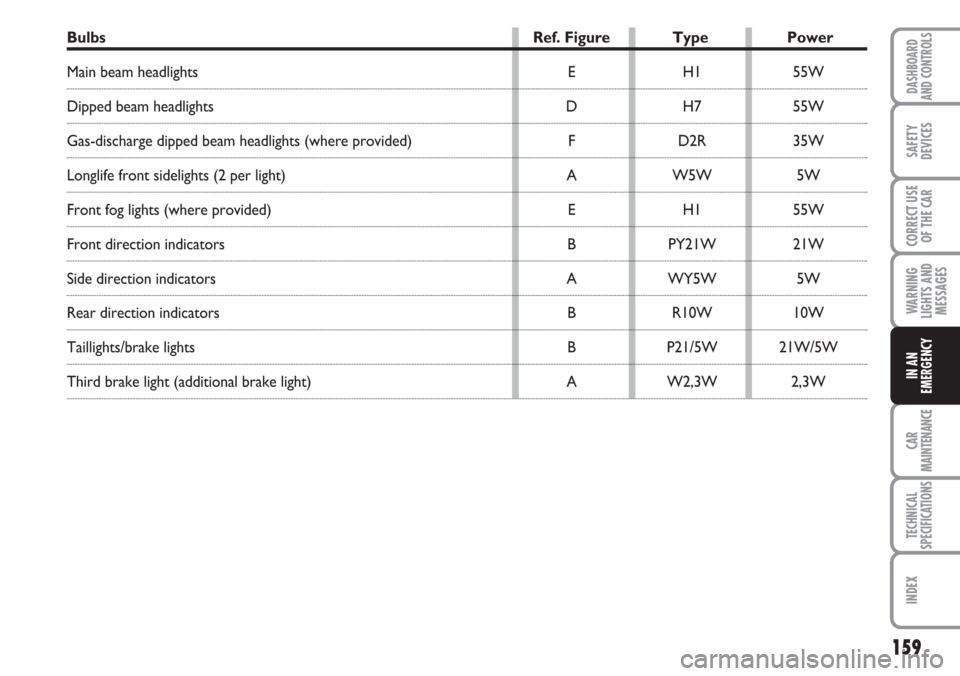
Bulbs Ref. Figure Type Power
Main beam headlights E H1 55W
Dipped beam headlights D H7 55W
Gas-discharge dipped beam headlights (where provided) F D2R 35W
Longlife front sidelights (2 per light) A W5W 5W
Front fog lights (where provided) E H1 55W
Front direction indicators B PY21W 21W
Side direction indicators A WY5W 5W
Rear direction indicators B R10W 10W
Taillights/brake lights B P21/5W 21W/5W
Third brake light (additional brake light) A W2,3W 2,3W
Page 160 of 240
160
WARNING
LIGHTS AND
MESSAGES
CAR
MAINTENANCE
TECHNICAL
SPECIFICATIONS
INDEX
DASHBOARD
AND CONTROLS
SAFETY
DEVICES
CORRECT USE
OF THE CAR
IN AN
EMERGENCY
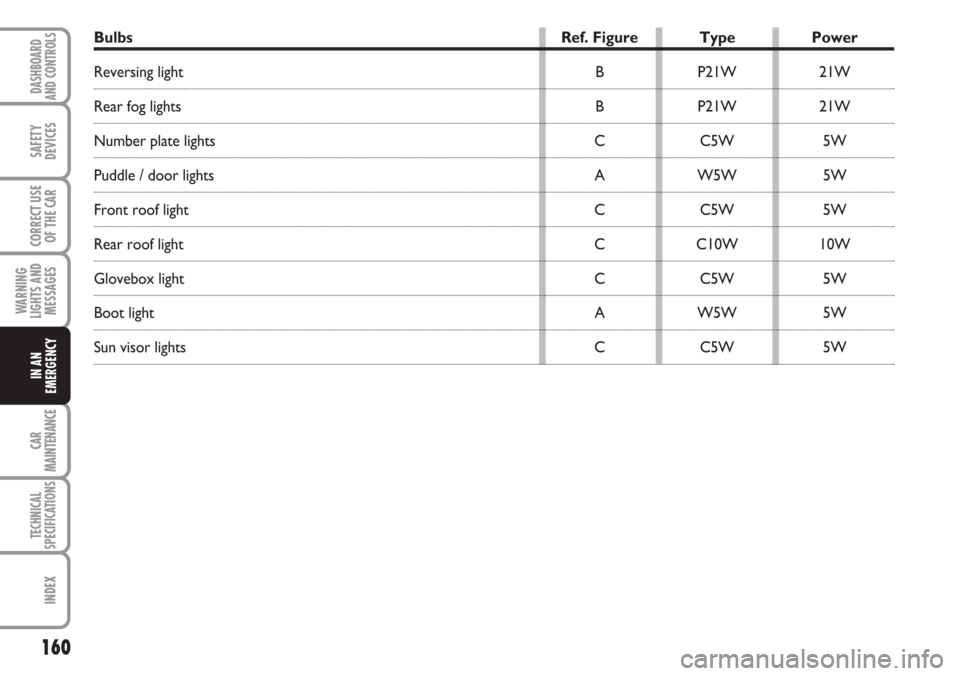
Bulbs Ref. Figure Type Power
Reversing light B P21W 21W
Rear fog lights B P21W 21W
Number plate lights C C5W 5W
Puddle / door lights A W5W 5W
Front roof light C C5W 5W
Rear roof light C C10W 10W
Glovebox light C C5W 5W
Boot light A W5W 5W
Sun visor lights C C5W 5W
Page 161 of 240
161
WARNING
LIGHTS AND
MESSAGES
CAR
MAINTENANCE
TECHNICAL
SPECIFICATIONS
INDEX
DASHBOARD
AND CONTROLS
SAFETY
DEVICES
CORRECT USE
OF THE CAR
IN AN
EMERGENCY
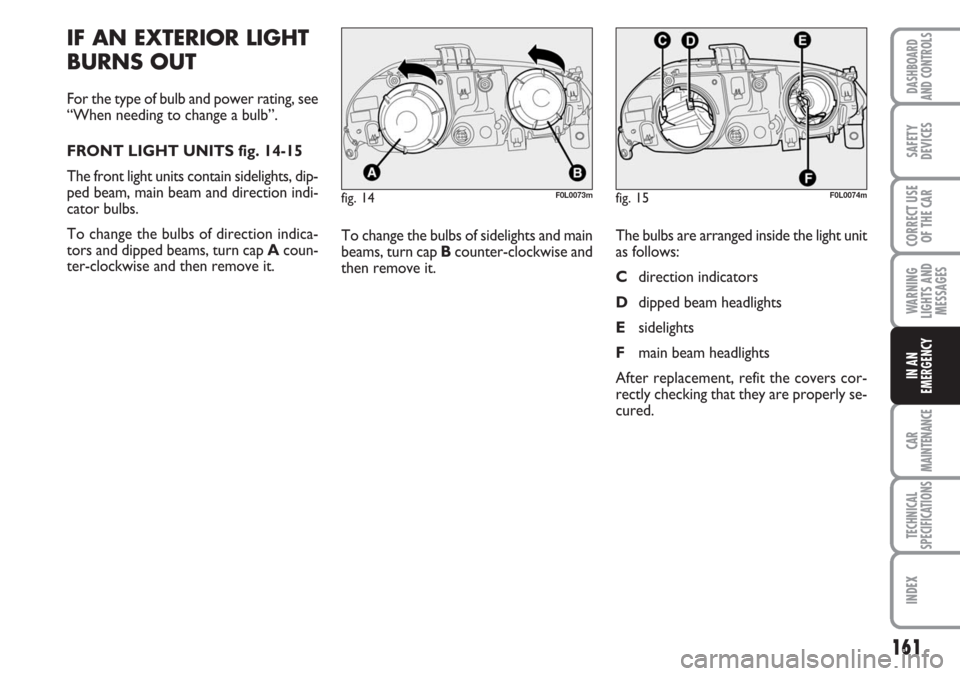
To change the bulbs of sidelights and main
beams, turn cap Bcounter-clockwise and
then remove it.The bulbs are arranged inside the light unit
as follows:
Cdirection indicators
Ddipped beam headlights
Esidelights
Fmain beam headlights
After replacement, refit the covers cor-
rectly checking that they are properly se-
cured.
IF AN EXTERIOR LIGHT
BURNS OUT
For the type of bulb and power rating, see
“When needing to change a bulb”.
FRONT LIGHT UNITS fig. 14-15
The front light units contain sidelights, dip-
ped beam, main beam and direction indi-
cator bulbs.
To change the bulbs of direction indica-
tors and dipped beams, turn cap Acoun-
ter-clockwise and then remove it.
fig. 14F0L0073mfig. 15F0L0074m
Page 162 of 240
162
WARNING
LIGHTS AND
MESSAGES
CAR
MAINTENANCE
TECHNICAL
SPECIFICATIONS
INDEX
DASHBOARD
AND CONTROLS
SAFETY
DEVICES
CORRECT USE
OF THE CAR
IN AN
EMERGENCY
Gas-discharge lamps (Xenon)
(where provided)
IMPORTANT When gas-discharge bulbs
are provided, front fog lights are not fit-
ted.
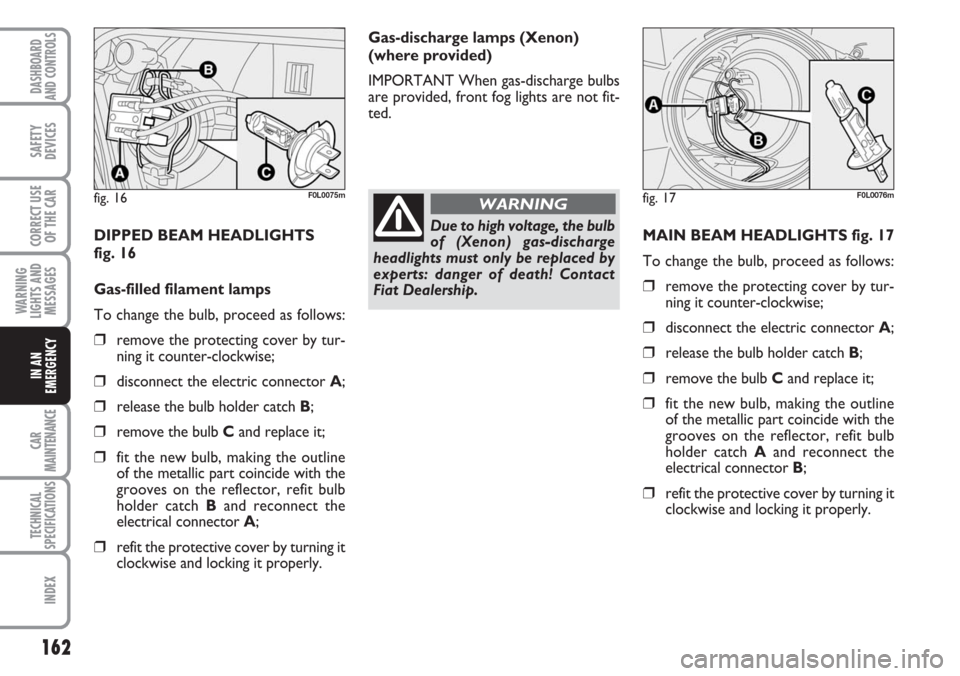
MAIN BEAM HEADLIGHTS fig. 17
To change the bulb, proceed as follows:
❒remove the protecting cover by tur-
ning it counter-clockwise;
❒disconnect the electric connector A;
❒release the bulb holder catch B;
❒remove the bulb Cand replace it;
❒fit the new bulb, making the outline
of the metallic part coincide with the
grooves on the reflector, refit bulb
holder catch Aand reconnect the
electrical connector B;
❒refit the protective cover by turning it
clockwise and locking it properly. DIPPED BEAM HEADLIGHTS
fig. 16
Gas-filled filament lamps
To change the bulb, proceed as follows:
❒remove the protecting cover by tur-
ning it counter-clockwise;
❒disconnect the electric connector A;
❒release the bulb holder catch B;
❒remove the bulb Cand replace it;
❒fit the new bulb, making the outline
of the metallic part coincide with the
grooves on the reflector, refit bulb
holder catch Band reconnect the
electrical connector A;
❒refit the protective cover by turning it
clockwise and locking it properly.
fig. 16F0L0075m
Due to high voltage, the bulb
of (Xenon) gas-discharge
headlights must only be replaced by
experts: danger of death! Contact
Fiat Dealership.
WARNINGfig. 17F0L0076m
Page 163 of 240
163
WARNING
LIGHTS AND
MESSAGES
CAR
MAINTENANCE
TECHNICAL
SPECIFICATIONS
INDEX
DASHBOARD
AND CONTROLS
SAFETY
DEVICES
CORRECT USE
OF THE CAR
IN AN
EMERGENCY
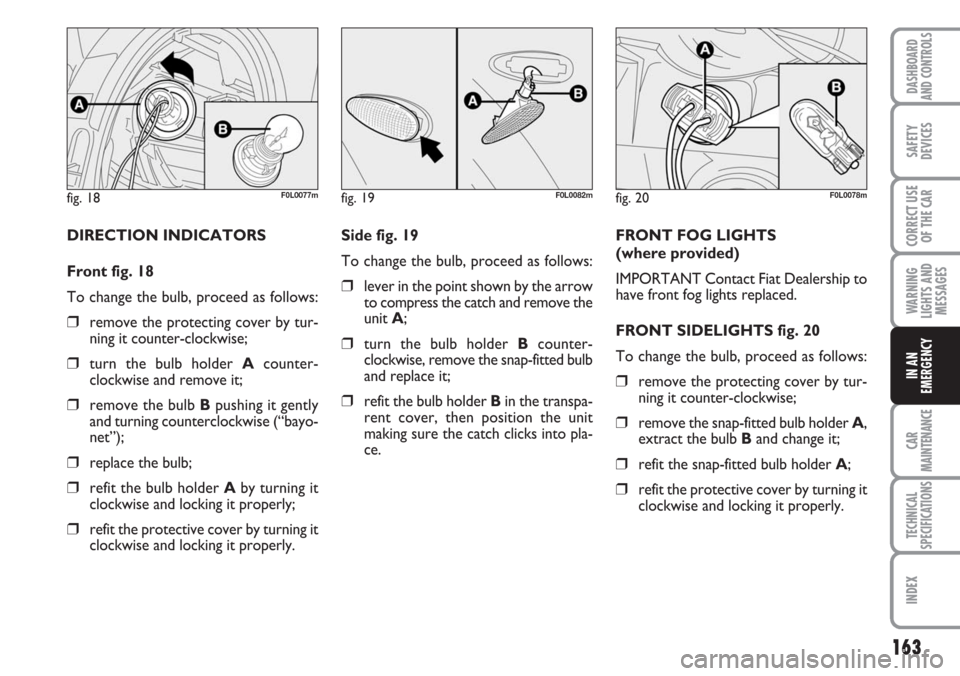
Side fig. 19
To change the bulb, proceed as follows:
❒lever in the point shown by the arrow
to compress the catch and remove the
unit A;
❒turn the bulb holder Bcounter-
clockwise, remove the snap-fitted bulb
and replace it;
❒refit the bulb holder Bin the transpa-
rent cover, then position the unit
making sure the catch clicks into pla-
ce.FRONT FOG LIGHTS
(where provided)
IMPORTANT Contact Fiat Dealership to
have front fog lights replaced.
FRONT SIDELIGHTS fig. 20
To change the bulb, proceed as follows:
❒remove the protecting cover by tur-
ning it counter-clockwise;
❒remove the snap-fitted bulb holder A,
extract the bulb Band change it;
❒refit the snap-fitted bulb holder A;
❒refit the protective cover by turning it
clockwise and locking it properly. DIRECTION INDICATORS
Front fig. 18
To change the bulb, proceed as follows:
❒remove the protecting cover by tur-
ning it counter-clockwise;
❒turn the bulb holder Acounter-
clockwise and remove it;
❒remove the bulb Bpushing it gently
and turning counterclockwise (“bayo-
net”);
❒replace the bulb;
❒refit the bulb holder Aby turning it
clockwise and locking it properly;
❒refit the protective cover by turning it
clockwise and locking it properly.
fig. 18F0L0077mfig. 19F0L0082mfig. 20F0L0078m
Page 164 of 240
164
WARNING
LIGHTS AND
MESSAGES
CAR
MAINTENANCE
TECHNICAL
SPECIFICATIONS
INDEX
DASHBOARD
AND CONTROLS
SAFETY
DEVICES
CORRECT USE
OF THE CAR
IN AN
EMERGENCY
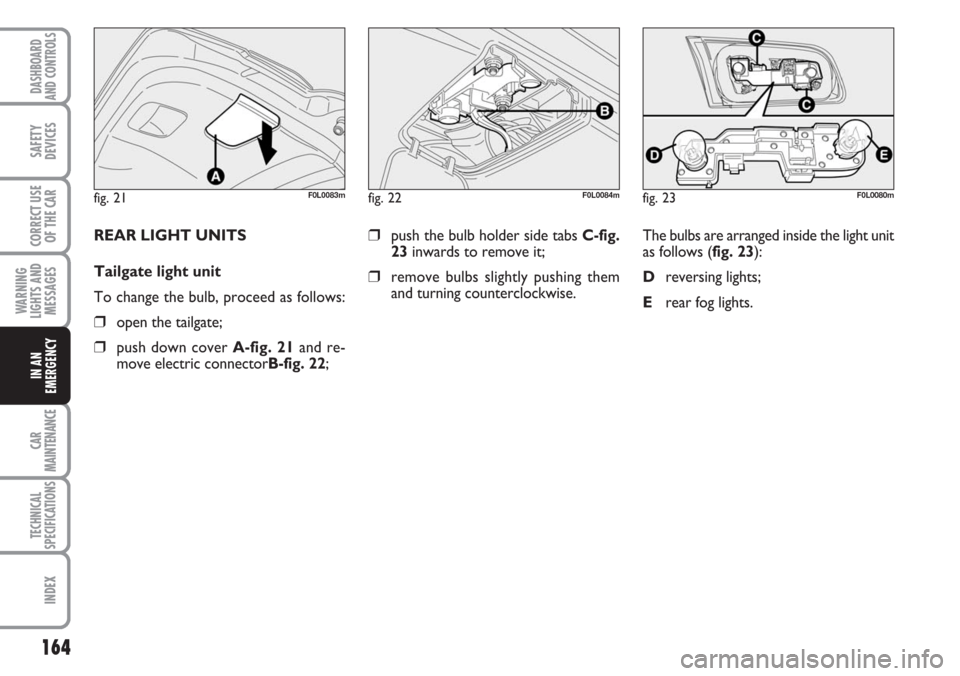
❒push the bulb holder side tabs C-fig.
23inwards to remove it;
❒remove bulbs slightly pushing them
and turning counterclockwise.The bulbs are arranged inside the light unit
as follows (fig. 23):
Dreversing lights;
Erear fog lights. REAR LIGHT UNITS
Tailgate light unit
To change the bulb, proceed as follows:
❒open the tailgate;
❒push down cover A-fig. 21and re-
move electric connectorB-fig. 22;
fig. 21F0L0083mfig. 22F0L0084mfig. 23F0L0080m