display FIAT CROMA 2007 2.G Connect NavPlus Manual
[x] Cancel search | Manufacturer: FIAT, Model Year: 2007, Model line: CROMA, Model: FIAT CROMA 2007 2.GPages: 166, PDF Size: 4.82 MB
Page 54 of 166
53
CONNECT Nav+
Starting from “Stop” state (stop
playing by pressing “
˙/I I” 9-fig. 1, user
can modify the playlist by means of the
“Define playlist” function or set a track
sequence by means of the “Playlist”
function. It is then possible to play the
MP3 CD by pressing again “
˙/II” 9-
fig. 1(“Play” key).
PLAYING MP3 CD
When a MP3 CD (to which a play list
has not been matched previously) is
put into the player, the radio naviga-
tion system will start playing auto-
matically from the first piece of the
first folder available in the CD, then
it will go on in a sequence. After all of
the pieces found in a folder have been
played, the pieces found in the next
folder of the CD will be played.
Before starting to play the first track
of the new folder, the display shows
for five seconds the new folder name.The main screen shows also the fol-
lowing information:
– audio source (MP3);
– when available, author and song
name fig. 28, or file name fig. 29;
– current track numberfig. 28;
– current status of MP3 CD source
(play fig. 28, pause fig. 30, stopfig.
31);
– CD time information;
– list of available tracks;
– TA, SHUFFLE, REPEAT… accord-
ing to the active function.
Icon keys on the right of the screen
are all enabled, excluding “Define
playlist” and “Playlist” under “Play” and
“Pause” conditions fig. 28 and 30; stop
the MP3 CD (“Stop”) fig. 31to enable
these two functions.When playing MP3 CD, buttons
“
¯¯”5-fig. 1and “˙˙” 6-fig. 1on
the left of the CONNECT Nav+ key-
pad, perform the following functions:
– pressing the keys briefly will allow
you to shift to the previous/following
piece of the play list; shifting from one
section of the CD to the next one will
involve displaying the name of the new
folder for a few instants;
– with long push skips to previ-
ous/next 10 track with respect to one
being played (provided the folder is
not empty). Should there be in the
folder 10 tracks preceding or follow-
ing the track being played then, skip to
first track of the previous or next fold-
er with respect to the one being
played will take place. During this op-
eration the name of the new folder is
displayed for five seconds.
021-059 Connect CROMA GB 2-07-2007 15:39 Pagina 53
Page 55 of 166
54
CONNECT Nav+
Starting from “Stop” state (stop play-
ing by pressing “
˙/I I”9-fig. 1, user can
create or modify the playlist (if any) by
means of the “Define playlist” func-
tion or set a track sequence by means
of the “Playlist” function. It is then pos-
sible to play the MP3 CD by pressing
again “
˙/I I”9-fig. 1(“Play” key).DEFINE PLAYLIST
FUNCTION
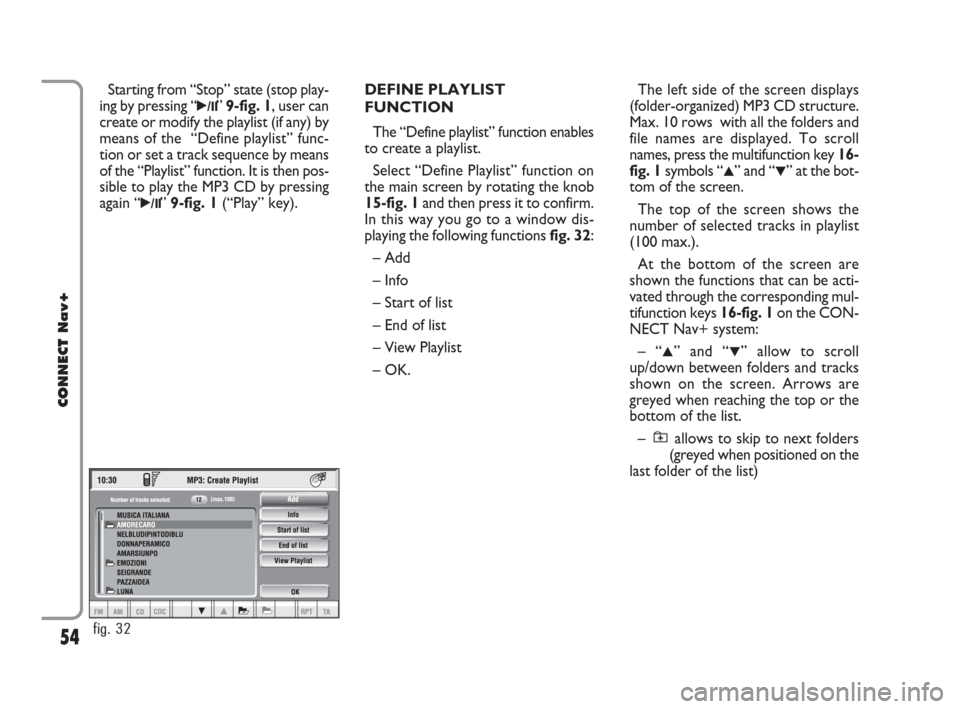
The “Define playlist” function enables
to create a playlist.
Select “Define Playlist” function on
the main screen by rotating the knob
15-fig. 1and then press it to confirm.
In this way you go to a window dis-
playing the following functions fig. 32:
– Add
– Info
– Start of list
– End of list
– View Playlist
– OK.The left side of the screen displays
(folder-organized) MP3 CD structure.
Max. 10 rows with all the folders and
file names are displayed. To scroll
names, press the multifunction key 16-
fig. 1symbols “
▲” and “▼” at the bot-
tom of the screen.
The top of the screen shows the
number of selected tracks in playlist
(100 max.).
At the bottom of the screen are
shown the functions that can be acti-
vated through the corresponding mul-
tifunction keys 16-fig. 1on the CON-
NECT Nav+ system:
– “
▲” and “▼” allow to scroll
up/down between folders and tracks
shown on the screen. Arrows are
greyed when reaching the top or the
bottom of the list.
– allows to skip to next folders
(greyed when positioned on the
last folder of the list)
fig. 32
021-059 Connect CROMA GB 2-07-2007 15:39 Pagina 54
Page 56 of 166
55
CONNECT Nav+
– allows to skip to previous fold-
ers (greyed when positioned on
the first folder of the list)
To define the playlist proceed as fol-
lows:
– select the preferred track scrolling
the available ones pressing buttons
“
▲” or “▼” on the keypad 16-fig. 1.
– press the knob 15-fig. 1to con-
firm.
Proceed in the same way for all the
tracks you want to add to the playlist.
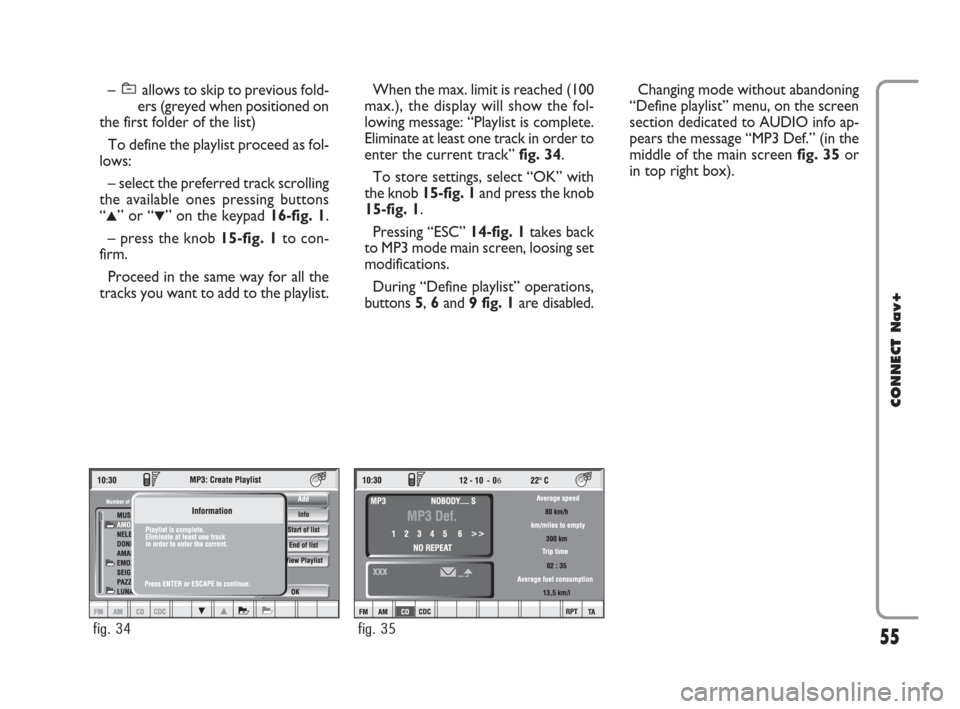
When the max. limit is reached (100
max.), the display will show the fol-
lowing message: “Playlist is complete.
Eliminate at least one track in order to
enter the current track”fig. 34.
To store settings, select “OK” with
the knob 15-fig. 1and press the knob
15-fig. 1.
Pressing “ESC” 14-fig. 1takes back
to MP3 mode main screen, loosing set
modifications.
During “Define playlist” operations,
buttons 5, 6and 9 fig. 1are disabled.Changing mode without abandoning
“Define playlist” menu, on the screen
section dedicated to AUDIO info ap-
pears the message “MP3 Def.” (in the
middle of the main screen fig. 35or
in top right box).
fig. 34
6
fig. 35
021-059 Connect CROMA GB 2-07-2007 15:39 Pagina 55
Page 57 of 166
56
CONNECT Nav+
“Add” function
The “Add” function enables to add
single tracks or folders to playlist. 100
tracks max. can be added to a playlist;
when this limit is reached the “Add”
icon key is greyed. If this limit is ex-
ceeded loading a folder, only permit-
ted tracks are added.
To turn the “Add” function on, se-
lect the corresponding icon by rotat-
ing the knob15-fig. 1and press it to
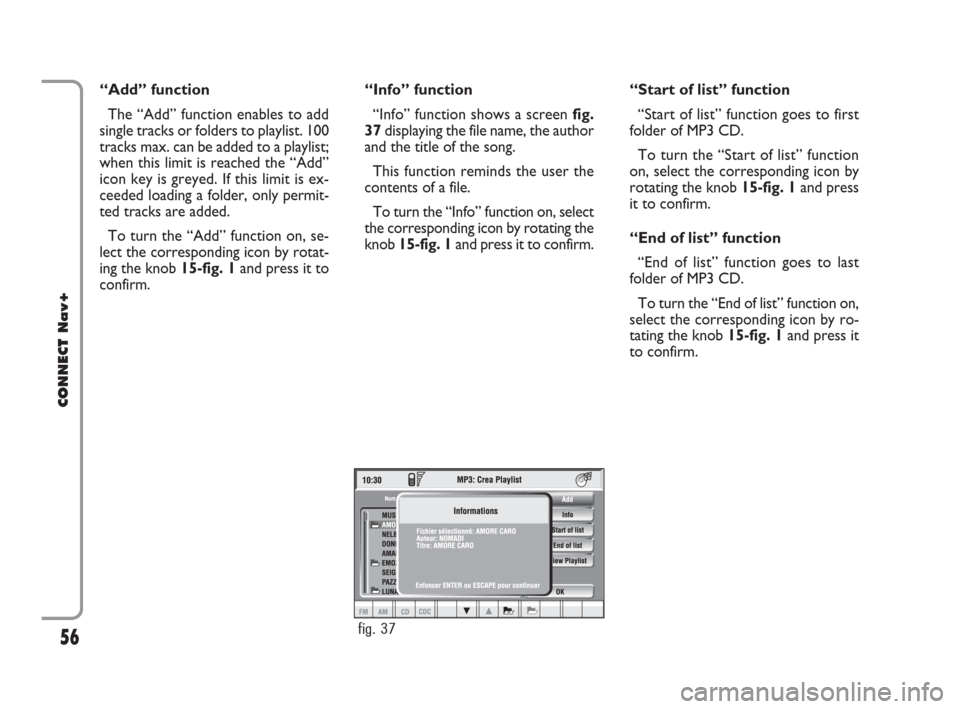
confirm.“Info” function
“Info” function shows a screen fig.
37displaying the file name, the author
and the title of the song.
This function reminds the user the
contents of a file.
To turn the “Info” function on, select
the corresponding icon by rotating the
knob 15-fig. 1and press it to confirm.“Start of list” function
“Start of list” function goes to first
folder of MP3 CD.
To turn the “Start of list” function
on, select the corresponding icon by
rotating the knob 15-fig. 1and press
it to confirm.
“End of list” function
“End of list” function goes to last
folder of MP3 CD.
To turn the “End of list” function on,
select the corresponding icon by ro-
tating the knob 15-fig. 1and press it
to confirm.
fig. 37
021-059 Connect CROMA GB 2-07-2007 15:39 Pagina 56
Page 58 of 166
57
CONNECT Nav+
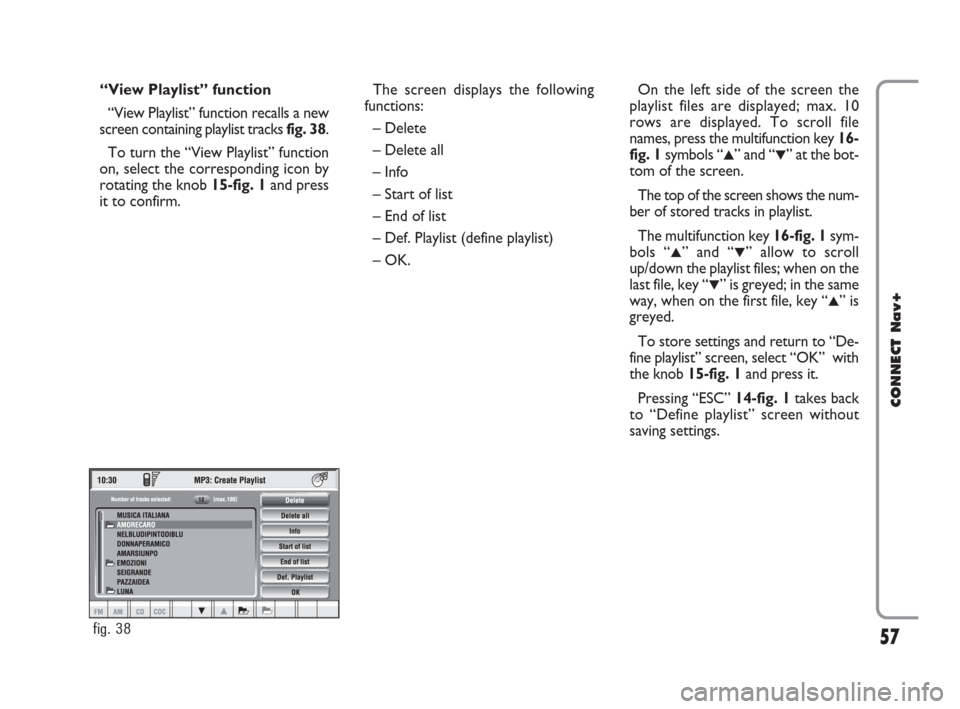
“View Playlist” function
“View Playlist” function recalls a new
screen containing playlist tracks fig. 38.
To turn the “View Playlist” function
on, select the corresponding icon by
rotating the knob 15-fig. 1and press
it to confirm.The screen displays the following
functions:
– Delete
– Delete all
– Info
– Start of list
– End of list
– Def. Playlist (define playlist)
– OK.On the left side of the screen the
playlist files are displayed; max. 10
rows are displayed. To scroll file
names, press the multifunction key 16-
fig. 1symbols “
▲” and “▼” at the bot-
tom of the screen.
The top of the screen shows the num-
ber of stored tracks in playlist.
The multifunction key 16-fig. 1sym-
bols “
▲” and “▼” allow to scroll
up/down the playlist files; when on the
last file, key “
▼” is greyed; in the same
way, when on the first file, key “
▲” is
greyed.
To store settings and return to “De-
fine playlist” screen, select “OK” with
the knob 15-fig. 1and press it.
Pressing “ESC” 14-fig. 1takes back
to “Define playlist” screen without
saving settings.
fig. 38
021-059 Connect CROMA GB 2-07-2007 15:39 Pagina 57
Page 59 of 166
58
CONNECT Nav+
“Delete” function
Selecting the “Delete” icon with the
knob 15-fig. 1and confirming it with
“ENTER” 15-fig. 1deletes the cur-
rent selected track from the playlist.
To select the track to delete use keys
“
▲” and “▼” on keypad 16-fig. 1.“Delete all” function
Selecting the “Delete all” icon with
the knob 15-fig. 1and pressing it to
confirm deletes the entire playlist. MP3
main screen is displayed and “Playlist”
icon is disabled since there is no
playlist available.“Info” function
“Info” function displays a screen
showing the selected file name, the au-
thor and the title of the song.
This function reminds the user the
contents of a file.
To turn the “Info” function on, select
the corresponding icon by rotating the
knob 15-fig. 1and press it to confirm.
To select the required file use keys
“
▲” and “▼” on the keypad 16-fig. 1.
021-059 Connect CROMA GB 2-07-2007 15:39 Pagina 58
Page 62 of 166
– DTMF setting (Dual Tone Multi
Frequency) to repeat dialling and in-
hibit the own identification number
transmission
– selection of network provider
– setting volume and tone of incom-
ing calls
– displaying the remaining credit for
a pre-paid SIM card (if provided for by
the telephone company)
– display of signal field intensity and
other status warnings with symbols
and words.PRELIMINARY
OPERATIONS
ENTERING AND EXITING
THE TELEPHONE MODE
To enter the telephone mode pro-
ceed as follows:
– turn ignition key to ON;
– short push on “TEL” button 19-fig.
1on front panel.
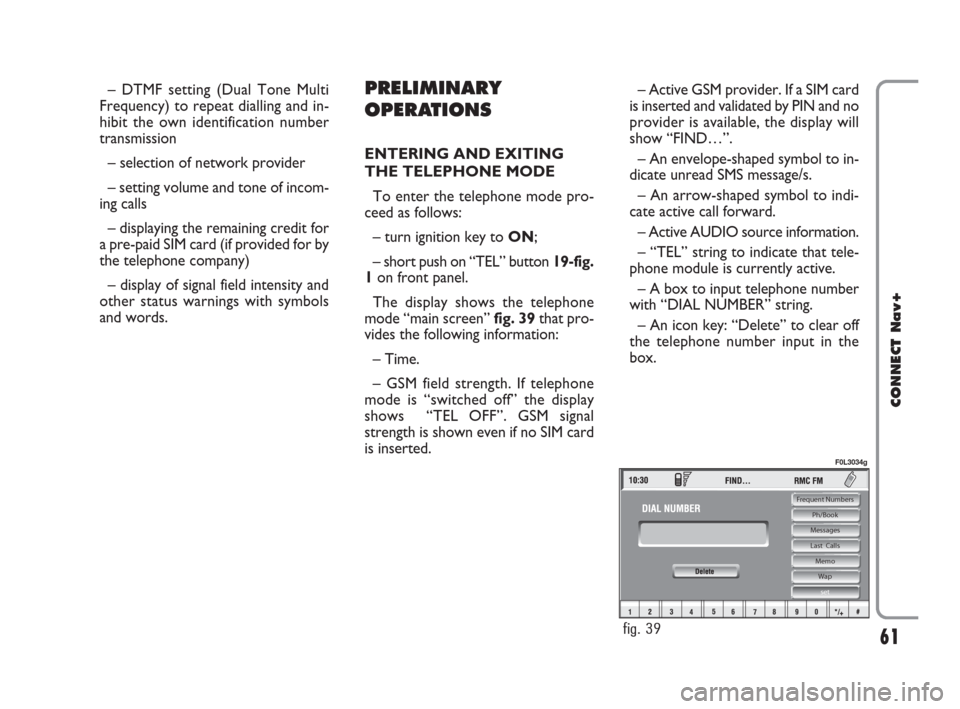
The display shows the telephone
mode “main screen” fig. 39that pro-
vides the following information:
– Time.
– GSM field strength. If telephone
mode is “switched off” the display
shows “TEL OFF”. GSM signal
strength is shown even if no SIM card
is inserted.– Active GSM provider. If a SIM card
is inserted and validated by PIN and no
provider is available, the display will
show “FIND…”.
– An envelope-shaped symbol to in-
dicate unread SMS message/s.
– An arrow-shaped symbol to indi-
cate active call forward.
– Active AUDIO source information.
– “TEL” string to indicate that tele-
phone module is currently active.
– A box to input telephone number
with “DIAL NUMBER” string.
– An icon key: “Delete” to clear off
the telephone number input in the
box.
61
CONNECT Nav+
Frequent Numbers
Ph/Book
Messages
Last Calls
Memo
Wap
set
fig. 39
F0L3034g
060-091 Connect CROMA GB 4-07-2007 14:20 Pagina 61
Page 63 of 166
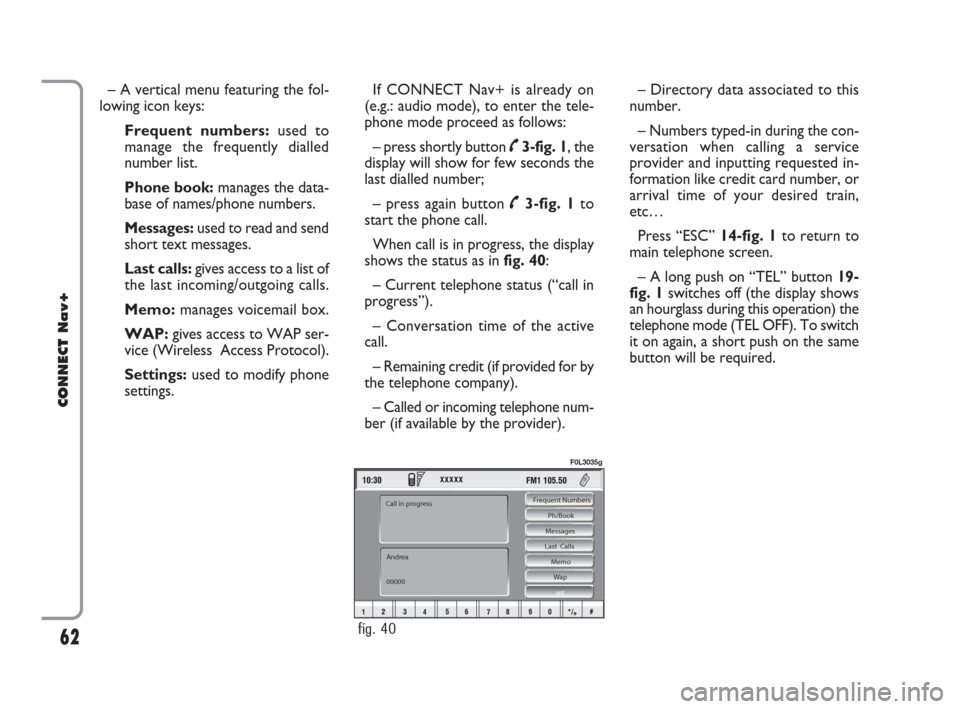
– A vertical menu featuring the fol-
lowing icon keys:
Frequent numbers: used to
manage the frequently dialled
number list.
Phone book: manages the data-
base of names/phone numbers.
Messages:used to read and send
short text messages.
Last calls: gives access to a list of
the last incoming/outgoing calls.
Memo:manages voicemail box.
WAP:gives access to WAP ser-
vice (Wireless Access Protocol).
Settings: used to modify phone
settings.If CONNECT Nav+ is already on
(e.g.: audio mode), to enter the tele-
phone mode proceed as follows:
– press shortly button ˜3-fig. 1, the
display will show for few seconds the
last dialled number;
– press again button ˜3-fig. 1to
start the phone call.
When call is in progress, the display
shows the status as in fig. 40:
– Current telephone status (“call in
progress”).
– Conversation time of the active
call.
– Remaining credit (if provided for by
the telephone company).
– Called or incoming telephone num-
ber (if available by the provider).– Directory data associated to this
number.
– Numbers typed-in during the con-
versation when calling a service
provider and inputting requested in-
formation like credit card number, or
arrival time of your desired train,
etc…
Press “ESC” 14-fig. 1to return to
main telephone screen.
– A long push on “TEL” button 19-
fig. 1switches off (the display shows
an hourglass during this operation) the
telephone mode (TEL OFF). To switch
it on again, a short push on the same
button will be required.
62
CONNECT Nav+
Frequent Numbers
Ph/Book
Messages
Last Calls
Memo
Wap
set
Andrea
00000 Call in progress
fig. 40
F0L3035g
060-091 Connect CROMA GB 4-07-2007 14:20 Pagina 62
Page 65 of 166
ENTERING THE PIN CODE
IMPORTANTThe PIN code (Per-
sonal Identification Number) prevents
unauthorised use of SIM card services.
PIN is asked by CONNECT Nav+ in
the following cases:
– When the system is switched on,
with SIM card already inserted into the
SIM reader and PIN lock is enabled on
that SIM card.
– When a SIM card is inserted into
the SIM reader, and the system is al-
ready on, and PIN lock is enabled on
that SIM card.
– When “TEL” key 19-fig. 1is
pushed to switch on a previously
switched off telephone module (TEL
OFF), and the SIM card is inserted in-
to the SIM reader, the PIN lock is en-
abled on that SIM card and PIN code
has never been inserted before.– When the user tries to make a
non-emergency call and the SIM card
is inserted into the SIM reader, PIN
lock is enabled on that SIM card and
PIN code has never been inserted be-
fore.
– When “TEL” 19-fig. 1or
˜key
3-fig. 1is pushed and a SIM card is in-
serted into the SIM reader and the sys-
tem is already on and PIN lock is en-
abled on that SIM card.
To enter the PIN code (between 4
and 8 digits) use the multifunction but-
tons 16-fig. 1at the bottom of the dis-
play and confirm by pressing knob
15-fig. 1. Entered digits are shown by
asterisks on the display fig. 41.
If a PIN code digit needs to be cor-
rected, press “ESC” 14-fig. 1to delete
it and write it again correctly. IMPORTANT If the user refuses to
insert PIN, a dialog box is displayed,
saying that telephone functions will not
be available till the insertion of the cor-
rect PIN. Only emergency calls (like po-
lice or S.O.S.) will always be enabled; in
this case only input box and 0-9 buttons
will be available on the display.
IMPORTANTAfter three unsuc-
cessful PIN code entries, the card is
locked. To unlock the card, enter both
the PUK code (Pin Unblocking Key)
and the new PIN.
The network signal search begins af-
ter entering the PIN code and the dis-
play shows the main telephone function
page. After connection, the display
shows the network provider’s name.
64
CONNECT Nav+
060-091 Connect CROMA GB 4-07-2007 14:20 Pagina 64
Page 66 of 166
INCOMING CALLS
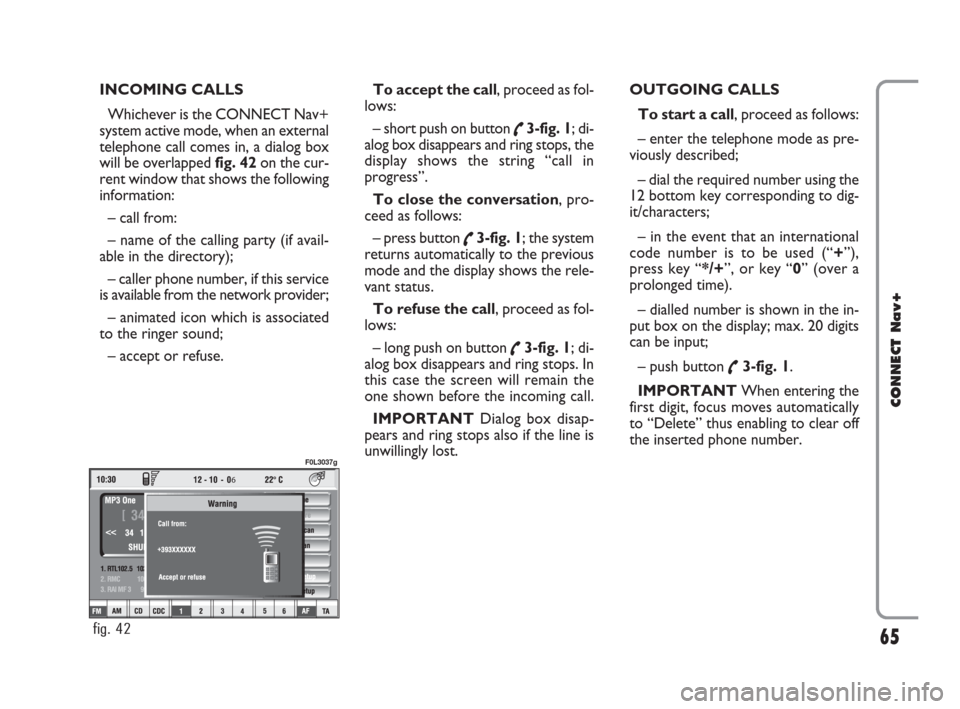
Whichever is the CONNECT Nav+
system active mode, when an external
telephone call comes in, a dialog box
will be overlapped fig. 42on the cur-
rent window that shows the following
information:
– call from:
– name of the calling party (if avail-
able in the directory);
– caller phone number, if this service
is available from the network provider;
– animated icon which is associated
to the ringer sound;
– accept or refuse.To accept the call, proceed as fol-
lows:
– short push on button
˜3-fig. 1; di-
alog box disappears and ring stops, the
display shows the string “call in
progress”.
To close the conversation, pro-
ceed as follows:
– press button
˜3-fig. 1; the system
returns automatically to the previous
mode and the display shows the rele-
vant status.
To refuse the call, proceed as fol-
lows:
– long push on button
˜3-fig. 1; di-
alog box disappears and ring stops. In
this case the screen will remain the
one shown before the incoming call.
IMPORTANT Dialog box disap-
pears and ring stops also if the line is
unwillingly lost.OUTGOING CALLS
To start a call, proceed as follows:
– enter the telephone mode as pre-
viously described;
– dial the required number using the
12 bottom key corresponding to dig-
it/characters;
– in the event that an international
code number is to be used (“+”),
press key “*/+”, or key “0” (over a
prolonged time).
– dialled number is shown in the in-
put box on the display; max. 20 digits
can be input;
– push button
˜3-fig. 1.
IMPORTANTWhen entering the
first digit, focus moves automatically
to “Delete” thus enabling to clear off
the inserted phone number.
65
CONNECT Nav+
6
fig. 42
F0L3037g
060-091 Connect CROMA GB 4-07-2007 14:20 Pagina 65