wiper blades FIAT CROMA 2009 2.G Owners Manual
[x] Cancel search | Manufacturer: FIAT, Model Year: 2009, Model line: CROMA, Model: FIAT CROMA 2009 2.GPages: 258, PDF Size: 5.69 MB
Page 66 of 258

Never use the window wiper
to remove ice or snow from
the windscreen. In these con-
ditions, the wiper is submitted
to excessive effort that results in mo-
tor protection cutting in and wiper op-
eration inhibition for few seconds as a
consequence. If operation is not re-
stored contact Fiat Dealership.
65
SAFETY
DEVICES
CORRECT USE
OF THE CAR
WARNING
LIGHTS AND
MESSAGES
IN AN
EMERGENCY
CAR
MAINTENANCE
TECHNICAL
SPECIFICATIONS
INDEX
DASHBOARD
AND CONTROLS
WINDOW WASHING
WINDSCREEN WASHER/
WIPER
This device can only work when the igni-
tion key is at ON.
The right stalk can be moved to five dif-
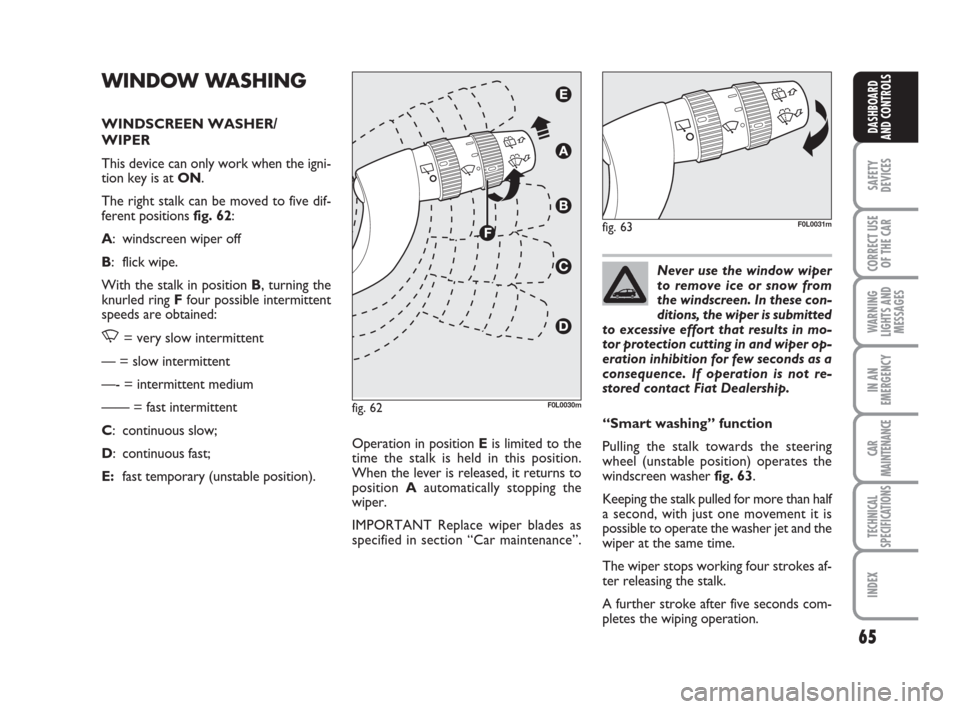
ferent positions fig. 62:
A: windscreen wiper off
B: flick wipe.
With the stalk in position B, turning the
knurled ring Ffour possible intermittent
speeds are obtained:
,= very slow intermittent
— = slow intermittent
—- = intermittent medium
—— = fast intermittent
C: continuous slow;
D: continuous fast;
E:fast temporary (unstable position).Operation in position Eis limited to the
time the stalk is held in this position.
When the lever is released, it returns to
position Aautomatically stopping the
wiper.
IMPORTANT Replace wiper blades as
specified in section “Car maintenance”.
fig. 62F0L0030m
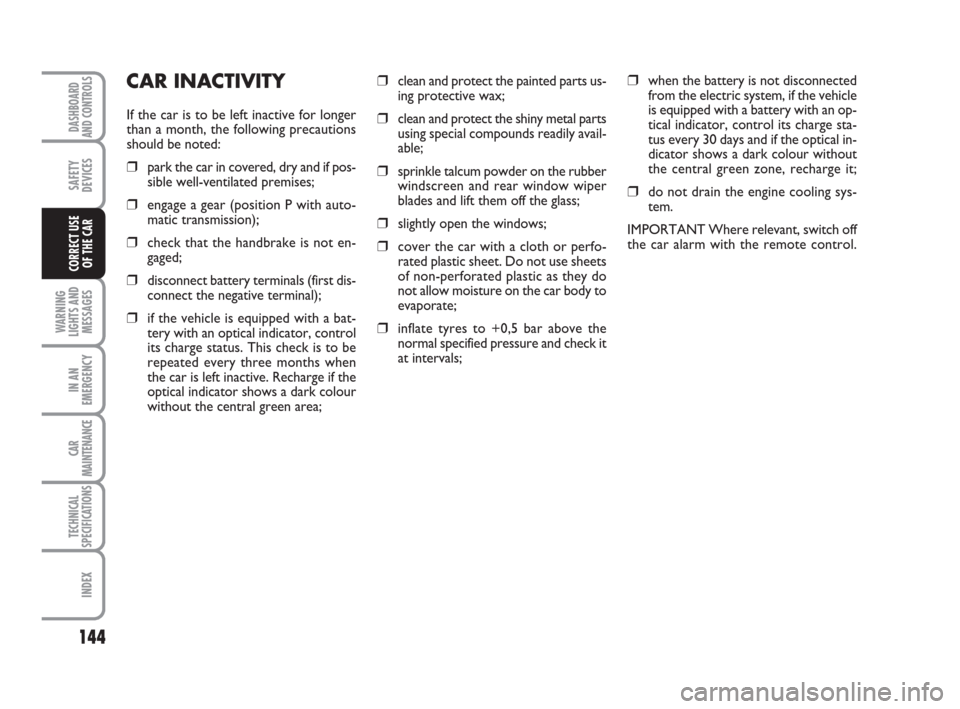
“Smart washing” function
Pulling the stalk towards the steering
wheel (unstable position) operates the
windscreen washer fig. 63.
Keeping the stalk pulled for more than half
a second, with just one movement it is
possible to operate the washer jet and the
wiper at the same time.
The wiper stops working four strokes af-
ter releasing the stalk.
A further stroke after five seconds com-
pletes the wiping operation.
fig. 63F0L0031m
039-069 Croma TRW GB 10-11-2008 13:15 Pagina 65
Page 145 of 258

❒clean and protect the painted parts us-
ing protective wax;
❒clean and protect the shiny metal parts
using special compounds readily avail-
able;
❒sprinkle talcum powder on the rubber
windscreen and rear window wiper
blades and lift them off the glass;
❒slightly open the windows;
❒cover the car with a cloth or perfo-
rated plastic sheet. Do not use sheets
of non-perforated plastic as they do
not allow moisture on the car body to
evaporate;
❒inflate tyres to +0,5 bar above the
normal specified pressure and check it
at intervals;
❒when the battery is not disconnected
from the electric system, if the vehicle
is equipped with a battery with an op-
tical indicator, control its charge sta-
tus every 30 days and if the optical in-
dicator shows a dark colour without
the central green zone, recharge it;
❒do not drain the engine cooling sys-
tem.
IMPORTANT Where relevant, switch off
the car alarm with the remote control.
CAR INACTIVITY
If the car is to be left inactive for longer
than a month, the following precautions
should be noted:
❒park the car in covered, dry and if pos-
sible well-ventilated premises;
❒engage a gear (position P with auto-
matic transmission);
❒check that the handbrake is not en-
gaged;
❒disconnect battery terminals (first dis-
connect the negative terminal);
❒if the vehicle is equipped with a bat-
tery with an optical indicator, control
its charge status. This check is to be
repeated every three months when
the car is left inactive. Recharge if the
optical indicator shows a dark colour
without the central green area;
144
WARNING
LIGHTS AND
MESSAGES
IN AN
EMERGENCY
CAR
MAINTENANCE
TECHNICAL
SPECIFICATIONS
INDEX
DASHBOARD
AND CONTROLS
SAFETY
DEVICES
CORRECT USE
OF THE CAR
127-144 Croma TRW GB 28-05-2008 16:33 Pagina 144
Page 213 of 258

212
WARNING
LIGHTS AND
MESSAGES
TECHNICAL
SPECIFICATIONS
INDEX
DASHBOARD
AND CONTROLS
SAFETY
DEVICES
CORRECT USE
OF THE CAR
IN AN
EMERGENCY
CAR
MAINTENANCE
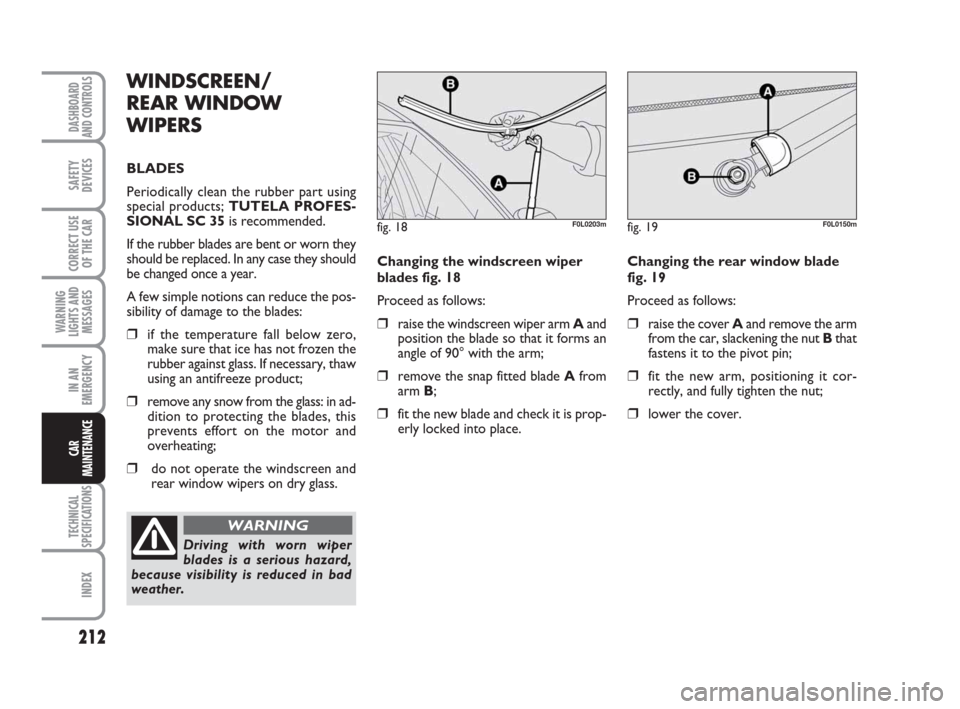
Changing the windscreen wiper
blades fig. 18
Proceed as follows:
❒raise the windscreen wiper arm Aand
position the blade so that it forms an
angle of 90° with the arm;
❒remove the snap fitted blade Afrom
arm B;
❒fit the new blade and check it is prop-
erly locked into place.Changing the rear window blade
fig. 19
Proceed as follows:
❒raise the cover Aand remove the arm
from the car, slackening the nut Bthat
fastens it to the pivot pin;
❒fit the new arm, positioning it cor-
rectly, and fully tighten the nut;
❒lower the cover.
WINDSCREEN/
REAR WINDOW
WIPERS
BLADES
Periodically clean the rubber part using
special products; TUTELA PROFES-
SIONAL SC 35is recommended.
If the rubber blades are bent or worn they
should be replaced. In any case they should
be changed once a year.
A few simple notions can reduce the pos-
sibility of damage to the blades:
❒if the temperature fall below zero,
make sure that ice has not frozen the
rubber against glass. If necessary, thaw
using an antifreeze product;
❒remove any snow from the glass: in ad-
dition to protecting the blades, this
prevents effort on the motor and
overheating;
❒do not operate the windscreen and
rear window wipers on dry glass.
fig. 18F0L0203m
Driving with worn wiper
blades is a serious hazard,
because visibility is reduced in bad
weather.
WARNING
fig. 19F0L0150m
193-216 Croma TRW GB 28-07-2009 12:16 Pagina 212