fuse FIAT DOBLO 2009 2.G Owners Manual
[x] Cancel search | Manufacturer: FIAT, Model Year: 2009, Model line: DOBLO, Model: FIAT DOBLO 2009 2.GPages: 274, PDF Size: 6.6 MB
Page 4 of 274
3
KNOW
YOUR
VEHICLE
SAFETY
STARTING
AND
DRIVING
WARNING
LIGHTS AND
MESSAGES
IN AN
EMERGENCY
SERVICING
AND
MAINTENANCE
TECHNICAL
SPECIFICATIONS
INDEXKNOW YOUR VEHICLE
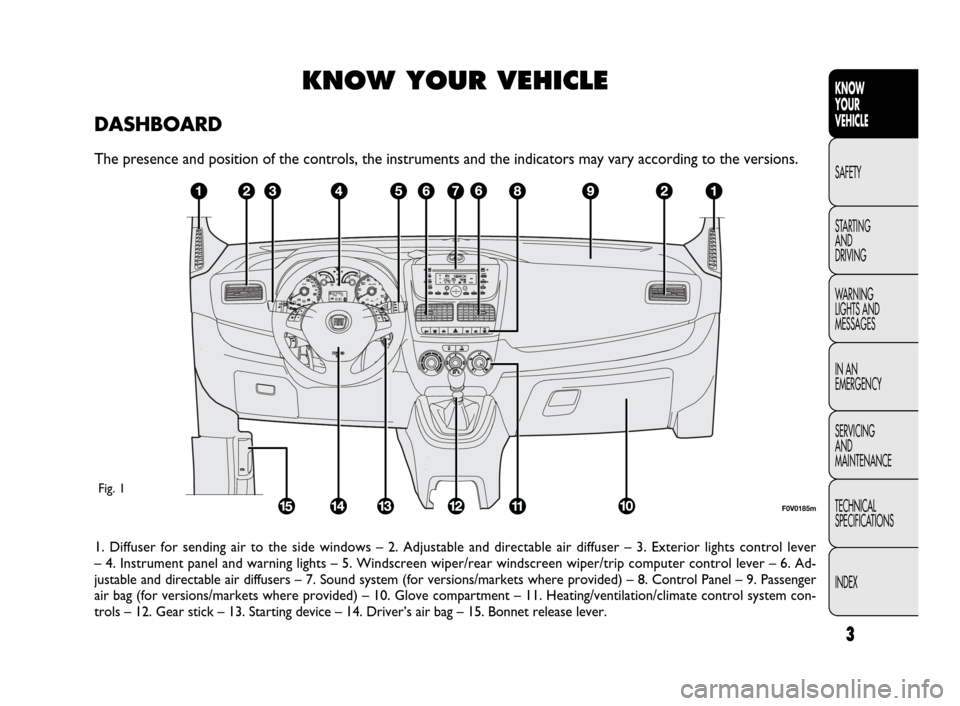
DASHBOARD
The presence and position of the controls, the instruments and the indicators may vary according to the versions.
1. Diffuser for sending air to the side windows – 2. Adjustable and directable air diffuser – 3. Exterior lights control lever
– 4. Instrument panel and warning lights – 5. Windscreen wiper/rear windscreen wiper/trip computer control lever – 6. Ad-
justable and directable air diffusers – 7. Sound system (for versions/markets where provided) – 8. Control Panel – 9. Passenger
air bag (for versions/markets where provided) – 10. Glove compartment – 11. Heating/ventilation/climate control system con-
trols – 12. Gear stick – 13. Starting device – 14. Driver’s air bag – 15. Bonnet release lever.
F0V0185m
Fig. 1
Page 43 of 274
42
KNOW
YOUR
VEHICLE
SAFETY
STARTING
AND
DRIVING
WARNING
LIGHTS AND
MESSAGES
IN AN
EMERGENCY
SERVICING
AND
MAINTENANCE
TECHNICAL
SPECIFICATIONS
INDEX
fig. 39F0V0016m
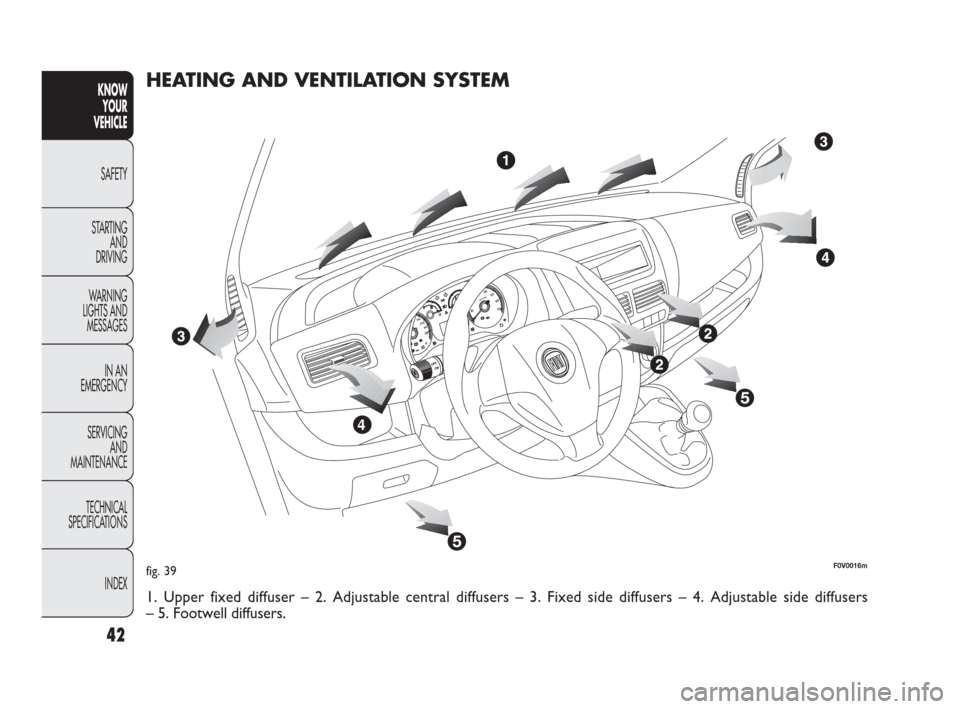
HEATING AND VENTILATION SYSTEM
1. Upper fixed diffuser – 2. Adjustable central diffusers – 3. Fixed side diffusers – 4. Adjustable side diffusers
– 5. Footwell diffusers.
Page 44 of 274
43
KNOW
YOUR
VEHICLE
SAFETY
STARTING
AND
DRIVING
WARNING
LIGHTS AND
MESSAGES
IN AN
EMERGENCY
SERVICING
AND
MAINTENANCE
TECHNICAL
SPECIFICATIONS
INDEX
F0V0017mfig. 40 – vent openF0V0018mfig. 41 – vent closed
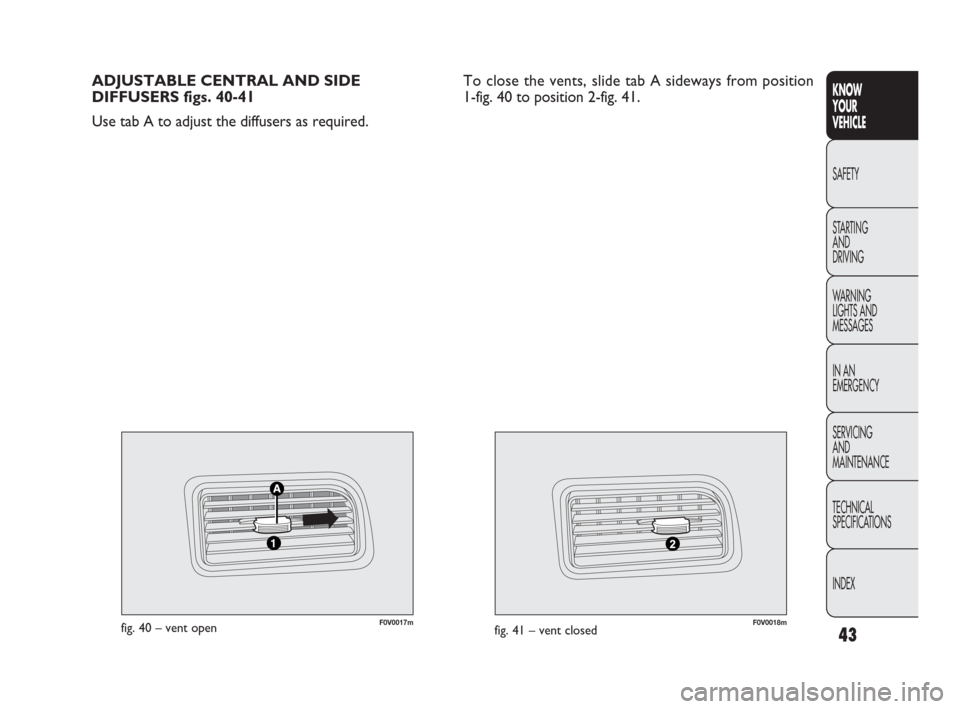
ADJUSTABLE CENTRAL AND SIDE
DIFFUSERS figs. 40-41
Use tab A to adjust the diffusers as required. To close the vents, slide tab A sideways from position
1-fig. 40 to position 2-fig. 41.
Page 46 of 274
45
KNOW
YOUR
VEHICLE
SAFETY
STARTING
AND
DRIVING
WARNING
LIGHTS AND
MESSAGES
IN AN
EMERGENCY
SERVICING
AND
MAINTENANCE
TECHNICAL
SPECIFICATIONS
INDEX
FAST HEATING
Proceed as follows:
❒close all the diffusers in the dashboard;
❒turn knob A to -;
❒turn knob B to 4 -;
❒turn knob C to ©.
RAPID WINDSCREEN AND FRONT SIDE
WINDOWS DEMISTING/
DEFROSTING
(MAX-DEF function)
Proceed as follows:
❒turn knob A to -;
❒turn knob B to 4 -;
❒turn knob C to -;
❒turn off internal air recirculation (button D LED off).
After demisting/defrosting, operate the controls as nor-
mal to restore the required comfort. TEMPERATURE COMFORT
Knob C enables the air introduced into the vehicle to reach
all parts of the passenger compartment through five dis-
tribution options:
¶delivers air from central and side diffusers;
ßwarms the feet and keeps the face cool (bi-level func-
tion)
©warms up the passenger compartment more quickly;
®warms up the passenger compartment and, at the same
time, demists the windscreen;
-demists and defrosts the windscreen and front side win-
dows.
HEATING
Proceed as follows:
❒turn knob A fully to the right (to -);
❒turn knob B to the required speed;
❒turn knob C to:
®to warm the feet and, at the same time, demist the
windscreen;
ßto send air to the feet and introduce fresher air
from the central and dashboard diffusers;
©to warm up quickly.
Page 47 of 274
46
KNOW
YOUR
VEHICLE
SAFETY
STARTING
AND
DRIVING
WARNING
LIGHTS AND
MESSAGES
IN AN
EMERGENCY
SERVICING
AND
MAINTENANCE
TECHNICAL
SPECIFICATIONS
INDEX
INTERNAL AIR RECIRCULATION
ACTIVATION
Press button D: when the function is on, the button LED
lights up.
It is advisable to switch the internal air recirculation on
while standing in queues or in tunnels to prevent the in-
troduction of polluted air.
Do not use the function for a long time, particularly if there
are several passengers on board, to prevent the windows
from steaming up.
WARNING The air recirculation system makes it possi-
ble to reach the required heating or cooling conditions
faster. Do not use the air recirculation function on
rainy/cold days as it would considerably increase the pos-
sibility of the windows misting up.
HEATED REAR WINDSCREEN AND DOOR
MIRRORS DEMISTING/DEFROSTING
(for versions/markets where provided)
Press button E
(to activate this function. The LED on
the button comes on to indicate activation.
Press button E
(again to disable the function.
WARNING Do not apply stickers to the inside of the heat-
ed rear windscreen over the heating filaments to avoid
damage that might cause it to stop working properly. Window demisting
In the event of considerable external moisture and/or rain
and/or large differences in temperature inside and outside
the passenger compartment, perform the following pre-
ventive window demisting procedure:
❒turn off internal air recirculation (button D LED off);
❒turn knob A to -;
❒turn knob B to 2;
❒turn knob C to -with the option of moving to posi-
tion
®if there is no sign of the windows steaming up.
REGULATING THE FAN SPEED
To ventilate the passenger compartment properly, pro-
ceed as follows:
❒fully open the central and side air diffusers;
❒turn knob A to the blue section;
❒turn knob B to the required speed;
❒turn knob C to ¶;
❒turn off internal air recirculation (button D LED off).
Page 50 of 274
49
KNOW
YOUR
VEHICLE
SAFETY
STARTING
AND
DRIVING
WARNING
LIGHTS AND
MESSAGES
IN AN
EMERGENCY
SERVICING
AND
MAINTENANCE
TECHNICAL
SPECIFICATIONS
INDEX
INTERNAL AIR RECIRCULATION
ACTIVATION
Press button E: when the function is on, the button LED
lights up.
It is advisable to switch the internal air recirculation on
while standing in queues or in tunnels to prevent the in-
troduction of polluted air. Do not use the function for a
long time, particularly if there are many passengers on
board, to prevent the windows from misting up.
WARNING The air recirculation system makes it possi-
ble to reach the required heating or cooling conditions
faster. It is not advisable to switch the air recirculation
on when it is rainy/cold or the windows might steam up,
especially if the climate control system is not turned on.
CLIMATE CONTROL (cooling)
Proceed as follows:
❒turn knob A to the blue section;
❒turn knob B to the required speed;
❒turn knob C to ¶;
❒press buttons ❄and E (button LEDs on). HEATED REAR WINDSCREEN AND DOOR
MIRRORS DEMISTING/DEFROSTING
(for versions/markets where provided)
Press button F (to activate; when this function is on, the
LED on button F (lights up.
This function is timed and will turn off automatically after
20 minutes. Press button F (again to switch it off before
20 minutes elapse.
WARNING Do not apply stickers to the inside of the heat-
ed rear windscreen over the heating filaments to avoid
damage that might cause it to stop working properly.
REGULATING THE FAN SPEED
To ventilate the passenger compartment properly, pro-
ceed as follows:
❒fully open the central and side air diffusers;
❒turn knob A to the blue section;
❒turn knob B to the required speed;
❒turn knob C to ¶;
❒turn off internal air recirculation (button E LED off).
Page 55 of 274
54
KNOW
YOUR
VEHICLE
SAFETY
STARTING
AND
DRIVING
WARNING
LIGHTS AND
MESSAGES
IN AN
EMERGENCY
SERVICING
AND
MAINTENANCE
TECHNICAL
SPECIFICATIONS
INDEX
Air distribution buttons (B)
By pressing these buttons, it is possible to set one of the
seven possible air distributions manually:
▲Air flow to the windscreen and front side window dif-
fusers to demist or defrost them.
˙Air flow to the centre and side dashboard diffusers to
ventilate the chest and the face during the hot
season.
▼Air flow to the front and rear footwell diffusers.
Thanks to the natural tendency of hot air to rise up-
wards, this distribution pattern allows the passenger
compartment to warm up as quickly as possible, pro-
viding an immediate feeling of warmth.
˙
▼Air flow distribution split between footwell diffusers
(hotter air) and central and side dashboard vents
(cooler air). This distribution mode is particularly use-
ful in spring and autumn on sunny days.
▲
▼Air flow distribution split between the footwell dif-
fusers and the windscreen and front side windows de-
frosting/demisting diffusers. This allows an adequate
warming of the passenger compartment and prevents
the windows from steaming up. This function may be used to heat up the passenger com-
partment exploiting the system potential to the maximum.
In this condition, the system stops controlling the tem-
perature automatically and sets the air mixing to maximum
heating. The air speed and distribution are fixed.
In particular, if the heating fluid is not sufficiently hot, the
maximum fan speed does not come on straight away in or-
der to limit the intake of insufficiently hot air into the pas-
senger compartment.
All manual settings will be allowed when this function
is on.
To switch the function off, simply turn the temperature
knob anticlockwise and set the required temperature.
❒LO function (maximum cooling):
select by turning the temperature knob anticlockwise un-
der the minimum value (16 °C).
This function may be used to cool down the passenger
compartment exploiting the system potential to the max-
imum. In this condition, the system stops controlling the
temperature automatically and sets the air mixing to max-
imum cooling. The air speed and distribution are fixed. All
manual settings will be allowed when this function is on.
To switch the function off, simply turn the temperature
knob clockwise and set the required temperature.
Page 56 of 274
55
KNOW
YOUR
VEHICLE
SAFETY
STARTING
AND
DRIVING
WARNING
LIGHTS AND
MESSAGES
IN AN
EMERGENCY
SERVICING
AND
MAINTENANCE
TECHNICAL
SPECIFICATIONS
INDEX
WARNING To restore automatic fan speed control af-
ter a manual adjustment, press the AUTO button.
WARNING At high vehicle speeds, the dynamic effect may
increase the air flow rate into the passenger compartment,
which in this case will not directly correspond to the fan
speed bar display.
AUTO button (A)
(automatic operation)
Press AUTO to make the system automatically adjust the
quantity and distribution of the air introduced into the pas-
senger compartment. All previous manual settings will be
cancelled.
The message FULL AUTO appears on the front display.
By manually adjusting at least one of the functions auto-
matically managed by the system (air recirculation, air dis-
tribution, fan speed or air conditioning compressor on/off),
the word FULL will disappear from the display, indicating
that the system is no longer automatically controlling all
the functions (the temperature will still be controlled au-
tomatically by the system).▲
˙Air flow distribution split between the windscreen
and front side windows defrosting/demisting diffusers
and the central and side dashboard vents. This dis-
tribution makes it possible to maintain good levels
of comfort and keep the passenger compartment suf-
ficiently cool (summer).
▲
˙
▼Air flow distribution split between the windscreen and
front side windows defrosting/demisting diffusers, the
central and side dashboard vents and the footwell dif-
fusers. This distribution allows good air diffusion and
maintains a good level of comfort both in summer and
winter.
The distribution set is shown by the corresponding LEDs
in the selected buttons coming on.
To restore automatic control of the air distribution after
a manual selection, press the AUTO button.
Fan speed adjustment buttons (H)
Press the outsides of button
Hto increase or decrease the
fan speed and therefore the amount of air admitted into
the passenger compartment, although maintaining the tar-
get temperature.
The fan speed is shown by the bars lit up on the display:
❒Max. fan speed = all bars lit
❒Min. fan speed = one bar lit.
The fan can only be disabled if the climate control com-
pressor has been switched off by pressing button
F-fig. 42.
Page 58 of 274
57
KNOW
YOUR
VEHICLE
SAFETY
STARTING
AND
DRIVING
WARNING
LIGHTS AND
MESSAGES
IN AN
EMERGENCY
SERVICING
AND
MAINTENANCE
TECHNICAL
SPECIFICATIONS
INDEX
❒the maximum air temperature for the HI air is set in
both areas;
❒sets the fan speed set according to the engine coolant
temperature to limit the flow of air that is insufficiently
warm to demist the windows;
❒the air flow is directed to the windscreen and front
door window glasses diffusers;
❒switches on the heated rear windscreen
WARNING The rapid demisting/defrosting function for
the windows remains on for about 3 minutes from when
the engine coolant reaches the appropriate temperature
for a rapid demisting of the windows.
When this function is active, the LED in the correspond-
ing button and the one for the heated rear windscreen but-
ton switch on. The message FULL AUTO goes off on the
display.
You can only adjust the fan speed and switch the heated
rear windscreen off manually when this function is active.
To restore the previous operating conditions, simply press
button B, air recirculation button G, compressor button
F or AUTO button A. IMPORTANT With the compressor off, it is not possible
to introduce air into the passenger compartment at a tem-
perature lower than that of the outside air. In certain
weather conditions, the windows could mist up rapidly due
to the non-dehumidified air.
The switching off of the compressor remains memorised
even when the engine has been stopped.
To restore automatic compressor engagement control,
press the √button again (in this case, the system will work
only as a heater) or press the AUTO button.
With the compressor switched off, if the outside tem-
perature is higher than the one set, the system is not ca-
pable of satisfying this request and signals it by the digits
for the temperature setting flashing after which the word
AUTO goes out.
With the climate control compressor off, the fan speed
can be set to zero manually (no bar shown).
With the compressor enabled and the engine started, the
fan speed may only be reduced to the minimum setting
(one bar shown).
Button for rapid window demisting/defrosting (D)
Press this button and the climate control system will au-
tomatically switch on all the functions required for fast
windscreen and side window demisting/defrosting:
❒the climate control compressor is turned on when
weather conditions are suitable;
❒the air recirculation is turned off;
Page 153 of 274

152
KNOW
YOUR
VEHICLE
SAFETY
STARTING
AND
DRIVING
WARNING
LIGHTS AND
MESSAGES
IN AN
EMERGENCY
SERVICING
AND
MAINTENANCE
TECHNICAL
SPECIFICATIONS
INDEX
EXTERIOR LIGHTS FAULT
(amber)
The warning light comes on (on some versions)
when a failure is detected in one of the following
lights:
– sidelights/taillights
– daytime running lights
– brake lights
– rear fog lights
– direction indicators
– number plate lights.
The failure relating to these lights could be: one or more
blown bulbs, a blown protection fuse or a break in the
electrical connection.
On certain versions, warning light èturns on as an al-
ternative.
A specific message is displayed on certain versions.
W
GENERIC WARNING
(amber)
The warning light turns on in the following cir-
cumstances:
Engine oil pressure sensor failure
The warning light turns on when a failure is detected in
the engine oil pressure sensor.
Go to a Fiat Dealership to have the fault fixed as soon as
possible.
Exterior lights failure
(for versions/markets where provided)
See the section on warning light
6.
Fuel cut-off switch tripped
The warning light comes on when the fuel cut-off switch
is triggered.
A specific message is displayed on certain versions.
Parking sensor fault
(for versions/markets where provided)
See the section on warning light t.
Start&Stop system fault
(for versions/markets where provided)
The warning light comes on when a failure is detected in
the Start&Stop system.
è
FIAT CODE VEHICLE PROTECTION
SYSTEM FAILURE (amber)
Warning light
Ymay come on (and a message on the
display may appear on certain versions) to indicate that
there is a fault in the Fiat Code system or, if applicable,
the alarm system; in this case, contact a Fiat Dealership
as soon as possible.
Y