ECU FIAT DOBLO 2009 2.G User Guide
[x] Cancel search | Manufacturer: FIAT, Model Year: 2009, Model line: DOBLO, Model: FIAT DOBLO 2009 2.GPages: 274, PDF Size: 6.6 MB
Page 121 of 274
120
KNOW
YOUR
VEHICLE
SAFETY
STARTING
AND
DRIVING
WARNING
LIGHTS AND
MESSAGES
IN AN
EMERGENCY
SERVICING
AND
MAINTENANCE
TECHNICAL
SPECIFICATIONS
INDEX
SEAT BELT MAINTENANCE
Observe the following precautions for correct seat belt
maintenance:
❒always make sure the belt is well stretched and never
twisted; make sure that it is free to run without ob-
structions;
❒replace the belt after a serious accident, even if it does
not appear damaged. Always replace the seat belt if the
pretensioners were deployed;
❒To clean the belt, wash by hand with water and mild
soap, rinse and leave to dry in the shade. Do not use
strong detergents, bleach, paints or any other chemi-
cals which could damage the belt fibres;
❒prevent the reels from getting wet: their correct op-
eration is guaranteed only if water does not get inside;
❒replace the seat belt if it shows significant signs of wear
and tear.
If the belt has been subjected to heavy
stress, for example after an accident, it
should be changed completely together with the
anchors, anchor fastening screws and the preten-
sioner. In fact, even if the belt has no visible de-
fects, it could have lost its resilience.
WARNINGCARRYING CHILDREN SAFELY
For optimum protection in the event of a crash, all pas-
sengers must be seated and wearing adequate restraint
systems.
This is even more important for children.
This prescription is compulsory in all EU countries ac-
cording to EC Directive 2003/20/EC.
Compared with an adult, a child’s head is larger and heav-
ier in proportion to his/her body and the child’s muscu-
lar and bone structures are not fully developed. For this
reason, they require restraint systems which are differ-
ent from those used by adults to protect them in the event
of an accident.
The result of research in relation to the best protection
for children is illustrated in European Regulation ECE-R44,
which divides the restraint systems into five groups in ad-
dition to making their use compulsory:
Group 0 up to 10 kg
Group 0+ up to 13 kg
Group 1 9-18 kg
Group 2 15-25 kg
Group 3 22-36 kg
As you can see, the groups overlap partly and, in fact, there
are devices on sale that cover more than one weight group.
All restraint devices must bear the type-approval data along
with the control mark on a label firmly secured to the
child seat which must never be removed.
Page 124 of 274

123
KNOW
YOUR
VEHICLE
SAFETY
STARTING
AND
DRIVING
WARNING
LIGHTS AND
MESSAGES
IN AN
EMERGENCY
SERVICING
AND
MAINTENANCE
TECHNICAL
SPECIFICATIONS
INDEX
F0V0111mfig. 118F0V0112mfig. 119
GROUP 3
For children between 22 kg and 36 kg, there are boost-
ers allowing the seat belt to fit correctly.
Fig. 119 shows proper child seat positioning on the rear
seat. Children over 1.50 m in height can wear seat belts
like adults.
GROUP 2
From 15 kg to 25 kg, children may be restrained directly
by the vehicle seat belts fig. 118. The only function of the
seat is to position the child correctly in relation to the
belts, so that the diagonal part fits over the chest and not
the neck, and that the horizontal part fits over the hips
and not the abdomen.
There are seats with Isofix hooks which
enable secure fastening to the seat with-
out using the vehicle’s seat belts. Follow the as-
sembly instructions carefully.
WARNING
The diagrams are indicative and provid-
ed for assembly purposes only. For as-
sembly, refer to the instructions mandatorily sup-
plied with the child seat.
WARNING
Page 127 of 274

126
KNOW
YOUR
VEHICLE
SAFETY
STARTING
AND
DRIVING
WARNING
LIGHTS AND
MESSAGES
IN AN
EMERGENCY
SERVICING
AND
MAINTENANCE
TECHNICAL
SPECIFICATIONS
INDEX
F0V0128mfig. 121F0V0129mfig. 122
Traditional child seats and Isofix child seats can be fitted
together.
An example of such a seat is shown in fig. 120. The Uni-
versal Isofix child seat covers weight group 1.
Specific Isofix systems are provided for the other weight
classes and may be used only if specifically designed, test-
ed and approved for use on this vehicle (see list attached
to the child seat).
Due to its different anchoring system, the child seat must
be attached to the dedicated lower metal rings A-fig. 121,
located between the backrest and rear cushion. After re-
moving the rear parcel shelf (if present), secure the up-
per belt (provided with the child seat) to ring B-fig. 122
(one on each side) located behind the rear seat backrest.
Remember that in case of Universal Isofix child seats, you
can use all seats approved with the marking ECE R44/03
“Universal Isofix”.The Universal Isofix “Duo Plus” child seat and the special
“Bimbo Fix” seat are available from Lineaccessori Fiat.
For any further details on installation/use, refer to the in-
struction manual for the child seat.
Fit the child seat when the vehicle is sta-
tionary. The child seat is correctly an-
chored to the brackets when you hear the click.
Follow the instructions for assembly, disassembly
and positioning that the child seat manufacturer
must supply.
WARNING
Page 136 of 274
135
KNOW
YOUR
VEHICLE
SAFETY
STARTING
AND
DRIVING
WARNING
LIGHTS AND
MESSAGES
IN AN
EMERGENCY
SERVICING
AND
MAINTENANCE
TECHNICAL
SPECIFICATIONS
INDEXHANDBRAKE
The handbrake is located between the two front seats.
Pull the lever upwards to engage the handbrake and en-
sure that the vehicle does not move.
STOPPING THE ENGINE
Turn the ignition key to STOP while the engine is idling.
IMPORTANT After a long drive, you should allow the
engine to “catch its breath” before turning it off by let-
ting it idle to allow the temperature in the engine com-
partment to fall.
Never jump start the engine by pushing,
towing or driving downhill. This could cause
fuel to flow into the catalytic converter and
damage it beyond repair.
The vehicle should be secured after sev-
eral clicks of the lever. If it is not, contact
a FIAT Dealership to have it adjusted.
WARNING
When the handbrake is on and the ignition key is at MAR,
the instrument panel warning light
xwill come on.
Proceed as follows to release the handbrake:
❒lift the lever slightly and press release button A-fig. 126;
❒hold button A down and lower the lever. The xwarn-
ing light on the instrument panel will go out.
Depress the brake pedal when carrying out this opera-
tion to prevent the vehicle from moving accidentally.
Page 158 of 274
157
KNOW
YOUR
VEHICLE
SAFETY
STARTING
AND
DRIVING
WARNING
LIGHTS AND
MESSAGES
IN AN
EMERGENCY
SERVICING
AND
MAINTENANCE
TECHNICAL
SPECIFICATIONS
INDEXThe spare wheel (where provided) is
specifically for your vehicle. Therefore, it
must not be used on other models. Do not use
spare wheels of other models on your vehicle. The
spare wheel should be used only in an emergency.
Use it as little as possible.
WARNING
Use your hazard lights, warning triangle,
etc to show that your car is stationary.
Passengers should get out of the car, particularly
if it is heavily loaded, and wait for the wheel to
be changed away from the traffic. If you are on
a steep slope or uneven surface, place wedges or
other suitable objects under the wheels to secure
the vehicle. Repair and refit the standard wheel
as soon as possible. Do not grease the bolt threads
before you fit them, because they could sudden-
ly come loose.
WARNING
Use the jack only to replace wheels on the
vehicle with which it is supplied or on oth-
er vehicles of the same model. Never use the jack
for other purposes, such as lifting other models.
Never use the jack to carry out repairs under the
vehicle. Incorrect positioning of the jack may
cause the lifted vehicle to fall. Do not use the jack
for loads higher than the one shown on its label.
WARNING
Incorrect hub cap assembly may cause it
to come off when the car is moving. Nev-
er tamper with the inflation valve. Never intro-
duce tools of any kind between the rim and the
tyre. Check tyre and spare wheel pressures regu-
larly, referring to the values shown in the “Tech-
nical specifications” section.
WARNING
Page 163 of 274
162
KNOW
YOUR
VEHICLE
SAFETY
STARTING
AND
DRIVING
WARNING
LIGHTS AND
MESSAGES
IN AN
EMERGENCY
SERVICING
AND
MAINTENANCE
TECHNICAL
SPECIFICATIONS
INDEX
F0V0158mfig. 139F0V0194fig. 140
❒put the jack and the other implements back in the tool
box.
❒position the tool box behind the left seat (Cargo ver-
sions) or inside the compartment in the rear right side
panel by resting the base of the box on the side
(Doblò/Doblò Combi versions);
❒secure the tool box with the elastic strap and fasten
it with the buckle. ❒use the wrench provided to tighten the bolts in a criss-
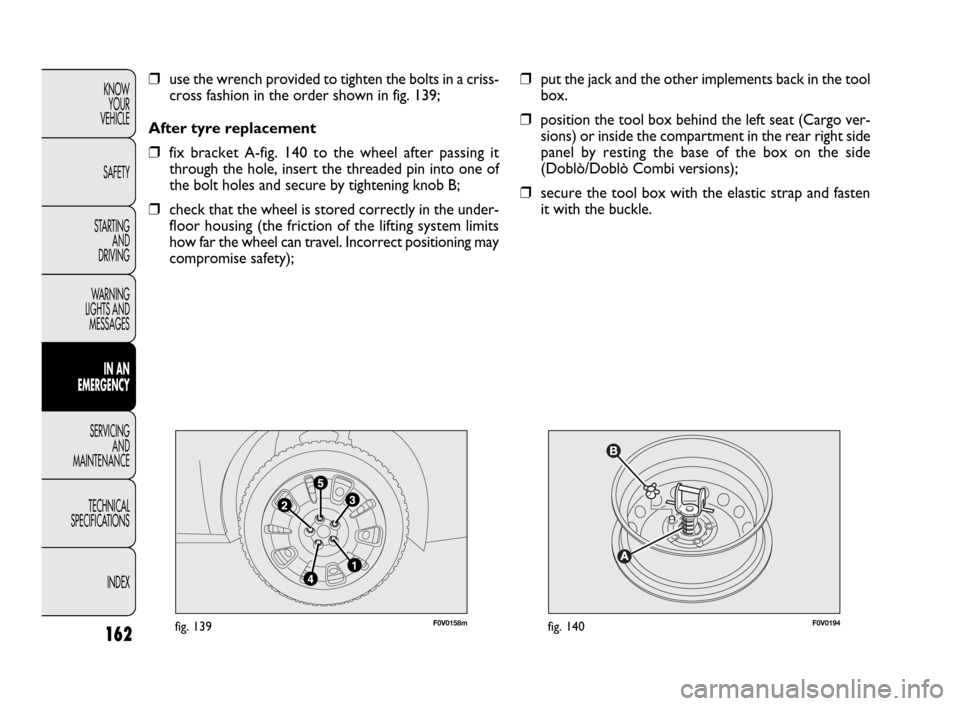
cross fashion in the order shown in fig. 139;
After tyre replacement
❒fix bracket A-fig. 140 to the wheel after passing it
through the hole, insert the threaded pin into one of
the bolt holes and secure by tightening knob B;
❒check that the wheel is stored correctly in the under-
floor housing (the friction of the lifting system limits
how far the wheel can travel. Incorrect positioning may
compromise safety);
Page 179 of 274

178
KNOW
YOUR
VEHICLE
SAFETY
STARTING
AND
DRIVING
WARNING
LIGHTS AND
MESSAGES
IN AN
EMERGENCY
SERVICING
AND
MAINTENANCE
TECHNICAL
SPECIFICATIONS
INDEX❒open the cover B-fig. 164 as shown;
❒remove bulb C-fig. 165 by releasing it from the side
contacts, then insert the new bulb and make sure it is
correctly clamped between these contacts;
❒ close the cover and secure the ceiling light into its hous-
ing, making sure it locks properly into place.CHANGING AN INTERIOR BULB
For the type of bulb and power rating, see “Changing
a bulb”.
FRONT CEILING LIGHT
Ceiling light with movable lens
Proceed as follows to replace the bulbs:
❒remove the ceiling light A-fig. 163 by manoeuvring the
points shown by the arrows;
F0V0070mfig. 163F0V0072mfig. 165
F0V0071mfig. 164
Page 180 of 274

179
KNOW
YOUR
VEHICLE
SAFETY
STARTING
AND
DRIVING
WARNING
LIGHTS AND
MESSAGES
IN AN
EMERGENCY
SERVICING
AND
MAINTENANCE
TECHNICAL
SPECIFICATIONS
INDEX❒replace bulbs C by releasing them from the side con-
tacts and making sure that the new bulbs are correctly
clamped between these contacts;
❒ close the flap B-fig. 167 and refit the ceiling light A-fig.
166 in its housing, making sure it locks into place cor-
rectly.
REAR CEILING LIGHT
To change the bulb, proceed as follows:
❒remove the ceiling light A-fig. 168 by manoeuvring the
points shown by the arrows;
❒open the cover B-fig. 169 as shown;
❒remove bulb C-fig. 170 by releasing it from the side
contacts, then insert the new bulb and make sure it is
correctly clamped between these contacts;
❒close the cover B-fig. 169 and secure the ceiling light
into its housing, making sure it locks properly into place. Ceiling light with spot lights (where provided)
Proceed as follows to replace the bulbs:
❒manipulate the points shown by the arrows and remove
ceiling light A-fig. 166;
❒open the protective flap B-fig. 167;
F0V0074mfig. 167
F0V0073mfig. 166
F0V0075mfig. 168
Page 185 of 274
184
KNOW
YOUR
VEHICLE
SAFETY
STARTING
AND
DRIVING
WARNING
LIGHTS AND
MESSAGES
IN AN
EMERGENCY
SERVICING
AND
MAINTENANCE
TECHNICAL
SPECIFICATIONS
INDEXPROTECTED DEVICE FUSE AMPS FIGURE
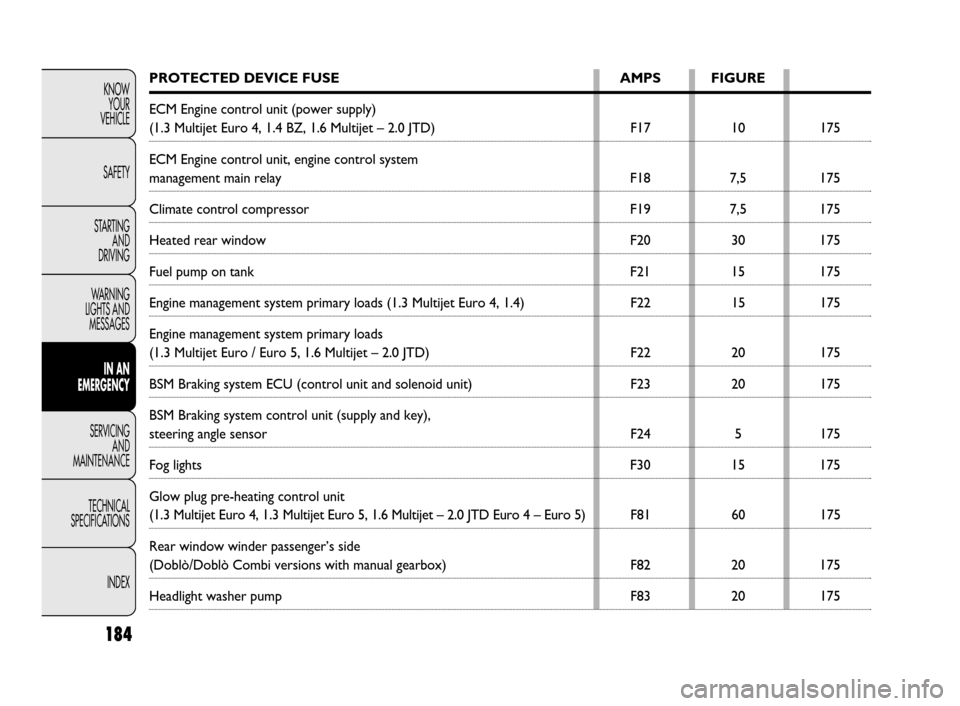
ECM Engine control unit (power supply)
(1.3 Multijet Euro 4, 1.4 BZ, 1.6 Multijet – 2.0 JTD) F17 10 175
ECM Engine control unit, engine control system
management main relay F18 7,5 175
Climate control compressor F19 7,5 175
Heated rear window F20 30 175
Fuel pump on tank F21 15 175
Engine management system primary loads (1.3 Multijet Euro 4, 1.4) F22 15 175
Engine management system primary loads
(1.3 Multijet Euro / Euro 5, 1.6 Multijet – 2.0 JTD) F22 20 175
BSM Braking system ECU (control unit and solenoid unit) F23 20 175
BSM Braking system control unit (supply and key),
steering angle sensor F24 5 175
Fog lights F30 15 175
Glow plug pre-heating control unit
(1.3 Multijet Euro 4, 1.3 Multijet Euro 5, 1.6 Multijet – 2.0 JTD Euro 4 – Euro 5) F81 60 175
Rear window winder passenger’s side
(Doblò/Doblò Combi versions with manual gearbox) F82 20 175
Headlight washer pump F83 20 175
Page 188 of 274
187
KNOW
YOUR
VEHICLE
SAFETY
STARTING
AND
DRIVING
WARNING
LIGHTS AND
MESSAGES
IN AN
EMERGENCY
SERVICING
AND
MAINTENANCE
TECHNICAL
SPECIFICATIONS
INDEXPROTECTED DEVICE FUSE AMPS FIGURE
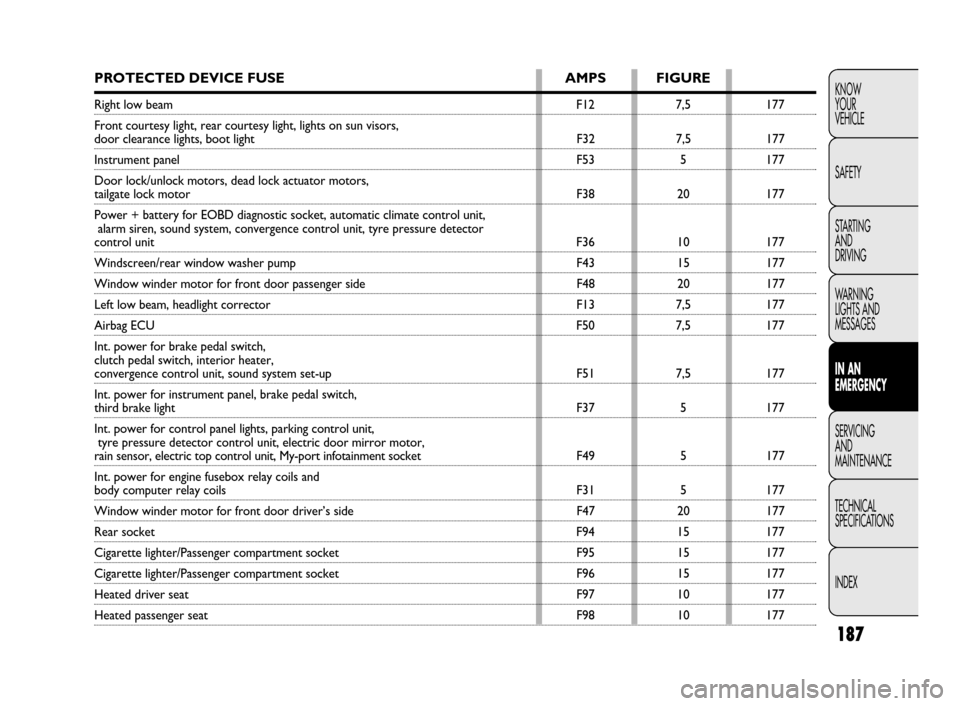
Right low beamF12 7,5 177
Front courtesy light, rear courtesy light, lights on sun visors,
door clearance lights, boot light F32 7,5 177
Instrument panel F53 5 177
Door lock/unlock motors, dead lock actuator motors,
tailgate lock motor F38 20 177
Power + battery for EOBD diagnostic socket, automatic climate control unit,
alarm siren, sound system, convergence control unit, tyre pressure detector
control unitF36 10 177
Windscreen/rear window washer pump F43 15 177
Window winder motor for front door passenger side F48 20 177
Left low beam, headlight corrector F13 7,5 177
Airbag ECUF50 7,5 177
Int. power for brake pedal switch,
clutch pedal switch, interior heater,
convergence control unit, sound system set-up F51 7,5 177
Int. power for instrument panel, brake pedal switch,
third brake light F37 5 177
Int. power for control panel lights, parking control unit,
tyre pressure detector control unit, electric door mirror motor,
rain sensor, electric top control unit, My-port infotainment socket F49 5 177
Int. power for engine fusebox relay coils and
body computer relay coils F31 5 177
Window winder motor for front door driver’s side F47 20 177
Rear socketF94 15 177
Cigarette lighter/Passenger compartment socket F95 15 177
Cigarette lighter/Passenger compartment socket F96 15 177
Heated driver seat F97 10 177
Heated passenger seat F98 10 177