headlamp FIAT DOBLO COMBI 2010 Owner handbook (in English)
[x] Cancel search | Manufacturer: FIAT, Model Year: 2010, Model line: DOBLO COMBI, Model: FIAT DOBLO COMBI 2010Pages: 274, PDF Size: 6.16 MB
Page 15 of 274
14
KNOW
YOUR
VEHICLE
SAFETY
STARTING
AND
DRIVING
WARNING
LIGHTS AND
MESSAGES
IN AN
EMERGENCY
SERVICING
AND
MAINTENANCE
TECHNICAL
SPECIFICATIONS
INDEX
DIGITAL DISPLAY
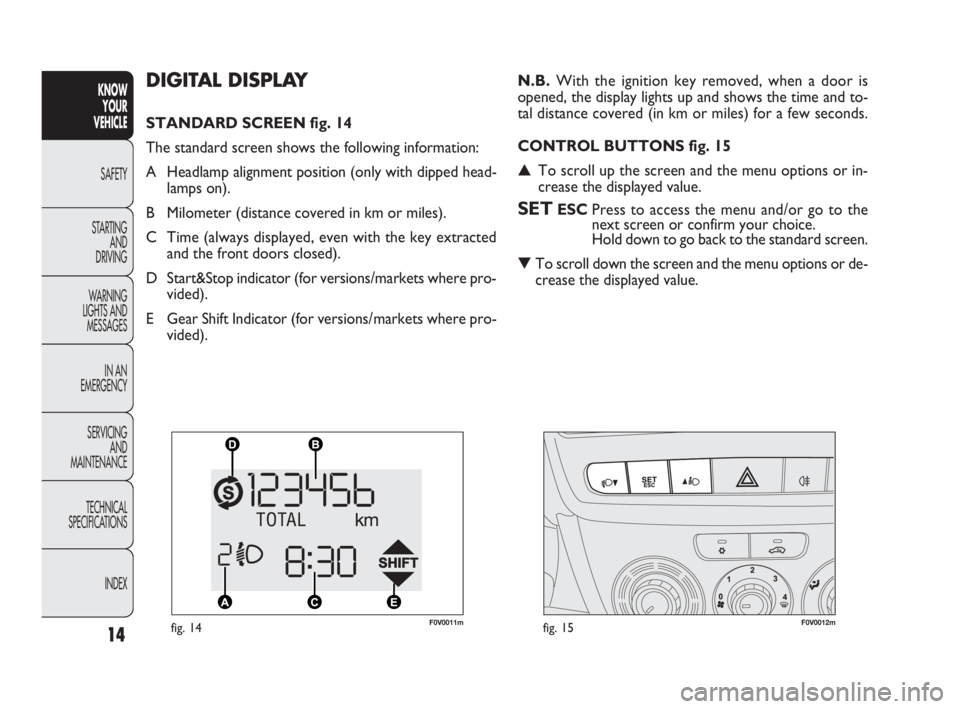
STANDARD SCREEN fig. 14
The standard screen shows the following information:
A Headlamp alignment position (only with dipped head-
lamps on).
B Milometer (distance covered in km or miles).
C Time (always displayed, even with the key extracted
and the front doors closed).
D Start&Stop indicator (for versions/markets where pro-
vided).
E Gear Shift Indicator (for versions/markets where pro-
vided).N.B.With the ignition key removed, when a door is
opened, the display lights up and shows the time and to-
tal distance covered (in km or miles) for a few seconds.
CONTROL BUTTONS fig. 15
▲To scroll up the screen and the menu options or in-
crease the displayed value.
SETESCPress to access the menu and/or go to the
next screen or confirm your choice.
Hold down to go back to the standard screen.
▼To scroll down the screen and the menu options or de-
crease the displayed value.
F0V0011mfig. 14F0V0012mfig. 15
001-034 DOBLO LUM EN 2e 7.0 21-05-2010 8:38 Pagina 14
Page 17 of 274
Proceed as follows to adjust the brightness:
– press the SET ESC button: the display will show ILLU;
– press button ▲or ▼to adjust the brightness level;
– press the SET ESC button to go back to the menu screen
or hold the button down to go back to the standard screen
without saving.
Setting the speed limit (SPEEd)
This function is used to set a speed limit (km/h or mph);
the driver is alerted when this limit is exceeded (see
“Warning lights and messages”).
To set the desired speed limit, proceed as follows:
– press SET ESC: the word SPEEd and the previously set
unit (km/h or mph) will appear on the display;
– press button ▲or ▼to select speed limit activation (On)
or deactivation (Off);
– when the function is activated (On), press buttons
▲or ▼to select the speed limit and press SET ESC to
confirm. Hold down the SET ESC button
– to quit the setup menu if you are in the menu;
– to quit to the menu if you are setting an option;
– to save only the settings already memorized (confirmed
by pressing the SET ESC button).
The setup menu page is timed. Only the changes already
memorized by pressing the SET ESC button are saved
when you come out of the menu.
Adjusting the vehicle interior lighting
(ILLU)
This function is available, with the dipped headlamps on
and at night, to adjust the brightness of the instrument pan-
el, buttons, radio display and automatic climate control dis-
play.
During the daytime, and with the dipped headlamps on,
the instrument panel, buttons and radio and automatic cli-
mate control displays are set to maximum brightness.
16
KNOW
YOUR
VEHICLE
SAFETY
STARTING
AND
DRIVING
WARNING
LIGHTS AND
MESSAGES
IN AN
EMERGENCY
SERVICING
AND
MAINTENANCE
TECHNICAL
SPECIFICATIONS
INDEX
001-034 DOBLO LUM EN 2e 7.0 21-05-2010 8:38 Pagina 16
Page 20 of 274
19
KNOW
YOUR
VEHICLE
SAFETY
STARTING
AND
DRIVING
WARNING
LIGHTS AND
MESSAGES
IN AN
EMERGENCY
SERVICING
AND
MAINTENANCE
TECHNICAL
SPECIFICATIONS
INDEX
F0V0038mfig. 16F0V0012mfig. 17
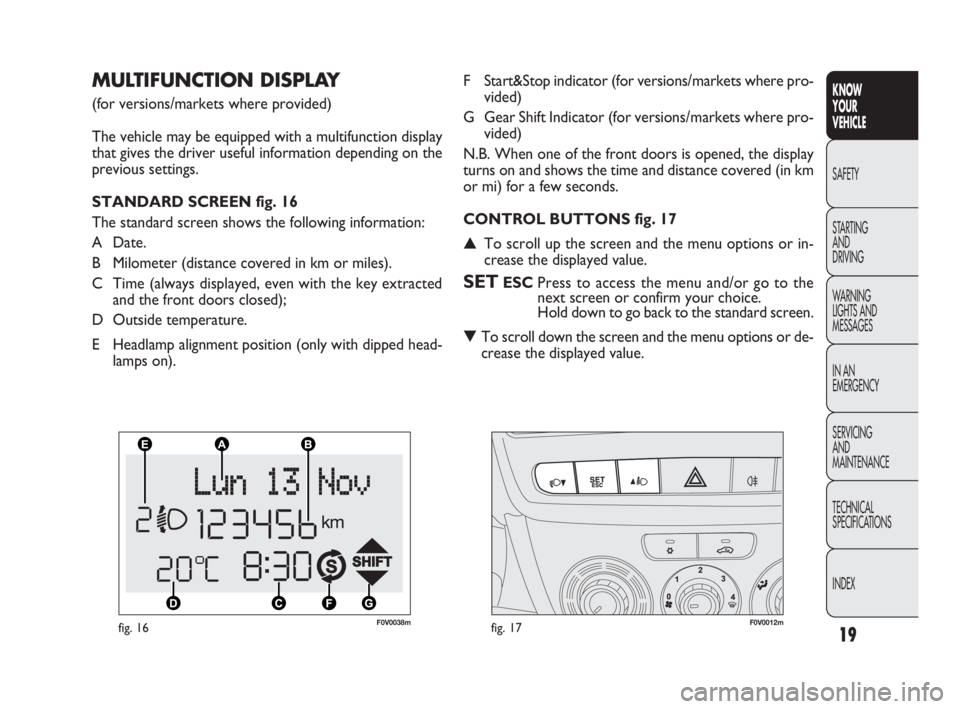
F Start&Stop indicator (for versions/markets where pro-
vided)
G Gear Shift Indicator (for versions/markets where pro-
vided)
N.B. When one of the front doors is opened, the display
turns on and shows the time and distance covered (in km
or mi) for a few seconds.
CONTROL BUTTONS fig. 17
▲To scroll up the screen and the menu options or in-
crease the displayed value.
SETESCPress to access the menu and/or go to the
next screen or confirm your choice.
Hold down to go back to the standard screen.
▼To scroll down the screen and the menu options or de-
crease the displayed value.
MULTIFUNCTION DISPLAY
(for versions/markets where provided)
The vehicle may be equipped with a multifunction display
that gives the driver useful information depending on the
previous settings.
STANDARD SCREEN fig. 16
The standard screen shows the following information:
A Date.
B Milometer (distance covered in km or miles).
C Time (always displayed, even with the key extracted
and the front doors closed);
D Outside temperature.
E Headlamp alignment position (only with dipped head-
lamps on).
001-034 DOBLO LUM EN 2e 7.0 21-05-2010 8:38 Pagina 19
Page 22 of 274
21
KNOW
YOUR
VEHICLE
SAFETY
STARTING
AND
DRIVING
WARNING
LIGHTS AND
MESSAGES
IN AN
EMERGENCY
SERVICING
AND
MAINTENANCE
TECHNICAL
SPECIFICATIONS
INDEX
MENU FUNCTIONS
Adjusting the vehicle interior lighting
This function is available, with the dipped headlamps on
and at night, to adjust the brightness of the instrument pan-
el, buttons, radio display and automatic climate control dis-
play.
During the daytime, and with the dipped headlamps on,
the instrument panel, buttons and radio and automatic cli-
mate control displays are set to maximum brightness.
Proceed as follows to adjust the brightness:
– press SET ESC: the previously set brightness level flash-
es in the display;
– press button ▲or ▼to adjust the brightness level;
– press the SET ESC button to go back to the menu screen
or hold the button down to go back to the standard screen
without saving.
Speed beep (Speed limit)
This function makes it possible to set the vehicle speed
limit (km/h or mph). When this limit is exceeded the dri-
ver is immediately alerted (see “Warning lights and mes-
sages” section).
To set the desired speed limit, proceed as follows:
– press the SET ESC button: the display shows the words
Speed Beep;
– press button ▲or ▼to select speed limit activation (On)
or deactivation (Off); – PASSENGER AIRBAG
– DAYTIME RUNNING LIGHTS
– EXIT MENU
Selecting an option from the main menu without a submenu:
– press SET ESC to select the main menu option you wish
to set;
– press ▲or ▼to select the new setting;
– press the SET ESC button to memorize the new set-
ting and go back to the previous main menu option.
Selecting an option from the main menu with a submenu:
– press the SET ESC button to display the first submenu
option;
– press ▲or ▼to scroll through all the submenu options;
– press the SET ESC button to select the displayed sub-
menu option and open the relevant setup menu;
– press ▲or ▼to select the new setting for this submenu
option;
– press the SET ESC button to memorize the new set-
ting and go back to the previous submenu option.
001-034 DOBLO LUM EN 2e 7.0 21-05-2010 8:38 Pagina 21
Page 60 of 274
59
KNOW
YOUR
VEHICLE
SAFETY
STARTING
AND
DRIVING
WARNING
LIGHTS AND
MESSAGES
IN AN
EMERGENCY
SERVICING
AND
MAINTENANCE
TECHNICAL
SPECIFICATIONS
INDEX
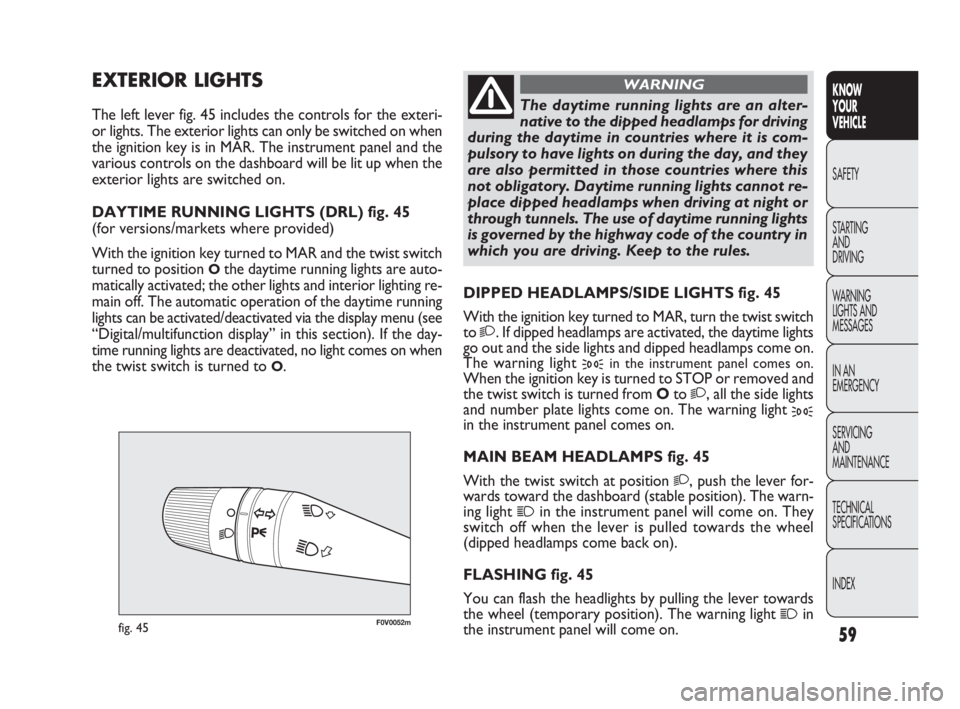
F0V0052mfig. 45
DIPPED HEADLAMPS/SIDE LIGHTS fig. 45
With the ignition key turned to MAR, turn the twist switch
to
2. If dipped headlamps are activated, the daytime lights
go out and the side lights and dipped headlamps come on.
The warning light
3in the instrument panel comes on.
When the ignition key is turned to STOP or removed and
the twist switch is turned from Oto
2, all the side lights
and number plate lights come on. The warning light
3in the instrument panel comes on.
MAIN BEAM HEADLAMPS fig. 45
With the twist switch at position
2, push the lever for-
wards toward the dashboard (stable position). The warn-
ing light
1in the instrument panel will come on. They
switch off when the lever is pulled towards the wheel
(dipped headlamps come back on).
FLASHING fig. 45
You can flash the headlights by pulling the lever towards
the wheel (temporary position). The warning light
1in
the instrument panel will come on.
EXTERIOR LIGHTS
The left lever fig. 45 includes the controls for the exteri-
or lights. The exterior lights can only be switched on when
the ignition key is in MAR. The instrument panel and the
various controls on the dashboard will be lit up when the
exterior lights are switched on.
DAYTIME RUNNING LIGHTS (DRL) fig. 45
(for versions/markets where provided)
With the ignition key turned to MAR and the twist switch
turned to position
Othe daytime running lights are auto-
matically activated; the other lights and interior lighting re-
main off. The automatic operation of the daytime running
lights can be activated/deactivated via the display menu (see
“Digital/multifunction display” in this section). If the day-
time running lights are deactivated, no light comes on when
the twist switch is turned to
O.
The daytime running lights are an alter-
native to the dipped headlamps for driving
during the daytime in countries where it is com-
pulsory to have lights on during the day, and they
are also permitted in those countries where this
not obligatory. Daytime running lights cannot re-
place dipped headlamps when driving at night or
through tunnels. The use of daytime running lights
is governed by the highway code of the country in
which you are driving. Keep to the rules.
WARNING
035-114 DOBLO LUM EN 2e 7.0 21-05-2010 9:54 Pagina 59
Page 63 of 274
62
KNOW
YOUR
VEHICLE
SAFETY
STARTING
AND
DRIVING
WARNING
LIGHTS AND
MESSAGES
IN AN
EMERGENCY
SERVICING
AND
MAINTENANCE
TECHNICAL
SPECIFICATIONS
INDEX
REAR WINDOW WIPER/WASHER
(for versions/markets where provided)
This operates only with the ignition key turned to MAR.
Activation
Turn the twist switch to
'to operate the rear window
wiper:
❒in intermittent mode if the windscreen wiper is off;
❒synchronised operation (but with half-stroke frequen-
cy) when the windscreen wiper is on;
❒continuous operation with reverse engaged and func-
tion on.
With the windscreen wiper on and reverse gear engaged,
rear window wiping will be continuous.
Pushing the lever towards the dashboard (temporary po-
sition) will activate the rear window washer jet. Keeping
the lever pushed for more than half a second will also ac-
tivate the rear window wiper. Releasing the lever will ac-
tivate the smart washing function, as described for the
windscreen wiper.
Deactivation
The function stops when the lever is released.
Do not use the rear window wiper to re-
move layers of snow or ice. In such condi-
tions, the wiper may be subjected to ex-
cessive stress and the motor protection, which pre-
vents operation for a few seconds, may intervene.
If the issue persists, contact the Fiat Service Net-
work.
HEADLIGHT WASHERS
(for versions/markets where provided)
They are activated when the dipped headlamps are on and the
screen washer is activated.
WARNING Check jet function and cleanliness at regular
intervals.
The headlamp washer jet does not function
when the level of fluid in the reservoir falls
below 1.6 litres.
035-114 DOBLO LUM EN 2e 7.0 21-05-2010 9:54 Pagina 62
Page 71 of 274
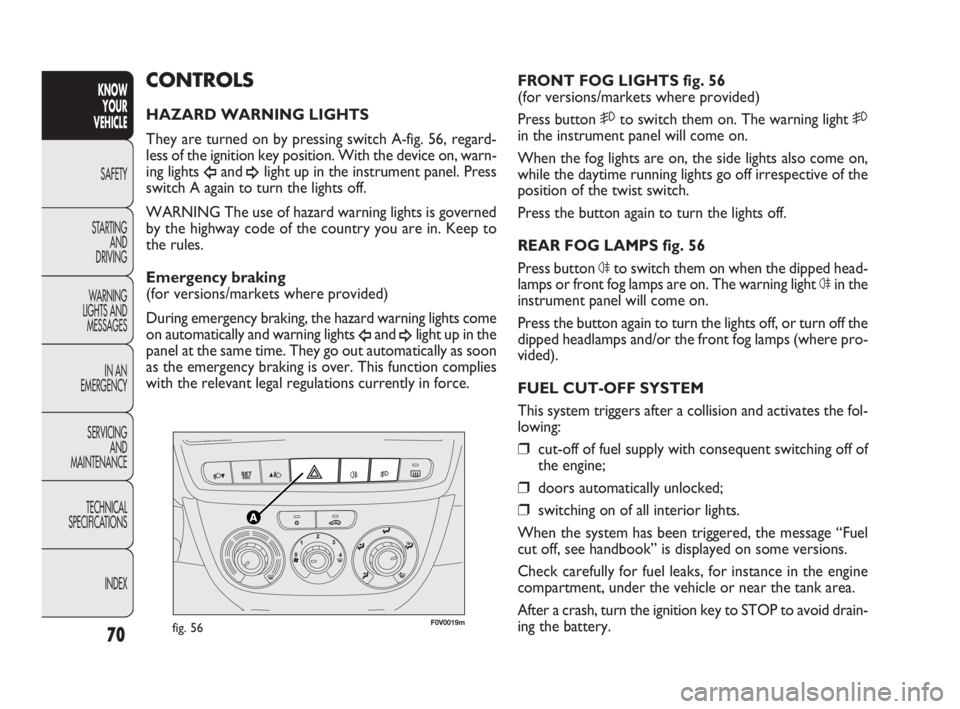
F0V0019mfig. 56
FRONT FOG LIGHTS fig. 56
(for versions/markets where provided)
Press button 5to switch them on. The warning light 5
in the instrument panel will come on.
When the fog lights are on, the side lights also come on,
while the daytime running lights go off irrespective of the
position of the twist switch.
Press the button again to turn the lights off.
REAR FOG LAMPS fig. 56
Press button
4to switch them on when the dipped head-
lamps or front fog lamps are on. The warning light
4in the
instrument panel will come on.
Press the button again to turn the lights off, or turn off the
dipped headlamps and/or the front fog lamps (where pro-
vided).
FUEL CUT-OFF SYSTEM
This system triggers after a collision and activates the fol-
lowing:
❒cut-off of fuel supply with consequent switching off of
the engine;
❒doors automatically unlocked;
❒switching on of all interior lights.
When the system has been triggered, the message “Fuel
cut off, see handbook” is displayed on some versions.
Check carefully for fuel leaks, for instance in the engine
compartment, under the vehicle or near the tank area.
After a crash, turn the ignition key to STOP to avoid drain-
ing the battery.
CONTROLS
HAZARD WARNING LIGHTS
They are turned on by pressing switch A-fig. 56, regard-
less of the ignition key position. With the device on, warn-
ing lights
Îand¥light up in the instrument panel. Press
switch A again to turn the lights off.
WARNING The use of hazard warning lights is governed
by the highway code of the country you are in. Keep to
the rules.
Emergency braking
(for versions/markets where provided)
During emergency braking, the hazard warning lights come
on automatically and warning lights
Îand¥light up in the
panel at the same time. They go out automatically as soon
as the emergency braking is over. This function complies
with the relevant legal regulations currently in force.
70
KNOW
YOUR
VEHICLE
SAFETY
STARTING
AND
DRIVING
WARNING
LIGHTS AND
MESSAGES
IN AN
EMERGENCY
SERVICING
AND
MAINTENANCE
TECHNICAL
SPECIFICATIONS
INDEX
035-114 DOBLO LUM EN 2e 7.0 21-05-2010 9:54 Pagina 70
Page 96 of 274
95
KNOW
YOUR
VEHICLE
SAFETY
STARTING
AND
DRIVING
WARNING
LIGHTS AND
MESSAGES
IN AN
EMERGENCY
SERVICING
AND
MAINTENANCE
TECHNICAL
SPECIFICATIONS
INDEX
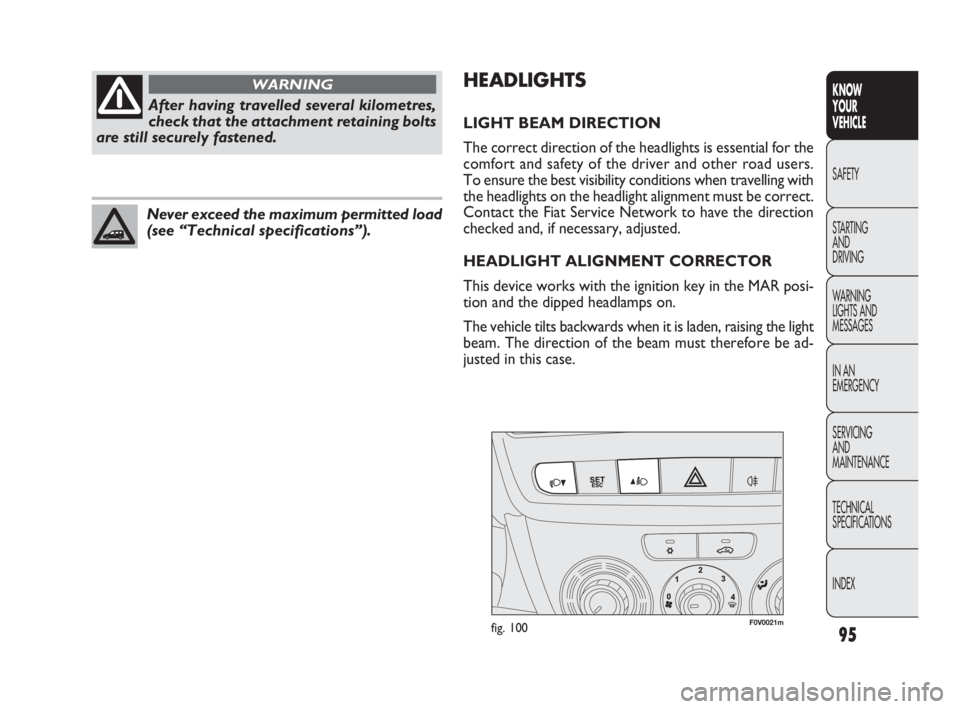
F0V0021mfig. 100
HEADLIGHTS
LIGHT BEAM DIRECTION
The correct direction of the headlights is essential for the
comfort and safety of the driver and other road users.
To ensure the best visibility conditions when travelling with
the headlights on the headlight alignment must be correct.
Contact the Fiat Service Network to have the direction
checked and, if necessary, adjusted.
HEADLIGHT ALIGNMENT CORRECTOR
This device works with the ignition key in the MAR posi-
tion and the dipped headlamps on.
The vehicle tilts backwards when it is laden, raising the light
beam. The direction of the beam must therefore be ad-
justed in this case.
After having travelled several kilometres,
check that the attachment retaining bolts
are still securely fastened.
WARNING
Never exceed the maximum permitted load
(see “Technical specifications”).
035-114 DOBLO LUM EN 2e 7.0 21-05-2010 9:54 Pagina 95
Page 97 of 274
96
KNOW
YOUR
VEHICLE
SAFETY
STARTING
AND
DRIVING
WARNING
LIGHTS AND
MESSAGES
IN AN
EMERGENCY
SERVICING
AND
MAINTENANCE
TECHNICAL
SPECIFICATIONS
INDEX
ABS SYSTEM
(for versions/markets where provided)
This is an integral part of the braking system, which pre-
vents one or more wheels from locking or slipping re-
gardless of the road surface conditions and braking action,
giving the best control during emergency braking.
The EBD system (Electronic Braking Force Distribution)
completes the system, allowing the braking action to be
distributed between the front and rear wheels.
WARNING For maximum efficiency of the braking sys-
tem, a bedding-in period of about 500 km is needed: dur-
ing this period it is better to avoid sharp, repeated and pro-
longed braking.
SYSTEM INTERVENTION
The driver can tell the ABS system has come into action
because the brake pedal pulsates slightly and the system
gets noisier: it means that the vehicle speed should be al-
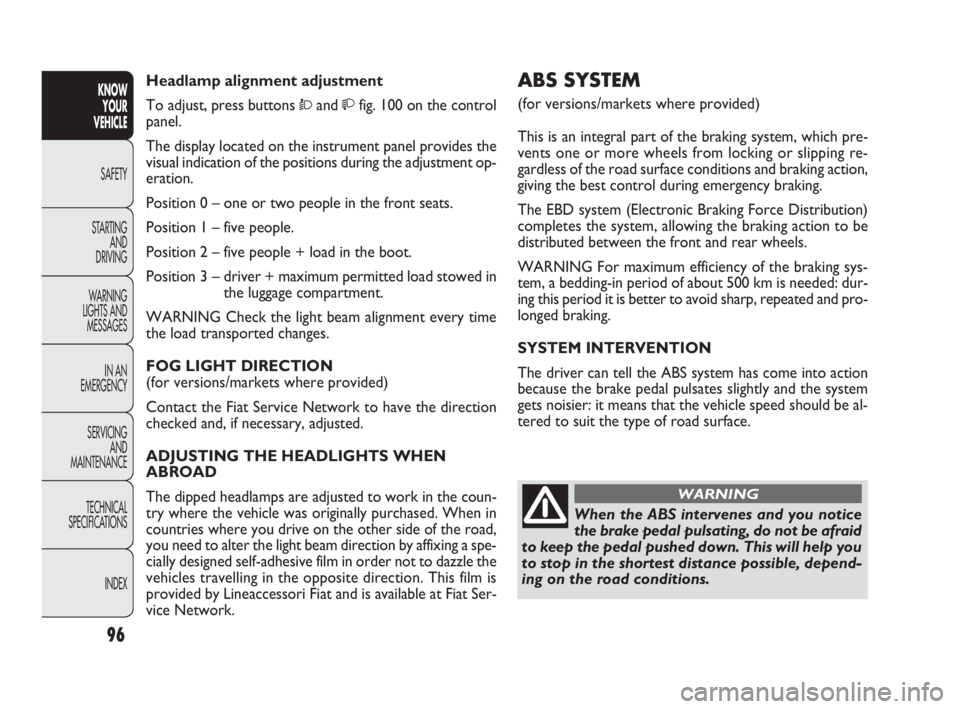
tered to suit the type of road surface. Headlamp alignment adjustment
To adjust, press buttons Òandfig. 100 on the control
panel.
The display located on the instrument panel provides the
visual indication of the positions during the adjustment op-
eration.
Position 0 – one or two people in the front seats.
Position 1 – five people.
Position 2 – five people + load in the boot.
Position 3 – driver + maximum permitted load stowed in
the luggage compartment.
WARNING Check the light beam alignment every time
the load transported changes.
FOG LIGHT DIRECTION
(for versions/markets where provided)
Contact the Fiat Service Network to have the direction
checked and, if necessary, adjusted.
ADJUSTING THE HEADLIGHTS WHEN
ABROAD
The dipped headlamps are adjusted to work in the coun-
try where the vehicle was originally purchased. When in
countries where you drive on the other side of the road,
you need to alter the light beam direction by affixing a spe-
cially designed self-adhesive film in order not to dazzle the
vehicles travelling in the opposite direction. This film is
provided by Lineaccessori Fiat and is available at Fiat Ser-
vice Network.
When the ABS intervenes and you notice
the brake pedal pulsating, do not be afraid
to keep the pedal pushed down. This will help you
to stop in the shortest distance possible, depend-
ing on the road conditions.
WARNING
035-114 DOBLO LUM EN 2e 7.0 21-05-2010 9:54 Pagina 96
Page 193 of 274
192
KNOW
YOUR
VEHICLE
SAFETY
STARTING
AND
DRIVING
WARNING
LIGHTS AND
MESSAGES
IN AN
EMERGENCY
SERVICING
AND
MAINTENANCE
TECHNICAL
SPECIFICATIONS
INDEX
●●●●●●
●●●●●●
●●●●●●
●●●●●●
●●●●●●
●●●
●●●●●●
●●●●●●
●●
●●
●●●●●●
●●●●●●
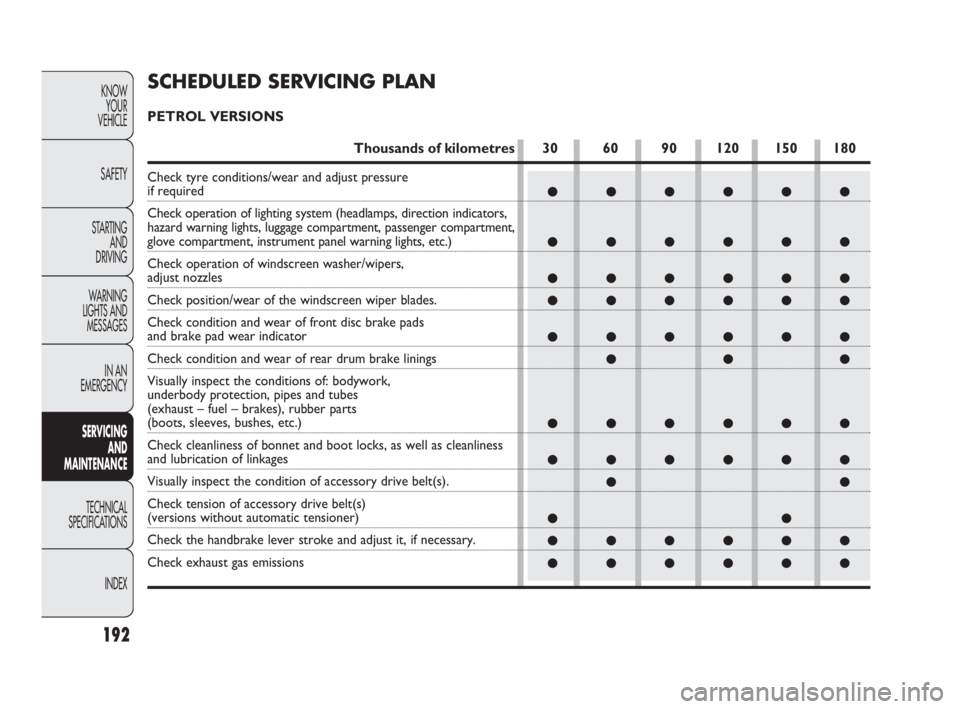
SCHEDULED SERVICING PLAN
PETROL VERSIONS
Thousands of kilometres 30 60 90 120 150 180
Check tyre conditions/wear and adjust pressure if required
Check operation of lighting system (headlamps, direction indicators,
hazard warning lights, luggage compartment, passenger compartment,
glove compartment, instrument panel warning lights, etc.)
Check operation of windscreen washer/wipers,
adjust nozzles
Check position/wear of the windscreen wiper blades.
Check condition and wear of front disc brake pads
and brake pad wear indicator
Check condition and wear of rear drum brake linings
Visually inspect the conditions of: bodywork,
underbody protection, pipes and tubes
(exhaust – fuel – brakes), rubber parts
(boots, sleeves, bushes, etc.)
Check cleanliness of bonnet and boot locks, as well as cleanliness
and lubrication of linkages
Visually inspect the condition of accessory drive belt(s).
Check tension of accessory drive belt(s)
(versions without automatic tensioner)
Check the handbrake lever stroke and adjust it, if necessary.
Check exhaust gas emissions
191-218 DOBLO LUM EN 2e 7.0 24-05-2010 10:40 Pagina 192