ESP FIAT DOBLO COMBI 2018 Owner handbook (in English)
[x] Cancel search | Manufacturer: FIAT, Model Year: 2018, Model line: DOBLO COMBI, Model: FIAT DOBLO COMBI 2018Pages: 272, PDF Size: 23.75 MB
Page 89 of 272
It is recommended to always choose
the restraint system most suitable
for the child; for this reason always refer
to the Owner Handbook provided with
the child restraint system, to be sure
that it is of the right type for the children
it is intended for.
When over 1.50 m in height, from the
point of view of restraint systems,
children are considered as adults and
wear seat belts normally.
In Europe child restraint systems are
classified, among other criteria, into five
weight groups:
Group Weight groups
Group 0up to 10 kg in
weight
Group 0+up to 13 kg in
weight
Group 1 9 - 18 kg
Group 2 15 - 25 kg
Group 3 22 - 36 kg
All restraint devices must bear the
type-approval data, together with the
control mark, on a label solidly fixed to
the child restraint system which must
never be removed.
Lineaccessori Fiat offers child restraint
systems for each weight group. These
devices are recommended having been
specifically designed for Fiat vehicles.
64)
GROUP 0 and 0+
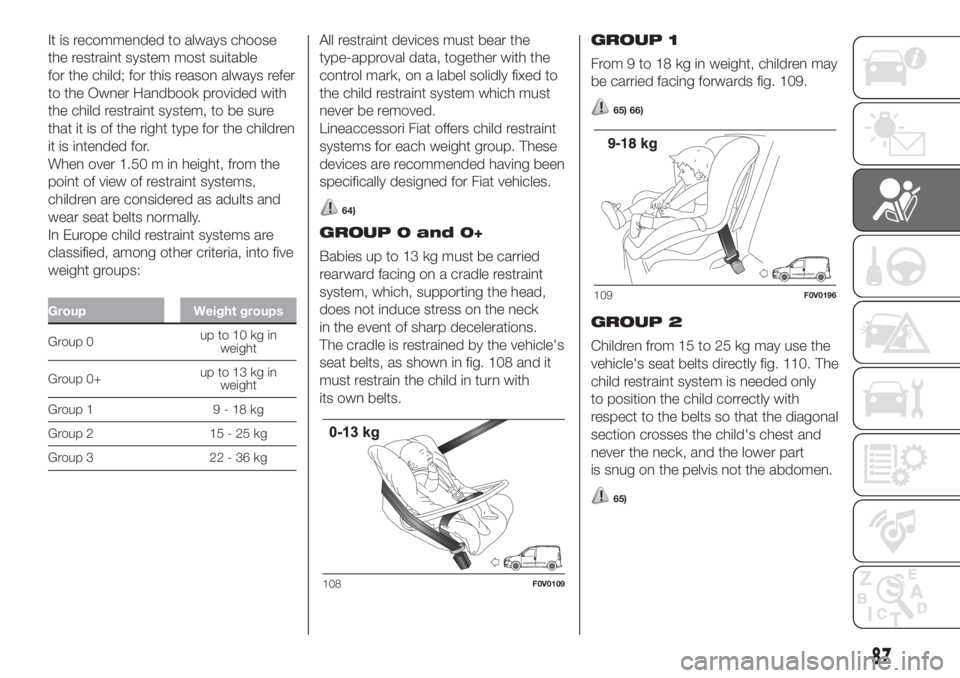
Babies up to 13 kg must be carried
rearward facing on a cradle restraint
system, which, supporting the head,
does not induce stress on the neck
in the event of sharp decelerations.
The cradle is restrained by the vehicle's
seat belts, as shown in fig. 108 and it
must restrain the child in turn with
its own belts.GROUP 1
From 9 to 18 kg in weight, children may
be carried facing forwards fig. 109.
65) 66)
GROUP 2
Children from 15 to 25 kg may use the
vehicle's seat belts directly fig. 110. The
child restraint system is needed only
to position the child correctly with
respect to the belts so that the diagonal
section crosses the child's chest and
never the neck, and the lower part
is snug on the pelvis not the abdomen.
65)
108F0V0109
109F0V0196
87
Page 113 of 272
JUMP STARTING
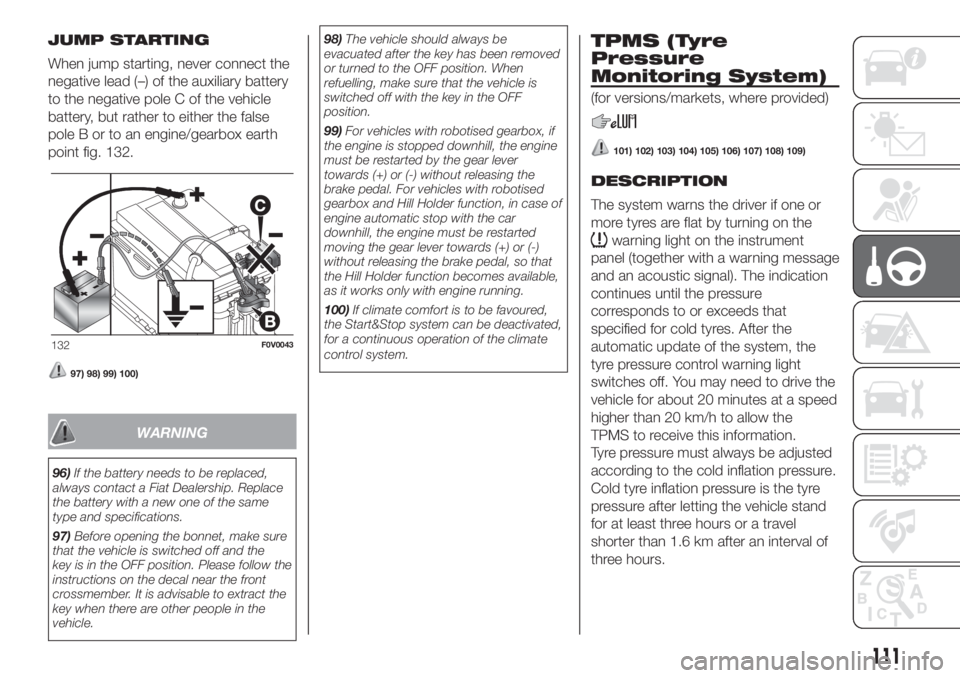
When jump starting, never connect the
negative lead (–) of the auxiliary battery
to the negative pole C of the vehicle
battery, but rather to either the false
pole B or to an engine/gearbox earth
point fig. 132.
97) 98) 99) 100)
WARNING
96)If the battery needs to be replaced,
always contact a Fiat Dealership. Replace
the battery with a new one of the same
type and specifications.
97)Before opening the bonnet, make sure
that the vehicle is switched off and the
key is in the OFF position. Please follow the
instructions on the decal near the front
crossmember. It is advisable to extract the
key when there are other people in the
vehicle.98)The vehicle should always be
evacuated after the key has been removed
or turned to the OFF position. When
refuelling, make sure that the vehicle is
switched off with the key in the OFF
position.
99)For vehicles with robotised gearbox, if
the engine is stopped downhill, the engine
must be restarted by the gear lever
towards (+) or (-) without releasing the
brake pedal. For vehicles with robotised
gearbox and Hill Holder function, in case of
engine automatic stop with the car
downhill, the engine must be restarted
moving the gear lever towards (+) or (-)
without releasing the brake pedal, so that
the Hill Holder function becomes available,
as it works only with engine running.
100)If climate comfort is to be favoured,
the Start&Stop system can be deactivated,
for a continuous operation of the climate
control system.
TPMS (Tyre
Pressure
Monitoring System)
(for versions/markets, where provided)
101) 102) 103) 104) 105) 106) 107) 108) 109)
DESCRIPTION
The system warns the driver if one or
more tyres are flat by turning on the
warning light on the instrument
panel (together with a warning message
and an acoustic signal). The indication
continues until the pressure
corresponds to or exceeds that
specified for cold tyres. After the
automatic update of the system, the
tyre pressure control warning light
switches off. You may need to drive the
vehicle for about 20 minutes at a speed
higher than 20 km/h to allow the
TPMS to receive this information.
Tyre pressure must always be adjusted
according to the cold inflation pressure.
Cold tyre inflation pressure is the tyre
pressure after letting the vehicle stand
for at least three hours or a travel
shorter than 1.6 km after an interval of
three hours.
132F0V0043
111
Page 116 of 272
Storing vehicle speed
Proceed as follows:
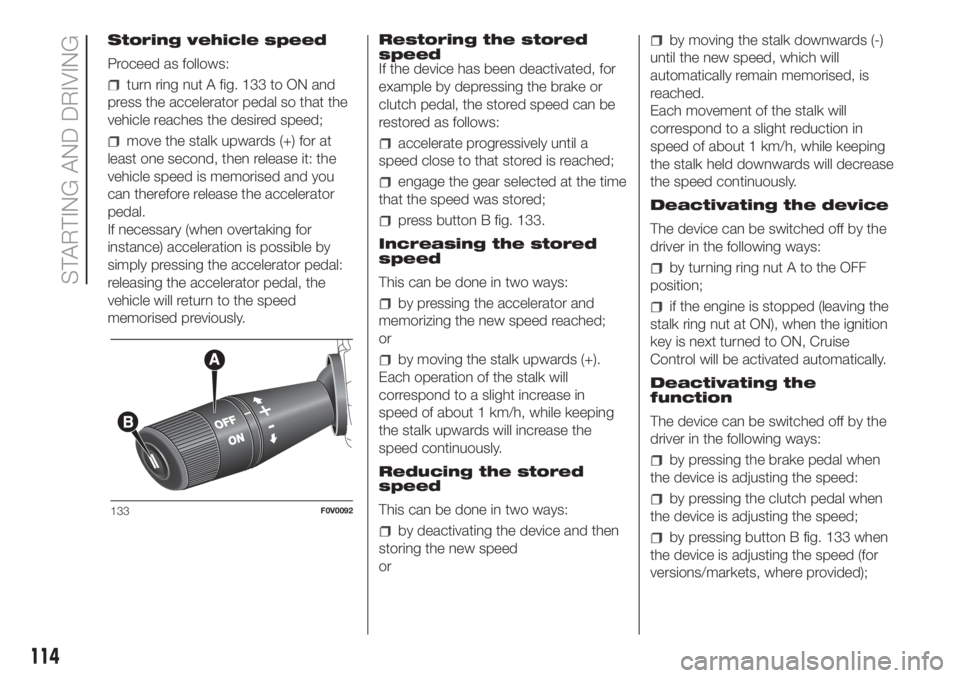
turn ring nut A fig. 133 to ON and
press the accelerator pedal so that the
vehicle reaches the desired speed;
move the stalk upwards (+) for at
least one second, then release it: the
vehicle speed is memorised and you
can therefore release the accelerator
pedal.
If necessary (when overtaking for
instance) acceleration is possible by
simply pressing the accelerator pedal:
releasing the accelerator pedal, the
vehicle will return to the speed
memorised previously.Restoring the stored
speed
If the device has been deactivated, for
example by depressing the brake or
clutch pedal, the stored speed can be
restored as follows:accelerate progressively until a
speed close to that stored is reached;
engage the gear selected at the time
that the speed was stored;
press button B fig. 133.
Increasing the stored
speed
This can be done in two ways:
by pressing the accelerator and
memorizing the new speed reached;
or
by moving the stalk upwards (+).
Each operation of the stalk will
correspond to a slight increase in
speed of about 1 km/h, while keeping
the stalk upwards will increase the
speed continuously.
Reducing the stored
speed
This can be done in two ways:
by deactivating the device and then
storing the new speed
or
by moving the stalk downwards (-)
until the new speed, which will
automatically remain memorised, is
reached.
Each movement of the stalk will
correspond to a slight reduction in
speed of about 1 km/h, while keeping
the stalk held downwards will decrease
the speed continuously.
Deactivating the device
The device can be switched off by the
driver in the following ways:
by turning ring nut A to the OFF
position;
if the engine is stopped (leaving the
stalk ring nut at ON), when the ignition
key is next turned to ON, Cruise
Control will be activated automatically.
Deactivating the
function
The device can be switched off by the
driver in the following ways:
by pressing the brake pedal when
the device is adjusting the speed:
by pressing the clutch pedal when
the device is adjusting the speed;
by pressing button B fig. 133 when
the device is adjusting the speed (for
versions/markets, where provided);
133F0V0092
114
STARTING AND DRIVING
Page 119 of 272
If they are open, they can cause the
system to send false signals: always
close the rear doors.
Do not apply stickers to the sensors.
WARNING
112)The sensor must be free of mud, dirt,
snow or ice in order for the system to
work. Be careful not to scratch or damage
the sensors while cleaning them. Avoid
using dry, rough or hard cloths. The
sensors must be washed using clean
water, with the addition of vehicle
shampoo if necessary. When using special
washing equipment such as high pressure
jets or steam cleaning, clean the sensors
very quickly keeping the jet more than
10 cm away.
113)Parking manoeuvres, however, are
always the driver’s responsibility. While
carrying out these manoeuvres, always
make sure that no people (especially
children) or animals are in the area
concerned. The parking sensor is designed
to assist drivers, who must still never
allow their attention to lapse during
potentially dangerous manoeuvres even if
performed at low speed.
REFUELLING THE
VEHICLE
PETROL ENGINES
Only use unleaded petrol, with an
octane number (R.O.N.) not lower than
95.
IMPORTANT Never use leaded petrol,
even in small amounts or in an
emergency, as this would damage the
catalytic converter beyond repair.
DIESEL ENGINES
Operation at low temperatures
Only use Diesel for motor vehicles
(EN590 specification).
In order to avoid these problems,
different types of Diesel are distributed
according to the season: summer
type, winter type and Arctic type (cold,
mountain areas). If refuelling with diesel
whose specifications are not suitable
for the usage temperature, it is
advisable to mix PETRONAS
DURANCE DIESEL ART additive in the
proportions shown on the container
with the fuel. Pour the additive into the
tank before the fuel.
When using or parking the vehicle for a
long time in the mountains or cold
areas, it is advisable to refuel using
locally available diesel fuel.In this case, it is also advisable to keep
the tank over 50% full.
28)
REFUELLING CAPACITY
To ensure that you fill the tank
completely, top up twice after the first
click of the fuel supply gun. Further
top-ups could cause faults in the fuel
feeding system.
FUEL TANK CAP
Opening
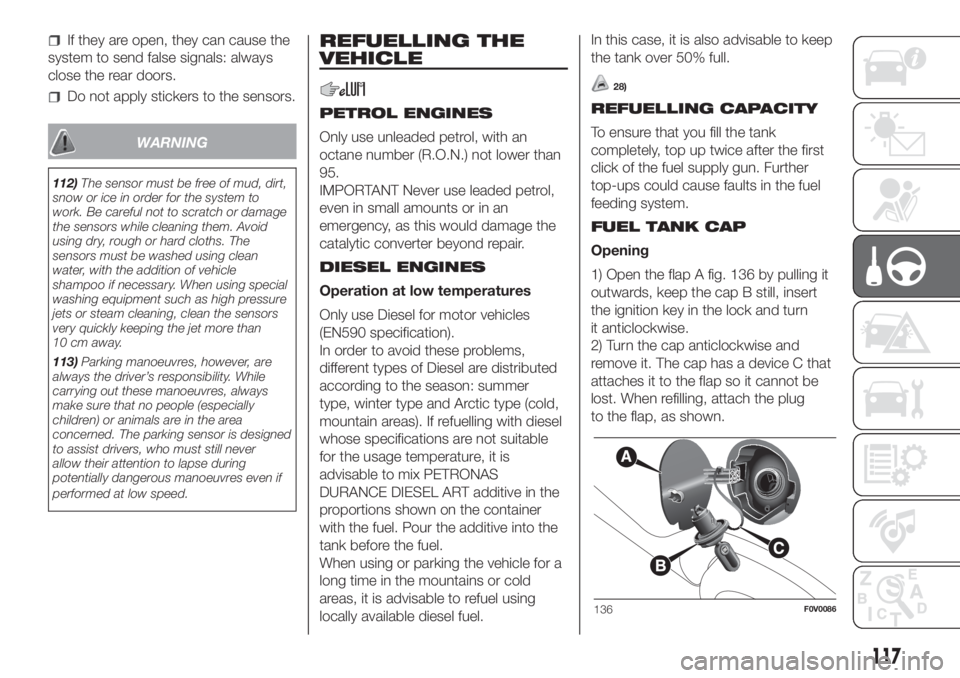
1) Open the flap A fig. 136 by pulling it
outwards, keep the cap B still, insert
the ignition key in the lock and turn
it anticlockwise.
2) Turn the cap anticlockwise and
remove it. The cap has a device C that
attaches it to the flap so it cannot be
lost. When refilling, attach the plug
to the flap, as shown.
136F0V0086
117
Page 124 of 272
HAZARD WARNING
LIGHTS
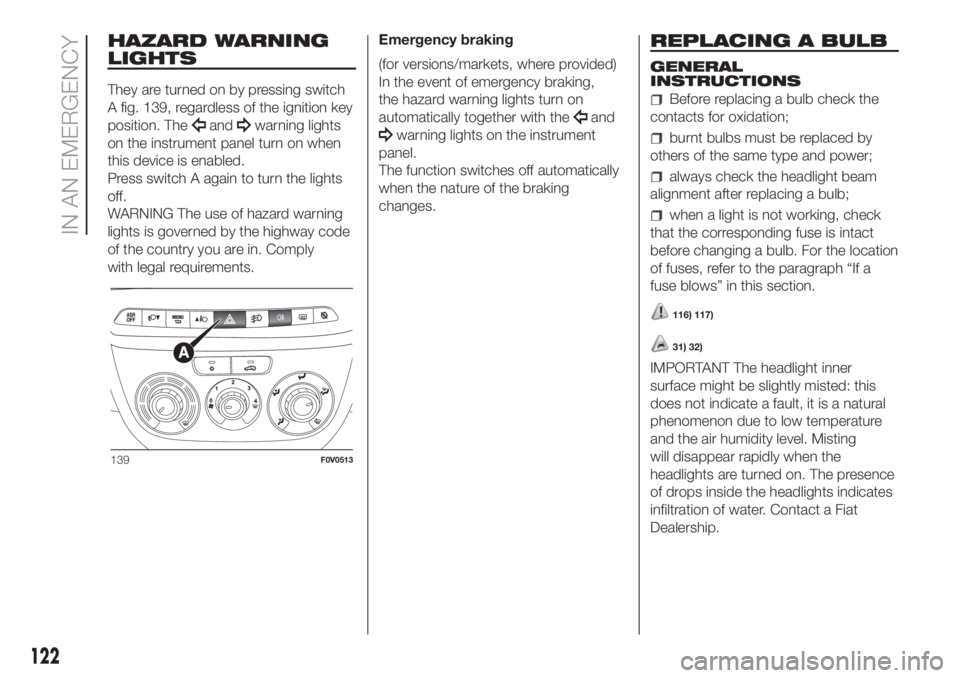
They are turned on by pressing switch
A fig. 139, regardless of the ignition key
position. The
andwarning lights
on the instrument panel turn on when
this device is enabled.
Press switch A again to turn the lights
off.
WARNING The use of hazard warning
lights is governed by the highway code
of the country you are in. Comply
with legal requirements.Emergency braking
(for versions/markets, where provided)
In the event of emergency braking,
the hazard warning lights turn on
automatically together with theand
warning lights on the instrument
panel.
The function switches off automatically
when the nature of the braking
changes.
REPLACING A BULB
GENERAL
INSTRUCTIONS
Before replacing a bulb check the
contacts for oxidation;
burnt bulbs must be replaced by
others of the same type and power;
always check the headlight beam
alignment after replacing a bulb;
when a light is not working, check
that the corresponding fuse is intact
before changing a bulb. For the location
of fuses, refer to the paragraph “If a
fuse blows” in this section.
116) 117)
31) 32)
IMPORTANT The headlight inner
surface might be slightly misted: this
does not indicate a fault, it is a natural
phenomenon due to low temperature
and the air humidity level. Misting
will disappear rapidly when the
headlights are turned on. The presence
of drops inside the headlights indicates
infiltration of water. Contact a Fiat
Dealership.
139F0V0513
122
IN AN EMERGENCY
Page 150 of 272
148
SERVICING AND CARE
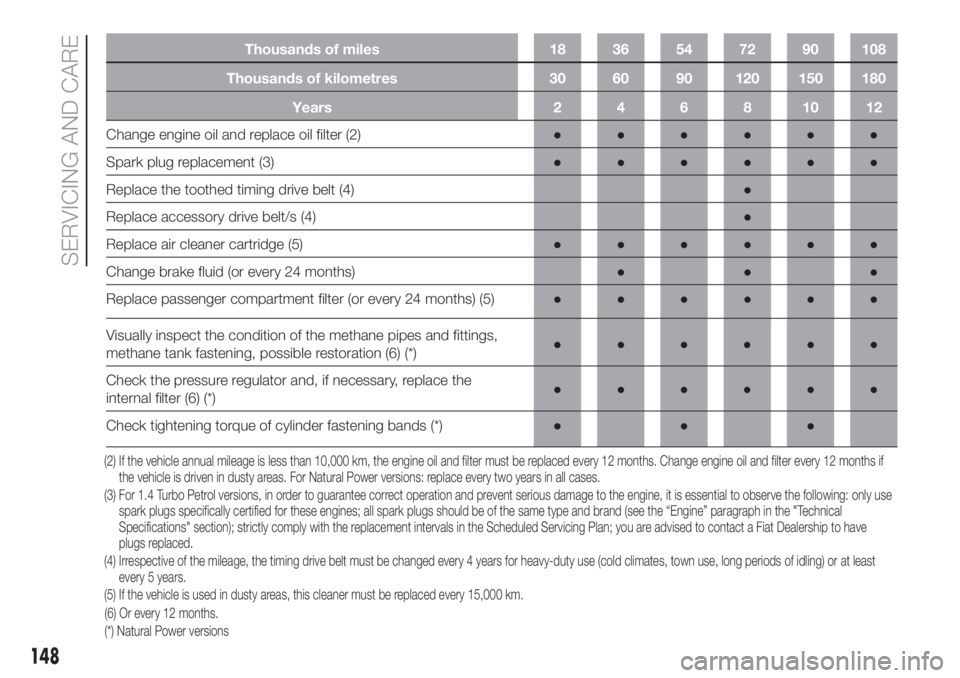
Thousands of miles 18 36 54 72 90 108
Thousands of kilometres 30 60 90 120 150 180
Years 2 4 6 8 10 12
Change engine oil and replace oil filter (2)●●●●●●
Spark plug replacement (3)●●●●●●
Replace the toothed timing drive belt (4)●
Replace accessory drive belt/s (4)●
Replace air cleaner cartridge (5)●●●●●●
Change brake fluid (or every 24 months)●●●
Replace passenger compartment filter (or every 24 months) (5)●●●●●●
(2) If the vehicle annual mileage is less than 10,000 km, the engine oil and filter must be replaced every 12 months. Change engine oil and filter every 12months if
the vehicle is driven in dusty areas. For Natural Power versions: replace every two years in all cases.
(3) For 1.4 Turbo Petrol versions, in order to guarantee correct operation and prevent serious damage to the engine, it is essential to observe the following: only use
spark plugs specifically certified for these engines; all spark plugs should be of the same type and brand (see the “Engine” paragraph in the "Technical
Specifications" section); strictly comply with the replacement intervals in the Scheduled Servicing Plan; you are advised to contact a Fiat Dealership to have
plugs replaced.
(4) Irrespective of the mileage, the timing drive belt must be changed every 4 years for heavy-duty use (cold climates, town use, long periods of idling) or at least
every 5 years.
(5) If the vehicle is used in dusty areas, this cleaner must be replaced every 15,000 km.
Visually inspect the condition of the methane pipes and fittings,
methane tank fastening, possible restoration (6) (*)●●●●●●
Check the pressure regulator and, if necessary, replace the
internal filter (6) (*)●●●●●●
Check tightening torque of cylinder fastening bands (*)●●●
(6) Or every 12 months.
(*) Natural Power versions
Page 152 of 272
150
SERVICING AND CARE
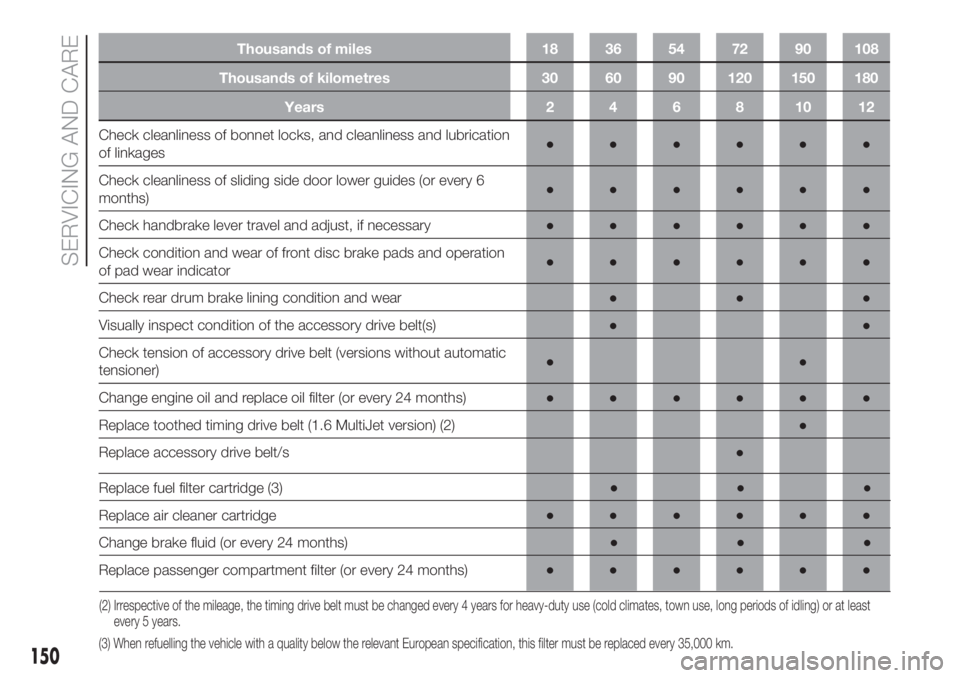
Thousands of miles 18 36 54 72 90 108
Thousands of kilometres 30 60 90 120 150 180
Years 2 4 6 8 10 12
Check cleanliness of bonnet locks, and cleanliness and lubrication
of linkages●●●●●●
Check cleanliness of sliding side door lower guides (or every 6
months)●●●●●●
Check handbrake lever travel and adjust, if necessary●●●●●●
Check condition and wear of front disc brake pads and operation
of pad wear indicator●●●●●●
Check rear drum brake lining condition and wear●●●
Visually inspect condition of the accessory drive belt(s)●●
Check tension of accessory drive belt (versions without automatic
tensioner)●●
Change engine oil and replace oil filter (or every 24 months)●●●●●●
Replace toothed timing drive belt (1.6 MultiJet version) (2)●
Replace accessory drive belt/s●
(2) Irrespective of the mileage, the timing drive belt must be changed every 4 years for heavy-duty use (cold climates, town use, long periods of idling) or at least
every 5 years.
Replace fuel filter cartridge (3)●●●
Replace air cleaner cartridge●●●●●●
Change brake fluid (or every 24 months)●●●
Replace passenger compartment filter (or every 24 months)●●●●●●
(3) When refuelling the vehicle with a quality below the relevant European specification, this filter must be replaced every 35,000 km.
Page 155 of 272
153
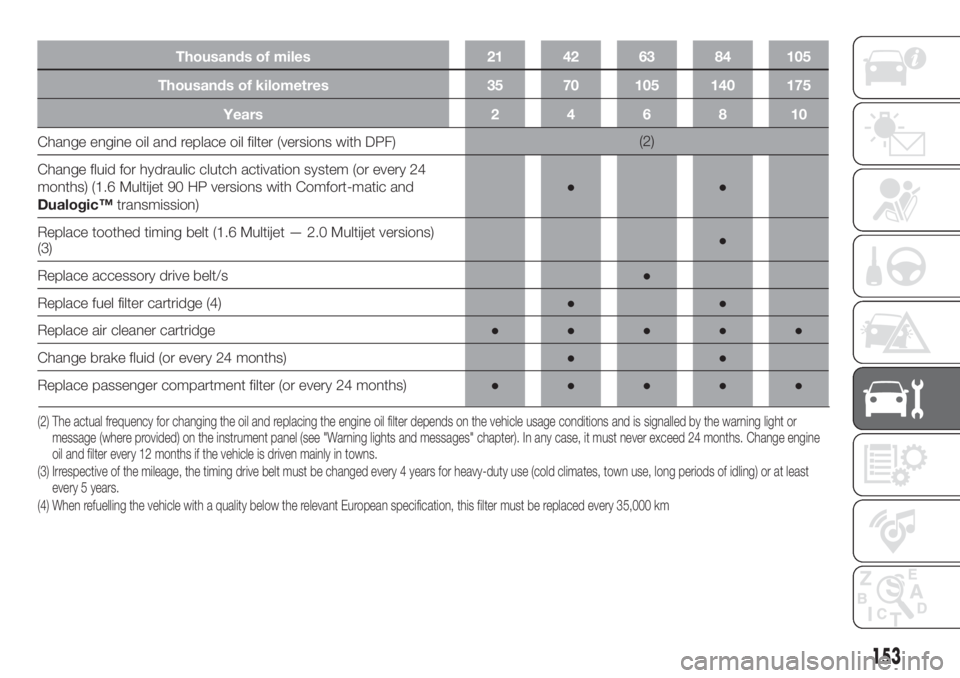
Thousands of miles 21 42 63 84 105
Thousands of kilometres 35 70 105 140 175
Years246810
Change engine oil and replace oil filter (versions with DPF)(2)
Change fluid for hydraulic clutch activation system (or every 24
months) (1.6 Multijet 90 HP versions with Comfort-matic and
Dualogic™transmission)●●
Replace toothed timing belt (1.6 Multijet — 2.0 Multijet versions)
(3)●
Replace accessory drive belt/s●
Replace fuel filter cartridge (4)●●
Replace air cleaner cartridge●●●●●
Change brake fluid (or every 24 months)●●
Replace passenger compartment filter (or every 24 months)●●●●●
(2) The actual frequency for changing the oil and replacing the engine oil filter depends on the vehicle usage conditions and is signalled by the warning light or
message (where provided) on the instrument panel (see "Warning lights and messages" chapter). In any case, it must never exceed 24 months. Change engine
oil and filter every 12 months if the vehicle is driven mainly in towns.
(3) Irrespective of the mileage, the timing drive belt must be changed every 4 years for heavy-duty use (cold climates, town use, long periods of idling) or at least
every 5 years.
(4) When refuelling the vehicle with a quality below the relevant European specification, this filter must be replaced every 35,000 km
Page 166 of 272
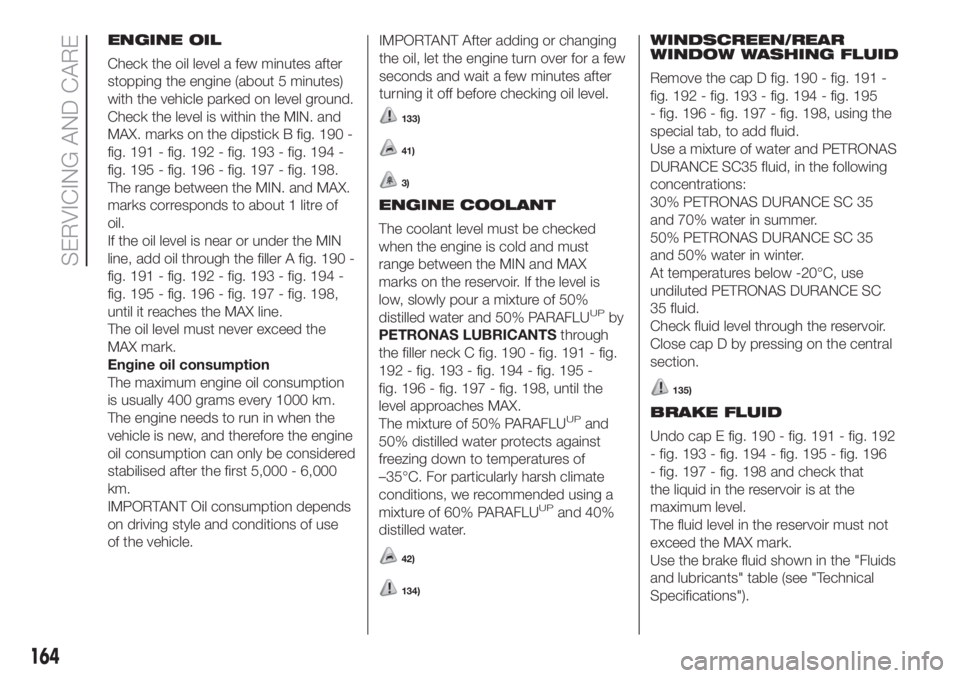
ENGINE OIL
Check the oil level a few minutes after
stopping the engine (about 5 minutes)
with the vehicle parked on level ground.
Check the level is within the MIN. and
MAX. marks on the dipstick B fig. 190 -
fig. 191 - fig. 192 - fig. 193 - fig. 194 -
fig. 195 - fig. 196 - fig. 197 - fig. 198.
The range between the MIN. and MAX.
marks corresponds to about 1 litre of
oil.
If the oil level is near or under the MIN
line, add oil through the filler A fig. 190 -
fig. 191 - fig. 192 - fig. 193 - fig. 194 -
fig. 195 - fig. 196 - fig. 197 - fig. 198,
until it reaches the MAX line.
The oil level must never exceed the
MAX mark.
Engine oil consumption
The maximum engine oil consumption
is usually 400 grams every 1000 km.
The engine needs to run in when the
vehicle is new, and therefore the engine
oil consumption can only be considered
stabilised after the first 5,000 - 6,000
km.
IMPORTANT Oil consumption depends
on driving style and conditions of use
of the vehicle.IMPORTANT After adding or changing
the oil, let the engine turn over for a few
seconds and wait a few minutes after
turning it off before checking oil level.
133)
41)
3)
ENGINE COOLANT
The coolant level must be checked
when the engine is cold and must
range between the MIN and MAX
marks on the reservoir. If the level is
low, slowly pour a mixture of 50%
distilled water and 50% PARAFLU
UPby
PETRONAS LUBRICANTSthrough
the filler neck C fig. 190 - fig. 191 - fig.
192 - fig. 193 - fig. 194 - fig. 195 -
fig. 196 - fig. 197 - fig. 198, until the
level approaches MAX.
The mixture of 50% PARAFLU
UPand
50% distilled water protects against
freezing down to temperatures of
–35°C. For particularly harsh climate
conditions, we recommended using a
mixture of 60% PARAFLU
UPand 40%
distilled water.
42)
134)
WINDSCREEN/REAR
WINDOW WASHING FLUID
Remove the cap D fig. 190 - fig. 191 -
fig. 192 - fig. 193 - fig. 194 - fig. 195
- fig. 196 - fig. 197 - fig. 198, using the
special tab, to add fluid.
Use a mixture of water and PETRONAS
DURANCE SC35 fluid, in the following
concentrations:
30% PETRONAS DURANCE SC 35
and 70% water in summer.
50% PETRONAS DURANCE SC 35
and 50% water in winter.
At temperatures below -20°C, use
undiluted PETRONAS DURANCE SC
35 fluid.
Check fluid level through the reservoir.
Close cap D by pressing on the central
section.
135)
BRAKE FLUID
Undo cap E fig. 190 - fig. 191 - fig. 192
- fig. 193 - fig. 194 - fig. 195 - fig. 196
- fig. 197 - fig. 198 and check that
the liquid in the reservoir is at the
maximum level.
The fluid level in the reservoir must not
exceed the MAX mark.
Use the brake fluid shown in the "Fluids
and lubricants" table (see "Technical
Specifications").
164
SERVICING AND CARE
Page 168 of 272
42)PARAFLUUPanti-freeze is used in the
engine cooling system. Use the same fluid
as in the cooling system when topping
up. PARAFLU
UPcannot be mixed with any
other type of fluid. If this occurs, do not
start the engine and contact your Fiat
Dealership immediately.
43)Prevent brake fluid, which is highly
corrosive, from coming into contact with
painted parts. Should it happen,
immediately wash with water.
44)Do not press on the power steering
end of travel with engine on for more than
8 consecutive seconds, since noise is
produced and there is a risk of system
damages.
WARNING
3)Used engine oil and oil filters contain
substances which are harmful to the
environment. Contact a Fiat Dealership to
have the oil and filters changed. They
are equipped to dispose of the used oil
and filters respecting nature and the law.
4)Power steering fluid consumption is
extremely low; if another top-up is required
after only a short period of time, have the
system checked for leaks at a Fiat
Dealership.
5)Used transmission fluid contains
substances that are harmful to the
environment. It is advisable to have the oil
changed by a Fiat Dealership where it
will be disposed of respecting the
environment and according to legal
requirements.
RECHARGING THE
BATTERY
IMPORTANT The battery recharging
procedure is provided for information
purposes only. This operation should be
performed at a Fiat Dealership.
IMPORTANT Charging should be slow
at a low ampere rating for
approximately 24 hours. Charging for a
longer time may damage the battery.
IMPORTANT If a "quick-type" battery
charger is used with the battery fitted
on the car, before connecting it
disconnect both cables of the battery
itself. Do not use a "quick-type" battery
charger to provide the starting voltage.
To recharge, proceed as follows:
IN THE ABSENCE OF THE
START&STOP SYSTEM
disconnect the terminal from the
negative battery pole;
connect the charger cables to the
battery terminals, observing the poles;
turn on the charger;
when you have finished, turn the
charger off before disconnecting the
battery;
reconnect the terminal to the
negative battery pole.WITH START&STOP
SYSTEM
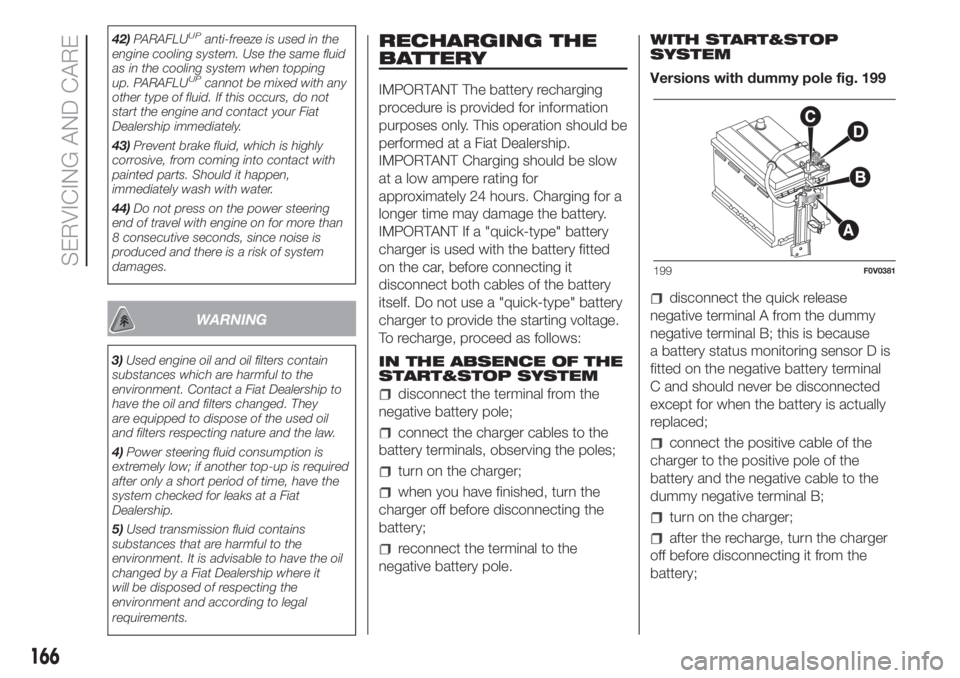
Versions with dummy pole fig. 199
disconnect the quick release
negative terminal A from the dummy
negative terminal B; this is because
a battery status monitoring sensor D is
fitted on the negative battery terminal
C and should never be disconnected
except for when the battery is actually
replaced;
connect the positive cable of the
charger to the positive pole of the
battery and the negative cable to the
dummy negative terminal B;
turn on the charger;
after the recharge, turn the charger
off before disconnecting it from the
battery;
199F0V0381
166
SERVICING AND CARE