warning FIAT DOBLO COMBI 2018 Owner handbook (in English)
[x] Cancel search | Manufacturer: FIAT, Model Year: 2018, Model line: DOBLO COMBI, Model: FIAT DOBLO COMBI 2018Pages: 272, PDF Size: 23.75 MB
Page 31 of 272
MAIN BEAM HEADLIGHTS
With ring nut in position
, push the
stalk forward toward the dashboard
(stable position). The
warning light
switches on in the instrument panel.
Pulling the stalk towards the steering
wheel, the main beams are turned
off and the dipped headlights on.
FLASHING
You can flash the beams pulling the
stalk toward the steering wheel
(unstable position). The
warning
light switches on in the instrument
panel.
DIRECTION INDICATORS
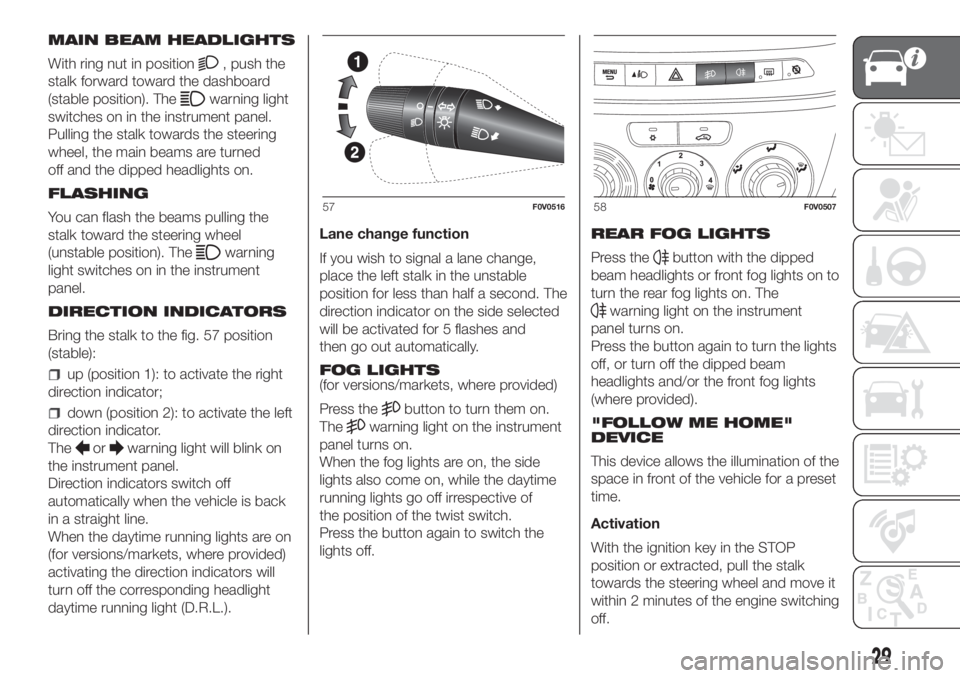
Bring the stalk to the fig. 57 position
(stable):
up (position 1): to activate the right
direction indicator;
down (position 2): to activate the left
direction indicator.
The
orwarning light will blink on
the instrument panel.
Direction indicators switch off
automatically when the vehicle is back
in a straight line.
When the daytime running lights are on
(for versions/markets, where provided)
activating the direction indicators will
turn off the corresponding headlight
daytime running light (D.R.L.).Lane change function
If you wish to signal a lane change,
place the left stalk in the unstable
position for less than half a second. The
direction indicator on the side selected
will be activated for 5 flashes and
then go out automatically.
FOG LIGHTS
(for versions/markets, where provided)
Press the
button to turn them on.
The
warning light on the instrument
panel turns on.
When the fog lights are on, the side
lights also come on, while the daytime
running lights go off irrespective of
the position of the twist switch.
Press the button again to switch the
lights off.REAR FOG LIGHTS
Press the
button with the dipped
beam headlights or front fog lights on to
turn the rear fog lights on. The
warning light on the instrument
panel turns on.
Press the button again to turn the lights
off, or turn off the dipped beam
headlights and/or the front fog lights
(where provided).
"FOLLOW ME HOME"
DEVICE
This device allows the illumination of the
space in front of the vehicle for a preset
time.
Activation
With the ignition key in the STOP
position or extracted, pull the stalk
towards the steering wheel and move it
within 2 minutes of the engine switching
off.
57F0V051658F0V0507
29
Page 32 of 272
Each time the stalk is moved, the lights
stay on for an extra 30 seconds up to
a maximum of 210 seconds; then
the lights are switched off automatically.
The
warning light on the
instrument panel will light up and the
corresponding message will appear in
the display (see “Warning lights and
messages” section) for as long as the
function is activated.
The warning light comes on when the
stalk is operated and stays on until
the function is automatically
deactivated.
Each movement of the stalk only
increases the amount of time the lights
stay on.
Deactivation
Keep the stalk pulled towards the
steering wheel for more than 2
seconds.
WARNING
27)The daytime running lights are an
alternative to the dipped beam headlights
for driving during the daytime in countries
where it is compulsory to have lights on
during the day, and they are also permitted
in those countries where this is not
obligatory. Daytime running lights cannot
replace dipped beam headlights when
driving at night or through tunnels. The use
of daytime running lights is governed by
the highway code of the country in which
you are driving. Comply with legal
requirements.
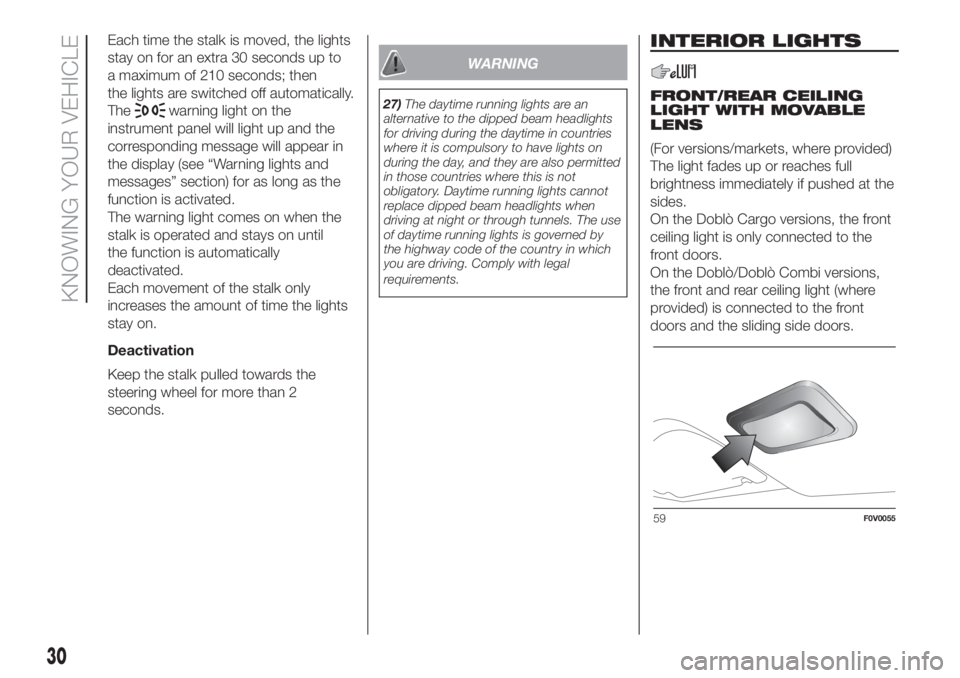
INTERIOR LIGHTS
FRONT/REAR CEILING
LIGHT WITH MOVABLE
LENS
(For versions/markets, where provided)
The light fades up or reaches full
brightness immediately if pushed at the
sides.
On the Doblò Cargo versions, the front
ceiling light is only connected to the
front doors.
On the Doblò/Doblò Combi versions,
the front and rear ceiling light (where
provided) is connected to the front
doors and the sliding side doors.
59F0V0055
30
KNOWING YOUR VEHICLE
Page 33 of 272
CEILING LIGHT WITH
SPOT LIGHTS
(for versions/markets, where provided)
On the Doblò Cargo versions, the
front ceiling light is only connected to
the front doors.
On the Doblò/Doblò Combi versions, it
is connected to the front doors and
the sliding side doors.
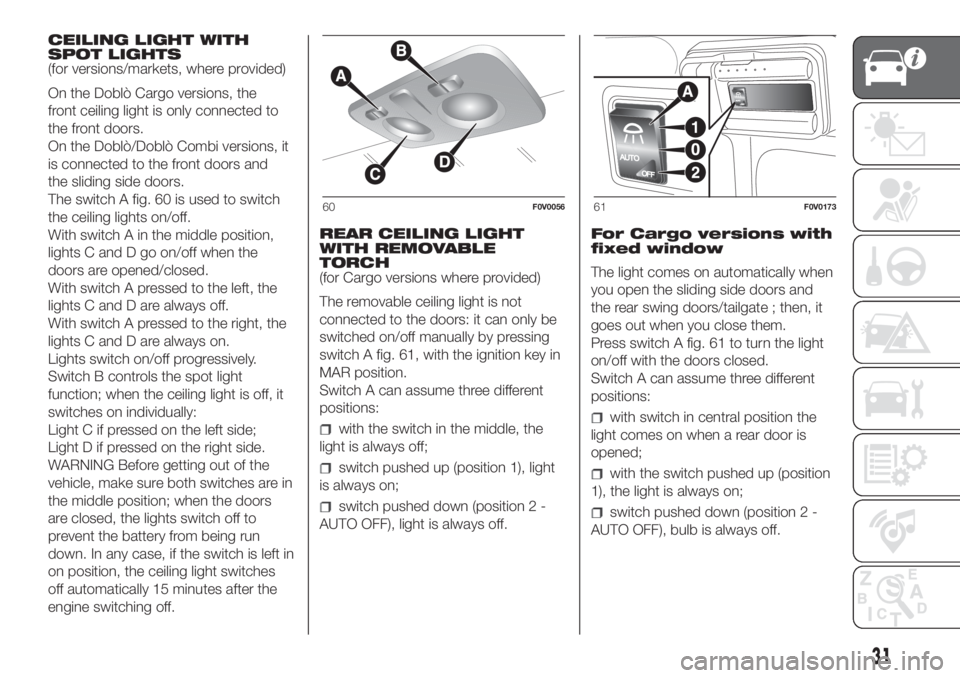
The switch A fig. 60 is used to switch
the ceiling lights on/off.
With switch A in the middle position,
lights C and D go on/off when the
doors are opened/closed.
With switch A pressed to the left, the
lights C and D are always off.
With switch A pressed to the right, the
lights C and D are always on.
Lights switch on/off progressively.
Switch B controls the spot light
function; when the ceiling light is off, it
switches on individually:
Light C if pressed on the left side;
Light D if pressed on the right side.
WARNING Before getting out of the
vehicle, make sure both switches are in
the middle position; when the doors
are closed, the lights switch off to
prevent the battery from being run
down. In any case, if the switch is left in
on position, the ceiling light switches
off automatically 15 minutes after the
engine switching off.REAR CEILING LIGHT
WITH REMOVABLE
TORCH
(for Cargo versions where provided)
The removable ceiling light is not
connected to the doors: it can only be
switched on/off manually by pressing
switch A fig. 61, with the ignition key in
MAR position.
Switch A can assume three different
positions:
with the switch in the middle, the
light is always off;
switch pushed up (position 1), light
is always on;
switch pushed down (position 2 -
AUTO OFF), light is always off.For Cargo versions with
fixed window
The light comes on automatically when
you open the sliding side doors and
the rear swing doors/tailgate ; then, it
goes out when you close them.
Press switch A fig. 61 to turn the light
on/off with the doors closed.
Switch A can assume three different
positions:
with switch in central position the
light comes on when a rear door is
opened;
with the switch pushed up (position
1), the light is always on;
switch pushed down (position 2 -
AUTO OFF), bulb is always off.
60F0V005661F0V0173
31
Page 35 of 272
REAR WINDOW WIPER /
WASHER
(For versions/markets, where provided)
This operates only with the ignition
key turned to MAR.
Activation
Turn the ring nut to
to operate the
rear window wiper:
in intermittent mode when the
windscreen wiper is not operating;
in synchronous mode (at half the
speed of the windscreen wiper) when
the windscreen wiper is operating;
in continuous mode with reverse
gear engaged and the control active.
With the windscreen wiper on and
reverse gear engaged, rear window
wiping will be continuous.
Pushing the stalk towards the
dashboard (rocking position) will
activate the rear window washer jet.
Keep the stalk pushed for more than
half a second to activate the rear
window wiper as well. Releasing the
stalk will activate the smart washing
function, as described for the
windscreen wiper.
Deactivation
The function stops when the stalk is
released.
5)
HEADLIGHT WASHERS
(for versions/markets, where provided)
They are activated when the dipped
headlights are on and the windscreen
washer is activated.
IMPORTANT Check jet function and
cleanliness at regular intervals.
6)
WARNING
3)Do not use the windscreen wiper to
remove layers of snow or ice from the
windscreen. In such conditions, the
windscreen wiper may be subjected to
excessive stress and the motor cut-out
switch, which prevents operation for a few
seconds, may intervene. If operation is
not restored (even after turning the key and
restarting the engine), contact a Fiat
Dealership.
4)Do not operate the windscreen wiper
with the blades lifted from the windscreen.
5)Do not use the rear window wiper to
remove layers of snow or ice. In such
conditions, the screen wiper may be
subjected to excessive stress and the
motor cut-out switch, which prevents
operation for a few seconds, may
intervene. If operation is not restored,
contact a Fiat Dealership.
6)The headlamp washer jet does not
function when the level of fluid in the
reservoir falls below 1.6 litres.
33
Page 39 of 272
warms the feet and keeps the face cool (bi-level function)
to warm the feet of those in the front and rear seats.
D: climate control system compressor on/off button
E: internal air recirculation on/off button
F: heated rear window and mirror on/off switch (for versions/markets, where provided)
.
WARNING
2)The air conditioning system uses refrigerant R134a or R1234yf compatible with the current regulations in the countries where the vehicle is
marketed. When charging, only use the gas indicated on the dedicated plate in the engine compartment . The use of other coolants affects
the efficiency and condition of the system. The lubricant used for the compressor is also strictly linked to the type of cooling gas, please refer
to a Fiat Dealership.
37
Page 43 of 272
WARNING
28)Improper use of the electric windows
can be dangerous. Before and during their
operation, ensure that any passengers
are not at risk from the moving glass either
by personal objects getting caught in the
mechanism or by being hit by it directly.
29)When leaving the car, always remove
the ignition key to avoid the risk of injury
due to accidental operation of the electric
windows.
BONNET
Opening
Proceed as follows:
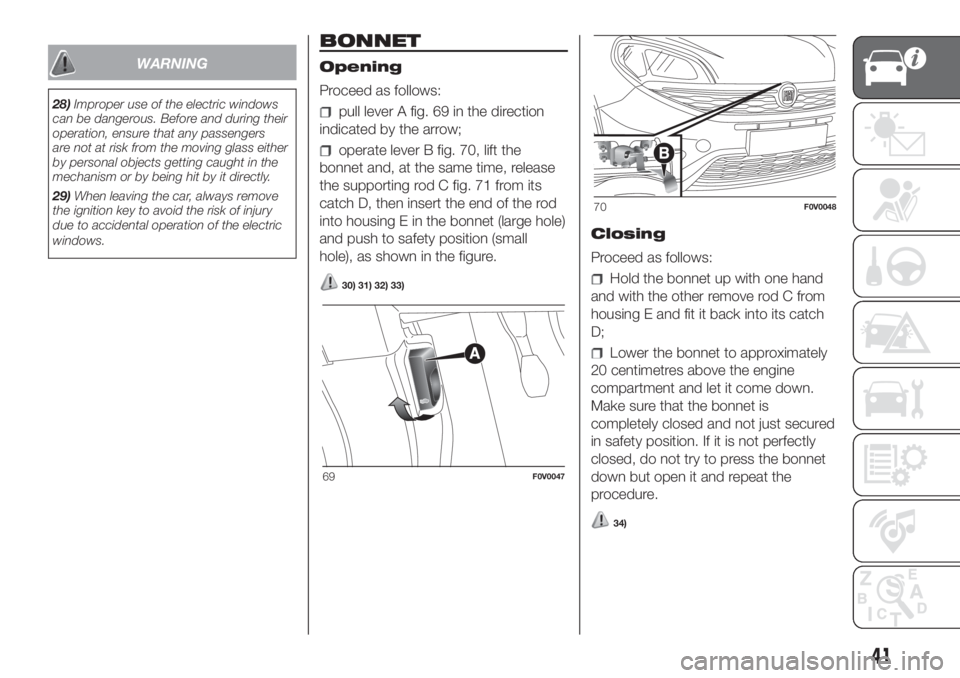
pull lever A fig. 69 in the direction
indicated by the arrow;
operate lever B fig. 70, lift the
bonnet and, at the same time, release
the supporting rod C fig. 71 from its
catch D, then insert the end of the rod
into housing E in the bonnet (large hole)
and push to safety position (small
hole), as shown in the figure.
30) 31) 32) 33)
Closing
Proceed as follows:
Hold the bonnet up with one hand
and with the other remove rod C from
housing E and fit it back into its catch
D;
Lower the bonnet to approximately
20 centimetres above the engine
compartment and let it come down.
Make sure that the bonnet is
completely closed and not just secured
in safety position. If it is not perfectly
closed, do not try to press the bonnet
down but open it and repeat the
procedure.
34)
69F0V0047
70F0V0048
41
Page 44 of 272
WARNING
30)Incorrect positioning of the supporting
rod may cause the bonnet to drop
suddenly. Perform this operation only when
the vehicle is stationary.
31)Before opening the bonnet, make sure
that windscreen wiper arm is not raised,
but is rather positioned against the
windscreen.32)When the engine is warm, work
carefully inside the engine compartment to
avoid getting burnt. Do not place your
hands near the fan as it may be activated
even when the key is removed. Wait for the
engine to cool down.
33)Pay attention to scarves, ties and other
loose-fitting garments. If they accidentally
come into contact with moving parts,
they may get caught up and dragged with
serious risks for those wearing them.
34)For safety reasons, the bonnet must
always be properly closed while driving.
Make sure that the bonnet is perfectly
closed and that the lock is engaged. If you
notice when driving that the bonnet has
not been properly locked, stop immediately
and close the bonnet correctly.
LUGGAGE
COMPARTMENT
35) 36) 37) 38) 39) 40)
OPENING/CLOSING THE
TAILGATE FROM THE
OUTSIDE
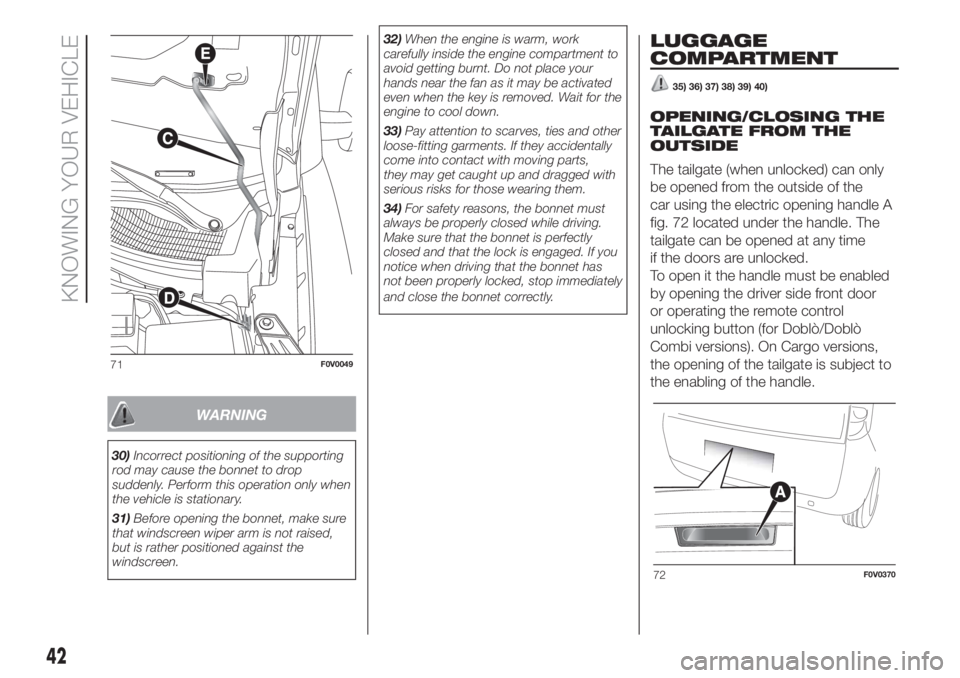
The tailgate (when unlocked) can only
be opened from the outside of the
car using the electric opening handle A
fig. 72 located under the handle. The
tailgate can be opened at any time
if the doors are unlocked.
To open it the handle must be enabled
by opening the driver side front door
or operating the remote control
unlocking button (for Doblò/Doblò
Combi versions). On Cargo versions,
the opening of the tailgate is subject to
the enabling of the handle.
71F0V0049
72F0V0370
42
KNOWING YOUR VEHICLE
Page 47 of 272
N.B. There are bands on the rear seats
under the cushion to attach the folded
seat to the front seat head restraint
rods.
SECURING YOUR LOAD
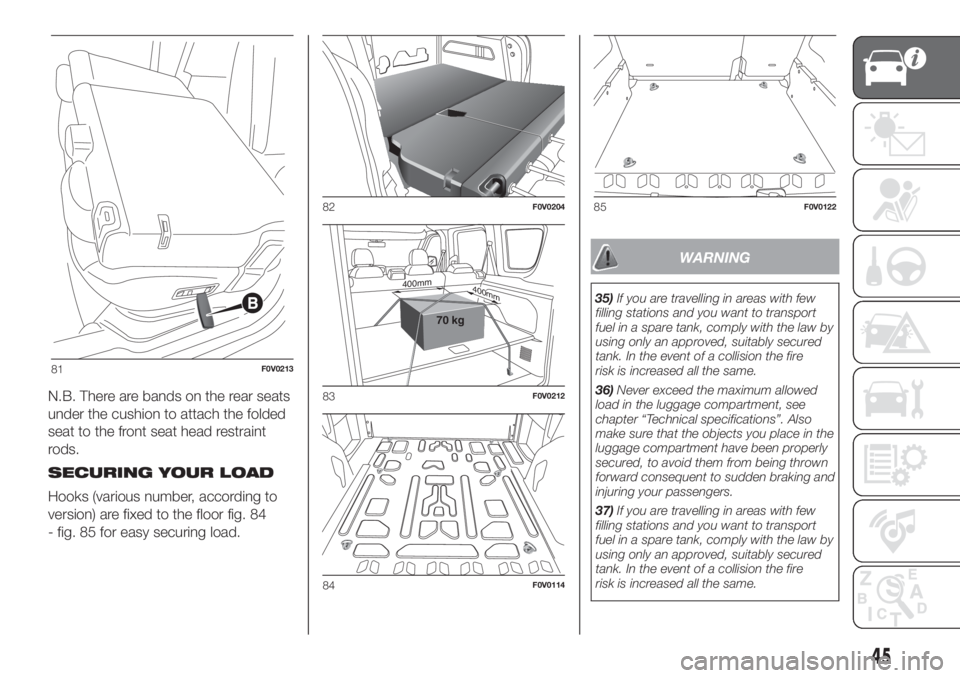
Hooks (various number, according to
version) are fixed to the floor fig. 84
- fig. 85 for easy securing load.
WARNING
35)If you are travelling in areas with few
filling stations and you want to transport
fuel in a spare tank, comply with the law by
using only an approved, suitably secured
tank. In the event of a collision the fire
risk is increased all the same.
36)Never exceed the maximum allowed
load in the luggage compartment, see
chapter “Technical specifications”. Also
make sure that the objects you place in the
luggage compartment have been properly
secured, to avoid them from being thrown
forward consequent to sudden braking and
injuring your passengers.
37)If you are travelling in areas with few
filling stations and you want to transport
fuel in a spare tank, comply with the law by
using only an approved, suitably secured
tank. In the event of a collision the fire
risk is increased all the same.
81F0V0213
82F0V0204
400mm400mm
70 kg
83F0V0212
84F0V0114
85F0V0122
45
Page 48 of 272
38)Never exceed the maximum allowed
load in the luggage compartment, see
chapter “Technical specifications”. Also
make sure that the objects you place in the
luggage compartment have been properly
secured, to avoid them from being thrown
forward consequent to sudden braking and
injuring your passengers.
39)You must not use the folded rear seat
to carry luggage. The load could be thrown
forward into the backrest of the front
seats, seriously injuring the occupants.
40)Make sure that the objects are
positioned carefully and secured to the
hooks on the floor to prevent them flung
forwards in the event of sharp braking and
causing injury to the passengers.
WARNING
7)To close the tailgate use handle B fig.
73. Do not try to close the tailgate by
pressing on the side shock absorbers C
fig. 73. Also be careful not to knock the
side shock absorbers when you load the
boot, to avoid damaging them.
HEADLIGHTS
HEADLIGHT ALIGNMENT
CORRECTOR
This device works with the ignition key
in the MAR position and the dipped
headlights on.
The vehicle tilts backwards when it is
loaded, raising the beam. The beams
must therefore be realigned in this case.
Headlight alignment
adjustment
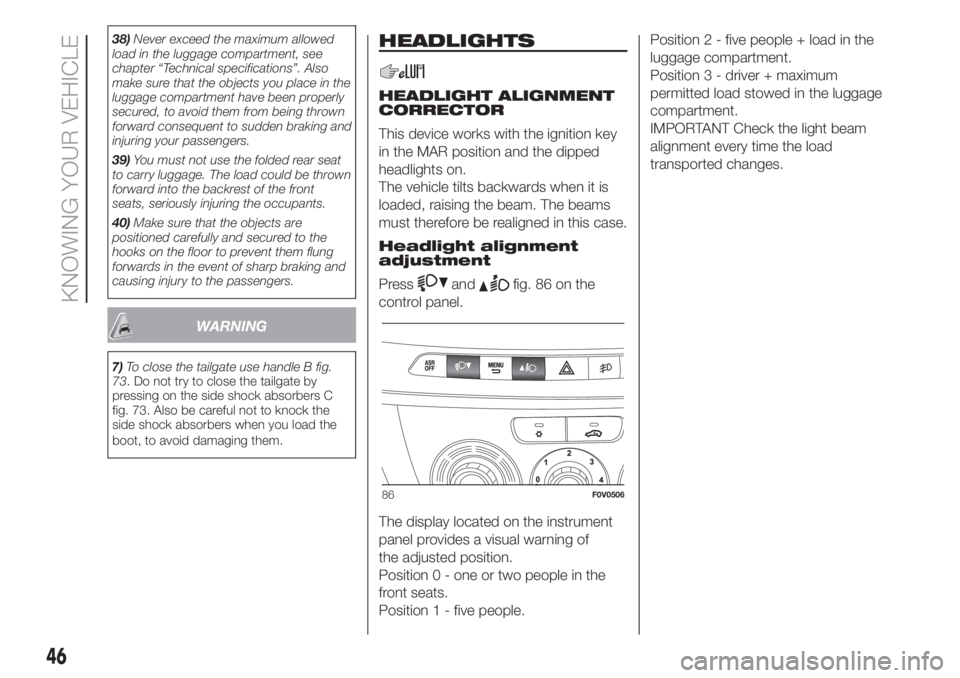
Press
andfig. 86 on the
control panel.
The display located on the instrument
panel provides a visual warning of
the adjusted position.
Position 0 - one or two people in the
front seats.
Position 1 - five people.Position 2 - five people + load in the
luggage compartment.
Position 3 - driver + maximum
permitted load stowed in the luggage
compartment.
IMPORTANT Check the light beam
alignment every time the load
transported changes.
86F0V0506
46
KNOWING YOUR VEHICLE
Page 50 of 272
Cylinder certification
The methane cylinders are certified in
accordance with ECE Regulation no.
110.
The cylinders must be inspected, in
accordance with ECE Regulation
Procedure no. 110, every 4 years from
the vehicle registration date or in
accordance with specific regulations in
individual countries.PETROL/METHANE
SWITCH
This engine normally runs on methane
except during starting when it runs
on petrol. Switching to methane takes
place automatically and is shown on
the instrument panel display by
switching off the
signal in the display.
Methane fuel reserve
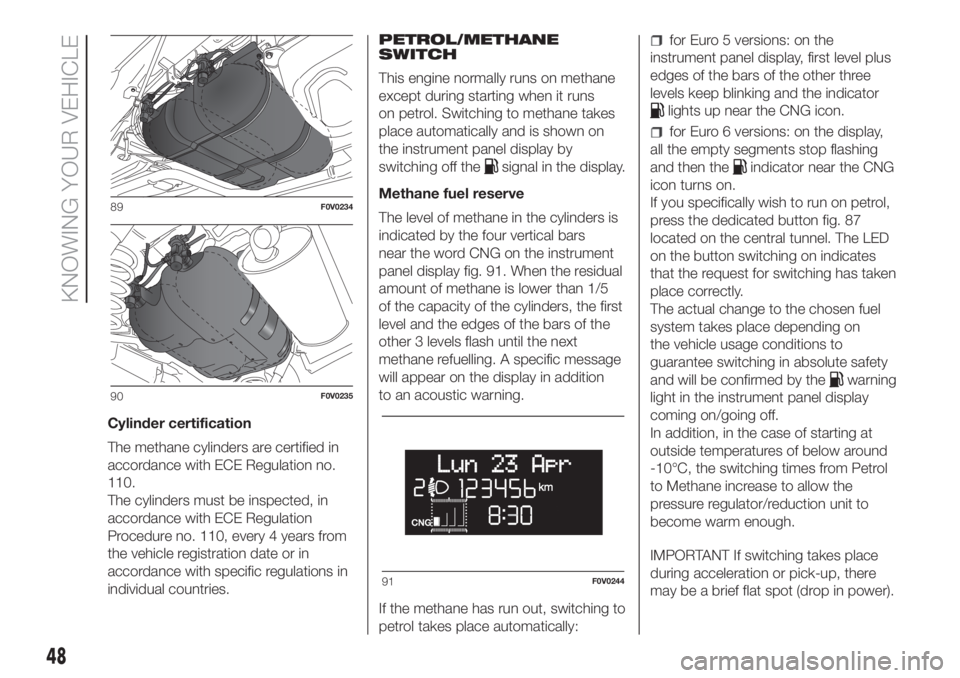
The level of methane in the cylinders is
indicated by the four vertical bars
near the word CNG on the instrument
panel display fig. 91. When the residual
amount of methane is lower than 1/5
of the capacity of the cylinders, the first
level and the edges of the bars of the
other 3 levels flash until the next
methane refuelling. A specific message
will appear on the display in addition
to an acoustic warning.
If the methane has run out, switching to
petrol takes place automatically:
for Euro 5 versions: on the
instrument panel display, first level plus
edges of the bars of the other three
levels keep blinking and the indicator
lights up near the CNG icon.
for Euro 6 versions: on the display,
all the empty segments stop flashing
and then the
indicator near the CNG
icon turns on.
If you specifically wish to run on petrol,
press the dedicated button fig. 87
located on the central tunnel. The LED
on the button switching on indicates
that the request for switching has taken
place correctly.
The actual change to the chosen fuel
system takes place depending on
the vehicle usage conditions to
guarantee switching in absolute safety
and will be confirmed by the
warning
light in the instrument panel display
coming on/going off.
In addition, in the case of starting at
outside temperatures of below around
-10°C, the switching times from Petrol
to Methane increase to allow the
pressure regulator/reduction unit to
become warm enough.
IMPORTANT If switching takes place
during acceleration or pick-up, there
may be a brief flat spot (drop in power).
89F0V0234
90F0V0235
91F0V0244
48
KNOWING YOUR VEHICLE