check engine FIAT DUCATO 2007 Owner handbook (in English)
[x] Cancel search | Manufacturer: FIAT, Model Year: 2007, Model line: DUCATO, Model: FIAT DUCATO 2007Pages: 282, PDF Size: 4.49 MB
Page 159 of 282
158
WARNING
LIGHTS AND
MESSAGES
VEHICLE
MAINTENANCE
TECHNICAL
SPECIFICATIONS
IINDEX
DASHBOARD
AND CONTROLS
SAFETY
DEVICES
CORRECT USE
OF THE
VEHICLE
IN AN
EMERGENCY
ENGINE
STARTING
EMERGENCY START-UP
If the instrument panel warning light
Yturns on glowing steadily, contact im-
mediately Fiat Dealership.
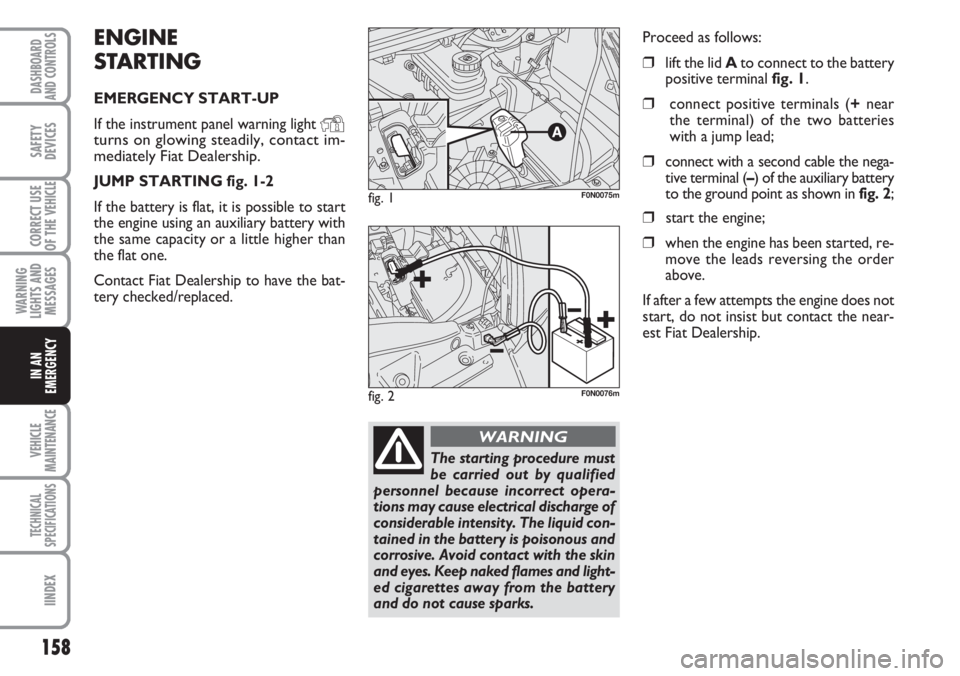
JUMP STARTING fig. 1-2
If the battery is flat, it is possible to start
the engine using an auxiliary battery with
the same capacity or a little higher than
the flat one.
Contact Fiat Dealership to have the bat-
tery checked/replaced.Proceed as follows:
❒lift the lid Ato connect to the battery
positive terminal fig. 1.
❒connect positive terminals (+near
the terminal) of the two batteries
with a jump lead;
❒connect with a second cable the nega-
tive terminal (–) of the auxiliary battery
to the ground point as shown in fig. 2;
❒start the engine;
❒when the engine has been started, re-
move the leads reversing the order
above.
If after a few attempts the engine does not
start, do not insist but contact the near-
est Fiat Dealership.
fig. 1F0N0075m
The starting procedure must
be carried out by qualified
personnel because incorrect opera-
tions may cause electrical discharge of
considerable intensity. The liquid con-
tained in the battery is poisonous and
corrosive. Avoid contact with the skin
and eyes. Keep naked flames and light-
ed cigarettes away from the battery
and do not cause sparks.
WARNING
fig. 2F0N0076m
Page 161 of 282
160
WARNING
LIGHTS AND
MESSAGES
VEHICLE
MAINTENANCE
TECHNICAL
SPECIFICATIONS
IINDEX
DASHBOARD
AND CONTROLS
SAFETY
DEVICES
CORRECT USE
OF THE
VEHICLE
IN AN
EMERGENCY
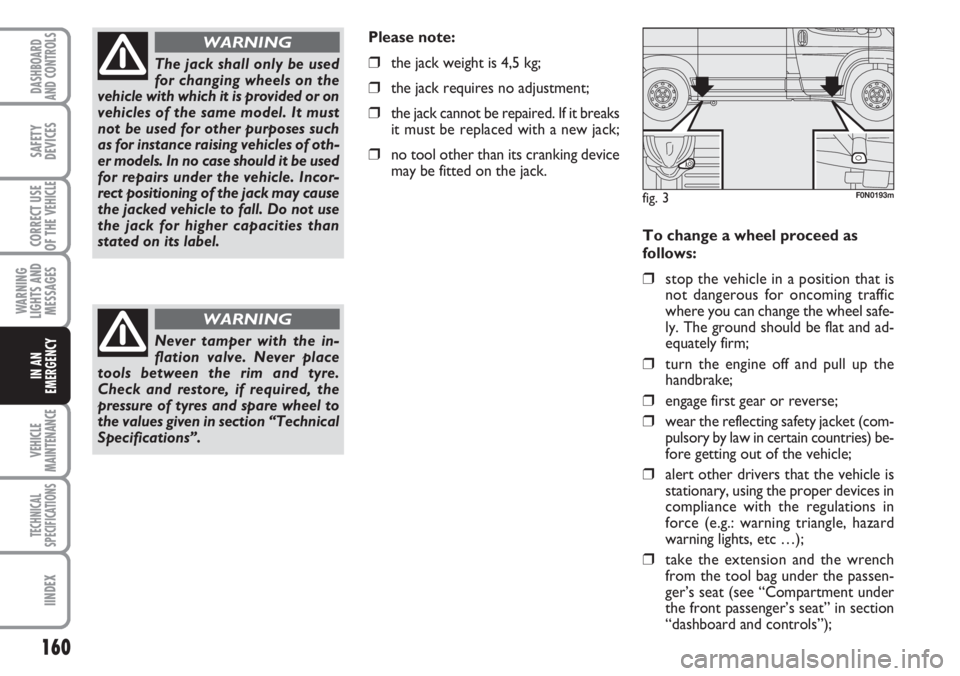
To change a wheel proceed as
follows:
❒stop the vehicle in a position that is
not dangerous for oncoming traffic
where you can change the wheel safe-
ly. The ground should be flat and ad-
equately firm;
❒turn the engine off and pull up the
handbrake;
❒engage first gear or reverse;
❒wear the reflecting safety jacket (com-
pulsory by law in certain countries) be-
fore getting out of the vehicle;
❒alert other drivers that the vehicle is
stationary, using the proper devices in
compliance with the regulations in
force (e.g.: warning triangle, hazard
warning lights, etc …);
❒take the extension and the wrench
from the tool bag under the passen-
ger’s seat (see “Compartment under
the front passenger’s seat” in section
“dashboard and controls”);
The jack shall only be used
for changing wheels on the
vehicle with which it is provided or on
vehicles of the same model. It must
not be used for other purposes such
as for instance raising vehicles of oth-
er models. In no case should it be used
for repairs under the vehicle. Incor-
rect positioning of the jack may cause
the jacked vehicle to fall. Do not use
the jack for higher capacities than
stated on its label.
WARNING
Never tamper with the in-
flation valve. Never place
tools between the rim and tyre.
Check and restore, if required, the
pressure of tyres and spare wheel to
the values given in section “Technical
Specifications”.
WARNING
Please note:
❒the jack weight is 4,5 kg;
❒the jack requires no adjustment;
❒the jack cannot be repaired. If it breaks
it must be replaced with a new jack;
❒no tool other than its cranking device
may be fitted on the jack.
fig. 3F0N0193m
Page 168 of 282
167
WARNING
LIGHTS AND
MESSAGES
VEHICLE
MAINTENANCE
TECHNICAL
SPECIFICATIONS
INDEX
DASHBOARD
AND CONTROLS
SAFETY
DEVICES
CORRECT USE
OF THE
VEHICLE
IN AN
EMERGENCY
❒if at laest 3 bar pressure is read, re-
store proper pressure specified in
paragraph” Tyre pressure” in section
“Technical Specifications” (with engine
running and handbrake on) and
restart;
❒drive with the utmost care to the
nearest Fiat Dealership.
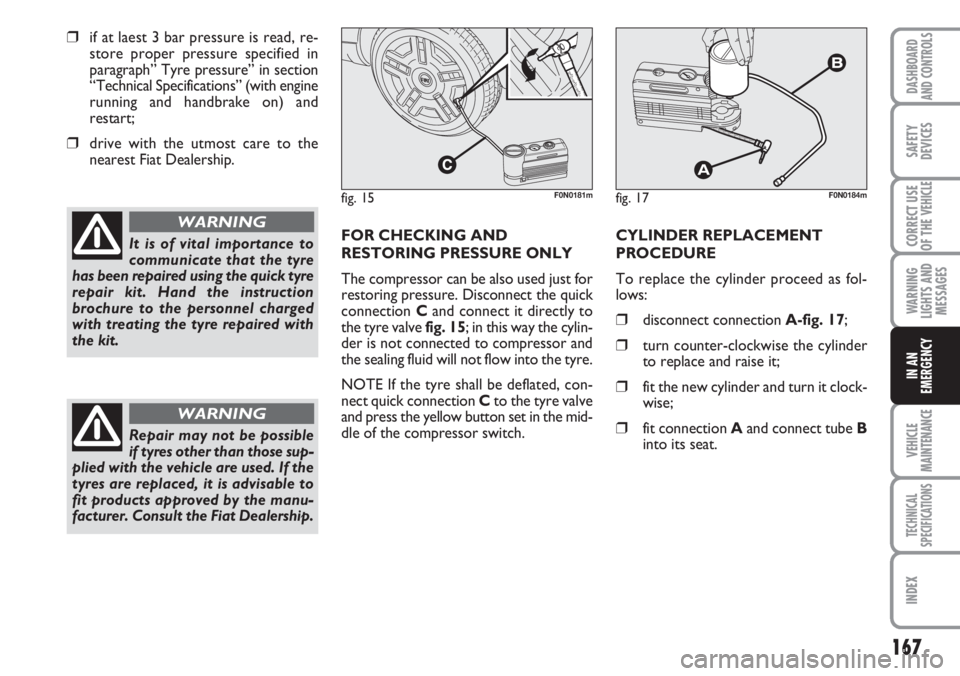
FOR CHECKING AND
RESTORING PRESSURE ONLY
The compressor can be also used just for
restoring pressure. Disconnect the quick
connection Cand connect it directly to
the tyre valve fig. 15; in this way the cylin-
der is not connected to compressor and
the sealing fluid will not flow into the tyre.
NOTE If the tyre shall be deflated, con-
nect quick connection Cto the tyre valve
and press the yellow button set in the mid-
dle of the compressor switch.CYLINDER REPLACEMENT
PROCEDURE
To replace the cylinder proceed as fol-
lows:
❒disconnect connection A-fig. 17;
❒turn counter-clockwise the cylinder
to replace and raise it;
❒fit the new cylinder and turn it clock-
wise;
❒fit connection Aand connect tube B
into its seat.
It is of vital importance to
communicate that the tyre
has been repaired using the quick tyre
repair kit. Hand the instruction
brochure to the personnel charged
with treating the tyre repaired with
the kit.
WARNING
fig. 17F0N0184mfig. 15F0N0181m
Repair may not be possible
if tyres other than those sup-
plied with the vehicle are used. If the
tyres are replaced, it is advisable to
fit products approved by the manu-
facturer. Consult the Fiat Dealership.
WARNING
Page 192 of 282
191
WARNING
LIGHTS AND
MESSAGES
TECHNICAL
SPECIFICATIONS
INDEX
DASHBOARD
AND CONTROLS
SAFETY
DEVICES
CORRECT USE
OF THE VEHICLE
IN AN
EMERGENCY
VEHICLE
MAINTENANCE
45 90 135 180 225
●●●●●
●●●●●
●●●●●
●●●●●
●●●●●
●●●●●
●●
●●●●●
●●●●●
●●●●●
●●●●●
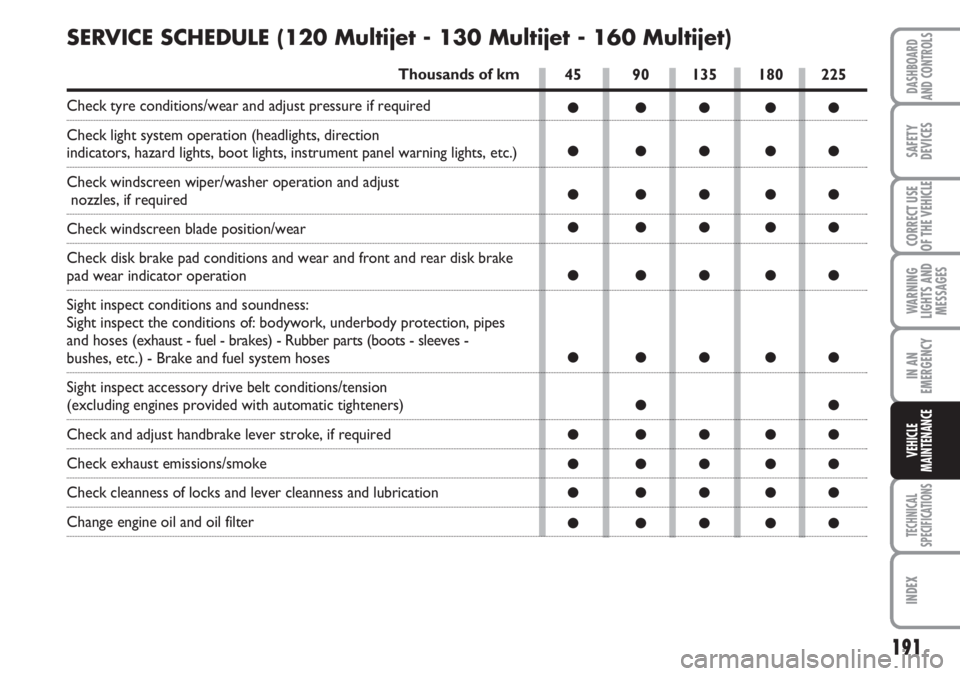
SERVICE SCHEDULE (120 Multijet - 130 Multijet - 160 Multijet)
Thousands of km
Check tyre conditions/wear and adjust pressure if required
Check light system operation (headlights, direction
indicators, hazard lights, boot lights, instrument panel warning lights, etc.)
Check windscreen wiper/washer operation and adjust
nozzles, if required
Check windscreen blade position/wear
Check disk brake pad conditions and wear and front and rear disk brake
pad wear indicator operation
Sight inspect conditions and soundness:
Sight inspect the conditions of: bodywork, underbody protection, pipes
and hoses (exhaust - fuel - brakes) - Rubber parts (boots - sleeves -
bushes, etc.) - Brake and fuel system hoses
Sight inspect accessory drive belt conditions/tension
(excluding engines provided with automatic tighteners)
Check and adjust handbrake lever stroke, if required
Check exhaust emissions/smoke
Check cleanness of locks and lever cleanness and lubrication
Change engine oil and oil filter
Page 193 of 282
192
WARNING
LIGHTS AND
MESSAGES
TECHNICAL
SPECIFICATIONS
INDEX
DASHBOARD
AND CONTROLS
SAFETY
DEVICES
CORRECT USE
OF THE VEHICLE
IN AN
EMERGENCY
VEICHLE
MAINTENANCE
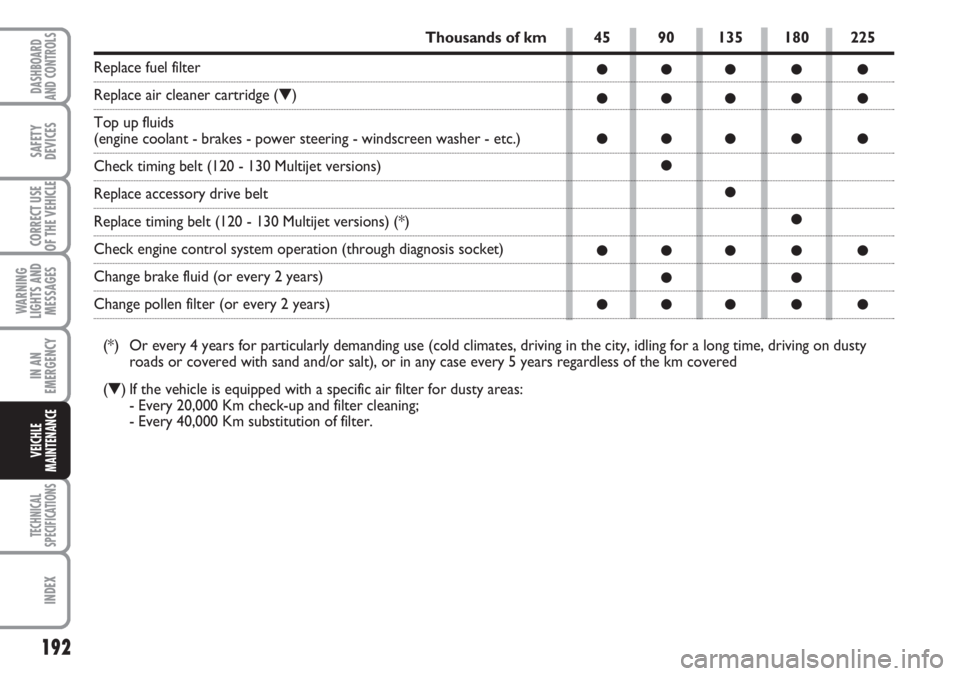
45 90 135 180 225
●●●●●
●●●●●
●●●●●
●
●
●
●●●●●
●●
●●●●●
Thousands of km
Replace fuel filter
Replace air cleaner cartridge (▼)
Top up fluids
(engine coolant - brakes - power steering - windscreen washer - etc.)
Check timing belt (120 - 130 Multijet versions)
Replace accessory drive belt
Replace timing belt (120 - 130 Multijet versions) (*)
Check engine control system operation (through diagnosis socket)
Change brake fluid (or every 2 years)
Change pollen filter (or every 2 years)
(*) Or every 4 years for particularly demanding use (cold climates, driving in the city, idling for a long time, driving on dusty
roads or covered with sand and/or salt), or in any case every 5 years regardless of the km covered
(▼) If the vehicle is equipped with a specific air filter for dusty areas:
- Every 20,000 Km check-up and filter cleaning;
- Every 40,000 Km substitution of filter.
Page 194 of 282
193
WARNING
LIGHTS AND
MESSAGES
TECHNICAL
SPECIFICATIONS
INDEX
DASHBOARD
AND CONTROLS
SAFETY
DEVICES
CORRECT USE
OF THE VEHICLE
IN AN
EMERGENCY
VEHICLE
MAINTENANCE
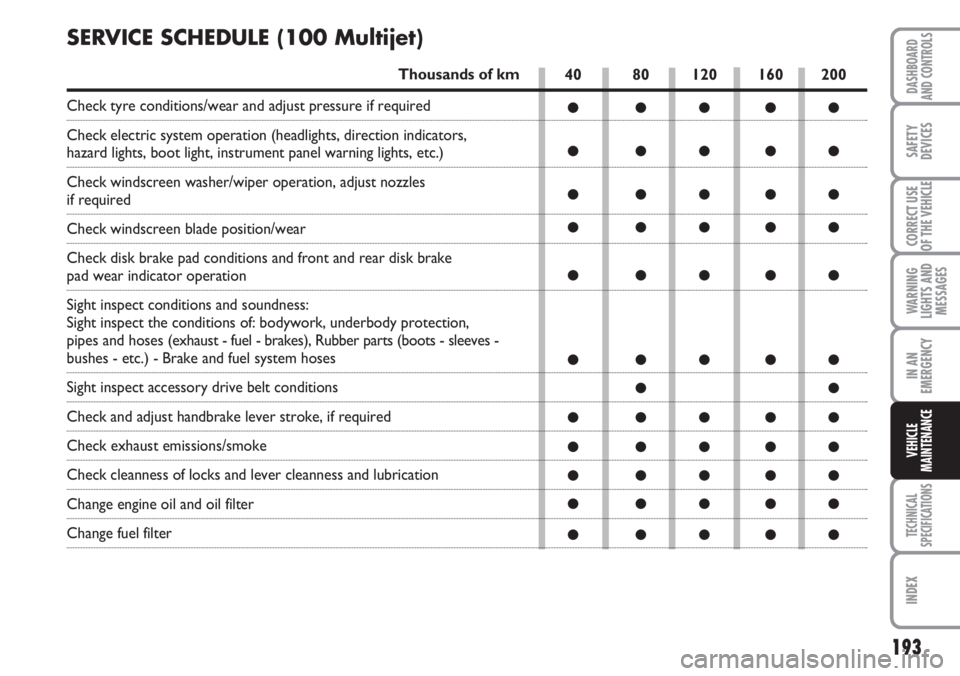
40 80 120 160 200
●●●●●
●●●●●
●●●●●
●●●●●
●●●●●
●●●●●
●●
●●●●●
●●●●●
●●●●●
●●●●●
●●●●●
SERVICE SCHEDULE (100 Multijet)
Thousands of km
Check tyre conditions/wear and adjust pressure if required
Check electric system operation (headlights, direction indicators,
hazard lights, boot light, instrument panel warning lights, etc.)
Check windscreen washer/wiper operation, adjust nozzles
if required
Check windscreen blade position/wear
Check disk brake pad conditions and front and rear disk brake
pad wear indicator operation
Sight inspect conditions and soundness:
Sight inspect the conditions of: bodywork, underbody protection,
pipes and hoses (exhaust - fuel - brakes), Rubber parts (boots - sleeves -
bushes - etc.) - Brake and fuel system hoses
Sight inspect accessory drive belt conditions
Check and adjust handbrake lever stroke, if required
Check exhaust emissions/smoke
Check cleanness of locks and lever cleanness and lubrication
Change engine oil and oil filter
Change fuel filter
Page 195 of 282
194
WARNING
LIGHTS AND
MESSAGES
TECHNICAL
SPECIFICATIONS
INDEX
DASHBOARD
AND CONTROLS
SAFETY
DEVICES
CORRECT USE
OF THE VEHICLE
IN AN
EMERGENCY
VEICHLE
MAINTENANCE
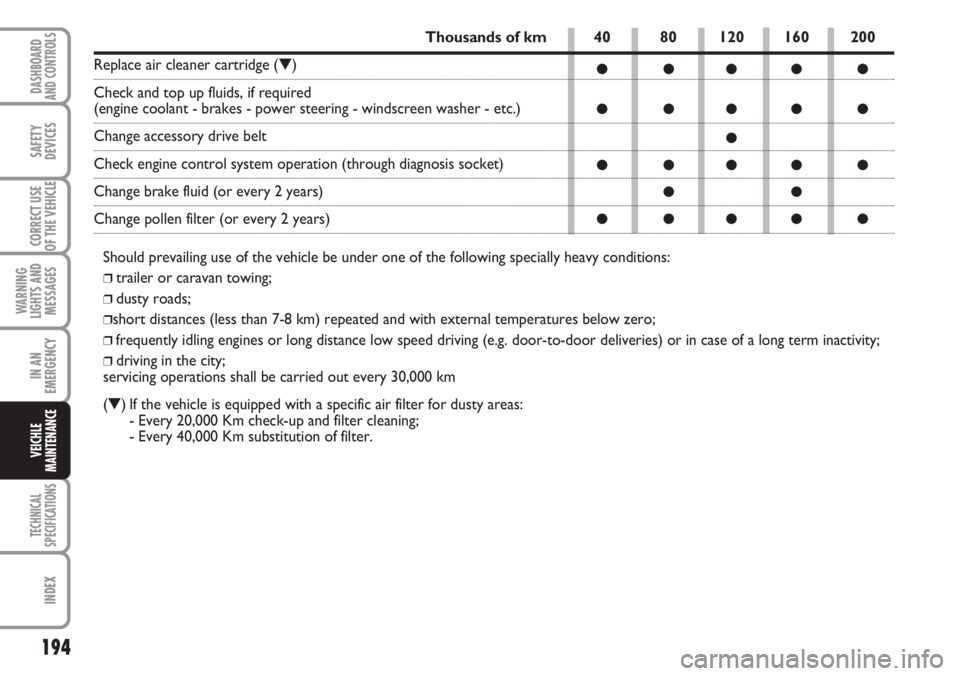
40 80 120 160 200
●●●●●
●●●●●
●
●●●●●
●●
●●●●●
Thousands of km
Replace air cleaner cartridge (▼)
Check and top up fluids, if required
(engine coolant - brakes - power steering - windscreen washer - etc.)
Change accessory drive belt
Check engine control system operation (through diagnosis socket)
Change brake fluid (or every 2 years)
Change pollen filter (or every 2 years)
Should prevailing use of the vehicle be under one of the following specially heavy conditions:
❒trailer or caravan towing;
❒dusty roads;
❒short distances (less than 7-8 km) repeated and with external temperatures below zero;
❒frequently idling engines or long distance low speed driving (e.g. door-to-door deliveries) or in case of a long term inactivity;
❒driving in the city;
servicing operations shall be carried out every 30,000 km
(▼) If the vehicle is equipped with a specific air filter for dusty areas:
- Every 20,000 Km check-up and filter cleaning;
- Every 40,000 Km substitution of filter.
Page 196 of 282
195
WARNING
LIGHTS AND
MESSAGES
TECHNICAL
SPECIFICATIONS
INDEX
DASHBOARD
AND CONTROLS
SAFETY
DEVICES
CORRECT USE
OF THE VEHICLE
IN AN
EMERGENCY
VEHICLE
MAINTENANCE
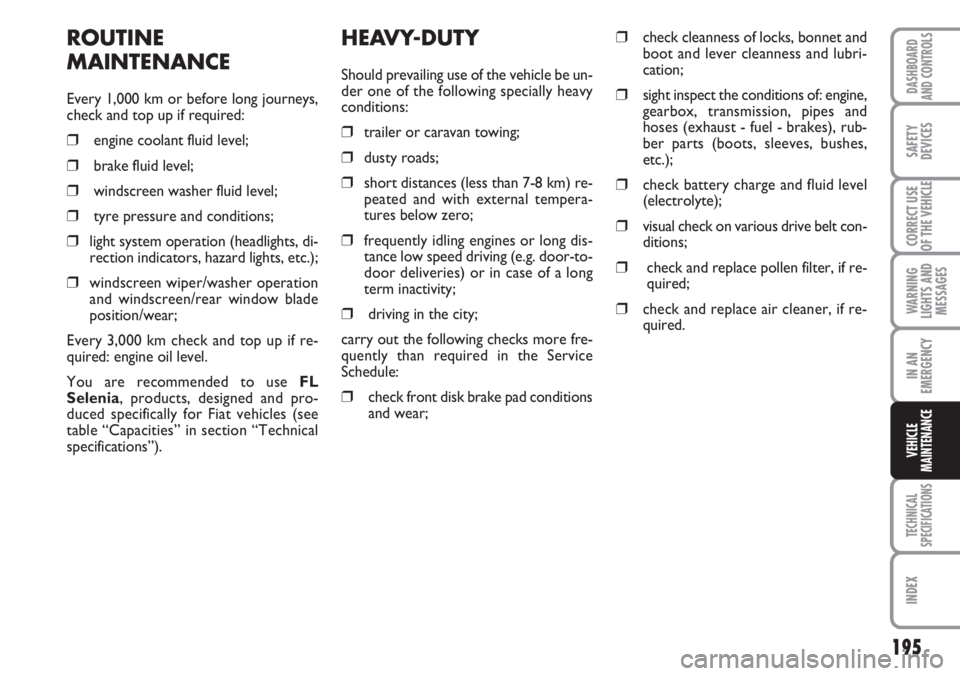
HEAVY-DUTY
Should prevailing use of the vehicle be un-
der one of the following specially heavy
conditions:
❒trailer or caravan towing;
❒dusty roads;
❒short distances (less than 7-8 km) re-
peated and with external tempera-
tures below zero;
❒frequently idling engines or long dis-
tance low speed driving (e.g. door-to-
door deliveries) or in case of a long
term inactivity;
❒driving in the city;
carry out the following checks more fre-
quently than required in the Service
Schedule:
❒check front disk brake pad conditions
and wear;
❒check cleanness of locks, bonnet and
boot and lever cleanness and lubri-
cation;
❒sight inspect the conditions of: engine,
gearbox, transmission, pipes and
hoses (exhaust - fuel - brakes), rub-
ber parts (boots, sleeves, bushes,
etc.);
❒check battery charge and fluid level
(electrolyte);
❒visual check on various drive belt con-
ditions;
❒check and replace pollen filter, if re-
quired;
❒check and replace air cleaner, if re-
quired.
ROUTINE
MAINTENANCE
Every 1,000 km or before long journeys,
check and top up if required:
❒engine coolant fluid level;
❒brake fluid level;
❒windscreen washer fluid level;
❒tyre pressure and conditions;
❒light system operation (headlights, di-
rection indicators, hazard lights, etc.);
❒windscreen wiper/washer operation
and windscreen/rear window blade
position/wear;
Every 3,000 km check and top up if re-
quired: engine oil level.
You are recommended to use FL
Selenia, products, designed and pro-
duced specifically for Fiat vehicles (see
table “Capacities” in section “Technical
specifications”).
Page 197 of 282
196
WARNING
LIGHTS AND
MESSAGES
TECHNICAL
SPECIFICATIONS
INDEX
DASHBOARD
AND CONTROLS
SAFETY
DEVICES
CORRECT USE
OF THE VEHICLE
IN AN
EMERGENCY
VEICHLE
MAINTENANCE
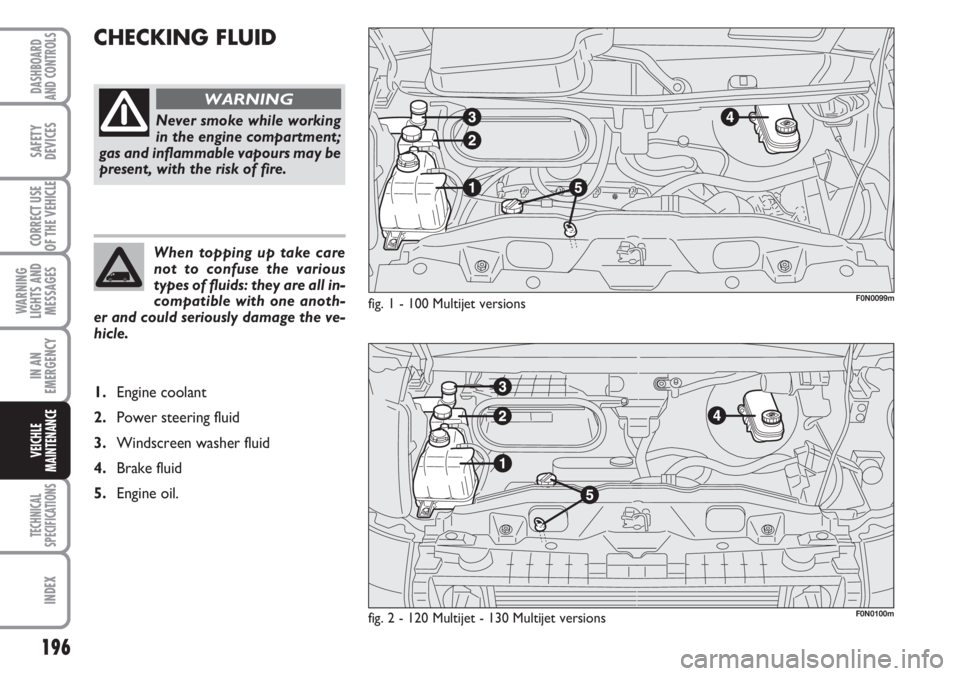
CHECKING FLUID
fig. 1 - 100 Multijet versions
Never smoke while working
in the engine compartment;
gas and inflammable vapours may be
present, with the risk of fire.
WARNING
When topping up take care
not to confuse the various
types of fluids: they are all in-
compatible with one anoth-
er and could seriously damage the ve-
hicle.
1.Engine coolant
2.Power steering fluid
3.Windscreen washer fluid
4.Brake fluid
5.Engine oil.
F0N0099m
fig. 2 - 120 Multijet - 130 Multijet versionsF0N0100m
Page 199 of 282
198
WARNING
LIGHTS AND
MESSAGES
TECHNICAL
SPECIFICATIONS
INDEX
DASHBOARD
AND CONTROLS
SAFETY
DEVICES
CORRECT USE
OF THE VEHICLE
IN AN
EMERGENCY
VEICHLE
MAINTENANCE
ENGINE OIL CONSUMPTION
Max engine oil consumption is usually 400
grams every 1,000 km.
When the vehicle is new, the engine needs
to run in, therefore the engine oil con-
sumption can only be considered stabilised
after the first 5,000 - 6,000 km.
IMPORTANT The oil consumption de-
pends on driving style and the conditions
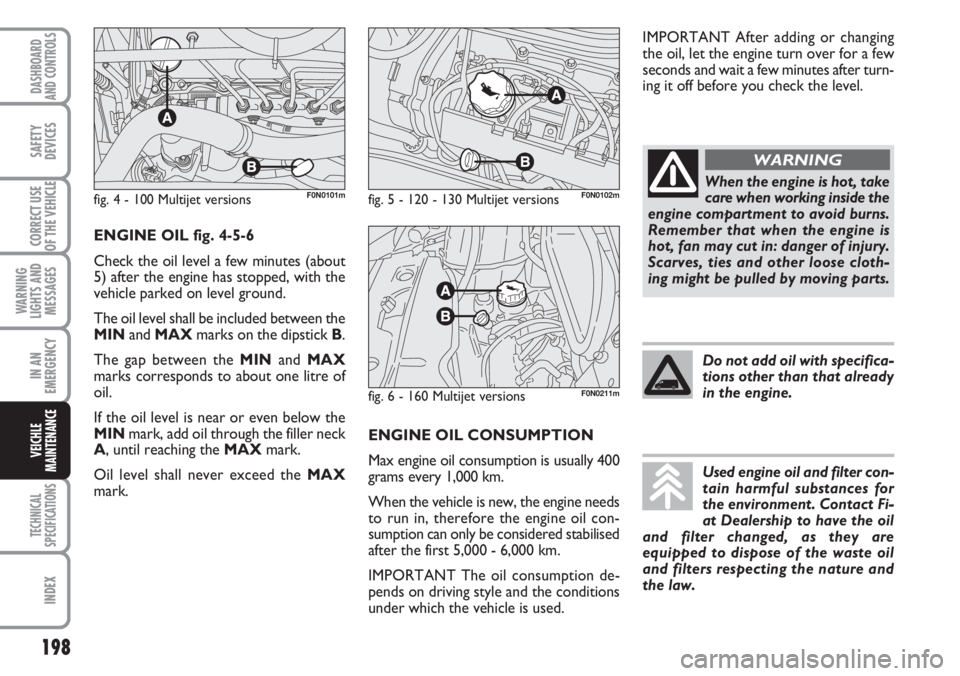
under which the vehicle is used. ENGINE OIL fig. 4-5-6
Check the oil level a few minutes (about
5) after the engine has stopped, with the
vehicle parked on level ground.
The oil level shall be included between the
MINand MAXmarks on the dipstick B.
The gap between the MINand MAX
marks corresponds to about one litre of
oil.
If the oil level is near or even below the
MINmark, add oil through the filler neck
A, until reaching the MAXmark.
Oil level shall never exceed the MAX
mark.
fig. 4 - 100 Multijet versionsF0N0101mfig. 5 - 120 - 130 Multijet versions
fig. 6 - 160 Multijet versionsF0N0102m
F0N0211m
When the engine is hot, take
care when working inside the
engine compartment to avoid burns.
Remember that when the engine is
hot, fan may cut in: danger of injury.
Scarves, ties and other loose cloth-
ing might be pulled by moving parts.
WARNING
Do not add oil with specifica-
tions other than that already
in the engine.
Used engine oil and filter con-
tain harmful substances for
the environment. Contact Fi-
at Dealership to have the oil
and filter changed, as they are
equipped to dispose of the waste oil
and filters respecting the nature and
the law.
IMPORTANT After adding or changing
the oil, let the engine turn over for a few
seconds and wait a few minutes after turn-
ing it off before you check the level.